Kadeka KA39WR User manual

1
Kadeka Wine Chiller
INSTRUCTION MANUAL
Model Number: KA39WR
BEFORE USE, PLEASE READ AND FOLLOW ALL SAFETY RULES AND
OPERATING INSTRUCTIONS.
Thank you for choosing wine Chiller Kadeka!
WE HOPE THIS PRODUCT WILL SATISFY YOUR REQUIREMENTS IN LONG TIME!

2
PARTS & FEATURES
WARNING
1. WORKTOP
2. DIGITAL CONTROL PANEL
3. LOCK
4. HUMIDOR
5. DOOR
6. HANDLE
7. FULL SHELVES
8. ODOUR FILTER
9. HALF SHELF
10. LEVELING LEGS
11. CABINET

3
IMPORTANT SAFETY INSTRUCTIONS
WARNING
To reduce the risk of fire, electrical shock, or injury when using
your appliance, follow these basic precautions:
Read all instructions before using the Wine Chiller.
DANGER or WARNING: Risk of child entrapment.
Child entrapment and suffocation are not problems of the past. Junked or abandoned appliances are still
dangerous . . . even if they will “just sit in the garage a few days”.
Before you throw away your old Wine Chiller: Take off the door. Leave the shelves in place so that children
may not easily climb inside.
Never allow children to operate, play with, or crawl inside the appliance.
Never clean appliance parts with flammable fluids. The fumes can create a fire hazard or explosion.
Do not store or use gasoline or any other flammable vapors and liquids in the vicinity of this or any other
appliance. The fumes can create a fire hazard or explosion.
-Save these instructions-
INSTALLATION INSTRUCTIONS
Before Using Your Wine Chiller
Remove the exterior and interior packing.
Before connecting the Wine Chiller to the power source, let it stand upright for approximately 2
hours. This will reduce the possibility of a malfunction in the cooling system from handling during
transportation.
Clean the interior surface with lukewarm water using a soft cloth.
Install the handle on the left side of the door.
When replace the illuminating lamp, please select the lamp which comply with the rated power
input of lamp according to the rating label. Shut off the power supply before replacing the lamp.
When disposing your appliance, please choose an authorized disposal site.
Installation of Your Wine Chiller
This appliance is designed to be for free standing installation only.
Place your Wine Chiller on a floor that is strong enough to support it when it is fully loaded. To
level your Wine Chiller, adjust the front leveling leg at the bottom of the Wine Chiller.
Locate the Wine Chiller away from direct sunlight and sources of heat (stove, heater, radiator,
etc.). Direct sunlight may affect the acrylic coating and heat sources may increase electrical
consumption. Extreme cold ambient temperatures may also cause the unit not to perform properly.
To prevent damaging the door gasket, make sure to have the door all the way opened when
pulling shelves out of the rail compartment.
The appliance must be positioned so that the plug is accessible. Release the electric cord. Move
your cabinet to its final location. Do not move your Cabinet while loaded with wine. You might
distort the body. The Wine Chiller should be installed in a suitable place in order to avoid Touching
the compressor with the hand.
If the supply cord is damaged, it must be replaced by manufacturer of its Service agent or a
similarly qualified person in order to avoid a hazard.

4
Avoid locating the unit in moist areas.
Plug the Wine Chiller into an exclusive, properly installed-grounded wall outlet. Do not under any
circumstances cut or remove the third (ground) prong from the power cord. Any questions
concerning power and/or grounding should be directed toward a certified electrician or an
authorized Products service center.
OPERATING YOUR WINE CHILLER
The Wine Chiller should be placed in where the ambient temperature is between 32-90 degrees
Fahrenheit(0-35℃). If the ambient temperature is above or below this range, the performance of the unit
may be affected. For example, placing your unit in extreme cold or hot conditions may cause interior
temperatures to fluctuate. The range of setting temperatures may not be reached.
Recommended Temperatures for Chilling Wine.
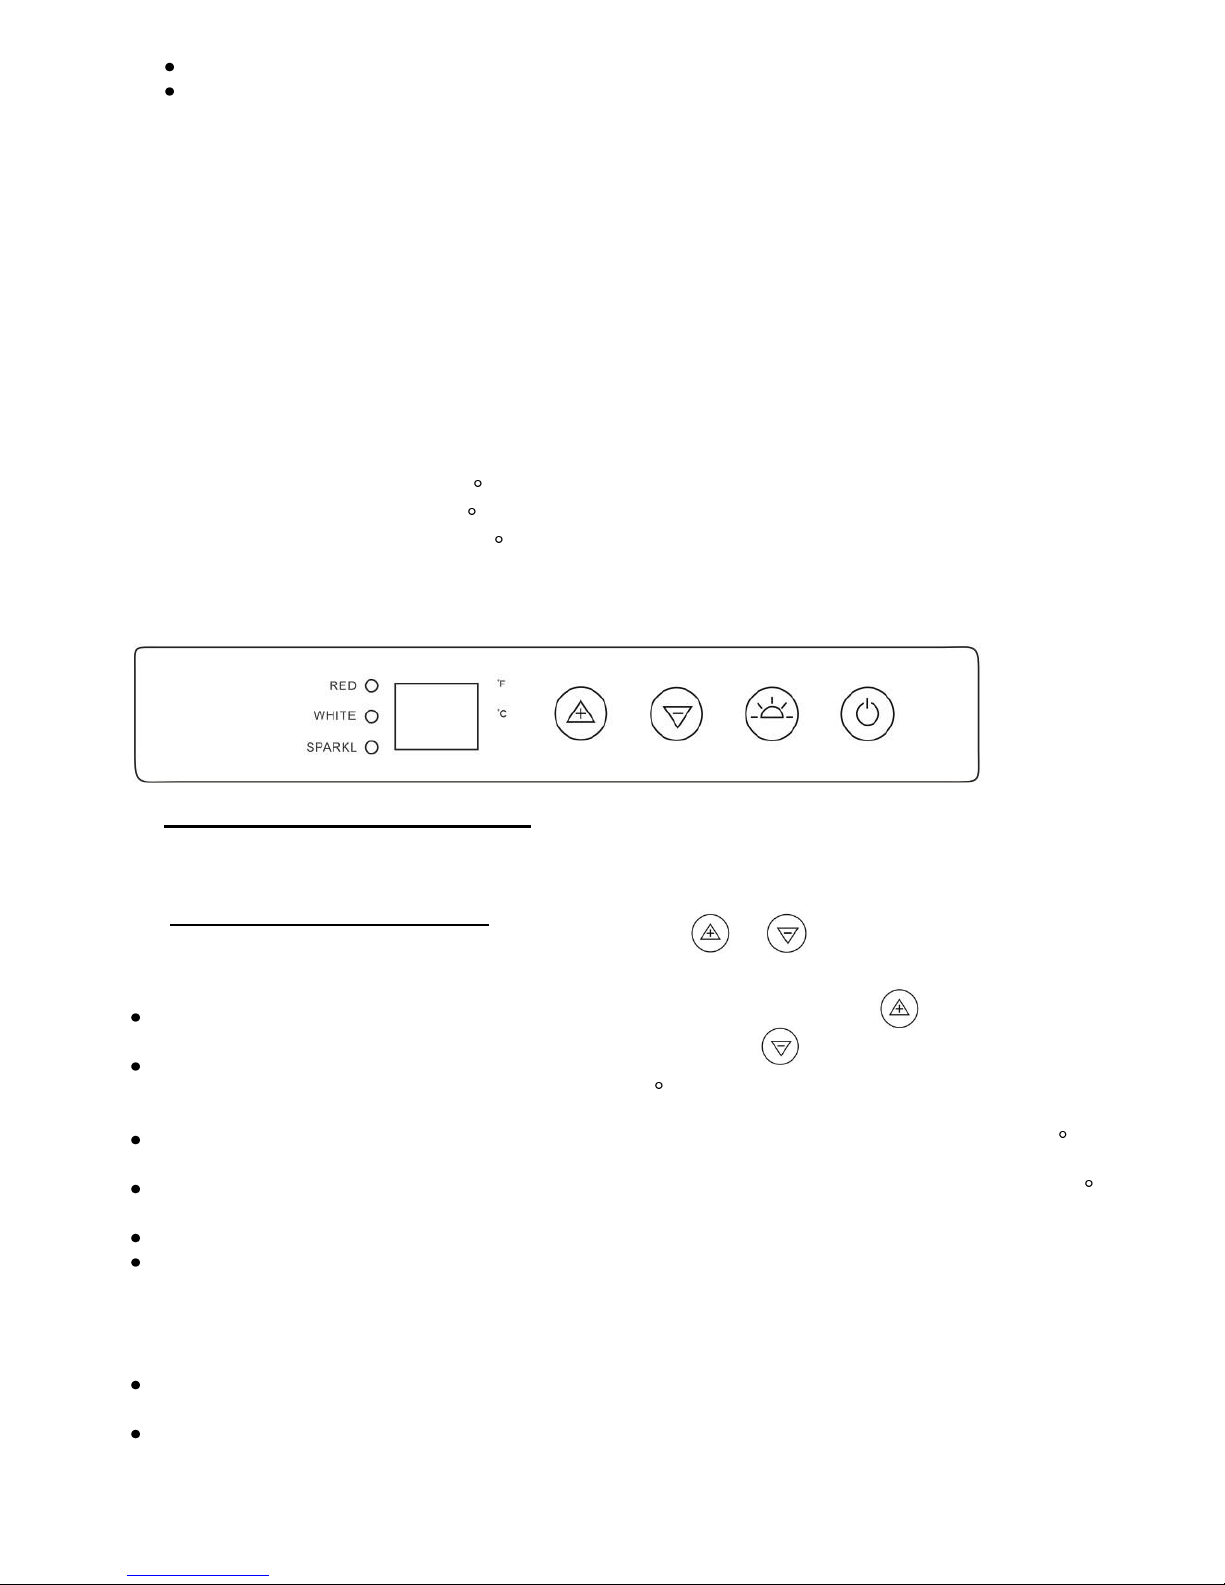
Red Wines: 15-18℃(59-64 F)
Dry/White Wines 9-14℃(48-57 F)
Sparkling Wines 5- 8℃(41-46 F)
The above temperatures may fluctuate depending on whether or not the interior bulb is ON or OFF or
whether the bottles are located on the upper/middle or lower section.
ON/OFF Power and memory function
To turn the Wine chiller ON or OFF, press and hold the power button for 2 seconds. The LED readout
will show the last set temperature.
Setting the Temperature Control
You can set the temperature as you desire by pushing the or button. When you push the
two buttons for the first time, the LED readout will show the original temperature set at previous time
.
The temperature that you desire to set will increase 1ºF or 1ºC if you push the button once, on the
contrary the temperature will decrease 1ºF or 1ºC if you push the button once.
When you store mostly red wines, the temperature which you control by pushing the above two
buttons need to be set at between 15 to 18℃(59 - 64 F) and the LED lamp under “RED” will be lit
red.
When you store mostly white wines, the temperature needs to be set at between 9 to 14℃(48 - 57 F)
and the LED lamp under “WHITE” will be lit green.
When you store mostly sparkling wines, the temperature needs to be set at between 5 to 8℃(41-46
F)and the LED lamp under “SPARKL” will be lit amber.
The temperature inside the unit will be appear in red color in the “DISPLAY” window.
You can select temperature display setting from Fahrenheit to Celsius degree by pushing theºF/ºC.
Fahrenheit or Celsius degrees indicator will appear in green color in the window marked “SCALE”.
NOTE:
If the unit is unplugged, power lost, or turned off, you must wait 3 to 5 minutes before restarting the
unit. If you attempt to restart before this time delay, the Wine Chiller will not start.
When you use the Wine Chiller for the first time or restart the Wine Chiller after having been shut off
for a long time, there could be a few degrees variance between the temperature you select and the one

5
indicated on the LED readout. This is normal and it is due to the length of the activation time. Once
the Wine Chiller is running for a few hours everything will be back to normal.
Interior Light
You can turn the interior light ON or OFF by pushing the button marked with the “bulb” symbol
Door Lock
Your unit is provided with a lock and key combination.
The keys are located inside the plastic bag that contains the User’s Guide. Insert the key into the lock
and turn it counterclockwise to unlock the door. To lock the door do the reverse operation making sure
metal arm is engaged completely. Remove the key and place it in a secure place for safekeeping.
Humidor
If humidity conditions are low, it will be necessary to use the humidor. Fill the humidor about 3/4 full
with fresh water, and place one humidor on the top rack. Check the water level occasionally and refill
as necessary.
NOTE: The use of humidior will reduce the storage capacity of the shelves on which they are placed
on by one bottle.
Odour Filter
The Odour Filter can purify air and eliminate peculiar smell, especially decompose formaldehyde
and toxicant from air.
CARE AND MAINTENANCE
How to remove the shelf
Firstly remove both of the plastic posts with the Phillips screwdriver, then pull on onward direction to
remove the shelf.
Cleaning Your Wine Chiller
Turn off the power, unplug the appliance, and remove all items including shelves and rack.
Wash the inside surfaces with a warm water and baking soda solution. The solution should be
about 2 tablespoons of baking soda to a quart of water.
Wash the shelves with a mild detergent solution.
Wring excess water out of the sponge or cloth when cleaning area of the controls, or any electrical
parts.
Wash the outside cabinet with warm water and mild liquid detergent. Rinse well and wipe dry
with a clean soft cloth.

6
Power Failure
Most power failures are corrected within a few hours and should not affect the temperature of your
appliance if you minimize the number of times the door is opened. If the power is going to be off for a
longer period of time, you need to take the proper steps to protect your contents.
Vacation Time
Short vacations: Leave the Wine Chiller operating during vacations of less than three weeks.
Long vacations: If the appliance will not be used for several months, remove all items and turn off
the appliance. Clean and dry the interior thoroughly. To prevent odor and mold growth, leave the
door open slightly: blocking it open if necessary.
Moving Your Wine Chiller
Remove all items.
Securely tape down all loose items (shelves) inside your appliance.
Turn the adjustable leg up to the base to avoid damage.
Tape the door shut.
Be sure the appliance stays secure in the upright position during transportation. Also protect
outside of appliance with a blanket, or similar item.
Energy Saving Tips
The Wine Chiller should be located in the coolest area of the room, away from heat producing
appliances, and out of the direct sunlight.
PROBLEMS WITH YOUR WINE CHILLER?
You can solve many common Wine Chiller problems easily, saving you the cost of a possible service call.
Try the suggestions below to see if you can solve the problem before calling the servicer.
TROUBLESHOOTING GUIDE
PROBLEM
POSSIBLE CAUSE
Wine Chiller does not operate.
Not plugged in.
The appliance is turned off.
The circuit breaker tripped or a blown fuse.
Wine Chiller is not cold enough.
Check the temperature control setting.
External environment may require a higher setting.
The door is opened too often.
The door is not closed completely.
The door gasket does not seal properly.
Turns on and off frequently.
The room temperature is hotter than normal.
A large amount of contents has been added to the Wine
Chiller.
The door is opened too often.
The door is not closed completely.
The temperature control is not set correctly.
The door gasket does not seal properly.
The light does not work.
Not plugged in.
The circuit breaker tripped or a blown fuse.
The bulb has burned out.
The light button is “OFF”.

7
Vibrations.
Check to assure that the Wine Chiller is level.
The Wine Chiller seems to make too much
noise.
The rattling noise may come from the flow of the
refrigerant, which is normal.
As each cycle ends, you may hear gurgling sounds caused
by the flow of refrigerant in your Wine Chiller.
Contraction and expansion of the inside walls may cause
popping and crackling noises.
The Wine Chiller is not level.
The door will not close properly.
The Wine Chiller is not level.
The door was reversed and not properly installed.
The gasket is dirty.
The shelves are out of position.
Water condensation may form on the glass
door.
A natural occurrence due to high humidity ambient . Just
wipe it off.
Table of contents
Other Kadeka Wine Cooler manuals