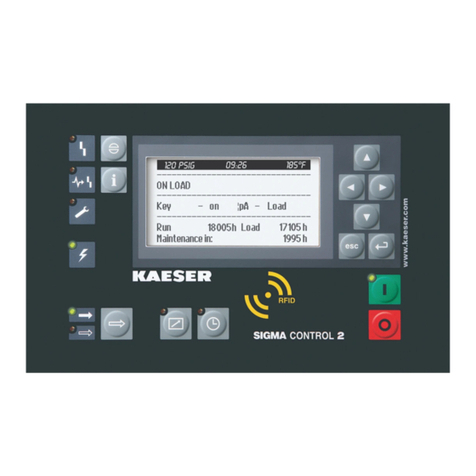
KAESER KOMPRESSOREN SIGMA CONTROL 2 User manual

/KKW/SSC 2.04 en BA-SIGMA CONTROL FLUID
/KKW/SSC 2.04
20140602 145709


1. Important settings ............................................................................................................. 1
2. Setting the contrast and the brightness ............................................................................ 2
3. Setting the display language ............................................................................................ 3
4. Logging on with Equipment Card ..................................................................................... 4
5. Adjusting the system setpoint pressure ........................................................................... 6
6. Activating the «timer control» key .................................................................................... 7
7. Activating the «remote control» key ................................................................................. 10
8. Changing the control mode .............................................................................................. 13
9. Outputting important operational states of the machine ................................................... 14
10. Resetting maintenance interval counters ......................................................................... 15
11. Checking the pressure relief valve ................................................................................... 17
12. Checking the temperature sensor and overheating shut-down function .......................... 20
13. Interpreting fault messages .............................................................................................. 23
14. Interpreting warning messages ........................................................................................ 32
15. Interpreting operation messages ...................................................................................... 38
16. Interpreting diagnostic messages .................................................................................... 41
17. Interpreting system messages ......................................................................................... 42
Contents
9_9450 04 E
Quick user guide Controller
SIGMA CONTROL 2 SCREW FLUID ≥1.2.4 i

Contents
ii Quick user guide Controller
SIGMA CONTROL 2 SCREW FLUID ≥1.2.4 9_9450 04 E

1 Important settings
In this chapter, important or often used settings are explained in brief. Detailed information on func‐
tion, configuration, fault removal and important instructions concerning safe operation are found in
subsequent chapters.
Setting and other work on the machine may only be carried out by the following persons:
■ persons trained on the machine/controller and persons instructed by and under the su‐
pervision of a specialist,
■ trained technicians,
■ authorised Service personnel.
1 Important settings
9_9450 04 E
Quick user guide Controller
SIGMA CONTROL 2 SCREW FLUID ≥1.2.4 1

2 Setting the contrast and the brightness
The display settings for contrast and brightness are set to the highest possible values by default.
Change the settings if adverse lighting conditions make it difficult to read the displayed information.
Optimising the contrast settings:
■ Press and hold the «Information» key.
■ At the same time, press the «Left» or «Right» key.
Optimising the brightness settings:
■ Press and hold the «Information» key.
■ At the same time, press the «UP» or «DOWN» key.
Precondition The display shows the operating mode.
1. Press «Enter».
The main menu is displayed.
2. Press and hold the «Information» key.
6.1 bar 08:15 80 °C
Main menu
········· Deutsch ········· Active line with current language
▶1 xxxxxxxxxx Submenu
▶2 xxxxxxxxxx Submenu
▶3 xxxxxxxxxx Submenu
▶4 xxxxxxxxxx Submenu
▶5 xxxxxxxxxx Submenu
3. Press «UP» or «DOWN» to adjust the contrast.
4. Press «Left» or «Right» to adjust the brightness.
Result The settings for contrast and brightness have been adjusted.
2 Setting the contrast and the brightness
2Quick user guide Controller
SIGMA CONTROL 2 SCREW FLUID ≥1.2.4 9_9450 04 E

3 Setting the display language
Precondition The display shows the operating mode.
1. Press «Enter».
The main menu is displayed.
6.1 bar 08:15 80 °C
Main menu
········· Deutsch ········· Current language
▶1 xxxxxxxxxx Active line
▶2 xxxxxxxxxx Submenu
▶3 xxxxxxxxxx Submenu
▶4 xxxxxxxxxx Submenu
▶5 xxxxxxxxxx Submenu
2. Press «UP» once.
The current set language is displayed as being active.
6.1 bar 08:15 80 °C
Main menu
········· Deutsch ········· Active line with current set language
▶1 xxxxxxxxxx Submenu
▶2 xxxxxxxxxx Submenu
▶3 xxxxxxxxxx Submenu
▶4 xxxxxxxxxx Submenu
▶5 xxxxxxxxxx Submenu
3. Press «Enter» to switch into setting mode.
The currently
set language
flashes.
4. Move to the required language with «UP» or «DOWN».
5. Press «Enter» to accept the setting.
The display texts are now in the selected language.
6. Press «Escape» repeatedly to return to the main menu.
3 Setting the display language
9_9450 04 E
Quick user guide Controller
SIGMA CONTROL 2 SCREW FLUID ≥1.2.4 3

4 Logging on with Equipment Card
Proceed as follows:
■ Take the plastic sleeve from the control cabinet.
■ Remove one Equipment Card.
■ Note the number on the reverse side of the Equipment Card.
■ Safely store the number.
■ Log on with Equipment Card
➤ Proceed in the prescribed sequence of actions.
Remove the Equipment Card from the control cabinet.
The supplied Equipment Cards are stored in a plastic sleeve.
This plastic sleeve is attached to the rear of the controller in the control cabinet.
The number shown on the rear of the Equipment Card is also the user name.
The user name is required for a manual log on without Equipment Card.
Fig. 1 KAESER Equipment Card
1KAESER Equipment Card
2Number of the KAESER Equipment Card
1. Open the control cabinet.
2. Remove the plastic sleeve from the rear of the controller.
3. Remove one Equipment Card from the plastic sleeve.
4. Note the number shown on the backside of the Equipment Card.
5. Store this information at a suitable location.
Log on with Equipment Card
Use a supplied KAESER Equipment Card to log on at the controller.
Two of them have been provided with the machine.
4 Logging on with Equipment Card
4Quick user guide Controller
SIGMA CONTROL 2 SCREW FLUID ≥1.2.4 9_9450 04 E

Fig. 2 RFID reader
1. Hold the Equipment Card for a short time in front of the RFID reader.
The data are read.
Your user name and access level are displayed.
2. Press «Enter» to confirm the log-on.
The operating mode is displayed.
Result You are logged on.
Further information See chapter 7.2.6 for a manual log-on to the controller.
4 Logging on with Equipment Card
9_9450 04 E
Quick user guide Controller
SIGMA CONTROL 2 SCREW FLUID ≥1.2.4 5

5 Adjusting the system setpoint pressure
Precondition Password level 2 is activated.
The display shows the operating mode.
1. Press «Enter».
The main menu is displayed.
2. Select the
< Configuration ➙ Pressure control ➙ Pressure settings >
menu.
The
pA
switching value is displayed in the active line.
6.1 bar 08:15 80 °C
5.2.2 Pressure settings Current menu
Setpoint pressure Parameter to be adjusted
pA SP : 8.0 bar ¦ SD : - 0.5 bar Active line, setting for switching point pA
pB SP : 7.7 bar ¦ SD : - 0.5 bar Setting for switching point pB
·········
System pressure low ☐
↓ < 5.0 bar ¦ SD : 0.5 bar
3. Press «Enter» to switch into setting mode.
The current value flashes.
4. Use «UP» or «DOWN» to adjust the setting for the switching point
pA
.
5. Press «Enter» to accept the setting.
6. Press the «Right» key once.
7. Press «Enter» to switch into the setting mode for the switching differential.
The current value flashes.
8. Use «UP» or «DOWN» to adjust the setting for the switching differential.
9. Press «Enter» to accept the setting.
10. If necessary, adjust the value for switching point pB in the same way.
11. Press «Escape» repeatedly to return to the main menu.
Further information See chapter 7.4 for the adjustment of the machine's pressure parameters.
5 Adjusting the system setpoint pressure
6Quick user guide Controller
SIGMA CONTROL 2 SCREW FLUID ≥1.2.4 9_9450 04 E

6 Activating the «timer control» key
Activating/deactivating the check box
Check box Check box for reset Status
☑ ☒ activated
☐ ☐ deactivated
Tab. 1 Check box status
Precondition Password level 2 is activated.
The display shows the operating mode.
Selecting the compressor clock menu
1. Press «Enter».
The main menu is displayed.
2. Select
< Compressor clock >
.
The display for setting the Compressor clock timing program appears.
6.1 bar 08:15 80 °C
6 Compressor clock Menu
Key clock : ☐
Reset: ☐
·········
01 n.a. 00:00 off Enter switching point 01 (active line)
02 n.a. 00:00 off Enter switching point 02
03 n.a. 00:00 off Enter switching point 03
Setting time control
1. Press «Enter» to switch into setting mode.
The
n.a.
column flashes in the active line.
2. Use «UP» to specify the settings for the weekdays.
3. Press «Enter» to accept the setting.
4. Press the «Right» key once.
5. Press «Enter» to switch into setting mode.
Column time, hours display,
00 :
00
flashes in the active line.
6. Use «UP» to specify the settings for the hours.
7. Press the «Right» key once.
Column time, hours display,
00
:
00
flashes in the active line.
8. Use «UP» to specify the settings for the minutes.
6 Activating the «timer control» key
9_9450 04 E
Quick user guide Controller
SIGMA CONTROL 2 SCREW FLUID ≥1.2.4 7

9. Press «Enter» to accept the settings.
The display stops flashing and the time (hours/minutes) is set.
6.1 bar 08:15 80 °C
6 Compressor clock Current menu
Key clock : ☐
Reset: ☐
·········
01 Mon-Fri 06:30 on Example for weekdays
02 Mon-Fri 12:00 off Example for time
03 Mon-Fri 13:00 on For example, compressor ON action
10. Press the «Right» key once.
11. Press «Enter» to switch into setting mode.
Column
action on/off
flashes.
12. Use «UP» to specify the settings for the action Compressor ON.
13. Press «Enter» to accept the setting.
The action Compressor ON is set for the first switching point.
14. Specify further switching points in the same manner.
Result Weekdays, time and the actions Compressor ON/Compressor OFF are set for all switching points.
Activate the «timer control» key
1. Use «UP» key to change to line
Key clock
.
2. Press «Enter» to switch into setting mode.
The check box flashes in the active line.
6.1 bar 08:15 80 °C
6 Compressor clock Menu
Key clock : ☑ Active line with check box
Reset: ☐ Resetting all current switching points
·········
01 Mon-Fri 06:30 on
02 Mon-Fri 12:00 off
03 Mon-Fri 13:00 on
3. Use the «UP» key to activate the check box.
4. Press «Enter» to accept the setting.
5. Press «Escape» repeatedly to return to the main menu.
The «Time control» key is activated.
The activated key «Time control» can be used for activating the time control.
■ Proceed in the same manner to deactivate the «time control» key.
■ All defined switching points will be reset simultaneously if you activate the reset check
box.
6 Activating the «timer control» key
8Quick user guide Controller
SIGMA CONTROL 2 SCREW FLUID ≥1.2.4 9_9450 04 E

Activating time control
➤ Press the «Time control» key on the SIGMA CONTROL 2 operating panel to activate the time
control.
The
timer
LED on the operating panel of SIGMA CONTROL 2 displays
green continuous light
to signal the successful timer operation.
The timer control of SIGMA CONTROL 2 switches the machine according to the switching
points specified in the timer program.
Further information See chapter 7.5 for configuration of starting and stopping the machine.
See chapter 7.8.2 for configuration of load changeover based on a time control.
6 Activating the «timer control» key
9_9450 04 E
Quick user guide Controller
SIGMA CONTROL 2 SCREW FLUID ≥1.2.4 9

7 Activating the «remote control» key
Further settings have to be made to allow the machine to be remotely controlled.
➤ Refer to the section "Additional information" in this chapter.
Activating/deactivating the check box
Check box Status
☑ activated
☐ deactivated
Tab. 2 Check box status
The following menus are used to activate the «remote control» key:
■ Menu
<Compressor ON>
■ Menu
<Load control>
The function will be available as soon as the «remote control» key in one of the menus has been
activated.
Precondition Access level 2 is activated.
The display shows the operating mode.
Activating the «remote control» key in the <compressor ON> menu
1. Press «Enter».
The main menu is displayed.
2. Select the
< Configuration ➙ Compressor start ➙ Compressor on >
menu.
3. Press «DOWN» repeatedly until
Key remote
is displayed as active line.
4. Press «Enter» to switch into setting mode.
The
check box
for «remote control» key flashes.
6.1 bar 08:15 80 °C
5.4.1 Compressor on Menu
Local mode : Key
Remote mode : Key
------------------------------
RC DI 1.12 ☐
Logic : + Option to negate the switching logic
Key remote : ☐ Active line with check box
5. Press «UP».
The activated check box is displayed.
7 Activating the «remote control» key
10 Quick user guide Controller
SIGMA CONTROL 2 SCREW FLUID ≥1.2.4 9_9450 04 E

6. Press «Enter» to save the setting.
The «Remote control» key is activated and can be used.
6.1 bar 08:15 80 °C
5.4.1 Compressor on Menu
Local mode : Key
Remote mode : Key
------------------------------
RC DI 1.12 ☐
Logic : +
Key remote : ☑ Active line with check box
7. Press «Escape» repeatedly to return to the main menu.
8. Press the «Remote control» key to enable remote mode.
Proceed in the same manner to deactivate the «remote control» key.
Activating the remote control«» key in the <load control> menu
Precondition Password level 2 is activated.
The display shows the operating mode.
1. Press «Enter».
The main menu is displayed.
2. Select the
< Configuration ➙ Pressure control ➙ Load control >
menu.
3. Press «UP» repeatedly until
Key remote
is displayed as active line.
4. Press «Enter» to switch into setting mode.
The
check box
for «remote control» key flashes.
6.1 bar 08:15 80 °C
5.2.3 Load control Menu
Load RC DI 1.02 ☐
Logic : + Option to negate the switching logic
loc.-load RC DI 1.09 ☐
·········
Key remote : ☐ Active line with check box
Key idle : ☐
5. Press «UP».
The activated check box is displayed.
7 Activating the «remote control» key
9_9450 04 E
Quick user guide Controller
SIGMA CONTROL 2 SCREW FLUID ≥1.2.4 11

6. Press «Enter» to accept the setting.
The «Remote control» key is activated and can be used.
6.1 bar 08:15 80 °C
5.2.3 Load control Menu
Load RC DI 1.02 ☐
Logic : +
loc.-load RC DI 1.09 ☐
·········
Key remote : ☑ Active line
Key idle : ☐
7. Press «Escape» repeatedly to return to the main menu.
8. Press the «Remote control» key to enable remote mode.
Proceed in the same manner to deactivate the «Remote control» key.
See the following menus for more options to activate the «Remote control» key:
■
<Configuration ➙ Acknowledgement>
■
<Communication>
Further information See chapter 7.5 for configuration of starting and stopping the machine.
See chapter 7.9 for configuration of load changeover under master control.
7 Activating the «remote control» key
12 Quick user guide Controller
SIGMA CONTROL 2 SCREW FLUID ≥1.2.4 9_9450 04 E

8 Changing the control mode
The standard setting of the control mode depends on the machine type.
As an example, the change from DUAL to QUADRO control mode is described below.
Precondition Access level 2 is activated.
The display shows the operating mode.
1. Press «Enter».
The main menu is displayed.
2. Select the
< Configuration ➙ Control mode >
menu.
Local mode
is displayed as active line.
6.1 bar 08:15 80 °C
5.3 Control mode Current menu
Local mode : DUAL Active line with control mode to be adjusted
------------------------------
▶1 Venting period
·········
▶3 DUAL
▶4 QUADRO
3. Press «Enter» to switch into setting mode.
The display for
DUAL
control mode flashes.
6.1 bar 08:15 80 °C
5.3 Control mode Current menu
Local mode : QUADRO Active line with changed control mode
------------------------------
▶1 Venting period
·········
▶3 DUAL
▶4 QUADRO
4. Use «UP» to select QUADRO .
5. Press «Enter» to accept the setting.
6. Press «Escape» repeatedly to return to the main menu.
Result The regulating mode DUAL has been switched to QUADRO.
Further information See chapter 4.7 for the functions of the control modes.
See chapter 7.6 for the parameters of the control modes.
8 Changing the control mode
9_9450 04 E
Quick user guide Controller
SIGMA CONTROL 2 SCREW FLUID ≥1.2.4 13

9 Outputting important operational states of the ma‐
chine
Important operational machine states can be assigned via floating relay contacts as a binary signal
on the outputs DOR 1.05 – DOR 1.07 . Further outputs are optionally available. You can assign
every output only once.
Precondition Access level 2 is activated.
The display shows the operating mode.
Configuration ➙ I/O Periphery ➙ DO Functions menu
1. Press «Enter».
The main menu is displayed.
2. Select the
< Configuration ➙ I/O periphery ➙ DO functions >
menu.
A list of available messages and their assigned outputs is displayed.
Controller on
line is displayed as being active.
3. Select the required message with the «UP» or «DOWN» keys.
6.1 bar 08:15 80 °C
5.7.1 DO functions Menu
Controller on Active line
DOR 1.05 ☐ ¦ Logic : +
DOT 1.02 ☐ ¦ Logic : +
Compressor on
DOR 1.03 ☐ ¦ Logic : +
DOT 1.02 ☐ ¦ Logic : +
Assigning a message to an output
1. Press «Enter» to switch into setting mode.
The display flashes.
2. Select a free output with the «UP» or «DOWN» key.
3. Press «Enter» to accept the setting.
A message is now sent via the assigned output.
4. Press «Escape» repeatedly to return to the main menu.
Further information See chapter 7.11 for the configuration and use of the controller's inputs and outputs.
9 Outputting important operational states of the machine
14 Quick user guide Controller
SIGMA CONTROL 2 SCREW FLUID ≥1.2.4 9_9450 04 E
Other manuals for SIGMA CONTROL 2
6
Table of contents
Other KAESER KOMPRESSOREN Controllers manuals
KAESER KOMPRESSOREN
KAESER KOMPRESSOREN SIGMA CONTROL 2 User manual

KAESER KOMPRESSOREN
KAESER KOMPRESSOREN SIGMA CONTROL 2 User manual

KAESER KOMPRESSOREN
KAESER KOMPRESSOREN SIGMA CONTROL 2 User manual

KAESER KOMPRESSOREN
KAESER KOMPRESSOREN SIGMA CONTROL 2 User manual

KAESER KOMPRESSOREN
KAESER KOMPRESSOREN SIGMA CONTROL 2 User manual

KAESER KOMPRESSOREN
KAESER KOMPRESSOREN SIGMA CONTROL 2 User manual