KAKA Industrial MUB-1 User manual

Operation Manual MUB-1
KAKA Industrial®
— 1 —
Unpacking
The UNIVERSAL BENDER is shipped from
the manufacturer in a carefully packed Carton
box. Thoroughly inspect the product upon
opening the package.
After unpacking the unit, carefully inspect for
any damage that may have occurred during
transit. Check for loose, missing, or damaged
parts. Shipping damage claims must be led
with the carrier and are the responsibility of
the user.
Specications
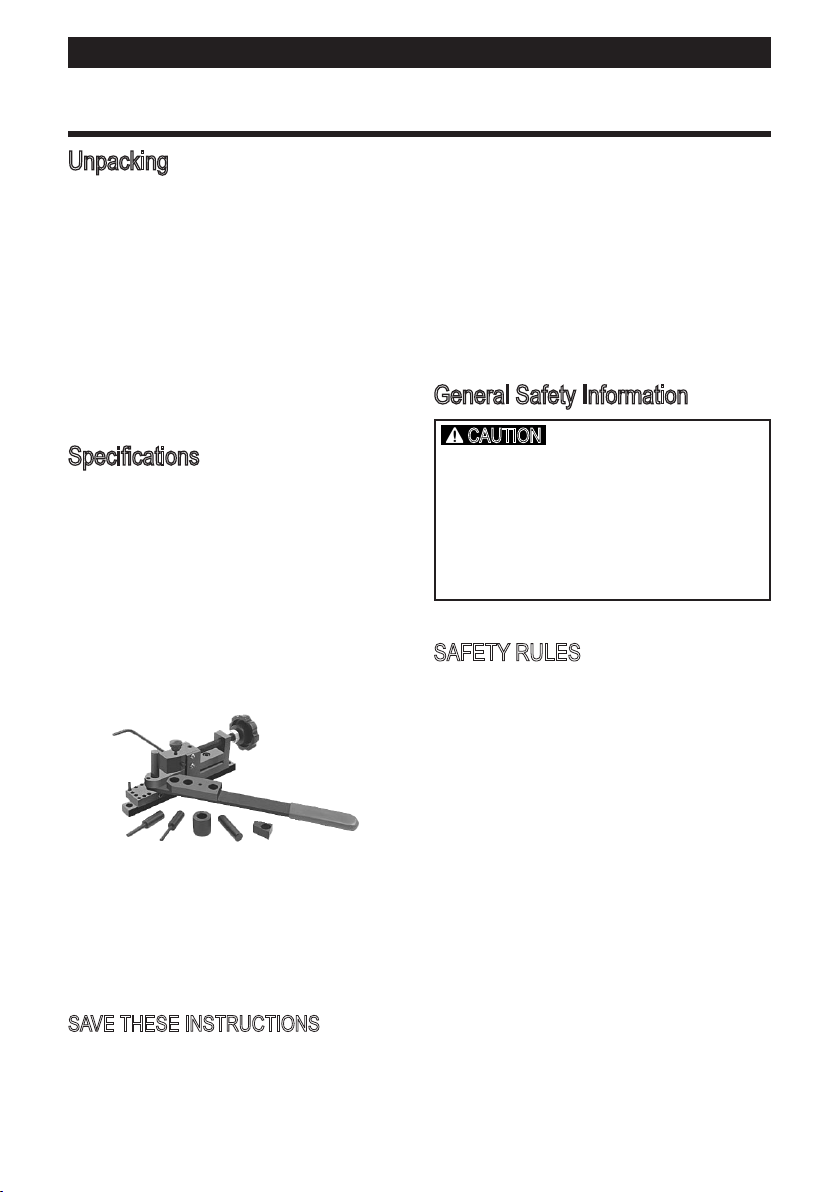
The KAKA UNIVERSAL BENDER is the
perfect addition to any fabricator’s work bench.
It is precision designed and manufactured to
allow for quick and easy wire, flat metal and
tubing into clamps, handle brackets, hooks,
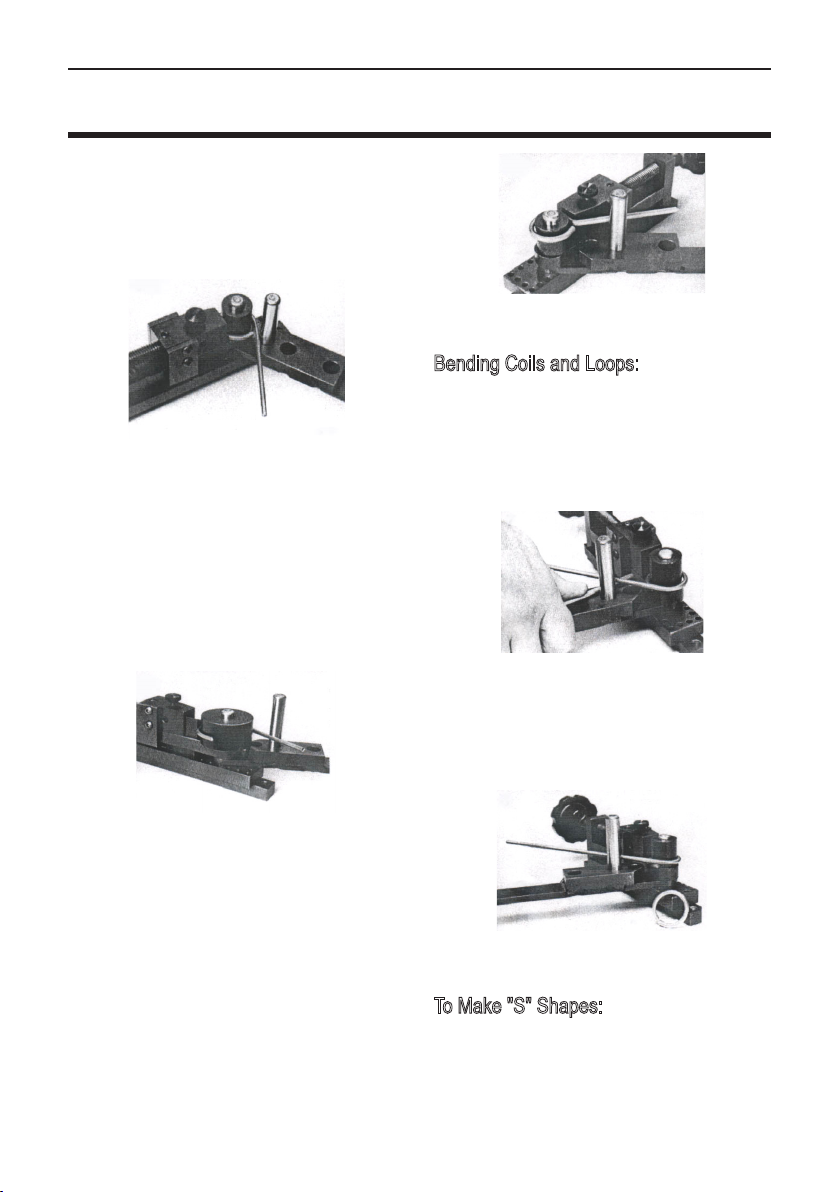
coils, and more. Make sharp angle bends in
wire and rod. Includes circle pins for 3/16",
1/4",1/2" dia, cirle 1" diacircle die, form pin
follower, sharp angle die, gauge and handle
Stock No. ............................................173207
Model....................................................MUB-1
Packing size.............13"x4"x4" (32X10X10 cm)
N.W./G.W..........................6.2/6.6 lbs (2.8/3 kg)
SAVE THESE INSTRUCTIONS
Thank you for purchasing our MUB-1
UNIVERSAL BENDER machine. Before
attempting to operate your new tool please
read these instructions thoroughly. You
will need these instructions for the safety
warnings, precautions, assembly, operation,
maintenance procedures, parts list and
diagrams. Keep your invoice number with
these instructions. Write the invoice number
on the inside of front cover. Keep the
instructions and invoice in a safe, dry place for
future reference.
General Safety Information
CAUTION
Always follow proper operating procedures
as defined in this manual even if you are
familiar with use of this or similar tools.
Remember that being careless for even a
fraction of a second can result in severe
personal injury.
SAFETY RULES
1. Wear proper apparel. Do not wear loose
clothing, gloves, neckties, rings, bracelets or
other jewelry which may get caught in moving
parts of machine.
2. Wear protective hair covering to contain
long hair.
3. Wear safety shoes with non-slip soles.
4. Wear safety glasses complying with United
States ANSI Z87.1.
Everyday glasses have only impact resistant
lenses. They are NOT safety glasses.
5. Be alert and think clearly. Never operate
tools when tired, intoxicated or when taking
medications that cause drowsiness.
6. Keep work area clean. Cluttered work areas
invite accidents.
7. Work area should be properly lit.
8. Keep visitors at a safe distance from work area.
9. Keep children out of workplace. Make

Operation Manual MUB-1
Model MUB-1
— 2 —
between the selected shaft and the Vise (#6)
and clamp it down as shown in Figure 1.
Figure 1
3. Put the Short Shaft (#9) into one of the
handle’s holes. Use the hole as close to the
bender as the material will permit.
4. Hold the material lightly with your thumb to
ensure parallel results (if desired).
5. Pull the handle in a clockwise direction for
a 1/4 turn. This should result in a 90degree
bender. If desired, you may insert the Stop
Pin (#16) at the appropriate hole for repetitive
bends. Typically, this will be the hole at the
front of the bender (furthest away from the
Vise Control Knob), second from the right as
shown in Figure 2.
Figure 2
6. Loosen the vise. Position the material so
that your bend is opposite the handle when it
is in the starting position. The straight part of
the material should be extending out towards
the handle; a slight amount of the bend should
be clamped when the vise is tightened.
workshop childproof. Use padlocks to prevent
any unintentional use of tools.
10. Assemble only according to these instructions.
Improper assembly can create hazards.
11. When tools are not in use, store them in a dry,
secure place out of the reach of children. Inspect
the tools prior to storage and before reuse.
12. Maintain product labels and nameplates.
These carry important safety information.
WARNING
The warnings, cautions, and instructions
discussed in this instruction manual cannot
cover all possible conditions or situations
that could occur. It must be understood
by the operator that common sense and
caution are factors which cannot be built
into this product, but must be used by the
operator.
OPERATING PROCEDURES
NOTE
The Universal Bender must be clamped to a
solid workbench or afxed in the T-slot of a
stable machine tool.
To Make Eyes and Centered Eyes:
1. Attach the Handle (#17) to the Working
Plate (#2) using the 1/2" Shaft (#10) with or
without the 1" Circle (#14), the 1/4" Shaft
(#11), or the 3/16" Shaft depending upon your
desired result. Secure the shaft with the Hex
Head Screw (#22). When you are standing
opposite the Vise Control Knob (#13), the
handle should be to your right and as far as
possible against the body of the bender.
2. Put the material you wish to bend in

Operation Manual MUB-1
KAKA Industrial®
— 3 —
7. Re-clamp the material. Continue the above
process until the material makes one full
revolution. A slight over bending on the final
step is required due to spring back, as shown
in Figure 3.
Figure 3
8. If you are working with heavy gauge wire,
it may be necessary to use the Sharp Angle
Plate (#15) to prevent slipping. If this becomes
necessary, it should be put on its side with the
angle portion facing up with one side of the
hole facing the vise and the other the shaft
being used, as shown in Figure 4.
Figure 4
9.If you wish to center the eye, position the
handle so that the material is on the opposite
side of the handle. This will allow the handle to
be moved counterclockwise.
10.Re-clamp the material in such a way that
the straight section is at right
angles to the vise.
11. Move the handle counterclockwise until
it meets the bender, as shown in Figure 5.
Figure 5
Bending Coils and Loops:
1. Repeat the top seven steps.
2. For loops and coils, you must lift the
material slightly on the third bend to allow it to
rise above the already bent material as shown
in Figure 6.
Figure 6
3. If you are doing coils, you may want to use
a spacer for the repetitive bends to ensure
that the spaces between the loops are even
and regular as shown in Figure 7.
Figure 7
To Make "S" Shapes:
1. Use the 1" Circle with the 1/2" Shaft on
the body as described in step 1 of "Eyes and
Centered Eyes".

Operation Manual MUB-1
Model MUB-1
— 4 —
2. Put the Sharp Angle Plate onto the short
shaft on the handle as shown in Figure 8.
Figure 8
3. Use a short section of stock approximately
2-3/4" to 3" in length. Clamp your stock in the
vise so that the edge of the material is even
with the edge of the circle.
4. Make a complete clockwise bend.
5. Leaving the handle in the left most position,
move the material so that the rst loop is on
the angled side of the vise's jaw and the edge
of the stock is even with the edge of the circle
as shown in Figure 9.
Figure 9
6. Make a complete counterclockwise bend
Using the Gauge:
1. The gauge (#23) is used when you need
more than one piece bent at precisely the
same length.
2. Simply insert the gauge into the side of
the bender so that the end of it is the exact
distance away from the bender for the length
of stock you need. Tighten the gauge clamp
(#24) as shown in Figure 10.
Figure 10
3. Use the gauge and the stop pin when you
need to make squares. It will enhance your
nal results immensely as shown in Figure 11.
Figure 11

Operation Manual MUB-1
KAKA Industrial®
— 5 —
Drawing

Operation Manual MUB-1
Model MUB-1
— 6 —
Parts List
Ref.No. Description QTY
1 Base 1
2 Working Plate 1
3 Small Plate 1
4Slide Track 1
5 Vise Body 1
6 Right Vise Plate 1
7 Left Vise Plate 1
8 Connecting Plate 1
9 Short Shaft 1
10 1/2” Shaft 1
11 1/4” Shaft 1
12 3/16” Shaft 1
13 Vise Control Knob 1
14 1” Circle 1
15 Angle Plate 1
16 Stop Pin 1
17 Handle 1
18 M12 Cap Nut 1
19 M6 x 35 Screw 1
20 Connecting Screw 2
21 M5 x 12 Screw 4
22 M8 x 9 Hex Head Screw 2
23 Gauge 1
24 Gauge Clamp 1

Operation Manual MUB-1
KAKA Industrial®
— 7 —
SERVICE RECORD
KAKA Industrial ®
Date Maintenance performed Repair components require
NOTES

Stock No: 173207
Edition 1 4/2019
Copyright © 2019 KAKA
If you have any questions about the use of this product, please contact the nearest one to you
as below:
KAKA INDUSTRIAL LLC
Mail:
Add: 4200 Steve Reynolds
Blvd Ste 6 Norcross,
GA 30093
U.S.A.
KAKA INDUSTRIAL LTD
Mail:
Add: 3143 Underhill Avenue
Burnaby,
B.C V5A3C8
Canada
KANG INDUSTRIAL PTY LTD
Mail:
Add: 3 Wayne Court
Dandenong,
VIC 3175
Australia
Table of contents
Other KAKA Industrial Tools manuals