Kalorik USK MGR 25959 User manual

120V~ 10
00Wmax
USK MGR 25959
Meat Grinder
Máquina para picar la
carne
www.KALORIK.com

2
USK MGR 25959 - 080630
IM ORTANT SAFEGUARDS
Please read these instructions carefully efore using the
appliance and check that your mains voltage corresponds to
that stated on the appliance.
From time to time check the appliance for damages. Never use
the appliance if it shows any signs of damage, ut have it
checked y a competent qualified electrician (*). Should the
cord e damaged, it must e replaced y a competent
qualified electrician
(*)
.
Never leave the appliance unsupervised when in use. Keep out
of reach of children or incompetent persons.
Only use the appliance for domestic purposes and in the way
indicated in these instructions. Most of all, follow the instructions
concerning the assem ly of the accessories efore starting the
appliance.
Switch off the meat grinder and unplug it when not using it or
during assem ly and disassem ly, respectively.
Never touch the worm or the lade without having removed the
cord from the power outlet eforehand.
Do not use meat grinder near sources of heat (cooking tops, grill,
oven).
Never immerse the appliance in water or any other liquid for any
reason whatsoever.
Never use the appliance outside and always place it in a dry
environment.
Never move the appliance y pulling the cord and never hang it
y the cord. Make sure the cord cannot get caught in any way.
Do not wind the cord around the appliance and do not end it.
Stand the appliance on a sta le surface so that it cannot fall
over.
This kind of appliance cannot function continuously; it is not a
professional type of appliance. It is necessary to make temporary
stops. Check the section « Important information » in the
instruction manual.
To push the meat to the worm, always make use of the pusher
only. Never use your fingers or other accessories.

3
USK MGR 25959 - 080630
You must keep this appliance clean, as it is in direct contact with
food.
(*)
Competent qualified electrician: after sales department of the
producer or importer or any person who is qualified, approved and
competent to perform this kind of repairs in order to avoid all
danger. In any case you should return the appliance to this
electrician.
SAVE THESE INSTRUCTIONS
OLARIZED LUG INSTRUCTIONS
Some appliances are equipped with a polarized plug (one lade is
wider than the other). To reduce the risk of electric shock, this plug
will fit into the polarized outlet only one way. If the plug does not
properly fit into the outlet at first, reverse it. If it still does not fit,
contact a competent qualified electrician. Do not attempt to modify
the plug in any way.
For appliances equipped with a standard plug, simply insert the plug
into the outlet without paying attention to the way you plug it.
SHORT CORD INSTRUCTIONS
A short detacha le power supply cord is provided to reduce the
hazards resulting from ecoming entangled in, or tripping over a
longer cord. Longer detacha le power supply cords may e used if
care is exercised in their use.
• The electrical rating of the longer cord should e at least that
of the appliance. If the electrical rating of the extension cord
is too low, it could overheat and urn.
• The longer cord should e arranged so that it will not drape
over the counter top or ta letop where it can e pulled on y
children or tripped over. The extension cord should e a
grounding-type 3-wire cord.

4
USK MGR 25959 - 080630
ART DESCRI TION
1 Reverse kno
2 ON / OFF switch
3 Head inlet
4 Body
5 Head
6 Filling tray
7 Pusher
8 Worm
9 Cutting lade
10 Cutting plate (fine)
11 Cutting plate (medium)
12 Cutting plate (large)
13 Ke e attachment
14 Sealing ring
15 Sausage attachment
16 Head stopper

5
USK MGR 25959 - 080630
10
A B

6
USK MGR 25959 - 080630
IM ORTANT INFORMATION
This appliance is not for professional use. You should follow the
requested reaks. Failure to follow this instruction carefully may result
in damage to the motor. Please refer to the rating la el for the
maximum continuous usage time (KB xx min where xx is the maximum
usage time). The reaks should last at least 10 minutes.
BEFORE FIRST USE
It is necessary to clean all accessories (see paragraph "cleaning and
care") and to dry them.
ASSEMBLY OF THE ACCESSORIES AND O ERATION
Make sure the power cord is unplugged and the ON/OFF switch is in
OFF position before assembling the accessories. This instruction
should be observed each time you assemble or replace accessories.
Unscrew the locking screw y turning it anti-clockwise and insert the
filling neck in the motor lock.
Once the filling neck is positioned correctly, tighten the locking screw
y turning it clockwise (Fig. 1) and make sure it is tightly connected
to the motor lock.
Put the worm on the motor shaft (Fig. 2) that you can see at the end
of the filling neck (to check if it is positioned correctly, it should not
e possi le to turn it with the hand).
A) Discs
• These accessories allow mincing meat. According to the disc
you choose, you can o tain more or less finely minced meat.
• Place the lade upon the worm with its rounded side facing the
worm. (Fig. 3)
• Assem le one of the 3 discs upon the lade, making sure that its
two arresting pins lock precisely into the corresponding recesses.
(Fig. 4).
• Firmly screw on the sealing ring y turning it clockwise to tighten
the worm, lade and disc together. (Fig. 5). When screwing the
sealing ring, we advise you to press the disc to make sure that its
arresting pins stay in the right position.

7
USK MGR 25959 - 080630
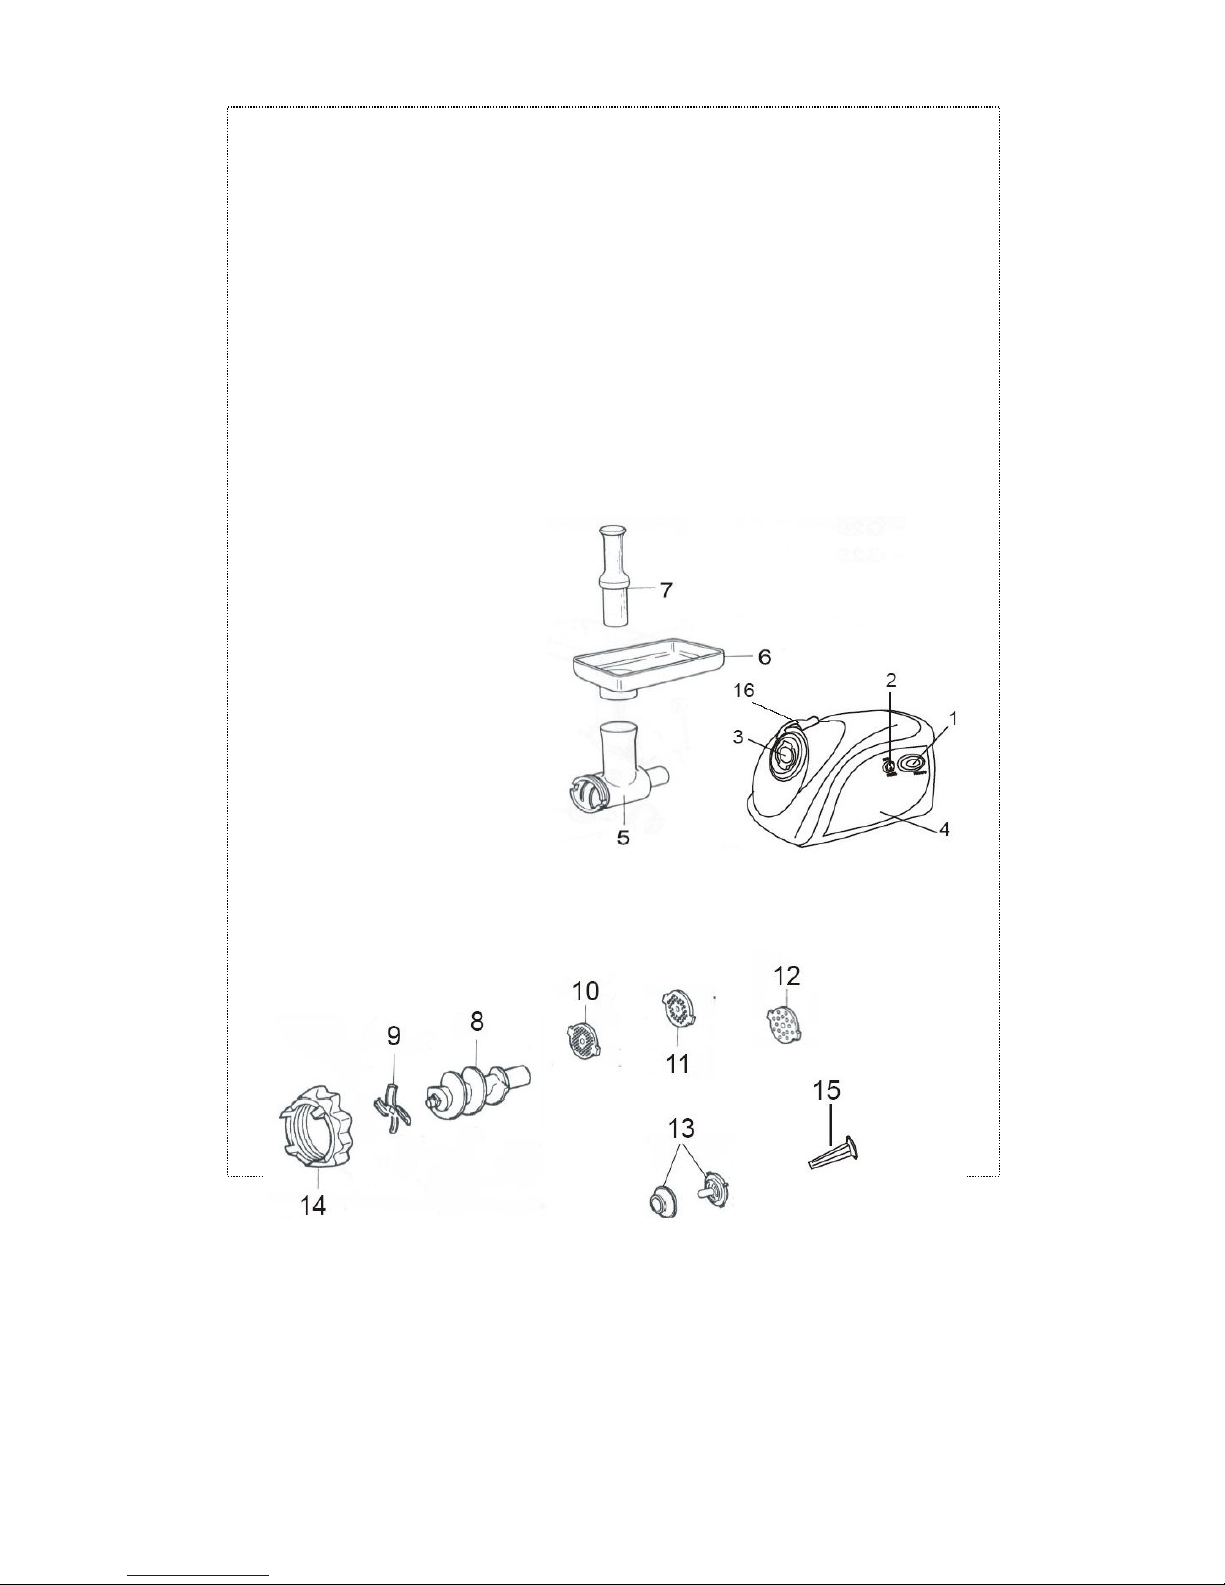
• Put the filling tray on the filling neck.
• Cut the meat into pieces of approximately 30 to 40 mm and put
these pieces on the filling tray.
• Plug in the appliance and switch it on with the ON/OFF switch.
• Put a tray or a plate under the filling neck to collect the minced
meat.
• Drop the pieces of meat in the filling neck and press with the
pusher. Do not press too strongly, as you might lock the
appliance. If this happens, do not try to use any accessory to
release the locking pieces ut stop the appliance, remove the
power cord from the mains and disassem le the part leading to
the locked pieces.
• The pusher allows you to press the pieces of meat towards the
worm in order to lead them to the lade (Fig. 6). Note: during
use, tighten the sealing ring regularly if necessary.
• Depending on the kind of meat, we advise you to insert a reak
of approximately 30 minutes after each continuous operation of
15 minutes. The meat grinder minces 5 kg of raw meat within a
maximum of 10 minutes.
B) Sausage filling funnel
• Place the lade on the shaft of the worm, with the rounded side
facing the disc (contrary to previously).
• Assem le the perforated disc (7 mm, the iggest one) on the
shaft of the worm and insert the two arresting pins precisely into
the corresponding recesses on the edge of the filling neck (fig.
4).
• Lead the narrow end of the sausage-filling funnel through the
sealing ring and screw on the sealing ring. When screwing we
advise you to press the sausage filling funnel against the disc so
that its arresting pins stay in the right position.
• Place the filling tray on the filling neck.
• Steep the sausage skin in lukewarm water for 30 minutes to make
it smooth.
• Then slip the sausage skin over the sausage-filling funnel.
• The pusher will allow you to push the sausage preparation
towards the worm. (fig. 6)
C) "Kebbe" attachment

8
USK MGR 25959 - 080630
• Place the "Ke e" attachment, which you will have assem led
eforehand, on the shaft of the worm and insert the two arresting
pins precisely into the corresponding recesses on the edge of the
filling neck.
• Screw on the sealing ring y turning it clockwise in order to lock
the unit formed y the worm and the "Ke e" attachment (fig. 8).
We advise you to press the rounded part of the "Ke e"
attachment to make sure that its arresting pins stay in the right
position.
• Place the filling tray on the filling neck.
• The pusher will allow you to push the sausage preparation
towards the worm. (fig. 6)
"Kebbe" recipes
Wrap for Kebbe”
450 g lean mutton, veal or eef *
150-200 g flour *
1 teaspoon allspice
1 teaspoon nutmeg
1 pinch chili powder
1 pinch pepper
* Using more meat and less flour for the wrap improves the
consistency and taste of the wrap.
Broil the meat and then mince it three successive times in the meat
grinder: first using the medium (5 mm), then the finely (3 mm)
perforated disc and once with the 3 mm disc after mixing with the
other ingredients. Then use the "Ke e" accessory to shape the
wraps that you will cut to the desired length (fig. 9).
Meat filling
100 g mutton
1 ½ soupspoon olive oil
1 ½ soupspoon fine chopped onion
1/3 teaspoon allspice
½ teaspoon salt
1 ½ soupspoon flour

9
USK MGR 25959 - 080630
Fry the onions and mix all other ingredients with the minced mutton.
Fill the “Ke e” wraps with this mixture and fry the whole. Serve hot.
Vegetable or rice filling
250 g stewed roccoli – or 250 g stewed zucchini – or
250 g oiled rice.
Fill “Ke e” wraps and fry them.
D) Cookie dough attachment
• Assem le the attachment. To do so, place part A on part B so
that one of the shapes on part A matches the opening on part B
and that the pin on part B enters one of the holes of part A. (fig.
10).
• Place the assem led attachment on the worm. Do not use the
lade nor the discs.
• Put the dough in the filling tray and switch on the appliance.
• Press the dough down the filling funnel with the pusher. Never use
your fingers!
• The dough comes through the attachment and you now give it
the desired shape.
IN CASE THE MOTOR IS BLOCKED
In case the motor slows down or stops it is possi le that the meat
locks the grinder. In this case, use the reverse switch. To do so, first
switch off the meat grinder (0 position), then press the reverse switch.
The worm will start rotating in the other direction and the meat will
move in the other direction as well in order to release the funnel. To
stop the reverse function, simply release the reverse switch. You can
now press the on/off switch again.
Be very careful when handling the lade, as it is very sharp. Should
the motor still e locked, unplug the appliance and disassem le its
attachments.
CLEANING AND CARE
• Always switch off the appliance and let it cool down efore
cleaning it.

10
USK MGR 25959 - 080630
• Clean the plastic parts of the appliance with a soft cloth.
• Never use a rasive products.
• Never immerse the motor lock into water or any other liquid.
• Clean the accessories with lukewarm water and some mild
detergent, rinse and dry.
• Never put any part of your appliance in the dishwasher.

11
USK MGR 25959 - 080630
WARRANTY
We suggest that you complete and return the enclosed Product
Registration Card promptly to facilitate verification of the date of
original purchase. However, return of the Product Registration Card is
not a condition of these warranties. You can also fill this warranty
card online, at the following address: www.KALORIK.com
This KALORIK product is warranted for 1 year from the date of
purchase against defects in material and workmanship. This warranty
is not transfera le. Keep the original sales receipt. Proof of purchase
is required to o tain warranty performance.
During this period, the KALORIK product that, upon inspection y
KALORIK, is proved defective, will e repaired or replaced, at
KALORIK's option, without charge to the customer. If a replacement
product is sent, it will carry the remaining warranty of the original
product.
This warranty does not apply to any defect arising from a uyer's or
user's misuse of the product, negligence, failure to follow KALORIK
instructions noted in the user’s manual, use on current or voltage
other than that stamped on the product, wear and tear, alteration
or repair not authorized y KALORIK, or use for commercial purposes.
There is no warranty for glass parts, glass containers, filter asket,
lades and agitators, and accessories in general. There is also no
warranty for parts lost y the user.
ANY WARRANTY OF MERCHANTABILITY OR FITNESS WITH RESPECT TO
THIS PRODUCT IS ALSO LIMITED TO THE ONE YEAR LIMITED WARRANTY
PERIOD
Some states do not allow limitation on how long an implied warranty
lasts or do not allow the exclusion of incidental or consequential
damages, so the a ove limitations may not apply to you. This
warranty gives you specific legal rights, and you may also have other
rights which vary from state to state.
If the appliance should ecome defective within the warranty
period and more than 30 days after date of purchase, do not return
the appliance to the store: often, our Consumer Service

12
USK MGR 25959 - 080630
Representatives can help solve the pro lem without having the
product serviced. If servicing is needed, a Representative can
confirm whether the product is under warranty and direct you to the
nearest service location.
If this is the case, ring the product (or send it, postage prepaid),
along with proof of purchase and indicating a return authorization
number given y our Consumer Service Representatives, to the
nearest authorized KALORIK Service Center (please visit our we site
at www.KALORIK.com or call our Customer Service Department for
the address of the nearest authorized KALORIK Service Center).
If you send the product, please include a letter explaining the nature
of the claimed defect.
If you have additional questions, please call our Consumer Service
Department (please see elow for complete contact information),
Monday through Friday from 9:00am - 6:00pm (EST). Please note
hours are su ject to change.
If you would like to write, please send your letter to:
KALORIK Consumer Service department
Team International Group of America Inc
1400 N.W 159th Street, Suite 102
Miami Gardens, FL 33169 USA
Or call :
Toll Free: +1 888-521-TEAM
Only letters can be accepted at this address above. Shipments and
packages that do not have a return authorization number will be
refused.

13
USK MGR 25959 - 080630
CONSEJOS DE SEGURIDAD
Antes de utilizar el aparato, lea detenidamente el modo de
empleo, y comprue e que el voltaje de la red eléctrica coincide
con el indicado en la placa de características del aparato.
Comprue e de vez en cuando que el aparato no esté dañado y
no utilice su aparato si el ca le o el aparato están dañados por
el motivo que sea. Cualquier reparación de e ser realizada por
un servicio cualificado competente(*). Si el ca le está dañado,
de e ser reemplazado por un servicio cualificado competente(*)
No deje nunca su aparato sin vigilancia cuando esté en marcha.
No lo deje al alcance de los niños ni al de personas no
responsa les.
Utilice el aparato sólo para usos domésticos y de la manera
indicada en el modo de empleo. Respete so re todo las
instrucciones de montaje antes de poner el motor en marcha.
Desenchufe siempre su aparato antes de limpiarlo o de montar /
quitar accesorios.
Asegúrese de no meter los dedos o o jetos en el espiral o en la
cuchilla hasta que el aparato esté apagado y desenchufado.
No utilice la máquina para picar carne cerca de fuentes de
calor (placas calentadoras, parrillas, hornos).
No sumerja nunca el loque motor en el agua o en cualquier
otro líquido ni para su limpieza ni por cualquier otra razón (véase
párrafo "Limpieza").
Procure no utilizar el aparato en el exterior y colóquelo en un sitio
seco.
No mueva nunca el aparato estirando del ca le. Procure que el
ca le no se enganche en alguna parte, a fin de evitar posi les
caídas del mismo. Evite enrollar el ca le alrededor del aparato y
no lo tuerza.
Coloque el aparato so re una mesa o un soporte esta le para
evitar su caída.
Este aparato no puede funcionar de manera continuada, no es
un aparato profesional. Es necesario efectuar pausas a intervalos
regulares. Consulte el punto "Tiempo de utilización" en el modo de
empleo.

14
USK MGR 25959 - 080630
Utilice sólo el mortero para empujar la carne hacia el espiral. No
utilice los dedos ni otros accesorios en ningún caso.
Es indispensa le guardar el aparato limpio, ya que está en
contacto directo con los alimentos.
(*) Servicio técnico cualificado: Servicio técnico del fa ricante o del
importador o una persona cualificada, reconocida y ha ilitada a fin
de evitar cualquier peligro. En cualquier caso devuelva el aparato al
servicio técnico.
GUARDE ESTAS INSTRUCCIONES.
INFORMACIÓN SOBRE EL ENCHUFE OLARIZADO
Algunos aparatos están provistos con un enchufe polarizado (una
pata es más ancha que la otra). Para reducir el riesgo de choque
eléctrico, este enchufe calza en el tomacorriente polarizado de una
sola manera. Si el enchufe no ca e totalmente en el tomacorriente,
gire el enchufe. Si aún así no calza, consulte a un servicio técnico
cualificado. No intente anular esta característica de seguridad.
Para los aparatos provistos con un enchufe clásico, asta con
insertar el enchufe en la toma de corriente.
INSTRUCCIONES DEL CABLE
El ca le de alimentación del aparato es un ca le corto separa le,
a fin de disminuir el riesgo de accidentes (caídas al tropezar con él,
etc.) Sin em argo, puede utilizar un ca le separa le más largo si es
necesario.
• Asegúrese de que el nivel eléctrico del ca le más largo sea
igual o mayor al indicado. Un
ca le más largo con un ajo
nivel eléctrico correría el riesgo de so recalentarse y de
estropearse.
• Para evitar riesgos colocar de forma tal que los niños no
puedan jalarlo o tropezar con él. Que no arrastre nunca por
el suelo. El ca le de e ser un ca le de tres hilos con toma de
tierra.

15
USK MGR 25959 - 080630
ARTES
1 Botón inversor
2 Interruptor ON / OFF
3 Orificio de conexión del tu o
de entrada
4 Bloque motor
5 Tu o de entrada
6 Bandeja de relleno
7 Mortero
8 Espiral
9 Cuchilla
10 Disco perforado (fino)
11 Disco perforado (medio)
12 Disco perforado (largo)
13 Accesorios para ke e
14 Anillo de cierre
15 Accesorio para salchichones
16 Bloqueo del tu o de entrada

16
USK MGR 25959 - 080630
10
A B

17
USK MGR 25959 - 080630
TIEM O DE UTILIZACIÓN
Este aparato no es para usos profesionales. Es necesario realizar
paradas a intervalos regulares. Para una utilización óptima de su
aparato y evitar el deterioro de su motor, controle el tiempo de
utilización continuada máximo indicado en la placa de
características (KB xx min. donde xx es la duración máxima). Las
pausas de utilización tienen que durar por los menos 10 minutos.
ANTES DE LA RIMERA UTILIZACIÓN
Limpie los accesorios (véase párrafo limpieza) y séquelos.
MONTAJE Y USO DE LOS ACCESORIOS
Antes que nada, asegúrese que el aparato no está conectado y que
el interruptor ON/OFF esté en posición OFF antes de asemblar el
aparato. Este aviso es válido para cada montaje o desmontaje de
accesorios
Destornille el tornillo de loqueo girándolo en el sentido contrario de
las agujas del reloj e insierta el tu o de entrada en el loque motor.
Una vez correctamente colocada la entrada del tu o, apriete el
tornillo de loqueo girándolo en el sentido de las agujas del reloj
(Imagen 1) y comprue e que esté ien atado al loque motor.
Coloque el espiral en el eje del motor (Imagen 2) que puede ver en
la extremidad del tu o de entrada (si está posicionado
correctamente, no de ería ser posi le girarlo con la mano).
A) Discos
• Estos accesorios permiten picar las carnes. La elección del disco
permite o tener carne más o menos fina.
• Coloque la cuchilla en el espiral con el lado redondo frente al
espiral (Imagen 3).
• Asem le uno de los 3 discos en la cuchilla, asegurándose que
am as uñas de loqueo coïnciden precisamente con las
ranuras correspondientes (Imagen 4).
• Entornille firmemente en el anillo de cierre girándolo en el
sentido de las agujas del reloj para apretar el espiral, la cuchilla
y el disco juntos (Imagen 5). Al entornillar el anillo de cierre, les

18
USK MGR 25959 - 080630
recomendamos presionen el disco para asegurarse que las uñas
de loqueo queden en una uena posición.
• Coloque la andeja de entrada en el tu o de entrada.
• Corte la carne en pedazos de aproximadamente 30 a 40 mm y
vierte estos pedazos en la andeja de entrada.
• Enchufe el aparato y enciéndelo con el interruptor ON/OFF.
• Ponga una andeja o un plato ajo el tu o de entrada para
colectar la carne picada.
• Vierte los pedazos de carne en el tu o de entrada y empuje
con el mortero. No empuje con demasiada fuerza, porqué
podría loquear el aparato. Si ocurre, no utilice ningún
accesorio para remover los pedazos que loquean. Apague el
aparato, desenchúfelo y desmonte las partes hasta alcanzar la
parte loqueada.
• El mortero le permite empujar los pedazos de carne hasta el
espiral para llevarlas hasta la cuchilla (Imagen 6). Nota : durante
el uso, apriete regularmente el anillo de cierre si es necesario.
• Dependiendo del tipo de carne, le aconsejamos que respete
una pausa de unos 30 minutos después de un uso ininterrumpido
de 15 minutos. El aparato es capaz de picar 5 Kg de carne
cruda en 10 minutos.
B) Accesorios para salchichones
• Coloque la cuchilla en el eje del espiral, con el lado redondo
frente al disco (contrariamente a lo mencionado antes)
• Asem le el disco perforado (7mm, el más grande) en el eje del
espiral e insierte am as uñas de loqueado precisamente en las
ranuras correspondientes en la extremidad del tu o de entrada
(Imagen 4)
• lleve la extremidad estrecha del accesorio para salchichones a
través del anillo de cierre y entornille el anillo de cierre. al
entornillar el anillo, les recomendamos presionen el accesorio
para salchichones contra el disco para que las uñas de loqueo
queden en la uena posición.
• Ponga la andeja de entrada en el tu o.
• Estire la tripa de la salchicha durante 30 minutos en agua ti ia.
• Pase esta tripa por arri a del accesorio para salchichones.
• El mortero le ayudará a llevar la preparación para salchichones
que haya picada previamente hacia el espiral (Imagen 6).
C) Accesorios para "Kebbe"

19
USK MGR 25959 - 080630
• Ponga el accesorio para ke e que haya acoplado
previamente en el eje del espiral e insierte am as uñas de
loqueado precisamente en las ranuras correspondientes en la
extremidad del tu o de entrada.
• Atornille el anillo de cierre en el tu o girándola en el sentido de
las agujas del reloj para loquear el conjunto del accesoriopara
ke e y el espiral (Imagen 8). Les recomendamos presionen el
accesorio para salchichones contra el disco para que las uñas
de loqueo queden en la uena posición.
• Ponga la andeja de entrada en el tu o.
• El mortero le ayudará a llevar la carne que haya picada
previamente hacia el espiral (Imagen 6)
Receta de kebbe
Sobre
450 g Carne magra de cordero, de ternero*
150-200 g Harina *
1 cucharadita Pimiento
1 cucharadita Nuez moscada
1 pizca Polvo de chile
1 pizca Pimienta
* Utilizando más carne y menos harina, la consistencia y el sa or
serán mejorados.
Ase la carne y después píquela tres veces consecutivamente:
primero con el disco de perforaciones medias (5 mm) y después con
el de perforaciones finas (3 mm), y, cuando haya mezclado la carne
con los demás ingredientes, repita la operación con el disco para
perforaciones finas. Luego, utilice el accesorio para ke e para
darles forma a los so res que cortará a su gusto (Imagen 9).

20
USK MGR 25959 - 080630
Relleno
100 g Carne de cordero
1 ½ cucharada sopera Aceite de oliva
1 ½ cucharada sopera Ce olla picada
1/3 cucharadita Pimiento
½ cucharadita Sal
1 ½ cucharada sopera Harina
Sancoche la ce olla y revuelva todos los ingredientes con la carne
de cordero (la carne de e ser asada y picada previamente).
Rellene los so res de ke e y ase el conjunto. Sírvalos calientes.
Relleno de arroz y verduras
250 g de rócolis cocidos al vapor – o 250 g de cala acines cocidos
al vapor – o 250 g de arroz cocido
Llene y fría los so res de ke e.
D) Accesorios de masa para cookies
• Asem le el accesorio. Para esto, coloque la parte A en la parte B
de manera que una de las formas de la parte A coïncida con la
a ertura en la parte B y que la uña en la parte B entre dentro uno
de los agujeros de la parte A (Imagen 10).
• Coloque el conjunto en el espiral. No utilice la cuchilla ni
tampoco los discos.
• Ponga la masa en el tu o de entrada y encienda el aparato.
• Empuja la masa hacia a ajo con el mortero. ¡Nunca utilice sus
dedos !
• La masa sale del accesorio y puede darle la forma deseada.
EN CASO DE BLOQUEO DEL MOTOR
Si el motor funciona demasiado despacio o se para, es posi le que
la carne loquee el aparato. En tal caso, utilice el inversor: pulse el
interruptor ON/OFF para apagar el aparato y luego pulse el inversor
REV. El espiral girará entonces en el sentido contrario y traerá
consigo la carne para des loquear el tu o. Para parar esta función,
deje de pulsar el inversor. Puede volver a pulsar el interruptor
ON/OFF.
Other manuals for USK MGR 25959
1
This manual suits for next models
1
Table of contents
Languages:
Other Kalorik Meat Grinder manuals