Kamasa-TOOLS K 2765 User manual

1
Digital torque wrench
K 2765
K 2766
K 2767

2
Components and Features
PRESET SELECT or
CLEAR BUTTON
DRIVE
BUZZER
PROGRESS
LIGHTS
DECREMENT
BUTTON
POWER
ON/OFF
MENU
BUTTON
UNIT BUTTON
INCREMENT BUTTON
PROGRESS LIGHT
BATTERY CAP

3
Product Specification
Memory
Accuracy
Display resolution
Display range
Drive
Operation mode
Unit selection
Length
Weight
Gear teeth
Key
Battery
Battery life
Operating ambient
temperature
Storage temperature
Operating relative
humidity
Auto shut off
K 2767
0.1
17.0~340.0 (N.m)
12.5~250.0 (ft-lb)
1/2"
ft-lb, in-lb, N.m, kg-m
683.5mm 513.7mm 311mm
1.96 kg 1.04 kg 0.43 kg
AAx3 AAx3 AAx1
K 2766
999
0.1
3/8”
Peak/Track
ft-lb, in-lb, N.m, kg-cm
72
6
15~90% noncondensing
2 minutes (can be set by the user)
7.0~136.0 (N.m)
5.0~100.0 (ft-lb)
CW±2%,CCW±3%
K 2765
0.01
1/4”
ft-lb, in-lb, N.m, kg-cm
1.40~27.00 (N.m)
1.00~20.00 (ft-lb)
5~42°C(41°F~108°F)
-20~70°C(-4°F~157.9°F)
20 hrs (4 times/min)

4
Features
●9 storable preset modes
●Torque or Angle measurement
●Track mode to display real time of torque
●Peak mode to hold and flash peak mode torque
●Memory recall to display the last 999 peak torque or angle readings
●LCD backlight design
●Over-torque warning information
●Directive progress lights
●Directive buzzer and vibration warning
Keys Functions
POWER – press button for 3 seconds to shut down torque wrench
UNIT – change units (FT-LB, IN-LB, NM, KGM) and Angle mode
PRESET/CLEAR – Select preset group number or clear the applied values
MENU– menu entry
UP – increments torque and angle settings and menu navigation
DOWN – decrements torque and angle settings and menu navigation
User Instructions
●Top view
250.0 FT-LB
2015/01/01 10:50
TrackP1
BATTERY
CONDITION
DATE
PROGRESS
LIGHTS TIME
MODE
UNIT BUTTON
INCREMENT BUTTON
PRESET SELECT or
CLEAR BUTTON
PRESET GROUP
NUMBER
TORQUE or
ANGLE
DISPLAY
PROGRESS
LIGHTS
DECREMENT
BUTTON
POWER
ON/OFF MENU
BUTTON
PROGRESS
LIGHTS

5
Operating Wrench
Note: If the battery is low, the LCD will show "Replace Batteries".
Turn Off- Press POWER button for 3 seconds.
(Auto shut off after 2 minutes non-usage (sleep time can be set in the menu.)
1. Turn On/Off the wrench
Turn On- Press POWERbutton
Replace Batteries
250.0 FT-LB
250.0 FT-LB
RECALIBRATE
Shows the wrench max torque
Entry operation window
2015/01/01
P1 Peak
10:50
Press 3 seconds to shut down
250.0 FT-LB
2015/01/01
P1 Peak
10:50
A "RECALIBRATE" image
will display every time the
wrench is powered on after
125% of full-scale (over
maximum torque) is used.
A "RECALIBRATE" image will display every time the wrench is powered on after 125% of
full-scale (over maximum torque) is used.

6
2. Unit Select
Press UNIT button to select torque unit ,angle mode or torque then angle.
3. Preset Select
Every preset group number can be saved when you press PRESET button.
Torque mode operation window
FT-LB Unit
Torque mode operation window
IN-LB Unit
Torque mode operation window
NM Unit
Torque mode operation window
KGM Unit
Angle mode initial window
Angle mode operation window
Do not move the wrench until
it stabilizes
ANGLE MODE
250.0 FT-LB
2015/01/01
P1 Peak
10:50
250.0 FT-LB
2015/01/01
P1 T then A 10:50
3000 IN-LB
2015/01/01
P1 T then A 10:50
338.0 NM
2015/01/01
P1 T then A 10:50
34.57 KGM
2015/01/01
P1 T then A 10:50
3000 IN-LB
2015/01/01
P1 Peak
10:50
338.0 NM
2015/01/01
P1 Peak
10:50
34.57 KGM
2015/01/01
P1 Peak
10:50
90
2015/01/01
P1
10:50
250.0 FT-LB
2015/01/01
P9 Peak
10:50
250.0 FT-LB
2015/01/01
P1 Peak
10:50
250.0 FT-LB
2015/01/01
P2 Peak
10:50

4. Preset Setting
The preset setting status will be saved in current setting. There are three set points.
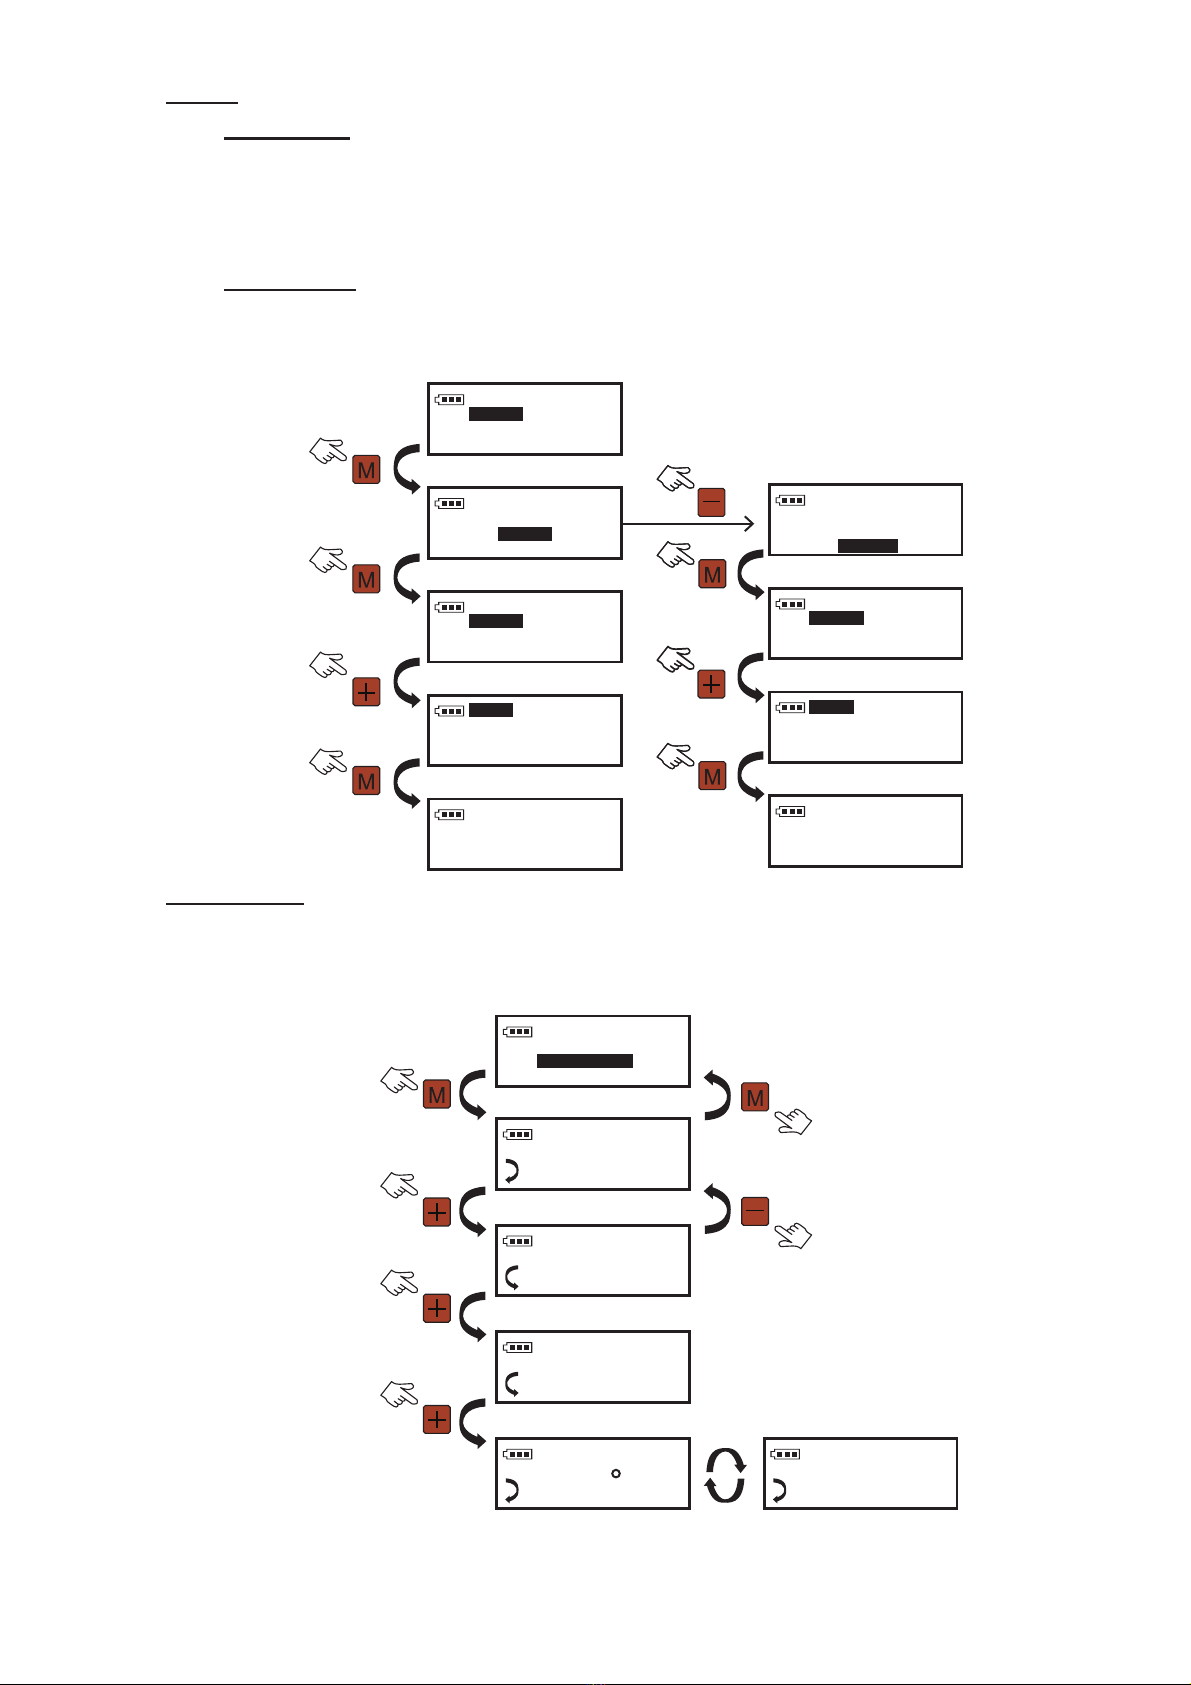
Torque Value- Press UP or DOWN
value.
Unit- Press UNIT button to select torque unit or angle mode or Torque then
Angle mode.
Mode-Press MENUbutton into menu and select “MODE” to change Peak or
Track.
Torque Mode Measurement
Angle Mode Measurement
Torque then Angle Mode
Press "UNIT" button in Angle Mode to enter "T then A" Mode.
In this mode, you can preset
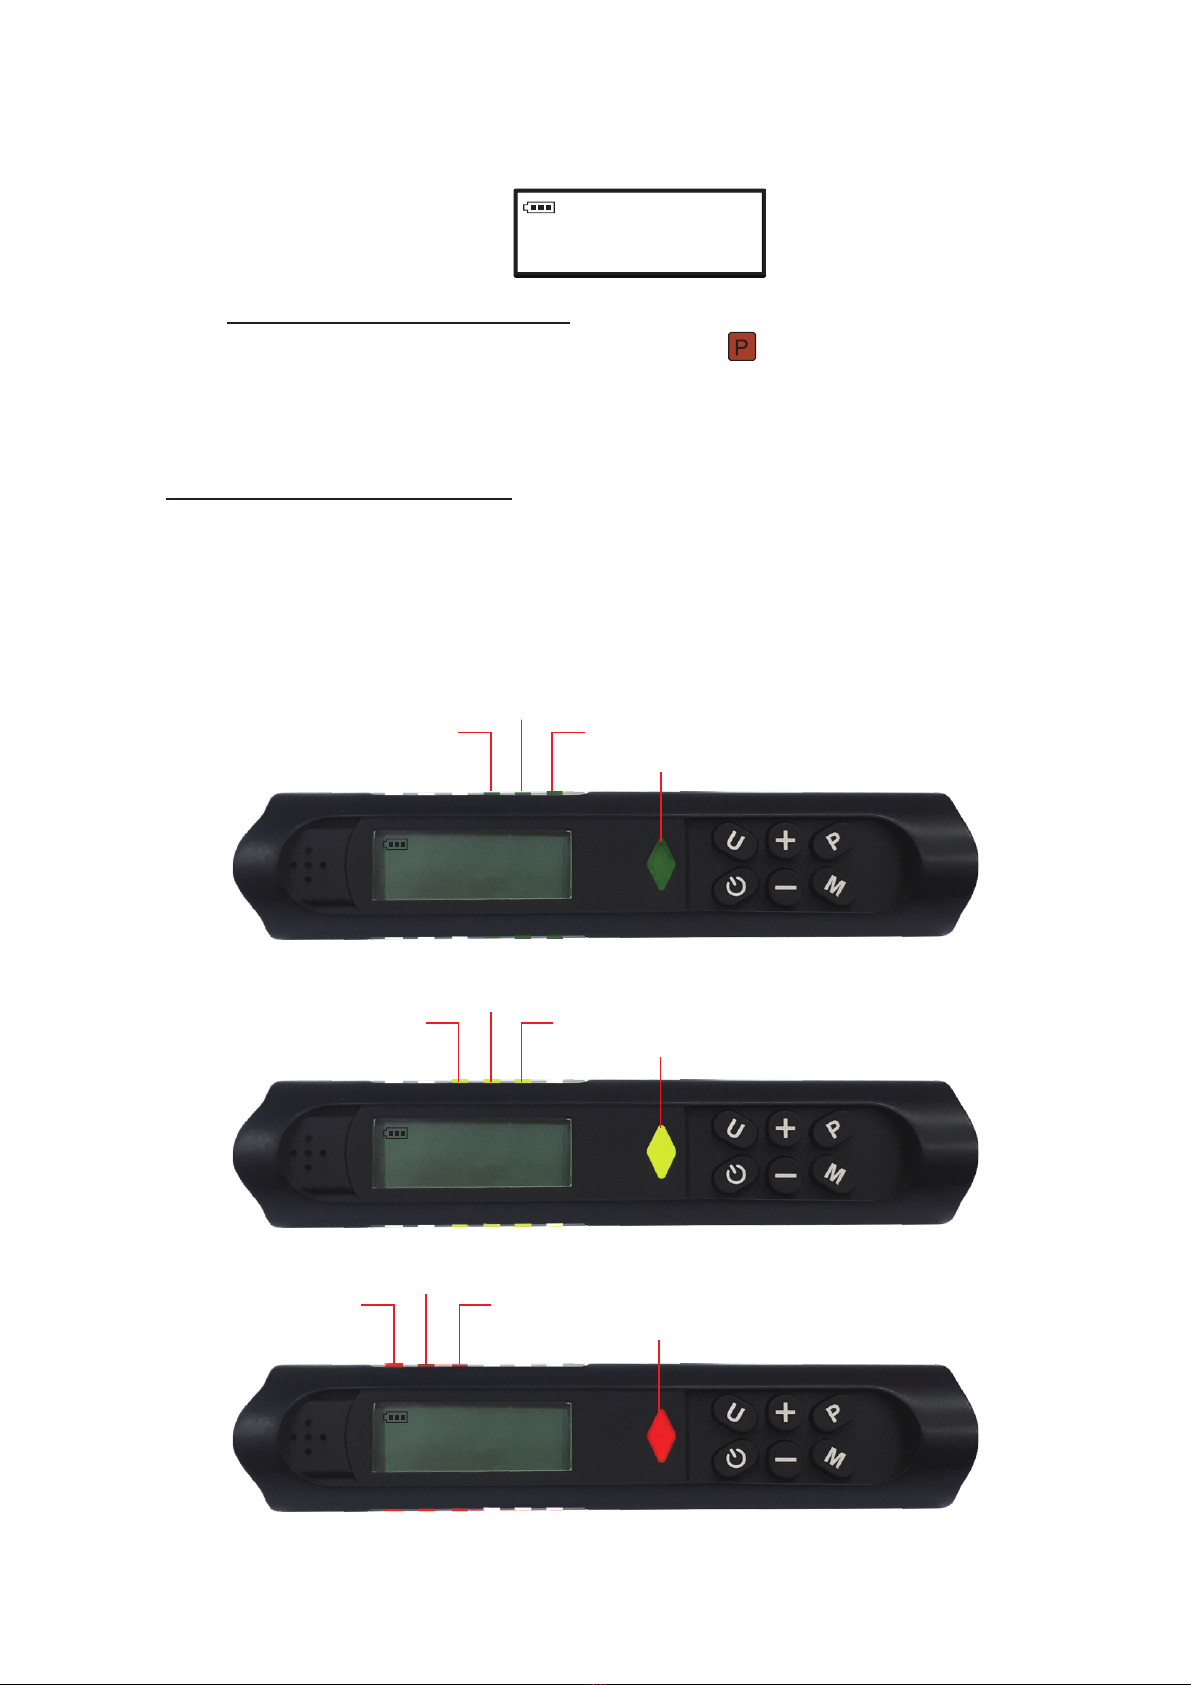
250.0 FT-LB
2015/01/01
P1 Peak
10:50
249.0 FT-LB
2015/01/01
P1 Peak
10:50
248.0 FT-LB
2015/01/01
P1 Peak
10:50
7
After entering Angle mode by pressing the UNIT
button and selecting your
desired units, you may start to use the angle function. When you apply the angle,
the wrench will only calculate angle degrees as the applied torque achieves 5% of
the full-scale of the torque wrench. The LCD display shows the actual applied angle
degrees. After applying angle degrees, the degree is displayed, and the display will
flash “maintain 10 seconds. The degrees can be continuously applied until reaching
the set target angle degrees. If the applied angle degrees do not reach the setting
values, the final values you apply will display the accumulated angle until clear by
pressing CLEAR or after 10 seconds to revert back to preset.
Once powered on, you may begin using the torque wrench. After force has been
applied, the LCD will display the actual torque value. Under Peak Mode, when the set
value is not reached, the LCD will display the last torque value attained. The last
reading will flash 10 seconds, but will stop flashing if additional force is applied. If the
torque value is exceeded, the peak torque will flash for 10 seconds then the LCD will
return to display the set torque value. If the torque value equals the set value, a
vibration and buzzer will automatically function.
button to increase or decrease the

8
the torque value.
When it reaches the preset torque value, it will automatically switch to
Angle Mode, then start angle function (the angle preset value must be set in Angle Mode
first).
Caution Light/buzzer/vibration
250.0 FT-LB
2015/01/01
Tthen A 10:50
P1
250.0 FT-LB
2015/01/01 10:50
TrackP1
250.0 FT-LB
2015/01/01 10:50
TrackP1
250.0 FT-LB
2015/01/01 10:50
TrackP1
40%~52.9%
53%~65.9%
66%~79.9%
40%~79.9%
80%~84.9%
85%~89.9%
90%~95.9%
80%~95.9%
96%~99.9% 100%~103.9% 104%~
96%~
- If you do not want to wait 10 seconds for the
applied values to reset, you may press CLEAR to force the system to clear the
applied values and return back to the Present Value Display. This same function
can be applied in “Angle Mode” or “T then A Mode."
If the applied torque values or angle degrees reach 100% of the set values, the
vibration and buzzer will act. If more than 104% of the set value is applied, the red
LED lights will flash. As the applied torque values or angle degrees reach the set
values, the lights illuminate to represent the percentage of applied value range
achieved.
Back to Preset Values Display

9
5. Entry Menu function
Press MENU button
Menu Function
Menu settings as following
EXIT
Exit the menu
250.0 FT-LB
2015/01/01
P1 Peak
10:50
250.0 FT-LB
2015/01/01
P1 Peak
10:50
EXIT
MODE
SHOW MEM
CLEAR MEM
EXIT
MODE
SHOW MEM
CLEAR MEM
BACKLIGHT
SET DATE/TIME
LCD CONTRAST
INFORMATION
OVER INFO
HEAD LENGTH
CYCLE COUNT
KEY BEEP
CAL REQUIRED
VIBRATION
SLEEP TIME
LANGUAGE
EXIT
MODE
SHOW MEM
CLEAR MEM
EXIT
MODE
SHOW MEM
CLEAR MEM

10
MODE
Peak Mode-
Track Mode- Display torque in real time on the LCD.
SHOW MEM
250.0 FT-LB
2015/01/01
P1 Peak
10:50
EXIT
MODE
SHOW MEM
CLEAR MEM
EXIT
MODE
SHOW MEM
CLEAR MEM
EXIT
MODE
SHOW MEM
CLEAR MEM
MODE
PEAK
TRACK
250.0 FT-LB
2015/01/01
P1 Track
10:50
EXIT
MODE
SHOW MEM
CLEAR MEM
EXIT
MODE
SHOW MEM
CLEAR MEM
MODE
PEAK
TRACK
EXIT
MODE
SHOW MEM
CLEAR MEM
51.1 FT-LB
2015/01/01
M1
14:02
199.1 NM
2015/01/01
M2
13:01
275.1 FT-LB
2015/01/01
M3
11:01
Over
17.1 FT-LB
2015/01/01
M4
09:15
90
2015/01/01
M4
09:15
Show “Over” if the torque > 110% max torque
To maintain Peak Torque, hold the Peak Torque 10 seconds, LCD will
flash and save into memory.
When releasing forced torque, the LCD will show real-time torque value and keep
flashing 10 seconds then the value will be recorded into memory.
The real-time value will display on LCD. If you release force, the torque value will not
be shown on LCD and not be saved into memory data.
When you are working in Peak Mode or Angle Mode measurement, the value will be
saved into memory. Press "M" button to select "SHOW MEM" to display stored date
/time/torque value or angle value.
Exchange angle and torque values if using Angle Function

11
CLEAR MEM
Clear all stored torque and angle data.
BACKLIGHT
ALWAYS ON: The backlight will always turn on.
OFF: key to turn on/off the backlight.
MODE
SHOW MEM
CLEAR MEM
BACKLIGHT
MODE
SHOW MEM
CLEAR MEM
BACKLIGHT
BACKLIGHT
ALWAYS ON
AUTO ON
OFF
EXIT
MODE
SHOW MEM
CLEAR MEM
EXIT
MODE
SHOW MEM
CLEAR MEM
EXIT
MODE
SHOW MEM
CLEAR MEM
EXIT
MODE
SHOW MEM
CLEAR MEM
CLEAR MEM
YES
NO
NO data
M1
Clear memory data
Memory is no data
CLEAR MEM
YES
NO
Not to do
AUTO ON: When any button is pressed, the backlight will activate. (The light will
remain on for 20 seconds)
(The light will remain on for 20 seconds)

12
SET DATE/TIME
Press MENU button into SET DATE/TIME and press UP or DOWN button
to increase or decrease the setting.
LCD CONTRAST
Press MENU button into LCD CONTRAST, press UP or DOWN button to
increase or decrease CONTRAST.
HEAD LENGTH
Torque calculation formula:
Set Contrast to adjustment 00~40
SHOW MEM
CLEAR MEM
BACKLIGHT
SETDATE/TIME
2015 / 01 / 01
SET DATE
YR/MON/DAY
01 : 01 : 01
SET TIME
HR:MIN:SEC
01 : 01 : 01
SET TIME
HR:MIN:SEC
01 : 01 : 01
SET TIME
HR:MIN:SEC
2015 / 01 / 01
SET DATE
YR/MON/DAY
SET DATE
YR/MON/DAY
2015 / 01 / 01
Set month to adjustment 01~12
Set second to adjustment 00~59
Set minute to adjustment 00~59
Set hour to adjustment 00~23
Set day to adjustment 01~31
LCD CONTRAST
CLEAR MEM
BACKLIGHT
SET DATE/TIME
CAL REQUIRED
HEAD LENGTH
CYCLE COUNT
KEY BEEP
MM
CONTRAST:20
HEAD LENGTH
000.0
HEAD LENGTH
IN
00.000
Torque Value
(Wrench Length + HEAD LENGTH)X
Wrench Length
When using an extension bar, please enter the length of extension bar. The torque
value can be calculated after entering the length. (Press "U" button to select length
unit-MM or IN).

13
CYCLE COUNT
Press MENU button into CYCLE COUNT to display usage count.
KEY BEEP
Turn on or turn off the key prompt tone.
CAL REQUIRED
Key prompt tone turn onKey prompt tone turn off
CAL REQUIRED
HEAD LENGTH
CYCLE COUNT
KEY BEEP
CAL REQUIRED
HEAD LENGTH
CYCLE COUNT
KEY BEEP
CAL REQUIRED
HEAD LENGTH
CYCLE COUNT
KEY BEEP
CAL REQUIRED
HEAD LENGTH
CYCLE COUNT
KEY BEEP
OFF
KEY BEEP
ON
OFF
KEY BEEP
ON
CYCLE COUNT
Counter: 0
Date:
The period can be selected for 6 or 12 months and needs to be confirmed.
After confirming the modification, when you enter next time, the setting period will be
displayed.
Set the calibration period, select the DATE, CYCLES or OFF. When the date or
cycle count reaches the set value, the startup screen will display CAL REQUIRED.
The screen will actively display “RECALIBRATE” and “DATE” for about 5 seconds.
At the factory, the calibration cycle is 5000 cycles.
When HEAD LENGTH is not 0, then HEAD L ADJ will be displayed in exchange
with the time!
340.0 NM
HEAD L ADJ
P1 Peak
10:50

14
DATE
CYCLES:
Set the cycles, the set values must be more than the current cycle count, otherwise
an error will occur.
OFF:
Close reminder.
VIBRATION
Turn on or off the vibration function.
Use + or - to select
for 6 or 12 months
Confirm
modifica�on or no
modifica�on
Show last set date
KEY BEEP
CAL REQUIRED
OVER INFO
CYCLE COUNT
KEY BEEP
CAL REQUIRED
OVER INFO
CYCLE COUNT
CYCLES
OFF
CAL REQUIRED
DATE
CYCLES
OFF
CAL REQUIRED
CAL REQUIRED
VIBRATION
CYCLE COUNT
KEY BEEP
CAL REQUIRED
VIBRATION
CYCLE COUNT
KEY BEEP
ON
OFF
VIBRATION
CAL REQUIRED
VIBRATION
CYCLE COUNT
KEY BEEP
ON
OFF
VIBRATION
If the current period
exceeds the set cycles,
an error will occur
Use +/- select cycle
number
KEY BEEP
CAL REQUIRED
OVER INFO
CYCLE COUNT
CYCLES
OFF
CAL REQUIRED
DATE
KEY BEEP
CAL REQUIRED
OVER INFO
CYCLE COUNT
CYCLES
OFF
CAL REQUIRED
DATE
Cycle : 5000
CYCLES Error
Current Cycles
Reselect
6000
Data: 6 MON
2017 / 01 / 01
DATE
YES
NO
MODIFY
YES
NO
MODIFY

15
SLEEP TIME
Set the sleep time to shut down the wrench.
LANGUAGE
English, Spanish and decimal mark selection.
INFORMATION
LFD- Leave Factory Date
CAL-Calibration Date
ISD- In Service Date
SLEEP TIME
LANGUAGE
CAL REQUIRED
VIBRATION
LCD CONTRAST
INFORMATION
BACKLIGHT
SET DATE / TIME
INFORMATION
LFD:2015/01/01
CAL:2015/01/01
ISD:2015/01/01
SLEEP TIME
LANGUAGE
CAL REQUIRED
VIBRATION
ENGLISH
ESPANOL
LANGUAGE
COMMA(1.23)
POINT(1.23)
DECIMAL MARK
VIBRATION
SLEEP TIME
KEY BEEP
CAL REQUIRED
2 MINUTE
SLEEP TIME
5 MINUTE
SLEEP TIME
10 MINUTE
SLEEP TIME
2 HOUR
SLEEP TIME
8 HOUR
SLEEP TIME
2 MINUTE
SLEEP TIME
30 MINUTE
SLEEP TIME
1 HOUR
SLEEP TIME

16
POWER
OVER INFO
If the torque is over 110% of full-scale, the value will be saved and the LCD display
will show “OVER” and the buzzer will act continuously. You must press the
button to reset the wrench.
Over Max Torque 110%
“OVER”
Caution
Over Max Torque 150%
“REPAIR”
Caution
RECALIBRATE
If “OVER” is displayed on the LCD and the torque exceeds 125% of full-scale,
every time you power on the wrench, after showing the logo image, the wrench will
display “RECALIBRATE” before the user can begin to use the wrench normally.
Counter- Summary of the number of times wrench has been over-torqued.
Torque- The max over-torque value ever applied to the torque wrench.
Date- The max over torque measurement date and time.
INFORMATION
OVER INFO
SET DATE/TIME
LCD CONTRAST
OVER INFO
Counter: 1
Torque: 275.1 FT-LB
Date: 2015/01/01 11:01
The screen will actively display “RECALIBRATE” and “DATE” for about 5 seconds.
250.0 FT-LB
2015/01/01
P1 Peak
10:50
250.0 FT-LB
RECALIBRATE
P1 Peak
10:50
If the applied torque exceeds 150% of full-scale, the LCD display will show
“REPAIR” and the buzzer will act continuously. You must press the POWER
button to shut down the wrench, and it is recommended the wrench be returned
to the repair center for repair.

17
250.0 FT-LB
2015/01/01
P 1
10:50
A 1
250.0 FT-LB
2015/01/01
T 1
10:50
250.0 FT-LB
2015/01/01
P1 Peak
10:50
250.0 FT-LB
2015/01/01
P1 Track
10:50
1
250.0 FT-LB
2015/01/01
P1 T then A 10:50
250.0 FT-LB
2015/01/01 10:50
90
2015/01/01
P1
10:50
90
2015/01/01 10:50
Peak
Tracck
T Then A
Preset
group1~9
Preset
group1~9
DIFFERENCES BETWEEN DIFFERENT MODELS
K 2766 K 2765K 2767

18
PARTS LIST
For this tool, a repair set including all parts in the
ratchet mechanism, is available.
This manual suits for next models
2
Table of contents
Other Kamasa-TOOLS Power Tools manuals