manuals.online logo
Brands
  1. Home
  2. •
  3. Brands
  4. •
  5. Kampa
  6. •
  7. Tent
  8. •
  9. Kampa Burnham 4 User manual

Kampa Burnham 4 User manual

Burnham 4
Instructions & care manual
Some of the images shown in these instructions are other similar
Kampa tents and are for illustration purposes only.
2
IMPORTANT:
Tents contain a high proportion of synthetic materials and
under certain conditions will be affected by condensation
inside the tent. This should not be confused with leaking and
condensation can be improved by ensuring adequate
ventilation.
The main seams of this tent have been factory taped to help
prevent leakage. Depending upon your expectations, it may
be necessary to treat the remaining seams with a seam
sealant. Seam sealant should also be applied to areas where
the taping is damaged or has peeled away through wear and
tear. It can also be applied to areas where a leak may have
developed. Seam sealant is available through your dealer.
WELCOME
Thank you for purchasing your Kampa tent. Please read these instructions
carefully before attempting to set up your tent and retain for future reference.
If used properly, your tent should give you years of trouble free use. We
recommend that your tent is insured against accidental and storm damage as
this is not covered by the warranty.
This tent is designed for use in light to
moderate weather. During very strong
winds or snowfall we recommend that
you take your tent down. The tent is
designed for touring use; it is not
designed for static or commercial use.
We recommend a trial run before using
your tent for the first time. This will
allow you to familiarise yourself with the
tent, its set up and any limitations the
tent may have for your particular use.
3
PARTS LIST
Before using for the first time, ensure that the following parts are present:
If any parts are missing please contact your supplying retailer immediately.
SITING
Choose a site that is flat and, if possible, protected from the wind. Try to clear
the site of sharp stones to avoid damaging the groundsheet. Try to set up your
tent with the door facing away from the wind. Avoid pitching under trees as
falling branches, sap, etc. could damage your tent.
SET UP
To protect your tent from dirt and damage, it may be beneficial to lay a
groundsheet or polythene down before unpacking. Unpack the tent and
separate and identify the different parts. The fibreglass poles are shock corded
together and just need to be slotted together. The three longer poles are colour
coded, two blue and one red pole.
Item Qty
Tent flysheet 1
Fibreglass shock corded pole - blue 2
Fibreglass shock corded pole - red 1
Fibreglass shock corded pole - short for canopy 1
Inner tent 2
Peg bag 1
Carry bag 1
Spread the flysheet on the ground
and locate the pole sleeves. The are
colour coded to match the poles.
Thread the poles into their respective
colour sleeves, either blue or red.
12
4
One pole at a time attach the pole
ends to the pins located on metal
rings and tighten the webbing straps.
43
Pull into shape, close all doors fully,
and peg the four corners ensuring that
the tent side walls are taut.
Take the inner tents inside and
suspend from the colour coded
buckles. Attach the remaining
suspension points.
Attach the base of the inners to the
corresponding buckles at the base of
the tent. It will be easier to attach the
rear points before fully suspending the
inner tent.
56
78
Attach the plastic clips to the adjacent
poles.
Peg the intermediate pegging points
and guy the tent out using all the guy
lines.
5
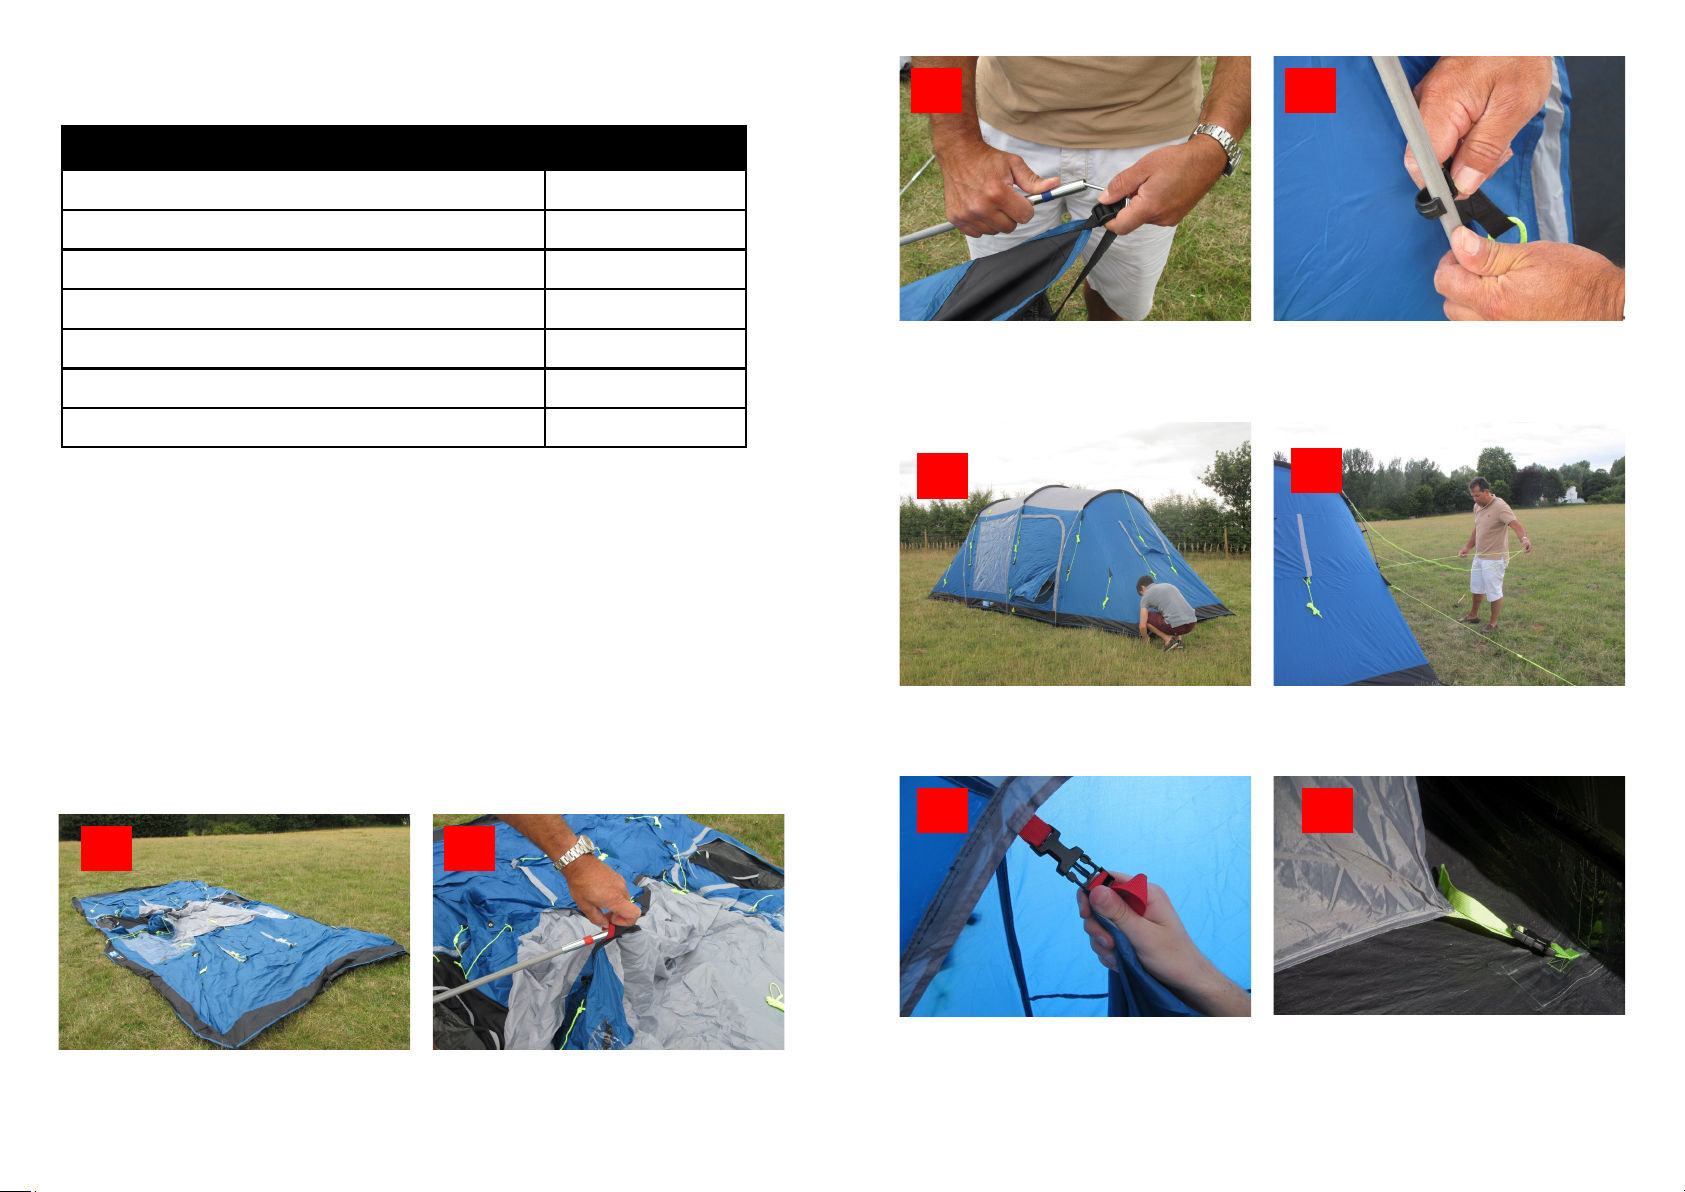
Thread the canopy pole through the
sleeve, at the front of the canopy, and
then insert in eyelets either side (13).
Doorways and entrances should be
cross pegged – the points should be
pulled across each other. Once
completed the tent should look taut
without too many creases – if
necessary readjust the pegging. A
well pitched tent will tolerate bad
weather much better than one that is
poorly erected.
13
CAUTION: The inner tent has pockets inside and organiser pockets on the
front wall. Please note that these pockets are for light items only and care
should be taken not to overload the pockets as this could damage the inner tent.
PEGS
The tent comes complete with general purpose wire pegs. These will be
suitable for many sites but there will be some instances where different pegs will
be necessary. Your dealer will stock a range of pegs suitable for different types
of ground. For maximum effectiveness, pegs should be driven into the ground at
a 45°angle away from the pegging point.
GUY ROPES
The tent comes with guy lines pre-attached. We recommend that these guy
lines are used at all times. Peg the guy lines so that the tent is under tension
without distorting the shape. The guy lines can be adjusted using the runners.
Guy lines should be secured using suitable pegs (see above) and the guy line
should generally be pegged in line with the seam of the tent it starts from.
Check the guy lines from time to time to ensure that they are still adequately
tensioned.
RAIN
We make our tents as resistant to the weather as possible. Occasionally you
may find slight leakage. This is not a fault with the manufacturing process or
materials and can normally be rectified by spot treating the seam with seam
sealant (see below). We recommend Kampa seam sealant.
SEAMS
The main seams of this tent have been factory taped to help prevent leakage.
Depending upon your expectations, it may be necessary to treat the remaining
seams with a seam sealant. Seam sealant should also be applied to areas
where the taping is damaged or has peeled away through wear and tear. It can
also be applied to areas where a leak may have developed. Kampa seam
sealant is available through your dealer.
6
SUITABILITY
This tent is designed for use in light to moderate weather. During very strong
winds or snowfall we recommend that you take your tent down. The tent is
designed for occasional use; it is not designed for static or commercial use.
UV DEGRADATION
Tent fabrics can be weakened by prolonged exposure to sunlight. Under normal
holiday use your tent will give long service but use for extended periods in strong
sunlight will soon cause deterioration. In those cases it would be wise to use a
site as shaded as possible. UV degradation is not covered under the warranty.
The warranty does not cover tents used on permanent sites, displays or for
commercial purposes.
CONDENSATION
Tents contain a high proportion of synthetic materials and under certain
conditions will be effected by condensation inside the tent. This should
not be confused with leaking. Condensation can be improved by ensuring
adequate ventilation. The tent comes with various ventilation ports that
can be opened and it may also help to keep a door open when the weather
allows. Condensation and its effects are not covered under the warranty.
SAFETY
DO NOT COOK IN THE TENT OR USE NAKED FLAMES. READ AND
UNDERSTAND THE FIRE PRECAUTIONS LABEL SEWN INTO THE INSIDE
OF THE TENT.
DISMANTLING
Reverse the set up procedure. Push the poles out of the sleeves, do not pull.
Ensure that all parts are clean before packing in the carry bag. If the tent is wet
or damp, dry fully as soon as possible.
CARE
Tents are best stored opened out. Air fully and ensure it is totally dry before
packing away. Store in a well ventilated dry place. A wet/damp tent will develop
mildew surprisingly quickly. Dirty tents can be washed using clean water and a
soft brush. Do not scrub and never use detergents.
Poles should be protected from damage and should be stored completely dry to
prevent corrosion of the ferrules. To prevent corrosion steel poles can be stored
with a light coating of petroleum jelly to protect them. Ensure that this is
completely removed before use. Damage due to improper use, wind damage or
neglect is not covered under the warranty. Have any damage repaired at the
first opportunity. Failure in the poles normally occurs through incorrect use.
Make sure that poles sections are fully inserted into their adjoining pole and do
not over stress the pole beyond its designed curve. You can purchase
replacement poles from your dealer. Connecting shock cord is considered a
consumable part and is not covered under the warranty. Replacement shock
cord is available from your retailer and is easy to change.
7
Zips should be treated with care, use two hands to close and open and never
tread on them. Never force a zip.
We strongly recommend that you carry a comprehensive spares kit including
silicone waterproof spray, seam sealer, tape for repairing split poles and spare
guy ropes and pegs for extreme weather.
Repairs should be made by a company recommended by Kampa or your
supplying dealer. Repairs and alterations made by an unauthorised company
may invalidate your warranty.
WARRANTY
We guarantee this product from manufacturing defects for twelve months from
date of purchase. The guarantee does not cover slight leakage, condensation,
UV degradation, storm/weather damage, improper use, improper set up,
permanent use, commercial use, displays or modification. Any complaint should
be made to your supplying dealer with the original receipt. Please ensure that
your tent is dry and clean before returning to your dealer for inspection. Your
dealer may refuse to handle any tent that is returned in an unsuitable condition.
SPARE PARTS
A full range of spare parts can be purchased from your supplying dealer or
Kampa.
OPTIONS (AT EXTRA COST)
The following custom made options are available for your tent:
FOOTPRINT goes under your tent to protect
and keep the groundsheet clean.
CARPET adds a
luxury feel to the living area of your
tent. Insulating and soft underfoot.
WINDBREAK matches the tent
and provides privacy and
protection from the wind.
8
PROBLEM SOLUTIONS
If you think your tent has a water
leak
Most suspected leakage is actually condensation (see condensation section of this
manual). This forms on the inside of the tent fabric. Try to increase the ventilation
by opening the doors and ventilation ports. Do not cook in your tent. The fabric,
used to make this tent, has a massive 4000 mm hydrostatic head, so it is extremely
unlikely that it would leak.
If your tent has a water leak at
specific points/areas
The main seams of this tent have been factory taped to help prevent leakage. De-
pending upon your expectations, it may be necessary to treat the remaining seams
with a seam sealant. Seam sealant should also be applied to areas where the tap-
ing is damaged or has peeled away through wear and tear and folding. It can also
be applied to areas where a leak may have developed. Kampa seam sealant is
available through your dealer.
The shock cord connecting the l
poles has broken
This is a consumable part and replacement shock cord can be purchased from your
dealer. It is easy to fit.
A pole has broken You can purchase replacement parts from you dealer or from Kampa. A temporary
repair can be made by using a straightened metal tent peg as a splint and binding it
to the pole with strong tape.
TROUBLESHOOTING
Kampa UK Limited
Witham
CM8 3EU

Other Kampa Tent manuals

Kampa Watergate Canopy User manual

Kampa

Kampa Watergate Canopy User manual

Kampa AIR Break Pro 3 User manual

Kampa

Kampa AIR Break Pro 3 User manual

Kampa Tailgater User manual

Kampa

Kampa Tailgater User manual

Kampa Brighton 2 User manual

Kampa

Kampa Brighton 2 User manual

Kampa Action AIR User manual

Kampa

Kampa Action AIR User manual

Kampa Canopy 300 User manual

Kampa

Kampa Canopy 300 User manual

Kampa Brean 3/4 User manual

Kampa

Kampa Brean 3/4 User manual

Kampa Hayling 4 Air User manual

Kampa

Kampa Hayling 4 Air User manual

Kampa Brean 4 AIR User manual

Kampa

Kampa Brean 4 AIR User manual

Kampa Party Tent AIR 4x4 User manual

Kampa

Kampa Party Tent AIR 4x4 User manual

Kampa Hayling 4 AIR TC User manual

Kampa

Kampa Hayling 4 AIR TC User manual

Kampa Mersea 3 User manual

Kampa

Kampa Mersea 3 User manual

Kampa Freedom 300 User manual

Kampa

Kampa Freedom 300 User manual

Kampa Cross AIR Annexe User manual

Kampa

Kampa Cross AIR Annexe User manual

Kampa Brean 4 Classic AIR User manual

Kampa

Kampa Brean 4 Classic AIR User manual

Kampa Brean 3 AIR User manual

Kampa

Kampa Brean 3 AIR User manual

Kampa Kielder DA User manual

Kampa

Kampa Kielder DA User manual

Kampa Brean Series User manual

Kampa

Kampa Brean Series User manual

Kampa Brighton 2 User manual

Kampa

Kampa Brighton 2 User manual

Kampa Kielder 4 AIR Deluxe User manual

Kampa

Kampa Kielder 4 AIR Deluxe User manual

Kampa CT9003 Activity Shelter 350 Programming manual

Kampa

Kampa CT9003 Activity Shelter 350 Programming manual

Kampa Mersea 4 Air User manual

Kampa

Kampa Mersea 4 Air User manual

Kampa Privvy User manual

Kampa

Kampa Privvy User manual

Popular Tent manuals by other brands

Trevi HONOLULU LGMF8020 Assembly instructions

Trevi

Trevi HONOLULU LGMF8020 Assembly instructions

Vango Seaton 800 instructions

Vango

Vango Seaton 800 instructions

SunnCamp Breton 200 Air quick start guide

SunnCamp

SunnCamp Breton 200 Air quick start guide

Classic Accessories 71827 instructions

Classic Accessories

Classic Accessories 71827 instructions

Gutta BS 160 Assembly instructions

Gutta

Gutta BS 160 Assembly instructions

Wanderer KALBARRI Assembly instructions

Wanderer

Wanderer KALBARRI Assembly instructions

Palram Aquila 1500 F Assembly instructions

Palram

Palram Aquila 1500 F Assembly instructions

SunnCamp ULTIMA ASPIRE 260 Erection Instructions

SunnCamp

SunnCamp ULTIMA ASPIRE 260 Erection Instructions

LuMac Canopy Fitting instructions

LuMac

LuMac Canopy Fitting instructions

Alpkit AXIOM 4 quick start guide

Alpkit

Alpkit AXIOM 4 quick start guide

VEIKOUS PG0202-03 instruction manual

VEIKOUS

VEIKOUS PG0202-03 instruction manual

Extreme marquees EMX Beta Series INFLATABLE INSTRUCTIONS

Extreme marquees

Extreme marquees EMX Beta Series INFLATABLE INSTRUCTIONS

Vango Nimbus 300 instructions

Vango

Vango Nimbus 300 instructions

komodo KDCMPTNT4PA user manual

komodo

komodo KDCMPTNT4PA user manual

MSR HUBBA NX Assembly instructions

MSR

MSR HUBBA NX Assembly instructions

Tentipi Safirflex Nordic tipi manual

Tentipi

Tentipi Safirflex Nordic tipi manual

Coleman 9391A133 instruction manual

Coleman

Coleman 9391A133 instruction manual

Tempo Fitness S11 manual

Tempo Fitness

Tempo Fitness S11 manual

manuals.online logo
manuals.online logoBrands
  • About & Mission
  • Contact us
  • Privacy Policy
  • Terms and Conditions

Copyright 2025 Manuals.Online. All Rights Reserved.