Karma LED PAR180 User manual

www.karmaitaliana.it
Manuale di istruzioni
Instruction manual
IE
LED PAR180
LED PAR240
Illuminatore a led
Led par light

32
Ci complimentiamo vivamente per la Sua scelta, il prodotto Karma da Lei acquistato
è frutto di un’accurata progettazione da parte di ingenieri specializzati.
Per la sua realizzazione sono stati impiegati materiali di ottima qualità per garantirne
il funzionamento nel tempo.
Il prodotto è stato realizzato in conformità alle severe normative di sicurezza imposte
dalla Comunità Europea, garanzia di adabilità e sicurezza.
Vi preghiamo di leggere attentamente questo manuale prima di cominciare ad
utilizzare l’apparecchio al ne di sfruttarne appieno le potenzialità.
La Karma dispone di numerosi prodotti accessori che potranno completare il vostro
apparecchio. Vi invitiamo quindi a visionare l’intera gamma dei nostri prodotti
visitando il sito internet:
www.karmaitaliana.it
sul quale troverete, oltre a tutti i nostri articoli, descrizioni accurate e documentazioni
aggiuntive sviluppate successivamente all’uscita del prodotto.
I nostri uci sono a vostra completa disposizione per qualsiasi chiarimento o
informazione.
Ci auguriamo che rimarrete soddisfatti dell’acquisto e Vi ringraziamo nuovamente
per la ducia riposta nel nostro marchio.
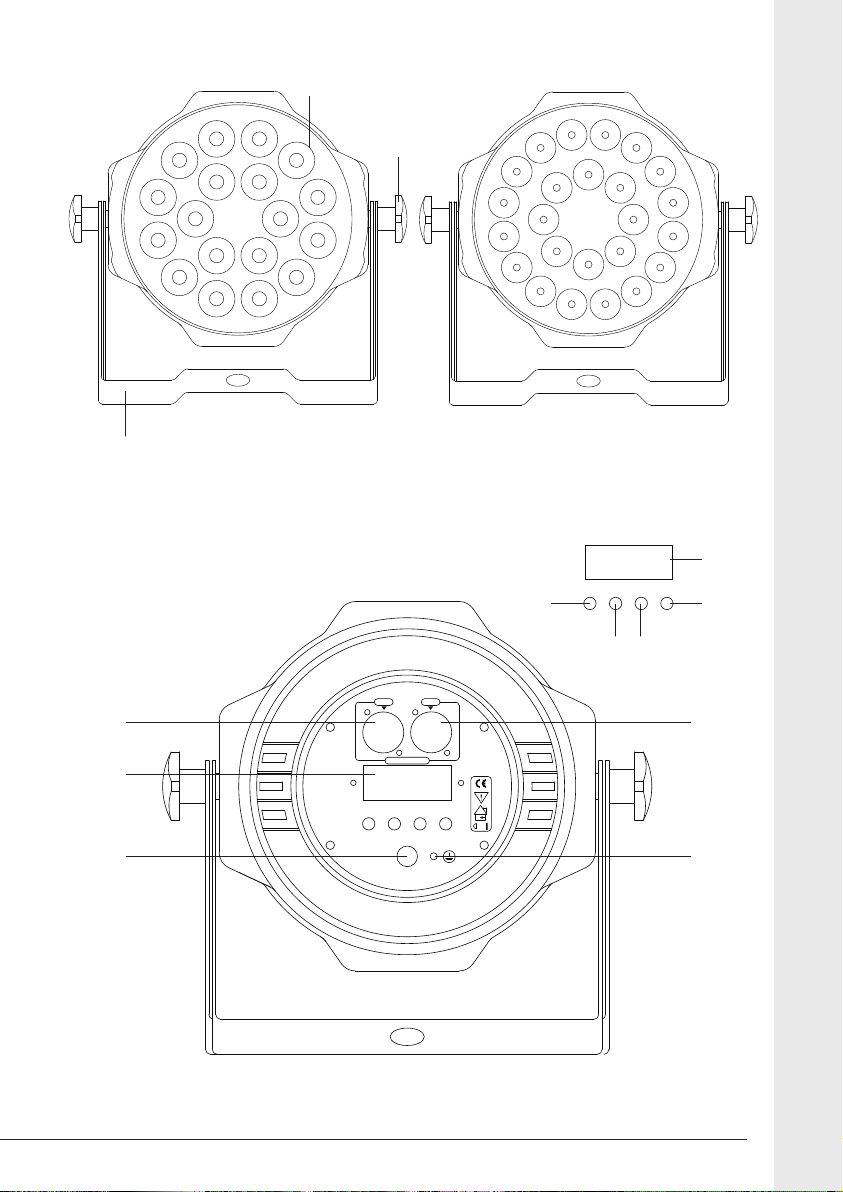
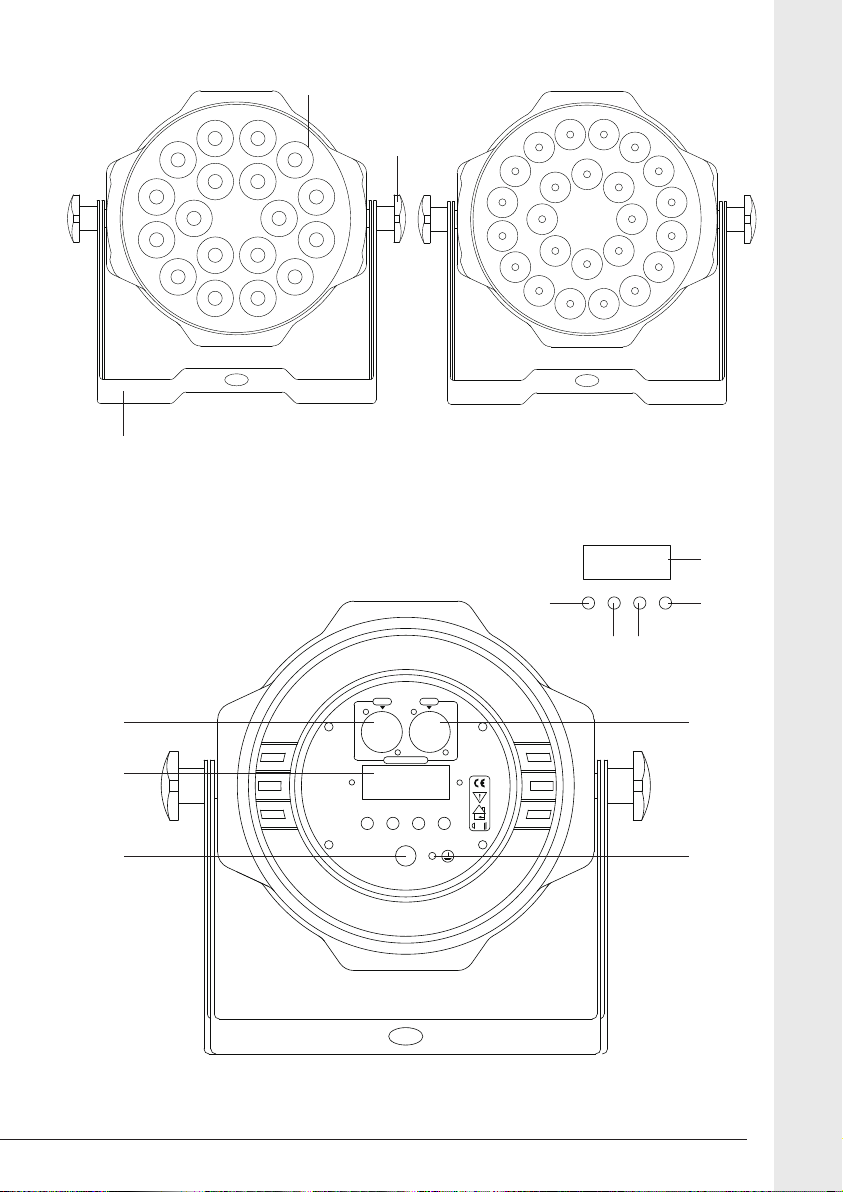
Il presente manuale si riferisce a due modelli LED PAR180 e LED PAR240 che
dieriscono tra loro unicamente per il numero di led.
ATTENZIONE:
Subito dopo aver ricevuto l’apparecchio aprite delicatamente la scatola e,
controllate attentamente il contenuto per accertarvi che tutte le parti siano
presenti e in buone condizioni. Segnalate immediatamente al venditore,
eventuali danni da trasporto subiti dall’apparecchio o dall’imballo. In caso
di reso è importante che il prodotto sia completo dell’imballo originale, vi
suggeriamo quindi di conservarlo.
• Conservare il manuale per future consultazioni e allegatelo se cedete
l’apparecchio ad altri. Visitate periodicamente il ns sito internet per
vericare la presenza di eventuali aggiornamenti.
• Assicuratevi sempre di collegare l’apparecchio con il voltaggio adeguato.
• Questo prodotto non è adatto ad usi esterni (in presenza di umidità)
• Per evitare il rischio di incendi o cortocircuiti non esponete mai l’apparecchio
alla pioggia o all’umidità.
• Non utilizzare con temperature ambiente superiori ai 35C°.
• In caso di problemi di funzionamento interrompete l’uso immediatamente. Non
tentate di riparare l’apparecchio per conto vostro, ma rivolgetevi all’assistenza
autorizzata. Riparazioni eettuate da personale non competente potrebbero
creare gravi danni sia all’apparecchio che alle persone.
• Controllate che il cavo di alimentazione non sia rovinato.
• Non staccate il cavo di alimentazione tirandolo dal lo.
Precauzioni ed avvertenze
Grazie per aver acquistato questo prodotto
Italiano

Ulteriori informazioni su: www.karmaitaliana.it
32
Italiano
MENU UP DOWN ENTER
DISPLAY
POWER
IN OUT
DMX512 SIGNAL
1=Ground
2=Data-
3=Data+
0.5m
AC 90~240V
50/60HZ
MENU UP DOWN ENTER
DISPLAY
POWER
IN OUT
DMX512 SIGNAL
1=Ground
2=Data-
3=Data+
0.5m
AC 90~240V
50/60HZ
MENU UP DOWN ENTER
DISPLAY
POWER
IN OUT
DMX512 SIGNAL
1=Ground
2=Data-
3=Data+
0.5m
AC 90~240V
50/60HZ
MENU UP DOWN ENTER
DISPLAY
POWER
IN OUT
DMX512 SIGNAL
1=Ground
2=Data-
3=Data+
0.5m
AC 90~240V
50/60HZ
MENU UP DOWN ENTER
DISPLAY
POWER
IN OUT
DMX512 SIGNAL
1=Ground
2=Data-
3=Data+
0.5m
AC 90~240V
50/60HZ
MENU UP DOWN ENTER
DISPLAY
POWER
IN OUT
DMX512 SIGNAL
1=Ground
2=Data-
3=Data+
0.5m
AC 90~240V
50/60HZ
5
8
D
6
1
3
2
CB
A
4
6
7
MENU UP DOWN ENTER
DISPLAY
POWER
IN OUT
DMX512 SIGNAL
1=Ground
2=Data-
3=Data+
0.5m
AC 90~240V
50/60HZ
MENU UP DOWN ENTER
DISPLAY
POWER
IN OUT
DMX512 SIGNAL
1=Ground
2=Data-
3=Data+
0.5m
AC 90~240V
50/60HZ
LED PAR180 LED PAR240

54
Prima di eettuare i collegamenti, assicuratevi di aver scollegato la
spina dalla presa elettrica. Tutti i collegamenti devono avvenire ad
apparecchio spento.
1. Se desiderate posizionare l’apparecchio a traliccio, utilizzate l’apposita staa(1).
I pomelli(2) permettono di serrare la staa mantenendola in posizione. La
particolare forma della staa consente anche di appoggiare il prodotto su
qualunque supercie.
2. Se intendete utilizzarlo collegato ad un impianto DMX, collegate i cavi in entrata
ed uscita alle prese DMX IN / DMX OUT(4-5).
3. Collegate la spina(7) ad una comune presa elettrica 230V per attivare
l’apparecchio.
Nel caso in cui il display(6) dell’apparecchio non dovesse accendersi, evitate
di smontarlo. Ogni intervento di riparazione va eettuato a cura di personale
competente e autorizzato.
Questo strumento può essere utilizzato in diverse modalità:
- Funzionamento in manuale
- Modalità ad attivazione sonora
- Modalità Slave
- Modalità DMX
MODALITA’ MANUALE
Premete ripetutamente il tasto Menu(A) per passare da una schermata all’altra.
Confermate con enter(D). Riferitevi alla tabella di pagina 11 per selezionare il colore
desiderato, l’eetto dimmer, strobo o i vari programmi di cambiacolori. Una volta
selezionato il menu prescelto potrete ulteriormente impostare un valore desiderato
tramite i due tasti UP/DOWN(B-C).
MODALITA’ SOUND
In modalità attivazione sonora, grazie al microfono interno, l’unità risponderà ai toni
della musica in bassa frequenza.
Analogamente alla modalità manuale, scegliete il programma “SoUd” e confermate
tramite il tasto enter(D).
MODALITA’ SLAVE
Se utilizzate vari fari identici, potrete farli funzionare in sincronia anche senza l’uso
di una centralina DMX. Collegate i fari a cascata tra loro utilizzando le prese IN e
OUT(3-4). Settate tutti i fari su slave (SLAu) tranne il primo. Tutti i fari copieranno il
comportamento del primo.
Italiano

Ulteriori informazioni su: www.karmaitaliana.it
54
Italiano
MODALITA’ DMX
In una connessione DMX 512 ci sono 512 canali a disposizione.
Ogni apparecchio DMX impiega 1 o più canali per gestire le varie funzioni. L’utente
deve assegnare un indirizzo di partenza ad ogni apparecchio DMX connesso
all’impianto, tale indirizzo indicherà il primo canale occupato nella centralina.
Bisogna pianicare la scelta dell’indirizzo di partenza in modo da non far mai
sovrapporre i canali, onde evitare un funzionamento non corretto dell’apparecchio.
Esempio: Ammettiamo di collegare 3 apparecchi DMX ognuno dotato di 10
canali, il primo apparecchio dovrà essere settato sull’indirizzo 1, il secondo
apparecchio sull’indirizzo 11 ed il terzo sull’indirizzo 21. Tuttavia si può usare lo
stesso indirizzo di partenza su più apparecchi se si desidera ottenere un loro
movimento all’unisono. Gli apparecchi DMX sono concepiti per ricevere dati tramite
collegamento seriale Daisy Chain. Questo tipo di collegamento si ha quando l’uscita
dati di un apparecchio è connessa all’ingresso dati del successivo. L’ordine in cui
gli apparecchi sono collegati non ha importanza e non incide su come la centralina
comunica con ciascuno di essi. Utilizzare l’ordine in cui il cablaggio è più semplice
e diretto. La lunghezza del cavo di segnale non dovrebbe superare i 100 metri per
evitare l’interferenze tra segnali e altri apparecchi elettrici. Spesso alla ne di un
impianto DMX è richiesto un terminatore. Rivolgetevi ad un installatore o al vostro
negoziante di ducia per ulteriori informazioni.
Nell’eettuare i collegamenti assicuratevi che gli apparecchi e i cavi utilizzino le
polarità riportate dalla tabella sottostante.
Per entrare in modalità DMX, premete il tasto Menu(A) no a quando non appare
sul display la scritta “d001”(4 canali) o “A001”(8 canali) quindi selezionate l’indirizzo
desiderato tramite i tasti UP/DOWN(B-C). Per la funzione relativa ad ogni canale
DMX, riferitevi alla tabella riportata a pagina 10.
OUT
Esempio di collegamento a cascata.
ININ OUTOUT IN
DMXDMX DMX
CENTRALINA
DMX

76
English
Thanks for choosing this product
The KARMA product you have purchased is the result of careful planning by
specialized engineers . High quality materials have been used for its construction,
to ensure its functioning over time. The product is manufactured in compliance with
strict regulations imposed by the European Union, a guarantee of reliability and safety.
Please read this manual carefully before starting to use the xture in order to exploit
its full potential. We thank you again for your trust in our brand.
Karma’s line includes many other products that can be combined with your device.
We invite you to have a look to the whole range of our products, by visiting our website
www.karmaitaliana.it
where you will nd the technical sheets of all our items, with detailed descriptions and
additional documents. Our oces are at your full disposal for further explainations
or information. We wish that you will be satised of your purchase and we thank you
again for your trust in our brand. This manual refers to models LED PAR180 and LED
PAR240, which are dierent only for the number of leds.
CAUTION:
When you receive the product you have to check carefully that the
parcel is not damaged from shipping or open. Even if the packaging is
not damaged you have to check the product’s conditions within three
(3) days from the reception. For any kind of problem found on the
item, it is necessary to address a claim to the seller and to our oces
(also by e-mail), describing in detail the damage. Any claim received
beyond the 3-day time limit, will not be accepted. It is suggested to
save all the packaging, labels, delivery bill and all that can be useful to
solve quickly the problem.
Safety Notes
• Keep this User Manual for future reference. If you sell the product to another user,
be sure to give this manual to the next owner.
• Make sure the voltage of the power source used for the product is correct.
• This product is not suitable for outdoor use.
• To avoid the risk of re or short-circuits never expose the xture to rain or moisture.
• Do not operate the product in an ambient temperature higher than 35°.
• In the event of a serious operating problem, stop using the product immediately.
Never try to repair the product, but contact the authorized technical assistance
center.
• Repairs carried out by untrained people can lead to damage both to the xture and
to persons.
• Make sure the power cord is not damaged.
• Never disconnect the product from the power source by pulling on the cord.

Ulteriori informazioni su: www.karmaitaliana.it
76
English
MENU UP DOWN ENTER
DISPLAY
POWER
IN OUT
DMX512 SIGNAL
1=Ground
2=Data-
3=Data+
0.5m
AC 90~240V
50/60HZ
MENU UP DOWN ENTER
DISPLAY
POWER
IN OUT
DMX512 SIGNAL
1=Ground
2=Data-
3=Data+
0.5m
AC 90~240V
50/60HZ
MENU UP DOWN ENTER
DISPLAY
POWER
IN OUT
DMX512 SIGNAL
1=Ground
2=Data-
3=Data+
0.5m
AC 90~240V
50/60HZ
MENU UP DOWN ENTER
DISPLAY
POWER
IN OUT
DMX512 SIGNAL
1=Ground
2=Data-
3=Data+
0.5m
AC 90~240V
50/60HZ
MENU UP DOWN ENTER
DISPLAY
POWER
IN OUT
DMX512 SIGNAL
1=Ground
2=Data-
3=Data+
0.5m
AC 90~240V
50/60HZ
MENU UP DOWN ENTER
DISPLAY
POWER
IN OUT
DMX512 SIGNAL
1=Ground
2=Data-
3=Data+
0.5m
AC 90~240V
50/60HZ
5
8
D
6
1
3
2
CB
A
4
6
7
MENU UP DOWN ENTER
DISPLAY
POWER
IN OUT
DMX512 SIGNAL
1=Ground
2=Data-
3=Data+
0.5m
AC 90~240V
50/60HZ
MENU UP DOWN ENTER
DISPLAY
POWER
IN OUT
DMX512 SIGNAL
1=Ground
2=Data-
3=Data+
0.5m
AC 90~240V
50/60HZ
LED PAR180 LED PAR240

98
English
Before arranging any connection, be sure to have disconnected the plug
from the power socket. All connections must be made with the device o.
1. If you wish mount the device on a stand, use the specic bracket(1). The knob
(2) allow to fasten the bracket in the wished position. The particular shape of the
bracket allows to place the item on any surface.
2. If you wish to use the par in a DMX system, connect the input and output cables
to the DMX IN / DMX OUT sockets(4-5).
3. Connect the plug(7) to a common 230V power socket to light on the product.
If the display (6) of the device doesn’t light on, don’t tamper with it. Each reparation
should be carried out by qualied technicians.
This product can be used in following ways:
- Manual mode
- Sound activated mode
- Slave mode
- DMX mode
MANUAL MODE
Press repeately the Menu(A) touch to skip from a screen to another. Conrm with
enter(D). Riferitevi alla tabella di pagina 11 per selezionare il colore desiderato,
l’eetto dimmer, strobo o i vari programmi di cambiacolori. Una volta selezionato il
menu prescelto potrete ulteriormente impostare un valore desiderato tramite i due
tasti UP/DOWN(B-C).
SOUND MODE
In sound active mode, thanks to the internal microphone, the unit will respond to
music tones in low frequency.
Similar to the manual mode, choose the “Soud” program and conrmed by the enter
button (D).
SLAVE MODE
If you use more than one par of the same type, you have the possibility to
synchronize them without using a DMX controller. Connect the pars in daisy-chain by
using the IN and OUT sockets (3-4). Set all the pars on slave (SLAu) except the rst.
All the pars will act as the rst.

Ulteriori informazioni su: www.karmaitaliana.it
98
English
DMX MODE
In a DMX 512 linking there are 512 channels available.
Each DMX xture uses one or more channels to manage its functions. The user must
assign a starting address to each DMX xture. This address will indicate the rst
channel used on the controller. You have to plan the starting address choice in order
to avoid channels’ overlapping. Otherwise the xture wouldn’t work correctly.
Example: If you need to connect 3 DMX xtures, each with 10 channels, the rst unit
is to be set on address 1, the second unit on address 11 and the third one on address
21. Anyway you can set the same starting address on more devices if you wish them
to operate in synchrony. DMX devices are conceived to receive datas through a
serial Daisy Chain connection. With this kind of linking the datas output of a xture is
connected to the data input of the following one. The order of linking of the devices is
not important and it doesn’t aect on how the controller manages each of them. We
suggest to put them in the easiest and most direct sequence for cable connection.
The cable length should not be more than 100mts to avoid interferences with other
signals or electric devices. A terminator is often requires at the end of a DMX system.
Please address to a technician or to your reseller for further information.
When you arrange the connections make sure that the xtures and the cables use
the polarities indicated in the chart below.
To enter in DMX mode, press the Menu(A) key until the indication “d001” (4
channels) or “A001” (8 channels) appears on the display. Select then the wished
address through the keys UP/DOWN(B-C). For the function related to each DMX
channel, refer to the chart on page 10.
OUT
Esempio di collegamento a cascata.
ININ OUTOUT IN
DMXDMX DMX
CENTRALINA
DMX

1110
DMX TABLE / TABELLA DMX
DISPLAY MODE DESCRIPTION
CH1 0 - 255 Rosso - Red
CH2 0 - 255 Verde - Green
CH3 0 - 255 Blu - Blue
CH4 0 - 255 Bianco - White
DISPLAY MODE DESCRIPTION
CH1 0 - 255 Dimming
CH2 0 - 255 Rosso - Red
CH3 0 - 255 Verde - Green
CH4 0 - 255 Blu - Blue
CH5 0 - 255 Bianco - White
CH6 1 - 255 Flash veloce-lento / Flash from Fast to Slow
CH7 1-30 RGBW - Selezione colore
RGBW - Selection color
31-119 Cambio graduale colori: Controllo velocità CH8
Color gradual change: CH8 control speed
120-199 Selezione colori macro
Macro Color Selection
200-231 Cambio colori
Color Change
232-255 Sound-Auto
CH8 0 - 255 Velocità - Speed
L’apparecchio può essere impostato per operare in DMX a 4 Canali o 8 Canali.
Riferitevi alle tabelle sottostanti per utilizzare correttamente l’apparecchio nelle
due modalità.
The device can be set to operate in DMX mode with 4 or 8 channels. Please refer
to the tables below to properly use the equipment in these two modes.

Ulteriori informazioni su: www.karmaitaliana.it
1110
DISPLAY
DISPLAY MODE DESCRIPTION
d001 D512 Modalità 4CH DMX
4CH DMX mode
A001 A512 Modalità 8CH DMX
8CH DMX mode
FF01 FF99 Cambio graduale colori RGB
RGB color gradual change
CC01 CC99 Cambio colori RGB
RGB color Jump
r000 r255 Dimmer Rosso / Red
G000 G255 Dimmer Verde / Green
b000 b255 Dimmer Blu / Blue
W000 W255 Dimmer Bianco / White
dEoo dEoo Demo Mode
LEdr
Press UP or
DOWN to
choise
Red demo
LEdG Green demo
LEdb Blue demo
LEdu White demo
LErg Red green demo
LErb Red Blue demo
LEGb Green blue demo
LEru Red White demo
LEGu Green White demo
LEbu Blue White demo
LrGb Green Blue demo
LrGu Green White demo
LGbu Blue White demo
Lrbu Blue White demo
SoUd Soud Sound activated
SLAu SLAu Master Slave
La tabella sottostante mostra le informazioni relative alle varie funzioni impostabili
manualmente.
The table below shows the information of the various functions that can be set
manually.

1312
Il prodotto è coperto da garanzia in base
alle vigenti normative.
Vi suggeriamo di consultare sul sito
internet: www.karmaitaliana.it le
“Condizioni Generali di Garanzia” riportate
nella sezione “FAQ”.
Di seguito un breve estratto:
The product is warranted in accordance with
current legislation.
We suggest to check in our website: www.
karmaitaliana.it the “Warranty terms” shown in
the corresponding “FAQ” section.
Below are the main points:
1) Si prega, dopo l’acquisto di procedere
alla registrazione del prodotto sul nostro
sito internet accedendo alla sezione
assistenza(occorre registrarsi). In alternativa,
è possibile registrare il prodotto compilando ed
inviando la scheda accanto.
Please, after purchasing
register your product on our website by accessing
the specic section (registration required).
Alternatively, you can register your product by
lling and sending us the form on the next page.
2) Sono esclusi i guasti causati da imperizia a da uso
non appropriato dell’apparecchio
Damages caused by negligence or wrong use of
the device are not covered by warranty.
3) La garanzia non ha più alcun eetto qualora
l’apparecchio risulti manomesso.
The warranty is no longer eective if the item is
modied or disassembled by not authorized people.
4) La garanzia non prevede la sostituzione del
prodotto.
This warranty doesn’t envisage the product’s
replacement.
5) Sono escluse dalla garanzia le parti esterne,
le batterie, le manopole, gli interruttori, e le parti
asportabili o consumabili.
External components, batteries, knobs, switches
and any removable or subject to wear and tear
parts are excluded from warranty.
6) Le spese di trasporto e i rischi conseguenti sono a
carico del proprietario dell’apparecchio
Shipment for the return of faulty items is at expense
and risk of the owner.
7) A tutti gli eetti la validità della garanzia è avallata
unicamente dalla presentazione della fattura o
scontrino d’acquisto.
For all intents and porpuses the warranty is
eective only upon exhibition of the invoice or of
the purchase receipt
COME PROCEDERE ALL’INVIO
DEL MODULO DI REGISTRAZIONE
PRODOTTO:
HOW TO PROCEED TO SEND US THE
PRODUCT’S REGISTRATION FORM:
1) Nel caso in cui non abbiate eettuato
la registrazione del prodotto sul nostro
sito www.karmaitaliana.it Vi invitiamo
a farlo ritagliando il modulo riportato
nella pagina accando e ad inviarlo
presso i nostri uci.
If you didn’t register your product
on our website www.karmaitaliana.it
please cut and ll the form in the next
page and send it to our oces.
2) Ricordatevi di compilare entrambi i
moduli in quanto una copia rimarrà
legata al manuale e potrà servirvi in
futuro.
Please ll both forms as a copy will
remain in the manual and could be
useful in the future.

Ulteriori informazioni su: www.karmaitaliana.it
1312
CERTIFICATO DI GARANZIA
GUARANTEE CERTIFICATE
CERTIFICATO DI GARANZIA
GUARANTEE CERTIFICATE
MODULO DI REGISTRAZIONE
REGISTRATION MODULE
MODULO DI REGISTRAZIONE
REGISTRATION MODULE
COPIADAINVIAREA:
COPIADACONSERVARE
Spett.le
KARMA ITALIANA Srl
Via Gozzano, 38 bis
21052 - Busto Arsizio (VA)
%

1514
Speciche Tecniche
Speciche tecniche
Speciche tecniche
MODELLO / MODEL
MODELLO / MODEL
DATA D’ACQUISTO
PURCHASING DATE
DATA D’ACQUISTO
PURCHASING DATE
N. SCONTRINO O FATTURA
RECEIPT/INVOICENUMBER
N. SCONTRINO O FATTURA
RECEIPT/INVOICENUMBER
TIMBROEFIRMADELRIVENDITORE
DEALER’S STAMPANDSIGNATURE
TIMBROEFIRMADELRIVENDITORE
DEALER’S STAMPANDSIGNATURE
ACQUISTATO DA / PURCHASED BY
COGNOME / SURNAME
COGNOME / SURNAME
NOME/ NAME
NOME/ NAME
VIA / ADDRESS
VIA / ADDRESS
N°
N°
PROV.
PROV.
CITTÀ / CITY
CITTÀ / CITY
C.A.P. / ZIP CODE
C.A.P. / ZIP CODE

Ulteriori informazioni su: www.karmaitaliana.it
1514
Speciche Tecniche / Technical specications
LED PAR180
Sorgente luminosa / Lighting Source 18 x 10W
Tipo Led / Kind of leds 4 in 1 (RGBW)
Durata led / Average life 50.000 ore / hours
Assorbimento / Comsumption 200W
Angolo Beam / Beam Angle 25°
Interfaccia DMX / DMX interface 4 o 8 canali DMX / 4 or 8 DMX channels
Modalità operative / Operation mode Auto, manuale, Musicale / Auto, manual, sound
Connettori / Connectors XLR 3 pins
Display Si
Tipo di staa / Bracket Doppia / Double
Alimentazione / Power supply AC 90-240V, 50-60Hz
Colore / Color Nero / Black
Dimensioni / Dimensions 215 x 215 x 230 mm
Peso / Weight 2,5 Kg
LED PAR240
Sorgente luminosa / Lighting Source 24 x 10W
Tipo Led / Kind of leds 4 in 1 (RGBW)
Durata led / Average life 50.000 ore / hours
Assorbimento / Comsumption 250W
Angolo Beam / Beam Angle 40°
Interfaccia DMX / DMX interface 4 o 8 canali DMX / 4 or 8 DMX channels
Modalità operative / Operation mode Auto, manuale, Musicale / Auto, manual, sound
Connettori / Connectors XLR 3 pins
Display Si
Tipo di staa / Bracket Doppia / Double
Alimentazione / Power supply AC 90-240V, 50-60Hz
Colore / Color Nero / Black
Dimensioni / Dimensions 215 x 215 x 230 mm
Peso / Weight 2,5 Kg

ver. 16.1
Via Gozzano 38 bis
21052, Busto Arsizio (VA) - Italy
Telefono +39 0331.628.244
Fax +39 0331.622.470
www.karmaitaliana.it made in China
Questo simbolo indica la conformità del prodotto alle normative internazionali RoHS
(Restriction of certain Hazardous Substances) che limita l’impiego di determinate sostanze
pericolose nelle apparecchiature elettriche ed elettroniche immesse sul mercato europeo dal
1° luglio 2006. Fa parte di una serie di Direttive UE sull’ambiente ed e’ connessa strettamente
alla Direttiva RAEE (Riuti di Apparecchiature Elettriche ed Elettroniche).
This symbol indicates that the product complies with international standards RoHS (Restriction
of certain Hazardous Substances) which restricts the use of certain hazardous substances in
electrical and electronic equipment put on the European market from 1 July 2006. It is part of
a series of EU Directives and environment and ‘ closely connected to the WEEE Directive (
Waste Electrical and Electronic Equipment).
Pursuant to Italian Legislative Decree 49 dated 14 March 2014 on “Implementation of
Directive 2012/19/EC on Waste Electrical and Electronic Equipment (WEEE)”
The symbol of the crossed-out wheeled bin shown on the device or its packaging indicates
that, at the end of its service life, the product must be collected separately from other wastes.
The user must therefore consign it complete with all its main components to a suitable
separate collection centre for electrical and electronic wastes, or confer it to a shop of
electrical and electronic equipment when purchasing an equivalent product. Suitable separate
collection allows the discarded equipment to be sent for recycling, treatment and disposal
in an environmentally friendly way, and helps to avoid possible negative eects on health
and environment, promoting the recycling of the materials of which the device is composed.
Illegal disposal of the product by the user may result in the application of the sanctions
envisaged by applicable law.by the user entails the application of administrative sanctions
pursuant to Legislative Decree n . 152/2006 ( Art.255 Part 4 )
Il marchio CE indica che questo prodotto è conforme alle norme della Comunità Europea: EMC
(Compatibilità Elettromagnetica) e LVD (Direttive sulla Bassa Tensione). La documentazione
di conformità in forma completa è reperibile presso la società Karma Italiana Srl.
The CE mark indicates that this product complies with the European Community standards
EMC ( Electromagnetic Compatibility) and LVD ( Low Voltage Directive ). Compliance
documentation in complete form is available at the company Karma Italian Srl.
Ai sensi del Decreto Legislativo N°49 del 14 Marzo 2014 - “ Attuazione delle Direttive
2012/19/UE sui riuti di apparecchiature elettriche ed elettroniche (RAEE)”.
Il simbolo del cassonetto barrato riportato sull’apparecchiatura indica che il prodotto alla
ne della propria vita utile deve essere raccolto separatamente dagli altri riuti. L’utente
dovrà, pertanto, conferire l’apparecchiatura integra dei componenti essenziali giunta a ne
vita agli idonei centri di raccolta dierenziata dei riuti elettronici ed elettrotecnici, oppure
riconsegnandola al rivenditore al momento dell’acquisto di nuova apparecchiatura di tipo
equivalente, in ragione di uno a uno. L’adeguata raccolta dierenziata per l’avvio successivo
dell’apparecchiatura dimessa al reciclaggio, al trattamento e allo smaltimento ambientale
compatibile contribuisce ad evitare possibili eetti negativi sull’ambiente e sulla salute e
favorisce il riciclo dei materiali di cui è composta l’apparecchiatura. Lo smaltimento abusivo
del prodotto da parte dell’utente comporta l’applicazione delle sanzioni amministrative di cui al
D.Lgs n. Decreto Legislativo N° 49 del 14 Marzo 2014.
This manual suits for next models
1
Table of contents
Languages:
Other Karma Dj Equipment manuals

Karma
Karma TM WASH70 User manual

Karma
Karma LED PAR120Q User manual

Karma
Karma LED PAR120 User manual

Karma
Karma LED PAR9030 User manual

Karma
Karma BUBBLE PRO3 User manual

Karma
Karma BM 661USB User manual

Karma
Karma MOT 4 User manual

Karma
Karma TM SPOT30 User manual

Karma
Karma LED BAR72 User manual

Karma
Karma SNOW 601 User manual
Popular Dj Equipment manuals by other brands

American DJ
American DJ Jewel User instructions

Panasonic
Panasonic AYJP2000 - PROFESSIONAL JOG installation manual

WE-EF
WE-EF FLC230 Installation and maintenance instructions

Robe
Robe ROBIN MegaPointe Wireless DMX user manual

American DJ
American DJ LunarPod User instructions

Color imagination
Color imagination SI-018L user manual