Karma LED PAR28 User manual

Manuale di istruzioni • Instruction manual
www.karmaitaliana.it
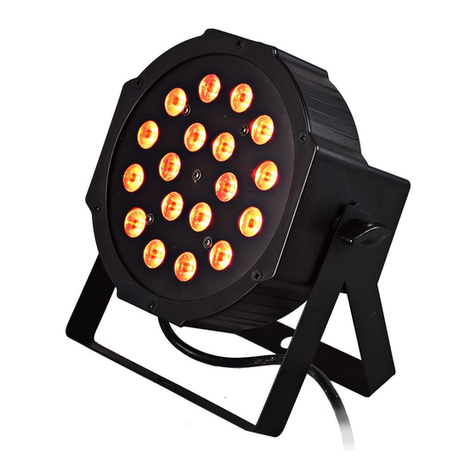
LED PAR28
Illuminatore a led
Led par

32
Ci complimentiamo vivamente per la Sua scelta, il prodotto Karma da Lei acquistato è frutto di
un’accurata progettazione da parte di ingegneri specializzati.
Per la sua realizzazione sono stati impiegati materiali di ottima qualità per garantirne il
funzionamento nel tempo.
Il prodotto è stato realizzato in conformità alle severe normative di sicurezza imposte dalla
Comunità Europea, garanzia di adabilità e sicurezza.
Vi preghiamo di leggere attentamente questo manuale prima di iniziare ad utilizzare
l’apparecchio al ne di sfruttarne appieno le potenzialità.
La Karma dispone di numerosi prodotti accessori che potranno completare il vostro apparecchio.
Vi invitiamo quindi a visionare l’intera gamma dei nostri prodotti visitando il sito internet:
www.karmaitaliana.it
sul quale troverete, oltre a tutti i nostri articoli, descrizioni accurate e documentazioni aggiuntive
sviluppate successivamente all’uscita del prodotto.
I nostri uci sono a vostra completa disposizione per qualsiasi chiarimento o informazione.
Ci auguriamo che rimarrete soddisfatti dell’acquisto e Vi ringraziamo nuovamente per la ducia
riposta nel nostro marchio.
Precauzioni ed avvertenze
Grazie per aver acquistato questo prodotto
Italiano
• IMPORTANTE: leggete attentamente le istruzioni riportate su questo manuale prima
dell’uso.
• Conservate il manuale per future consultazioni e allegatelo se cedete il prodotto ad altri.
• E’ obbligatorio eettuare il collegamento ad un impianto di alimentazione dotato di
messa a terra.
• Vericate sempre che frequenza e tensione della rete corrispondono a quelle per cui il
prodotto è predisposto.
• Il dispositivo funziona con pericolosa tensione di rete 230V. Non aprite, smontate e/o
apportate modiche al prodotto per evitare il rischio di scariche elettriche.
• Evitate che nel prodotto entrino liquido inammabile, acqua o altri oggetti metallici
• Evitate di utilizzare l’unità:
- in luoghi con temperatura superiore ai 45°C
- in luoghi soggetti a vibrazione e/o possibili urti
- in luoghi con troppa umidità
• Tutti gli interventi di riparazione devono sempre essere eettuati da personale
autorizzato. Non ci sono componenti riparabili dall’utente all’interno del faro. Riparazioni
eettuate da personale non competente potrebbero arrecare danni sia al prodotto che
alle persone
• Questo prodotto è adatto solo per uso interno
• Disconnettere l’unità dalla rete elettrica quando non è in uso
• Lasciate rareddare il prodotto prima di eettuare pulizia o manutenzione.
• Non accendere e spegnere il prodotto a brevi intervalli, potrebbe ridurre la durata del
dispositivo.
• Controllare periodicamente lo stato del cavo di alimentazione
• Non staccare il cavo di alimentazione tirandolo dal lo, ma dalla spina
Ulteriori informazioni su: www.karmaitaliana.it
32
8
9 10 11 12
13
4
5
6
7
3
2
1
Italiano

54
Prima di eettuare i collegamenti, assicuratevi di
aver scollegato la spina dalla presa elettrica. Tutti i
collegamenti devono avvenire ad apparecchio spento.
1. Posizionate il faro a piacimento utilizzando la doppia staa(6) per
ssarlo a traliccio o semplicemente appoggiarlo su qualsiasi supercie.
I pomelli di serraggio(7) assicureranno che rimanga in posizione.
Abbiate cura di non utilizzare l’apparecchio in ambienti umidi, o
troppo caldi e assicuratevi che la ventola di rareddamento(4) non sia
coperta.
2. Se intendete utilizzarlo collegato ad un impianto DMX, collegate i cavi
in entrata ed uscita alle prese DMX IN / DMX OUT(2-3).
3. Collegate il cavo di alimentazione(1) ad una presa elettrica
230V.
Una volta completati questi passaggi siete pronti per utilizzare
l’apparecchio.
Nel caso in cui l’apparecchio non dovesse accendersi, scollegate il
cavo di alimentazione e rivolgetevi all’assistenza tecnica Karma. Non
tentate di aprire l’apparecchio, potrebbe essere pericoloso e comunque
invaliderebbe la garanzia.
Questo strumento può essere utilizzato in diverse modalità:
- Funzionamento in manuale
- Modalità Demo
- Modalità ad attivazione sonora
- Modalità DMX
- Modalità Slave
Nelle pagine successive verranno analizzate le singole modalità.
DISPLAY
Premete ripetutamente il tasto “Menu”(9) sul display per selezionare la
funzione desiderata. Utilizzate i tasti Down(11) e Up(10) per scorrere i
valori. Premete il tasto Enter(12) per confermare la scelta.
Di seguito sono riportate le varie funzioni mostrate dal display ed i relativi
sottomenu:
Italiano

Ulteriori informazioni su: www.karmaitaliana.it
54
MENU FUNZIONE
A001 Indirizzo DMX
FF01 Sfuma i colori con velocità da 01 - 99
CC01 Cambia colori con velocità da 01 - 99
r001 Regola colore rosso da 0 - 255
G001 Regola colore verde da 0 - 255
b001 Regola colore blu da 0 - 255
u001 Regola colore bianco da 0 - 255
dE00 Modalità DEMO
SoUd Modalità a tempo di musica
SLAu Modalità slave
TELECOMANDO
Il telecomando in dotazione(13), oltre ad accendere e spegnere
l’apparecchio a distanza, permette di controllare tutte le principali funzioni
del faro.
In caso di malfunzionamento, vericate la carica della batteria interna ed
eventualmente sostituitela con una di eguale modello (CR 2025). Abbiate
cura di inserire correttamente la batteria rispettando le polarità indicate.
MODALITA’ DEMO
Selezionate dal display la scritta “dE00” e confermate con il tasto enter. Il
faro si illuminerà mostrando le dierenti combinazioni disponibili. Questa
modalità viene generalmente impostata durante le dimostrazioni.
MODALITA’ MANUALE
SCELTA COLORE
Premete ripetutamente MENU e selezionate “r001”, “G001”, “b001” o
“U001”. Utilizzate i tasti UP/DOWN per scegliere il valore di intensità da 0
a 255. Potrete così ottenere il colore desiderato.
ALTRI EFFETTI
Oltre al colore, potete selezionare manualmente eetti quali dissolvenze o
cambiacolori, Il tutto riferendovi alla tabella sopra riportata.
Italiano

76
MODALITA’ SOUND
In modalità attivazione sonora, grazie al microfono interno(8), l’unità
risponderà ai toni della musica in bassa frequenza.
Premete MENU(9) e selezionate “SoUd”. Confermate con Enter(12).
MODALITA’ DMX
In una connessione DMX 512 ci sono 512 canali a disposizione.
Ogni apparecchio DMX impiega 1 o più canali per gestire le varie funzioni.
L’utente deve assegnare un indirizzo di partenza ad ogni apparecchio DMX
connesso all’impianto, tale indirizzo indicherà il primo canale occupato nella
centralina.
Bisogna pianicare la scelta dell’indirizzo di partenza in modo da non
far mai sovrapporre i canali, onde evitare un funzionamento non corretto
dell’apparecchio.
Esempio: Ammettiamo di collegare 3 apparecchi DMX ognuno dotato di 10
canali:
il primo apparecchio dovrà essere settato sull’indirizzo 1, il secondo
apparecchio sull’indirizzo 11 ed il terzo sull’ indirizzo 21.
Tuttavia si può usare lo stesso indirizzo di partenza su più apparecchi se si
desidera ottenere un loro movimento all’unisono. Gli apparecchi DMX sono
concepiti per ricevere dati tramite collegamento seriale Daisy Chain.
Questo tipo di collegamento si ha quando l’uscita dati di un apparecchio
è connessa all’ingresso dati del successivo. L’ordine in cui gli apparecchi
sono collegati non ha importanza e non incide su come la centralina
comunica con ciascuno di essi. Utilizzare l’ordine in cui il cablaggio è più
semplice e diretto.
La lunghezza del cavo di segnale non dovrebbe superare i 100 metri per
evitare interferenze tra segnali e altri apparecchi elettrici. Spesso alla ne di
un impianto DMX è richiesto un terminatore. Rivolgetevi ad un installatore o
al vostro negoziante di ducia per ulteriori informazioni.
Nell’eettuare i collegamenti assicuratevi che gli apparecchi e i cavi
utilizzino le polarità riportate dalla tabella sottostante.
Italiano

Ulteriori informazioni su: www.karmaitaliana.it
76
Per entrare in modalità DMX, premete il tasto Menu no a quando non
appare sul display la scritta “A001” e selezionate l’indirizzo desiderato
tramite i tasti UP/DOWN.
OUT
Esempio di collegamento a cascata.
ININ OUTOUT IN
DMXDMX DMX
CENTRALINA
DMX
Italiano
MENU FUNZIONE DMX MOD. LED PAR28
d001 Settaggio DMX 4 canali impostabile da 001 - 512
A001 Settaggio DMX 8 canali impostabile da 001 - 512
MODALITA’ SLAVE
Qualche volta si ha la necessità di collegare più fari dello stesso modello
e si desidera che essi si accendano all’unisono riproducendo il medesimo
eetto. Per fare ciò è suciente collegare tutti i fari a cascata tra di
loro sfruttando le prese DMX (2-3), impostando il primo apparecchio
come desiderato mentre tutti gli altri andranno posti su “SLau”. Tutti fari
riprodurranno lo stesso eetto del primo faro.

98
English
Thanks for choosing this product
The KARMA product you have purchased is the result of careful planning by specialized
engineers. High quality materials have been used for its construction, to ensure its functioning
over time. The product is manufactured in compliance with strict regulations imposed by the
European Union, a guarantee of reliability and safety. Please read this manual carefully before
starting to use the xture in order to exploit its full potential. We thank you again for your trust
in our brand.
Karma’s range includes many other products that can be combined with your device.
We invite you to have a look to the whole range of our products, by visiting our website
www.karmaitaliana.it
where you will nd the technical sheets of all our items, with detailed descriptions and additional
documents. Our oces are at your full disposal for further explainations or information. We
wish that you will be satised of your purchase and we thank you
again for your trust in our brand.
Cautions and warnings
• IMPORTANT: before starting using the product read carefully the present manual.
• Keep this user manual for future reference. If you give the product to another user, be
sure to include the manual.
• It is necessary to connect the product to a power system with ground.
• Always check that the frequency and voltage of the power source correspond to those
set on the item.
• This device works with dangerous 230V mains power. Do not open, disassemble and /
or make changes to the product to avoid the risk of electric shock.
• Do not allow ammable liquid, water or metal objects to enter the product
• Avoid using the unit:
- in places with temperatures above 45 ° C
- in places subject to vibrations and / or possible impacts
- in places with too much humidity
• All repairs must always be carried out by authorized persons. There are no user-
serviceable parts inside. Repairs carried out by untrained people can lead to damage
both to the xture and to persons.
• This product is suitable for indoor use only
• Disconnect the unit from power when it is not used
• Wait for the product to cool before cleaning or maintenance
• Do not turn the product on and o at short intervals. This may reduce the life of the
device
• Periodically check the condition of the power cord
• Never disconnect the product from the power source by pulling on the cord (pull on the
plug)

Ulteriori informazioni su: www.karmaitaliana.it
98
English
8
9 10 11 12
13
4
5
6
7
3
2
1

1110
English
Before arranging any connection, make sure that the power
cord is unplugged from the mains socket. All operations
should be carried with the device o.
1. Position the par as you wish by using the double bracket (6) to mount
it on a stand or place it on a at surface. The tightening knobs (7) will
keep it in correct position. Be careful not to expose the product to
moisture and heat and check that the cooling fan (4) is not obstructed.
2. If you mean to use it in a DMX system, connect the input and output
cables to the DMX IN / DMX OUT(2-3) sockets.
3. Connect the power cord (1) to a 230V mains socket.
Once you have completed this steps you are ready to use the device.
If the par doesn’t light on, disconnect the power cord and address to
Karma’s technical support. Don’t try to open the device, it could be
damaged and would invalidate warranty.
This unit can be used in several modes:
- Manual mode
- Demo mode
- Sound activated mode
- DMX mode
- Slave mode
In the following pages all the above modes will be described.
DISPLAY
Press repeatedly the “Menu”(9) button on the display to select the desired
function. Use the Up(10) and Down (11) to scroll the values. Press the
Enter button (12) to conrm your choice.
Here are the functions showed by the display and the related sub-menus:

Ulteriori informazioni su: www.karmaitaliana.it
1110
English
MENU FUNCTION
A001 DMX Adress
FF01 Fades colours with speed from 01 - 99
CC01 Changes colours with speed from 01 - 99
r001 Adjusts red colour from 0 - 255
G001 Adjusts green colour from da 0 - 255
b001 Adjusts blue colour from da 0 - 255
u001 Adjusts white colour from 0 - 255
dE00 DEMO Mode
SoUd Sound activated mode
SLAu Slave mode
REMOTE CONTROL
The included remote control (13) allows to switch on/o the device at a
distance and to manage all its main functions.
In case of malfunctioning, check the charge of the internal battery and if
necessary replace it with one of the same model(CR 2025). Be careful to
insert correctly the battery by respecting the correct polarities.
DEMO MODE
Select “dE00” on the display and conrm with enter key. The par will light
on showing the dierent available combinations. This mode is generally
set for DEMO.
MANUAL MODE
COLOUR CHOICE
Press repeatedly MENU and select “r001”, “G001”, “b001” or “U001”. Use
the buttons UP/DOWN to choose the intensity value from 0 to 255. In this
way you can obtain the desired colour.
OTHER EFFECTS
Besides colour you can select manually eects such as fade or colour-
changing (please refer to the above chart).

1312
English
SOUND MODE
In sound-activation mode, thanks to the internal mic (8), the unit will
respond to low frequency music tones.
Press MENU(9) and select “SoUd”. Conrm with Enter (12)
DMX MODE
In a DMX 512 linking there are 512 channels available. Each DMX xture
uses one or more channels to manage its functions. The user must assign
a starting address to each DMX xture. This address will indicate the rst
channel used on the controller. You have to plan the starting address
choice in order to avoid channels’ overlapping.Otherwise the xture
wouldn’t work correctly. Example: If you need to connect 3 DMX xtures,
each with 10 channels, the rst unit is to be set on address 1, the second
unit on address 11 and the third one on address 21. Anyway you can set
the same starting address on more devices if you wish them to operate
in synchrony. DMX devices are conceived to receive datas through a
serial Daisy Chain connection. With this kind of linking the datas output
of a xture is connected to the data input of the following one. The order
of linking of the devices is not important and it doesn’t aect on how the
controller manages each of them. We suggest to put them in the easiest
and most direct sequence for cable connection.
The cable length should not be more than 100 m to avoid interferences
with other signals or electric devices. A terminator is often required at the
end of a DMX system. Please address to a technician or to your reseller
for further information.
When you arrange the connections make sure that the xtures and
the cables use the polarities indicated in the chart below
DMX Connector conguration
GROUND

Ulteriori informazioni su: www.karmaitaliana.it
1312
English
OUT
Example of daisy-chain connection
ININ OUTOUT IN
DMXDMX DMX
DMX
CONTROLLER
MENU DMX FUNCTION - MODEL LED PAR28
d001 DMX setting - 4 channel from 001 to 512
A001 DMX setting - 8 channel from 001 to 512
To enter DMX mode, press the Menu touch until the code “A001” appears
and select the address you wish using the buttons UP/DOWN.
SLAVE MODE
You could have the necessity to connect together several pars of the same
model and to synchronize them, so that they produce the same eect. To
do that you just have to connect them in daisy-chain, by using the DMX (2-
3) sockets. Then select on the rst device the desired functions and set all
the others on “SLau”. All the pars will reproduce the same eect as the rst
one.

1514
Condizioni di garanzia
Il prodotto è coperto da garanzia in base alle vigenti
normative nazionali ed Europee.
Per le condizioni complete di garanzia e per
eettuare richieste di assistenza visitate il sito:
www.karmaitaliana.it
• La garanzia copre i difetti di fabbrica ed
i guasti vericatisi nei primi 2 anni dalla
data di acquisto. Nel caso di acquisto con
fattura, la garanzia è limitata ad 1 anno.
• Sono esclusi i guasti causati da imperizia o da
uso non appropriato dell’apparecchio
• La garanzia non ha più alcun eetto qualora
l’apparecchio risulti manomesso.
• La garanzia non prevede necessariamente la
sostituzione del prodotto.
• Sono escluse dalla garanzia le parti esterne,
le batterie, le manopole, gli interruttori, e le
parti asportabili o consumabili.
• Le spese di trasporto e i rischi conseguenti
sono a carico del proprietario dell’apparecchio
• A tutti gli eetti la validità della garanzia è
avallata unicamente dalla presentazione della
fattura o scontrino d’acquisto.
Warranty conditions
The product is covered by warranty according to
current national and European regulations.
For detailed warranty conditions and RMA requests
please refer to our website:
www.karmaitaliana.it
• The warranty covers manifacturing defects
and faults occurred in the rst 2 years from
the date of purchase. In case of purchase
with invoice, the warranty is limited to 1 year
• Damages caused by negligence or wrong use
of the device are not covered by warranty.
• The warranty is no longer eective if the item
is modied or disassembled by not authorized
people.
• This warranty doesn’t necessarily envisage the
product’s replacement.
• External components, batteries, knobs,
switches and any removable or subject to wear
and tear parts are excluded from warranty.
• Shipment for the return of faulty items is at
expense and risk of the owner.
• For all intents and porpuses the warranty
is eective only upon exhibition of the
invoice or of the purchase receipt.
We also suggest to register your product
on our website www.karmaitaliana.it, after
signing in to access the private area.
In this way you will have the possibility to keep
track of the warranty validity and to receive
updates on our items.
Vi suggeriamo anche di procedere alla
registrazione del prodotto sul nostro sito
internet, www.karmaitaliana.it loggandovi
nell’area riservata.
Avrete così la possibilità di tener traccia
della validità della garanzia e di ricevere
aggiornamenti sui nostri articoli.

Ulteriori informazioni su: www.karmaitaliana.it
1514
Speciche Tecniche - Technical specications
Sorgente luminosa: 7 led da 4W (quad)
Assorbimento: 30W
Durata led: 25.000 ore circa
Beam: 40°
Controlli DMX: 4 o 8 Canali
Modalità Operativa: Demo - Manuale - Tempo di musica - DMX
Tipo di connettori: XLR 3 pin per connessioni DMX
Display: Si
Tipo di staa: Doppia per il collegamento a tralicci o per appoggio
Alimentazione: 110V - 230V ~AC
Colore: Nero
Dimensioni: 190 x 210 x 100 mm
Peso: 1,5 Kg
Led: 7 x 4W (Quad)
Absorption: 30W
Led life: 25.000 h
Beam: 40°
DMX Control: 4/8 Channels
Operative Mode: Demo - Manual - Sound - DMX
Connectors: XLR 3 pin for DMX connections
Display: Yes
Brackets: Double
Power Supply: 110V - 230V ~AC
Color: Black
Dimensions: 190 x 210 x 100 mm
Weight: 1,5 Kg
Karma Italiana srl, in order to improve its products, reserves the right to modify the characteristics whether
technical or aesthetic, at any time and without notice.
Karma Italiana srl, allo scopo di migliorare i propri prodotti, si riserva il diritto di modicare le caratteristiche
siano esse tecniche o estetiche, in qualsiasi momento e senza alcun preavviso.

1716
Tabella DMX
MODALITÀ 4 CANALI
CH1 0 - 255 Rosso da 0 - 100%
CH2 0 - 255 Verde da 0 - 100%
CH3 0 - 255 Blu da 0 - 100%
CH4 0 - 255 Bianco da 0 - 100%
MODALITÀ 8 CANALI
CH1 0 - 255 Rosso da 0 - 100%
CH2 0 - 255 Verde da 0 - 100%
CH3 0 - 255 Blu da 0 - 100%
CH4 0 - 255 Bianco da 0 - 100%
CH5 0 - 255 Strobo da lento a veloce
CH6 0 - 255 Dimmer generale
CH7 0 - 63 Cambio colore graduale (CH8 x velocità)
64 - 127 Cambio colore Pulse (CH8 x velocità)
128 - 191 Salto colore (CH8 x velocità)
192 - 255 Modalità a tempo di musica
CH7 0 - 255 Velocità

Ulteriori informazioni su: www.karmaitaliana.it
1716
DMX chart
4 CHANNEL MODE
CH1 0 - 255 Red 0 - 100%
CH2 0 - 255 Green 0 - 100%
CH3 0 - 255 Blue 0 - 100%
CH4 0 - 255 White 0 - 100%
8 CHANNEL MODE
CH1 0 - 255 Red 0 - 100%
CH2 0 - 255 Green 0 - 100%
CH3 0 - 255 Blu 0 - 100%
CH4 0 - 255 White 0 - 100%
CH5 0 - 255 Strobe slow - fast
CH6 0 - 255 Dimmer
CH7 0 - 63 Gradual colour change(CH8 for speed)
64 - 127 Pulse change colors (CH8 for speed)
128 - 191 Color jump (CH8 for speed)
192 - 255 Sound-activated mode
CH7 0 - 255 Speed

1918
Questo simbolo vi avverte della presenza di istruzioni d’uso e manutenzione importanti, nel
manuale o nella documentazione che accompagna il prodotto
This symbol alerts you of the presence of important operating and maintenance instructions, in the
manual or in the documentation accompanying the product
II marchio CE indica che il prodotto è conforme ai requisiti essenziali delle direttive europee e
relative norme ad esso applicabili. La documentazione di conformità in forma completa è reperibile
presso la società Karma Italiana Srl.
The CE mark indicates that this product complies with the essential applicable European directives
and their related standards. Compliance documentation in complete form can be asked to the
company Karma Italiana Srl.
Ai sensi del Decreto Legislativo N°49 del 14 Marzo 2014 - “ Attuazione delle Direttive 2012/19/UE
sui riuti di apparecchiature elettriche ed elettroniche (RAEE)”.
Il simbolo del cassonetto barrato riportato sull’apparecchiatura indica che il prodotto alla ne della
propria vita utile deve essere raccolto separatamente dagli altri riuti. L’utente dovrà, pertanto,
conferire l’apparecchiatura integra dei componenti essenziali giunta a ne vita agli idonei centri di
raccolta dierenziata dei riuti elettronici ed elettrotecnici, oppure riconsegnandola al rivenditore
al momento dell’acquisto di nuova apparecchiatura di tipo equivalente, in ragione di uno a uno
oppure 1 a zero per le apparecchiature aventi lato maggiore inferiore a 25 cm. L’adeguata raccolta
dierenziata per l’avvio successivo dell’apparecchiatura dimessa al reciclaggio, al trattamento
e allo smaltimento ambientale compatibile contribuisce ad evitare possibili eetti negativi
sull’ambiente e sulla salute e favorisce il riciclo dei materiali di cui è composta l’apparecchiatura.
Lo smaltimento abusivo del prodotto da parte dell’utente comporta l’applicazione delle sanzioni
amministrative di cui al D.Lgs n. Decreto Legislativo N° 49 del 14 Marzo 2014.
Directive 2012/19/UE regarding electric and electronic equipment waste (WEEE).
The symbol of the crossed-out dustbin indicates that the product at the end of its life must be
collected separately from other waste . The user must , therefore , confer the xture complete
with all the essential components to an authorized disposal center for collection of electronic and
electrical waste, or return it to the dealer when buying new equipment of equivalent type, at a
rate of one to one, or one to zero if external dimension is less than 25cm. Appropriate separate
collection to send the decommissioned equipment to recycling , treatment and environmentally
compatible disposal helps to prevent negative impact on the environment and human health and
promotes recycling of the materials making up the product. In Italy illegal dumping of the product
by the user entails the application of administrative sanctions pursuant to Legislative Decree n.
49 (14/03/2014).
Questo simbolo vi avverte della presenza di materiale non isolato “sotto tensione“ ad elevato
voltaggio, all’interno del prodotto, che può costituire pericolo di folgorazione per le persone.
This symbol alerts you to the presence of uninsulated dangerous voltage within the
product’s enclosure that might be of sucient magnitude to constitute a risk of electric shock. Do
not open the product’s case.

Ulteriori informazioni su: www.karmaitaliana.it
1918
Note:

ver. 19.1
Prodotto da/ produced by:
KARMA ITALIANA SRL
Via Gozzano 38 bis
21052, Busto Arsizio (VA) - Italy
www.karmaitaliana.it made in China
Table of contents
Languages:
Other Karma Dj Equipment manuals

Karma
Karma LED PAR27 User manual

Karma
Karma TM WASH70 User manual

Karma
Karma Wash Series User manual

Karma
Karma BM 661USB User manual

Karma
Karma BUBBLE PRO3 User manual

Karma
Karma SNOW 1201 User manual

Karma
Karma LED PAR27 User manual

Karma
Karma LED PAR180 User manual

Karma
Karma DJ 368MP3 User manual

Karma
Karma LED PAR120Q User manual