Basic
Operation
B
Table
of
Contents
E
Before
Using
the
FS750
.........
sss
MM
B-1
|
Bi
Creating
Rhythm
and
Auto-Accompaniment
m
|
|
Trouble-Shooting
sath
nathan
sc
MM
DER
B-3]|
...^-—e6e
нинен
ито
анн
аденин
нанио
АЫ
А
–
ў
T
and
Ехр!апайоп........................
B-4
Ф
Creating
Basic
Райегтѕ......................
eee
А-7
-
QVEM
us
еен
зое
Ф
Creating
Fill-in
and
Intro/Ending
Patterns
M
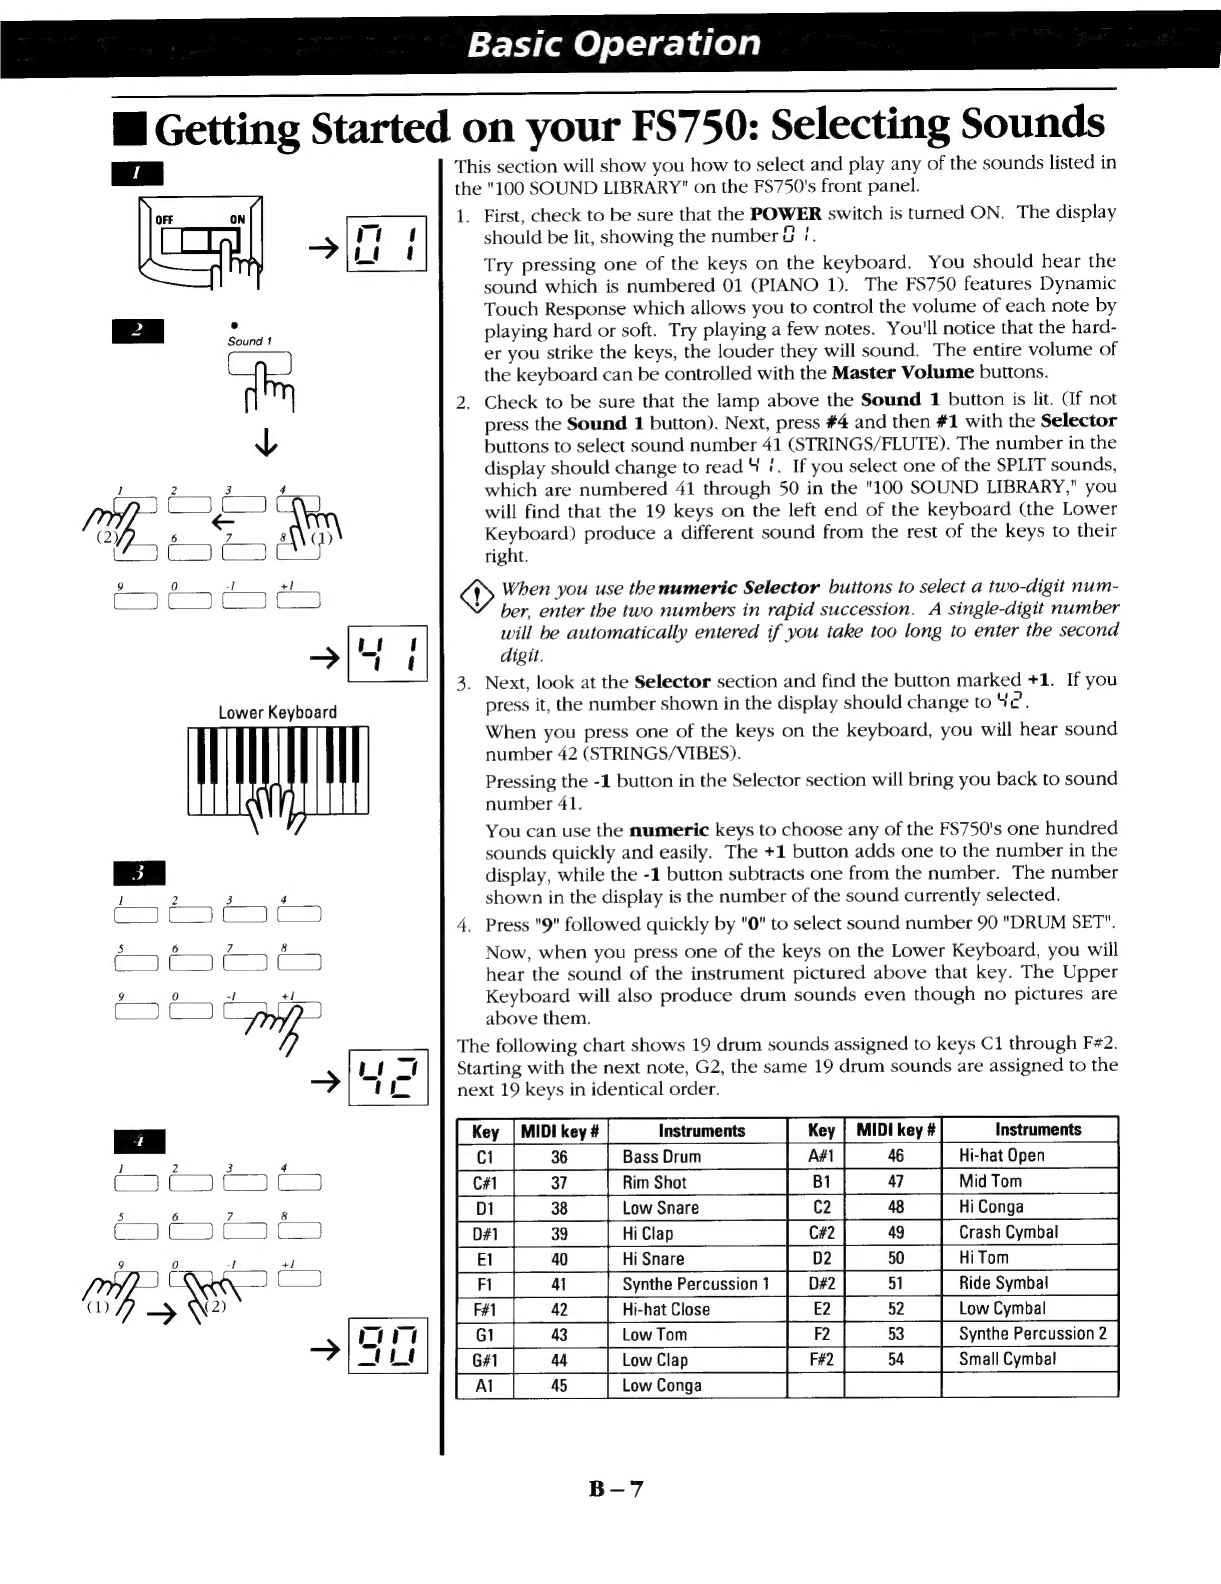
Selecting
Sounds...
B-7
Y
"
M:
oh
{ом
ens
еса
:
Е
:
€
Storing
the
Newly
Created
Patterns
................
A-9
Using
the
$
елбет
еы
BI
Programmable
ONE
FINGER
AD-LIB:
iino:
А10
Ф
Changing
Rhythm
Tempo...........
ee
B-8
©
Cicating
Phrases
КОЙ;
W.
Using
Auto-ACCOMpaniMent:
а-нан
B=?
€
Storing
Phrases
.........
eerte
A-11
Ф
Explanation
of
AUTO
1...
B-9
: |
:
E
Using
the
SYSTEM
Functions
...........
eem
A-12
€
Using
the
Arrangement
Expander
..................
B-9
f
:
E
Using
ONE
FINGER
AD-LIB:
B-10
E
Using
the
MIDI
Functions:.........eeeee
A
—
14
а
:
|
ee
VU
RS
€
Setting
the
Local
Control
ON/OFF
...............
A
—
14
@
The
Digital
Mixer
Section
..........................
Pew
Фф:
Creating
SODgs.
idee
torpe
tecti
A
—
16
WI
Using
the
Real-Time
RECORDER
....................
B-12
€
Sending
Automatic
Functions
.............
A-17
Ш
Advanced
Use
of
Sounds:............
ss
A-1
€
Changing
MIDI
Channels...
A—18
€
Combining
Two
Sounds
............
seen
A-1
€
Creating
Patterns
sss
А
–
19
Ф
Adding
Bffécts
idee
eer
et
nee
sad
А
–
2
Ф
Creating
ONE
FINGER
AD-LIB
Phrases
........
A
—
20
E
Advanced
Use
of
Auto-Accompaniment
Section:
€
Using
Other
Functions
............seee
A-21
eene
enne
dieere
НИ
А-5
|
W
ApDSUdices.
мааа
Ap
T
M
А
*
js
Р
ОНИ
2
=
:
I.
SpedticaHonso
undo
emet
ннан
Ap-1
xplanation
of
AUTO
5...
sees
A
=
ш
DI
Impi
(ation
E
N
f
Ap-2
€
Explanation
of
AUTO
4..........
sse
A-6
МИНОР
DAN
OR
Ша
нна
рп:
P
€
Introducing
Accompaniment
Hold.................
A-6
е
Ш
Before
Using
the
FS750
1.
Cautions
Ф
Do
not
disassemble
or
attempt
to
modify
the
@
Do
not
subject
the
FS750
to
severe
shocks.
FS750.
|
А
@
Do
not
expose
the
FS750
to
direct
sunlight,
or
€
Should
the
FS750
become
soiled,
clean
it
using
a
high
temperatures
(such
as
inside
your
car
on
a
soft,
ne
iie
hrs
iss
not
remove
the
stain,
warm
day).
wet
the
cloth
slightly
before
wiping.
Never
use
€
Do
not
ie
the
FS750
where
there
is
excessive
alcohol
or
thinner
to
clean
the
FS750.
{
o
not
allow
foreign
matter
to
enter
the
gaps
moisture
or
dust.
Фр
llow
forei
he
gap
between
the
keys
or
around
the
buttons.
2.
Connecting
the
Power
Supply
The
FS750
can
use
either
your
home
AC
power
outlet
or
dry
cell
batteries
as
a
power
source.
Ш
To
insert
batteries:
1.
Turn
the
unit
over
and
remove
the
battery
cover.
2.
Insert
six
Size
C
dry
cell
batteries.
Be
sure
they
are
aligned
in
the
proper
direction.
Replace
the
battery
cover.
3.
q^
tbe
batteries
begin
to
run
down,
tbe
volume
of
tbe
FS750
will
decrease
and
tbe
sound
quality
will
begin
to
change
or
deteriorate.
Tbe
unit
may
begin
to
malfunction.
At
tbat
time,
you
sbould
replace
all
six
of
tbe
batteries.
Do
not
mix
battery
types
(or
new
batteries
witb
old
ones),
as
tbis
may
cause
problems
sucb
as
battery
fluid
leakage.
Remove
tbe
batteries
when
not
using
the
FS750
for
long
periods
of
time.
B-1