KaZAM Thunder 345L User manual

1
KAZAM Thunder 345L
User Manual

2
©2013 Kazam Mobile Ltd. All rights are reserved. Kazam, the Kazam logo and the
Kazam icon are trademarks of Kazam Mobile Ltd. No part of this document can be
reproduced without permission. All trademarks and brand names mentioned in this
publication are property of their respective owners.
While all the efforts have been made to ensure the accuracy of contents in this
manual, we presume no responsibility for errors or omissions or statements of any
kind, whether such errors are omissions or statements resulting from negligence,
accidents, or any other cause. We operate a policy of continuous development
and reserve the right to make changes, modifications and improvements to the
device, device features/specifications or any of its parts without prior notice.
Your device may have preinstalled bookmarks and links for third party internet sites
and may allow you to access third party sites. These are not affiliated with us, and
we do not endorse or assume liability for them. If you access such sites take
precautions for security or content.
The limited warranty does not cover user manuals or any third party software,
settings, content, data or links, whether included in, or downloaded to the product,
whether included during installation, assembly, shipping or any other time in the
delivery chain, or otherwise and in any way acquired by you. To the extent
permitted by applicable law(s), we do not warrant that any of our software will meet
your requirements, will work in combination with any hardware or software
applications provided by a third party, that the operations of the software will be
uninterrupted or error free or that any defects in the software are correctable or will
be corrected.
User Manual is provided to guide the user about the functionality of the device. It
does not constitute any certificate of technology. Some functions may vary due to
modifications and upgrades of software, or due to printing mistake.
Please read the following safety guidelines before using the device.
Do not use the mobile phone while you are driving.
Do not place magnetic storage media near your mobile phone, as the
magnetic force from the device may erase the information stored on it.
Keep your mobile phone and its accessories away from children.
ALL RIGHTS RESERVED
SAFETY PRECAUTIONS

3
Mobile phones can interfere with the functioning of medical devices such as
hearing aids or pacemakers. People with active medical implants should
keep their mobile phone at least 15 cm away from the implant.
Permanent hearing loss may occur if you use earphones or headphones at
high volume.
Use a wireless hands-free system (headphone/ headset) with a low power
Bluetooth emitter.
Make sure the mobile phone has a low SAR.
Keep your calls short or send a text message (SMS) instead. This advice
applies specially to children adolescents and pregnant women.
Use mobile phone when the signal quality is good.
Notice:
Warranty is invalidated if the mobile phone or accessories are dismantled, the
manufacturer will not be liable to pay for damages.
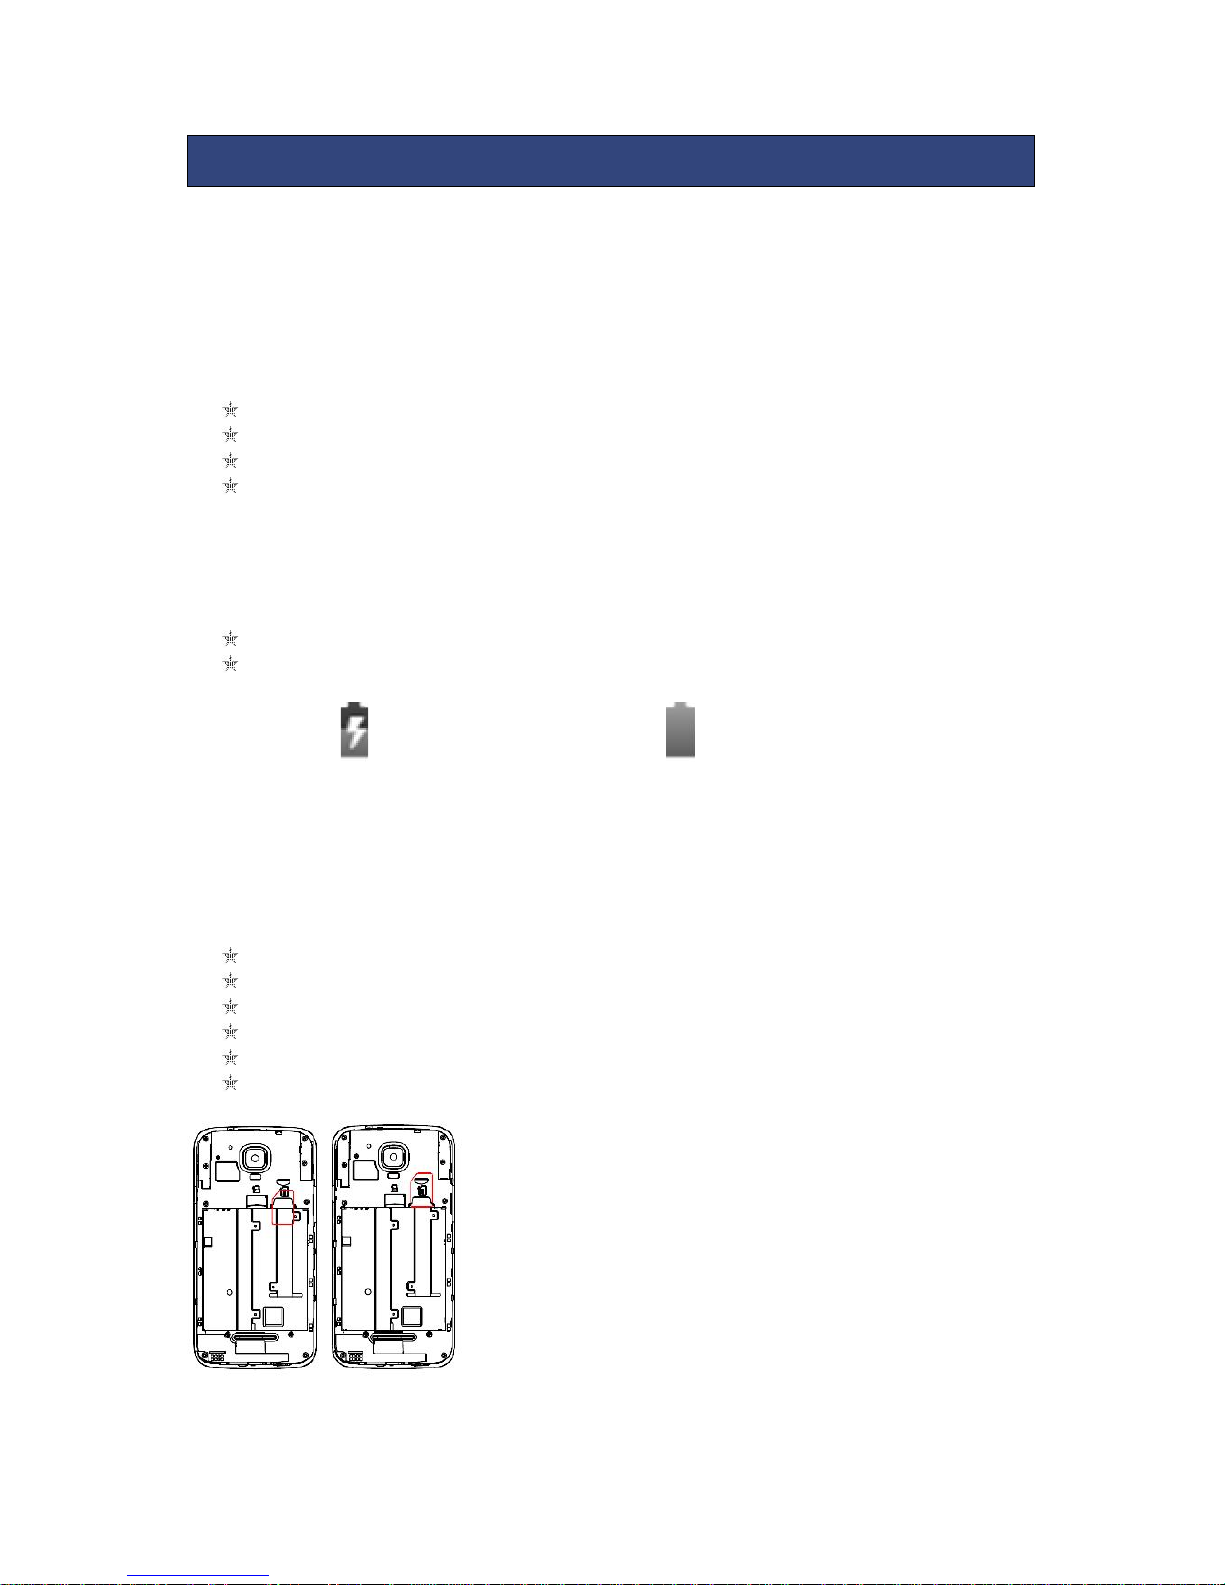
Only use original batteries and charging devices.
Back up important data regularly and store it properly. The manufacturer is
not liable for any loss of data due to mis-operation, poor signal or power cut,
etc.
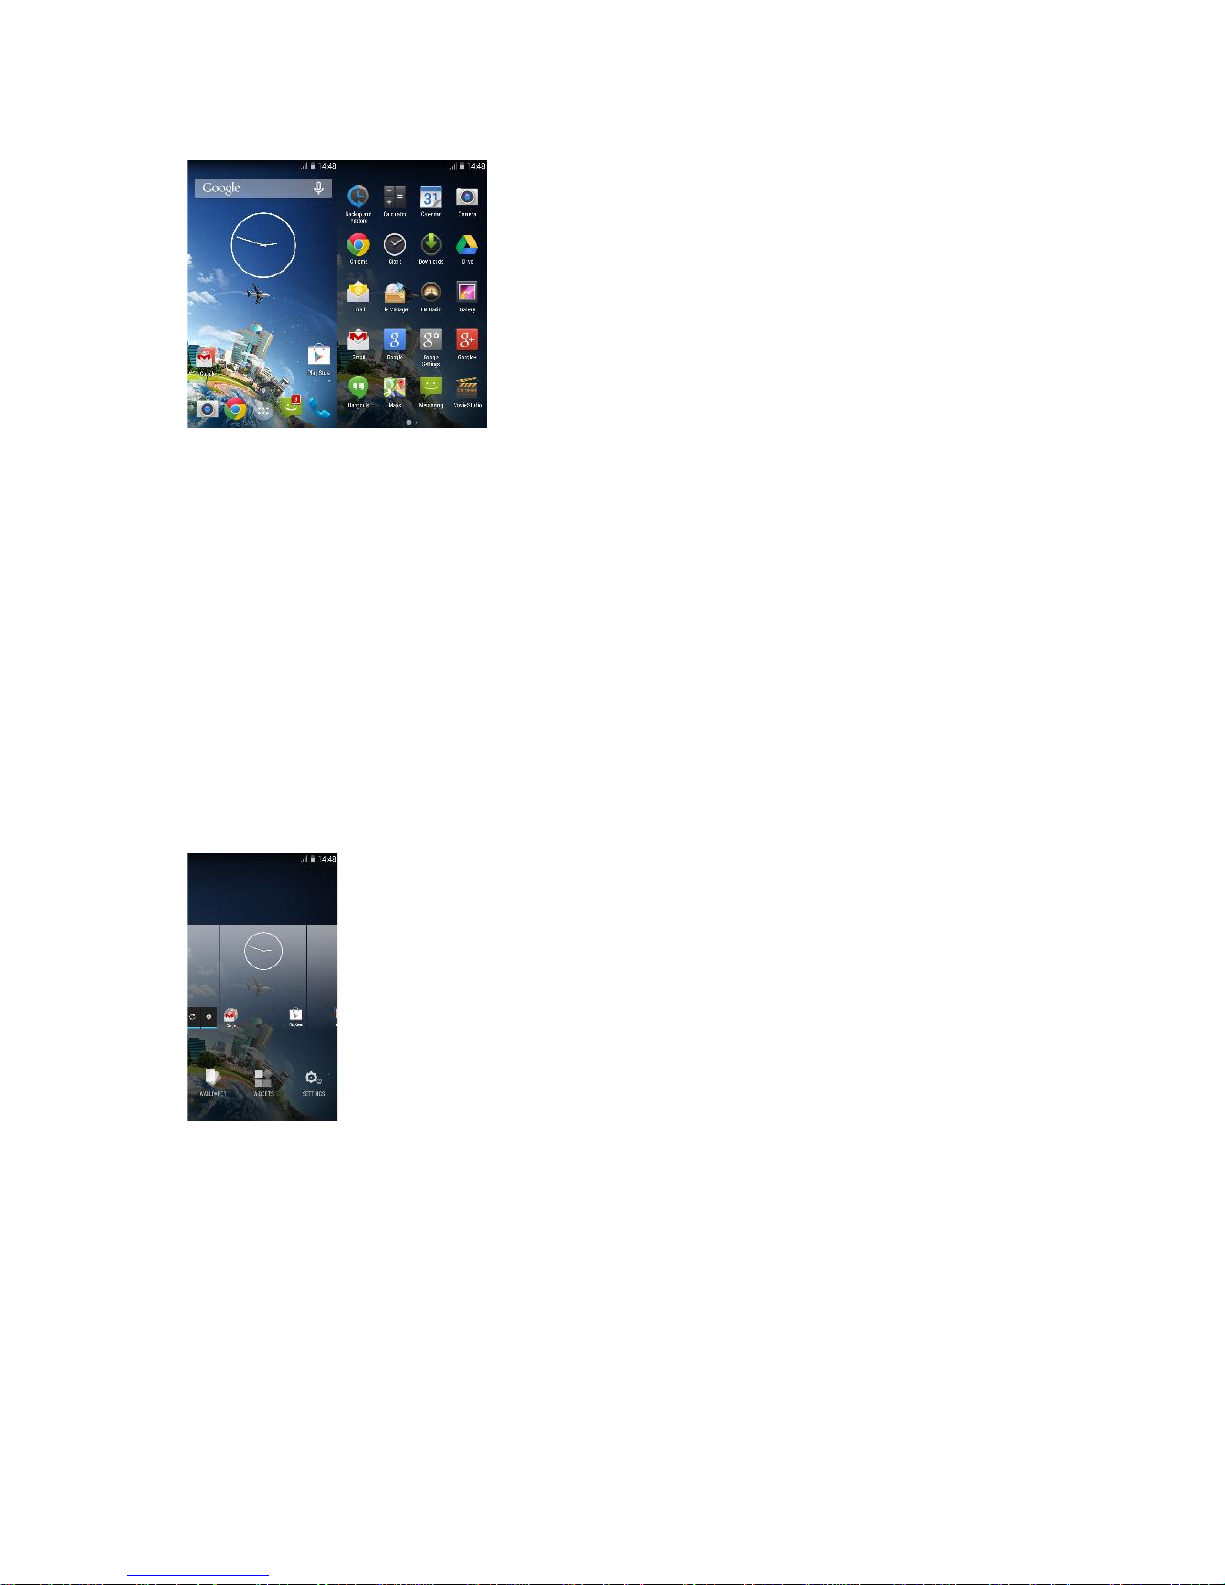
All screen images in this manual are for reference only, content displayed
may depend on the pre-setting of the service provider, the network operator
or the SIM card. If any functions referred to in this manual are different from
those of your device, please follow your device.
Do not put use it in a place with flammable gas such as a petrol pumps. The
temperature recommended for using the device is 10-55℃. Do not touch the
charger, power cable or socket with wet hands. This may cause an electric
shock.
Our cellular phones are in accordance with the communication industry
standards of PRC,and also according in accordance with standards of
European,and are approved for GSM networks.
Your phone may be used internationally with various networks depending on your
roaming arrangements with your service provider.
Only use the chargers listed in the manufacturer’s catalogue should be used.
Using any other charger may be dangerous and would also invalidate your
warranty. Line voltage must be exactly the one indicated on the charger’s serial
plate.
Your phone is a radio transmitter which may interfere with electronic medical
equipment or implants, such as hearing aids, pacemakers, insulin pumps, etc. It is
recommended that a minimum separation of 15cm be maintained between the
phone and an implant.
If your mobile phone or any of its accessories do not function normally,
please contact Kazam customer support. The qualified personnel will assist
you, and if necessary will arrange for a repair.

4
ALL RIGHTS RESERVED 1
SAFETY PRECAUTIONS 2
TABLE OF CONTENTS 4
1. UNDERSTANDING YOUR DEVICE 5
1.1. GENERAL INFO 5
1.2. DEVICE OVERVIEW 5
2. GETTING STARTED 6
2.1. INSTALLING CARDS& BATTERY 7
2.2. POWERING ON/OFF THE DEVICE 7
3. BASIC OPERATIONS 7
3.1. Switch Main Menu style 7
3.2. Home screen 8
4. CAMERA 9
5. GPRS/WLAN NETWORK 9
6. U-DISK STORAGE 9
7. MUSIC 10
8. BLUETOOTH 10
9. CALL MENU 11
10. FUNCTION MENU 11
10.1. File management 12
10.2. Sending an Email 12
10.3. Dialing 12
10.4. Call 13
10.5. Calculator 13
10.6. Chrome 13
10.7. Voice Recorder 13
10.8. Calendar 14
10.9. Settings 14
10.10. Clock 15
10.11. FM Radio 15
10.12. Voice Search 16
10.13. Contacts 16
10.14. Gallery 16
10.15. Messaging 17
10.16. Notification menu 18
10.17. Download content 18
10.18. Call records 18
10.19. Widget 18
10.20. Selecting wallpaper source 19
11. SPECIFICATION 20
TABLE OF CONTENTS

5
1.1 GENERAL INFO
KAZAM Thunder 345L has a 4.5” FWVGA screen with 480*854 resolution. It has a fixed
focus camera, an 1800mAh battery and expandable memory. It supports MMS, SMS
and Bluetooth.
1.2 DEVICE OVERVIEW
1.UNDERSTANDING YOUR DEVICE

6
2.1 INSTALLING SIM CARDS & BATTERY
Please switch off your device before removing the battery,inserting a SIM or memory
card.
Installing Battery
To install the battery please follow the steps below:-
Remove the back cover of the device.
Hold the device with the front facing downwards.
Insert the battery ensuring it is the correct way round.
Replace the battery cover until it clicks into place.
Charging the Battery
The device prompts a warning tone and message indicating insufficient battery
when the battery power is low. Please follow the instructions below to charge your
device:-
Plug the connector of the charger into the micro USBport on the device.
Plug the charger into a standard AC wall outlet.
Charging……. Fully Charged…….
It is recommended to fully charge the battery before using the device for the first
time.
Installing SIM Card
In order to install you SIM card, follow the steps below:
Remove the back cover of the device.
Hold the device with the front facing downwards.
Remove the battery.
Insert the SIM cardinto the device as shown below.
Replace the battery.
Replace the battery cover until it clicks into place.
Installing Memory Card
2. GETTING STARTED

7
Your device supports micro SD card, which is a multimedia memory card used to
increase the memory of the device. The micro SD card is small and should be
installed carefully to avoid any kind of damage. Please follow the steps below to
install the memory card in the device:
Remove the back cover of the device.
Hold the device with the front facing downwards.
Remove the battery
Slot the micro SD card into the device as shown below.
Replace the battery.
Replace the battery cover until it clicks into place.
2.2 POWERING ON/OFF THE DEVICE
To power off your phone, press & hold POWER key. On release, the Phone options
menu opens. Select ‘Power off’and confirm.
To power on again, press & hold POWER key.
3.1 Switch Main Menu style
(1) In default Home screen, slide your fingertip left and right along the screen to
reveal more home screen.
(2) On Home screen, click icon on the bottom of the screen (Main menu
icon) to enter the main menu screen, slide your fingertip left and right
3. BASIC OPERATIONS

8
along the screen to reveal the more applications.
3.2. Home screen
(1) Read your notifications
When you see a notification in the status bar, touch the bar and slide your finger
down the screen to open the list of notifications displayed in the sliding window.
Ongoing notifications report activities such as call forwarding ON, current call status,
song playing.
Notifications report the arrival of new messages, calendar events, and alarms. You
can clear notifications list by selecting ‘Clear’ notifications at the top of the
notifications window.
To open the message, reminder or other notification, you can touch the items. To
close the notifications window, slide your finger up the screen.
(2) Create Home screen shortcuts and widgets:
From the Home screen, touch the main menu, and then click the WIDGETS. Touch &
hold to pick up a widget to select a shortcut to some of your saved information
(such as a play list), a widget (a clock) for your Home screen.
(3) Move objects on the Home screen
·To move an icon or other item on the Home screen, you must first touch & hold it
to enter move mode. The object will magnify when it’s ready to be moved.
·Without lifting your finger (or you’ll drop out of move mode), drag the object to
the new position. To move an item to a section of the Home screen not in view,
move it to the edge of the screen and hold it there for a moment. The screen view
will shift; position the object and release.

9
All the pictures you can capture or view on your phone are stored on a memory
card, which must be installed in your phone. Before you can use the Camera or view
pictures in Pictures, make sure you have a card installed.
Your device’s networking capabilities allow you to access the Internet or your
corporate network through WLAN, GPRS, EDGE (if available)
You can also add and set up a VPN or proxy connection.
To use WLAN on your device, you need access to a wireless access point
Note: The availability and range of your device’s WLAN signal depends on the
number, infrastructure, and other objects through which the signal passes.
To open the Browser you need to be connected to a network.
This phone supports movable storage, i.e., the U-disk function.
When the phone is switched on, you see the icon in the status bar on the top of the
screen when its connected to a PC by a data line. Touch the bar and slide your
finger down the screen to open the list of notifications displayed in the sliding
window. Select [USB connected] and touch [Turn on USB storage] to confirm, you
can use the phone as a U-disk.
4. CAMERA
5. GPRS/WLAN NETWORK
6. U-DISK STORAGE

10
Your music is organized into four categories: Artists, Albums, Songs, and Play lists.
Select a category to view the lists within each. Once in a category, keep selecting
until you reach the music you want to play.
The phone supports Bluetooth( BT) functions, you can establish a wireless connection
between the phone with other compatible devices, and data transmission, you can
establish a wireless connection between devices in the phone with a distance of up
to 10 meters. Bluetooth connection may be interference by obstacles, such as walls
or other electronic device.
1. Enter the setting menu, Touch the Bluetooth to open the function, idle screen will
display BT icon in the status bar.
2. Open the BT discoverable, and other devices can search the phone.
3. Before using the phone as a Bluetooth device, you need to pair the phone with
the target device as follows:
-Sure your phone has Bluetooth-enabled.
-Touch "Scan for devices." Bluetooth devices within the range of the phone will start
scanning.
-Touch the device you want to pair, to confirm password to complete the pairing.
7. MUSIC
8. Bluetooth

11
You can use Bluetooth to share the pictures, videos or music files with family and
friends.
The Call menu is only visible during an active call, and features such as Call Waiting,
Call Diverting, and Multiple-party Call are network dependent. Contact your
network service provider.
The call options include:
▪Mute
Do not send local voice.
▪Hands free
Switch on the loudspeaker to amplify the voice.
▪Hold
Put the current call on hold or retrieve the call on hold.
▪End a call.
End the current call.
▪New call
Make another new call
▪Click Menu key -- start voice recording
Start voice recording.
10.1 File Management
9. Call menu
10. Functional Menu

12
The file management is composed of SD card ,SD card is the external Memory. In
the file management, files can be searched rapidly, Deleted or edited in each card
and new files can be created.
10.2 Sending an Email
You can send an Email to anyone who has an Email address.
Entering the procedure and set an account, you can click the account so that you
come into the account already created, you can also activate, compile and
create an account and then delete the operating. The email can be sent and
received just like in a computer. This procedure requires the network support.
10.3 Dialing
When dialing, you can have a quick access to the call records, contacts and digit
dial keyboard(used for manual dialing) by the menu key on the screen.

13
10.4 Call
Click a number portrait in the phonebook, and you can do these things instantly:
dial, send a message and make a call. During call, you can select applications such
as adjusting it to mute mode, switching to robot portrait, turning off the voice and
intercepting photos to SD card.
10.5 Calculator
Your phone provides a calculator with 4 basic functions for the convenience of your
calculating.
Press this button , and you delete the input and output in bitwise.
10.6 Chrome
The browser allows you to surf on the net and browse the page just like on the
computer. You can create on the phone a bookmark and synchronize it with
computer. You can have a quick access to your favorite sites on the main screen.
You could view web pages in longitudinal or transverse mode. The page rotates
according to the rotation of the phone and automatically adjusts to fit the page.
10.7 Voice Recorder
The recorder could be used to record audio files.
To start voice recording: Tap
To end voice recording: Tap
To play back voice recording: Tap

14
The audio files are automatically stored on your phone. Click the Menu key, and you
can operate and set the recorded voice. The file can be in document
management and various players can be selected to play the voices.
10.8 Calendar
Calendar allows you to view your schedules and events at any time. You may view
schedules one by one or several ones at the same time.
Select to show calendar by day, week or month. If “by week (or month)”, the
calendar will be shown by week (or month). This application is convenient for you to
view schedule or add events.
10.9 Settings
● SIM management: Sim card can be managed and made settings.
● Wi-Fi: Wi-Fi can be turned on or off and made some settings.
● Bluetooth: Bluetooth can be turned on or off and settings are made.
● Data usage: It makes you in full awareness of the usage of the information.
● More: Click more and you will set up flight mode and VPN and more.
● Audio profiles: General, silent, meeting and outdoor optional. In the meanwhile,
customized setting-up of some scene modes are allowed.
● Select a mode and enter the customized setting-up, operational are vibration,
volume, ring tones, notifications and key beep, etc.
● Display: Customized setting-up of the phone luminance, wallpaper, the screen
and screen time-out and font size is allowed.
● Storage: The internal memory of the storage card and of the phone is shown.
● Battery: The usage detail of the battery is shown.
● Applications: View/manage and delete the applications on your phone.

15
● Account and synchronization: Set the synchronization of your phone account with
your phone.
● Location access: Set the service during the locating.
● Security: Set unlocking pattern; lock the SIM card; set the SD card.
● Language and input: Select a language and input method.
● Backup and reset: Reset DRM and restore factory settings to clear all personal
data on your phone.
● Date and time: Set current time and date.
● Schedule power on/off : set the time to turn on or off your phone.
● Accessibility : Some accessibility functions can be set.
● Developer options: Set some options used by developers.
● About phone: View the model, service status, mobile software and hardware
information, etc.
10.10 Clock
● Clock
Enter the menu to display the current time.
● Alarms
Your phone provides many groups of alarm clocks. Select one of them to edit and
customize alarm clock.
10.11FM Radio
Wear your earpieces of radio before searching for channels.

16
Glossary:
Channel list : Display the list of FM radio channels. You can select to play one of
them. (the list can contain 20 channels maximum)
Search : Select this option to automatically search for channels and generate the list
of channels.
Loudspeaker : Press the button to use the radio loudspeaker.
and : Tap to move to another channel.
► and (: Tap to broadcast and pause.
10.12 Voice Search
You can locally search for the information you need.
10.13 Contacts
“Contacts ” lets you easily call your colleagues or friends, or send emails or short
messages to them. You may add contacts directly from your phone, or synchronize
“contacts” with any application on your computer. You may open “contacts ”
directly from the Main screen, or open it via the “Dialing” application.
Add a contact:
To add a contact, directly enter the name and phone number, or import the name
and phone number from the SIM card. (The number of contacts you can add is
limited by the memory of your phone.)
Search for contacts:
To search for a contact, press the Search key in search screen, and a search box will
pop up. In the search box, enter the key words, such as first name, second name
and company name. While you are entering the key word, the matching contacts
immediately appear.

17
Edit a contact:
To edit details of a contact, select “Edit a contact”.
Delete a contact:
To delete the current contact, select “Delete a contact”.
From the menu, you can also synchronize with/share an account or import/export a
contact.
10.14 Gallery
Gallery is a picture manager that typically exhibits miniatures, supports the features
of “save picture”, “set pictures as desktop” and “share picture”.
10.15 Messaging
Messaging lets you send text and multimedia messages to any contact that has an
SMS device. The multimedia messages include photos, video clips (for iPhone 3GS or
other new style phones), contacts information, and voice memos. What’s more, you
can send messages to several contacts at the same time.
Note: Perhaps Messaging is not available in all countries and regions. Probably you
need pay for using Messaging. For more information, consult your network operator.
As long as you are within the network, you can use “Messaging”. As long as you can
make a call, you can send messages. You probably have to pay for sending or
receiving messages, depending on your network operator.
Send a message: Tap it, enter the number and name of the contact or select the
contact from Contacts. Tap the text box above keypad, enter the information and
then tap “Send”.
After selecting the number, you can select such options as Call, Add subject, Attach,
Insert facial expression, and more.
Tap Settings to set ringtone, Delivery reports, and maximum quantity of messages.
10.16 Notification Menu
Slide and pull down menu on the main interface, you can see the message notice
and choose whether to turn on or off WIFI, Bluetooth, off-line mode. In the data
connection, the current SIM is available to make data connection of GPRS. Slide it
around you can see the options of profile for your convenience.

18
10.17 Download Content
You can download through the browser things and pictures you want and list them
in the Download Content menu.
10.18 Call Records
Come into the call records, you can view missed calls, received calls and outgoing
calls. The calling time is viewed in each record and features such as calling, sending
messages and adding to new contacts can be set. Deleting call records and setting
up speed dial can be done in the menu.
10.19 Widget
Hold down the main screen, you can select the widget:
holding down this widget, you can drag it anywhere you want in the main screen. It
is convenient for you to enter that procedure.

19
10.20 Selecting Wallpaper Source
Hold down the main screen, the options of selecting wallpaper source will appear,
then you can set up wallpapers you like.

20
Main Specification
Display
GSM Bands(MHz)
850/900/1800/1900
Size
4.5'
3G Bands(MHz)
900/2100
Type
TFT
4G Bands(MHz)
800/1800/2600
Resolution
480*854
Internal User Memory
2.3G
Camera
SD Expandable to
32GB
Resolution
0.3M/5.0M
SIM Card Slots
Single
Type
Fixed Focus/Fixed Focus
Size(mm)
134.5 x 67.2 x 9.7
Flash
YES
Weight with Battery
152g
Video
30FPS/40Mbps
Connectivity
Bluetooth
YES
WIFI
YES
USB
YES
AUDIO
3.5MM jack
Applications and Features
MMS
YES
WAP
YES
Alarm
YES
World Clock
YES
Calendar
YES
Games
NO
Calculator
YES
FM Radio
YES
Torch
YES
Charging/Battery/Certifications
Charger
Type
USB
Battery
Removable
YES
Type
Li-ion
Size
1800mAh
Standby time
300 hours
Talk Time
6 hours
* The standby time and maximum talk time depend upon the network signals and
settings.
11. SPECIFICATION
Table of contents
Other KaZAM Cell Phone manuals

KaZAM
KaZAM Life B1 User manual

KaZAM
KaZAM Trooper X3.5 User manual

KaZAM
KaZAM Tornado 348 User manual

KaZAM
KaZAM Trooper2 4.5 User manual

KaZAM
KaZAM Trooper X5.0 User manual

KaZAM
KaZAM Thunder 350L User manual

KaZAM
KaZAM Tornado 2 5.0 User manual

KaZAM
KaZAM Thunder 340W User manual

KaZAM
KaZAM Life B2 User manual

KaZAM
KaZAM thunder 345 User manual