Kemot NAR0238 User manual

Tester napięcia pozwala na szybkie, łatwe i bezpieczne sprawdzenie obecności napięcia.
KWESTIE BEZPIECZEŃSTWA:
1. Nie należy używać testera do wyższych napięć niż pozwala na to instrukcja.
2. Optymalna temperatura pracy urządzenia to -10°C do 50°C, częstotliwość prądu 50-500 Hz.
3. Nie należy wystawiać urządzenia na działanie promieni słonecznych, oraz na wysokościach
bez uziemienia (np. stojąc na drewnianej drabinie).
4. Należy sprawdź stan testera przed użyciem (SELF-TEST).
5. Należy unikać wszelkiego kontakty testera z wilgocią.
6. Ostrze grota detekcyjnego powinno być używane tylko do testowania napięcia na częściach
pod napięciem. Nie należy wykonywać innych prac pod napięciem.
7. Nigdy nie należy używać uszkodzonego testera.
8. Nie należy samemu modykować/naprawiać testera.
OPIS PRODUKTU
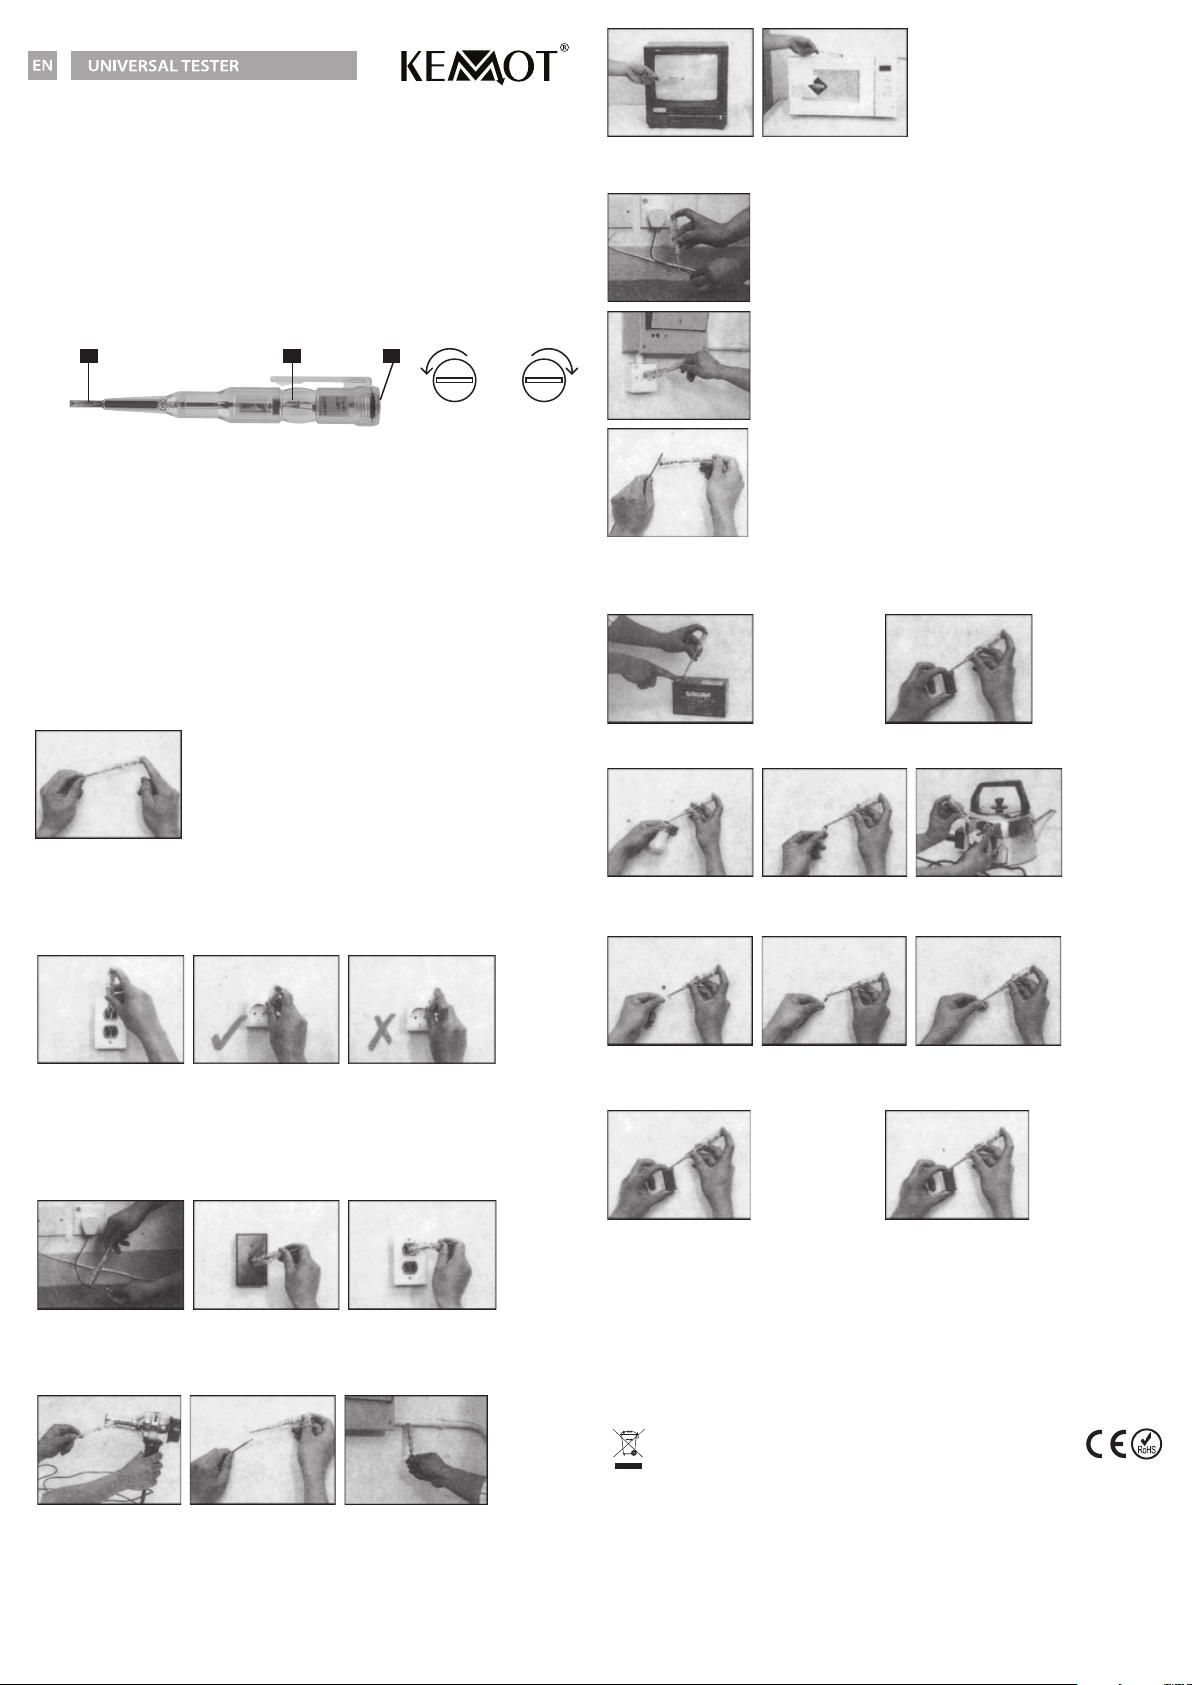
1. Grot detekcyjny
2. Dioda LED
3. Pokrywa baterii
BATERIE
• Do pracy testera potrzebne są dwie baterie typu AG3 lub LR41A (2x 1,5V alkaliczne lub srebrne).
WYMIANA BATERII
Odkręć (przeciwnie do ruchu wskazówek zegara) pokrywę testera przy pomocy odpowiedniego
śrubokręta. Wyjmij pokrywę baterii i ostrożnie odegnij drucik zabezpieczający baterie. Wyjmij
baterie i zamień je na nowe, tego samego typu. Zwróć uwagę na polaryzacje baterii. Zagnij
drucik do pozycji wyjściowej, zamknij pokrywę i zakręć ją do oporu.
Uwaga!
1. Należy uważać, aby podczas wymiany baterii nie wypadła z urządzenia żadna część.
2. Nie należy używać testera bez pokrywy baterii.
3. Należy dobrze przymocować pokrywę baterii.
INSTRUKCJA UŻYTKOWANIA:
SELF-TEST
Przed rozpoczęciem pomiarów należy wykonać „Se-test”, który
zapewni prawidłowe wykrywanie. Aby wykonać „Self-test” dotknij
jedną ręką grota detekcyjnego a drugą pokrywy baterii. Jeżeli dioda
świeci na czerwono, urządzenie jest gotowe do użycia.
TEST NAPIĘCIA
1. Metoda dotykowa (70-250 V AC)
Podczas testu należy trzymać za korpus. Dotknąć grotem detekcyjnym do badanego punktu,
dioda LED zaświeci się po wykryciu fazy napięcia. W przypadku„zera” dioda nie reaguje.
Uwaga: Podczas tego testu nie należy dotykać palcem pokrywy baterii (nie grozi to porażeniem
prądem).
2. Metoda bezdotykowa (70-600 V AC)
a) Identykacja polaryzacji napięcia AC - metoda ta pozwala na „bezdotykowe” wykrywanie
nieciągłości obwodu elektrycznego znajdującego się pod napięciem. Aby wykonać test tą
metodą, należy trzymać tester jak zostało pokazane na rysunku.
Uwaga: Podczas tego testu należy trzymać urządzenie za grot detekcyjny.
b) Wysokie napięcie / urządzenia elektryczne / wyszukiwanie przewodów - służy do wykrywania
napięcia w układzie zapłonowym w samochodach, w kablach i przewodach, nieprawidłowych
połączeń obwodów i braku uziemienia oraz wykrywaniu przewodów w ścianie z cegły/drewna.
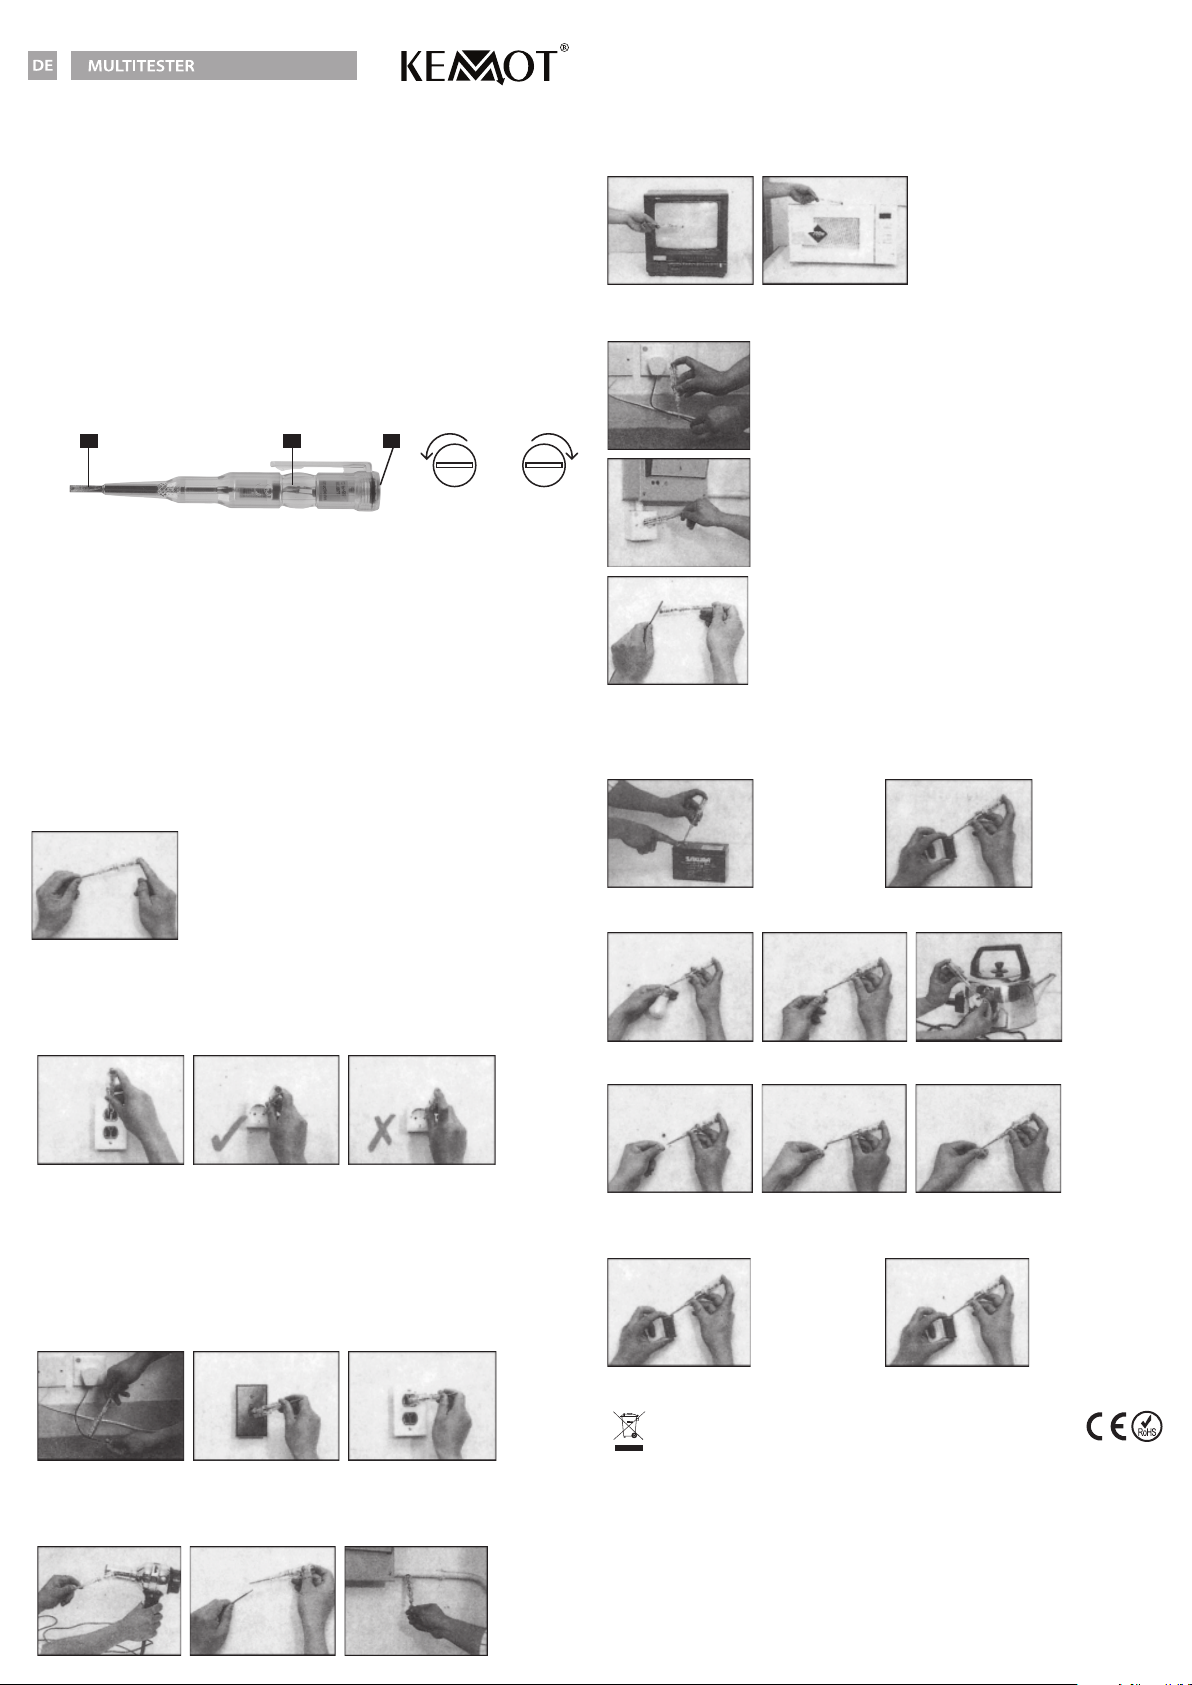
c) Detekcja miejsca „wycieku” mikrofal z kuchenki mikrofalowej lub promieniowania telewizora.
Należy umieścić wewnątrz kuchenki pojemnik z wodą, zamknąć drzwiczki i uruchomić
kuchenkę mikrofalową. Czułość testera należy ustawić na zakres LOW i przesuwać tester
dookoła kuchenki. Miejsce „wycieku” mikrofal z kuchenki wskazuje świecenie diody LED.
Bezpieczna odległość od telewizora sygnalizowana jest przez wyłączenie się diody LED.
WYBÓR CZUŁOŚCI (TYLKO NAPIĘCIE AC)
NISKA CZUŁOŚĆ
Dotknij pokrywy baterii dla lepszego pomiaru.
WYSOKA CZUŁOŚĆ
Aby uzyskać wyższą czułość i lepszą widoczność, trzymając grot
detekcyjny skieruj i dotknij pokrywą baterii w kierunku testowanego
obiektu.
ZMNIEJSZENIE CZUŁOŚCI
Aby zredukować czułość, należy przytrzymać testowany obiekt w ręku.
UWAGA: Czułość może zostać zmniejszona w warunkach wysokiej
wilgotności.
TEST CIĄGŁOŚCI
UWAGA: Należy pamiętać, aby podczas testu odłączyć zasilanie AC lub wysokie napięcie!
1. Test polaryzacji - identykuje biegunowość napięcia DC (3-36 V DC).
Biegun dodatni –
dioda LED świeci
Biegun ujemny –
dioda LED nie świeci
2. Elektryczność - testuje i werykuje połączenie przewodów, wtyczek, gniazdek, żarówek,
elementów grzewczych, wiatraków, opiekaczy.
3. Kontrola podzespołów elektronicznych - idealny dla personelu elektrycznego/techników,
sprawdza/testuje/identykuje stan prostownika, diody, rezystora, kondensatora, tranzystora,
przewodów, kabli komputerowych, płyty drukowanej itp.
4. Test baterii - można również sprawdzić poziom naładowania baterii (1,5 V i więcej).
Naładowana bateria sygnalizowana jest świecącą diodą LED świeci po stronie dodatniej, a
odwrotnie - pokazuje„słaba/rozładowana”bateria.
Bateria naładowana
– dioda LED świeci
Bateria słaba/
rozładowana
– dioda LED nie
świeci
SPECYFIKACJA
• Test napięcia:
Dotykowy: AC 70 – 250 V
Bezdotykowy: AC 70 – 600 V
• Test polaryzacji: DC 3 – 36 V
• Test ciągłości: 0 – 50 MΩ
• Temperatura pracy: -10°C ~ 50°C
• Zakres częstotliwości pracy: 50 – 500 Hz
• Zasilanie: 2x 1,5 V bateria AG3 lub LR41
• Żywotność baterii: do 5 h (praca ciągła)
1 2 3
OTWÓRZ ZAMKNIJ
Poland
Prawidłowe usuwanie produktu
(zużyty sprzęt elektryczny i elektroniczny)
Oznaczenie umieszczone na produkcie lub w odnoszących się do niego tekstach wskazuje, że po
upływie okresu użytkowania nie należy usuwać z innymi odpadami pochodzącymi z gospodarstw
domowych. Aby uniknąć szkodliwego wpływu na środowisko naturalne i zdrowie ludzi wskutek
niekontrolowanego usuwania odpadów, prosimy o oddzielenie produktu od innego typu odpadów
oraz odpowiedzialny recykling w celu promowania ponownego użycia zasobów materialnych jako
stałej praktyki. W celu uzyskania informacji na temat miejsca i sposobu bezpiecznego dla środowiska
recyklingu tego produktu użytkownicy w gospodarstwach domowych powinni skontaktować się z
punktem sprzedaży detalicznej, w którym dokonali zakupu produktu, lub z organem władz lokalnych.
Użytkownicy w rmach powinni skontaktować się ze swoim dostawcą i sprawdzić warunki umowy
zakupu. Produktu nie należy usuwać razem z innymi odpadami komercyjnymi.
Wyprodukowano w CHRL dla LECHPOL ELECTRONICS Sp. z o.o. Sp.k., ul. Garwolińska 1, 08-400 Miętne.
INSTRUKCJA OBSŁUGI
SAFETY INSTRUCTIONS:
1. The tester should not be used to test voltages above standard rated voltage.
2. Perfect indication is only assured in temperature range -10°C to 50°C, and frequency range 50-500 Hz.
3. The perceptibility of the indication can be impaired: in unfavorable lighting conditions (e.g.
in sunlight) or in unfavorable positions (e.g. on wooden runged ladders etc.).
4. The tester must be tested for perfect function before use (SELF-TEST).
5. The tester must not be used in the presence of moisture (e.g. dew or rain).
6. The sensing tip should only be used for testing voltage on live. Other work must not be
carried out without isolating the voltage.
7. Never use damaged tester.
8. Static electricity may generate by rubbing the plastic body this causing false indication).
9. Never try to modify/repair any components of the tester.
PRODUCT DESCRIPTION
1. Sensing tip
2. LED light
3. Battery cover
BATTERIES REPLACEMENT
• Type: 392A, AG3, LR41, 192; V3GA (2x1.5 V alkaline or silver type)
HOW TO REPLACE THE BATTERIES
Unscrew the battery cover completely in anticlockwise direction, gently straighten the wire over
the batteries. Replace batteries with negative (-) side at inside position ant then bend the wire back.
Caution!
1. Never attempt to take any parts out except replacing batteries.
2. Do not operate tester with the battery cover removed.
3. Please, sure the battery cover is screw tightly (clockwise direction)
QUICK OPERATING GUIDE:
SELF-TEST
Prior to use, please perform a “Self-test” to ensure guaranteed
indicating. While “Self-test” touch the sensing tip and other hand
touch battery cover.
Red LED lights up indicating good functioning.
TESTING AC VOLTAGE
1. Contact method (70-250 V AC)
While testing the sensing tip must be in direct contact with the Live/hot part of the AC voltage.
Red LED lights up indicating the presence of AC voltage. Also whenever neutral or earthing/
ground is disconnected, the red LED will light up indicating a fault line in the system.
Note: When in direct contact method, it is not recommended to touch the battery cover of the
tester. (Of course, it is absolutely safe even when touching it).
2. Non-contact method (70-600 V AC)
a) Identifying polarity of AC Voltage - holt the tester as shown. To locate Live/hot side of wire
gently trace the tester along the wire. Live/hot side is indicated by red LED light. Fault point in
the Live/hot wire is indicated by an interruption in light. Instantaneous nding of AC Voltage is
also obtained by tester when placed near socket, plug, wire inside PVC conduit etc.
Note: To increase the sensitivity, hold tester by the sensing tip.
b) High Voltage/electrical appliances/hidden wire check - detects high voltage, such as in car
ignition system. High voltage in transformer/wire, improper connection of circuits and
ungrounding in electrical appliances, wire inside wooden/dry wall etc.
c) Great for modern home/Do-It-Yourself. It is great for education and must have in modern home.
Educates children don’t watch TV at a close distance due to static radiation. Also, it checks for
microwave leakage in a microwave. Approximate safe distance is obtained by LED light turns o.
• Place a cup of water inside the microwave (as it is not safe to operate the oven empty).
• Set the microwave to 1 minute at high and turn on.
• Move the tester slowly over all around the door edge and also front glass of microwave. LED
lights up when microwave leakage is detected.
SENSITIVITY SELECT (AC VOLTAGE ONLY)
LOW SENSITIVITY
For more sensitivity, while testing touch the battery cover.
HIGH SENSITIVITY
To obtain higher sensitivity and perfect visibility, hold the sensing tip
and place battery cover towards the object being tested.
REDUCE THE SENSITIVITY
To reduce the sensitivity, place your other hand the object being
tested (e.g. grip the wire).
NOTE: The sensitivity may be reduced under high humidity
environment.
CONTINUITY TEST
CAUTION: Be sure to disconnect any AC mains or high voltage!
1. Polarity check - Identies the polarity of DC Voltage (3-36 V DC). Lights up at positive (+) only.
Positive – lights up Negative – lights o
2. Electrical check - Tests and veries the connection of wire, plug, socket, fuse, bulb, heater/
heating element, toaster, fan etc.
3. Electronic Component Check - Ideal for electronic personnel/technician, since it can test/
check/identify the condition of rectier, diode, resistor, capacitor, transistor, cable, computer
cable, PCB etc.
4. Battery test - It can roughly test the condition of battery cell (1,5 V and up). A normal battery
is when the LED lights up at the positive (+) side, while a reverse indication shows a weak/
drained battery.
Normal - lights up. Weak/drained –
lights o
SPECIFICATIONS
• AC voltage test:
Contact: AC 70 – 250 V
Non-contact: AC 70 – 600 V
• Polarity test: DC 3 – 36 V
• Continuity test: 0 – 50 MΩ
• Operating temperature: -10°C ~ 50°C
• Frequency range: 50 – 500 Hz
• Power supply: 2x 1,5 V AG3 or LR41 battery
• Battery lifespan: up to 5 h (continuous operation)
1 2 3
OPEN CLOSE
English
Correct Disposal of This Product
(Waste Electrical & Electronic Equipment)
(Applicable in the European Union and other European countries with separate collection systems)
This marking shown on the product or Its literature, indicates that It should not be disposed with
other household wastes at the end of its working life. To prevent possible harm lo the environment
or human health from uncontrolled waste disposal, please separate this from other types of wastes
and recycle it responsibly to promote the sustainable reuse of material resources. Household users
should contact either the retailer where they purchased this product, or their local government oce,
for details of where and how they can take this item for environmentally safe recycling. Business users
should contact their supplier and check the terms and conditions of the purchase contract This product
should not be mixed with other commercial wastes for disposal.
Made in China for LECHPOL ELECTRONICS Sp. z o.o. Sp.k., ul. Garwolińska 1, 08-400 Miętne.
OWNER’S MANUAL
SICHERHEITSANLEITUNGEN:
1. Der Tester sollte nicht zum Prüfen von Spannungen über der Standardnennspannung
verwendet werden.
2. Eine einwandfreie Anzeige ist nur im Temperaturbereich -10°C zu 50°C und im
Frequenzbereich 50-500 Hz gewährleistet.
3. Die Wahrnehmbarkeit der Anzeige kann beeinträchtigt sein: unter ungünstigen
Lichtverhältnissen (z.B. bei Sonnenlicht) oder in ungünstigen Positionen (z.B. auf hölzernen
Sprossenleitern usw.).
4. Der Tester muss vor Gebrauch auf einwandfreie Funktion getestet werden (SELBSTTEST).
5. Der Tester darf nicht in Gegenwart von Feuchtigkeit (z.B. Tau oder Regen) verwendet werden.
6. Die Messspitze sollte nur zum Testen der Spannung an Spannungsführenden Teilen
verwendet werden. Andere Arbeiten dürfen nicht ohne Trennung der Spannung
durchgeführt werden.
7. Verwenden Sie niemals beschädigte Tester.
8. Durch Reiben des Kunststogehäuses kann statische Elektrizität entstehen, die eine falsche
Anzeige verursacht).
9. Versuchen Sie niemals, Komponenten des Testers zu ändern / reparieren
PRODUKTBESCHREIBUNG
1. Messspitze
2. LED Leuchte
3. Batteriefachdeckel
ERSATZBATTERIEN
• Type: 392A, AG3, LR41, 192; V3GA (2x1,5 V Alkali oder Silbertyp)
BATTERIEN ERSETZEN
Schrauben Sie den Batteriefachdeckel vollständig gegen den Uhrzeigersinn ab und richten
vorsichtig den Draht über den Batterien aus. Ersetzen Sie die Batterien mit der negativen (-) Seite
an der Innenseite und biegen dann den Draht zurück.
Vorsicht!
1. Versuchen Sie niemals, Teile zu entfernen, außer den Batterien zu ersetzen.
2. Betreiben Sie nicht den Tester mit abgenommenem Batteriefachdeckel.
3. Bitte achten Sie darauf, dass der Batteriefachdeckel fest angezogen ist (im Uhrzeigersinn)
SCHNELLSTARTANLEITUNG:
SELBSTTEST
Vor dem Gebrauch bitte einen„Selbsttest”durchführen, um eine sichere
Anzeige zu gewährleisten. Während des „Selbsttest” die Messspitze
berühren und mit der anderen Hand den Batteriefach-Deckel berühren.
Rote LED leuchtet auf und zeigt einwandfreie Funktion.
AC SPANNUNGSTEST
1. Kontaktmethode (70-250 V AC)
Während der Prüfung muss die Messspitze in direktem Kontakt mit dem Spannungsführenden
/ heißen Teil der Wechselspannung stehen. Rote LED leuchtet auf und zeigt das Vorhandensein
von Wechselspannung an. Auch wenn der Neutralleiter oder die Erdung unterbrochen wird,
leuchtet die rote LED auf und zeigt so eine Störungslinie im System an.
Hinweis: Bei direktem Kontakt wird empfohlen, den Batteriefachdeckel des Testers nicht zu berühren.
(Natürlich ist es absolut sicher, auch wenn man ihn berührt).
2. Berührungslose Methode (70-600 V AC)
a) Identizierung der AC Spannungspolarität - Halten Sie den Tester wie angezeigt. Um die aktive
/ heiße Seite des Drahts zu lokalisieren, führen Sie den Tester vorsichtig entlang des Drahtes.
Die aktive / heiße Seite wird durch rotes LED-Licht angezeigt. Der Fehlerpunkt im aktiven- /
heißen Draht wird durch eine Unterbrechung des Lichts angezeigt. Der sofortige Nachweis der
Wechselspannung wird auch durch den Tester erhalten, wenn er in der Nähe von Steckdose,
Stecker, Kabel innerhalb von PVC-Leitung usw. platziert wird.
Hinweis: Um die Empndlichkeit zu vergrößern, halten Sie den Tester an der Messspitze.
b) Hochspannung/ elektrische Geräte/ überprüfen versteckter Kabel - Erkennt Hochspannung, wie
z.B. im Autozündsystem. Hochspannung in Transformatoren / Kabel, unsachgemäßer Anschluss
von Stromkreisen und fehlende Erdung in Elektrogeräten, Kabel in Holz / Trockenbau usw.
c) Ideal für ein modernes Zuhause / Mach es selber - Es ist großartig für Bildung und ein muss in
einem modernen Zuhause. Erzieht Kinder, sich nicht zu nah am Fernseher zu benden, wegen
statischer Strahlung. Außerdem prüft es auf Mikrowellenaustritt an einer Mikrowelle.
Approximative sichere Entfernung ist gewährleistet bei erloschener LED.
• Stellen Sie eine Tasse Wasser in die Mikrowelle (da der leere Mikrowellenofen nicht
gefahrlos betrieben werden kann).
• Stellen Sie die Mikrowelle auf Hoch und schalten sie für 1 Minute ein.
• Bewegen Sie den Tester langsam über die gesamte Türkante und auch das Frontglas der
Mikrowelle. LED leuchtet, wenn Mikrowellenaustritt erkannt wird.
EMPFINDLICHKEIT AUSWÄHLEN (NUR WECHSELSPANNUNG)
NIEDRIGE EMPFINDLICHKEIT
Für mehr Empndlichkeit, berühren Sie den Batteriefachdeckel
während des testen.
HOHE EMPFINDLICHKEIT
Um eine höhere Empndlichkeit und perfekte Sichtbarkeit zu
erreichen, halten Sie die Messspitze und richten den Batteriefach-
Deckel in Richtung des zu prüfenden Objekts.
EMPFINDLICHKEIT VERRINGERN
Um die Empndlichkeit zu verringern, legen Sie die andere Hand auf
das zu testende Objekt (z.B. den Draht).
HINWEIS: Die Empndlichkeit kann in Umgebungen mit hoher
Luftfeuchtigkeit verringert sein.
DURCHGANGSPRÜFUNG
VORSICHT: Achten Sie darauf, alle AC-Netzspannungen oder Hochspannungen zu trennen!
1. Polarität überprüfen - Identiziert die Polarität der DC-Spannung (3-36 V DC). Leuchtet nur
bei positivem (+).
Positiv – leuchtet auf Negativ – erlischt
2. Elektrische Überprüfung - Testet und überprüft die Verbindung von Kabel, Stecker, Sockel,
Sicherung, Lampenbirne, Heizung / Heizelement, Toaster, Ventilator usw.
3. Elektrische Überprüfung - Testet und überprüft die Verbindung von Kabel, Stecker, Sockel,
Sicherung, Lampenbirne, Heizung / Heizelement, Toaster, Ventilator usw.
4. Batterietest - Es kann den Zustand der Batteriezelle (1,5 V und höher) grob prüfen. Eine
Batterie ist normal, wenn die LED an der positiven (+) Seite leuchtet, während keine Anzeige
eine schwache / entladene Batterie anzeigt.
Normal – leuchtet
auf
Schwach/Entladen–
erlischt
1 2 3
OPEN CLOSE
Deutsch
Korrekte Entsorgung dieses Produkts
(Elektromüll)
(Anzuwenden in den Ländern der Europäischen Union und anderen europäischen Ländern mit einem
separaten Sammelsystem)
Die Kennzeichnung auf dem Produkt bzw. auf der dazugehörigen Literatur gibt an, dass es nach seiner
Lebensdauer nicht zusammen mit dam normalen Haushaltsmüll entsorgt werden darf. Entsorgen Sie
dieses Gerät bitte getrennt von anderen Abfällen, um der Umwelt bzw. der menschilchen Gesundheit
nicht durch unkontrollierte Müllbeseitigung zu schaden. Recyceln Sie das Gerät, um die nachhaltige
Wiederverwertung von stoichen Ressourcen zu fördern. Private Nutzer sollten den Händler, bei dem
das Produkt gekauft wurde, oder die zuständigen Behörden kontaktieren, um in Erfahrung zu bringen,
wie sie das Gerät auf umweltfreundliche Weise recyceln können. Gewerbliche Nutzer sollten sich an
Ihren Lieferanten wenden und die Bedingungen des Verkaufsvertrags konsultieren. Dieses Produkt
darf nicht zusammen mit anderem Gewerbemüll entsorgt werden.
Hergestellt in China für LECHPOL ELECTRONICS Sp. z o.o. Sp.k., ul. Garwolińska 1, 08-400 Miętne.
BEdIENUNGSANLEITUNG
MANUAL dE UTILIZARE
INSTRUCȚIUNI PRIVIND SIGURANȚA
1. Testerul nu trebuie folosit pentru vericarea tensiunilor peste tensiunea nominală standard.
2. Indicarea precisă este sigură doar în intervalul de temperatură -10°C - +50°C, frecvență 50-500 Hz.
3. Indicarea precisă poate afectată de: condiții de iluminare nefavorabile (ex. la lumina directă
a soarelui) sau în poziții nefavorabile (ex. pe scări din lemn).
4. Testerul trebuie vericat dacă funcționează perfect înainte de utilizare (SELF-TEST).
5. Testerul nu trebuie utilizat dacă este umezeală ( ex. rouă sau ploaie).
6. Vârful de detectare poate utilizat doar pentru vericarea tensiunii continue.
Alte lucrări nu trebuie efectuate fără izolarea tensiunii.
7. Nu utilizați niciodată un tester deteriorat.
8. Electricitatea statică poate generată, prin frecarea corpului de plastic, cauzând indicații false.
9. Nu încercați niciodată să modicați/reparați vreun component al testerului.
DESCRIEREA PRODUSULUI
1. Vârf detectare
2. Lumină LED
3. Capac baterii
ÎNLOCUIREA BATERIILOR
• Tip: 392A, AG3, LR41, 192; V3GA (2x 1,5 V, tip alcalina sau cu argint).
CUM SĂ ÎNLOCUIȚI BATERIILE
Deșurubați în sens invers acelor de ceasornic capacul de la baterie, îndreptați ușor rul peste
baterii. Înlocuiți bateriile amplasandu-le cu partea negativă (-) în interior, apoi îndoiți rul la loc.
Atenție!
1. Nu încercați să scoateți nici o alta piesă, cu excepția capacului in cazul înlocuirii bateriilor.
2. Nu utilizați aparatul dacă capacul bateriilor este îndepărtat.
3. Vă rugăm să vă asigurați că capacul bateriilor este bine înșurubat (în sensul acelor de
ceasornic).
GHID RAPID DE FUNCȚIONARE:
SELF-TEST
Înainte de utilizare, vă rugăm să efectuați un ”Self-test” pentru a vă
asigura că indicațiile sunt corecte. În timpul ”Self-Test-ului” atingeți
vârful de detectare, iar cu cealaltă mână atingeți capacul bateriei.
LED-ul roșu luminează și indică o bună funcționare
VERIFICAREA TENSIUNII AC
1. Metoda cu contact (70-250 V AC
În timpul testării, vârful de detectare trebuie să e în contact direct cu tensiunea AC. LED-ul
roșu aprins indică prezența tensiunii AC. De asemenea, ori de câte ori conductorul nul sau
împământarea este deconectată, LED-ul roșu va lumina indicând o eroare în sistem.
Notă: În metoda cu contact direct, se recomandă să atingeți capacul bateriei testerului.
(Bineînțeles că este absolut sigur atunci când îl atingeți).
2. Metoda fără contact (70-600 V AC)
a) Identicarea polarității tensiunii AC - Țineți testerul așa cum arată în imagine. Pentru a localiza
partea„erbinte” a cablului trasați ușor testerul de-a lungul cablului. Această parte este indicată
de LED-ul roșu. Punctul de defecțiune al conductorului cald este indicat de o întrerupere a
luminii. Găsirea instantanee a tensiunii AC este de asemenea obținută de tester atunci când
este amplasat lângă priză, ștecher, cablul din interiorul conductorului din PVC, etc.
Notă: Pentru a crește sensibilitatea, țineți testerul de vârful de detectare.
b) Vericarea aparatelor electrice/de înaltă tensiune/cablurilor ascunse - Detectează tensiuni
înalte, cum ar sistemul de pornire al mașinii, tensiunea înaltă în transformator/cablu,
conexiunea necorespunzătoare a circuitelor și împământarea aparatelor electrice, cablurile din
pereții de lemn etc.
c) Perfect pentru case moderne/ Do-It-Yourself - Este bun pentru educație și trebuie avut într-o
casă modernă. Educă copiii să nu se uite la TV de la o distanță mică din cauza rediațiilor
statice. De asemenea, verică scaparile de microunde ale unui cuptor cu microunde. Distanța
aproximativă de siguranță este obținută prin oprirea luminii LED.
• Puneți un pahar cu apă în cuptorul cu microunde (nu este sigur să utilizați cuptorul gol).
• Setați cuptorul pe 1 minut la temperatură mare și porniți-l.
• Mutați testerul încet peste tot pe marginea ușii și, de asemenea în fața sticlei cuptorului.
• LED-ul luminează când este detectată scurgerea de microunde.
SELECTARE SENSIBILITATE (DOAR TENSIUNE AC)
SENSIBILITATE SCĂZUTĂ
Pentru mai multă sensibilitate, în timpul testării atingeți capacul
bateriei.
SENSIBILITATE MARE
Pentru a obține o sensibilitate mare și o vizibilitate perfectă, țineți
vârful de detectare și plasați capacul bateriei spre obiectul care
trebuie testat.
REDUCEREA SENSIBILITĂȚII
Pentru a reduce sensibilitatea, puneți cealaltă mână pe obiectul testat
(ex. prindeți rul)
NOTE: Sensibilitatea poate redusă într-un mediu cu umiditate
ridicată.
VERIFICARE CONTINUITATE
ATENȚIE: Deconectați orice sursă de curent alternetiv sau de tensiune înaltă!
1. Vericare polaritate - Identică polaritatea tensiunii DC (3-36 V DC). Luminează doar când
este pozitivă (+).
Pozitiv –
luminează
Negativ –
se stinge
2. Vericare electrică - Testează și verică conexiunea cablurilor, ștecherului, prizei, siguranței,
becului, elementelor de încălzire, prăjitorului, ventilatorului etc.
3. Vericarea componentelor electronice - Perfectă pentru personal/tehnician electronic,
deoarece poate testa/verica/identica starea redresorului, diodelor, rezistorului,
condensatorului, tranzistorului, cablutilor, cablurilor de la calculator, PCB etc.
4. Vericare baterie - Poate verica aproximativ starea bateriilor (1,5 V și mai mare). O baterie
normală este când LED-ul luminează pe partea pozitivă (+), în timp ce o indicație inversă
arată o baterie slabă/ descarcata.
Normala -
luminează
Slabă/descarcata
– se stinge
1 2 3
OPEN CLOSE
Romania
Reciclarea corecta a acestui produs
(reziduuri provenind din aparatura electrica si electronica)
Marcajale de pe acest produs sau mentionate in instructiunile sale de folosire indica faptul ca produsul
nu trebuie aruncat impreuna cu alte reziduuri din gospod arie atunci cand nu mai este in stare de
functionare. Pentru a preveni posibile efecte daunatoare asupra mediului inconjurator sau a san ata
tii oamenilor datorate evacuarii necontrolate a reziduurilor, vă rugăm să separați acest produs de
alte tipuri de reziduuri si să-l reciclati in mod responsabil pentru a promova refolosirea resurselor
materiale. Utilizatorii casnici sunt rugati să ia legatura e cu distribuitorul de la care au achizitionat
acest produs, e cu autoritatile locale, pentru a primi informatii cu privire la locul si modul in care
pot depozita acest produs in vederea reciclarii sale ecologice. Utilizatorii institutionali sunt rugati să ia
legatura cu furnizorul și să verice condițiile stipulate in contractul de vanzare. Acest produs nu trebuie
amestecat cu alte reziduuri de natura comerciala.
Distribuit de Lechpol Electronic SRL, Republicii nr. 5, Resita, CS, ROMANIA
Table of contents
Languages:
Other Kemot Test Equipment manuals


