Kenmore 204101 - Elite 56 oz. Stand Blender User manual

Use & Care Guide
Manual de Uso y Cuidado
English/Espa_ol
i
Kenmore Elite°
lender
Mezc[ador
ModeLsiModetos:
100,06£0I - Brushe_,dAi|Jminum
100,069!t - Black
P!N 134779000B (0807)
.Sears Brands Manclg_lent Corporation
Hoffmczn Estates, IL 60179 U.S.A,
wv/w.kenmore.com
w_.seors.com

KENMORE ELI TE FULLWARRANTY
if this product fails due to a defect in material or workmanship within five years _rom the
date of purchase, return it to any Sears store or other Kenmore outlet in the United States
for free replacement,
If the motor et this product fails due to adefect in material or workmanship within I0 years
from the date of purchase, return this product to any Sears store or other Kenmore outlet
in the United States for free repfacement,
This warranty does not cove r the gasket and blade ossembI% which a re expendable parts
that can wear ou! from norrnat use withi_ the warranty period.
This w0rranty is void if thTs product is ever used for other lhan private household
purposes,
This warranty gives you specific legal rights, and you may also have other rights which
vary from state to state.
Sears BrandsMonogement Corporation, Hoffmon Estates, IL60179
When using electrical appliances, basic safety precautions should always be
foI!owed,_ncluding the following:
i. READ oJI instructions.
2. To protect against risk of electrical shock do not put b_ender in water Or other liquid.
3, Close supervision is necessary when any appliance is used by or near children,
4. UNPLUG from outlet when not in use, before putting on or faking off parts, and
before cleaning.
SAVOID contact with moving parts.
6. DO NOT operate any appliance with a damaged cord or plug, or after the appliance
malfunctions or has been dropped or damaged in any manner. Return appliance to
the nearest authorized service facility for examination, repair or adjustment.
7. The use of accessory attachments, including canning iars, not recommended by the
appliance manufacturer may cause o risk of personal iniur,!
8. DO NOT use outdoors.
9, DO NOT let the cord hang over the edge of table or counter.
10. Keep hands and utensils out of container while blending to reduce the risk of severe
injury to persons or damage to the blender. A scraper may be used, but must be
used ONLY when the blender is not running,
11. Blades are sharp, Hc_ndte carefully,

12.Toreducetheriskofinjury, never place cutter-assembly blades on base without jar
properjyattached.
13. ALWAYS operate blender with cover in place.
14.When blending hot liquids remove measuring cup from the two-piece lid. Do not fill
jar beyond 3-cup level.
15. To protect against electrical shock this appliance is equipped with a cord having a
3-prong grounding-type plug for insertion in_o aproper grounding-type receptacle
DO NOT alter the Plug for use in a 2-prong receptacle. If the plug will not fit into
a receptacle, have the proper receptacle insla]Ied by a qualified electrician.
16.A short powersupply cord (or detachable powersupp[y cord] is to be provided to
reduce risks resulting from becoming entangled in or tripping over a ranger cord
_7.Thisappliance is for household use only.
18.SAVE THESE INSTRUCTIONS!
Fig. 1
Measuring cup (middle of lid)
Jar
Lid
Blade
Assembly
Collar
I
LED
Count-u
PULSE
Stir
_e,.., t1
Motor/Base Unit
OFF
ICE CRUSH
Puree
Mix
3

1. Before assembling your blender, wipe blender base with a warm sudsy cloth,
then wipe clean with a damp cloth, Dry with a soft cloth. Wash blender jar, lid, collar
and blades in warm, sudsy water. Rinse and wipe parts dry
2. Turn blender jar .upside down. Ploc_e the
gasket on the b_ade assembly (Fig.2).
3. Place the blade assemblywith the gasket
in the bottom opening of thejar {Fig,3].
4. Twist coJlar onto jar. Be sure to engage
threads properly and securely (Fig.4},
Turn assembled jar right side up (F_g.5).
Fig. 3
"_ CAUTION: Blade,, ,:,_o sharp, Handle .... fully.
m: CAUT'ON: NEVE_ _,_ce b,ender', motor/bo., in _€_,er or o,_er ,,quid,. I

Your blender has been designed to work in a
variety of ways to suit your blending needs.
Once you plug the blender in, The LED light
display is illuminated. Operate the blender in
either continuous or pulse made by pressing
the speed buttons. The soft start Function begins
blending action slowly, and then picks up to
maximum setting speed.
1. Make surethe power cord isunplugged.
2, Place Bbnder motor/base on a dry, level,
stable surface,
3. Set jar assembly into place on motor/base,
making sure motor/base and jar are
securely tightened into place.
4. Place the _ood solids and liquids to be
blended into the jar and put the lid on
the jar before blending. Be sure _he
measuring cup is _nplace in the middle
of the lid.
5. Plug power cord into a standard
120-V, 60 Hz AC-onty, 3-prong
electrical outlet. The blue LCD will display
0:00 for the timer, and the blue OFF
indicalor will illuminate (Fig, 7).
Fig. 6
Fig, 7

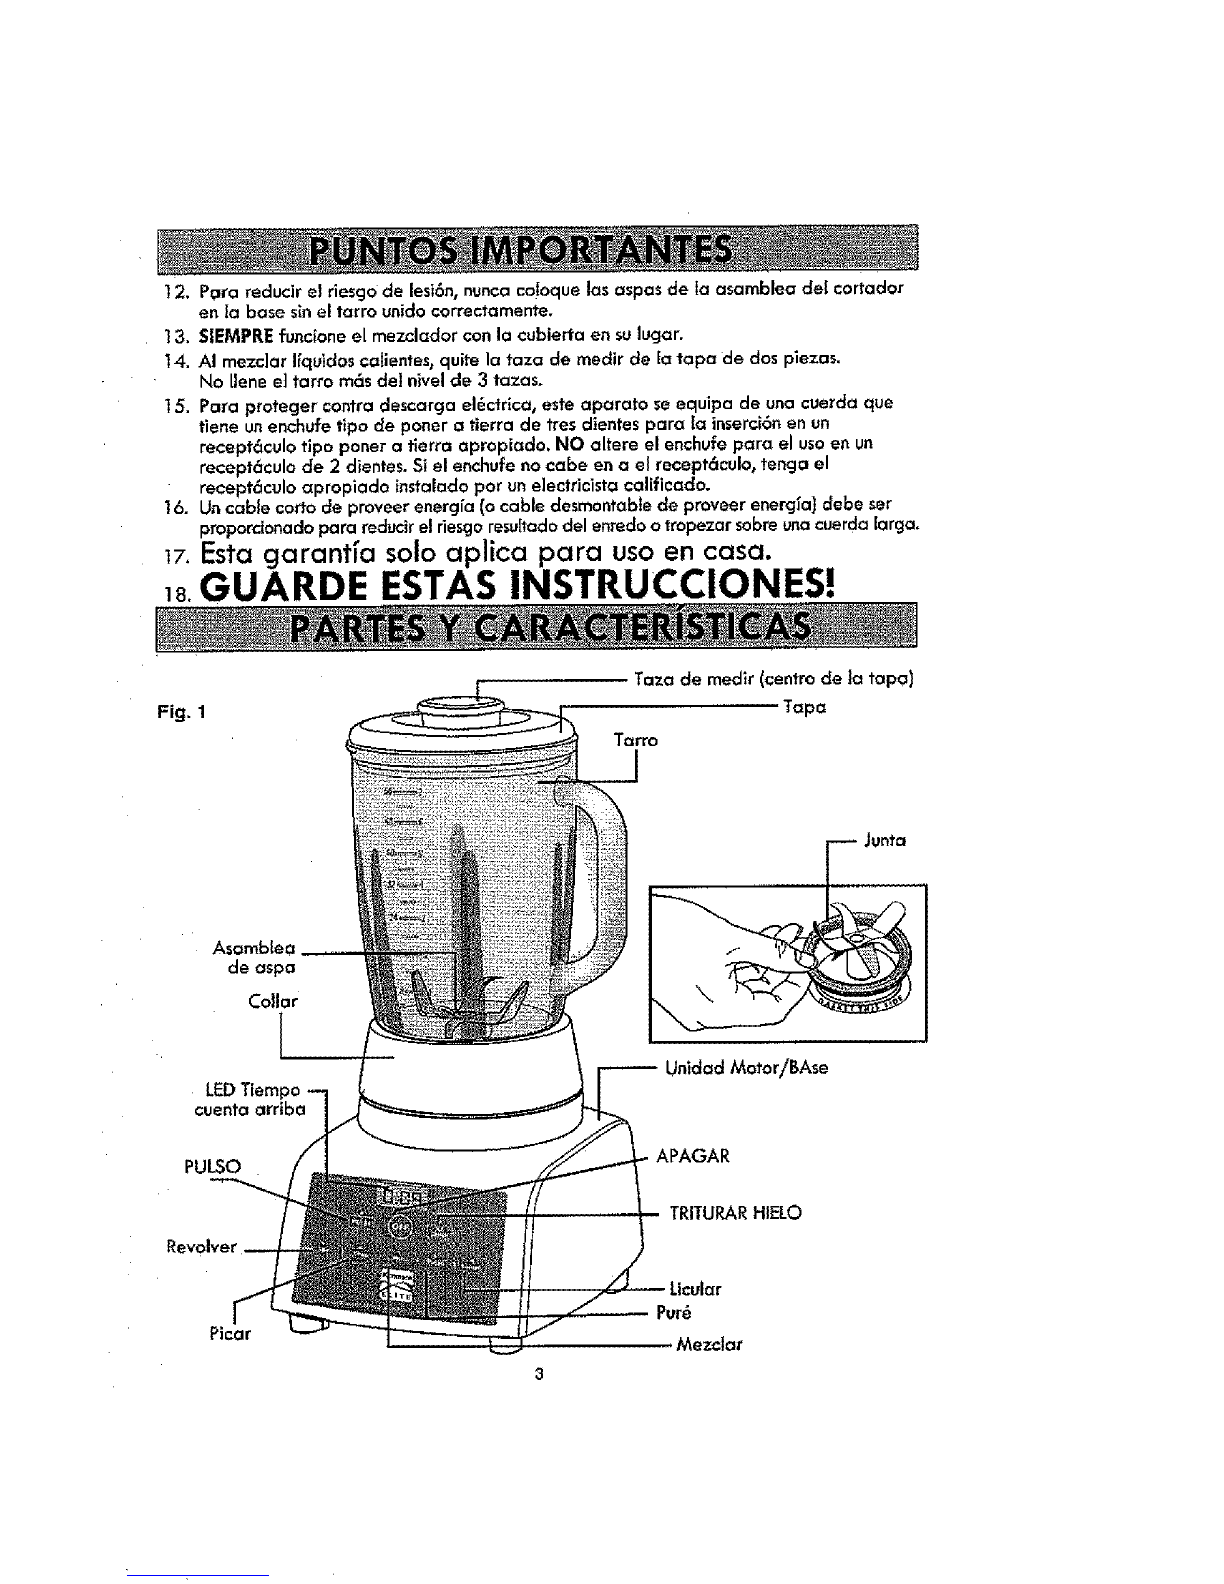
6. To turn on the blender in continuous
mode,press one of the following speed
buttons:Stir (slowest),Chop,Mix,Puree
or Liquefy (fostest_ .The button for the
speed you select will illumingle blue and
the blender's limer will storl counting the
seconds and it will count-up up to
mo×irnum of 3 minules then blender wiI!
stop when lhe timer reaches,
The blender will run continuously after
you press the button and until you press
the some button again,or press Ihe OFF
bulton.
You can chef, go blender speeds by
pressing odiffereni" button without first
pressing OFF, The timer feature will
contln ue while you ore blending and will
pause in its count when you re-push e speed button to shut the blender off, The ffmer
wii_ re?set itself to zero onJy if you press the OPF button.
7.To run the blender intermittently (pu_semodeJ rather than continuously, first press the
PULSEbutton. The PULSEbutton light will flash blue. Then press one of the five
speed buttons below it. When you release the button the blender will stop and
turn oil
_WARN ING: LED display light indicates mad,/to operate.
Do not touch blades. J
8, The Ice Crush bgtton is the highest and strongest blender speed, The blender.will
begin to operate at this speed as soon as you press the button,but will only continue
to operate as long as you hold the button down, While the button is pressed,
it illuminates blue. As soon as you stop pressing the button,the blender turns of[
9. As a safety feature, the LED light display is always illuminated and indicates it's ready
to operate (not seen any light on the OFF_ once you plug the blender in.
10. To add food or fruit to the jar While the blender is running,remove the measuring cup
in the middle of the lid, Add the food or fruit through the hole in the middle of the lid
and then replace _he measuring cup on [id. NEVER start up the blender without the
lid in place. The speed of the blades wi_I th row contents high up in the jar, and
withe at the _idthe contents could spill out.
NOTE: Only operate blender in one speed at a time.
6

Forquickei;easierblending,cutfoodinto2-in.longpiecesbeforeaddingtoblenderjar.
Tochop,grateorpreparei_ruJtsmoothies,witheitherfreshorfrozenfruit,cutfruitinto
about3/4-inchlongpieces.
Tobestcirculatefoodsorfruitthataretobeblendedwithliquid,pourtheliquidintothejor
first,thenaddthesolid foods or fruit.
Some tasks cannot be performed efficiently with a blender. These are: Beating egg whites,
Whipping cream, mashing potatoes, grinding meats, mixing dough, and extracting juices
from fruit and vegetables.
The following i_ems should never be placed in the blender jar, as they can cause damage:
Bones, targe pieces of solid frozen foods, or dense, tough foods such as turnips.
To crush ice ALWAYS have liquid in the jar. Start out with 2 cups of I_quid, and add about
2 cups of ice cubes. Hold one hand firmy on the id. Push the Joe Crush button.
If more ice is needed remove the measuring cup in the middle of the lid and add cubes
one at a time through the hole _nthe id. DO NOT CRUSH ICEWITHOUT LIQUID.
failure to follow these directions can result in damage to the blades, jar, blender motor,
and possibly result in personal injury.
If you should ever need replacemen_ parts for this bIender, contact Sears Par.fs and
Repair Service at 1-800-4-MY-HOME.
1. Before cleaning, unplug the blender,
2. Rinse parts (jar, blade assembly, gasket, collar, lid and measuring cup inner tid]
immediately after blending br easier cleanup.
3. AIt removabb parts con be washed by hand or in a dishwoshe_ The Iid, measuring
cup, collar, gasket and blade assembly shouid be placed in the top rack only.
Disassemble before placing in the d_shwasher. The jars a re bottom rack
dishwasher-safe. Do not place the jar or any other parts in boiling liquids.
€. The motor/base is designed to be resistant to liquids. If liquids spi_i into the motor/base
• Unplug the motor/base.
• Wipe with a damp cloth and dry thoroughl'/
5. Do not use abrasive scouring pads or cleaners on base as finish may become
scratched or damaged.
6. Any other servicing should be pretormed by an authorized service Representative.

KENMORE ELITEGARANTiA COMPLETA
Si este producto falla debido a unalefectoen material o o [a e_ecuci6nen el plaza de
cinco a_os a panir de la fecha de [a compra, devuelvalo a cualquiertienda Searso u
otto Kenmore Outlet en losEstados Unidospara el reemptazografts.
Si el motor de esteproducto falla debido a undefecto en material o a Jaejecuci6n enel
plaza de 10 a_os a partir de la fecho de la compra,devuelvo esteproductoa cualqu[er
tienda Sears o u otto Kenmore Outlet en los EstadosUnidospora el reemplazo gratis.
Estagarantla no incluyeel filtro y junta, que es una porte consumible que puede agotar
de usanormal dentrodeI perlodo de la garantia.
Estagarantla se opllca solamentemientrosque este procluctose utitizaen losEstadosUnidos.
Estagaranffo le da losderechos legales especificos, y ustedpuede tambi_ntener arras
derechos quevar_an de estado a estado.
Corporaci6n de Administraci6n de Marcas Sears,Hoffman Estates_IL60179 E.E.U.U.
AI usar aparatos el_ctricos,las medidas de seguridad b6sicasse deben seguir
siempre, incluyendo Io siguiente:
1. LEA todas las instrucciones.
2. Para proteger contra el fuego, [a descarga eI_ctrica no ponga el mezclador en
agua uotros Ifquidos.
3. La supervisi6n cercana es necesaria euando cualquier aparato esusado par par o
cerca a hi, as.
4. DESENCHUFEde la toma cuando no seusa, antes encender o de sacar piezas, y
antes de Iimpior.
5. EVITEel contacto con Iaspanes m6viles.
6. NO funcione ningOnaparato con una cuerda o unenehufe dafiado, o despu_s de
que el aparato funeione incorrectamenteo se haya eaido o se haya da_ado de
cualquier manera. Devuelva el aparato ala instaJaci6nautorizada m6s cercana
del servicio para Ia examinaci6n_ la reparaci6n o el ajuste.
7. Etusa de aecesoriost incluyendolostarros de conser¢aci6n_no recomendados par
el fabricante del aparata puede causar un rlesgo de lesi6na los personas.
8. NO utilice al aire libre.
9. NO deje Ia cuerda colgar sabre el borde de la mesa o contador.
t0. Mantenga los manos y los utensilios fuera clel envase mlentras que mezcla para
reducir el riesgo de ]esi6nsevera alos personas o dafio aI mezelador. Un
raspador sepuede utilizar0pero debe set utilizado SOLAMENTEcuando el
mezciad0r no est6 funeionando.
11. Losaspas son agudas. Maneje cuidodosarnente.

12. Para reducir el rlesgo de lesi6n, nunea co!oque las aspas de Ia asamblea del cortador
en la base sin el tarro unido correctamente.
13. SIEMPRE funcione el mezclador con la cubierta en su lugar.
14. AI mezc]ar ffquidos calientes, quite la taza de medir de [a tapa de dos piezas.
No llene e] tarro m6s de] nivel de 3 tazas.
15. Para proteger contra descarga el_ctrica, este aparato se equipa de una cuerda que
tiene unenchufe tipo de poner a tierra de tres dlentes para la inserci6n en un
recept&culo tipo poner a tierra apropiado, NO altere el enchufe para el uso en un
recept6culo de 2 dientes. Si el enchufe no cabe en a el recept6culo, tencja el
recept6culo apropiado instalado pot un e]ectricista calificado.
16. Un cable corto de proveer energfa (o cable desmentable de proveer energla) debe set
propordenado para reducir el riesgo resu[tado del enredo o tropezar sobre una cuerda larga,
17.Esta garant_a solo aplica para uso en casa.
Is.GUARDE ESTAS INSTRUCCIONES!
Taza de medlr (centro de la tapa)
Fig. 1 Tapa
Tarro
de aspa
Collar
t
cuenta arriba
PULSO
Revolver
_' '"J
Unldad Motor/BAse
APAGAR
TRITURAR HIELO
Picar Pur_
Mezclar

Antesde mQntar sumezclador, limpie la base dei mezclador con un pa_o espumoso
caliente, entonces llmpie can un pa_o hgmedo, Seque con un patio suave. Lave el
tarro, tapa, cotlar ylos aspas deI mezclador en agua jabonosa caiiente. Enjuague y
Iimpie los partes secas.
Fig. 2 2. Gire el tarro gel mezcladar al rev@s.
Coloque la junta en el montaje de as_pa
(F_g.2).
3. Ponga el montaje de aspa con Ja junta en
la abertura inferior del torte (Fig.3).
4. Tuerza el collar sobre el torte. Sea seguro
de ocupar los roscas eorrectamente y
seguramente (Fig.4). Gire e[ tarro montado
derecha arriba (FigS).
Fig. 3
Fig. 5
F
Fig, 4
_PRECAUCI6N: Los aspas son agudas. M=neie cuidaclosamente, 1
PRECAUCION: NUNCA penga el motor/base del mezcfador en agua u otrosI{quidos. 1

Su mezclador se ha disefiado para trabajar
en una variedad de rnaneras para
safisfacer sus necesidades de mezclar. Una
vez que usted enchufe el mezclador, la
exhibici6n de la Iuz del LED es iluminada.
Funcione e[ mezclador en rnodo continuo o
pulso presionando los botones de velocidad.
La funci6n de1 comienzo suave comienza la
c_cci6n de mezclar lentamente, ydespu_s
Ilega hasta la mc_xima velocidad ajustada.
1. Cerci6rese de que el cable el_ctrico est_
desenehufado.
2. Ponga el motor/base del mezclador en
una superfieie seca, piano, estable
3. Fije et montaje del tarro en [ugar en el
motor/_base, cercior6ndose de que el
motor/base yel tarro est6n apretados
con seguridad en su lugar.
4. Coloque los s61idos ylos I/quidos deI
alimento que se mezclar6n en el tarro y
ponga la tapa en el tarro antes de
mezclar. Sea seguro que la taza de
medFr est6 en Iugar en el medio de la
tapa.
5. Conecte el cabJe el_ctrico en una toma
120-V est6ndar, 60 Hz soksmente AC
de tres dientes. La pantala azul del LED
aparecer6, 0:00 paro el eontador.
Fig. 6
Fig. 7

L
6.
7,
Pare encender el mezclador en mode
continua, presione uno de los botones
siguientes de velocidad: Revolver (m6s
lento), Picot, Mezclar, Pur6 o Liouar (m6s
r6pido). El bot6n paro la velocidad que
usted ha seleccionado Jlumina en azuJ y el
contador de tiempo del mezclador
comenzar6 acontar los segundos y
cuenta-para err|be haste e[ m6ximo de 3
minutes entonces et mezclador parer6
cuando alcanza e! contador de tlempo.
El mezdador fun¢ionar6 confinuamente
despu_s que usted presione el bo'_6ny basra
que usted presiona el mismo bot6n otra vez
opresiona el bot6n APAGAR.
Usted puede camloiar velocidades del mezclador preslonando un diverse bot6n sin
primero presionar APAGAR. La caracterlstica del contador continuara mientras que
usted est6 mezclando y se pausar6 en su cuenta cuando usted re-preslona un bot6n de
vel0cidad pare apagar el mezclador. El contador se reajustar6 a core solamente si
usted presiona el bot6n APAGAR.
Pqra flJncionar el mezclador intermitentemente (mode de pulse) m6s blen que
continuamente, primero preslone el bot6n PULSe. La luz de[ bot6n PULSe destellar6 en
azul. Entonces presione uno de los cinco botones de velacidad sabre _1. Cuando usted
sueffa el bot6n el mezc[ador parar_ yse apagar6.
_DVERTENC|A: Laluz de exhil0ici6n de LEDindlca que es list0 funcionar,
He toque los Iciminas,
8. El baton de Triturar hielo es la velocidad m6s alto yfuerte del mezclador. En la
velocidad de Triturar hielo, e_ mezclador permanecer6 encendido solamente mientras
usted mant_ene presionado el bot6n. Mientras que se presiona el bot6n, i]umina en azuL
Tan pronto coma usted pare de presionar el bot6n, el mezctador se APAGA.
9. Coma caracter_stica de seguridad, la exhibici6n de luz gel LEDest6 siempre ffuminada e
indite que es lis_'ode funcionar [no se ve ninguna luz en APAGADO) una vez que
enchufa el mezclador.
10. Para agregar el alimento o flute al terra mientras queet mezclador est6 funcionando,
quite Ja taza de medir en el media de [a tape. Agregue el affrnento o fruta atrav6s del
agu_ero en el medlo de ia tapa y despu6s substituya la taza de medir en la tape.
NUNCA encienda el mezclador sin la tapa en lugar. La velocidad de los aspas ]anzar6
conten_do pare arriba en el terra, y sin la tape peede derramarse hacia fuera,
NOTA: Fun¢ione solamente et mezclador en una veleoldad a la vez,

Para el mezclar mr_s r_pido y m6s f6cil0 carte el alimento en pedazos en cerca de 2
pulgadas largo antes de agregar al tarro del mezclador. Para tajar, rallar o preparar los
batidos de fruta, con a fruta fresca ocongelada, carte la fruta en pedazos de 3/4
pulgadas de largo.
Para circular Io meier posible los alimentos ola fruta que deben ser mezclados con el
Ifquido, vierta el llquido en el tarro primero, en seguida agregue los alimentos o fruta s61idos.
Algunas tareas no se pueden realizar eficientemente con un mezclader. I_stosson: Batir
clara de huevot mezclarar cremat amasar papasl meier carnes_ mezclarar pasta_ y
extraer los jugos de la fruta y de los vegetales.
Los puntos siguientes nunca se deben poner en el tarro del mezclador, pues pueden causar
danes: Huesos, pedazos grandes de a]imentos congeiados s6Iidost o de alimentos densos_
resistentes tales coma nabos.
Para triturar hielo, SIEMPRE tenga I[quido en el tarro. Comience con 2tazas de ffquido, y
agregue cerca de 2tazas de cubes de hJelo. Sostenga una mane firmemente en ]a tapa.
Pulse el bot6n de triturar hielo.
Si es necesario m6s hielo, quite la taza de medir en el media de la tapa y agregue los
cubes uno a Ia vez a tray, sdeI agujero en ta tapa. NO TRITURE HIELO SIN EL LJQUIDO.
Lo falta de seguir estas direcciones puede cousar da_o a los aspas, tarro, motor deI
mezcJador, yposiblemente causar da_os corporales.
Si ustednecesita slemprelas piezas de reemplazo para este mezclador, contacte
Servicio de Partes y Reparaci6n Sears en 1-800-€-MY-HOME.
1. Antes de limpiar, gire la perilla del interrupter de controla APAGADO y
desenchufe el mezcIador.
2. Enjuague las partes (tarrO, monta_e de aspa, junta,collar, tapa yla tapa intema
de la taza de medir) inmediatamente despu_s de mezclar para una [impieza m6s
f_ciL
3. Todas taspartes desprendibles se pueden lavar a mane o en un Iavaplatos. La
tapa, taza de medir, coilar_junta y montaie de aspa se cleben porter en el estante
superior soiamente.
Desmonte antes de coiocar en el lavapiatos. Lostarros sonestante inferior seguro
al lavaplatos. No ponga el tarroo nlngOnotra pieza en llquidos de hervir,
4. Elmotor/base se dise_an para set resistentesaloslfquldos, Si los liquidos se
derraman en e] motor/base
•Desenchufe el motor/base.
•Limpie con unpaEo h_medo y seque a rondo.
5. No utiIice los soportes o a Jimpiadores de rayar abrasives en base come el
acabado puede rasgu_arse o da_arse.
6. Cualquierottoserviciodebe serrealizadopory repTesentan|ede servicioaulorizado.

I
Your Home
For troubleshooting, product manuals and expert advice:
managemytife
www.managemylife.com
For repair - in your home - of all major brand appliances,
lawn and garden equipment, or heating and cooling systems,
no matter who made it, no matter who sold it!
For the repJacement pads, accessories and
owner's manuals that you need to do-it-yourself.
For Sears professional installation of home appliances
and items like garage door openers and water heaters.
1-800-4-MY-HOME® Cat{anytime,dayornight
(1-800-469-4663) (U,S.A.and Canada)
www.sears.com www.seats.ca
Our Home
For repair of carry-in items iike vacuums, lawn equipment,
and electronics, call anytime for the location of the nearest
Sears Parts & Repair Service Center
1-800.488.1222 (U.S.A.) 1-800-469-4663 (Canada)
Www.sear_,com www,_ears,c8
To purchase a protection agreement on a product serviced by Sears:
1-800-827.6655 (u.sJ_.) 1-800-36%6665 (Canada)
Para pedir servicio de reparaciOn
adomicilio, y para ordenar piezas:
1-888.,SU4-10GAR®
(1-888-784-6427)
www,sears.corn
Au Canada pour service en fran_;ais:
1-80O-LE.FOYER Mc
(_-soo-533-6937)
®Reg{stered Trademerk lT_ Trademark of KCD IP, LLC in the United States, or Sears Brands, LLC in other countries
®Marca Registrada tr_ Marca de F_brica de KCD IP, LLC en Estados Uaidos, o Seat's Brands, LLC in otros patses
u_
_: Marque de commerce IMarque d_pos_e de Sears Brands, LLC
This manual suits for next models
2
Table of contents
Languages:
Other Kenmore Blender manuals

Kenmore
Kenmore 100.80001 User manual

Kenmore
Kenmore 100.40709310 User manual

Kenmore
Kenmore Elite Series User manual

Kenmore
Kenmore KKEB1.3HSS User manual

Kenmore
Kenmore KKEB1.3HSS User manual

Kenmore
Kenmore 100.90001 User manual

Kenmore
Kenmore KKIBC5SS User manual

Kenmore
Kenmore 100.88919610 User manual

Kenmore
Kenmore 68929 User manual

Kenmore
Kenmore KKSBB User manual