3 4
Before plugging in
lMake sure your electricity supply is the same as the one shown
on the rear of your handmixer.
Important – Plug and Fuse Information
l The wires in the cord are coloured as follows:
Blue = Neutral
Brown = Live.
l If the plug supplied with your appliance has a fuse fitted it is
rated 3A. If the fuse fails it must be replaced with one of the
same rating.
Note:
l For non-rewireable plugs the fuse cover MUST be refitted when
replacing the fuse. If the fuse cover is lost then the plug must
not be used until a replacement can be obtained. The correct
fuse cover is identified by colour and a replacement may be
obtained from your Kenwood Authorised Repairer (see Service).
l If a non-rewireable plug is cut off it must be DESTROYED
IMMEDIATELY. An electric shock hazard may arise if an
unwanted non-rewireable plug is inadvertently inserted into a
13A socket outlet.
l This appliance conforms to EC Regulation 1935/2004 on
materials and articles intended to come into contact with food.
Before using your handmixer
for the first time
lWash the parts (see
‘cleaning’).
Key
1
2
3
4
5
6
7
8
9
10
11
12
13
14
15
16
17
18
19
20
21
22
23
24
25
26
27
28
29
30
31
32
33
34
35
36
37
38
39
40
41
42
43
44
45
46
47
48
49
50
51
52
53
54
55
56
57
58
59
60
61
62
63
64
65
66
67
68
69
70
71
72
73
74
75
76
77
78
79
80
81
82
83
84
85
86
87
88
89
90
91
92
93
94
95
96
97
98
99
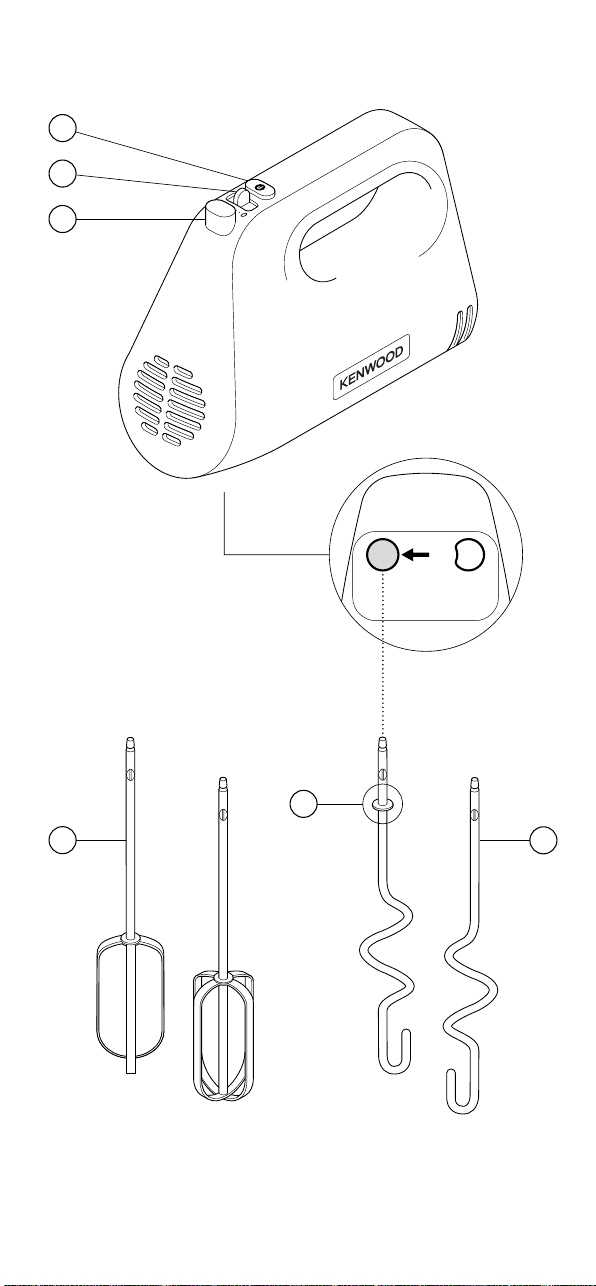
Tool release button
2
3
4
5
6
7
8
9
10
11
12
13
14
15
16
17
18
19
20
21
22
23
24
25
26
27
28
29
30
31
32
33
34
35
36
37
38
39
40
41
42
43
44
45
46
47
48
49
50
51
52
53
54
55
56
57
58
59
60
61
62
63
64
65
66
67
68
69
70
71
72
73
74
75
76
77
78
79
80
81
82
83
84
85
86
87
88
89
90
91
92
93
94
95
96
97
98
99
Speed selector
3
4
5
6
7
8
9
10
11
12
13
14
15
16
17
18
19
20
21
22
23
24
25
26
27
28
29
30
31
32
33
34
35
36
37
38
39
40
41
42
43
44
45
46
47
48
49
50
51
52
53
54
55
56
57
58
59
60
61
62
63
64
65
66
67
68
69
70
71
72
73
74
75
76
77
78
79
80
81
82
83
84
85
86
87
88
89
90
91
92
93
94
95
96
97
98
99
Pulse button (P)
4
5
6
7
8
9
10
11
12
13
14
15
16
17
18
19
20
21
22
23
24
25
26
27
28
29
30
31
32
33
34
35
36
37
38
39
40
41
42
43
44
45
46
47
48
49
50
51
52
53
54
55
56
57
58
59
60
61
62
63
64
65
66
67
68
69
70
71
72
73
74
75
76
77
78
79
80
81
82
83
84
85
86
87
88
89
90
91
92
93
94
95
96
97
98
99
Beaters
5
6
7
8
9
10
11
12
13
14
15
16
17
18
19
20
21
22
23
24
25
26
27
28
29
30
31
32
33
34
35
36
37
38
39
40
41
42
43
44
45
46
47
48
49
50
51
52
53
54
55
56
57
58
59
60
61
62
63
64
65
66
67
68
69
70
71
72
73
74
75
76
77
78
79
80
81
82
83
84
85
86
87
88
89
90
91
92
93
94
95
96
97
98
99
Kneader with collar
6
7
8
9
10
11
12
13
14
15
16
17
18
19
20
21
22
23
24
25
26
27
28
29
30
31
32
33
34
35
36
37
38
39
40
41
42
43
44
45
46
47
48
49
50
51
52
53
54
55
56
57
58
59
60
61
62
63
64
65
66
67
68
69
70
71
72
73
74
75
76
77
78
79
80
81
82
83
84
85
86
87
88
89
90
91
92
93
94
95
96
97
98
99
Kneader
To Use Your
Handmixer
1 Insert the beaters or kneaders
– turn and push until a positive
click is felt.
Important: check that the
kneader with the metal collar
is correctly fitted into the
socket (refer to illustration).
2 Plug in.
3 With the ingredients in a bowl
of an appropriate size, place
the beaters/kneaders into the
bowl.
4 Select the required speed
from 1 (slowest) to 5.
lAs the mixture thickens,
increase the speed.
lIf the machine starts to slow
or labour, increase the speed.
lUse the pulse ‘P’ button
to operate the motor at
maximum speed. Note: the ‘P’
pulse button will only operate
if a speed is selected first.
5 When the mixture has reached
the desired consistency, return
the speed selector to the off
‘O’ position and then lift the
beaters/kneaders out of the
bowl.
6 To remove the tools, make
sure the speed selector is in
the off ‘O’ position and unplug
the handmixer. Press the tool
release button 1
2
3
4
5
6
7
8
9
10
11
12
13
14
15
16
17
18
19
20
21
22
23
24
25
26
27
28
29
30
31
32
33
34
35
36
37
38
39
40
41
42
43
44
45
46
47
48
49
50
51
52
53
54
55
56
57
58
59
60
61
62
63
64
65
66
67
68
69
70
71
72
73
74
75
76
77
78
79
80
81
82
83
84
85
86
87
88
89
90
91
92
93
94
95
96
97
98
99
. Hold onto
the tool shafts when ejecting
the tools.
Important:
lkneaders only - when making
bread dough we recommend
that the dough load does not
exceed 450g flour.