KERN EWJ 300-3H User manual

KERN & Sohn GmbH
Ziegelei 1
D-72336 Balingen
E-Mail: info@kern-sohn.com
Phone: +49-[0]7433- 9933-0
Fax: +49-[0]7433-9933-149
Internet: www.kern-sohn.com
Operating manual
Precision balances
KERN EWJ
Version 1.7
2019-06
GB
EWJ-BA-e-1917

2 EWJ-BA-e-1917
GB
KERN EWJ
Version 1.7 2019-06
Operating manual
Precision balance
Contents
1Technical data................................................................................................ 4
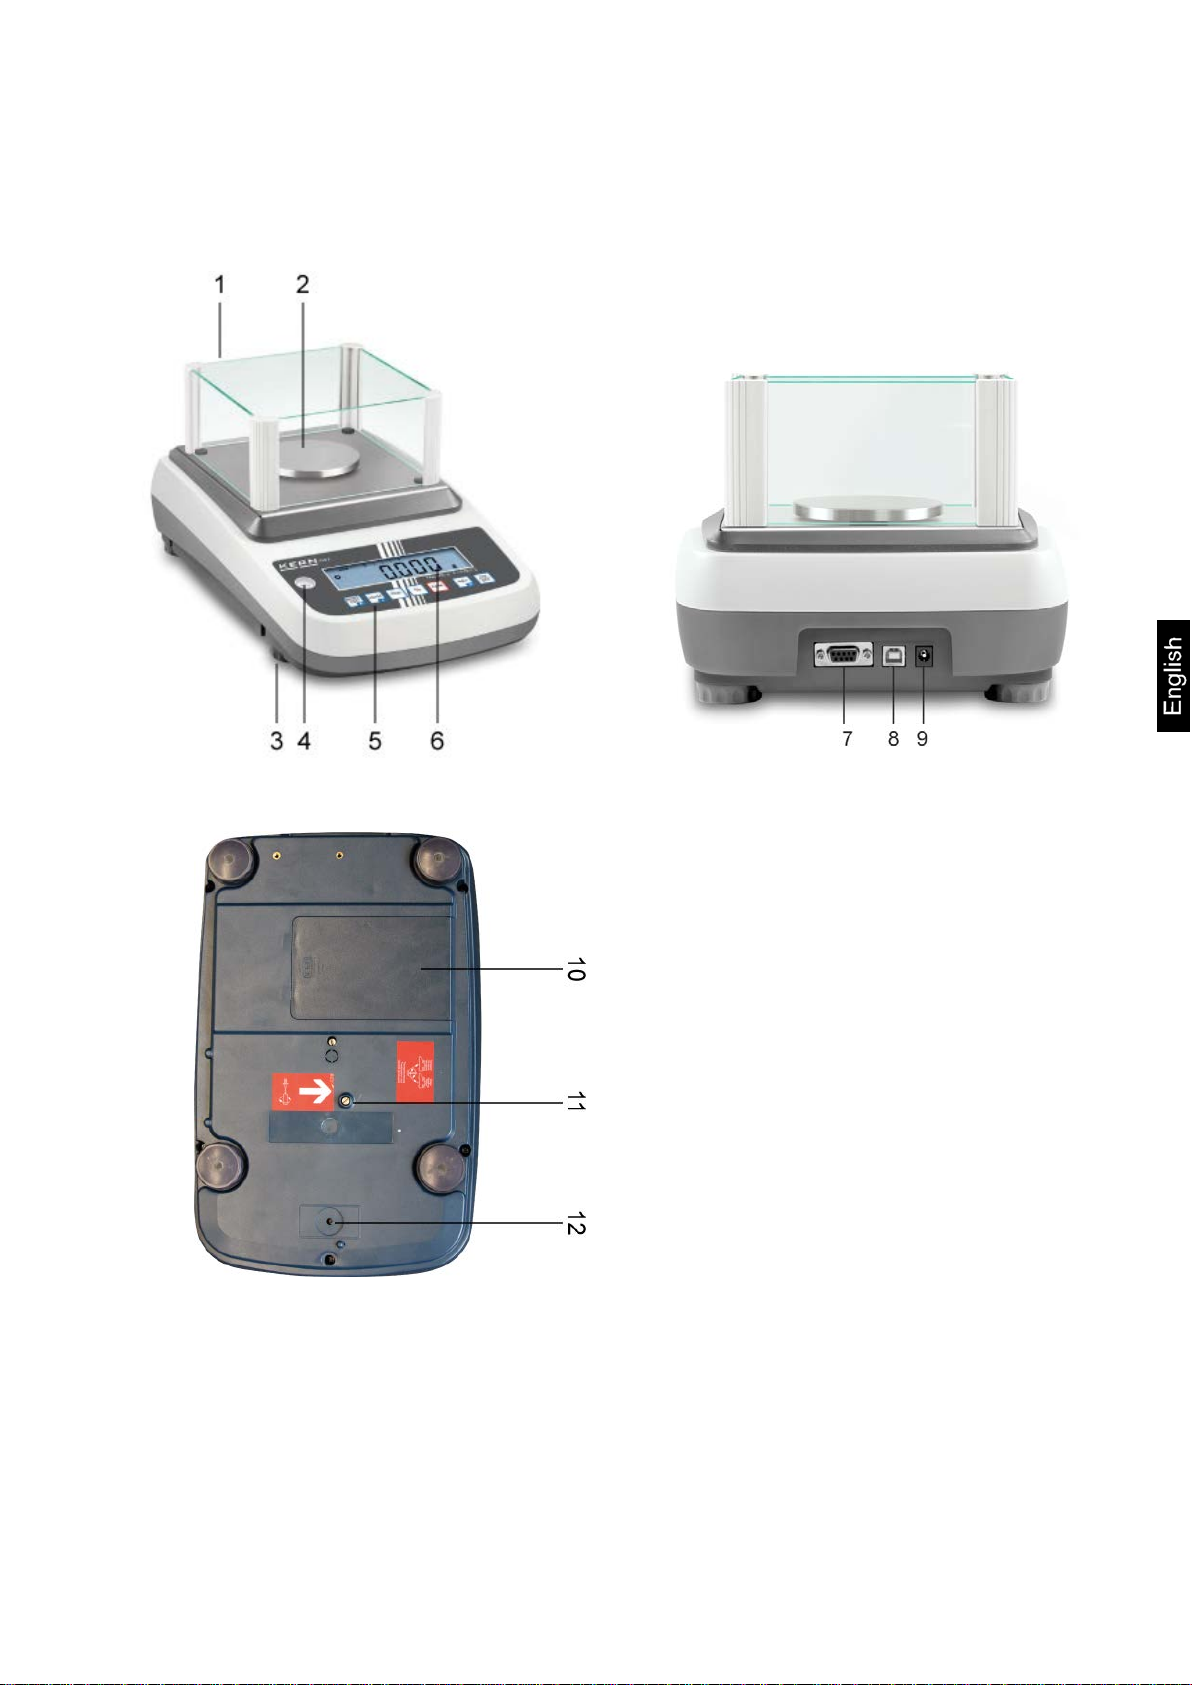
2Appliance overview ....................................................................................... 7
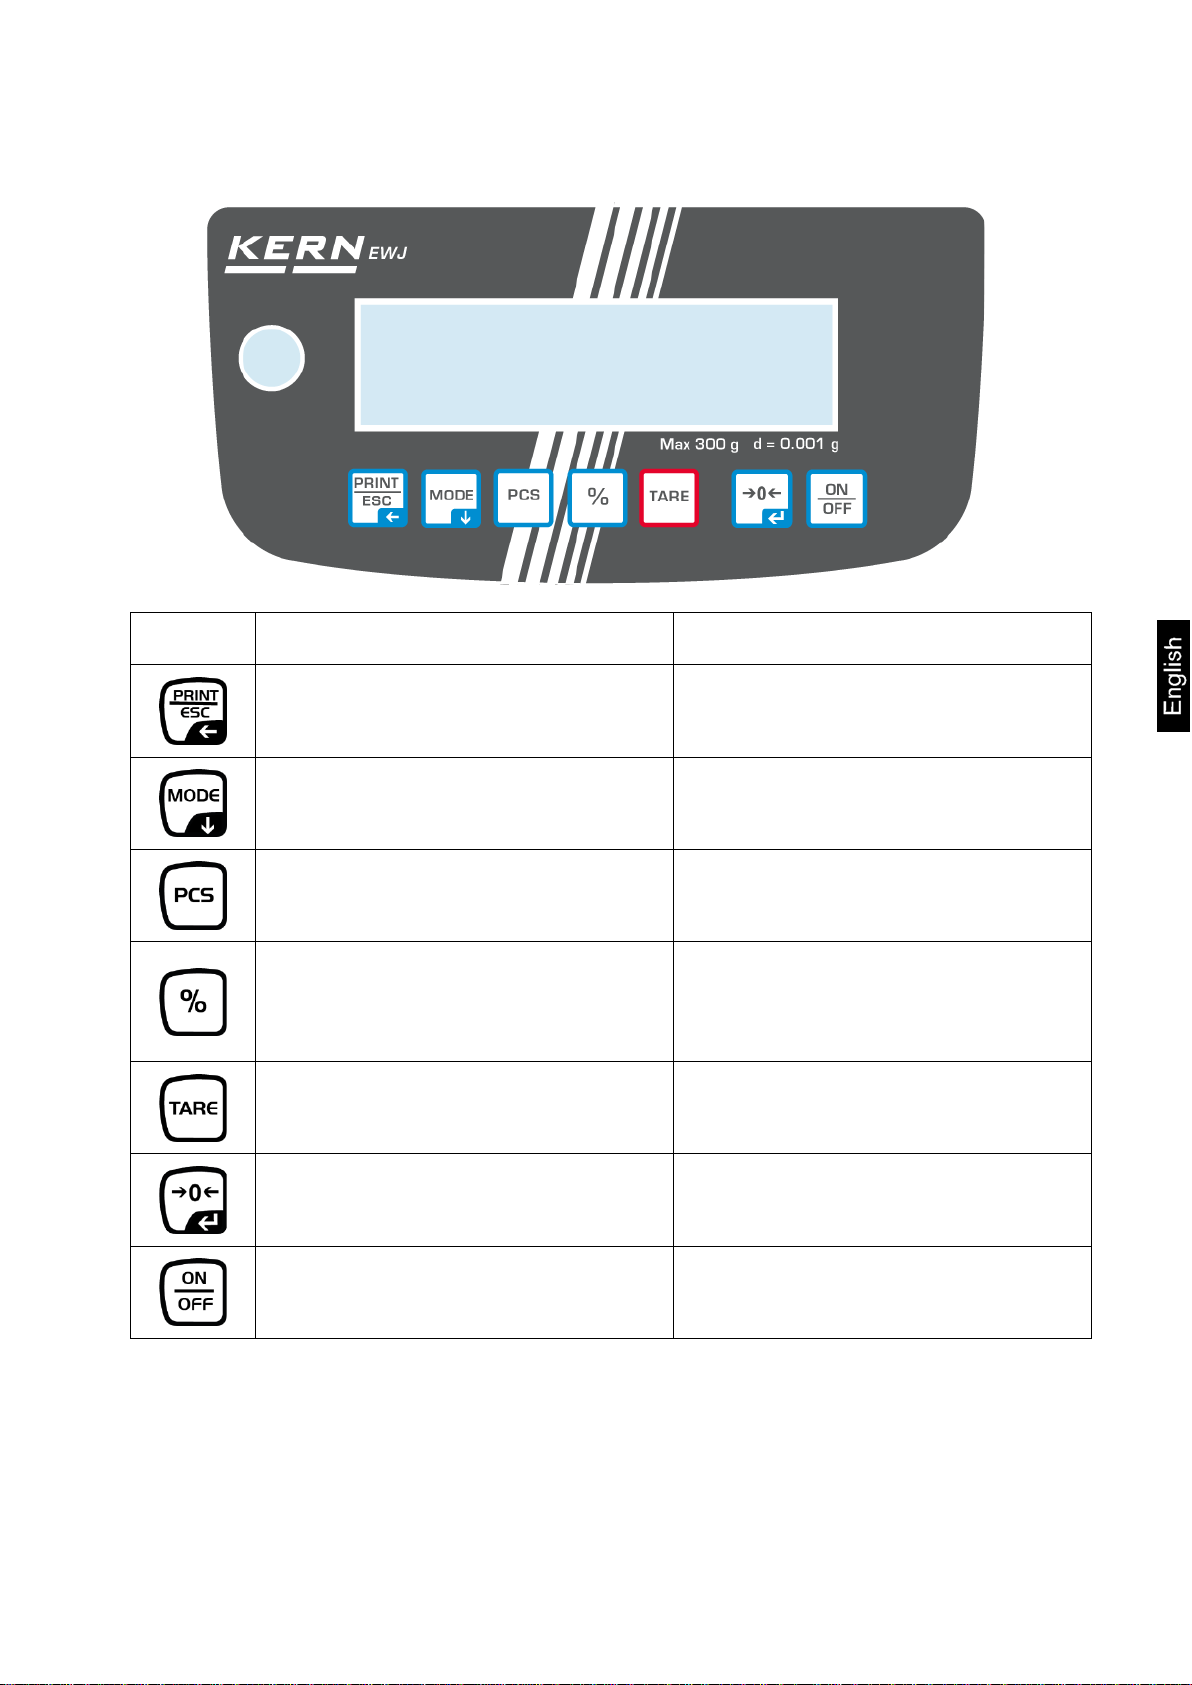
2.1 Keyboard overview..................................................................................................................... 9
2.2 Overview of display .................................................................................................................. 10
3Basic Information (General)........................................................................ 11
3.1 Proper use................................................................................................................................ 11
3.2 Improper Use............................................................................................................................ 11
3.3 Warranty................................................................................................................................... 11
3.4 Monitoring of Test Resources................................................................................................... 12
4Basic Safety Precautions............................................................................ 12
4.1 Pay attention to the instructions in the Operation Manual........................................................ 12
4.2 Personnel training..................................................................................................................... 12
5Transport and storage................................................................................. 12
5.1 Testing upon acceptance ......................................................................................................... 12
5.2 Packaging / return transport..................................................................................................... 12
6Unpacking, Setup and Commissioning ..................................................... 13
6.1Installation Site, Location of Use.............................................................................................. 13
6.2 Unpacking, Scope of delivery................................................................................................... 13
6.2.1 Scope of delivery / serial accessories: ..................................................................................... 13
6.2.2 Installing / removing transport fittings....................................................................................... 14
6.3 Mains connection...................................................................................................................... 18
6.4 Storage battery operation (optional)......................................................................................... 18
6.5 Connection of peripheral devices............................................................................................. 18
6.6Initial Commissioning................................................................................................................ 18
6.7 Adjustment................................................................................................................................ 19
6.7.1 Manual internal adjustment by pressing button........................................................................ 19
6.7.2 Automatic internal adjustment.................................................................................................. 20
6.8 Verification................................................................................................................................ 21
7Operation...................................................................................................... 22
7.1 Start-up..................................................................................................................................... 22
7.2 Switching Off ............................................................................................................................ 22
7.3 Zeroing...................................................................................................................................... 22
7.6 Percent determination .............................................................................................................. 23
7.7 Parts counting........................................................................................................................... 24
7.8 Manual totalizing....................................................................................................................... 25
7.9 Automatic adding-up................................................................................................................. 28
8Menu ............................................................................................................. 30
8.1 Navigation in the menu............................................................................................................. 30
8.2 Access to technology menu...................................................................................................... 31
8.3 Overview................................................................................................................................... 32
9Interfaces...................................................................................................... 35
9.1 Technical data .......................................................................................................................... 35
9.2 Printer operation (RS 232)........................................................................................................ 36
9.3 Output log (continuous output)................................................................................................. 37

EWJ-BA-e-1917 3
10 Servicing, maintenance, disposal .............................................................. 37
10.1 Clean ........................................................................................................................................ 37
10.2 Servicing, maintenance ............................................................................................................ 37
10.3 Disposal.................................................................................................................................... 37
11 Error messages............................................................................................ 38
12 Instant help................................................................................................... 39
13 Declaration of conformity ........................................................................... 40

4 EWJ-BA-e-1917
1 Technical data
KERN EWJ 300-3 EWJ 300-3H EWJ 3000-2
Readability (d) 0.001 g 0.001 g 0.01 g
Weighing range (max) 300 g 300 g 3000 g
Reproducibility 0.001g 0.001g 0.02 g
Linearity ±0.003 g ±0.003 g ±0.05 g
Smallest part weight for
piece counting 2 mg 2 mg 20 mg
Reference quantities at
piece counting 10, 20, 50, 100, 200
Weighing Units g, ct, dwt, lb, mo, oz, ozt, tl (HK), tl (Singap., Malays), tl (Tw)
Adjustment internal
Warm-up time 2 hours
Stabilization time (typical) 3 sec.
Operating temperature + 5° C .... + 40° C
Humidity of air max. 80 % (not condensing)
Dimensions, completely
assembled (wind shield)
(W x D x H) mm 220 x 315 x 180 220 x 315 x 321 220 x 315 x 180
Dimensions of the housing
(B x D x H) mm 220 x 315 x 95
Dimensions of windshield
inside (B x D x H) mm 145 x 160 x 80 155 x 175 x 217 -
Dimensions of windshield
outside (B x D x H) mm 158 x 143 x 82 180 x 191 x 230 -
Weighing plate, stainless steel
(mm) Ø 80 Ø 120
Weight kg (net) 2200 g 2560 g 2900 g
Input voltage balance 12 V / 2500 mA
Rechargeable battery (optional) Service life – background illumination ON 10 h
Operating time – background illumination OFF 15
Loading time 4h
Interfaces RS-232
USB

EWJ-BA-e-1917 5
KERN EWJ 600-2M EWJ 600-2SM
Readability (d) 0.01 g 0,01 g
Weighing range (max) 600 g 600 g
Reproducibility 0.01 g 0,01 g
Linearity ± 0,03 g ± 0,03 g
Verification value (e) 100 mg 100 mg
Verification class II II
Minimum weight (min) 500 mg 500 mg
Smallest part weight for
piece counting 20 mg 20 mg
Reference quantities at
piece counting 10, 20, 50, 100, 200
Weighing unit g g
Adjustment internal
Warm-up time 2 hours 2 hours
Stabilization time (typical) 3 sec.
Operating temperature
+ 5° C .... + 40° C
Humidity of air max. 80 % (not condensing)
Dimensions fully mounted (wind
shield) (W x D x H) mm 220 x 315 x 180 220 x 315 x 180
Dimensions of the housing
(B x D x H) (mm) 220 x 315 x 95
Dimensions of windshield
inside (B x D x H) mm 145 x 160 x 80 145 x 160 x 80-
Dimensions of windshield
outside (B x D x H) mm 158 x 143 x 82 158 x 143 x 82
Weighing plate, stainless steel
(mm) Ø 120 Ø 120
Weight kg (net) 2560 g 2560 g
Input voltage balance 12 V / 2500 mA
Rechargeable battery (optional) Service life – background illumination ON 10 h
Operating time – background illumination OFF 15
Loading time 4h
Interfaces RS-232 -
USB
-

6 EWJ-BA-e-1917
KERN EWJ 6000-1M EWJ 6000-1SM
Readability (d) 0.1 g 0,1 g
Weighing range (max) 6000 g 6000 g
Reproducibility
0.1 g
0,1 g
Linearity ± 0.3 g ± 0,3 g
Verification value (e) 1 g 1 g
Verification class II II
Minimum weight (min) 5 g 5 g
Smallest part weight for
piece counting 20 mg 20 mg
Reference quantities at
piece counting 10, 20, 50, 100, 200
Weighing unit g g
Adjustment
internal
Warm-up time 2 hours 2 hours
Stabilization time (typical) 3 sec.
Operating temperature + 5° C .... + 40° C
Humidity of air max. 80 % (not condensing)
Dimensions fully mounted (wind
shield) (W x D x H) mm - -
Dimensions of the housing
(B x D x H) (mm) 220 x 315 x 95
Dimensions of windshield
inside (B x D x H) mm - -
Dimensions of windshield
outside (B x D x H) mm - -
Weighing plate, stainless steel
(mm) 155 x 145 155 x 145
Weight kg (net)
2900 g
2900 g
Input voltage balance 12 V / 2500 mA
Rechargeable battery (optional) Service life – background illumination ON 10 h
Operating time – background illumination OFF 15
Loading time 4h
Interfaces RS-232 -
USB -

EWJ-BA-e-1917 7
2 Appliance overview
Example EWJ 300-3 / EWJ 600-2M:
1. Windshield
2. Weighing pan
3. Levelling screw
4. Bubble level
5. Keyboard
6. Display
7. RS-232
8. USB
9. Terminal power supply unit
10. Battery compartment
11. Transportation locks
12. Adjustment switch

8 EWJ-BA-e-1917
Example EWJ 300-3H:
1. Windshield
2. Weighing pan
3. Display
4. Bubble level
5. Keyboard
6. Levelling screw
7. RS-232
8. USB
9. Terminal power supply unit
10.Battery compartment
11.Transportation locks
12.Adjustment switch

EWJ-BA-e-1917 9
2.1 Keyboard overview
Key Function Function in Menu
Calculate weighing data via
interface Exit menu / back to weighing mode.
Switch-over weighing unit Scroll forward in menu
Parts counting
Delete total added memory
Percent determination
Start internal adjustment (longer
pressing of the button)
Taring
Zeroing Take over selected setting
Turn on/off

10 EWJ-BA-e-1917
2.2 Overview of display
Zero indicator
The displayed weighing value is a net weighing value
Capacity display
The bar graph display moves from the left to the right
and proceeds equally to the weight loaded onto the
weighing balance. Its full width is reached at maximum
load.
This is an analogue display of the current allocation of
the weighing area.
οStability display
Pcs Indicator for counting
% Indicator for percent determination
Currently selected weight unit
fully loaded Loading status of the rechargeable battery (prerequisite
menu setting „P9batt on“, see chap. 8.2).
The number of segments informs about the loading
status of the rechargeable battery.
1/2 loaded
empty

EWJ-BA-e-1917 11
3 Basic Information (General)
3.1 Proper use
The balance you purchased is intended to determine the weighing value of material
to be weighed. It is intended to be used as a “non-automatic balance”, i.e. the
material to be weighed is manually and carefully placed in the centre of the weighing
pan. As soon as a stable weighing value is reached the weighing value can be read.
3.2 Improper Use
Do not use balance for dynamic weighing. In the event that small quantities are
removed or added to the material to be weighed, incorrect weighing results can be
displayed due to the “stability compensation“. (Example: Slowly draining fluids from a
container on the balance.)
Do not leave permanent load on the weighing pan. This may damage the measuring
system.
Impacts and overloading exceeding the stated maximum load (max) of the balance,
minus a possibly existing tare load, must be strictly avoided. Balance may be
damage by this.
Never operate balance in explosive environment. The serial version is not explosion
protected.
The structure of the balance may not be modified. This may lead to incorrect
weighing results, safety-related faults and destruction of the balance.
The balance may only be used according to the described conditions. Other areas of
use must be released by KERN in writing.
3.3 Warranty
Warranty claims shall be voided in case
•Our conditions in the operation manual are ignored
•The appliance is used outside the described uses
•The appliance is modified or opened
•mechanical damage and damage caused by media, liquids,
natural wear and tear
•The appliance is improperly set up or incorrectly electrically connected
•The measuring system is overloaded

12 EWJ-BA-e-1917
3.4 Monitoring of Test Resources
In the framework of quality assurance the measuring-related properties of the
balance and, if applicable, the testing weight, must be checked regularly. The
responsible user must define a suitable interval as well as type and scope of this test.
Information is available on KERN’s home page (www.kern-sohn.com with regard to
the monitoring of balance test substances and the test weights required for this. In
KERN's accredited DKD calibration laboratory test weights and balances may be
calibrated (return to the national standard) fast and at moderate cost.
4 Basic Safety Precautions
4.1 Pay attention to the instructions in the Operation Manual
Carefully read this operation manual before setup and
commissioning, even if you are already familiar with KERN
balances.
4.2 Personnel training
The appliance may only be operated and maintained by trained personnel.
5 Transport and storage
5.1 Testing upon acceptance
When receiving the appliance, please check packaging immediately, and the
appliance itself when unpacking for possible visible damage.
5.2 Packaging / return transport
Keep all parts of the original packaging for a possibly required
return.
Only use original packaging for returning.
Prior to dispatch disconnect all cables and remove loose/mobile
parts.
Reattach possibly supplied transport securing devices.
Secure all parts such as the glass wind screen, the weighing
platform, power unit etc. against shifting and damage.

EWJ-BA-e-1917 13
6 Unpacking, Setup and Commissioning
6.1 Installation Site, Location of Use
The balances are designed in a way that reliable weighing results are achieved in
common conditions of use.
You will work accurately and fast, if you select the right location for your balance.
Therefore, observe the following for the installation site:
•Place the balance on a firm, level surface;
•Avoid extreme heat as well as temperature fluctuation caused by installing
next to a radiator or in the direct sunlight;
•Protect the balance against direct draughts due to open windows and doors;
•Avoid jarring during weighing;
•Protect the balance against high humidity, vapours and dust;
•Do not expose the device to extreme dampness for longer periods of time.
Non-permitted condensation (condensation of air humidity on the appliance)
may occur if a cold appliance is taken to a considerably warmer environment.
In this case, acclimatize the disconnected appliance for ca. 2 hours at room
temperature.
•Avoid static charge of goods to be weighed or weighing container.
Major display deviations (incorrect weighing results) may be experienced should
electromagnetic fields (e.g. due to mobile phones or radio equipment), static
electricity accumulations or instable power supply occur. Change location or remove
source of interference.
6.2 Unpacking, Scope of delivery
Remove device and accessories carefully from packaging, remove packaging
material and place device at the planned work place. Verify that there has been no
damage and that all packing items are present.
6.2.1 Scope of delivery / serial accessories:
•Balance, see chap. 2
•Mains adapter
•Protective cover
•Operating manual
•Transport Securing
•Glass wind shield only models EWJ 300-3, EWJ 300-3H, EWJ 600-2M, EWJ 600-
2SM

14 EWJ-BA-e-1917
6.2.2 Installing / removing transport fittings
The right place is decisive for the accuracy of the weighing results of high-resolution
precision balances (see chap. 6.1).
Turn the screw to the stop to the
left
Install weighing plate and wind shield if necessary.

EWJ-BA-e-1917 15
Install weighing plate as follows:
Models EWJ-300:
Put holder weighing plate
Screw screw with hexagon socket
carefully and fix holder weighing plate so
Attach the weighing plate

16 EWJ-BA-e-1917
Models EWJ-600-2M_EWJ-3000-2
Put holder weighing plate
Screw screw with hexagon socket
carefully and fix holder weighing plate so
Attach the weighing plate

EWJ-BA-e-1917 17
Models EWJ-6000:
Attach the weighing plate
Ensure that the slanted side faces
forward
Screw screw with hexagon socket
carefully and fix pan so
Level balance with foot screws until the air bubble of the water balance is in the
prescribed circle.
Check levelling regularly

18 EWJ-BA-e-1917
6.3 Mains connection
Power is supplied via the external mains adapter. The stated voltage value must be
the same as the local voltage.
Only use KERN original mains adapter. Using other makes requires consent by
KERN.
6.4 Storage battery operation (optional)
Before the first use, the battery should be charged by connecting it to the mains
power supply for at least 12 hours.
The LED display provides information about the battery's charging status.
Voltage has dropped below prescribed minimum.
Rechargeable battery very low.
Rechargeable battery completely reloaded
To spare the rechargeable battery the permanent background illumination of the
display can be switched off in the menu item „F2 bl“, see chapter 8.2.
6.5 Connection of peripheral devices
Before connecting or disconnecting of additional devices (printer, PC) to the data
interface, always disconnect the balance from the power supply.
With your balance, only use accessories and peripheral devices by KERN, as they
are ideally tuned to your balance.
6.6 Initial Commissioning
In order to obtain exact results with the electronic balances, your balance must have
reached the operating temperature (see warming up time chap. 1). During this
warming up time the balance must be connected to the power supply (mains,
accumulator or battery).
The accuracy of the balance depends on the local acceleration of gravity.
Strictly observe hints in chapter Adjustment.

EWJ-BA-e-1917 19
6.7 Adjustment
As the acceleration value due to gravity is not the same at every location on earth,
each display unit with connected weighing plate must be coordinated - in compliance
with the underlying physical weighing principle - to the existing acceleration due to
gravity at its place of location (only if the weighing system has not already been
adjusted to the location in the factory). This adjustment process must be carried out
for the first commissioning, after each change of location as well as in case of
fluctuating environment temperature. To receive accurate measuring values it is also
recommended to adjust the display unit periodically in weighing operation.
•Observe stable environmental conditions. Stabilisation requires a certain
warm-up time.
6.7.1 Manual internal adjustment by pressing button
In weighing mode keep pressed as long as „CAL“ is displayed
The motor noise of the loading system for the internal adjustment weight can be
heard, the internal adjustment is started.
After successful adjustment „PASS“ will be displayed. The balance returns
automatically into weighing mode.

20 EWJ-BA-e-1917
6.7.2 Automatic internal adjustment
Automatic adjustment takes place:
•when the balance is switched off and on.
•at the end of a time interval
After a set time interval (selectable 1 – 8 hrs.) in the menu (F5 HoUr, see chap.
8.3) the internal adjustment is automatically started.
The motor noise of the loading system for the internal adjustment weight can be
heard, the internal adjustment is started.
After successful adjustment „PASS“ will be displayed. The balance returns
automatically into weighing mode.
This manual suits for next models
7
Table of contents
Other KERN Scale manuals

KERN
KERN FEJ-A05 User manual

KERN
KERN PCD 250-3 User manual

KERN
KERN ECB Series User manual

KERN
KERN MCB 300K100NM User manual

KERN
KERN AEJ 100-4DM User manual

KERN
KERN EMB-S 200-1S User manual

KERN
KERN CPB 3K1M User manual

KERN
KERN EMB 500-1BE User manual

KERN
KERN GAB-N Series User manual

KERN
KERN EFC 30K-3 User manual