Kersten K2000 Technical reference manual

Instruction and Parts Manual
K2000 and K2000/E
Part no 6000 000 001 Copyright Kersten (UK) Ltd © 2008 Compiled 28/04/08
________ _
UK
Kersten Maschinenvertriebs GmbH
D - 46459 Rees, Empeler Straße 93-95
www.kersten-maschinen.de
Tel.: 028 51 / 92 34 0
Fax: 028 51 / 92 34 44
Kersten (UK) Ltd
Progress House, 39 Boulton Road
Reading, Berkshire RG2 0NH
Phone: 0118 986 9253
Email: info@cnect2.com

2
CONTENTS
1. About this Manual ………………………………………………… 4
1.1 Product Identification …………………………………………… 4
1.2 Before Start Up ……………………………………………………. 4
1.3 Intended Use ………………………………………………………. 5
2. Safety Precautions ……………………………………………….. 5
2.1 Transporting ……………………………………………………….. 6
2.2 Safety ………………………………………………………………… 7
3. Basic Rules …………………………………………………………. 8
3.1 Before Starting ……………………………………………………. 8
3.2 Repair Work ……………………………………………………….. 8
3.3 General Maintenance ……………………………………………. 9
4. Disposal …………………………………………………………….. 9
5 Warrenty …………………………………………………………… 9
6. Assembly …………………………………………………………… 10-13
7. Operation ………………………………………………………….. 14-15
8. Maintenance ………………………………………………………. 16-17
9. Technical Data ……………………………………………………. 18
10. Conformity ………………………………………………………… 19
11. Parts Lists …………………………………………………………. 20-33
3
1About this manual
Dear Customer,
We thank you for the purchase of this machine or attachment and having confidence in
our equipment.
Before using this machine please read this instruction manual carefully.
Keep this manual to hand as it contains important information and instructions.
The machine or the attachment is subject technical progress.
All Information, illustrations and technical data corresponds to the newest model at
the time of the publication.
Changes due to technical progress are reserved by the manufacturer at any time.
1.1 Product Identification
Always quote model number and serial number when ordering spare parts.
The identification plate may be found on the main chassis of all machines.
1.2 Before start up
We are not liable for any substantial accident and/or damage.
Before you drive this machine or start the engine of the Kersten machine that you are
handling, we ask that you urgently to make yourself familiar with this manual and the
operation of the machine.
●This symbol indicates important safety information!
●Read all safety references on the following pages!
●Read the operating instructions before start-up!
●Use this manual in conjunction with the power unit manual!
●Pass all safety instructions onto other users!
Typ
Id-Nr
Model Number
Serial Number
KERSTEN
Maschinenvertriebs GmbH
D46459 REES

4
1.3 Intended use
●The machine is a hydraulically propelled 2 wheel tractor exclusively intended for
professional employment in the management of land, forestry, amenity and
landscape conservation and for sole use with Kersten attachments. (Also see
individual attachment instructions.)
●Use going beyond that described is not considered as intended. Therefore the
manufacturer is not responsible for any resulting damage or harm and the
operator alone is responsible for the risk.
●Compliance with and adherence to the operating, maintenance and repair as
prescribed by the manufacturer in this manual must be considered essential
elements of intended use.
●The machine may only be operated repaired and serviced by persons familiar
with the machine, this manual and all relevant safety features and dangers.
●The relevant rules for the prevention of accidents as well as other safety-relevant
rules according to the health and safety at work act must be considered as part
of the operating procedure.
●The manufacturer is not liable for any accidents or damage resulting from
modifications or alterations carried out on the machine without the express
written permission of the manufacturer.
2Safety Precautions
It is important to note that not all possibilities can be covered within this
manual.
The manual assumes that the operator has a general awareness for Health and
Safety to be appointed an operator in the first place.
This Kersten machine has been designed, so far as is reasonably practical,
So that it will not endanger the safety of the operator or anyone else if the
machine is used and maintained according to the instructions stated in this
manual which have been compiled following research and experience of the
manufacturers.

5
General safety and accident prevention instructions:
●Consider all additional valid general operating instructions and health and safety
regulations
●This machine should not be operated by any person under the age of 16.
●This machine may be subject to regulations when used on the public highway
●Before starting operating this machine you should be familiar with all controls
and their functions. Familiarization should not be carried out during operation.
●The user is responsible for operating the unit in the work area.
●Standing in the danger area of the machine is forbidden!
●Look out for any children or animals in the work area.
●Operators are advised to wear clothing that is close fitting with stout footwear.
Loose fitted clothes or casual footwear increase risk of accident
●All controls, engine and functions must be cleaned regularly.
●Do not leave the engine running in an enclosed area.
●Whenever handling fuel there is an increased risk of fire. Never refill near a
naked flame or sparks, do not smoke whilst refilling the fuel tank.
Before refuelling, turn the engine off, allow to cool down and take ignition keys
out (if available).
●Keep machine clean to reduce the risk of fire
●When starting the engine all drives must be switched off
●Never leave the operator console while driving
●Never adjust the handlebar while engine is running
●Never leave the machine whilst engine is running.
●Close the fuel valve when machine is not in use.
●Apply parking brake (where fitted), when leaving, and minimize unauthorized
use!
●Never leave the equipment unsupervised, when the engine is running.
2.1 Transporting
When transporting this unit ensure all possible power is isolated disengaged and
disabled.
Apply parking brake where fitted.
Secure the machine by use of bindings any transporting vehicle.
Only transport on vehicles designed for the use of transporting this type of equipment.

6
2.2 Safety
Attention! This machine is equipped with warning symbols (safety decals).
Be aware of your safety at all times when operating a machine.
Real security means that you are familiar with all safety decals.
These decals indicate types and areas of endangerment and in particular the safety
measure which should be taken.
Always remain alert and conscious of the dangers the decals indicate on the machine,
you are operating, presents to you and others.
The decals must be maintained in good condition, they are important safety devices
The following decals are present on this machine:
Read the safety manual carefully before start up.
Before repair, maintenance and cleaning
Turn off engine and pull out keys
Consider references in the technical manual.
Lubrication fitting
The risk by away-hurling parts
with running engine.
Respect a safety margin from the

7
3 Basic Rules
●Always use the machine across the slope in preference to going up and down
Use extreme caution when changing direction on a slope
●Do not operate this machine on slopes of more than 20 degrees
Humidity and rain increases the danger of slippage. Certain conditions may not
permit safe handling of the machine
●Wear firm footwear with sufficient profile.
Operate only in conditions where sufficient lighting exists
Check terrain for hidden hazards prior to commencement of operation
In the event of accidental impact with a foreign object, immediately stop the
machine, including engine, and inspect for damage before continuing
Never run whilst operating the machine
Disengage drive to the attachment when transporting machine to and from area
to be worked
Never put hands or feet near or under rotating parts
Prior to any maintenance or repair work ensure that all drives are in the neutral
position, all switches are in the off position and for extra safety the spark plug
lead should be removed
3.1 Before starting
●When starting the engine all drives must be disengaged – i.e. all drive leavers
should be in the neutral rest position
●Never leave the operating position whilst machine is running
●Do not adjust handle bars when operating
Do not operate the machine without all guards and safety devices being intact
Keep hands and feet always from all rotating parts
●In the event of malfunction stop immediately
3.2 Repair work
●Repair work such as a welding, cutting or drilling must not be carried out on any
safety relevant parts
Damaged parts should be replaced with new before further use of the machine

8
3.3 Maintenance
●Examine the machine before start-up to ensure it is in a safe operating condition,
paying particular notice to the security of all screw fittings
Worn/damaged parts should be replaced as a safety precaution
●Cleaning should be carried out regularly to aid visual inspection of all working
parts on the machine, including all safety devices, and to prevent fire hazards
Cleaning, e.g. with a high pressure cleaner, should be accomplished in such a
way that the water jet is not focused directly on rotating parts, lubrication points
and electrical fittings.
The machine should be maintained according to the instructions contained within
the manual.
●Failure to comply with maintenance and operating instructions will cause the
guarantee to be considered null and void
4 Disposal
This device must be disposed of according to the regulation of the municipality or the
country. All possible parts should be recycled and the remainder disposed of in a
satisfactory manner.
The company Kersten Maschinenvertriebs GmbH or Kersten (UK) Ltd does not take
responsibility of disposal.
5 Warranty
Details of Warranty are included on the warranty registration form.
All conditions must be satisfied.
IMPORTANT! Please complete the warranty registration form enclosed and send it to:
Kersten (UK) Ltd
Progress House, 39 Boulton Road
Reading, Berkshire RG2 0NH
Phone: 0118 986 9253

9
6. Assembly
6.1 Assembly Dirt collector
Attach left and right hand collector height adjustment brackets to the front of the
sweeper housing using counter sunk screws and lock nuts.
Attach the collector to the sweeper by folding the catch lever up. Slide the
container down on to the two adjustable hooks and fold the catch lever down to
lock in to place. (see diagram 1)
6.2 Container - Adjustment:
The height of the container may be altered by means of the black handles on the
height adjustment brackets. There is a graduated indicative scale. The collector
should be set evenly and level with the front edge 4cm from the surface. The
adjustment is affected by the sweeping brush height and so should be
monitored.
As the brush wears adjustments will need to be made.
Attention : Never allow the collector to rub the ground!!!

10
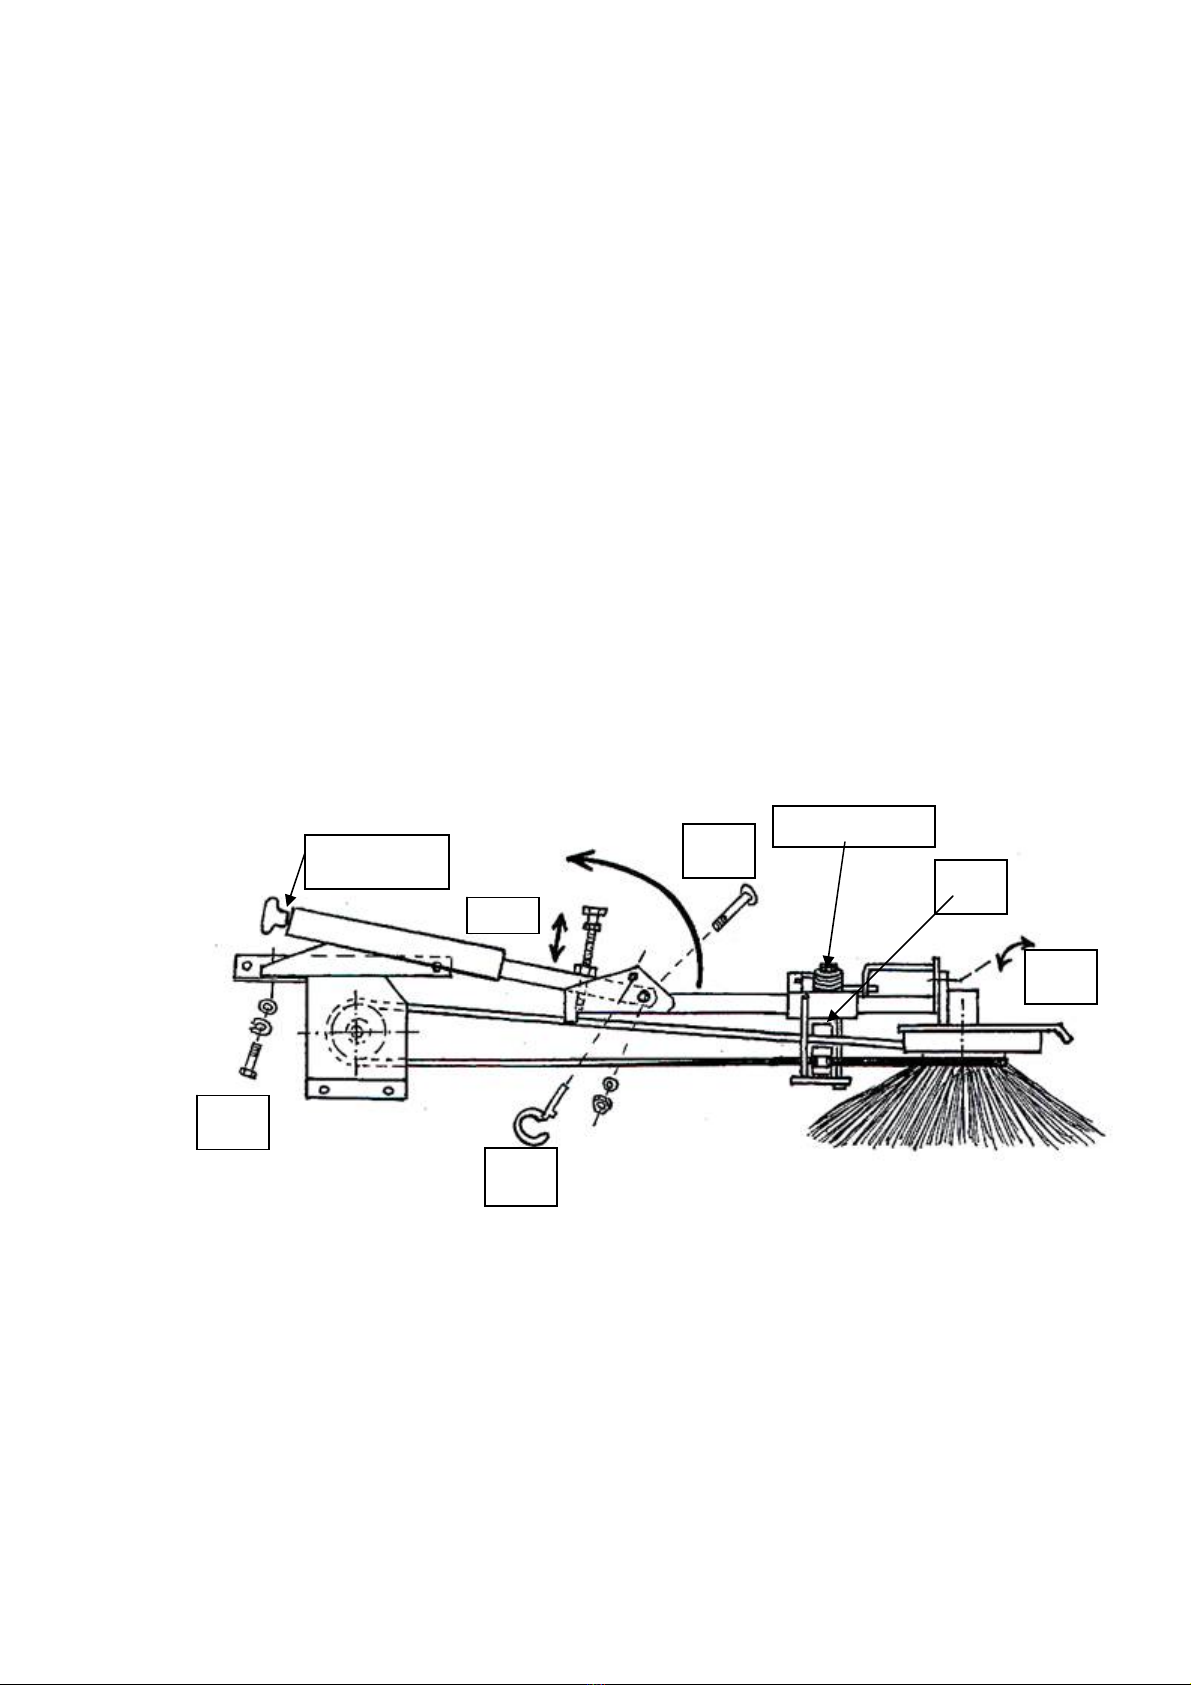
6.3 Assembly - side broom
When attaching the side brush to the sweeper housing for the first time the drive
pulley and support casing needs to be fitted to the right hand of the sweeper
housing as viewed from the operating position. Remove the 17mm clamping
bolt, discard the flat washer. Refit the clamping bolt including the spring washer
and drive pulley. Now mount the support casing using four screws, lock washers
and nuts. The screws should be outside and the nuts inside. The side brush may
now be slid on to the support casing and secured with the M8 screw and spring
washer. “A”.
Insert coach bolt “B” and assemble sweeper head assy. Using 17mm lock nut
and flat washer. Do not over tighten to allow free movement of sweeper arm.
Secure sweeper arm in the upright position with spring clip “C”
Position the drive belt around the drive pulley within the mounting plate. The top
belt should lay with its back against the white roller at point “X” and be at the
top of the drive pulley.
The belt is tensioned in to the work position by removing spring clip “C” and
folding side brush arm down. Replace spring clip for safe storage. Correct
tension is achieved when a distance of 5mm is measured between the tension
grasp and tube (Point “Z”).
The spring pivot of the gulley brush arm assembly allows lateral movement in
case of obstacles.
“A”
“B”
“X”
Point “Z”
Spring pivot
“H”
“N”
“C”
11
Adjustment possibilities with the side broom
"H" = height adjustment of the side broom is made by turning grasp “H”. Anti-
clockwise lowers the brush for more contact with the ground. Clockwise raises
the brush for less contact with the ground.
Please note that adjusting the height of the main brush will affect the
height setting of the gulley brush!!
“N” = Angle adjustment for gulley brush head. This may be set by loosening
13mm screw, adjusting and retightening.
"C" = Allows the brush to become inoperative by folding it out of use. Lock it in
the up position using spring clip to secure it.
Easy removal of the side broom
To dismantle the assembly remove screw “A”, slide assembly forwards and
remove the belt laterally from the drive pulley.
Easy side broom attachment
Fit the drive belt by sliding it over the pulley. Locate the brush assembly on the
mounting plate replace screw “A”.
“A”
“B”
“X”
Point “Z”
Spring pivot
“H”
“N”
“C”

12
6.4 Assembly -water dust suppression unit:
When used on a sweeping machine without collector the water nozzles are
mounted on the front, top edge of the sweeper housing as represented in sketch
1.
With the FKM 1050 one nozzle may be mounted centrally or when two nozzles
are employed they should be mounted 500mm from each other and 250 mm
from the centre.
With the FKM 1255 the two water nozzles should be mounted 625mm from each
other.
The water nozzles, when used on the collector, are mounted in a similar way but
on the top front edge of the collector box, 40mm up from the centre line.
For each water nozzle support plate there must two drillings each with diameter
8.5mm and 30mm from each other on the sweeping machine roof and/or the
collector. Each support plate is fixed with two screws M8 x 16, lock washers and
nuts.
(see sketch)
with collector: without collector:
The 5 litre water tank bracket should be mounted
on the right of the handle bar upright
of the K2000
2 x 8.5mm holes must be drilled 170mm
from each other and 260mm from
the top along the centre line of the
handlebar upright.
Caution – take care of oil tank.

13
7. Operation
7.1 Operating instructions – power unit:
Adjusting handlebars :
Loosen the 17 mm screws in elongated slots, one each side of the control
console.
Adjust the handlebars to the desired height and retighten screws.
Engine :
Please use engine manufacturers information from the enclosed operating
instructions for this.
Attaching implements:
Align power unit with implement connector and slide together.
Connect hydraulic pipes by sliding back collars and inserting ends.
Ensure equipment is well greased and dirt free.
Lubricate adjusters and mounting points of the machine regularly!
Wheel drive:
The forwards/reverse lever is operated from the left hand handle bar.
Forward by tightening the left lever towards you 0 to 7 km/h
Backwards by squeezing the lower lever forwards 0 to 3.5 km/h
The fastest driving speed (forwards and reverse) can be adjusted through the
left rotary control.
Implement drive :
The implement can be started or switched off by using the PTO lever on the
right of the operating console.
By using the right rotary button you can adjust the number of revolutions of the
brush or other implement. e.g. slowly with dust and faster with snow.
Caution. Do not engage PTO without implement attached.

14
7.2 Operating instructions to Sweeping machine:
Height adjusters “A” control the brush depth settings . Twisting them clockwise
will lower the brush – anticlockwise will raise the brush. The base setting from
which to work is when 40mm of the brush is in contact with the surface to be
swept. Always adjust the brush evenly to achieve even wear.
The graduation scale on the side of the adjusters provides an indication of setting.
(see sketch 1)
Sketch 1
7.3 Collector - adjustment: (see sketch 1)
Height adjusters “B” control the box level settings. Twisting them clockwise will
raise the box – anticlockwise will lower the box. The base setting from which to
work is when box is level to the ground ie there is a parallel gap of 40mm
between the surface to be swept and the bottom of the box.
The graduation scale on the side of the adjusters provides an indication of
setting.
Note: Sweeping machine collector must never rub the ground!!!
7.4 Side broom - adjustment:
See assembly – Side broom 3.3
Height adjusters “A”
Height adjusters “B”

15
8. Maintenance
8.1 General information
Note!
Injuries to people or Damages to the machine can occur.
You should check before each use that the machine is safe and the
relevant parts and hydraulic connections are properly connected.
8.2 Maintenance
●The sweeping machine must be submitted to regular maintenance.
●After use you must dismantle all the safety devices for reattachment
when the machine is used again.
●check all fixings and pin connections after the first 5 hours of use
and lubricate all mobile parts
●check the tightness of the hydraulic fittings before every use.
●check hydraulic fittings after 5 hours use for the first time, and tighten if
necessary
(Important note: Only tighten joint if it is leaking. Procedure: Loosen the screw
connection then move hose left and right. Now the screw connection can be
tightened again.
8.3 Daily maintenance
●check the safety and control parts for wear before every use.
●check the oil level and Air filter.
●check the Hydraulic fittings and linings
●check the air pressure in the wheels.
●do a test run before every use.
●clean the equipment after every use.
●regularly lubricate all adjustable and moving parts on the power unit and any
attachments.
Storage settings
Sweeping brush:adjust wheels so that the brush is off the floor making sure the
sweeping brush is evenly relieved
●Side brush: only store off the ground.
8.4 Maintenance after 20 and 100 hours use or longer
All mobile parts must be greased and oiled regularly including at the beginning
and the end of each season.
Oil change Honda motor:
Change For the first time after 20 hours use, then every 100 hours use after that
for further information, see engine manual.
Hydraulic oil change:
The hydraulic oil and oil filter should be changed after the first 20 hours and then
after every 100 hours
Type of oil used: BP Biohyd SE-S46 (biologically degradable Ester based) or
similar.
Check chain tension between hydraulic motor and differential.

16
8.5 Installing a replacement sweeping brush
Remove the 17mm long clamping bolt from the sweeping machine housing
Loosen the three screws on the bearing housing and remove clamp and bearing
assembly. Take the square drive tube out of the two sectioned sweeping brush
and remove brushes.
Install new brush - so that the round 145mm recess is on the right as shown and
fits over the hydraulic motor - see sketch. Then reinstall the drive tube in reverse
with the clamp and the square bar, and install the left hand bearing and clamp.
Hydraulic
Motor this
end
17 mm screw
from this end

17
9 Technical Data:
Power Unit:
Engine: Honda four-cycle petrol engine 6,6kW (9PS)
Regular grade fuel, lead free
Option of electric start model as above = K 2000/E
Transmission:
Hydrostatic with differential axle
Infinitely variable speed adjustment
Adjustable handlebar
Hydraulic drive for attachments with infinitely variable speed
Equipment quick attach system
Forward 0 to 7 km/h (infinitely variably)
Backwards 0 to 3.5 km/h
Standard tyre = 4.00-8 block profile
Tyre options = 4.00-8 lug tread
or 16x6,50 -8 block or lug tread
Option: Side light and headlight
tyre chains
wheel weights
Noise emission: 83 dba
8.2 Sweeping machine:
Hydrostatic drive, work width 100 or 125cm
Brush diameters 370mm or 450 mm
Hydraulic drive for sweeper with infinitely variable speed
Standard brush is 5 row poly combination brush.
Brush options: Full poly brush, full poly/steel brush,
4 row poly snow brush .

18
Conformity explanation
Conformity explanation of the manufacturer (article 8 that Guideline 98/37/EG)
We,
Kersten Maschinen – Vertriebs GmbH
Empeler road 93-95
D - 46459 R e e s
explain that the machine
Hand-guided front sweeping machine with combustion engine
Fabrikmarke: Kersten
Typ: K 2000 / K 2000/E
mit folgenden EG-Richtlinien übereinstimmt:
98/37/EG,
_____________________
Rees, den 26.04.04
Dipl.-Ing. Georg
Kersten
Geschäftsführer-

19
1 Parts List K 2000 :
Drives
Nr. Part Nr. Qty. Description
1 700 200 010 1 Housing K 2000
2 922 001 001 1 Differential Axle
3 920 501 045 1 Chain Sprocket
4 900 008 016 4 Nut
5 920 101 056 1 Chain
6 908 047 440 2 Parallel key
7 905 800 100 1 Circlip
8 924 200 205 4 Bearing Plate
9 924 100 205 2 Bearing
10 700 000 021 2 Bush
11 700 000 022 2 Wheel hub
f.R.4.00-8
12 700 000 023 2 Wheel hub
f.R.16x6,50-8
13 901 008 016 6 Bolt
14 905 008 000 6 Lock washer
15 900 008 001 6 Nut
16 700 000 170 1 Locking pin
17 909 100 189 1 Spring
18 700 000 171 1 Locking pin plug
19 700 000 172 1 Lever
20 901 005 020 1 Bolt
21 900 005 002 1 Locknut

20
Wheels
Nr. Part Nr. Qty. Descrition
1 700 000 050 1 Hydraulic hose
housing
2 901 008 016 6 Bolt
3 905 008 000 6 Lock washer
4 900 008 001 6 Nut
5 700 000 055 2 Fender
6a 926 140 408 2 Block tyre 4.00-8
6b 926 110 408 2 Cleated tyre 4.00-
8
6c 926 140 168 2 Block trye.
16x6,50-8
6d 926 110 168 2 Cleated tyre
16x6,50-8
7 901 012 025 8 Bolt
8 907 012 000 8 Washer
9 900 012 001 8 Nut
10 943 300 035 2 Hub cover
Options:
10
0 945 104 008 2 Wheel weights for
4.00-8
10
1 945 101 665 2 Wheel weights for
16x6,50-8
10
2 901 012 060 4 Bolt
10
3 905 012 000 4 Lock washer
10
4 905 112 000 4 washer
10
5 902 912 040 4 Threaded sleeve
Block profile
6 a, c
Cleated
profile
This manual suits for next models
1
Table of contents
Other Kersten Lawn And Garden Equipment manuals


Popular Lawn And Garden Equipment manuals by other brands


Fimco
Fimco BR-15-SP-EC owner's manual

Gaspo
Gaspo Vertical Garden Assembly instructions

Sovereign
Sovereign GR57 operating instructions

Koolatron
Koolatron BITE SHIELD quick start guide

TBI PRO Engineering
TBI PRO Engineering ELECTRONIC ZapLikePRO 360 user manual

LI-COR
LI-COR 6400-18 Installation and operational instructions