Kersten WKB-H-K 35 User manual


WKB-H-K 35, WKB-H-KU 70
Table of contents
1. Foreword
3
2. About this instruction manual
4
2.1 Before commissioning
4
2.2 References to this instruction manual
4
3. Safety instructions for the attachments
5
3.1 Intended Use
5
3.2 General safety and accident prevention rules
5
3.3 Used pictograms
8
4. Disposal
9
5. Warranty
9
6. Recommendations
9
6.1 Lubricants
9
6.2 Maintenance and Repair
9
7. Assembly
10
7.1 Installation of the Weedbrush
10
8. Service
11
8.1 Operating instructions- Weedbrush
11
8.2 Turning on the Weedbrush
11
9. Maintenance
12
9.1 General
12
9.2 Maintenance
12
9.3 Daily testing
12
9.4 Maintenance after 50 hours of working hours or longer idle time
12
10. Technical (data)information
13
10.1 Weedbrush supplement
13
10.2 Measurement sheet, attachments
13
11. Fault cause and remedy
14
12. EG- declaration of conformity
15
2

WKB-H-K 35, WKB-H-KU 70
1 Foreword
Dear customers,
Thank you for choosing a quality product from Kersten.
This product was manufactured using the most modern manufacturing processes and
extensive quality assurance measures, because our goal is reached only when you are
satisfied with your device. Please read these operating instructions
completely and conscientiously before using this machine or the attachment for the first time.
If you do not understand any of the information in this safety data sheet or in the
product-specific assembly or operating instructions, please contact your seller or the
machine manufacturer.
Keep these operating instructions to hand. You can then access important information if
needed
and read instructions.
We wish you lots of fun with your Kersten device
R. Bosch
(managing director)
3

WKB-H-K 35, WKB-H-KU 70
2 About this Instruction manual
2.1 Before commissioning
Because of self-propelled implements and attachments with improper application and the
dangers that can emanate from this,instruction from competent and authorised persons
absolutely are necessary when using the device for the first time. You'll do best with its basic
features when familiarising yourself with handling by choosing a clear and level terrain for
your first ride.
● You reduce the risk of accidents on your part or third parties!
For further information and difficulties of any kind, please contact the dealer, importer or
directly to the manufacturer.
● Please note the safety instructions on the following pages!
● Please read the operating instructions before commissioning!
● Also pass on all safety instructions to other users!
2.2 Safety Instructions for the attachments
Enumerations will be marked by dots.
Example:
● Text
● Text
Instructions are marked according to the order in which they are to be carried out.
Example:
1. Text
2. Text
The machine or attachment is subject to technical progress. All information,
illustrations and technical information correspond to the latest status at the time of the
publication. Changes in terms of technical progress reserved to the manufacturer at any time.
4

WKB-H-K 35, WKB-H-KU 70
3. Safety instructions for the attachments
The most important safety instructions in this manual may not cover all possibilities. It goes
without saying that common sense and caution are factors that are not built into a machine, but must
be brought along by the one who does use and maintain the machine.
In order to keep the accident risk as low as possible, please observe the following
subchapters.
3.1 Intended use
● The attachment is designed for standard use in Arial Care for weed removal.
● Any use that goes beyond this is considered to be improper. The manufacturer is not liable for
any resulting damage; the risk is borne solely by the operator.
● Intended use also includes compliance with the operating, maintenance and repair conditions
specified by the manufacturer.
● The attachment may only be used, serviced and repaired by persons who
are familiar with this and have been informed of the dangers.
● The relevant accident prevention regulations as well as the other generally accepted safety
and occupational health rules must be observed.
● Unauthorised modifications to the machine lead to the manufacturer's exclusion of liability for
the resulting damage.
3.2 General safety and accident prevention rules
3.2.1 Basic rules
● In addition to the information in these operating instructions, also observe the generally
applicable safety and accident prevention regulations!
● The working device must not be used by persons under the age of 16, not even under
the supervision of an adult! Children and young people should be instructed not to
to play with.
● Only trained personnel or persons are allowed to use this machine!
● When using public transport routes, please note the relevant regulations!
● The user's clothing should be tight-fitting. Avoid loose clothing and wear sturdy shoes or
safety shoes!
● Only work in good visibility and light conditions!
● The attached warning and information signs provide important information for the safe
operation; this is for your safety!
● Be careful with rotating tools - keep a safe distance!
● Be careful with trailing tools - Before working on these, wait until they have come to a
complete standstill!
● There are crushing and shearing points on driven parts!
● Driving behaviour, steering and, if necessary, braking ability as well as tipping behaviour
are controlled by built-in or attached devices and loading affected. For this reason, only
the attachments approved by the manufacturer may be used. The working speed must
be adapted to the respective circumstances.
● Unauthorised modifications that endanger the operational safety of the machine are
forbidden!
● Check the machine for operational safety before each use!
● Never remove or change protective devices!
● Never go under the unsecured device for repair or inspection!
5

WKB-H-K 35, WKB-H-KU 70
3.2.2 Work and danger area
● The user is responsible to third parties in the work area!
● Staying in the danger area of the machine is prohibited!
● Before switching on the attachment and driving off, check the immediate area.
Pay particular attention to children and animals. Make sure you have sufficient visibility!
● Before starting work, foreign objects must be removed from the area to be worked on.
When working, watch out for other foreign objects and remove them in good time.
● When working in enclosed areas, the safety distance to the border must be maintained
in order to not to damage the machine or brushes.
● When working in the immediate vicinity of public roads and paths, these should, if
possible,not be approached across but as lengthwise as possible, as this minimises the
risk of injury to third parties from objects flying around.
● When working on public streets and squares or in the immediate vicinity, information
and danger signs must be set up to draw the attention of third parties.
3.2.3 Before starting work
● Before starting work, please familiarise yourself with all facilities and controls and
familiarise also with their function and make sure that all protective devices are properly
installed and in the protective position. During the work assignment it is too late for that!
3.2.4 During operation
● Never leave the operating area while driving!
● Do not leave the operating station until the brushes of the attachment come to a
standstill!
● Do not make any adjustments to the attachment during operation - risk of accident!
● The transport of persons and objects is prohibited!
● For example, if the attachment has caught a foreign object and is blocking, the engine
must be switched off and the attachment cleaned with a suitable tool!
Always switch off the engine and remove the spark plug connector for interventions or
cleaning the attachment! Please note the safety instructions from
self-propelled implement.
● n the event of damage to the self-propelled implement or attachment, stop the engine
immediately
● and have the damage repaired.
● In the event of damage to the self-propelled implement or attachment, stop the engine
immediately and have the damage repaired.
3.2.5 Leaving the machine
● When leaving the machine, secure it against rolling away, by using wheel chocks or if
necessary by operating the parking brake.
● Secure the device against unauthorised use!
● Never leave the appliance unattended while it is still in operation!
3.2.6 Screw connections and tires
● When working on the wheels, make sure that the device is parked safely and secured
against rolling away!
● Regularly check nuts and bolts for tightness and retighten if necessary.
● Repair work on the tires may only be carried out by specialists and with the appropriate
assembly tools!
● If the tire pressure is too high there is a risk of explosion!
● Check the air pressure regularly.
6
WKB-H-K 35, WKB-H-KU 70
3.2.7 Coupling and uncoupling attachments
● Only connect and disconnect attachments when the engine is off and the PTO is off.
● When changing attachments and their parts, use suitable tools and wear gloves.
● When mounting and dismounting, bring the required support equipment into the
respective position and ensure sufficient stability.
● Secure the self-propelled work machine and attachment against rolling away (parking
brake, wheel chocks).
● There is a risk of injury (crushing) when coupling attachments. Special caution is
necessary.
● Couple attachments according to regulations and fasten them at the specified points.
3.2.8 Maintenance, cleaning and repair work
● Maintenance and cleaning work only when the drive is switched off and the motor
stationary!
● If protective devices and work equipment are subject to wear and tear, then these
should be checked regularly and replaced if necessary.
● Only use original spare parts from the manufacturer, as these correspond to the
technical requirements and minimise the risk of accidents!
● Cleaning work with the high-pressure cleaner should be carried out in such a way that
the Water is held not directly on bearings, turned parts, grease nipples, shaft seals,
wheel hubs etc. After each cleaning with the high-pressure cleaner, the lubrication
points must be re-greased. Otherwise the guarantee will be void!
● Check the moving parts for ease of movement and if necessary grease them!
● After maintenance and cleaning work, be sure to remove the protective devices and put
them in the protective position!
● To avoid the risk of fire, keep the machine clean!
● Check nuts and bolts regularly for tightness and retighten if necessary.
● When carrying out maintenance, cleaning and repair work on the lifted device, always
make sure that it is protected by suitable support elements!
● Before carrying out any repairs, make sure that the hydraulic system is pressureless,
because fluids under pressure can penetrate the skin and cause serious injuries!
Therefore, seek medical attention immediately - risk of infection!
● Repairs may only be carried out by qualified personnel.
● Check the hydraulic hose lines for damage and aging at regular intervals and replace if
necessary.
● Disconnect the battery when performing welding work on the towing vehicle or on the
attached device.
● Repairs such as welding, grinding, drilling, etc. must not be carried out on supporting
and other safety-related parts such as frames, axles, etc.!
7
WKB-H-K 35, WKB-H-KU 70
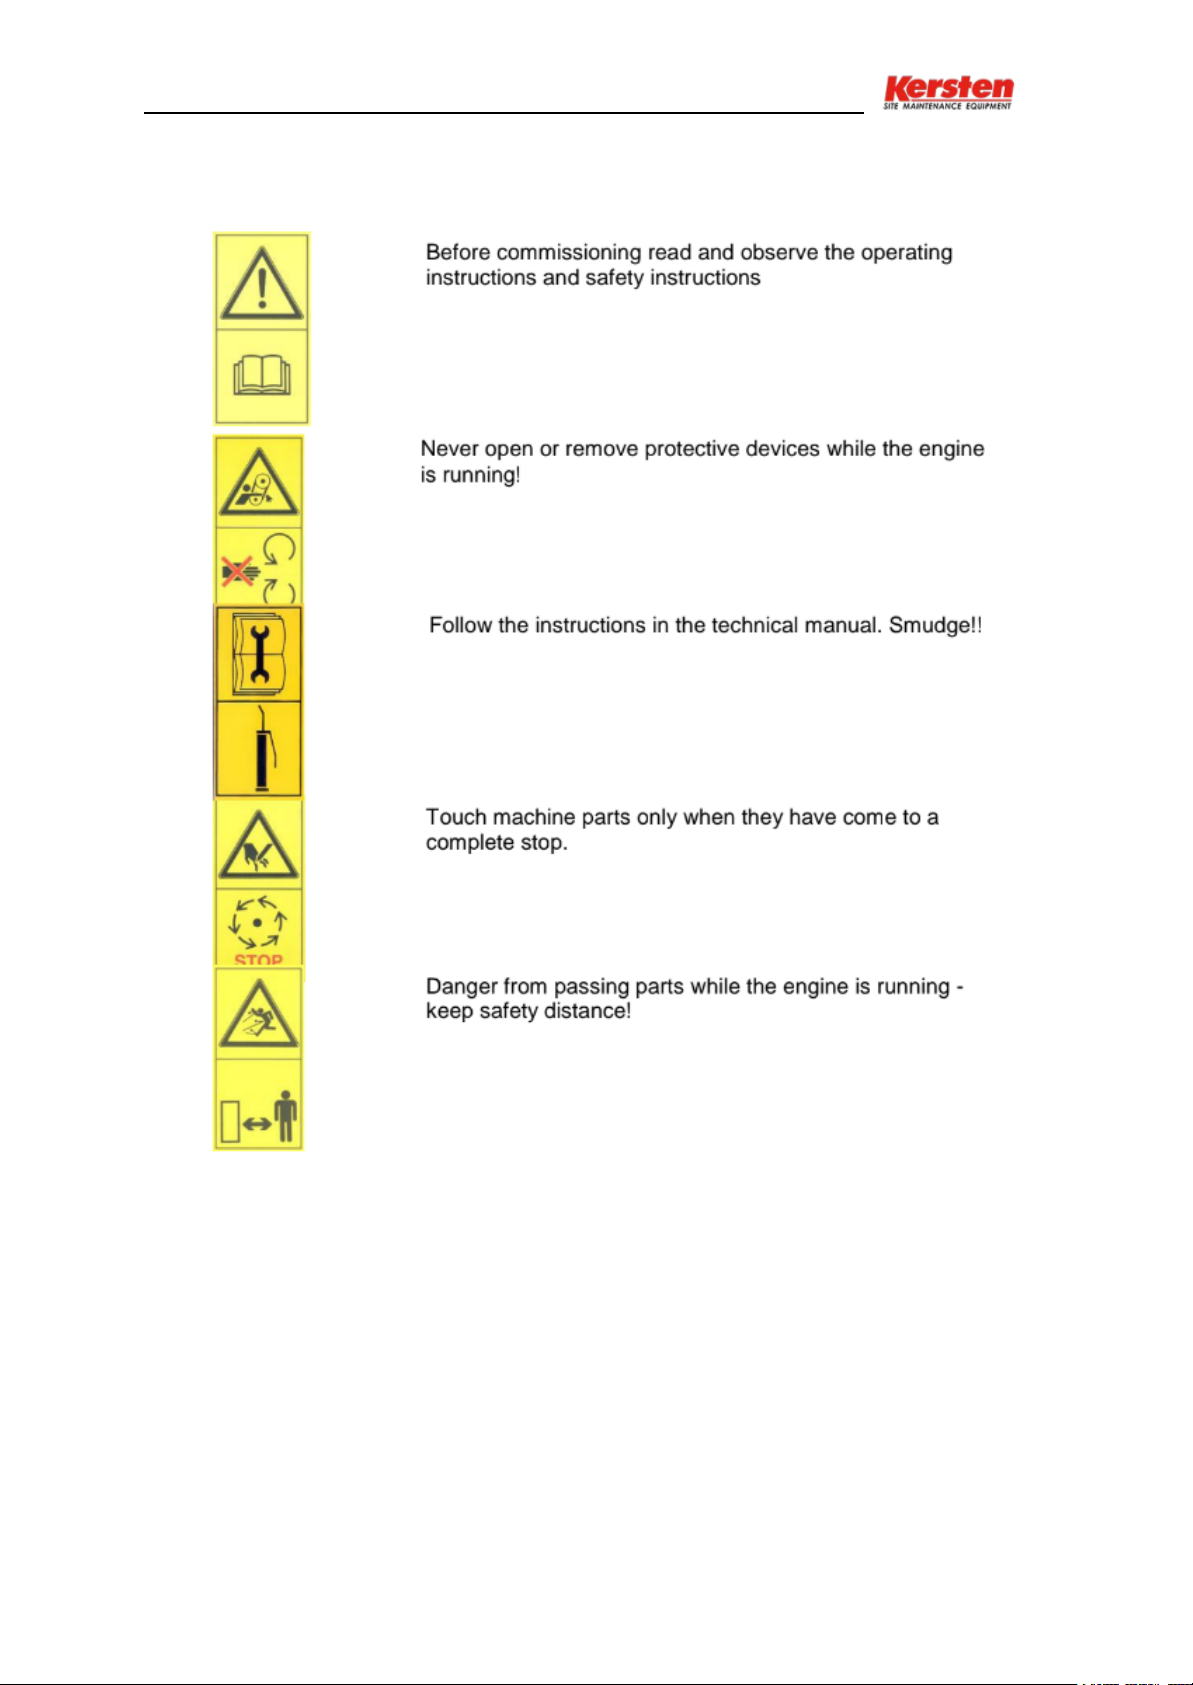
3.3 Used pictograms
Explanation of the pictograms used:
8

WKB-H-K 35, WKB-H-KU 70
4. Disposal
Devices must comply with applicable local, city, or state regulations
be disposed of in the country.
Depending on the material, dispose of the parts in residual waste, hazardous waste or recycling.
The company Kersten Areal Maschinen GmbH does not accept any disposal.
5. Warranty
The device is accompanied by a sales message, which among other things determines
the time for the start of the warranty period. When selling the device please fill in the
sales message completely and send them back to us within 14 days. If warranty claims are asserted
without us having a sales message, no warranty service will be provided.
A sales message is attached to the device, which, among other things, states the time for the start
determined by the warranty period. If you are selling the device, please fill out the sales message
completely and send them back to us within 14 days. If warranty claims are asserted without us
having received a sales message, there will be no warranty processing.
Guarantee claims should be made immediately, but no later than six weeks after the occurrence of the
damage which should be submitted with details of the purchase data, otherwise no Areal Maschinen
GmbH will provide the warranty. Wear parts are excluded from the guarantee. Furthermore the
guarantee expires in the event of improper operation, in the event of no or incorrect operation
maintenance work, the use of impermissible operating resources and the use of non
original spare parts.
6. Recommendations
6.1 Lubricants
For "open" lubricating points or nipples, we recommend bio-lubricating oil or bio-lubricating grease
to use. With the use of bio-lubricants you act ecologically correct, protect the environment, and
promote the health of people, animals and plants.
6.2 Maintenance and repair
Your dealer has trained mechanics who can provide proper maintenance and repairs. You should only
carry out major maintenance work and repairs
You should only carry out major maintenance work and repairs if you have the appropriate tools and
knowledge of machines and internal combustion engines.
9
WKB-H-K 35, WKB-H-KU 70
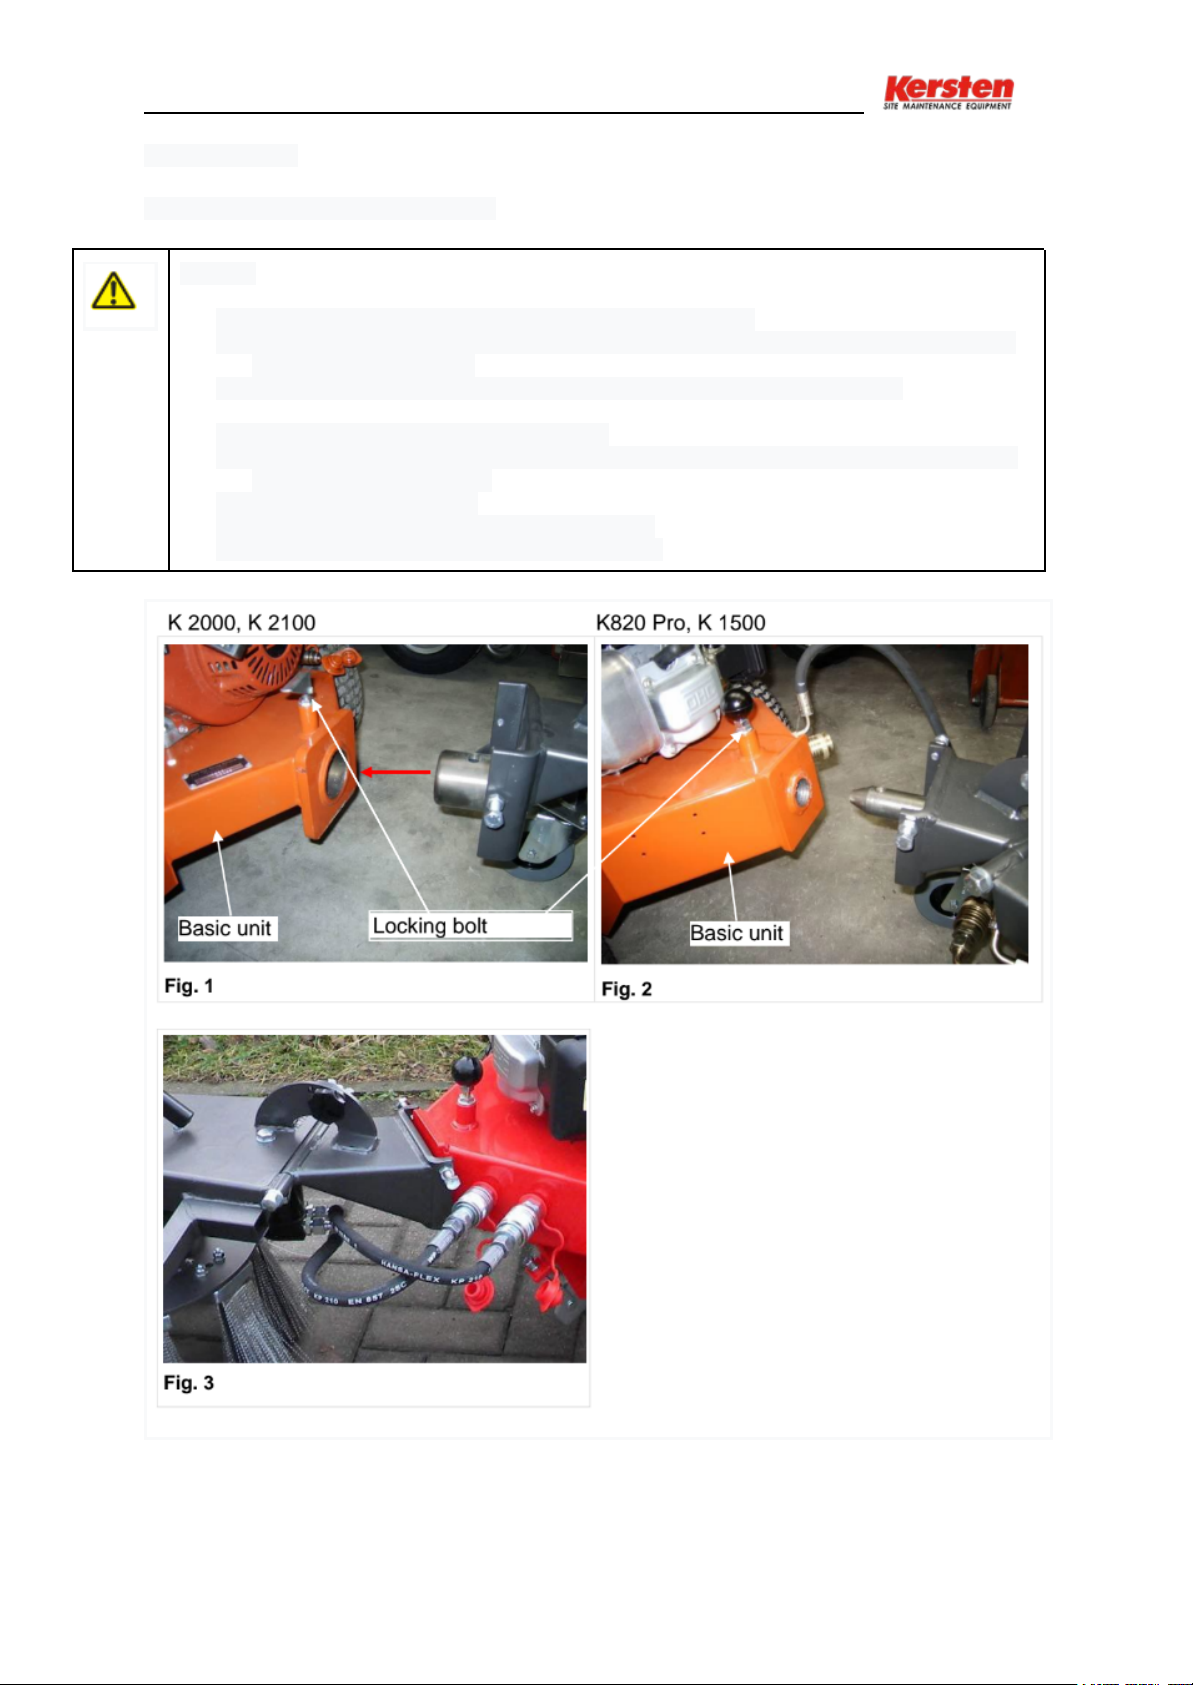
7. Montage
7.1 Installation of the Weedbrush
Danger!
● Severe injuries to the operator or third parties may occur.
● Before fitting or disassembling the Weedbrush, switch off the prime mover and remove
the spark plug connector.
● The receptacle and the receiving tube must be clean and freshly greased.
1. Pull up the locking pin (see Fig.1 and 2).
2. Insert the receiving tube on the intermediate frame of the Weedbrush into the receiving
socket on the basic device.
3. Then lock the locking pin.
4. Now insert the two hydraulic lines (see Fig.3).
5. To dismantle, follow the steps in reverse order.
10

WKB-H-K 35, WKB-H-KU 70
8. Operation
8.1 Operating instructions - Weedbrush
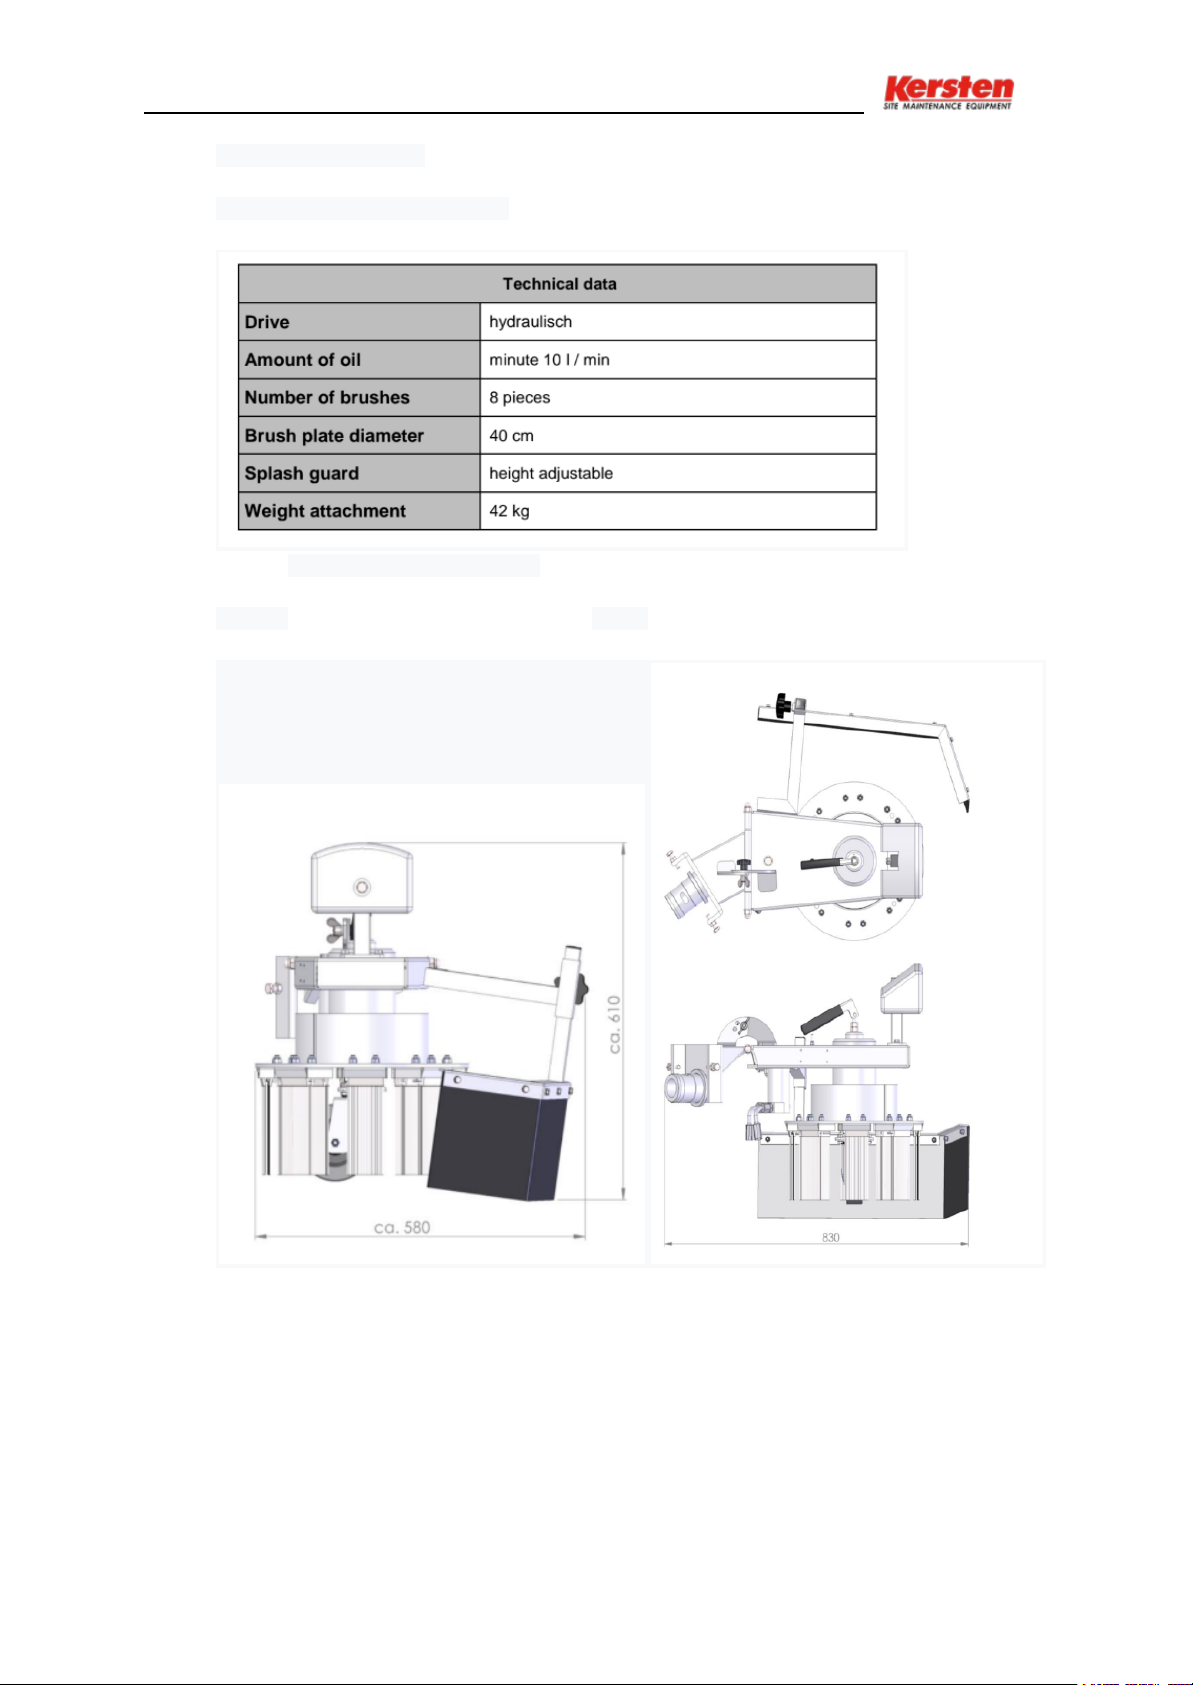
The best performance of the Weedbrush is achieved when the brushes in area "A"
(see Fig.4) touch the ground. Since the vertical inclination of the brush plate also contributes to the
work output, the following relationship applies:
The more the brush holder is lowered at an angle (vertical inclination), the sooner and more
aggressively the brushes are used and the wear increases.
Setting the work area:
In order to get to the working area "A" first, the horizontal inclination of the brush plate must be
adjusted.
The horizontal inclination of the brush plate is adjusted using the two screws (Fig.5; Item 1) on the
left and right of the drive unit mount. For that, loosen the lock nuts, adjust the inclination with the help
of the screws and then tighten lock nuts.
The vertical two wheeled tractor of the brush plate is changed by moving the stem housing (Fig.5;
Pos.2) to accommodate (Fig.5; Item 3) at an angle over predefined holes. Using a star grip (Fig.5;
Item 4) and a thumbscrew (Fig.5; Item 5) the angle adjustment is locked.
The height adjustment of the brush plate is made by a support wheel, which can be
changed via the lever (Fig.5, Pos.6). Changes in length of the brushes due to wear are
hereby compensated.
8.2 Turning on the Weedbrush
The Weedbrush is switched on by operating the lever for the hydraulic power take-off (PTO).
11

WKB-H-K 35, WKB-H-KU 70
9. Maintenance
9.1 General
Personal injury or damage to the machine can occur.
Before each use of the machine, check all safety-relevant parts and
the hydraulic connections.
9.2 Maintenance
● The weed brush must undergo regular maintenance.
● After carrying out maintenance work, all disassembled protection devices must be properly
replaced.
● Check all bolt and bolt connections after the first 5 operating hours.
● Lubricate or lubricate all moving parts.
● Check the hydraulic connections for leaks before each use.
● Check hydraulic connections for the first time after 5 operating hours, retighten if necessary!
Only tightening has no success !!!
Please first loosen a leaking hydraulic screw connection, then move the hose or screw
connection. Now the screw connection can be tightened again.
9.3 Daily test
● Check the brush elements for tightness.
● Check the safety elements and moving parts for wear before each use.
● Check the hydraulic connections and lines.
● Perform a test run before each use.
● Clean the device after each use.
9.4 Maintenance after 50 hours of working hours or longer idle time
● At regular intervals and always at the beginning and end of the season, the moving parts of the
unit must be greased or oiled.
● Check hydraulic connections and hoses for leaks and damage, replace if necessary.
Also consider the legal regulations for the maximum duration of use.
● Grease the mounting of the attachment regularly.
9.5 Storage
If the machine is not used for a long time, the following measures are recommended:
1. Carry out cleaning
2. Check the function of all parts
3. Check all screws and bolts for tightness and tighten if necessary
4. Replace worn or damaged components, only use original Kersten spare parts
5. subordinate the machine
• To prevent corrosion, protect the machine from weathering. Do not place the machine in
damp rooms, stables or artificial fertiliser storage.
6. Cover the machine with a cloth or similar
12
WKB-H-K 35, WKB-H-KU 70
10 Technical data
10.1 Weedbrush attachment
Reserve technical change!
10.2 Measurement sheet, attachment
13

WKB-H-K 35, WKB-H-KU 70
11. Fault cause and remedy
This chapter describes in more detail the most important faults that can occur during
operation on the artificial turf care brush. Faults which require major intervention must
always be rectified by your specialist workshop.
Observe safety instructions!
14
WKB-H-K 35, WKB-H-KU 70
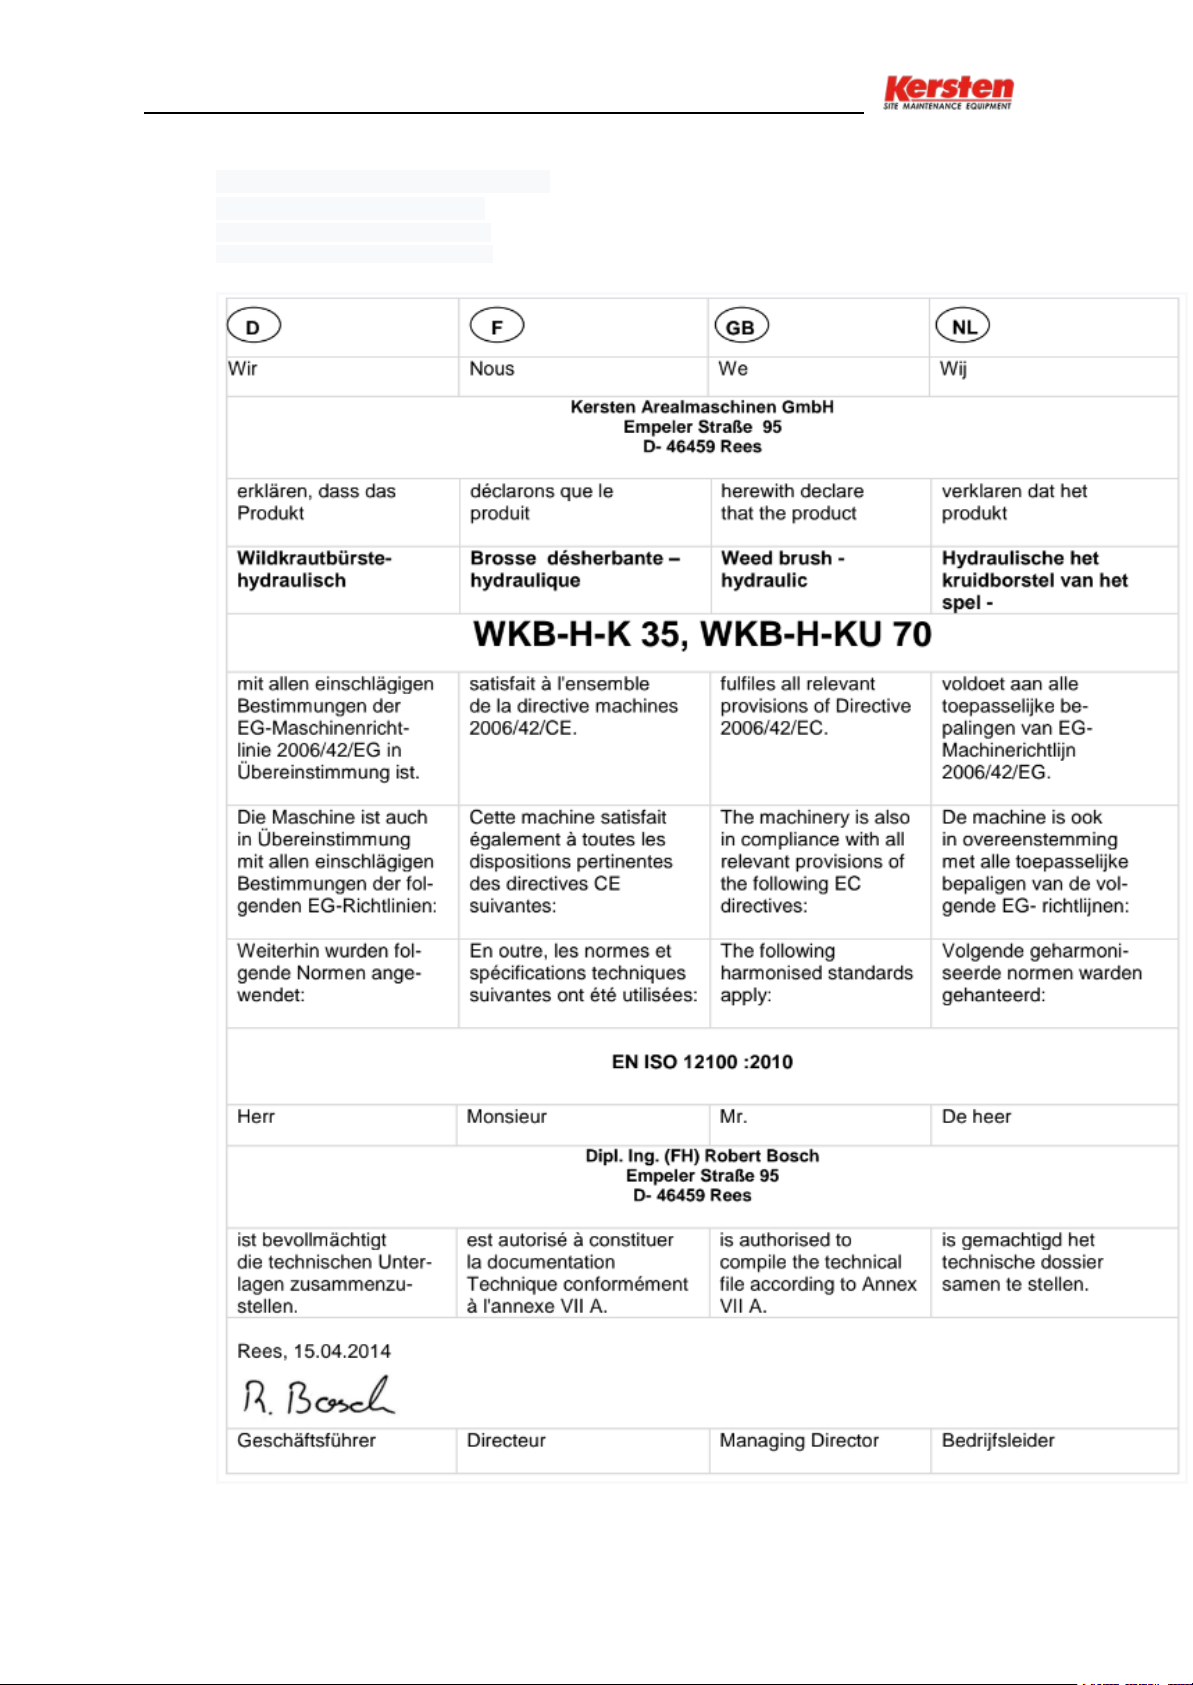
12. EG - Konformitätserklärung
Déclaration de conformité
EC Declaration Conformity
EG conformiteitsverklaring
15
Other manuals for WKB-H-K 35
1
This manual suits for next models
2
Table of contents
Other Kersten Lawn And Garden Equipment manuals


