INSTRUCCIONES PERTINENTES A UN RIESGO DE ICENDIO O
LESION A LAS PERSONAS
INSTRUCCIONES IMPORTANTES DE SEGURIDAD
¡La lámpara encendida es CALIENTE!
ADVERTENCIA — Para disminuir el riesgo de INCENDIO O LESION A LAS PERSONAS.
1) Apague/desenchufeydejequeseenfríeantesdecambiar
lalámpara.
2) ¡LalámparaseCALIENTArápidamente!Hagacontactodel
conmutador/enchufesólocuandoencienda.
3) Notoquelalenteolacapuchacaliente.
4) Nopermanezcaenlaluzsisientetibialapiel.(Laluzes
intensa,puedecausar“quemadurasdesol”).
5) Nomiredirectamentealalámparaencendida.
6) Mantengalalámparaalejadadelosmaterialesquepuedan
encenderse.
7) Usesolamenteconelvatiajeylalámparamarcadosenel
artefacto.
8) Notoqueelvidriodelinteriordelalámparaenningún
momento.Useunpañosuave.Elaceitedelcuerpopuede
dañarlalámpara.
9) Nohagafuncionarelartefactoconunalentedañadao
faltante.
INSTRUCCIONES DE SEGURIDAD
PRIMERO LEA ESTO
GUARDE ESTAS INSTRUCCIONES
PRECAUCIÓN – RIESGO DE DESCARGA ELÉCTRICA –
Desconecte la electricidad en el panel principal del interruptor
automático o caja principal de fusibles antes de comenzar y
durante la instalación.
Este artefacto se debe instalar de acuerdo con el Código
Eléctrico Nacional (NEC, por sus siglas en inglés) y con las
especicaciones del código local. No cumplir con estos
códigos e instrucciones puede resultar en lesiones graves y/ o
en daños a la propiedad y anulará la garantía.
1) ADVERTENCIA: Esteartefactonodebeinstalarsea
menosde10pies(3m)deunapiscina(alberca),spaofuente.
2) Esteartefactodebeutilizarsesolamenteconunaunidadde
potencia(tranformador)concapacidadnominalmáximade
300vatios(25amp.)15voltios.
3) Elcabledebajatensióndelaunidaddeberá:
a)estarprotegidomediantesutendidoenlasproximidades
delaluminariaoconexión,ocercadelaestructuradeun
edicio,comounacasaounacubierta(deck);
b)noserenterrado,exceptoporunmáximode6pulgadas
(15,2cm)paraconectarconelcableprincipaldebaja
tensión;y
c)tenerlalongitudcortadademaneraqueseconecteaun
conectoramenosde6pulgadas(15,2cm)delaestructura
deunedicio,unaluminariaounaconexión.
4) DeacuerdoconlosrequisitosdelCódigoEléctricoNacional
(NECporsussiglaseninglés),elalambreclasicadopara
soterradodirectosedebeenterrarunmínimode6pulgadas
[152mm.]debajodelasuperciedelterreno.
• Elalambrecalibre8puedecomprarseenlongitudde250’
(76m.),15503-BK
• Elalambrecalibre10puedecomprarseenlongitudde250’
(76m.),15504-BK
• Elalambrecalibre12puedecomprarseenlongitudesde75’
(22m.),15550-BK;100’(30m.),15501-BK;250’(76m.),
15502-BK;500’(152m.),15505-BK;y1000’(304m.),
15506-BK.
5) Lasconexionesdecableadosedebenhacerconlas
conexionesdel(los)dispositivos)deconexióndecableado
aprobados/delalista,adecuadosparalaaplicación.No
excedalasespecicacionesdecombinacióndecableado
delfabricanteparaeltamañoycantidaddeconductores.
PRECAUCION
CUANDO SE INSTALE SISTEMAS DE ALUMBRADO KICHLER PARA JARDINES
(YA SEA DE VOLTAJE DE LINEA O CON VOLTAJE BAJO) SE DEBE TENER
CUIDADO DE MAINTNERLOS ALEJADOS DE MATERIALES QUE PUEDAN SER
COMBUSTIBLES EN POTENCIA.
AL DAR SERVICIO DE MANTENIMIENTO A ESTOS SISTEMAS, ASEGURESE DE
DESPEJAR LAS HOJAS, CONOS DE PINO, RECORTES DEL PASTO, CUBIERTA
DE PAJA O CUALQUIER BASURA QUE SE HAYA ACUMULADO EN LA BOMBILLA
DE LUZ, EL LENTE O EL SOPORTE DE LA BOMBILLA.
ENSAMBLAJE E INSTALACIÓN
1) DESCONECTE LA ENERGÍA ELÉCTRICA.
2) Determinelaubicacióndeseadaparamontarelartefacto.
Enlaubicacióndeseada,claveconmartillounaestaca
REV28-JUL-2020 IS-15480-US
For warranty information please visit: kichler.com/warranty
Para informacion de la garantia por favor visite: kichler.com/warranty
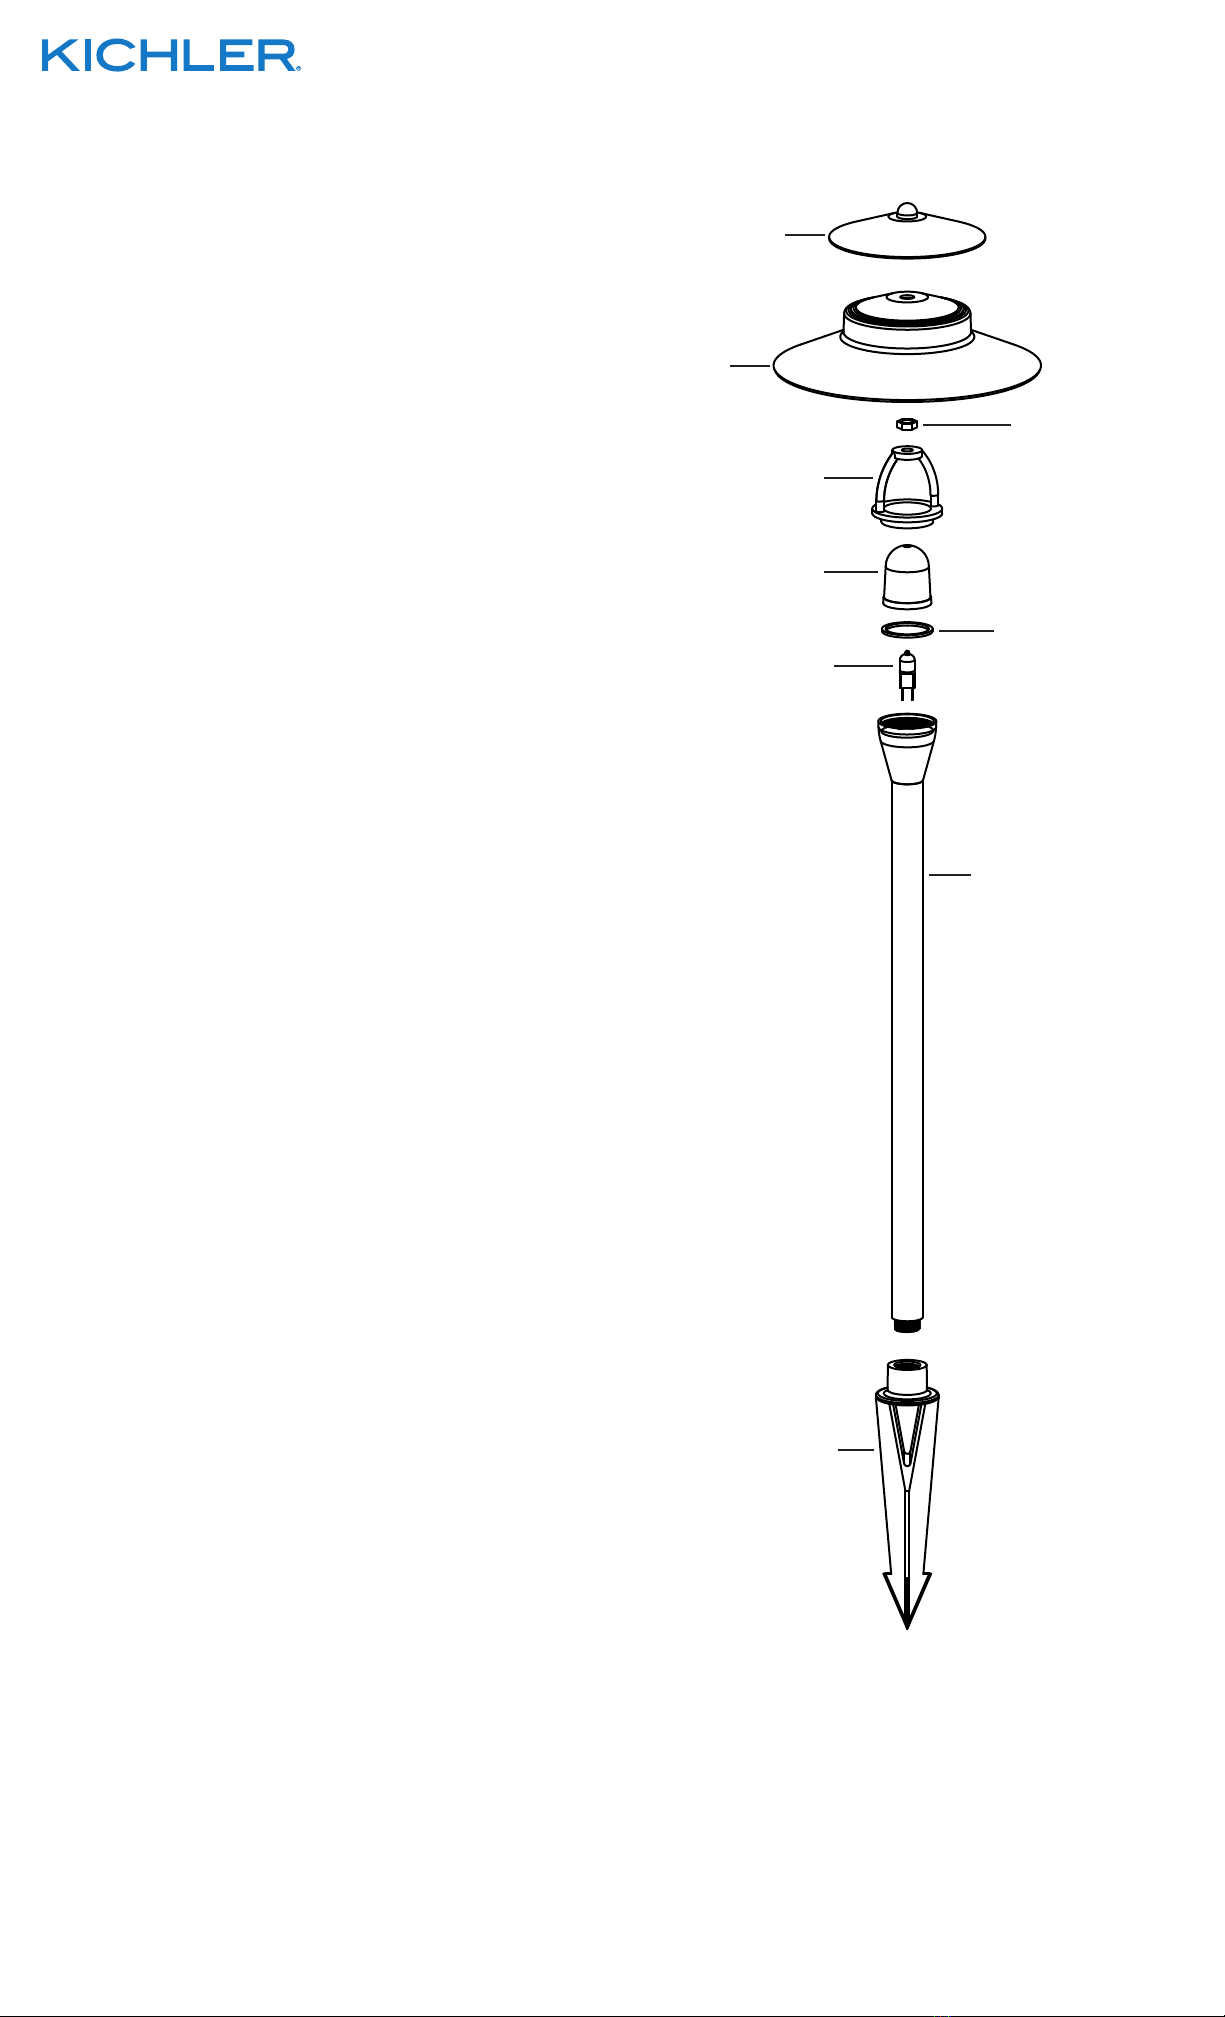
TOPSHADE
PANTALLASUPERIOR
BOTTOMSHADE
PANTALLA
INFERIOR NUT
TUERCAHEXAGONAL
HARP
ARMAZÓN
GLASSHOOD
CAMPANADE
VIDRIO GASKET
JUSTA
LAMP
(NOTINCLUDED)
LÁMPARA
(NOSEPROPORCIONA)
STEM
VÁSTAGO
STAKE
ESTACA
dentrodelsuelo.Paraevitardañosalaestaca,coloqueuna
tablasobrelapartesuperiordelaestacamientrasestá
martillandooutiliceunmazodecaucho.Sielsueloestá
duroyesdifícilinstalarlaestaca,hagauncortetransversal
enelsueloutilizandounapalaplana.
3) Despejeeláreaenelsueloenlaaberturadelcanalde
alambreenlaestaca.
4) Encamineelcabledelartefactoatravésdelaaberturadel
canaldealambreyatornilleelvástagodentrodelaestaca.
Deberátenersecuidadoparaasegurarqueelalambreno
estéretorcido.Sielensamblajenopareceestarrecto,
ajústelosolamenteempujandoojalandolaestaca.
5) Instalelalámpara(noseproporciona)dentrodelcasquillo
enelinteriordelartefacto.NOTA: Utiliceprecaucióncuando
estéinstalando.Utiliceuntraposuaveparamanejarla
lámpara;NOtoquelaenvolventedevidrioconlasmanos
desnudas.Siestosucede,limpielalámparaconalcohol
desnaturalizadoyuntrapolibredepelusa.
6) Para15480únicamente–Remuevalatuercahexagonalde
lapantallasuperioryensámblelaconlapantallainferior.
Vuelvaainstalarlatuercahexagonal.
7) Instalelajuntaylacampanadevidriosobreelfoco(bombilla)
enlapartesuperiordelvástago.
8) Atornilleelarmazónsobreelvástagoparaasegurarelvidrio.
[NOaprietedemasiado].
9) Enrosqueelensamblajedelapantallasobreelarmazón.
10) Hagalasconexionesdelalambreutilizandounosconectores
dealambreaprobados(nosesuministran),siguiendolas
instruccionesproporcionadasporelfabricante.
SEE OTHER SIDE FOR ENGLISH TRANSLATIONS.
VEA EL OTRO LADO DE TRADUCCIONES AL INGLÉS.
Estamos aquí para ayudarle 866-558-5706
Horario: Lunes-Viernes 9am a 5pm EST (hora ocial del este)