Kidde TRUSENSE SMOKE 2050-DS10 User manual

11
TRUSENSE SMOKE
User Guide
Multi-Criteria Optical Sensor
Smoke Alarm – Battery Operated
Model 2050-DS10
WARNING!
THIS SMOKE ALARM IS NOT ACTIVE UNTIL IT IS ATTACHED TO THE
MOUNTING BRACKET.
THIS SMOKE ALARM WILL AUTOMATICALLY ACTIVATE WHEN IT IS
ATTACHED TO THE MOUNTING BRACKET FOR THE FIRST TIME.
IMMEDIATELY AFTER ATTACHING THE SMOKE ALARM TO THE
MOUNTING BRACKET, PRESS/RELEASE THE TEST BUTTON. IF THE
SMOKE ALARM SOUNDS, IT HAS BEEN EFFECTIVELY ACTIVATED.
IF THE SMOKE ALARM DOES NOT SOUND AFTER PRESSING THE TEST
BUTTON, THEN REMOVE THE SMOKE ALARM FROM THE BRACKET,
REINSTALL, AND PRESS THE BUTTON AGAIN. IF THE ALARM STILL
DOES NOT SOUND, THEN IT IS DEFECTIVE AND NEEDS TO BE
IMMEDIATELY REPLACED.
THE SMOKE ALARM WILL REMAIN ACTIVE AND CAN ONLY BE
DEACTIVATED MANUALLY. ONCE DEACTIVATED, IT CAN NOT BE
REACTIVATED.
P/N:2050-7201- 01 RevB

1 1
TRUSENSE SMOKE
User Guide
Multi-Criteria Optical Sensor
Smoke Alarm – Battery Operated
Model 2050-DS10
10YEAR SEALED
LITHIUM BATTERY
SMOKE ALARM
10 YEAR SMOKE ALARM
Advanced Smoke Detection Technology
SENSE
P
U
S
H
T
O
T
E
S
T
W
E
E
K
L
Y
O
R
T
O
H
U
S
H
RED = ALARM
GREEN = OPERATE
AMBER = FAULT
Helps Reduce Cooking
Nuisance Alarms
UL 217 8
th
Ed.
1
TRUSENSE SMOKE
User Guide
Multi-Criteria Optical Sensor
Smoke Alarm – Battery Operated
Model 2050-DS10
P/N:2050-7201- 01 RevB

2
Thank You for Purchasing this Kidde Smoke Alarm
This model is powered by a non-replaceable, long life sealed lithium battery system. It also
contains SMART HUSH® Control to temporarily silence nuisance alarms.
Teach children how to respond to the alarm and that they should never play with the
unit. Your Kidde Smoke Alarm was designed for use in a residential environment. It is not
designed for use in a recreational vehicle (RV) or boat.
NOTE: Please thoroughly read this user guide and save the document for future reference
and to pass on to any subsequent owner.
The National Fire Protection Association (NFPA) and the manufacturer recommend
replacing this alarm ten years from the date code on back of alarm.
Date Code (on back): ___________________
Date of Purchase: ___________________
Where Purchased: ___________________
Date to Replace: ___________________
Product Support: 1-800-880-6788
Please write down the below information
and have this at hand when you call.

3
Contents
1. Smoke Alarm: What To Do When The Alarm Sounds . . . . . . . . . . . . 4
2. Other Alarm Visual And Audible Indicators . . . . . . . . . . . . . . . . 5
3. Troubleshooting Guide . . . . . . . . . . . . . . . . . . . . . . . 6
4. Introduction, Product Features And Specifications . . . . . . . . . . . . . 7
5. Limitations Of Smoke Alarms . . . . . . . . . . . . . . . . . . . . . 8
6. Recommended Locations For Smoke Alarms . . . . . . . . . . . . . . . 10
7. Locations To Avoid . . . . . . . . . . . . . . . . . . . . . . . . . 14
8. Installation And Activation . . . . . . . . . . . . . . . . . . . . . . 15
9. Operation And Testing . . . . . . . . . . . . . . . . . . . . . . . 18
10. Recognizing Nuisance Alarms . . . . . . . . . . . . . . . . . . . . 19
11. Battery . . . . . . . . . . . . . . . . . . . . . . . . . . . . . 20
12. Permanently Disable Alarm / Discharge Battery . . . . . . . . . . . . . . 21
13. Cleaning Your Alarm . . . . . . . . . . . . . . . . . . . . . . . . 22
14. Good Safety Habits . . . . . . . . . . . . . . . . . . . . . . . . 23
15. Service And Warranty . . . . . . . . . . . . . . . . . . . . . . . 26

4
1. Smoke Alarm: What To Do When The Alarm Sounds
The smoke alarm pattern is three long beeps, a 1.5 second pause, and three long beeps
repeating. The red LED blinks in time with the alarm pattern.
•Alert small children in the home as well as anyone else that might have difficulty
recognizing the importance of the alarm sounding or that might have difficulty leaving
the area without help.
•Leave immediately by your escape plan. Every second counts, so don’t waste time
getting dressed or picking up valuables.
•While leaving, don’t open any inside door without first feeling its surface. If hot, or if
you see smoke seeping through cracks, don’t open that door! Instead, use your alter-
nate exit. If the inside of the door is cool, place your shoulder against it, open it slightly
and be ready to slam it shut if heat and smoke rush in.
•If the escape route requires you to go through smoke, stay close to the floor where the
air is cleaner. Crawl if necessary, and breathe shallowly through a cloth, wet if possible.
•Once outside, go to your selected meeting place and make sure everyone is there.
•Call the fire department or 911 from your cell phone outside, or from your neighbor’s
home-not from yours!
•Don’t return to your home until the fire officials say that it is all right to do so.
NOTE: See Section RECOGNIZING NUISANCE ALARMS, for nuisance alarm situations.

5
2. Other Alarm Visual And Audible Indicators
Operational Mode Visual Indications Audible Indications Action/Note
Normal (standby) Green LED blinks
approx every 60 sec.
Test (button press
when no alarm
condition is
present)
(Note: Test is very
loud, stand a few
feet away.)
Red LED blinks in time
with alarm pattern.
• Single beep.
•3 long beeps, pause,
3 long beeps.
• Single beep.
Perform button press once
a week to verify proper
alarm operation.
Smoke Alarm
Memory (unit has
experienced a
smoke alarm event)
Red LED blinks every
15 sec.
NOTE: Alarm memory is
only retained for 24 hrs.
Push test button to clear
Alarm Memory.
Smoke Alarm Hush
Mode (SMART
HUSH®
CONTROL)
Red LED blinks every
2 sec.
Smoke alarm pattern
stops.
(If there is too much
smoke to allow Hush:
Smoke alarm pattern
continues.)
This feature is to be used
only when a known alarm
condition, such as smoke
from cooking, activates
the alarm.

6
3. Troubleshooting Guide
Trouble
Condition
Visual
Indications Audible Indications Action
Low
Battery
Amber LED
blinks every
30 sec.
Chirp every 60 sec. * Push button once to silence for 24 hrs.
(Push button again to clear Hush and
perform a test.)
Note: 7 days after Low Battery begins, the
chirps cannot be silenced.
* Remove, discharge, dispose unit, and
replace as soon as possible.
Photo Fault Amber LED
blinks 4 times
every 30 sec.
Chirp every 30 sec. * See Cleaning Your Alarm section.
* Push button once to attempt to reset
the unit.
* If error continues, remove, discharge, dis-
pose unit, and replace as soon as possible.
Memory
Fault
Amber LED
blinks 3 times
every 30 sec
Chirp every 30 sec. * Push button once to attempt to reset
the unit.
* If error continues, remove, discharge,
dispose unit, and replace as soon as
possible.
End of Unit
Life
Amber LED
blinks twice
every 30 sec.
Double chirp every
30 sec.
* Push button once to silence for 24 hrs.
(Push button again to clear Hush.)
Note: 7 days after End of Unit Life begins,
the chirps cannot be silenced.
* Remove, discharge, dispose unit, and
replace as soon as possible.
Stuck Button Amber LED
blinks every
4 sec.
Chirp every 4 sec. * Push button to dislodge it from being
stuck. If button cannot be unstuck,
remove, discharge, dispose unit, and
replace as soon as possible.
MCU Failure None Constant Tone. * Remove, discharge, dispose unit, and replace
as soon as possible.

7
If you require further information please contact Product Support at 1-800-880-6788 or write us at:
Kidde, 1016 Corporate Park Drive, Mebane, NC 27302. Our internet address is www.kidde.com.
4. Introduction, Product Features And Specifications
Introduction
This alarm detects products of combustion using a multi-criteria optical sensor. Ten (10)
years after the unit was installed, this unit will automatically alert you that it is time to
replace the unit. This is called “End of Unit Life” mode. See Troubleshooting Guide.
To help identify the date to replace the unit, a label has been affixed to the side of the alarm.
Write the “Install date” in the space provided, and then write in the “Replace by” date (10
years from initial power up) in permanent marker on the label prior to installing the unit.
Product Features and Specifications:
•Temperature Operating Range: 40°F (4.4°C) to 100°F (37.8°C)
•Humidity Operating Range: up to 95% RH non-condensing
•Audible Alarm: 85+ dB at 10’, 3.0 to 3.5 KHz pulsing alarm
•Smoke Sensor: Multi-Criteria Optical
•Smoke Alarm SMART HUSH® Control
•Powered by a 3V DC non-replaceable sealed lithium battery.
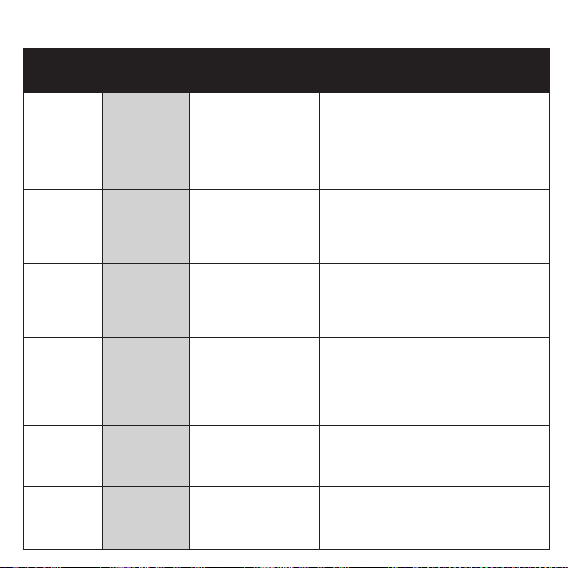
Trouble
Condition
Visual
Indications Audible Indications Action
Low
Battery
Amber LED
blinks every
30 sec.
Chirp every 60 sec. * Push button once to silence for 24 hrs.
(Push button again to clear Hush and
perform a test.)
Note: 7 days after Low Battery begins, the
chirps cannot be silenced.
* Remove, discharge, dispose unit, and
replace as soon as possible.
Photo Fault Amber LED
blinks 4 times
every 30 sec.
Chirp every 30 sec. * See Cleaning Your Alarm section.
* Push button once to attempt to reset
the unit.
* If error continues, remove, discharge, dis-
pose unit, and replace as soon as possible.
Memory
Fault
Amber LED
blinks 3 times
every 30 sec
Chirp every 30 sec. * Push button once to attempt to reset
the unit.
* If error continues, remove, discharge,
dispose unit, and replace as soon as
possible.
End of Unit
Life
Amber LED
blinks twice
every 30 sec.
Double chirp every
30 sec.
* Push button once to silence for 24 hrs.
(Push button again to clear Hush.)
Note: 7 days after End of Unit Life begins,
the chirps cannot be silenced.
* Remove, discharge, dispose unit, and
replace as soon as possible.
Stuck Button Amber LED
blinks every
4 sec.
Chirp every 4 sec. * Push button to dislodge it from being
stuck. If button cannot be unstuck,
remove, discharge, dispose unit, and
replace as soon as possible.
MCU Failure None Constant Tone. * Remove, discharge, dispose unit, and replace
as soon as possible.

8
5. Limitations Of Smoke Alarms
WARNING: PLEASE READ CAREFULLY AND THOROUGHLY
•Life safety from fire in residential occupancies is based primarily on early notification to occu-
pants of the need to escape, followed by the appropriate egress actions by those occupants.
•There are situations where a smoke alarm may not be effective to protect against fire as
stated in the NFPA
Standard 72. For instance:
a) smoking in bed
b) leaving children home alone
c) cleaning with flammable liquids, such as gasoline
•Fire warning systems for dwelling units are capable of protecting about half of the occupants
in potentially fatal fires. A smoke alarm may not be effective in some situations, such as
during incendiary fires where the fire grows so rapidly that an occupant’s egress is blocked
even with properly located smoke alarms, or when victims are intimate with the fire (for
example, when a person’s clothes catch fire while cooking), too old or young, or physically or
mentally impaired such that they cannot escape even when warned early enough that es-
cape should be possible. For these people, additional strategies such as protection-in-place
or assisted escape or rescue are necessary.
•For maximum detection of the various types of fires that can occur within the home,
including fast flaming and slow smoldering, it is recommended that multi criteria smoke
alarms be installed. This model meets the latest residential smoke alarm standards, which
includes enhanced resistance to nuisance alarms from cooking.

9
•A battery powered alarm must have a battery of the specified type, in good condition and
installed properly (this model has a sealed battery).
•Smoke alarms must be tested regularly to make sure the battery and the alarm circuits are in
good operating condition.
•Smoke alarms cannot provide an alarm if smoke does not reach the alarm. Therefore, smoke
alarms may not sense fires starting in chimneys, within walls, on roofs, on the other side of a
closed door or other obstruction.
•If the alarm is located outside the bedroom or on a different floor, it may not wake up a
sound sleeper.
•The use of alcohol or drugs may also impair one’s ability to hear the smoke alarm. For
maximum protection, a smoke alarm should be installed in each sleeping area on every level
of a home.
This alarm is not intended to alert hearing impaired individuals.

10
6. Recommended Locations For Smoke Alarms
•Locate smoke alarms in all sleeping areas. Try to monitor the exit path as the bedrooms
are usually farthest from the exit. If more than one sleeping area exists, locate
additional alarms in each sleeping area.
•Locate additional alarms in stairways, because stairways act like chimneys for smoke
and heat.
•Locate at least one alarm on every floor level.
•Locate an alarm in every bedroom.
•Locate an alarm in every room where electrical appliances are operated (i.e. portable
heaters or humidifiers).
•Locate an alarm in every room where someone sleeps with the door closed. The closed
door may prevent an alarm not located in that room from waking the sleeper.
•Smoke, heat, and combustion products rise to the ceiling and spread horizontally.
Mounting the smoke alarm on the ceiling in the center of the room places it closest to
all points in the room. Ceiling mounting is preferred in ordinary residential construc-
tion.
NFPA 72 states: “Smoke alarms in rooms with ceiling slopes greater than 1 ft in 8 ft (.3m in
2.4 m) horizontally shall be located on the high side of the room.” NFPA 72 states: “A row of
detectors shall be spaced and located within 3 ft (0.9m) of the peak of the ceiling measured
horizontally.”

11
ANYWHERE ALONG
THIS BOLD SURFACE
Locations permitted for smoke
alarms and smoke detectors
on tray-shaped ceilings.
Not within 6 feet of appliances
ACCEPTABLE
TOP OF ALARM
ACCEPTABLE HERE
Note: measurements shown
are to the closest edge
of the alarm.
Figure 6-A
ANYWHERE ALONG
THIS BOLD SURFACE
Locations permitted for smoke
alarms and smoke detectors
on tray-shaped ceilings.
ACCEPTABLE
TOP OF DETECTOR
ACCEPTABLE HERE
Note: measurements shown
are to the closest edge
of the detector.

12
ANYWHERE ALONG
THIS BOLD SURFACE
Locations permitted for smoke
alarms and smoke detectors
on tray-shaped ceilings.
ACCEPTABLE
TOP OF DETECTOR
ACCEPTABLE HERE
Note: measurements shown
are to the closest edge
of the detector.
ANYWHERE ALONG
THIS BOLD SURFACE
Locations permitted for smoke
alarms and smoke detectors
on tray-shaped ceilings.
ACCEPTABLE
TOP OF DETECTOR
ACCEPTABLE HERE
Note: measurements shown
are to the closest edge
of the detector.
ANYWHERE ALONG
THIS BOLD SURFACE
Locations permitted for smoke
alarms and smoke detectors
on tray-shaped ceilings.
ACCEPTABLE
TOP OF DETECTOR
ACCEPTABLE HERE
Note: measurements shown
are to the closest edge
of the detector.
Figure 6-B Figure 6-C
ANYWHERE ALONG
THIS BOLD SURFACE
Locations permitted for smoke
alarms and smoke detectors
on tray-shaped ceilings.
Not within 6 feet of appliances
ACCEPTABLE
TOP OF ALARM
ACCEPTABLE HERE
Note: measurements shown
are to the closest edge
of the alarm.

13
•For mobile home installation, select locations carefully to avoid thermal barriers that
may form at the ceiling. For more details, see MOBILE HOME INSTALLATION section.
•When mounting the alarm on the wall, use an inside wall with the top edge of the alarm
at a maximum of 12” (30.5 cm) below the ceiling.
•Put smoke alarms at both ends of a bedroom hallway or large room if the hallway or
room is more than 30 feet (9.1 m) long.
•Install Smoke Alarms on sloped, peaked or cathedral ceilings at or within 3ft (0.9m) of the
highest point (measured horizontally).
This equipment should be installed in accordance with the National Fire Protection
Association’s 72 (National Fire Protection Association, Batterymarch Park, Quincy, MA 02269).
Mobile Home Installation
Modern mobile homes have been designed and built to be energy efficient. Install smoke
alarms as recommended above. In older mobile homes that are not well insulated compared
to present standards, extreme heat or cold can be transferred from the outside to the inside
through poorly insulated walls and roof. This may create a thermal barrier which can prevent
the smoke from reaching an alarm mounted on the ceiling. In such units, install the smoke
alarm on an inside wall with the top edge of the alarm a maximum of 12” (30.5 cm) below the
ceiling.
If you are not sure about the insulation in your mobile home, or if you notice that the outer
walls and ceiling are either hot or cold compared to the room air temperature, install the
alarm on an inside wall. NFPA 72 (National Fire Protection Association) requires smoke alarms
be installed in each sleeping area.
WARNING: TEST YOUR ALARM OPERATION AFTER MOBILE HOME HAS BEEN
IN STORAGE OR UNOCCUPIED, AND AT LEAST ONCE A WEEK DURING USE.

14
7. Locations To Avoid
(See Figures 6-A, 6-B, & 6-C for recommended locations)
•In the garage. Products of combustion are present when you start your automobile.
•Normal cooking may cause nuisance alarms. If a kitchen alarm is desired, it should have
an alarm silence feature and should not be installed within 6 ft of cooking appliances.
•Do not install within 6 ft of heating appliances.
•Less than 4” (10cm) from the peak of an “A” frame type ceiling.
•In an area where the temperature may fall below 40ºF or rise above 100ºF, such as
garages and unfinished attics.
•In dusty areas. Dust particles may cause nuisance alarms or a failure to alarm.
•In very humid areas (above 95% RH, non-condensing) as moisture or steam can cause
nuisance alarms.
•In insect-infested areas.
•Smoke alarms should not be installed within 3 ft (.9m) of the door to a bathroom
containing a tub or shower, forced air supply ducts used for heating or cooling, ceiling
or whole house ventilating fans, or other high air flow areas.
•Near lights. Electronic “noise” generated by the lights may cause nuisance alarms.
•Do not install near vents, flues, or chimneys.
•Do not install near fans, doors, windows or areas directly exposed to the weather..
NOTE: Smoke alarms are not to be used with detector guards unless the combination
(alarm and detector guard) has been evaluated and found suitable for that purpose.

15
8. Installation And Activation
NOTE: The unit must be fully rotated onto the mounting bracket to activate the battery.
Activate the battery first, before installation, and push the test button to confirm
battery is activated (test sequence will follow). To allow for installation, battery will
remain active when unit is removed from mounting bracket.
NOTE: The battery activation is a one-time feature that occurs when the alarm is
rotated fully onto the mounting bracket. Upon initial power being applied, a chirp will
be heard. After activation, the battery cannot be turned off, and can only be discharged
at the end of product life. If the alarm is removed from the mounting bracket, the bat-
tery will remain active. See Permanently Disable Alarm / Discharge Battery section.
Installation Instructions
CAUTION: THIS UNIT IS SEALED (INCLUDING THE BATTERY). THE COVER IS
NOT REMOVABLE! REMOVING COVER WILL IMPACT DEVICE FUNCTIONALITY AND
VOID WARRANTY.
1. To insure aesthetic alignment of the alarm with the hallway or wall, the “A” line on
the mounting bracket should be parallel with the hallway when ceiling mounting or
horizontal when wall mounting.
A A
Figure 8-A
When mounting
in a hallway, the
“A” line should
be parallel with
the hallway.
Alignment Marks
(”A” Line) on
Mounting
Bracket
Figure 8-B
When wall
mounting, the
“A” line should
be horizontal.
Figure 8-C
Remove
Install
A A

16
2. After selecting the proper smoke alarm location as described in Section 6, attach the
mounting bracket to the ceiling as shown in Figure 8-A. For wall mounting see Figure
8-B. Place the mounting bracket on the wall; be sure the “A” line is horizontal (parallel to
the floor). Use the screws and anchors provided to secure the mounting bracket (use
3/16” drill bit for anchors).
3. This alarm has a battery permanently sealed inside the alarm no battery installation is
necessary.
WARNING: FAILURE TO PROPERLY INSTALL AND ACTIVATE THIS ALARM
WILL PREVENT PROPER OPERATION OF THIS ALARM AND WILL PREVENT ITS
RESPONSE TO FIRE HAZARDS.
ACTIVATING THE ALARM
This model is equipped with a feature that automatically activates the alarm when the
alarm is mounted to the mounting bracket for the first time.
1. To activate the alarm, install the alarm on the mounting bracket (Figure 8-C) and rotate
the alarm clockwise until the alarm ratchets into place. The alarm is now activated!
2.After installation/activation, test your alarm by pushing and releasing the button. This
should sound the alarm.

17
TAMPER RESIST FEATURE
This alarm is equipped with a tamper resist feature that helps prevent someone from
removing the unit from the mounting bracket. When activated, it can be very effective in
preventing smoke alarm removal or tampering.
Activate the smoke alarm tamper resist feature by breaking off the four posts in the square
holes in the mounting bracket (see Figure 8- D). When the posts are broken off, the tamper
resist on the base is allowed to engage the mounting bracket. Rotate the alarm onto the
mounting bracket until you hear the tamper resist tab snap into place, locking the alarm on
the mounting bracket. Using the tamper resist feature will help deter children and others
from removing the alarm from the bracket.
NOTE: To remove the alarm when the tamper resist tab is engaged, press down on the
tamper resist tab and rotate the alarm counterclockwise (see Figures 8-E and 8-C).
Figure 8-D Figure 8-E
Location of Posts:

18
9. Operation And Testing
Operation
The alarm is operating once it is activated and testing is complete (see “TESTING” below).
When products of combustion (smoke) are sensed, the unit sounds a loud alarm.
See Section 1 for alarm signal descriptions.
Testing
Test your alarm weekly by pressing and releasing the button quickly. A quick beep will
confirm the button has been pushed followed by the test sequence. See Other Alarm Visual
and Audible Indicators table. The alarm will sound if the electronic circuitry, horn, and
battery are working. If the alarm does not sound, or gives erratic or low volume sound,
the unit must be replaced. See Permanently Disable Alarm / Discharge Battery section to
determine how to prepare the unit for shipment or disposal.
WARNING: DUE TO THE LOUDNESS OF THE ALARM, ALWAYS STAND ABOUT
2.5 FEET AWAY FROM THE UNIT OR USE EAR PROTECTION WHEN TESTING.
WARNING: DO NOT USE AN OPEN FLAME TO TEST YOUR ALARM, YOU
COULD DAMAGE THE ALARM OR IGNITE COMBUSTIBLE MATERIALS AND
START A STRUCTURE FIRE.
Chirping
When End of Unit Life or Low Battery chirping begins, you can temporarily silence these
chirps by pressing the button.
WARNING: REPLACE UNIT AS SOON AS POSSIBLE WHEN IN END OF UNIT LIFE
OR LOW BATTERY MODE.

19
10. Recognizing Nuisance Alarms
Smoke Nuisance
HUSH®: If you know why the alarm is sounding, and you can verify that it is not a life
threatening situation, you can push the button to silence the alarm for 8-10 minutes. If the
smoke is not too dense, that unit will silence. After the Hush® period, the smoke alarm will
automatically reset and sound the alarm if particles of combustion are still present. You can
use Hush® repeatedly until the air has been cleared of the condition causing the alarm.
NOTE: Dense smoke will override Hush® and sound a continuous alarm. If no fire is
present, check to see if one of the reasons listed in “Locations to avoid” may have
caused the alarm. If a fire is discovered, get out and call the fire department or 911.
This alarm is designed to minimize nuisance alarms. Cigarette smoke will not normally cause
the unit to alarm, unless the smoke is blown directly into the alarm. Combustion particles
from cooking may set off the alarm if it is located too close to a cooking appliance. Large
quantities of combustible particles are generated from spills or when broiling. Using the fan
on a range hood which vents to the outside (non-recirculating type) will also help prevent
nuisance alarms from occurring by removing these combustible products from the kitchen.
Table of contents
Other Kidde Smoke Alarm manuals

Kidde
Kidde P4010DCS-W User manual

Kidde
Kidde P3010L-CO-CA User manual

Kidde
Kidde i12060 User manual

Kidde
Kidde P12040CA User manual

Kidde
Kidde KN-SMFM-i User manual

Kidde
Kidde 916 User manual

Kidde
Kidde Fyrewatch 0913 User manual

Kidde
Kidde P9050 User manual

Kidde
Kidde PI9000 User manual

Kidde
Kidde I9030 User manual