KIDWELL LUXI BUELLUX01A1 User manual

INSTRUKCJA OBSŁUGI
USER MANUAL
BENUTZERHANDBUCH
PL
EN
DE
Bujaczek leżaczek elektryczny 2w1
Electric Baby Bouncer 2in1
Elektrische Baby-Liegeschaukel 2in1
LUXI

6
13
19
MODEL: BUELLUX01A1, BUELLUX01A2

3
12
21
5
4
7
3
68
10
9
11
153 2 4
76
3
10
8
9
1
3
4
2
5
6
7
12
11
13
14
A B

6
4
5
4

5
78
9
11

6
Dziękujemy za zakup produktu marki Kidwell.
Priorytetem jest dla nas bezpieczeństwo dziecka oraz tworzenie pięknych wspomnień.
W przypadku jakichkolwiek pytań, prosimy o kontakt na adres e-mail:
Prosimy o dokładne przeczytanie niniejszej instrukcji oraz podążanie za jej poleceniami.
Celeminstrukcjijestdostarczenieinformacjiotym,jakprawidłowoibezpieczniekorzystać
z produktu. Po złożeniu produktu proszęupewnićsię, czy wszystkie funkcje działają
prawidłowo oraz sązabezpieczone zgodnie z zaleceniami instrukcji Przygotowanie
produktu Kidwell do użytkownia powinno byćwykonane przez osobędorosłą.
Brak zastosowania siędo poleceńzawartych w tym dokumencie może spowodować
poważne obrażenia.
WAŻNE: Pamiętaj by usunąć i wyrzucićwszystkie elementy opakowania, które były
załączonedoproduktu,takabyniepozostaływzasięgudziecka(m.in.elementykartonu,
folie itp.). Mogłoby to spowodowaćryzyko obrażeń, np. zagrożenie zadławienia.
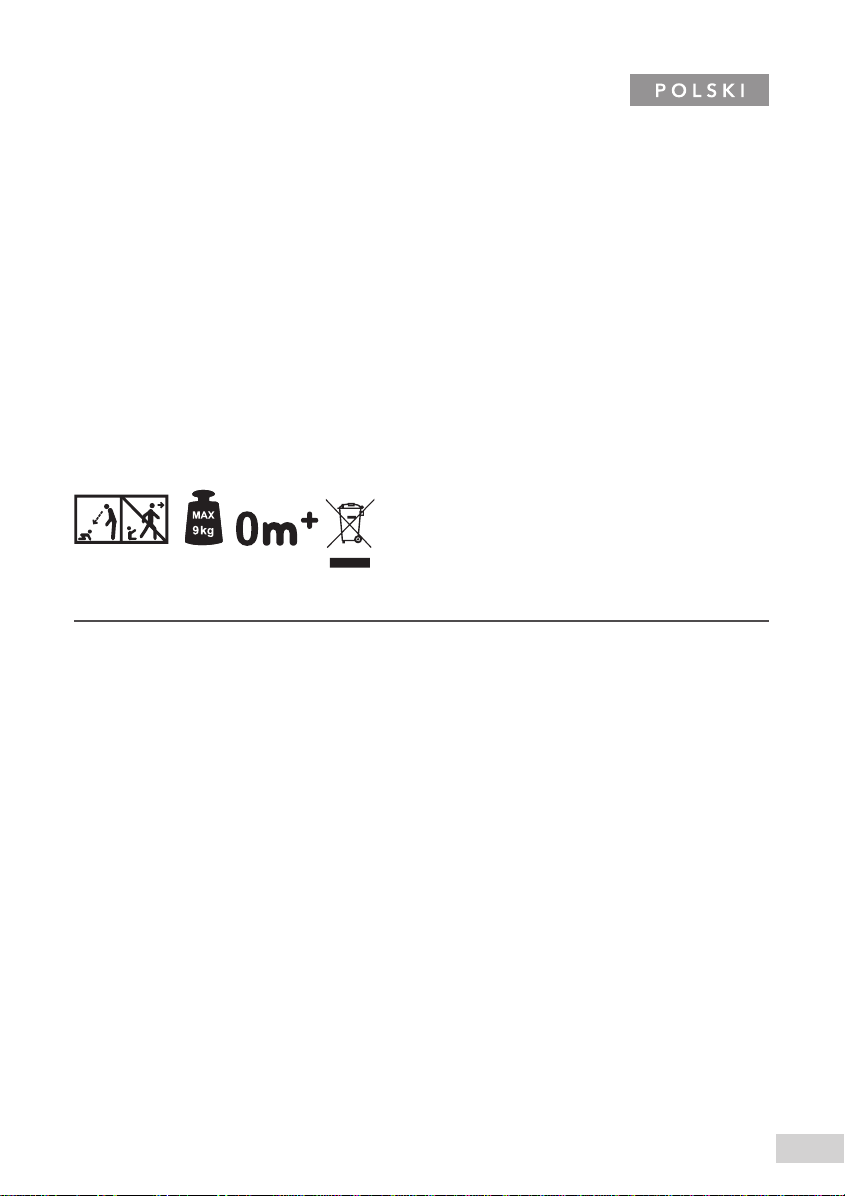
FUNKCJA LEŻACZKA
WAŻNE!
ZACHOWAĆNA PRZYSZŁOŚĆ
OSTRZEŻENIE!:
• Nigdy nie pozostawiaj dziecka bez opieki.
• Nie używaj tego leżaczka gdy twoje dziecko może samodzielnie siedzieć.
• Ten leżaczek nie jest przeznaczony na miejsce dłuższego snu dziecka.
• Stawianie leżaczka na podwyższeniu np. na stole jest niebezpieczne.
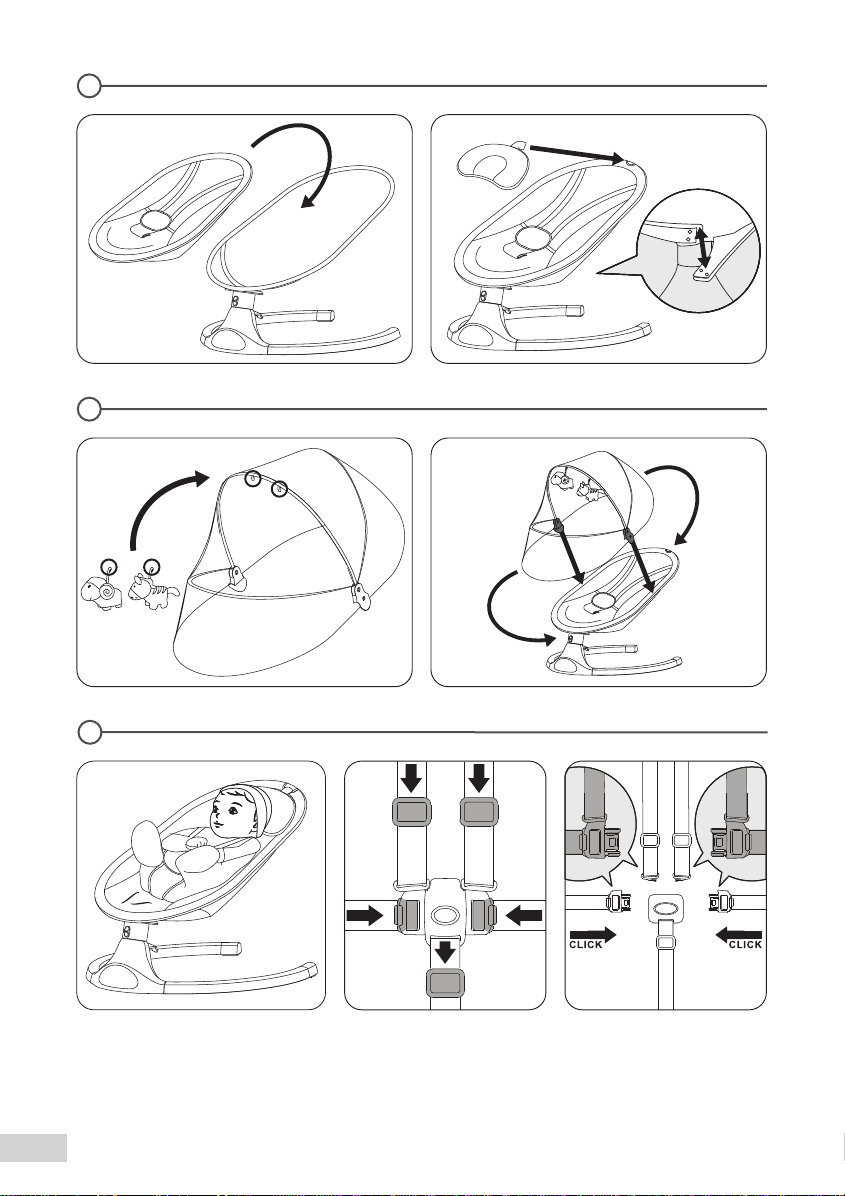
• Zawsze używaj systemu zabezpieczeń.
• Nigdy nie używaj pręta z zabawkami do przenoszenia leżaczka.
• Produkt przeznaczony dla dzieci o maksymalnej wadze - 9kg.
• Ten leżaczek nie zastępuje łóżeczka dziecięcego lub łóżka. Jeżeli twoje dziecko
potrzebuje snu, to powinno byćumieszczone w odpowiednim łóżeczku dziecięcym
lub łóżku.
• Nie używaj leżaczka, jeśli jakakolwiek jego część jest uszkodzona lub gdy jej
brakuje.
• Nie używaj akcesoriów ani części zamiennych innych niżte, które mająaprobatę
producenta.
FUNKCJA HUŚTAWKI
WAŻNE!
PRZECZYTAJ UWAŻNIE I ZACHOWAJ NA PRZYSZŁOŚĆ JAKO ODNIESIENIE
OSTRZEŻENIE!:
• Nigdy nie pozostawiaj dziecka bez opieki.
• Nie korzystaj z produktu jeżeli dziecko jest w stanie samodzielnie siedziećlub waga
dziecka przekracza 9kg.

7
• Ten produkt nie jest przeznaczony do dłuższego spania.
• Nigdy nie używaj tego produktu na podwyższeniu (np. na stole).
• Zawsze należy stosowaćsystemy zabezpieczająco-podtrzymujące.
• Aby zapobiec obrażeniom należy upewnićsięczy podczas rozkładania i składania
produktu nie ma w pobliżu dzieci.
• Nie pozwalaj dzieciom bawićsięproduktem.
• Nie przenosićani nie podnosićtego produktu jeżeli znajduje sięw nim dziecko.
• Po podłączeniu produktu do odtwarzacza muzycznego upewnićsięże głośność
odtwarzacza jest ustawiona na niskim poziomie.
• Produkt nie zastępuje łóżeczka ani łóżka. Jeśli Twoje dziecko potrzebuje snu,
należy je umieścićw odpowiednim łóżeczku lub łóżku.
• nie należy stosowaćproduktu gdy jakakolwiek część jest uszkodzona, rozdarta lub
gdy jej brakuje.
• nie należy stosowaćakcesoriów i części zamiennych innych niżzatwierdzone przez
producenta.
normamy bezpieczeństwa EN:16232, EN 12790, EN71
OPIS PRODUKTU
• Odpowiedni dla dzieci od urodzenia
do 9 kg
• 5 - punktowe pasy bezpieczeństwa
• Stabilna i lekka, aluminiowo-stalowa
konstrukcja - 3,5 kg
• 5 - stopniowa regulacja zakresu
bujania (prawo/lewo)
• Regulacja czasu kołysania - 8, 15
lub 30 minut
• Blokada bujania
• Odpinana budka z dwiema
zabawkami
• Moskitiera w zestawie
• Odpinana dwustronna poduszka
• 10 wbudowanych melodii
z regulacjągłośności
• Możliwość połączenia przez
Bluetooth
• Sterowanie manualne lub pilotem
(w zestawie)
• Napęd elektryczny lub zasilanie
bateryjne (4xAAA - brak
w zestawie)
• Cicha praca silnika
• Zdejmowana tapicerka
• Antypoślizgowe podkładki
• Montażbez użycia narzędzi
• Zgodność z normami
bezpieczeństwa EN:16232, EN
12790, EN71

8
CZĘŚCI ZESTAWU
Moskitiera (odpinana na zamek)
Poszycie
Rama siedziska
Blokada ruchu
Podstawa bujaczka
Moduł
Baldachim (odpinany)
1
2
3
4
5
6
7
8
9
10
11
12
13
14
Komora baterii
Zacisk zwalniający siedzisko
Gniazdko adaptera
2 pluszowe zabawki (na rzepy)
Zagłówek (na rzep)
Pilot
Zasilacz
ZDALNE STEROWANIE
Zasilanie włącz / wyłącz
Regulator czasowy
Muzyka / Bluetooth
Zwiększenie głośności
Ściszanie
Odtwórz / wstrzymaj
Poprzednia melodia
1
2
3
4
5
6
7
8
9
10
11
Następna melodia
Tryb usypiania - poziom huśtania 2
przez 15-minut
Wstrzymanie huśtania
Ustawienia mocy huśtania
1
MODUŁ
Przycisk zasilania: gdy huśtawka jest
podłączona do zasilania wskaźnik
prądu zacznie świecić
Naciśnij przycisk, aby wyłączyć
huśtawkę.
Naciśnij przycisk, aby włączyć
wbudowanąmuzykę. Dotknij go
ponownie, aby wyłączyć.
Włącz Bluetooth w smartfonie i
połącz sięz „BT_BABY006”. Kiedy
huśtawka da sygnałdźwiękowy,
oznacza to, że Bluetooth jest
połączony.
Priorytet muzyki: Bluetooth>
wbudowana muzyka.
1
2
3
4
5
6
7
Naciśnij przycisk, aby zmienićpoziom
huśtania. Jest pięć poziomów, które są
wskazywane światełkiem.
Naciśnij przycisk, aby ustawićczas.
Pierwsze dotknięcie - czas huśtania 8
min, drugie – 15 min, trzecie - 30 min.
Naciśnij przycisk, aby włączyć
następny utwór.
Naciśnij przycisk, aby stopniowo
zwiększaćgłośność.
Naciśnij przycisk, aby stopniowo
zmniejszaćgłośność.
2

9
PODSTAWA BUJACZKA
POKROWIEC NA SIEDZENIE I ZAGŁÓWEK
BALDACHIM I ZABAWKI
PASY BEZPIECZEŃSTWA
Montaż
Aby połączyćramęsiedziska z podstawąbujaczka, umieść środkowy trzpieńramy
w module. Centralny trzpieńposiada w środku szczelinęw kształcie półkola, moduł
posiada pręt w tym samym kształcie - upewnij się, że oba elementy sąwyrównane przed
ich połączeniem.
Demontaż
Należy pociągnąć za zacisk zwalniający (patrz rys. B) , spowoduje to odłączenie
mechanizmu blokującego, który pozwoli wyciągnąć ramęsiedziska z podstawy.
Montaż
Naciągnij pokrowiec na ramęi zapnij rzepy z tyłu siedziska. Aby zamocowaćzagłówek,
zapięcie na rzep powinno przejść przez pętlęznajdującąsięw górnej części pokrowca
Zdejmowanie: aby zdjąć tapicerkęsiedzenia wystarczy odpiąć rzepy i ściągnąć materiał
z ramy.
Instalacja:
Aby zamocowaćzabawki do baldachimu, wystarczy przeciągnąć rzep przez jedną
z dwóch pętli. Po zamocowaniu zabawek do baldachimu należy go połączyćz ramą
bujaczka za pomocąklamr, które znajdująsiępo obu stronach baldachimu. Część
baldachimu z elastycznym wykończeniem powinna zachodzićza oparcie bujaczka.
Moskitieręmożna przymocowaćdo baldachimu za pomocązamka błyskawicznego.
Zdejmowanie:
Należy odczepićklamry od ramy siedziska aby zdjąć baldachim.
UWAGA: Poszycie ma małe klapki z tkaniny, które po odsłonięciu pozwalająna dostęp
do metalowej ramy. Dzięki temu baldachim jest pewniej mocowany i nie narusza
materiału. Po zdjęciu baldachimu należy zamknąć klapki.
Umieść dziecko w bujaczku i pamiętaj, aby wyregulowaćpas bezpieczeństwa
równomiernie po obu stronach. Klamra pasów bezpieczeństwa znajduje sięw pasie
krokowym. Pociągając za rzep można podnieść materiałumożliwiając łatwy dostęp do
centralnej klamry.
3
4
5
6

10
UWAGA: Upewnij się, że pas bezpieczeństwa dobrze przylega do dziecka.
UWAGA: Aby zapewnićdziecku bezpieczeństwo, przed użyciem huśtawki należy
upewnićsię, że pas bezpieczeństwa jest prawidłowo zapięty.
BLOKADA RUCHU
INSTALACJA BATERII
ZASILACZ
Przesuńblokadęruchu w dół, aby zablokowaćbujaczek w pozycji wyjściowej. Pociągnij
blokadęruchu do góry, aby odblokowaćopcje bujania.
OSTRZEŻENIE: Nie należy używaćblokady, gdy bujaczek jest w ruchu.
Komora baterii znajduje sięna końcu podstawy huśtawki, na przeciwległej nodze
posiadającej głośnik. Komora jest oznaczona ikonąbaterii.
Aby otworzyćkomorę, należy odkręcićśruby i zdjąć pokrywę. Włóż4 baterie alkaliczne
AAA zgodnie z oznaczaniem biegunowości i przykręć pokrywę.
Podłącz adapter do huśtawki, jak pokazano na rysunku. Gniazdo znajduje się
od wewnętrznej strony podstawy.
A. WtyczkęDC można włożyćdo zasilacza AC 100-240 V ~ 50 / 60Hz.
B. Parametry wyjściowe adaptera: napięcie wynosi 5 V, a prąd 1A.
C. Adapter posiada 2-metrowy kabel USB.
D. Ciągłe miganie lampki sygnalizuje alarm wysokiego napięcia - użyj dopasowanego
adaptera o napięciu wyjściowym 5V i 1A.
• Zasilacz używany z produktem powinien byćregularnie sprawdzany czy nie
występująuszkodzenia przewodu zasilającego, wtyczki, obudowy i innych części.
W przypadku wystąpienia takich uszkodzeńprodukt nie powinien byćużytkowany
do czasu wykonania naprawy.
• Produkt powinien byćużywany wyłącznie z zasilaczem zalecanym przez
producenta. Zasilacz ani przewód nie sązabawkami i nie powinny byćdostępne
dla dzieci.
• Nie zaleca siępodłączania zasilacza, kiedy w komorze bateryjnej znajdująsię
baterie.
• Produktu nie należy przyłączaćdo większej niżzalecanej liczby źródełzasilania.
7
9
8

11
BATERIE
Dopracywymaganesącztery(4)baterieAAA(1,5V),którenieznajdująsięw komplecie.
Aby uzyskaćnajwyższąskuteczność działania, należy stosowaćbaterie alkaliczne.
OSTRZEŻENIE: Postępuj zgodnie ze wskazówkami dotyczącymi baterii zawartymi
w tej części. W przeciwnym razie żywotność baterii ulegnie skróceniu, może teżdojść
do wycieku elektrolitu lub rozsadzenia baterii.
• Zawsze przechowuj baterie w miejscu niedostępnym dla dzieci.
• Nie stosuj starych i nowych baterii jednocześnie.
• Modułu nie można przyłączaćdo większej niżzalecanej liczby źródełenergii.
• Zużyte baterie należy wyjąć, a nowe włożyćzgodnie z polaryzacjązaznaczoną
w komorze bateryjnej.
10
• Baterie należy wkładaćz zachowaniem prawidłowej biegunowości.
• Wyczerpane baterie należy wyjąć z zabawki.
• Nie należy zwieraćzacisków zasilania.
• Nie mieszaj ze sobąbaterii alkalicznych, zwykłych i akumulatorów do wielokrotnego
ładowania. Zaleca sięstosowanie wyłącznie baterii tego samego typu, lub ich
odpowiedników.
• Nie przechowuj baterii w miejscach, gdzie występująskrajne temperatury.
• W żadnym wypadku nie podejmuj prób ponownego ładowania baterii, o ile na nich
wyraźnie nie zaznaczono, że sąprzeznaczone do wielokrotnego ładowania.
• Akumulatory przeznaczone do wielokrotnego ładowania należy przed ładowaniem
wyjąć z zabawki.
• Akumulatory przeznaczone do wielokrotnego ładowania wolno ładowaćwyłącznie
pod nadzorem osób dorosłych.
• Nie ładuj akumulatorów alkalicznych w ładowarkach przeznaczonych dla
akumulatorów niklowo-kadmowych lub niklowo-metalowo-wodorkowych.
• Zużyte baterie usuwaj w sposób zgodny z przepisami.
• W przypadku nieużywania bujaczka przez dłuższy czas wyjmij z niego baterie.
OSTRZEŻENIE: Wyczerpane baterie powodująnieprawidłowe działanie
urządzenia, w tym zniekształcony dźwięk, przygaszone lub zgaszone
wskaźniki oraz spowolniony ruch napędzanych części lub całkowity brak ich
ruchu. Ponieważukłady elektryczne wymagajądo pracy różnych napięć, gdy
tylko którakolwiek z funkcji przestanie działać, wymieńbaterie. Nie wolno
wyrzucaćproduktu lub baterii do ognia. Może to spowodowaćeksplozjęlub
wyciek baterii.
Ten symbol oznacza, że produktu nie można utylizowaćwraz z odpadami gospodarstwa
domowego,ponieważbaterieiakumulatoryzawierająsubstancje,któremogąszkodliwie
oddziaływaćna środowisko naturalne i zdrowie człowieka. Informacje dotyczące
recyklingu i odbioru takich odpadów można uzyskaćod przedstawicieli lokalnych władz.

12
Dla dobra środowiska, po zaprzestaniu użytkowania produktu, prosimy o jego utylizację
do odpowiedniego obiektu na odpady, zgodnym z lokalnąustawą.
ŚRODOWISKO:
Gwarancja nie obejmuje zniszczenia lub zgubienia poszczególnych elementów na
skutek upadku, otarcia, nieprawidłowego montażu, użytkowania niezgodnego
z instrukcją.
OGRANICZENIA GWARANCJI:
Rama
Wyczyść podstawębujaczka i ramęsiedziska wilgotnąszmatkąw roztworze wody
z mydłem. Dokładnie wysusz, nie używaj wybielacza ani innych chemikaliów.
Zdejmowany materiał
• Tkanina siedziska: praćręcznie, max 30°. Dokładnie wysusz.
• Baldachim: zdejmij z bujaczka i wypierz ręcznie, max 30°. Wypłucz czystąwodą.
Dokładnie wysusz. Unikaj wystawiania produktu na słońce, ponieważmoże
to spowodowaćblaknięcie koloru.
• Zagłówek: odczep od siedziska i wypierz ręcznie, max 30°. Wypłucz czystąwodą.
Dokładnie wysusz. Unikaj wystawiania produktu na słońce, ponieważmoże
to spowodowaćblaknięcie koloru.
Ten produkt zawiera elementy elektroniczne. Nie używaj, gdy produkt jest mokry lub
znajduje sięw pomieszczeniu o w wysokiej wilgotności. Produkt powinien byćzawsze
suchy.
Przechowywanie: Ten produkt zawiera elementy elektroniczne. Przed odłożeniem
upewnij się, że huśtawka jest sucha. Przechowywaćw suchym i chłodnym miejscu.
UWAGA: Wyjmij baterie przed schowaniem produktu.
CZYSZCZENIE
11

13
Dear Customer!
Thank you for choosing Kidwell,
Our highest priority is the safety of your child and the creation of beautiful memories.
We hope you will enjoy our product, in case of any questions please contact us at:
Please read this manual carefully and follow its instructions. The purpose of this
manual is to provide information on how to use the product correctly and safely. After
assembling the product, please make sure that all functions work properly and are
secured in accordance with the instruction manual (fasteners, nuts, bolts, joints, etc.).
The assembly must be performed by an adult. Failure to comply with the instructions and
safety warnings could result in serious injuries.
IMPORTANT: Remove and dispose of all of the packaging materials which were included
with the product; and keep them out of children’s reach to avoid the risk of harm.
IMPORTANT: Product for self-assembly.
ROCKER
IMPORTANT!
KEEP FOR THE FUTURE
WARNING!:
• Never leave your child unattended.
• Do not use this rocker when your child is able to sit alone.
• This rocker is not intended for prolonged periods of sleeping.
• It is dangerous to put the rocker on elevated surfaces, e.g. on a table.
• Always use a harness system.
• Never lift the product by the toy bar.
• The product is intended for children with a maximum weight of 9 kg.
• This rocker is not a substitute for a cot or a bed. If your child needs sleep, it should
be placed in a suitable cot or bed.
• Do not use the rocker if any part is damaged or missing.
• Do not use accessories or spare parts other than those approved by the
manufacturer.
BABY SWING
IMPORTANT!
READ CAREFULLY AND SAVE FOR THE FUTURE AS A REFERENCE
WARNING!:
• Never leave your child unattended.
• Do not use the product if the child is able to sit alone or the child weighs exceeds
9 kg.

14
• This product is not intended for prolonged periods of sleeping.
• Never use this product at elevated surfaces (e.g. on a table).
• Always use a harness system.
• To prevent injury, ensure that there are no children nearby when unfolding
or folding the product.
• Do not allow children to play with the product.
• Do not move or lift this product if a child is in it.
• When turning on the music player, make sure the player’s volume is set to low.
• The product does not replace a cot or a bed. If your child needs sleep, place
it in a suitable cot or bed.
• Do not use the product if any part is damaged, torn, or missing
• Do not use accessories and spare parts other than those approved by the
manufacturer.
Safety standards EN:16232, EN 12790, EN71
SPECIFICATIONS
• Suitable for babies from birth up to
9 kg
• 5-point safety harness
• Stable, light aluminum and steel
construction - 3.5 kg
• 5-possible rocking strengths (from
side-to-side)
• Adjustable rocking time - 8, 15, or
30 minutes
• Rocking motion lock
• Detachable canopy with two toys
• Mosquito net included
• Detachable two-sided headrest
• 10 different melodies with volume
control
• Possibility to connect via
Bluetooth
• Manual control or by remote
control (included)
• Powered by adapter or with
batteries (4xAAA - not included)
• Silent motor
• Removable seat cover
• Non-slip pads
• Tool-free assembly
• Compliance with the safety
standards EN: 16232, EN 12790,
EN71
PARTS
Mosquito net
Seat cover
Seat frame
Motion lock
Bouncer base
1
2
3
4
5
6
7
8
9
10
Console
Canopy
Battery compartment
Seat release clip
Adapter socket
1

15
REMOTE CONTROL
Power on/off
Timer
Built-in music/Bluetooth
Volume up
Volume down
Play/pause
Previous song
1
2
3
4
5
6
7
8
9
10
11
Next song
Sleep mode – swing level 2 with 15
min timer
Stop rocking motion
Bouncer power settings
1
MODULE
Power button: plugin and the
indicator light will turn on
Press the button to turn the rocking
motion off.
Press the button to play the built-
in music. Touch it again to turn the
sound off.
Turn on the Bluetooth on
a smartphone and connect to
“BT_BABY006”. When the bouncer
beeps, it means that the Bluetooth is
connected.
Music priority: Bluetooth > built-in
music.
Press the button to change the
1
2
3
4
5
6
7
swinging level. There are five levels
which are indicated by the lights.
Press the button to set the time. The
first touch will have the bouncer chair
swing for 8 minutes, the second touch
will have it swing for 15minutes, and
the third will have it swing for 30
minutes.
Press the button the play the next
song.
Press the button to increase
the volume gradually.
Press the button to decrease
the volume gradually.
2
BASE OF THE SWING
Assembly:
To connect the seat frame with the bouncer base put the frame’s central shaft into the
module. The central shaft has a slot within, shaped like a semi-circle and the base has
a pin in the same shape – make sure that the components are aligned before connecting
them.
Disassembling
Pull out the metal clip as shown on the drawing „B”, this will disengage the locking
mechanism which will allow to pull out the seat frame from the base.
3
11
12 2 plush toys
Headrest 13
14 Remote control
Power adaptor

16
CANOPY AND TOYS
SAFETY BELT INSTRUCTION
Installation: To attach the toys to the canopy simply pull the Velcro flap through
the two possible loops. Once the toys are connected to the canopy fasten the clasps on
the swing frame on both sides. The canopy part with the elastic finish should go behind
the seat, so that it overlaps the back of the headrest area of the swing. The mosquito net
can be quickly attached to the canopy with a zipper.
Removal: Pull out both clasps of the canopy to remove it.
NOTE: the seat cover has small fabric flaps which reveal the metal frame. Thanks to
this, the canopy is more securely attached to the frame. After the canopy net has been
removed, the flaps should be closed to hide access to the frame.
Place the baby into the bouncer and remember to adjust the seat belt on both sides
equally. The buckle of the safety belts is located in the crotch support restraint. It can be
easily accessed by pulling on the Velcro attachment.
NOTE: Make sure that the safety belt is fitted for the child.
WARNING: To ensure the safety of the child make sure that the safety belt is properly
connected to the buckle before using the bouncer.
5
6
MOTION LOCK
Push the motion lock down to lock the bouncer in the starting position. Pull the motion
lock up to unlock the rocking motion.
WARNING: do not try to engage the lock while the bouncer is in motion.
7
POWER SUPPLY
Plugin the adapter into the swing as shown in the picture. The socket is located on the
inside of the base.
8
SEAT COVER AND HEADREST
Installation: pull the seat cover over the frame and fasten the Velcro flaps on the back.
To attach the headrest, the Velcro flap should go through the loop located on the top
of the seat cover.
Removal: to take offthe seat cover simply detach the Velcro, and pull out the fabric
of the metal frame.
4

17
BATTERY INSTALLATION
The battery compartment is located at the end of the swing base, on the opposite leg
with the speaker, it is marked with a battery icon. To open the compartment firstly,
unscrew the screws and remove the cover. Insert 4pcs of AAA alkaline batteries
and screw back the cover.
9
A. DC plug can be inserted into 100-240V ~ 50 / 60Hz AC power supply.
B. Adapter output parameters: voltage is 5V and current is 1A.
C. The adapter has a 2m long USB cable.
D. When the power lamp keeps flashing it signals a high voltage alarm – use
a matchable adapter with an output voltage of 5V and 1A.
• The AC adapter used with the product should be checked regularly for damage
to the power cord, plug, case, and other parts. In the event of such damage,
the product should not be used until the repair has been carried out.
• The product should be used only with the power supply recommended by
the manufacturer.
• The adapter and cord are not toys and should not be accessible to children
• It is not recommended to connect the AC adapter with batteries in the battery
compartment.
• The product should not be connected to more than the recommended number
of power sources.
Four (4) AAA batteries are required for operation, which are not included in the set.
For the best performance without using the power supply, use alkaline batteries.
WARNING: Follow the battery guidelines in this section. Otherwise, the battery life will
shorten, or electrolyte leakage or battery bursting may occur. Always keep the batteries
out of the reach of children.
• Do not use old and new batteries at the same time.
• Do not mix alkaline, regular and rechargeable batteries with you. lt is recommended
to use only the same type of battery as recommended, or equivalent.
• Insert all batteries in a way that matches their polarity in the battery compartment.
• Do not short the battery terminals.
• Do not store the battery in places with extreme temperatures (in the attic,
in the garage or in the car).
• Remove used batteries from the chamber.
• Under no circumstances attempt to recharge the battery unless clearly marked on
the battery that it is rechargeable.
• Rechargeable batteries must be removed from the toy before charging.
Rechargeable batteries may only be charged under the supervision of an adult.
BATTERY
10

18
For environmental reasons, when you have stopped using this product, we ask that you
dispose of the product in the proper waste facilities in accordance with local legislation.
ENVIRONMENT
The warranty does not cover destruction or loss of individual elements due to falling,
abrasion, incorrect assembly and usage which disagrees with the user manual.
LIMITATIONS OF WARRANTY
CLEANING AND MAINTENANCE
Base
Clean the base of the swing and seat frame with a wet cloth in a soap solution. Dry
thoroughly, do not use corrosive cleaner or chemicals.
Removable and washable fabric
• Seat fabric: wash by hand, max 30°. Dry thoroughly.
• Canopy: disassemble it from the bouncer, and wash by hand, max 30°. Rinse
it with clean water. Dry thoroughly. Avoid exposure to the sun as it can cause the
color to fade.
• Headrest: detach it from the seat, wash by hand, max 30°. Rinse it with clean
water. Dry thoroughly. Avoid exposure to the sun as it can cause the color to fade.
This product contains electronic components. Do not use when wet or in high humidity.
The product should be dry at all times.
Storage: this product contains electronic components. Before putting it away, make sure
that the bouncer is dry. Store in a dry and cool environment. Avoid direct sunshine for
a long period of time.
WARNING: remove batteries before storing the swing.
11
WARNING: RequiresfourAAbatteries(notincluded).lnformationonDisposal
for Users of Waste Electrical & Electronic Equipment: Electronic Equipment
(private households). This symbol on the product(s) and/ or accompanying
documents means that used electrical and electronic products should not
be mixed with general household waste. For proper treatment, recovery and
recycling, please take this product(s) to designated collection points where it
will be accepted free of charge. Disposing of this product correctly will help
save valuable resources and prevent any potentia! negative effects on human health
and the environment, which could otherwise arise from inappropriate waste handling.
Please contact your local authority for further details of your nearest designated
collection point. Penalties may be applicable for incorrect disposal of this waste,
in accordance with you national legislation.

19
Danke, dass Sie sich für den Kauf dieses Produkts der Marke Kidwell entschieden
haben. Die Sicherheit des Kindes und das Schaffen schöner Erinnerungen haben für
uns oberste Priorität. Sollten Sie noch Fragen haben, setzen Sie sich bitte mit uns in
Verbindung und schreiben Sie uns an die folgende E-Mail-Adresse:
Lesen Sie diese Anleitung bitte aufmerksam durch und befolgen Sie die in dieser
enthaltenen Anweisungen. Aufgabe dieser Anleitung ist es, Informationen über den
richtigen und sicheren Gebrauch des Produkts bereitzustellen.
Überzeugen Sie sich nach dem Zusammenbau des Kinderfahrrads über die korrekte
Funktionsweise aller Funktionen und dass die Sicherungs- und Schutzeinrichtungen
(Befestigungs- und Fixierelemente, Muttern, Schrauben, Verbindungen u.ä.)
ordnungsgemäß entsprechend den Anweisungen in derAnleitung angebracht wurden.
Die Montage des Kidwell-Produkts hat durch einen Erwachsenen zu erfolgen.
Die Nichtbeachtung derAnweisungen in dieserAnleitung enthaltenen kann zu schweren
Verletzungen führen.
WICHTIG: Denken Sie daran, alle Verpackungselemente, die mit dem Produkt
mitgeliefert wurden, so zu entfernen und zu entsorgen, dass sie nicht in Reichweite
von Kindern gelangen, um eine Gefahr von Schäden, z. B. Erstickungsgefahr
(Kartonelemente, Kunststofffolien usw.) auszuschließen.
WICHTIG: Produkt zur Selbstmontage.
SCHAUKEL
WICHTIG!
LESEN SIE SORGFÄLTIG DURCH UND SPEICHERN SIE FÜR DIE ZUKUNFT ALS
REFERENZ
WARNUNG!:
• Das Produkt nicht verwenden, wenn das Kind in der Lage ist, eigenständig
zu sitzen, oder wenn das Gewicht des Kindes 9 kg übersteigt.
• Dieses Produkt ist nicht für längeres Schlafen vorgesehen.
• Dieses Produkt nie auf einer Erhöhung (z.B. auf dem Tisch) verwenden.
• Immer Sicherungs- und Schutzsysteme verwenden.
• Um Verletzungen zu vermeiden, ist sicherzustellen, dass sich beim Auf-
und Zusammenklappen des Produkts keine Kinder in der Nähe aufhalten.
• Kinder nicht mit dem Produkt spielen lassen.
• Das Produkt nicht tragen oder anheben, wenn sich ein Kind darin befindet.
• Nach dem Anschluss des Produkts an einen Musik-Player, sicherstellen, dass die
Lautstärke des Players auf niedrig eingestellt ist.
• Das Produkt ersetzt weder ein Kinderbett noch ein Bett. Wenn das Kind Schlaf
brauchen sollte, sollte es in ein geeignetes Kinderbett oder Bett gelegt werden.
• Das Produkt darf nicht benutzt werden, wenn ein Teil beschädigt oder gerissen
ist oder fehlt.
• Keine anderen als vom Hersteller zugelassenen Zubehör- und Ersatzteile
verwenden.

20
BABYLIEGE:
WICHTIG!
ZUR SPÄTEREN EINSICHT AUFBEWAHREN
WARNUNG!:
• Das Kind niemals unbeaufsichtigt lassen.
• Die Babyliege nicht verwenden, wenn das Kind nicht selbständig sitzen kann.
• Diese Babyliege ist nicht als Schlafplatz fürs Baby konzipiert.
• Es ist gefährlich, die Babyliege auf eine Ablage, z.B. auf einen Tisch, zu stellen.
• Immer das Sicherheitssystem benutzen.
• Die Spielzeugstange niemals zum Tragen der Babyliege verwenden.
• Das Produkt ist für Kinder mit einem Höchstgewicht von 9 kg bestimmt.
• Diese Babyliege ersetzt weder ein Kinderbett noch ein Bett. Wenn das Kind Schlaf
brauchen sollte, sollte es in ein geeignetes Kinderbett oder Bett gelegt werden.
• Die Babyliege nicht verwenden, wenn Teile beschädigt sind oder fehlen.
• Keine anderen Zubehörteile oder Ersatzteile als die vom Hersteller zugelassenen
Zubehör- oder Ersatzteile verwenden.
SPEZIFIKATION
• Geeignet für Kinder von der Geburt
bis 9 kg
• 5-Punkt-Gurte
• Stabile und leichte Aluminium-Stahl-
Konstruktion – 3,5 kg
• 5-Schwingstufen (rechts/links)
• Einstellbare Schaukelzeit – 8, 15
oder 30 Minuten
• Schaukelsperre
• Abnehmbares Verdeck mit zwei
Spielzeugen
• Moskitonetz im Set enthalten
• Abnehmbares zweiseitiges Kissen
• 10 eingebaute Melodien mit
Lautstärkeregelung
• Bluetooth-Schnittstelle
• Manuelle Steuerung oder
Fernbedienung (im Set enthalten)
• Elektrisch oder batteriebetrieben
(4xAAA – nicht enthalten)
• Leiser Motorbetrieb
• Abnehmbare Bezüge
• Antirutsch-Pads
• Werkzeuglose Montage
• Entspricht den Sicherheitsnormen
EN:16232, EN 12790, EN71
TEILE
Moskitonetz (abnehmbar mit
Reißverschluss)
Verkleidung
Sitzrahmen
1
2
3
4
5
6
7
Bewegungssperre
Schaukelgestell
Konsole
Baldachin (abnehmbar)
1
This manual suits for next models
1
Table of contents
Languages:
Other KIDWELL Baby Swing manuals
Popular Baby Swing manuals by other brands

Fisher-Price
Fisher-Price 79595 instructions

die-schaukel.de
die-schaukel.de Education Assembly instruction and manual

Kids II
Kids II Ingenuity Soothe'n Delight Portable Swing... manual

Mattel
Mattel Fisher-Price GKH64 owner's manual

Graco
Graco 4F01OAS - Soothe And Swaddle Bouncer user guide

Wehrfritz
Wehrfritz 055035 manual