kincrome KP87001 User manual

UNIVERSAL BATTERY CHARGER & MAINTAINER
6/12V, 1 AMP
UNIVERSAL BATTERY
CHARGER & MAINTAINER
6/12V, 1 AMP
KP87001
ED1/Feb 18
100%
AUTOMATIC
SMART BATTERY
CHARGER &
MAINTAINER
SUITS
ALL LEAD
ACID TYPE
BATTERIES
SELECTABLE
6 & 12V
OUTPUT
PULSE
CHARGE
FOR LONG TERM
MAINTENANCE
TECHNICAL
EXPERIENCE
NEEDED
NO
100%
AUTOMATIC
SMART BATTERY
CHARGER &
MAINTAINER
SUITS
ALL LEAD
ACID TYPE
BATTERIES
SELECTABLE
6 & 12V
OUTPUT
PULSE
CHARGE
FOR LONG TERM
MAINTENANCE
TECHNICAL
EXPERIENCE
NEEDED
NO
100%
AUTOMATIC
SMART BATTERY
CHARGER &
MAINTAINER
SUITS
ALL LEAD
ACID TYPE
BATTERIES
SELECTABLE
6 & 12V
OUTPUT
PULSE
CHARGE
FOR LONG TERM
MAINTENANCE
TECHNICAL
EXPERIENCE
NEEDED
NO
KP87001 OzCharge Manual.indd 1 29/03/2018 2:37 PM

2
UNIVERSAL BATTERY CHARGER & MAINTAINER
6/12V, 1 AMP
Congratulations on purchasing the Kincrome KP87001 fully automatic, switched mode
6 Volt and 12 Volt / 1 Amp battery charger and maintainer. Please take the time to carefully
read and understand this manual before using this product.
Part No:............................ KP87001
Output: ............................ 1A @ 6V/12VDC
Input Voltage:.................. 100-240VAC/0.35A (20W)
Input Frequency: ........... 50/60Hz
Boost Charge Voltage: .. 7.2V/14.4VDC
Float Trickle Charge:..... 6.75/13.5VDC
Start Voltage: ................. 4.4V/8.8VDC
Operating Temperature: .............. -15 to 50ºC
Storage Temperature:................... -25 to 85ºC
Operating Humidity: ...................... 90% RH Max.
Dimensions: .................................... 100 x 65 x 36mm
Weight:............................................. 0.4kg
Approvals ........................................ CE, AS/NZS, EMC
SPECIFICATIONS
Table of Contents
Know Your Product................................................ 2
IMPORTANT Safety Advice and Warnings............ 3
Main Features ........................................................ 3
Temperature & Safety Protection......................... 4
Battery Types & Capacity ...................................... 4
Electrical Parts & Accessories............................. 4
Understanding Your Product ................................ 5
Operation Charging Instructions.......................... 6
Troubleshooting & Warranty................................. 8
Know Your Product
1. RED Power LED
2. AMBER Charging LED
3. GREEN Full LED
4. RED Fault LED
5. Voltage Selector Switch
5
1
2
3
4
KP87001 OzCharge Manual.indd 2 29/03/2018 2:37 PM

3
UNIVERSAL BATTERY CHARGER & MAINTAINER
6/12V, 1 AMP
IMPORTANT SAFETY ADVICE AND WARNINGS
• The charger is designed to charge 6V/12V lead-acid batteries from 3Ah to 20Ah.
However the charger can also be used to maintain batteries up to 100Ah.
• Always refer to the battery manufacturers specifications and recommendations if
you’re unsure of your battery charging requirements.
E.g. Such as removing or not removing cell caps whilst charging.
• Explosive gases may escape from the battery during charging so please ensure the
battery is charged in a well ventilated area.
• This charger is designed for indoor use only and should never be exposed to water,
rain, snow, liquids etc.
• Do not attempt to use the charger if it has been dropped or damaged.
• Do not attempt to use the charger if the cables or plugs are damaged.
• If battery acid contacts your skin or clothing, wash immediately with soap and water.
If acid enters your eye, immediately flush the eye with running cold water for at least
10 minutes and seek medical attention. Someone should always be within range of
your voice.
• Never attempt to charge a damaged battery, frozen battery or
non rechargeable battery.
• Never place the charger on the battery or battery on the charger.
• When working with lead-acid batteries, remove personal metal items such as rings,
bracelets, necklaces, watches and make sure you don’t short circuit the battery
terminals with any type of metal tool or piece of jewellery as this will cause an
explosion. You can wrap your spanner with insulation tape to minimise the risk of a
short circuit.
• NEVER smoke, use an open flame or create sparks near a battery or charger during
charging operation as this may cause an explosion and explosive gases.
• Do not disassemble the charger. Take it to a qualified and authorised person for repair.
• If using a generator, you must ensure you use a surge protector to protect the charger
from Voltage spikes.
• The charger must not be used or played with by infirm persons or children. Also keep
it away from any pets.
MAIN FEATURES
• 100% Automatic smart battery charger & maintainer with reconditioning.
• The battery charger is easy to use and requires NO technical experience.
• High frequency, High Efficiency Switching Mode Charger and Maintainer.
• Suits all Lead Acid Type Batteries (VRLA, AGM & Gel).
• Selectable 6 Volt & 12 Volt Output.
• Pulse charge for long term maintenance.
• Multi Stage:
1- Bulk charging
2- Float mode
3- Maintenance
KP87001 OzCharge Manual.indd 3 29/03/2018 2:37 PM

4
UNIVERSAL BATTERY CHARGER & MAINTAINER
6/12V, 1 AMP
•Can be left on 24/7 to ensure your battery is always maintained and fully charged:
The battery charger can be left unattended and left permanently connected all year
round. The intelligent charger will monitor the battery Voltage and will maintain it at
peak performance with a special pulse charge during long term maintenance.
•Short circuit and reverse polarity protection.
•Heavy-duty and corrosion-resistant output connectors.
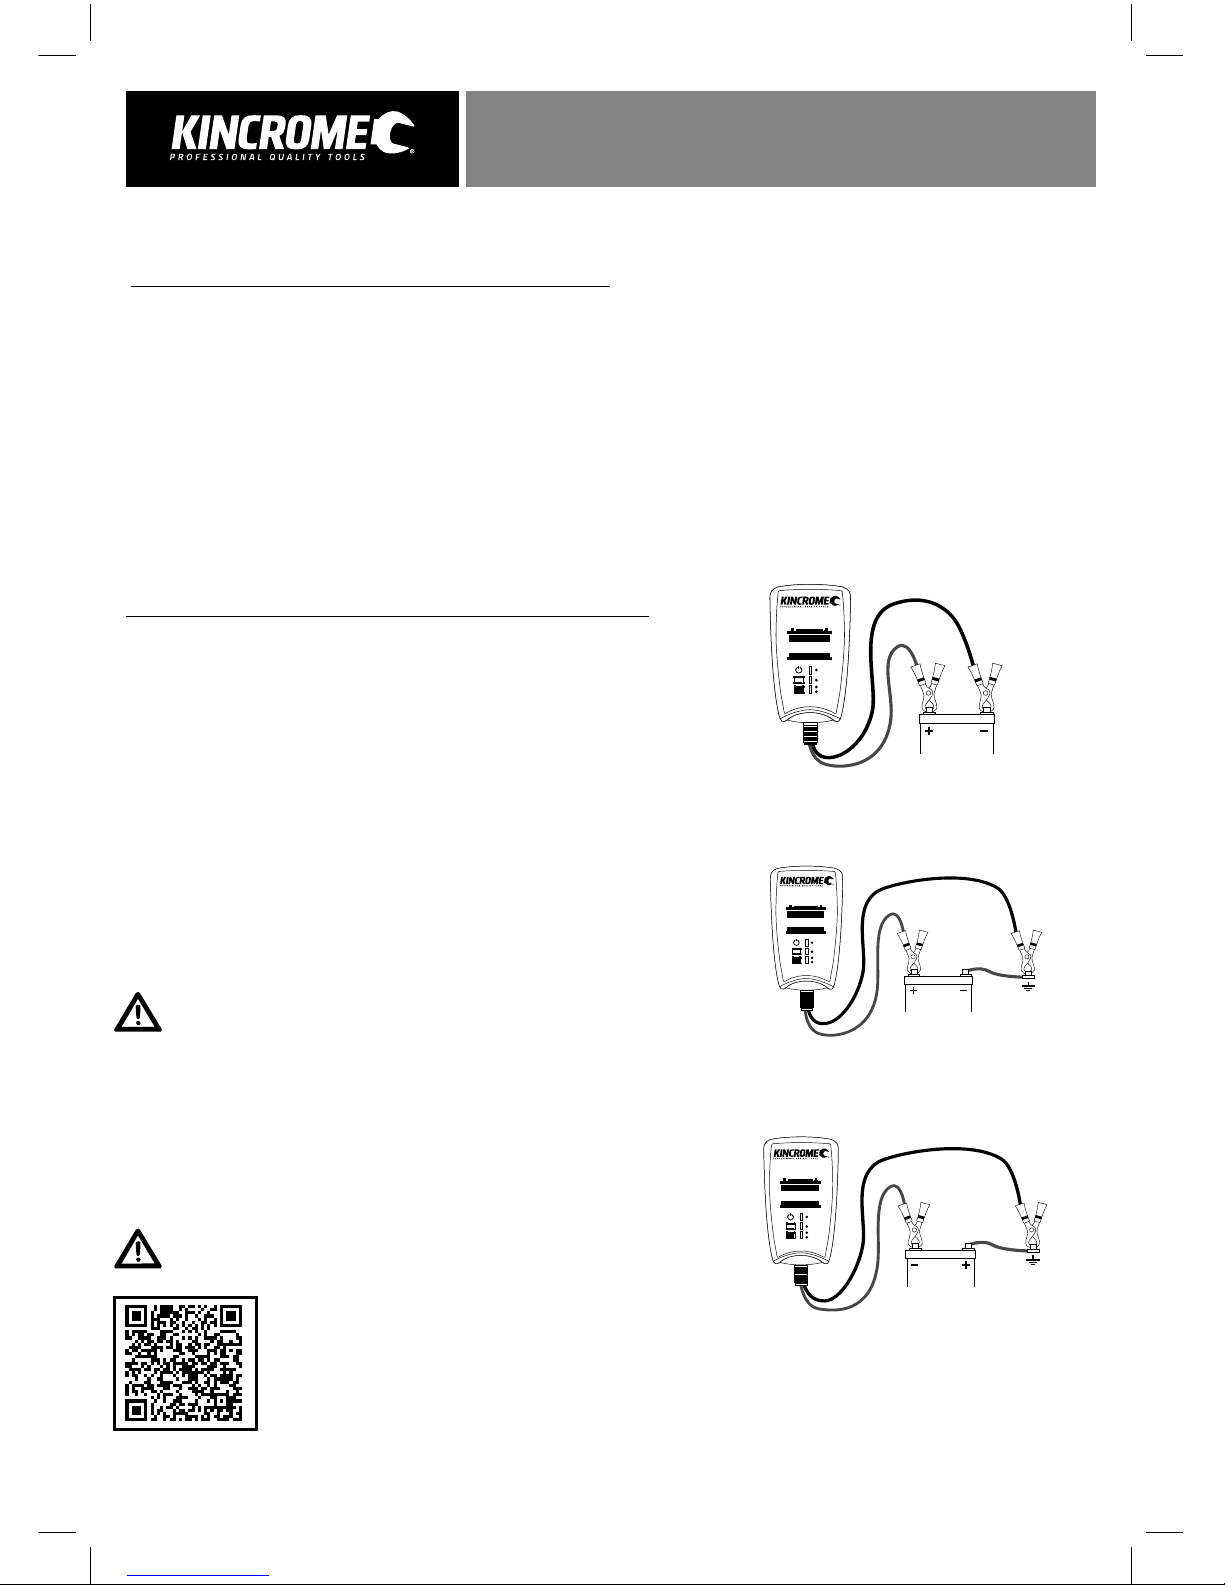
•Crocodile clips and ring terminals: It comes with a quick connect fly lead and 2
different kinds of connectors, crocodile clips and ring terminals. The ring terminals
are perfect for permanent connection to your battery. You can connect the lead to the
battery and tuck the lead away while you are using your vehicle and when you get back
to your garage simply plug the lead back into the charger.
TEMPERATURE & SAFETY PROTECTION:
•INTERNAL OVERHEAT PROTECTION: The charger has a built-in overheat and
an overload electronic circuit. This protects the charger from being damaged if
overheated or overloaded and will automatically decrease the charging current.
Once the units internal temperature decreases to a safe level, the charger will resume
normal charging.
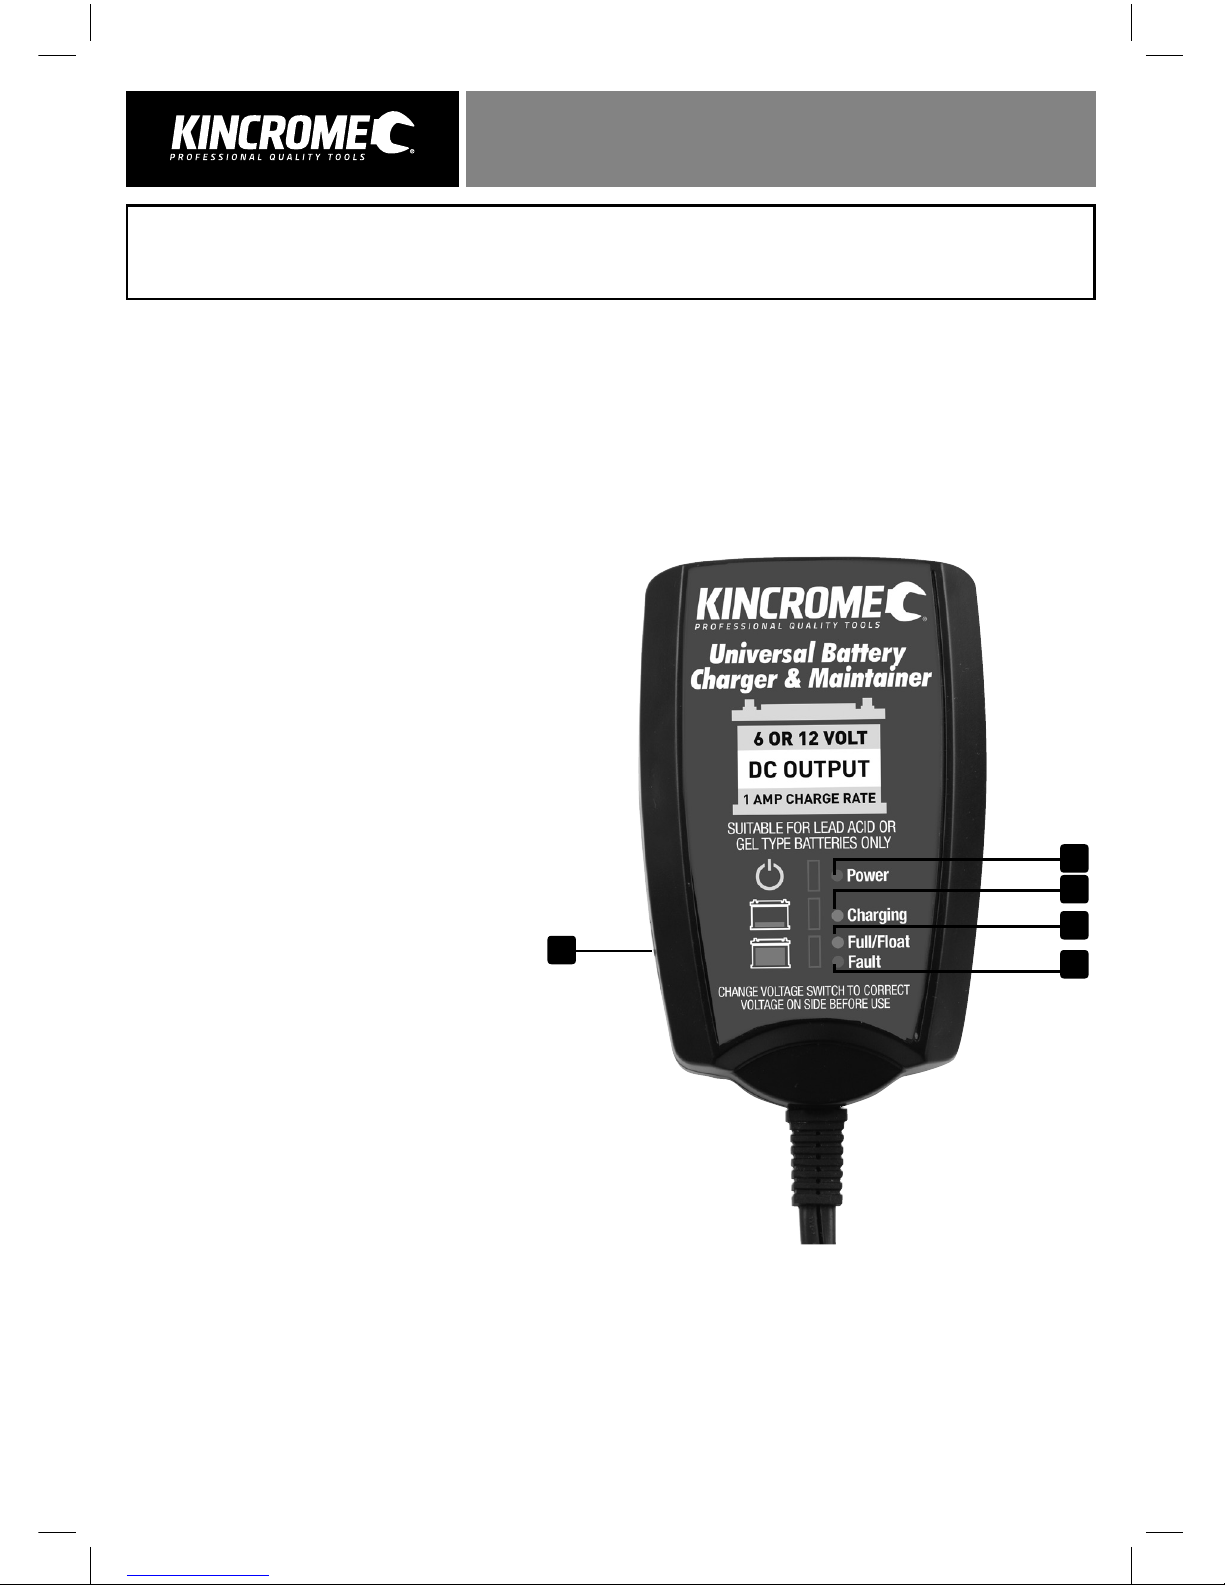
•REVERSE POLARITY: The charger has reverse polarity protection. If the charger
output leads are connected reverse polarity, the fault LED will come on and the
charger will be disabled. Simply unplug the charger from AC power and then connect
the output leads to the correct polarity.
•SHORT CIRCUIT PROTECTION: The charger will automatically turn off if the output
leads are short circuited and the fault LED will come on. This prevents the charger from
being damaged if the positive and negative crocodile clips or ring terminals accidently
touch each other while the charger is turned on.
BATTERY TYPES & CAPACITY:
•Suits 6V and 12V conventional lead acid batteries (VRLA) AGM, Gel & Wet.
It can also be used as a maintenance charger only for Calcium batteries if required.
•The Ah (Ampere-hour) capacities shown below are to be used as a general guide only.
Some batteries may be able to handle a higher charge current. Refer to the battery
manufacturers specifications and recommendations for your charging requirements.
Battery Capacity: Charging 3- 20Ah
Battery Capacity: Maintaining 3- 100 Ah
ELECTRICAL PARTS & ACCESSORIES:
AC Power Cord: SAA 3 Pin AU Plug
DC Output Lead: 1.2m with quick connect plug
Charging Leads: Quick connect 60cm Crocodile Clip Harness
Quick connect 60cm Ring Terminal Harness
KP87001 OzCharge Manual.indd 4 29/03/2018 2:37 PM

5
UNIVERSAL BATTERY CHARGER & MAINTAINER
6/12V, 1 AMP
RED BLACK
Model: OC-61201
6/12 Volt 1 Amp
CHANGE SWITCH TO CORRECT
VOLTAGE ON SIDE BEFORE USE
MICROPROCESSOR CONTROLLED
BATTERY CHARGER & MAINTAINER
www.ozcharge.com.au
RED
BLACK
CONNECTION IN VEHICLE
(POSITIVELY EARTHED)
Model: OC-61201
6/12 Volt 1 Amp
CHANGE SWITCH TO CORRECT
VOLTAGE ON SIDE BEFORE USE
MICROPROCESSOR CONTROLLED
BATTERY CHARGER & MAINTAINER
www.ozcharge.com.au
RED BLAC
K
CONNECTION IN VEHICLE
(NEGATIVELY EARTHED)
Model: OC-61201
6/12 Volt 1 Amp
CHANGE SWITCH TO CORRECT
VOLTAGE ON SIDE BEFORE USE
MICROPROCESSOR CONTROLLED
BATTERY CHARGER & MAINTAINER
www.ozcharge.com.au
Model: OC-61201
6/12 Volt 1 Amp
CHANGE SWITCH TO CORRECT
VOLTAGE ON SIDE BEFORE USE
MICROPROCESSOR CONTROLLED
BATTERY CHARGER & MAINTAINER
www.ozcharge.com.au
UNDERSTANDING YOUR PRODUCT
LED STATUS INDICATOR TABLE:
Power
Red
Charging
Amber
Full
Green
Fault
Red
ON OFF OFF OFF AC power is connected, battery disconnected
ON ON OFF OFF Bulk Charging
ON ON OFF OFF Level 1 Charging
ON OFF ON OFF Level 2, 3 Charging
ON OFF OFF ON Battery Reverse polarity connection
OFF OFF OFF OFF AC Power OFF
CHARGING CURVE
BULK CHARGE FLOAT-MAINTENANCE
Reduces charging time by delivering maximum
charge until the battery reaches a set voltage.
Maintains the battery at 100% charge.
Special pulse charge for long-term maintenance
to ensure the battery is in optimal condition.
KP87001 OzCharge Manual.indd 5 29/03/2018 2:37 PM

6
UNIVERSAL BATTERY CHARGER & MAINTAINER
6/12V, 1 AMP
OPERATION CHARGING INSTRUCTIONS:
1. Pre charge check & electrolyte level check
• Check the Battery Electrolyte levels (Not required on sealed & maintenance free
batteries).
If necessary, remove the vent caps and add distilled water so the levels are halfway
between the upper and lower fill lines.
• Check the battery Voltage, type and Ah capacity of your battery to ensure the charger is
compatible.
• Ensure the battery is in a well ventilated area and the charger should be as far away from
the battery as the cables permit.
2. Connecting the battery charger to your battery
If the Battery is out of the vehicle:
• Connect the RED (+) Crocodile clip or ring terminal
to the positive (+) battery terminal.
• Connect the BLACK (-) Crocodile clip or ring
terminal to the negative (-) battery terminal (Fig.1).
Note: If the battery is still in the vehicle, determine
if the vehicle is positively or negatively earthed.
If Negatively Earthed (Most Common)
• FIRST Connect the RED (+) Crocodile clip or ring
terminal lead to the positive (+) battery terminal
and then connect the BLACK (-) Crocodile clip or
ring terminal lead to the vehicle’s chassis (Fig. 2).
WARNING: DO NOT connect the BLACK (-) lead to
the carburettor or fuel lines.
If Positively Earthed
• FIRST Connect the BLACK (-) Crocodile clip or ring
terminal lead to the negative (-) battery terminal
and then connect the RED (+) Crocodile clip or ring
terminal lead to the vehicle’s chassis (Fig 3).
WARNING: DO NOT connect the RED (+) lead to
the carburettor or fuel lines.
RED BLACK
RED
BLACK
CONNECTION
IN
VEHICLE
(
POSITIVELY
EARTHED
)
RED BLACK
CONNECTION
IN
VEHICLE
(
NEGATIVELY
EARTHED
)
Model: OC-61201
6/12 Volt 1 Amp
CHANGE SWITCH TO CORRECT
VOLTAGE ON SIDE BEFORE USE
MICROPROCESSOR CONTROLLED
BATTERY CHARGER & MAINTAINER
www.ozcharge.com.au
CHANGE VOLTAGE SWITCH TO CORRECT
VOLTAGE ON SIDE BEFORE USE
Power
Charging
Full/Float
Fault
Universal Battery
Charger & Maintainer
6 OR 12 VOLT
DC OUTPUT
1 AMP CHARGE RATE
CHANGE VOLTAGE SWITCH TO CORRECT
VOLTAGE ON SIDE BEFORE USE
Power
Charging
Full/Float
Fault
Universal Battery
Charger & Maintainer
6 OR 12 VOLT
DC OUTPUT
1 AMP CHARGE RATE
CHANGE VOLTAGE SWITCH TO CORRECT
VOLTAGE ON SIDE BEFORE USE
Power
Charging
Full/Float
Fault
Universal Battery
Charger & Maintainer
6 OR 12 VOLT
DC OUTPUT
1 AMP CHARGE RATE
RED BLACK
RED
BLACK
CONNECTION
IN
VEHICLE
(
POSITIVELY
EARTHED
)
RED BLACK
CONNECTION
IN
VEHICLE
(
NEGATIVELY
EARTHED
)
Model: OC-61201
6/12 Volt 1 Amp
CHANGE SWITCH TO CORRECT
VOLTAGE ON SIDE BEFORE USE
MICROPROCESSOR CONTROLLED
BATTERY CHARGER & MAINTAINER
www.ozcharge.com.au
CHANGE VOLTAGESWITCH TO CORRECT
VOLTAGEON SIDE BEFORE USE
Power
Charging
Full/Float
Fault
Universal Battery
Charger & Maintainer
6 OR 12 VOLT
DC OUTPUT
1 AMP CHARGE RATE
CHANGE VOLTAGESWITCH TO CORRECT
VOLTAGEON SIDE BEFORE USE
Power
Charging
Full/Float
Fault
Universal Battery
Charger & Maintainer
6 OR 12 VOLT
DC OUTPUT
1 AMP CHARGE RATE
CHANGE VOLTAGESWITCH TO CORRECT
VOLTAGEON SIDE BEFORE USE
Power
Charging
Full/Float
Fault
Universal Battery
Charger & Maintainer
6 OR 12 VOLT
DC OUTPUT
1 AMP CHARGE RATE
RED BLACK
RED
BLACK
CONNECTION IN VEHICLE
(POSITIVELY EARTHED)
RED BLACK
CONNECTION IN VEHICLE
(NEGATIVELY EARTHED)
Model: OC-61201
6/12 Volt 1 Amp
CHANGE SWITCH TO CORRECT
VOLTAGE ON SIDE BEFORE USE
MICROPROCESSOR CONTROLLED
BATTERY CHARGER & MAINTAINER
www.ozcharge.com.au
CHANGE VOLTAGESWITCH TO CORRECT
VOLTAGEON SIDE BEFORE USE
Power
Charging
Full/Float
Fault
Universal Battery
Charger & Maintainer
6 OR 12 VOLT
DC OUTPUT
1 AMP CHARGE RATE
CHANGE VOLTAGESWITCH TO CORRECT
VOLTAGEON SIDE BEFORE USE
Power
Charging
Full/Float
Fault
Universal Battery
Charger & Maintainer
6 OR 12 VOLT
DC OUTPUT
1 AMP CHARGE RATE
CHANGE VOLTAGESWITCH TO CORRECT
VOLTAGEON SIDE BEFORE USE
Power
Charging
Full/Float
Fault
Universal Battery
Charger & Maintainer
6 OR 12 VOLT
DC OUTPUT
1 AMP CHARGE RATE
SEE QR CODE FOR
QUICK START PRODUCT VIDEO
Fig. 1
Fig. 2
Fig. 3
KP87001 OzCharge Manual.indd 6 29/03/2018 2:37 PM

7
UNIVERSAL BATTERY CHARGER & MAINTAINER
6/12V, 1 AMP
3. Connect the battery charger to Mains Power (240Vac)
• The charger will automatically start charging when AC power is connected and switched
ON. Note: If the Fault Indicator LED illuminates RED, please check your connections as it’s
likely that the Positive (RED(+)) and Negative (BLACK(-)) Leads are reversed. Refer to Trouble
Shooting Page for further information on page 8.
4. The Charging Process:
• Qualification - Battery Condition Check
When the charger is first switched ON, it checks the battery condition to determine
whether the battery needs reconditioning. During this qualification process it checks
the internal impedance and initial Voltage of the battery and it will determine how much
charge current, if any that the battery will accept. It also senses whether the battery is
still connected in the vehicle.
• Bulk Charging - Amber Charging LED ON
Uses the maximum charge output (1A) until the battery Voltage reaches 7.2V/14.4V.
• Float Mode - Full / Float Green LED ON
This stage allows you to keep the charger connected 24/7 to ensure your battery is
well maintained and kept 100% fully charged. Float mode will maintain the battery at a
constant 6.75V/13.5V.
5. Disconnecting the Battery charger from Battery
• If the Battery is out of the vehicle:
(1) Switch OFF and Remove the AC Power Socket from the outlet.
(2) Remove the BLACK (-) lead and then the RED (+) lead.
• If the battery is still in the vehicle:
(1) Switch OFF and Remove the AC Pin Plug from the outlet.
(2) Remove the BLACK (-) lead from the vehicle chassis.
(3) Remove the RED (+) lead from the battery.
Note: Check electrolyte levels if possible after charging as they may need topping up with distilled water.
(This does not apply to sealed maintenance free batteries)
KP87001 OzCharge Manual.indd 7 29/03/2018 2:37 PM

UNIVERSAL BATTERY CHARGER & MAINTAINER
6/12V, 1 AMP
Warranty given by Kincrome Australia Pty Ltd of 3 Lakeview Drive, Caribbean Park, Scoresby, Victoria (Tel 1300 657 528). The applicable warranty
period (24 months) commences on the date that the product is purchased. If this product has materials or workmanship defects (other than defects
caused by abnormal or non warranted use) you can, at your cost, send the product to place of purchase, an authorised Kincrome service agent or one
of Kincromes addresses for repair or replacement. Your rights under this warranty are in addition to any other rights you have under the Australian
Consumer Law or other applicable laws. Our goods come with guarantees that cannot be excluded under the Australian Consumer Law. You are
entitled to a replacement or refund for a major failure and compensation for any other reasonably foreseeable loss or damage. You are also entitled
to have the goods repaired or replaced if the goods fail to be of acceptable quality and the failure does not amount to a major failure. For further
details please visit www.kincrome.com.au or call us. Due to minor changes in design or manufacture, the product you purchase may sometimes
differ from the one shown on the packaging.
Technical support is provided by Kincrome Tools or charger partner, OzCharge Corporation. Call Kincrome Customer Service on 1800 657 528
if assistance is required.
24
PROBLEM INDICATION POSSIBLE CAUSES SOLUTIONS
Charger does
not work?
NO Indicator lights ON - NO AC power - Check AC connections and
make sure the AC Power Point is
switched ON.
- Try a different AC Power Point
which you know is working.
Charger has no
DC output?
Fault RED LED is ON
OR
GREEN power LED ON or
flashing
- Output is short circuited
- Reverse polarity protection
- Loose / bad connection to the battery
- Check DC connection between
charger and battery and make
sure they are not short circuited.
(Touching each other)
- Check that the crocodile clips
have not fallen OFF the terminals
or come loose.
- Check that the crocodile clips/
ring terminals are connected to
the correct polarity.
Note: The charger output is only
present when connected to a
battery.
NO charging current? Fault RED LED is Flashing - Battery is severely sulphated
- Battery has a damaged cell
- Over temperature protection mode
- Check the battery condition,
age etc.
- Battery may need replacement.
- Move battery & charger to a
cooler environment.
The full / float light won’t
come ON.
Fault RED LED is Flashing - Battery Ah capacity too large for the
battery charger and it has timed out
- Battery is defective
- Battery is severely sulphated
- Check the charger specifications
match the battery capacity.
Eg. make sure battery capacity is
not too big for the charger.
- Battery may need replacement.
In the event you believe your Battery Charger is not functioning correctly, please contact Kincrome
Customer Service, (1300 657 528) before returning the item to your place of purchase. Our technical
team may be able to rectify your issue over the phone.
REPLACEMENT PARTS
For the full range of replacement parts and accessories, please visit our website www.kincrome.com.au
TROUBLESHOOTING
National Head Office
National Distribution and Showroom
3 Lakeview Dve, Caribbean Business Park
Scoresby Victoria 3179 Australia
E enquiries@kincrome.com.au
W kincrome.com.au
Administration
T(03) 9730 7100 F(03) 9730 7199
ABN 41 007 185 006
Customer Service Centre
T1300 657 528 F1300 556 005
National Head Office
National Distribution and Showroom
3 Lakeview Dve, Caribbean Business Park
Scoresby Victoria 3179 Australia
W kincrome.com.au
Administration
T(03) 9730 7100 F(03) 9730 7199
ABN 41 007 185 006
Customer Service Centre
T1300 657 528 F1300 556 005
Made to Kincrome Tools & Equipment Pty Ltd Global
specifications and quality standards in China
Australia & Global UK & EU
www.kincrome.com.au www.kincrome.co.uk
enquiries@kincrome.com.au enquiries@kincrome.co.uk
KP87001 OzCharge Manual.indd 8 29/03/2018 2:37 PM
Table of contents
Other kincrome Batteries Charger manuals
Popular Batteries Charger manuals by other brands

nedis
nedis NBARF6510FBK quick start guide

Texas Instruments
Texas Instruments BQ25123 manual

Ravpower
Ravpower Super-C Series user guide

Beta
Beta 1498/30A Instructions for use

Ingersoll-Rand
Ingersoll-Rand BC1110 Product information

Saritek Technical Solutions
Saritek Technical Solutions Alpatronix CX200 user manual

ANSMANN
ANSMANN POWERLINE 8 instruction manual

Charging Systems International
Charging Systems International i-2412 Safety, installation and operating instructions

SNOWJOE
SNOWJOE SUNJOE 24VCHRG-HS-DPC quick guide

Horizon Fitness
Horizon Fitness Sunbox USB 3.0 user guide

Voltech
Voltech SBC-1205 user manual

Insignia
Insignia NS-GXBOSBCS18 Quick setup guide