kincrome KP87004 User manual

SMART 6-STAGE BATTERY CHARGER AND
MAINTAINER - RV & MARINE
SMART 6-STAGE BATTERY
CHARGER AND MAINTAINER
12V 10 AMP
KP87004
ED1/Feb 18
100%
AUTOMATIC
SMART BATTERY
CHARGER &
MAINTAINER
MICROPROCESSOR
CONTROLLED
FULLY NO FAN
NO NOISE
TECHNICAL
EXPERIENCE
NEEDED
NO SUITS
ALL LEAD
ACID TYPE
BATTERIES
100%
AUTOMATIC
SMART BATTERY
CHARGER &
MAINTAINER
MICROPROCESSOR
CONTROLLED
FULLY NO FAN
NO NOISE
TECHNICAL
EXPERIENCE
NEEDED
NO
SUITS
ALL LEAD
ACID TYPE
BATTERIES
100%
AUTOMATIC
SMART BATTERY
CHARGER &
MAINTAINER
MICROPROCESSOR
CONTROLLED
FULLY NO FAN
NO NOISE
TECHNICAL
EXPERIENCE
NEEDED
NO SUITS
ALL LEAD
ACID TYPE
BATTERIES
KP87004 OzCharge Manual.indd 1 5/03/2018 2:24 PM

2
SMART 6-STAGE BATTERY CHARGER AND
MAINTAINER - RV & MARINE
Part No:............................ KP87004
Output: ............................ 10 AMPs DC peak, 8A DC constant
Input Voltage:.................. 230-240VAC nominal
Input Frequency: ........... 50Hz
Charge Voltage: ............. 14.1/14.4/14.7VDC
Trickle Charge Voltage:. 13.7VDC
Equalise Voltage: .......... 15.5VDC
Operating Temperature: .............. 0 to 40ºC
Operating Humidity: ...................... 90% RH Max.
Dimensions: ....................................140 x 145 x 55mm
Weight:.............................................1.0kg
Approvals ....................................... CE, UL/cUL, AS/NZS, EMC
You are now the owner of one of the most advanced, reliable and feature packed chargers
available today. Please take the time to read and understand this manual, even though it may
have already been installed for you.
Table of Contents
Know Your Product ................................................ 2
IMPORTANT Safety Advice and Warnings............ 3
Main Features ........................................................ 4
Control & Indicators .............................................. 4
Installation ............................................................. 4
Charging Instructions............................................ 5
Programming......................................................... 5
Automatic Power Supply....................................... 6
Operating Instructions .......................................... 7
Storage ................................................................... 7
The Charging Process........................................... 8-9
Troubleshooting & Warranty................................. 10
Specifications:
*Additional ring terminals included in pack
Know Your Product
1. Charge Stage Indicator LEDs
2. Battery Type Button
3. Battery Type Selection LEDs
4. Equalisation Button
5. Function LEDs
6. Temperature Compensation Sensor Socket
7. Output Socket
8. AC Mains Pin Plug
6
1
2
6
73 4 5
78
8
KP87004 OzCharge Manual.indd 2 5/03/2018 2:24 PM

3
SMART 6-STAGE BATTERY CHARGER AND
MAINTAINER - RV & MARINE
IMPORTANT SAFETY ADVICE AND WARNINGS
• While this charger is dust-proof and water splash-proof to IP64, we recommend that
it is used and/or installed indoors only and should never be directly exposed to water,
rain, pressure washer, etc.
• Make sure you are using proper AC mains power Voltage.
• Do not attempt to use the charger if it has been dropped or damaged.
• Never attempt to charge a damaged battery, frozen battery or non-rechargeable
battery.
• Do not use the charger in a closed area or poorly-ventilated area.
• Never smoke, use an open flame, or create sparks near a battery or charger during
charging operation as this may cause an explosion / explosive gas.
• Do not operate the charger if any of the cables or plugs are damaged.
• Do not disassemble the charger. Take it to a qualified and authorised person if any
repair is required.
• Keep the charger away from infants, children and pets.
• Ensure the correct Battery Type is selected before the first use or any battery
replacement.
• Do not charge using an incorrect Battery Type setting. (EG: do not charge a Gel
battery with Calcium battery selection setting or vice-versa as this may damage your
battery)
• If you are in doubt as to what battery type you have, refer to the battery Supplier or
Manufacturer. Do not guess or assume as this may damage your battery.
• Incorrect Battery Type selection may result in you battery being under charged or
over charged and any damage will not be covered by warranty.
• Check the Battery Manufacture’s specific precautions. EG: such as removing or not
removing cell caps whilst charging.
• As a general precaution, someone should be within range of your voice or close
enough to come to your aid while working with any battery.
• Wear protective goggles and turn your face away when connecting or disconnecting a
battery.
• If battery acid contacts your skin or clothing, wash immediately with soap and water.
If acid enters your eye, immediately flush the eye with running cold water for at least
10 minutes and seek medical attention.
• To reduce risk of damaging the battery, avoid dropping any metal tools onto the
battery. Wrap spanners with electrical insulation tape to minimise the risk of a short
circuit.
• Never rest the battery being charged on top of your Kincrome battery charger or
place the charger on top of the battery.
• The battery charger should be installed and kept as far away from the battery as the
output cables permit.
KP87004 OzCharge Manual.indd 3 5/03/2018 2:24 PM

4
SMART 6-STAGE BATTERY CHARGER AND
MAINTAINER - RV & MARINE
MAIN FEATURES
• High frequency Switching Mode with pulse charge output.
• Microprocessor controlled.
• NO fan! NO noise to keep you awake at night and no moving parts to wear out and fail.
• Quick connect output plugs.
• Automatic Power-Supply mode.
• Suits all Lead Acid battery types (user selectable): Conventional wet flooded,
Calcium, Absorbed Glass Mat (AGM) & Gel.
• Battery rejuvenation (De-Sulphation) function (user selectable).
• Heavy-duty cables & fittings.
• Designed for Australian & New Zealand conditions and applications.
INSTALLATION:
This product is designed to be installed in a HARDWIRED SITUATION ONLY.
Because this Charger has NO fan it is important to MOUNT IT AN AREA OF GOOD
VENTILATION. Nothing should located be within 100mm (4 inches) of the charger unit to
ensure natural convection cooling takes place.
Choose a suitable location that meets these requirements. In camper-trailers and caravans
especially make sure the location is not used for storage of things that may limit the airflow
like tents/swags/canvas awnings that may wrap around the unit during travel and not be
unfolded or used at the next destination.
CAUTION: If this charger does get too hot, it is not a danger as the unit will automatically
“foldback” and reduce the output the current and continue to work at a lower power level
to prevent overheating. The battery recharge time however will be longer. Only in extreme
ambient heat environments the unit may shutdown.
1
2
4 53
CONTROL & INDICATORS:
1. Charge stage indicator LED’s
Shows what the stage of charge
mode is.
The Float/PS LED will automatically
come on when used with no battery
as a Power Supply (PS).
2. Battery Type button
Allows the user to program the
charger for the battery type
connected. Hold for 3 seconds to
change.
KP87004 OzCharge Manual.indd 4 5/03/2018 2:24 PM

5
SMART 6-STAGE BATTERY CHARGER AND
MAINTAINER - RV & MARINE
3. Battery Type selection.
Shows what battery type is programmed. Use Battery Type button to change.
4. Equalisation button.
Allows the user to start an Equalisation charge cycle. Hold for 3 seconds to begin.
5. Fault, Rejuvenation and Equalisation mode LED’s
Refer to the following pages for more information.
CHARGING INSTRUCTIONS:
PROGRAMMING:
Before any use, make sure the correct battery type is set! This is a list of common batteries
from the lead-acid chemistry family;
• Conventional wet flooded cell. Also simply known as “Lead Acid”. This type will have screw-
out vents for maintenance and topping up with distilled water. For this type use the AGM/Wet
setting.
• Sealed Maintenance Free (SMF). This type still has a liquid acid inside (if you rock it from side
to side you will hear it ‘slosh’ and move) but is not able to be opened for topping up. This type
commonly has a “Magic Eye” for telling the state of charge too. Use the Calcium setting for this
battery type.
• Absorbed Glass Mat (AGM). A common type of fully sealed and maintenance free battery used
in a lot of camper-vans, caravans, motorhomes & boats as they emit no toxic fumes during
678
6. Temperature Compensation sensor
socket.
Before any use, connect only the
provided sensor. Do not modify the
cable in any way. Connect the sensor
to one of the battery terminals
(preferably the Negative).
7. DC output socket.
Anderson 30Amp Power-Pole (PP30)
connector. Use the matching cable
provided to connect to the battery
(preferably via the battery master
fuse). This cable can be shortened.
Extra care should be taken before
making this cable longer to make
sure any Voltage drop is considered (a
larger cable will probably be required
depending on the distance).
8. AC mains input plug.
For use with 230-240Vac only.
KP87004 OzCharge Manual.indd 5 5/03/2018 2:24 PM

6
SMART 6-STAGE BATTERY CHARGER AND
MAINTAINER - RV & MARINE
normal use. Use the AGM/Wet setting for this type of battery.
• Gel. The original sealed battery type uses silica-dioxide to fix the acid in place. They can be
difficult to identify and can be easily mistaken for an AGM battery. Use the GEL setting for
this type.
IMPORTANT! If you are unsure of your battery type, check with your battery supplier or the
battery manufacturer. Using the wrong setting can damage your battery and will not be covered
under warranty.
AUTOMATIC POWER-SUPPLY MODE:
This charger will automatically become a power supply in the event there is no battery
connected or there has been a total battery failure. This allows you to use critical loads such as
a water-pump in a remote area where no replacement may be available.
If there has never been a battery installed in your camper-trailer, caravan, etc you must have
this unit plugged into AC mains to be able to operate the lights, TV, etc.
If you decide to install a battery at a later stage, you do not need to purchase another charger.
Simply have a suitable battery installed by a professional automotive-electrician and check the
Battery Type is set correctly.
If you have a battery installed and suspect there has been a battery failure of any kind, this
feature will allow you to still be able to operate your DC loads such as lights and TV because the
charger will still turn on when the battery has been disconnected and/or removed.
If this happens, disconnect the AC mains and have an automotive-electrician to disconnect the
battery Negative terminal and then secure and insulate the cable so it cannot short-circuit or
make contact with anything.
When AC mains is re-applied with no battery connected, the charger will automatically restart
as a Power Supply. This is shown by the Float/PS LED coming on.
When the problem is fixed or faulty battery is replaced, it will automatically restart as a Battery
Charger.
USE WITH OTHER CHARGING SOURCES:
It is quite common in installations where this charger will be used to have other methods of
charging the batteries also connected (and possibly in use) at the same time. Because this
charger has been designed as a Voltage regulated product, there is little chance of this being a
problem. Most alternators, solar controllers, DC-DC chargers, etc will not cause any ill-effect
if used at the same time. However, we recommend that you check with the other equipment
suppliers if you are not sure.
STORAGE
This charger has been designed to be left permanently connected.
We therefore recommend that you plug the charger into AC mains when your camper-trailer,
caravan, boat, etc is in storage so that the battery is always maintained at 100% state of charge
and always ready for use.
If you don’t have access to permanent AC mains power, consider solar panels and a suitable
regulator to keep the battery fully charged.
KP87004 OzCharge Manual.indd 6 5/03/2018 2:24 PM

7
SMART 6-STAGE BATTERY CHARGER AND
MAINTAINER - RV & MARINE
Keep in mind that all batteries have a certain rate of “self discharge” and will eventually go flat by
themselves,so we recommend the charger be left connected to AC mains when not in use.
USE WITH GENERATORS
This product is designed for safe use with generators. Test your generator with the charger before
you leave home!
We recommend only using “inverter” type generators (ie: Honda EU or Yamaha EF-iS) or
generators with an Automatic Voltage Regulator (AVR) on the alternator.
If you are using a 2-stroke or open frame “tradesman” type generator without an AVR, we highly
recommend using an additional surge protector at the generator outlet.
Remember that powered sites in remote areas are often powered from a large generator too.
The charger requires approx 200Watts to run at its full output. Therefore we recommend the
smallest generator used to run this charger is 1kVA (1000VA).
OPERATING INSTRUCTIONS
This Kincrome battery charger has been designed to be easy to operate and very simple to use.
Please refer to the operating instructions below.
1. Pre-Charge Check
(a) Check the Battery Electrolyte level (non-sealed batteries). If necessary, remove
the vent caps and add distilled water so the levels are halfway between the upper and
lower fill lines.
(b) Location – Ensure the Battery is in a well ventilated area. Never charge a conventional
wet cell battery inside a campervan or caravan without adequate ventilation.
This includes “Calcium” maintenance-free types. Refer to Australian / New Zealand
Standards 2676 and 3011 for indoor battery installations.
(c) If your charger came as Original Equipment (OE) with your caravan, ignore this step.
Keep the charger as far away from battery as the cables permit. Never place the
charger directly above the battery being charged as gasses from the battery may
corrode and damage the charger.
CAUTION: Always keep the charger away from high corrosion / wet and moist areas.
2. Connecting the charger to your battery
Because this product is designed to be hardwired, this step will normally be done as part of the
original installation.
(a) Connect the RED (+) lead from the charger directly to the positive (+) battery terminal.
(b) Connect the BLACK (-) lead from the charger directly to the negative (-) battery
terminal. Do not connect to the chassis, fuel rails, brake lines, etc.
(c) When multiple batteries are installed in parallel, always use a fuse or DC circuit
breaker as close to each battery as possible.
(d) If connecting the charger to batteries in parallel, connect the charger output lead to
each of the opposite ends of the battery bank to minimise any Voltage drop in each
battery interconnect.
KP87004 OzCharge Manual.indd 7 5/03/2018 2:24 PM

8
SMART 6-STAGE BATTERY CHARGER AND
MAINTAINER - RV & MARINE
3. Connect the battery charger to the mains power (230-240Vac)
(a) This could be from a generator, powered site, marina, or your home.
(b) The charger will automatically start when AC power is connected.
Note: If the Fault Indicator LED illuminates RED, please check your connections as the
most common problem is that the Positive (RED (+)) and Negative (BLACK (-)) Leads
are reversed, refer to Trouble Shooting Page for further information.
(c) Ensure the Battery Type indicator LED matches your battery installed!
Note: The charger will automatically memorise your charging rate setting and battery
type setting. The next time you use the charger it will default to the last setting.
THE CHARGING PROCESS:
The charging LED’s indicate all of the Charging Stages. The charging stages are in this order
as follows:
• Soft Start. Indicated by the GREEN Bulk LED flashing.
A Soft Start will only occur if the initial battery Voltage is between 3V DC and 10.5V DC due
to a deep discharge. During a Soft Start the unit will charge the battery using 2.5Amps until
the battery Voltage is over 10.5V DC.
If the GREEN Bulk LED is blinking, turn OFF all the loads possible (lights, TV, etc) until the
Bulk LED turns solid and stops blinking.
• Bulk charge. Indicated by the GREEN Bulk LED on solid.
Charges the battery using a constant maximum current (10Amps maximum) until the
battery Voltage rises to the Absorption level. This stage is generally the first 60%.
• Absorption. Indicated by the GREEN Absorption LED on solid.
This stage charges the battery using a constant Voltage (determined by the Battery Type
setting). This stage is generally the second 30%.
• Float. Indicated by GREEN Float/PS (Power Supply) LED.
During the first hour of float charge (>90%) the green Float/PS LED will blink.
When the battery is 100% and fully charged the green Float/PS LED will turn solid. It will
now be trickle charged and maintained at a safe constant Voltage (determined by the
Battery Type selection).
• Equalising. Indicated by the GREEN Absorption LED flashing and the Equalisation LED on.
Equalisation mode (not possible in GEL mode).
This mode is a well proven way of extending the life of your battery, especially when used
in a deep-cycle application such as a camper-trailer or with an electric outboard on a boat.
Activating this mode will force the battery Voltage higher than normal, at a limited output
current to perform a controlled overcharge, reactivating all of the chemicals maximising all of
the available capacity. Every battery manufacturer has different guidelines for Equalisation so
check with them before activating this mode. A s a general rule though, use this mode once a
month if you are using the battery heavily to once every few months if you use it lightly.
KP87004 OzCharge Manual.indd 8 5/03/2018 2:24 PM

9
SMART 6-STAGE BATTERY CHARGER AND
MAINTAINER - RV & MARINE
Rejuvenation mode (Patented).
Your Kincrome battery charger provides a unique battery “Rejuvenation” function.
What does this feature do? The Rejuvenation mode uses high frequency and high Voltage
pulses that has been proven to break down the crystalline form of lead sulphate (commonly
called “Sulphation” pronounced “Sul-Fay-Shon”) within the battery cells which helps
extend your battery life. Sulphation can occur when batteries are regularly discharged, have
insufficient recharge time and/or they are left in a discharged state.
We recommend that you periodically use this rejuvenation (de-Sulphate) feature to ensure
you get the maximum life out of your battery, only when connected to mains power (not on a
generator due to the time and fuel that would be required).
While there are no true rules to follow, we suggest that if you use the battery on a daily basis,
Rejuvenation every few months is adequate. If you only use the battery a few times a year,
every 6-12 months or so is enough.
To activate the Rejuvenation feature, press and hold the Battery Type and the Equalisation
buttons for 3 seconds until the YELLOW Rejuvenation LED begins flashing.
Once the charger has entered the rejuvenation (de-sulphate) charging stage, the process will
automatically stop after 24 hours.
KP87004 OzCharge Manual.indd 9 5/03/2018 2:24 PM

SMART 6-STAGE BATTERY CHARGER AND
MAINTAINER - RV & MARINE
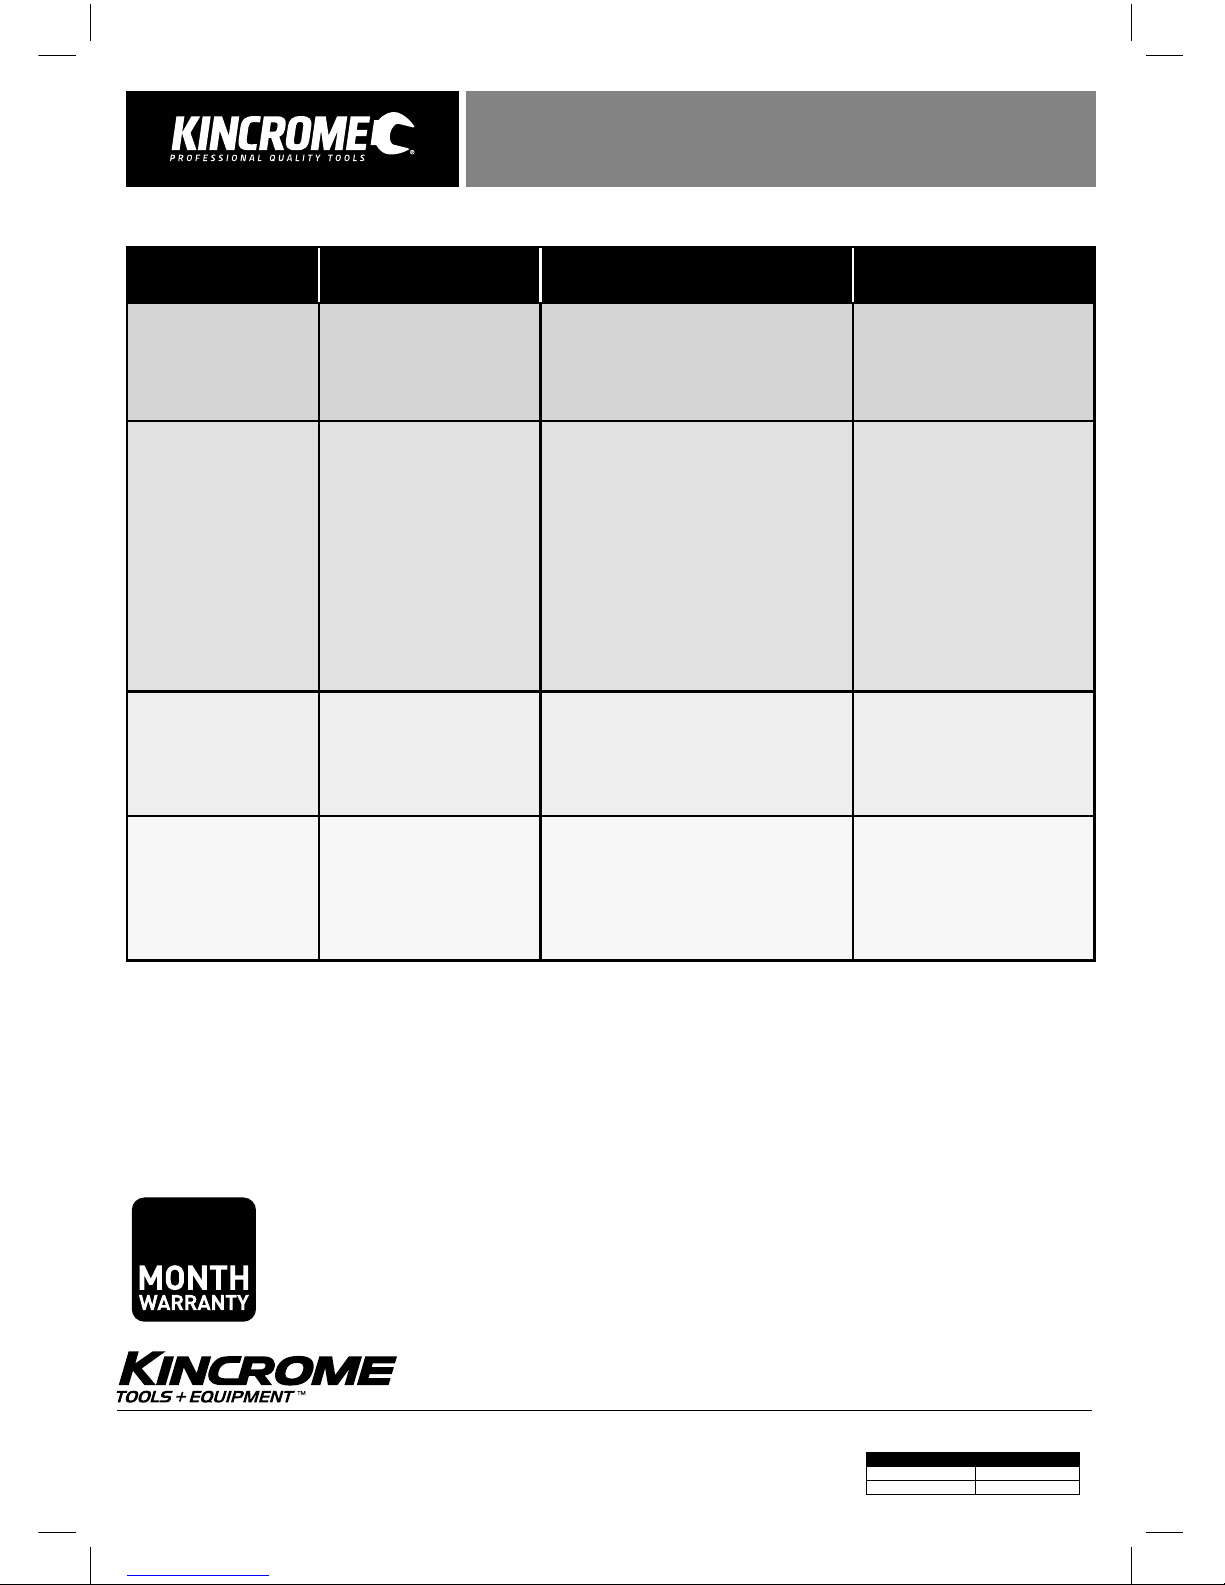
PROBLEM INDICATION POSSIBLE CAUSES SOLUTIONS
Charger does
not work?
NO Indicator lights ON - NO AC power - Check AC connections and
make sure the AC Power Point is
switched ON.
- Try a different AC Power Point
which you know is working.
Charger has NO
DC output?
Fault RED LED is ON
OR
GREEN power LED ON or
flashing
- Output is short circuited
- Reverse polarity protection
- Loose / bad connection to the battery
- Check DC connection between
charger and battery and make
sure they are not short circuited.
(Touching each other)
- Check that the crocodile clips
have not fallen off or come loose.
- Check that the crocodile clips/
ring terminals are connected to
the correct polarity.
Note: The charger output is only
present when connected to a
battery.
NO charging current? Fault RED LED is Flashing - Battery is severely sulphated
- Battery has a damaged cell
- Over temperature protection mode
- Check the battery condition,
age etc.
- Battery may need replacement.
- Move battery & charger to a
cooler environment.
The full / float light won’t
come ON.
Fault RED LED is Flashing - Battery Ah capacity too large for the battery
charger and it has timed out
- Battery is defective
- Battery is severely sulphated
- Check the charger specifications
match the battery capacity. Eg.
make sure battery capacity is not
too big for the charger.
- Battery may need replacement.
TROUBLESHOOTING
In the event you believe your Battery Charger is not functioning correctly, please contact Kincrome
Customer Service, (1300 657 528) before returning the item to your place of purchase. Our technical
team may be able to rectify your issue over the phone.
REPLACEMENT PARTS
For the full range of replacement parts and accessories, please visit our website www.kincrome.com.au
Warranty given by Kincrome Australia Pty Ltd of 3 Lakeview Drive, Caribbean Park, Scoresby, Victoria (Tel 1300 657 528). The applicable warranty
period (24 months) commences on the date that the product is purchased. If this product has materials or workmanship defects (other than defects
caused by abnormal or non warranted use) you can, at your cost, send the product to place of purchase, an authorised Kincrome service agent or one
of Kincromes addresses for repair or replacement. Your rights under this warranty are in addition to any other rights you have under the Australian
Consumer Law or other applicable laws. Our goods come with guarantees that cannot be excluded under the Australian Consumer Law. You are
entitled to a replacement or refund for a major failure and compensation for any other reasonably foreseeable loss or damage. You are also entitled
to have the goods repaired or replaced if the goods fail to be of acceptable quality and the failure does not amount to a major failure. For further
details please visit www.kincrome.com.au or call us. Due to minor changes in design or manufacture, the product you purchase may sometimes
differ from the one shown on the packaging.
Technical support is provided by Kincrome Tools or charger partner, OzCharge Corporation. Call Kincrome Customer Service on 1800 657 528
if assistance is required.
24
National Head Office
National Distribution and Showroom
3 Lakeview Dve, Caribbean Business Park
Scoresby Victoria 3179 Australia
E enquiries@kincrome.com.au
W kincrome.com.au
Administration
T(03) 9730 7100 F(03) 9730 7199
ABN 41 007 185 006
Customer Service Centre
T1300 657 528 F1300 556 005
National Head Office
National Distribution and Showroom
3 Lakeview Dve, Caribbean Business Park
Scoresby Victoria 3179 Australia
W kincrome.com.au
Administration
T(03) 9730 7100 F(03) 9730 7199
ABN 41 007 185 006
Customer Service Centre
T1300 657 528 F1300 556 005
Made to Kincrome Tools & Equipment Pty Ltd Global
specifications and quality standards in China
Australia & Global UK & EU
www.kincrome.com.au www.kincrome.co.uk
enquiries@kincrome.com.au enquiries@kincrome.co.uk
KP87004 OzCharge Manual.indd 10 5/03/2018 2:24 PM
Table of contents
Other kincrome Batteries Charger manuals
Popular Batteries Charger manuals by other brands

Alcad
Alcad AT30 SERIES Operating and service instructions

ABB
ABB HT570948 Operation manual

Elite Power
Elite Power PFC Series user manual

Entel
Entel CSBHT V3 Quick start user guide

Proosten Electronics
Proosten Electronics ProMax 200 Series user manual

Balmar
Balmar Digital Duo Charge Installation & operation