KiteWinder KiweeOne User manual

KiweeOne
User Manual
User manual V1 April 2021
KiteWinder
1 allée Jean Rostand
33650 Martillac, France
Tel : 06 03 88 82 52
sales@kitewinder.fr
www.kitewinder.fr
Made in France

1. Safety
For your safety and the safety of
those who may be near the
KiweeOne while using it, please
observe the following guidelines
at all times :
- Do not rotate the blades when
KiweeOne is not in flight and
near other people or animals.
- Do not make any changes to
KiweeOne.
- Comply with local codes, laws
and aviation regulations.
- Do not open the electrical box
when it is powered.
- Do not operate the KiweeOne if
any component is damaged.
- Do not attempt to puncture,
burn or heat the battery.
In this manual you will find
the following symbols :
WARNING
Indicates a risk of serious
injury or equipment
damage. Use caution and
follow the instructions.
IMPORTANT
Indicates an important
instruction or advice for
proper assembly or use to
avoid equipment damage.
ADVICE
Indicates an instruction
that may simplify a task.
INFORMATION
Indicates an information
that can help you to
understand more how your
KiweeOne works.
2User Manual KiweeOne

User Manual KiweeOne 3
Safety
p.2
Introduction
p.4
How it works
p.5
General principle
p.6
Description
p.7
Technical specifications
p.7
Structure Components
p.8
Using KiweeOne
p.11
Kite launch
p.11
Assembly
p.12
Wind turbine manual launch
p.15
Bringing back KiweeOne
p.17
Using the electricity
p.18
How to use the electrical box
p.19
Maintenance
p.21
Troubleshooting
p.23
Part list
p.24
Summary

For safety reasons, read this user guide carefully before using
your KiweeOne. Failure to follow this instructions may cause
damages to the KiweeOne and/or it’s user.
These instructions are intended for the user of the KiweeOne wind turbine
and any person who may be near it when using it.
This owner's manual is an important part of your KiweeOne. It provides
rules and guides that will help you use your KiweeOne safely and efficiently.
You should familiarize yourself with the functions and operations by
carefully reading this user guide. For your safety, it is very important that
you follow all the recommendations.
Please keep this owner's manual for future reference. If the instruction
manual is lost or damaged, a printable PDF version is available for
download on our website:
www.kitewinder.fr
This manual describes the safety instructions to be applied by the user. It is
the user's responsibility to take care of his own safety and that of other
persons concerned, in accordance with the instructions given to him.
Do not store heavy objects on top of your KiweeOne and avoid impacts,
especially on the blades.
4User Manual KiweeOne
2. Introduction

5User Manual KiweeOne
3. How it works
Kite
Kite lines
Safety line
Omega, wind
turbine part
attachment to
the safety line
Wind flow
Wind
vane
Safety line
anchor
Electrical
box
Rope belt (70m between the
wind turbine and the
generator)
Power cable
and Command
cable
Toothed
belt
Blades
Generator
Generator
anchor
Reel to store the
safety line
Hand crank
The wind keeps the kite at altitude.
The wind turbine is suspended to
the kite. The blades drive the
toothed belt then the rope belt. The
rope belt makes a loop between the
wind turbine and the generator. It
transmits the rotational movement
to the generator which supplies
electricity to the electrical box.
The rope belt is tight and holds the
kite. If, however, the rope belt
breaks (wear), the safety line will
hold the kite and the wind turbine.
The generator reel can be used to
rewind the rope belt manually
(manual crank) or automatically
(thanks to the electrical box).
rope
belt Reel

6User Manual KiweeOne
4. General Principle
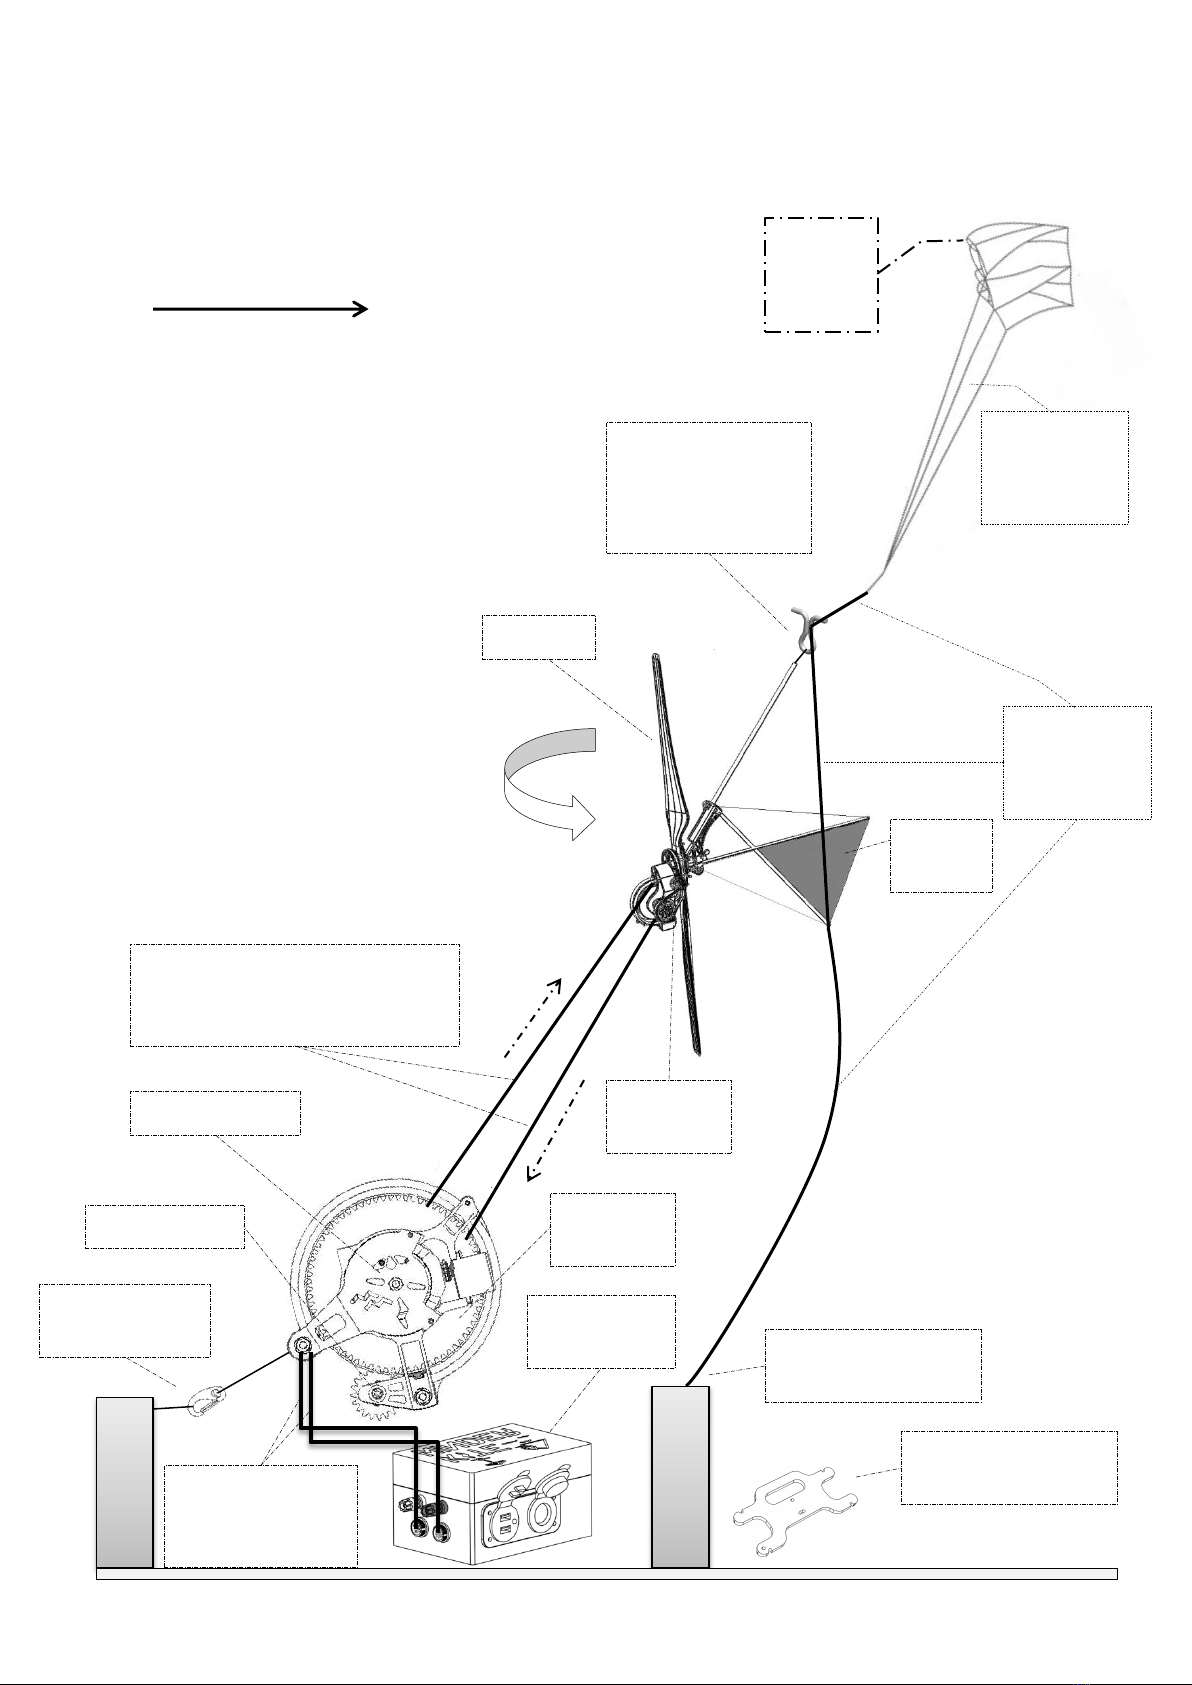
When using the wind turbine, the generator must always be connected to the electrical box.
The power cable transmits the electricity produced to the electrical box and its internal
battery. The electrical box will then power your equipment. The command cable allows the
transmission of information between the generator and the electrical box.
The generator is composed of a reel for storing the rope belt (rewound) and a servomotor
controlling a locking pin. It allows 3 positions : rotation blocking (storage), free rotation
(unwinding, production, rewinding) and start of rewinding (used to hook the rope belt loop in
order to start rewinding). These 3 modes can be activated manually or automatically.
Unwinding of the rope belt can be done manually with the crank or semi-automatically using a
button on the box. In semi-auto mode, the servomotor automatically changes position and the
generator unwinds the entire rope belt.
To produce electricity, the rotation of the blades must be started manually by pulling on the
rope belt or semi-automatically using a button on the box. During electricity production, the
crank should be placed on the smooth side of the generator as it serves as a balancing mass.
The rewinding of the rope belt can be done manually with the crank, semi-automatically
thanks to a button on the box or fully automatically if the generator detects a wind too weak to
continue to fly the wind turbine.
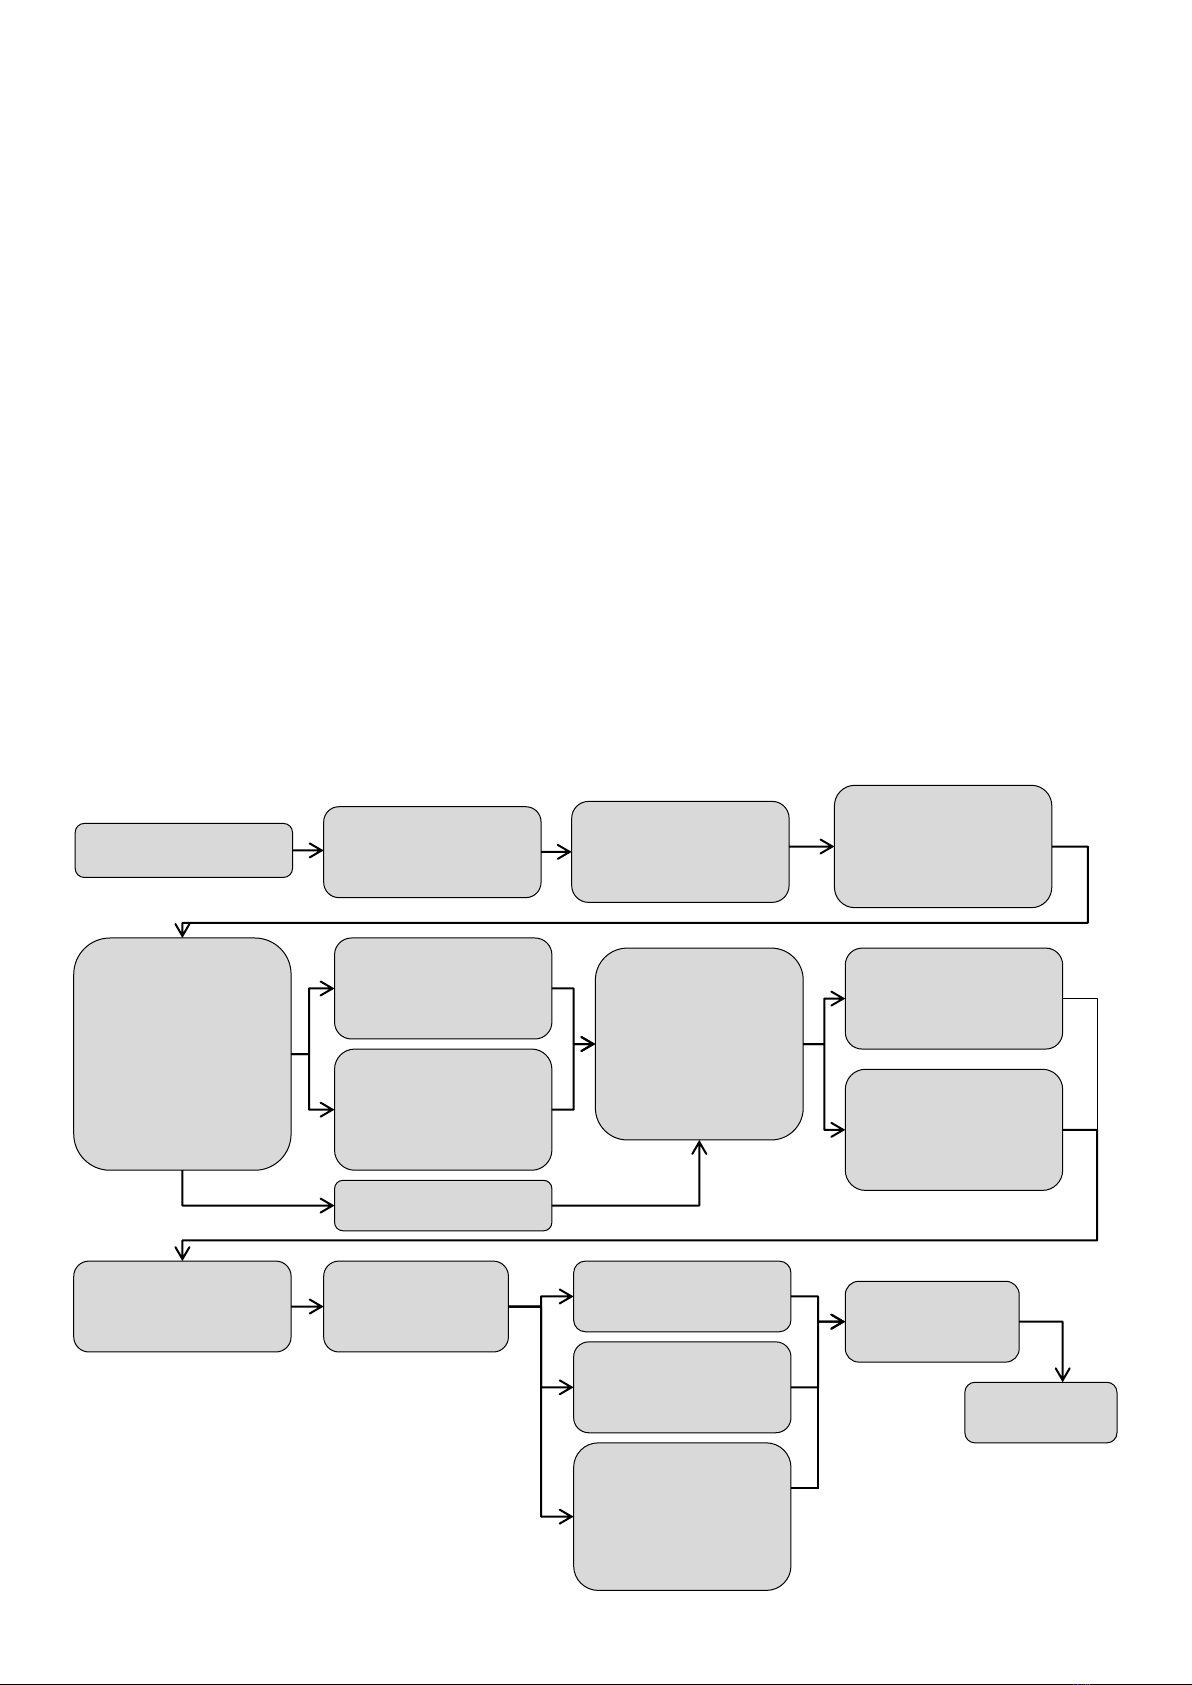
Here is a summary of the steps for using the KiweeOne :
KiweeOne stored
Putting the kite in
flight using the
safety line, altitude
10m
Assembly of the
wind turbine and
attachment to the
safety line with the
Omega
Positioning the
rope belt loop
between the
generator and the
wind turbine
Unwinding the rope
belt in manual
mode with crank
Unwinding the rope
belt in semi-auto
mode (button)
Unwinding the
safety line
Attaching the
generator and the
safety line to an
anchor
Wind turbine in
flight, The rope
belt allows the
transmission of
the movement
from the blades
to the generator
Electrical
production
Storage
Rewinding the rope
belt manually
(crank)
Initiation of blade’s
rotation semi-auto
(button)
Initiation of blade's
rotation manually
(pulling the rope
belt)
Stopping the
electrical
production Rewinding the rope
belt semi-
automatically
(button)
Rewinding the
safety line
manually
Rewinding
automatically the
rope belt if the
wind is becoming
to weak to fly the
kite

5.1 Technical Specifications
Mass and dimensions :
- Total mass
- Flying mass
- Turbine diameter
- Kite size
- Length of the rope belt (between the
wind turbine and the generator)
Wind speeds :
- Starting wind speed
- Nominal wind speed (100W)
- Maximum wind speed
Operating temperature :
Battery capacity
≈4.5kg
≈0.8kg
1,10m
4 m²
≈70m (140m loop)
4,2 m/s (15 km/h)
8 m/s (29 km/h)
25 m/s (90 km/h)
-10°C à +40°C
80 Wh
2x USB outlet Type-A
Cigarette lighter outlet
12V/24V
Terminal block 12V/24V
Out
5V/1A
5V/2.1A
12V/8A or24V/5A
12V/8A or24V/5A
Power
100W in total
Charge type
Standard
Constant current
Constant voltage
Constant current
Constant voltage
7User Manual KiweeOne
WARNING : The electrical box can be
configured in 12V or 24V. Always
check the compatibility between your
equipments and the configuration of
your electrical box. Go to p18 for more
details.
INFORMATION : Your electrical
box is protected against short-
circuit.
5. Description
INFORMATION : The 12v and 24V
modes are actually 14V and 28V
(allows charging of lead
batteries).

5.2.a Wind turbine
5.2 Structure components
8User Manual KiweeOne
5.2.b Generator
Blade
Toothed
belt
Fin
Safety pin
rope belt
pulley
Rope
guide
Vane
Main
pulley
Manual Crank :
•On smooth side for
production
•On toothed side for
manual unwind/rewind
Reel
Locking tab
rope belt Anchor
hook

User Manual KiweeOne 9
5.2.c Safety line reel
Locking tab positions (servomotor)
100 m of coiled
safety line
Rewind : in this position a small stainless steel pin located inside the reel will come out and try to
hook the loop of the rope belt to allow the start of rewinding.
Production : in this mode, the rotation of the generator reel is free and allows unwinding, electricity
production and rewinding.
Lock : in this mode, the rotation of the reel and the generator is locked (storage).
The locking tab can be operated by hand when unwinding and rewinding manually. When these
operations are automatically controlled the tab will change its position automatically (servomotor).
This part is only used for
winding and storing the safety
line. It should not be used as a
hook or anchor for the safety
line when the rope belt is
deployed and tied to the kite.
Rewind Production Lock

Terminal
outlet –
(black)
Charging
socket
ON/OFF Button
Terminal
outlet +
(red)
Command Button
Cigarette
lighter
outlet
USB type A
outlet
Generator
port
LEDs
User Manual KiweeOne 10
LEDs: IMPORTANT :
The LEDs can light up in different
ways. The meaning of these
different signals are explained on
page 19 and 20.
5.2.d Electrical box
Green
Yellow
Red
The terminal block, cigarette lighter and USB sockets are the outputs of the box, to which
you can connect your suitable electrical equipments. The terminal block and cigarette
lighter outputs are configurable in 12V and 24V (factory setup 12V).
If a USB device is plugged in but the generator cables are not, the box functions as a
battery and will power your USB equipment. To do this, disconnect the control and power
connectors, connect your USB, switch on the box (keep ON for 3s). If nothing is connected
to USB, the electric box is shutting off after 30s.
The generator connectors are to be connected to the generator cables for the production
of electricity and the control of unwinding / rewinding in automatic mode. The ON / OFF
and COMMAND buttons are used to control the wind turbine. The electronic box
automatically manages electricity production by seeking the optimum production.
At first start, the electrical box must be paired to the generator. See p19 how to configure
it.

6.1.a Anchor point for the safety
line
Carefully chose your anchor, it must withstand the
pull of the kite even if the wind increases.
Some anchor examples :
–Tree stump
–Bag filled with sand or rocks
–Car roof rack
–Stick stuck in the ground
IMPORTANT : with a wind of 20
km/h, the kite will pull with an
equivalent force of 4kg on the
anchor. With a wind of 90 km/h,
the force will be equivalent to
20kg. We advice you to use an
anchor that can resist twice the
force exerted by the kite.
11User Manual KiweeOne
6.1 Kite launch
6.1.c Check
Make sure the kite is stable. In light wind, if pull is too
weak, or it swings from side to side, slack off the
safety line a bit to bring the kite up in altitude. In
strong wind, if the kite is too unstable, hang the kite
storage bag on the kite as a tail (see illustration
above *).
Safety line
Kite hanger
6. Using KiweeOne
It is recommended to familiarize yourself with launching KiweeOne in a flat, open area within a
radius of 50m. The kite is launched using the safety line.
6.1.b Deployment
Unfold your kite. Be careful to disentangle the lines
correctly. Tie your kite to the safety line with the
knot shown in the figure on the left.
You can then deploy your kite as follows:
WIND
Kite tail in
strong
wind *
Anchor

5a
4
4
1
6
1 : Blade
4 : M4x12mm
5 : M4x25mm
6 : Main pulley
5b
6.2 Assembly
6.2.a Setting up the wind
turbine
Blades fixation
•Remove the butterfly screws (4 and
5a) from the blades.
•Partially unscrew the butterfly
screws (5b) from the pulley (6).
•Insert the blades (1).
•Put back all the screws (4 and 5)
being careful with the lengths (screw
4 is the smallest).
•Tighten properly by hand (do not use
any tool).
12User Manual KiweeOne
IMPORTANT : Be careful to
insert the blades in the
right direction. Refer to the
engraving on the aluminum
plate.
Vane fixation
•Unscrew the butterfly nut (20).
•Insert the upper tube (21a).
•Insert the vane (8) on the hexagonal
column nut (14). The vane must be in
the same plane as the rope belt
pulley.
•Screw the butterfly nut (20).
•Insert the lower tube (21b).
IMPORTANT : Pay attention
to untangle the tensioner
(33) of the fin (32) and to
not cross them when
assembling the tubes.
8
20
21a
21b
14
8 : Vane
14 : M8 Hexagonal column nut
16 : rope belt pulley
20 : M8 butterfly nut
21 : Ø8mm tubes
ADVICE : The upper tube
(21a) is the one with a
twisted screw at its end.

50cm
User Manual KiweeOne 13
INFORMATION :
Once fitted, the lower tube (21b) blocks the butterfly nut (20), which prevents
it from unscrewing.
21a
21b
33
32
16
8 8 : Vane
16 : rope belt pulley
21 : Ø8mm tubes
32 : Fin
33 : Tensioner
Find a anchor for the generator. It can
be the same support as the safety line.
However, it must meet the same
resistance requirements (see page 11).
Be careful to respect horizontal and
vertical clearance.
6.2.b Generator anchoring
70cm
IMPORTANT :
During occasional use and
with steady wind, provide an
horizontal clearance of 180°.
During continuous use and/or
with a wind changing
direction, provide an
horizontal clearance of 360°.

User Manual KiweeOne 14
6.2.d Setting up the rope belt on the
wind turbine
IMPORTANT : The upper
strand on the generator
must be placed on the upper
side of the rope belt pulley.
IMPORTANT : The safety pin
must separate both strands
of the rope belt.
•Unlock the locking tab (28) (Production position),
see positions p9.
•Unreel by hand about 1m of the rope belt (100)
•Lock back the locking tab (Lock position)
•Remove the safety pin (37)
•Pass the loop between the guides (12), and behind
the rope belt pulley (16)
•Put back the safety pin.
100
16
28
12 : Rope guides
16 : rope belt pulley
28 : Locking tab
37 : Safety pin
100 : rope belt
Ending
position
Starting
position
37
12
6.2.c Check-list
Before proceeding further, take the time to check the
correct tightening of all screws.
Check the position of the toothed belt. It must be
positioned as shown in the right image.
The toothed side is positioned on the toothed pulleys and
the smooth side on the two small pulleys.

User Manual KiweeOne 15
6.2.e Linking the wind turbine to the safety line
•Attach the omega (130) located at the top of the vane to the safety line (96). The distance between the
kite and the wind turbine is thus to be defined by you according to the wind conditions. We recommend 10
to 30m in small wind, and 2 to 10m in strong wind.
96
130
96 : Safety line
130 : Omega
x3
•Pass the safety line through the distance screw (45) located at the end of the fin (32) in order to guide
its trajectory and prevent it from being entangled with the blades.
96
45
32
32 : Fin
45 : Spacing screw
96 : Safety line
6.3 Wind turbine manual launch
The KiweeOne can be deployed semi-automatically or manually. The semi-auto mode is preferred
when internal battery level is sufficient. Manual mode requires unwinding the entire rope belt using
the manual crank.
The semi-automatic mode is described in the section “How to use the electrical box” p19.
The following section describes the unwinding process of the rope belt in manual mode.

User Manual KiweeOne 16
ADVICE : In light wind, several tries
might be needed. Adjust your
strength : the weaker the wind, the
slowest the blades should rotate.
Manually starting the rotation of
the blades
•Check that the locking tab is on the
Production position and that the
reel is rotating freely.
•Grab the rope belt upper strand
near to the generator.
•Pull in the direction of the wind
turbine. If the wind is strong enough,
the rotation of the blades will be
maintained.
IMPORTANT : Pay attention to your
safety line : if it does not have
enough length, lock back the
locking tab, let go some length on
the safety line and then restart
unreeling the rope belt.
Manually unreeling the rope belt
•Install the crank, handle downward,
on the toothed flange side.
•Block the crank with your forearm,
then unlock the locking tab
(Production position) as shown on
figure 2.
•Unreel by turning the crank
clockwise
•Once the rope belt is fully reeled out,
put the crank back on the smooth
flange side (allows the generator to
be balanced during production mode).
WARNING: Once the locking tab is
on the Production position, the
traction force from the kite will
make the reel and the crank rotate
quickly. Be careful to always
control the rotation of the crank, to
prevent injuries.
Figure 2 :
Setting up the locking tab in Production
mode (middle)
Figure 1 :
Positioning the
crank for unwinding

Direction of
rotation of
the crank for
rewinding
IMPORTANT :
The marked icon
indicates the direction
of rotation of the reel
during rewinding
Reeling in
Method 1 (small wind/ reduced clearance)
•Once the blades are stopped, put the locking tab (28) on
the Rewind position .
•Install the crank on the toothed flange side.
•Turn the crank anticlockwise a dozen times. Check if the
loop has started to reel in.
•Put the locking tab on the Production position , then
continue reeling in until there is about 1m of belt left.
•Put the tab in Lock position .
•Reel in the safety line and anchor it in a way that the
rope belt is totally loose.
•You can now unhook the wind turbine and proceed to its
storage.
Manually stopping the blade’s rotation
You can stop the blades easily by pulling on the safety line until the rope belt is slack. This will
turn the blades off the wind and stop them.
17User Manual KiweeOne
6.4 Bringing back KiweeOne
The KiweeOne can be brought back automatically, semi-automatically or manually. Auto and semi-
auto modes are only possible in moderate wind. The automatic mode allows KiweeOne to detect a
decrease in wind force and rewind the rope belt without any user action. The wind turbine and the
kite will then land close to the generator.
The semi-automatic mode allows you to start the reeling procedure using a button on the electrical
box on demand (button). Manual reeling should be used when the other modes are not possible
(KiweeOne battery too low or wind too strong to be handle by the generator).
Method 2 (strong wind/ high clearance) when method 1 is not
possible or dangerous
•Once the blades are stopped, put the locking tab in Lock
position .
•Go up along the rope belt, bringing it toward the ground as you
go (by hand or by sliding a smooth object along the belt). The
goal is to lower and bring down the whole rope belt and the
kite.
•Once arrived at the wind turbine, fold the kite down.
•Unhook the wind turbine and proceed to its storage. Reel in
the rope belt with the crank. Reel in the safety line.

User Manual KiweeOne 18
6.5.c Setting the output voltage
6.5 Using the electricity
6.5.a Connections
WARNING : KiweeOne will
NOT check the device if it is
not a battery. Plugging a
12V device while the box is
on 24V will damage the
device.
The terminal block and the
cigarette lighter outlet
work in parallel. Once a
device is powered by one of
these two outlets, security
is turned off on the second
one. This can create a risk
in the case of a bad
connection.
6.5.b Internal battery charge rate
KiweeOne smartly manages the charge rate of it’s internal
battery in order to keep enough energy for automatic reel
out and reel in. :
•Under 40%, the cigarette lighter outlet and the
terminal block are turned off.
•Under 30%, all outlets are turned off.
The battery charges when the wind turbine is operating. You
can also charge with the charge socket using a 10S 42V/2A
charger and Jack 5.5*2.1 connector (not provided with the
KiweeOne).
Connection types available on the box are described p7.
KiweeOne automatically detects when a device is plugged on
one of its outlets. The electronic box then checks if it is
possible to power the device. KiweeOne will NOT power the
device :
•If the device is a 12V Battery and the box is set on 24V
mode.
•If the device is a 24V Battery and the box is set on 12V
mode.
•If the device is a battery and was plugged on the
wrong polarity (only on the terminal block and the
cigarette lighter outlet).
WARNING:
Stay alert and always
check by yourself the
compatibility before
plugging in your devices.
Factory setup of the electrical box is 12V. To set
it to 24V, open the box (4 cruciform screws) and
move the connector circled in the left picture to
the position shown below. Kitewinder is not
responsible for any damage made to your
equipment as a result of improper handling .
+12V +24V +12V +24V
Connector in
12V Mode
Connector in
24V Mode

The electrical box enables the rope belt to be unwound automatically and thus deploy the wind
turbine at altitude. It then manages the launching of the blades and the electrical production.
These actions are triggered by pressing buttons on the box. The repatriation of the wind turbine
can be done automatically below a certain critical wind threshold or manually on demand.
Button : - a long press (3s) turns on the unit.
- If there is problem when operating KiweeOne, press this button 10s to force a
shutdown.
- Directly after turning on the unit, a short press switches to “Controlled Rewinding”
mode.
Button : - a long press (3s) on this button takes you to the next operating step. To go from
one step to another, the system requires a double validation.
Steps : ON > Unwind > Launch wind turbine > Production mode > Stop production
> Rewind
- Once the unwinding step has been passed, a short press starts/stops the
propeller.
- In “Controlled Rewinding”mode, pressing this button will rewind until you release it.
The green, orange and red LEDs give the following information : off state, on state, phase in execution,
execution failure, awaiting double validation, full battery.
The sticker on the electrical box summarizes the color codes associated with this information. The
detailed use of the electrical box can be found on p20 (function block diagram). We recommend that you
familiarize yourself with this diagram before using your KiweeOne.
The LEDs also make it possible to know the state of charge of the internal battery, the total power
produced by the wind turbine and the power consumed by the electrical outputs of the box. Every
minute, the following sequence giving this information will start automatically. After initialization, the
number of flashes must be added.
6.6 How to use the electrical box
User Manual KiweeOne 19
Initialize the sequence of the charge rate (internal battery)
Indicates 50% charge
Indicates 10% charge
Initialize the produced power sequence
Indicates a power level of 50W
Indicates a power level of 10W
Initialize the consumed power sequence
Indicates a power consumption of 50%
+
+
+
When going through certain stages, the locking pin will change position, the generator will rotate,
the blades will start at high speed, be careful with your hands !
Example of battery charge level :
Initialization
: 1 Tinkling 50 %
3 Tinkling 10%
50 + 10 + 10 +10 = 80
The battery is 80% charged
LEDs:
Green
Yellow
Red
States OFF ON steady Blinking
Pairing the generator : the generator must be paired to the electrical box. At first start up, it is
necessary to configure it. Switch on the unit : long press ON and then make a long press on both
buttons simultaneously. The generator runs at low speed for a minute, help the thread to unwind
properly (1 meter). It then turn off automatically. At next power on the generator is paired to the
electrical box.

If the propeller is turning
(manually started)
User Manual KiweeOne 20
Production
mode
Unwinding validation request
Unwinding
Launching the
propeller
Battery full, electricity
production is paused,
it will resume
automatically when
the battery has been
used a little by your
electrical devices
connected to the box.
Stopping electricity production and blades‘s rotation
Rewind validation request
Long press
ON
Long press
If the rope belt is already
unwound, allows to skip
the unwinding
Production
mode
Wind strong
enough
Wind too weak
Short press
Rewinding
Or wind becoming
too weak
Inclinometer
detection
OFF
Mode USB charger
if the battery > 50%
Notes :
When the box is turned on, it
can be turned off at any time
with Long Press 10s .
When requesting validation,
you can go back to the
previous step by Short Press
If inaction for 10s during a
validation request > previous
step.
Excluding production mode,
inaction for 5min > power off.
Symbols:
LEDs:
Green
Yellow
Red
States OFF
ON steady
Blinking
Chaser
Check visually that
the unwinding is good
Long press
Switching to
production mode not
possible
Short press
Long press
Long press
Short press
Long press
Long press
Auto
Auto
Auto
Auto If power and command cables are not
connected and USB is connected
If nothing is
connected , battery
level info then OFF
Function Block Diagram
Long press
OFF
Controlled Rewinding mode
Keep pressing
to rewind
Short Press
Auto
Short Press
Table of contents