manuals.online logo
Brands
  1. Home
  2. •
  3. Brands
  4. •
  5. KLARITY
  6. •
  7. Medical Equipment
  8. •
  9. KLARITY BiteLok User manual

KLARITY BiteLok User manual

!
To be used by a qualified medical professional
IFU Form: A101-06 8/19/20
*Patent Pending
!
Klarity BiteLok®*
INSTRUCTIONS FOR USE
GENERAL INFORMATION
The Klarity BiteLok® is a one-per-patient medical device used with a
thermoplastic mask as an aid for positioning the teeth and tongue for
radiation therapy treatment.
PRODUCT DESCRIPTION
The Klarity BiteLok is an innovative design for simple positioning of the
teeth and tongue. The BiteLok and its optional attachments can be
easily removed from the mask for cleaning. The general size of the
BiteLok allows it to fit various mouth sizes and offers an open airway for
optimal patient comfort. The BiteLok is custom molded to the patient’s
dental anatomy as well as the thermoplastic mask, allowing for accurate
reproducibility.
MAINTENANCE AND DISPOSAL
The Klarity BiteLok must be stored in a dry, clean place at temperatures
between 50°F (10°C) and 95°F (35°C) and can be disposed of with
normal facility waste.
PARTS INCLUDED
Klarity
BiteLok®
RNB-100 Klarity BiteLok® Kit
Kit Includes
BiteLok® Mouthpiece
Two-Part Dental Putty (2 Packets)
QuickFit™ Tool
Long and Short Tongue Depressors
Right and Left Tongue Diverters
Tongue Device Removal Tool
Quick Instruction Card
INSTRUCTIONS FOR USE
Determine Placement of the BiteLok:
1.
Place the BiteLok mouthpiece in the patient’s mouth. *The
mouthpiece alone is not directional until putty has been
formed by the patient’s dental impression.
2.
If using one of the optional tongue depressors or diverters,
insert the device into the BiteLok and test for desired
length and placement.
*The depressors and diverters are directional and are
marked to show which side goes “up” or “down”.
Mixing and Forming the Putty:
3.
Before mixing the putty, you have the option to remove the
tongue depressor or diverter from the BiteLok using the
included tongue device removal tool.
*This will allow a better impression of the teeth into the
putty. If you choose to leave the tongue accessory intact,
please be aware that the patient could cause the device
to wiggle with their tongue, which could affect the
impression in the putty made by the teeth.
4.
Tear or cut the putty pouch and squeeze out the contents
of both packets. Mix the two-part putty together thoroughly
for 15-20 seconds. Roll the putty into a two-inch long
cylinder. Pinch off a small amount of putty and set it aside
(about 0.5cm) (See step 3c).
5.
Wrap the entire cylinder of putty around the “BITE” area of
the BiteLok mouthpiece. Press the putty gently, but firmly,
around the “Bite” area to ensure it will fill the bite region
indentations.
Making the Impression:
6.
While the putty is still soft, have patient gently bite into the
putty until it hardens (about 2 minutes).
7.
Instruct the patient to bite down with a “natural” bite,
which will help relieve jaw fatigue during treatment.
Tongue depressor inserting
into the BiteLok
Putty wrapping around the BiteLok
Klarity Medical & Equipment (GZ) Co., Ltd
www.klarity-medical.com
T: 86-20-8222 6380
F: 86-20-8208 8552
E:sales@klarity-medical.com
T: 86-20-8222 6380
F: 86-20-8208 8552
E: sales@klarity-medical.com
!
To be used by a qualified medical professional
IFU Form: A101-06 8/19/20
*Patent Pending
!
8.
Periodically check the 0.5cm piece you set aside earlier
for firmness. This will help determine when the putty has
fully set up.
9.
Once the putty has set, verify that the hardened putty is
fully secured to the BiteLok mouthpiece.
*If putty starts to harden before the impression was
made, the putty may not fully secure to the mouthpiece.
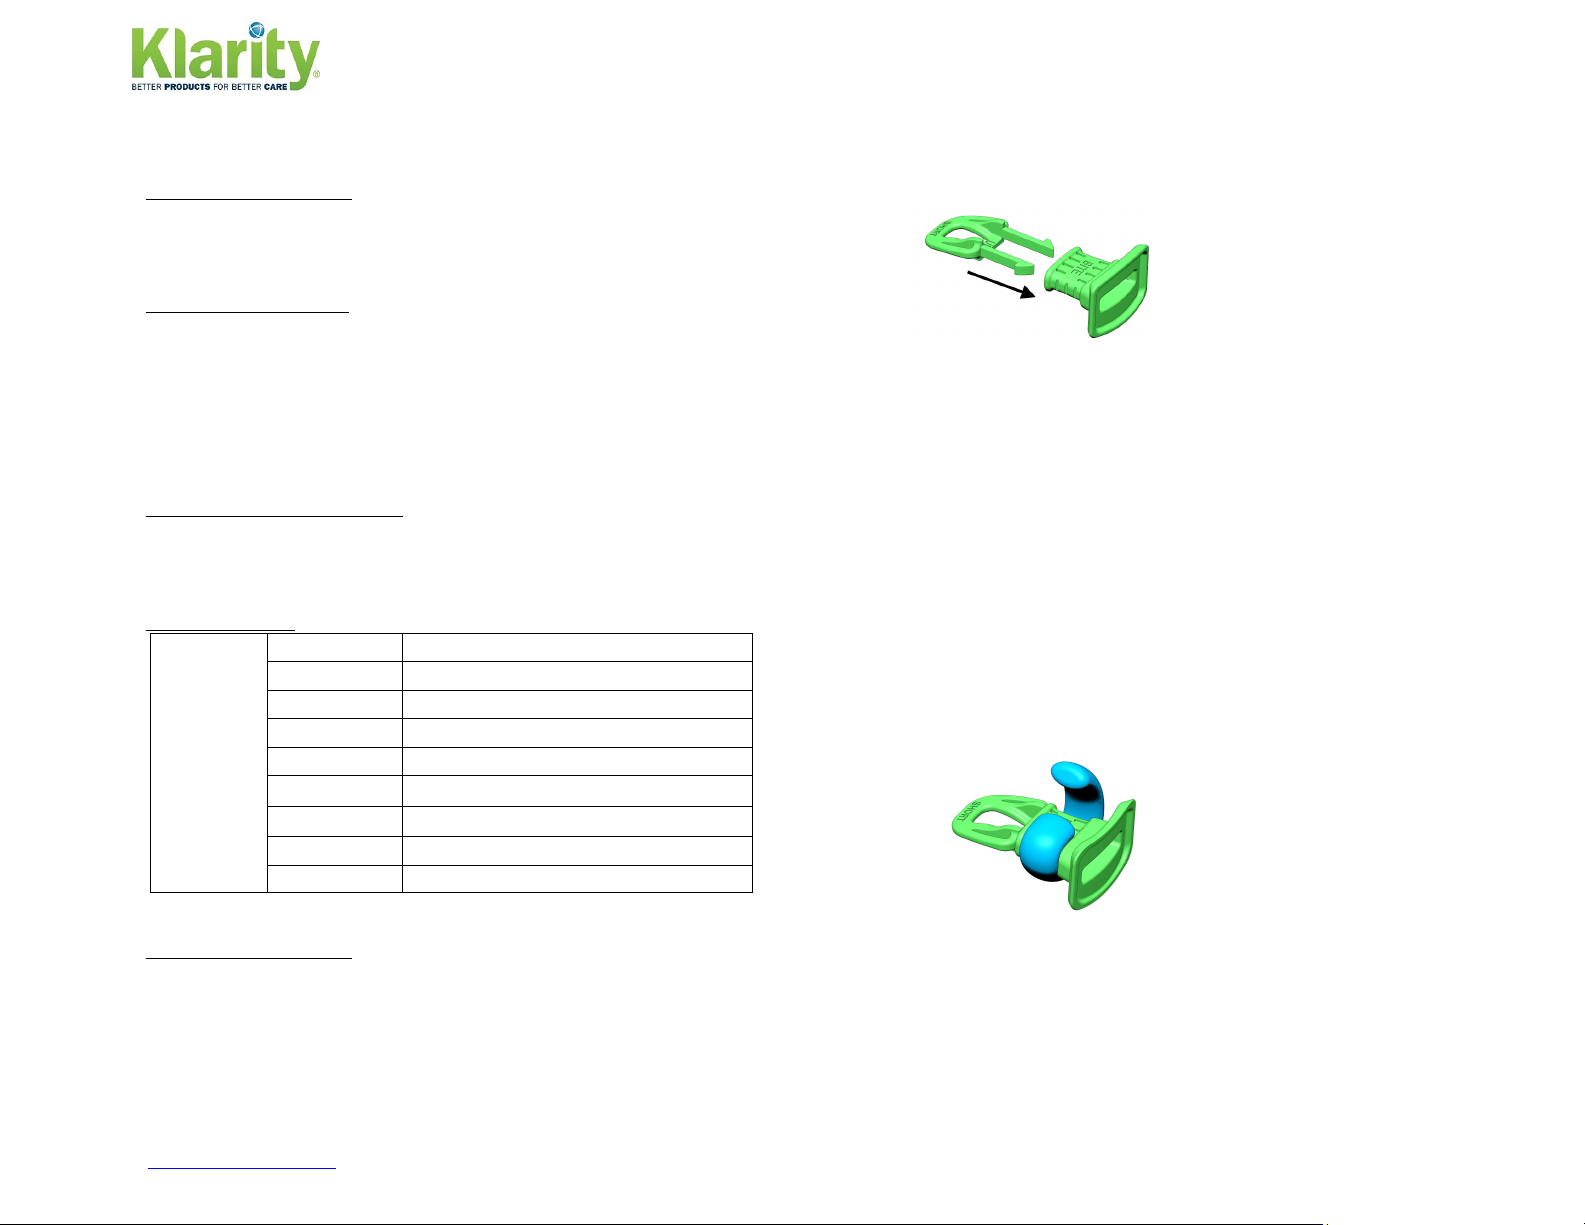
10.
If an optional tongue depressor or diverter is being used,
insert it back into the BiteLok before making the mask and
double check the attachment to ensure it is facing the
correct direction.
11.
Re-insert the BiteLok into the patient’s mouth.
Forming the Mask over the BiteLok:
12.
Form the mask according to the manufacturer’s
instructions, placing the mask over the BiteLok.
13.
While the mask is still warm, the QuickFit tool can be used
for hands free indexing. Pinch the two QuickFit tool
handles together, place the QuickFix™ tool over the
BiteLok, and release. The QuickFit Tool will secure the
mask over the BiteLok. Allow mask to fully cool.
14.
Keep the QuickFit tool, mask, and BiteLok attached
together as you remove the mask from the patient. It is
recommended to leave the BiteLok indexed within the
mask with the QuickFit tool attached for 12 hours. This will
allow the mask to finish shrinking around the BiteLok for
better re-indexing.
15.
After 12 hours have passed, remove the QuickFit tool from
the mask by pinching the two handles together and
detaching from the mask.
The BiteLok will remain
indexed within the mask
until removed.
Removing the BiteLok from the Mask:
16.
The BiteLok can be removed from the mask for easy
cleaning. Once the mask is fully cured, hold onto the
BiteLok with one hand. With your other hand, press on the
outside of the mask at the corner of the BiteLok and push
the BiteLok in on one side. This will allow the BiteLok to
release from the mask. *Take care not to hold it by the
putty or tongue depressor/diverter.
Cleaning the BiteLok:
17.
Once removed from the mask, the BiteLok can be rinsed
with water and cleaned with an antiseptic product such as
mouthwash. Once clean, press the BiteLok back into the
mask.
Extra Strong Thermoplastics and the Klarity BiteLok:
18.
Form the upper mask according to the manufacturer’s
instructions, placing the mask over the BiteLok.
19.
When using a strong thermoplastic mask, there are 2
options for using the QuickFit tool.
a.
Option 1 - While the mask is still warm, pinch the
two QuickFit tool handles together, place the
QuickFit tool over the BiteLok and release. Allow
mask to fully cool.
Please note: When using the BiteLok
with stronger thermoplastic masks, take extra care when
removing the mask. You may not be able to remove the
BiteLok from the mask.
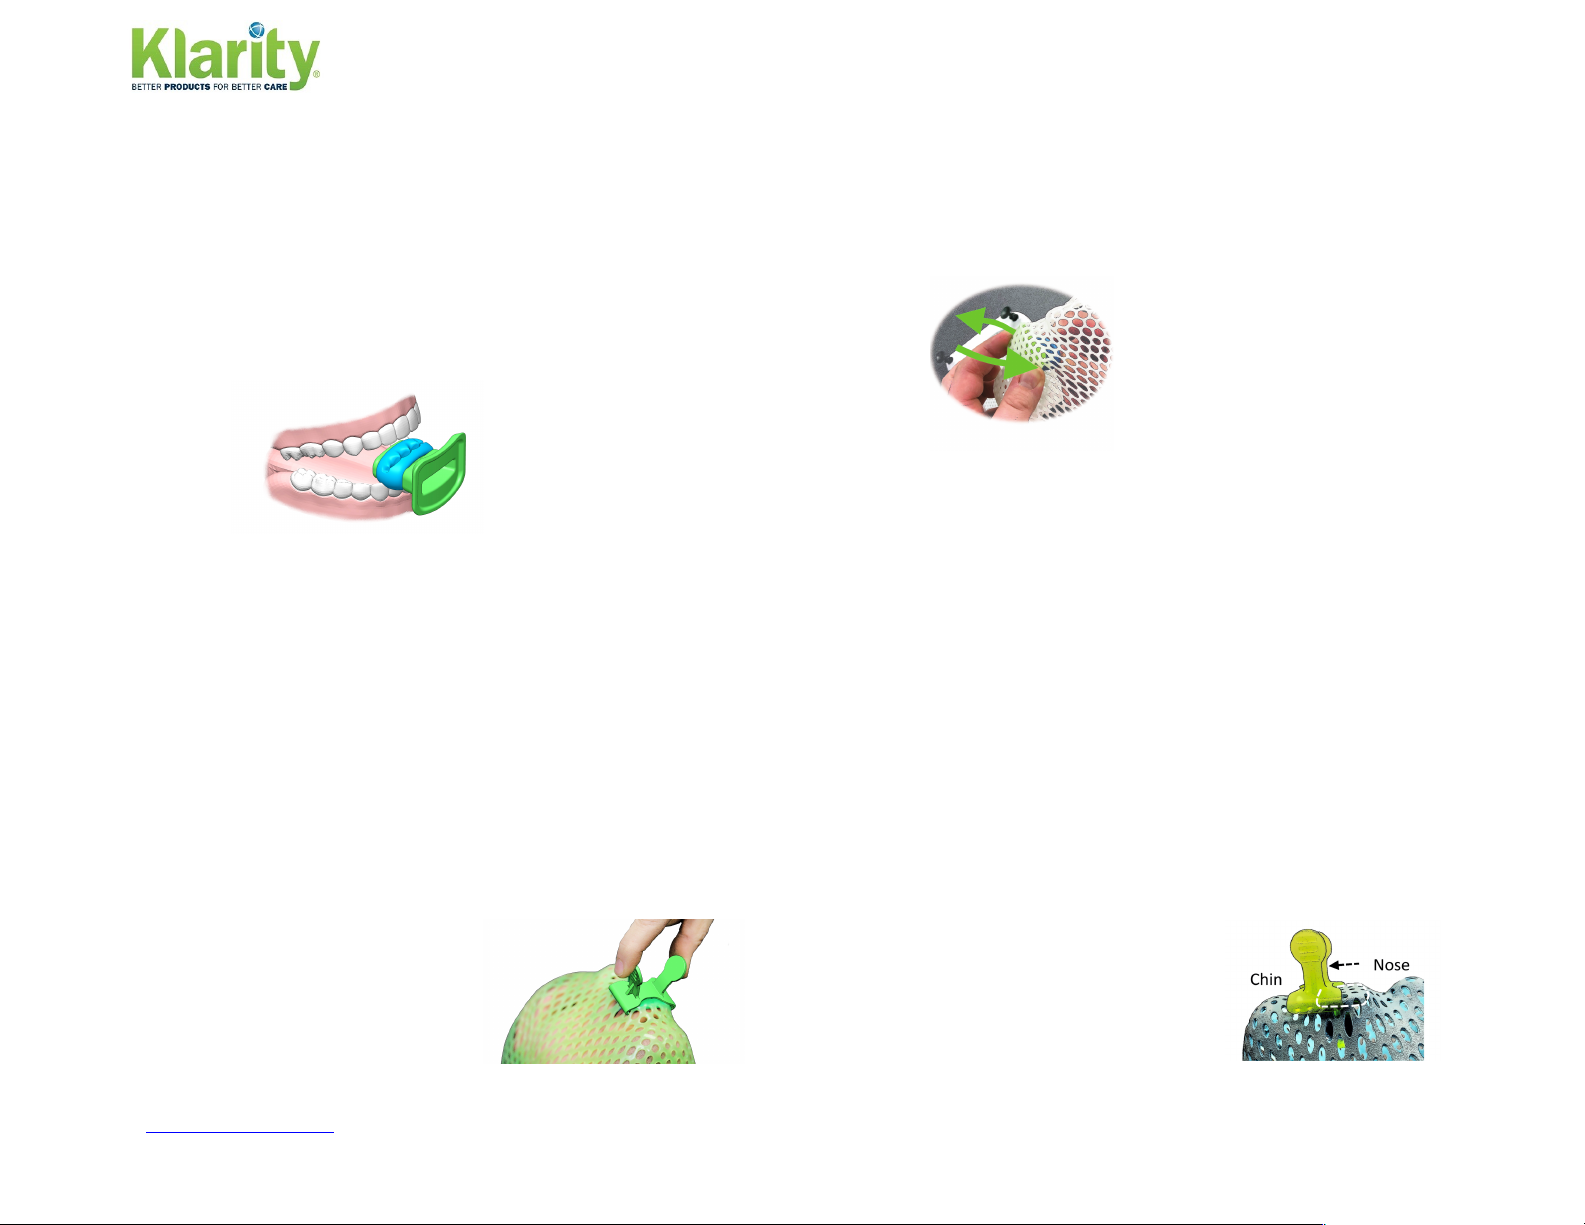
b.
Option 2 – While the mask is still warm, pinch the
two handles together and align the QuickFit tool
with the lower part of the BiteLok mouthpiece,
toward the chin. You will only lock in the bottom
half of the Bitelok. This
will still allow you to re-
index the BiteLok to
the mask, while still
being able to remove it
for cleaning.
BiteLok indexed to
teeth
QuickFit tool on top
of mask
Removing BiteLok
from mask
Klarity Medical & Equipment (GZ) Co., Ltd
www.klarity-medical.com

Other KLARITY Medical Equipment manuals

KLARITY Supine Breast System User manual

KLARITY

KLARITY Supine Breast System User manual

KLARITY SBRT System User manual

KLARITY

KLARITY SBRT System User manual

KLARITY BiteLok User manual

KLARITY

KLARITY BiteLok User manual

Popular Medical Equipment manuals by other brands

Arjo Evenda EV-ACC12 Accessories Instructions

Arjo

Arjo Evenda EV-ACC12 Accessories Instructions

Malem MO7 manual

Malem

Malem MO7 manual

Dräger BiliLux Instructions for use

Dräger

Dräger BiliLux Instructions for use

Gaymar MEDI-THERM II Service manual

Gaymar

Gaymar MEDI-THERM II Service manual

KaVo KEY Laser III 1243 Instructions for use

KaVo

KaVo KEY Laser III 1243 Instructions for use

Riester ri-fox N quick start guide

Riester

Riester ri-fox N quick start guide

Mindray BeneView T1 Service manual

Mindray

Mindray BeneView T1 Service manual

PMD RespiraSense RS Device Instructions for use

PMD

PMD RespiraSense RS Device Instructions for use

Zeiss Cinemizer user guide

Zeiss

Zeiss Cinemizer user guide

GERATHERM Spirostik Complete user manual

GERATHERM

GERATHERM Spirostik Complete user manual

TensCare QALM user manual

TensCare

TensCare QALM user manual

bpr Firesafe Instructions for use

bpr

bpr Firesafe Instructions for use

Ohio Medical MiniOX 3000 operating manual

Ohio Medical

Ohio Medical MiniOX 3000 operating manual

Meyra-Ortopedia AS-Basic Medical MY275101 manual

Meyra-Ortopedia

Meyra-Ortopedia AS-Basic Medical MY275101 manual

Dr. Senst YK-80B user manual

Dr. Senst

Dr. Senst YK-80B user manual

Pari bubbles the fish ii Instructions for use

Pari

Pari bubbles the fish ii Instructions for use

Schiller AT-101 user guide

Schiller

Schiller AT-101 user guide

BMC G2S BPAP Series user manual

BMC

BMC G2S BPAP Series user manual

manuals.online logo
manuals.online logoBrands
  • About & Mission
  • Contact us
  • Privacy Policy
  • Terms and Conditions

Copyright 2025 Manuals.Online. All Rights Reserved.