KLAUDIO KD-CLN-LP200T User manual

English v1.0
TM
KD-CLN-LP200T
Ultrasonic Vinyl Record Cleaner
User’s Manual

ii
User Manual
User Manuals are updated regularly. Please be sure to check our support page for a newer
version of this guide: www.klaudio.com
GENERAL PRECAUTION
Please read this manual carefully before using your Klaudio product.
!WARNING:Indicates a potentially hazardous situation which, if not avoided,
could result in personal injury or be life-threatening.
!CAUTION:Indicates a potentially hazardous situation which, if not avoided,
may result in damage to equipment or property.
PROHIBITED:Indicates a prohibited action.
ABOUT SIGNS
Throughout this document, critical information is highlighted in gray-colored boxes. The
following symbols are intended to help prevent any situation which may cause personal
injury and/or damage to equipment:
TRADEMARKS
The Klaudio name and logo are trademarks or registered trademarks of Koolance, Inc.
Other company and product names used in this publication are for identication purposes
only and may be trademarks or registered trademarks of their respective companies.
COPYRIGHT
All rights reserved. Copyright (C) Klaudio.
CONTACT INFORMATION
Web: www.klaudio.com
Address: 2840 W Valley Hwy N, Auburn, WA 98001
Phone: +01 253-249-7813

iii
CAUTION: Keep this product level whenever in operation.
If the product is tilted, water may spill onto and damage the
electronics.
!
Do not tilt or move while operating!
Keep unit level whenever water is inside. Always drain water
from the cleaner completely before transporting.
CAUTION: Before power-
ing-on the system, the “AC
POWER SELECT” switch
must be set for your local
voltage. The incorrect setting
can damage the product and
is not covered by the product
warranty.
!

iv
User Manual
- 6mm ID Plastic Tubing
- 10mm ID Plastic Tubing
- 13mm ID Plastic Tubing
- External Pump
- Water Filter Assembly
- Bracket, Tube Fittings, and Attachment Strap for Filter
- Reservoir
- User Manual
- AC Power Cable (U.S. plug)
Included Hardware
at-head screw driver
Required Tools
During installation, you may need the following tools:

v
Table of Contents
Overview 1
Product Diagram ............................................................................................. 2
Features.......................................................................................................... 3
Setup 4
Voltage Conguration...................................................................................... 5
Water Sources ................................................................................................ 5
Reservoir, Filter, and Pump Installation .......................................................... 6
Optional Cooling Unit .................................................................................... 11
Connecting the Power Cable ........................................................................ 12
Adjusting Washing and Drying Settings ........................................................ 12
Understanding the LED Progress Bar........................................................... 13
Operation 14
Loading a Record.......................................................................................... 15
Troubleshooting ............................................................................................ 16
Limited Warranty ........................................................................................... 17

1
User Manual
Chapter 1
Overview

2
Product Diagram
Power Output for
Pump or Tap Water Kit
Auxillary Power Outputs
AC Plug and
Voltage Switch
Outlet and Inlet
Water Lines
Overview
Power Switch Display Panel
Velcro Strap
Filter Pads and Bracket
Filter Core
Filter Fittings
Power Cable
6mm ID
Tubing
Pump
Reservoir
Filter Body
Filter Lid
10mm ID
Tubing
13mm ID
Tubing

3
User Manual
Features
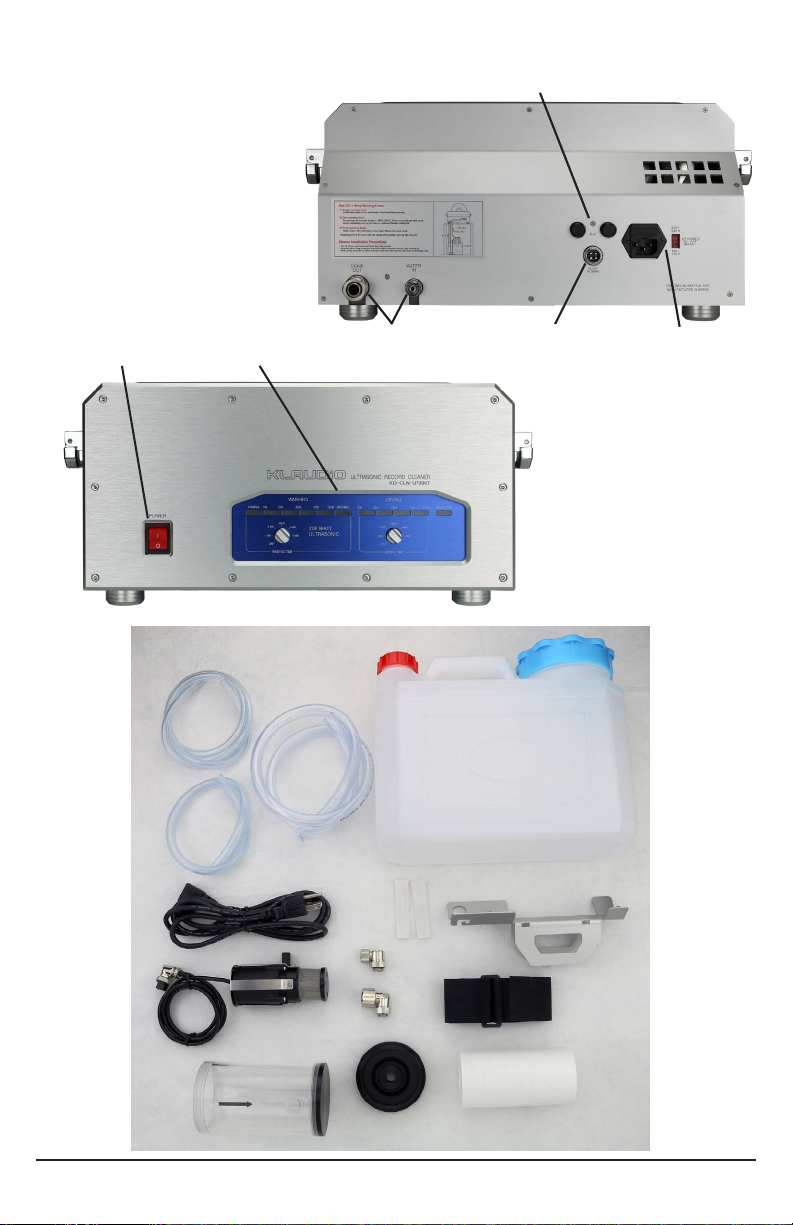
Enjoy your vinyl records as if they were new again! Klaudio’s KD-CLN-LP200T brings
an unrivaled 200 Watts of ultrasonic cleaning power to your LP collection. Using
patent-pending technology, the toughest grime and dust is easily removed without
the risk of physical scrubbers or need for detergent. Drying is also handled safely
with blowers. Simply connect an external water source and insert your phonograph
record-- the rest is automated.
Ultrasonic transducers are placed perpendicular to the disc for maximum cleaning
eect. Klaudio’s technology allows powerful waves to remove debris without dam-
aging the disc. The entire washing and drying process can be adjusted from 2 to 10
minutes. Cleaning status is conveniently displayed through an LED progress bar.
• 200W total ultrasonic cleaning power
• Compatible with 296-304mm (11.65-12in) diameter LP vinyl records
(7in and 10in with separate adapters)
• Two auxiliary power outputs for Klaudio accessories
• Risk-free cleaning and drying without physical surface contact
• No scrubbing or drying rollers to replace
• Designed for use without detergents, use only tap or bottled drinking
water)
• Adjustable washing time: 0-5 minutes
• Adjustable drying time: 0-5 minutes
• Wash + dry, wash-only, and dry-only modes
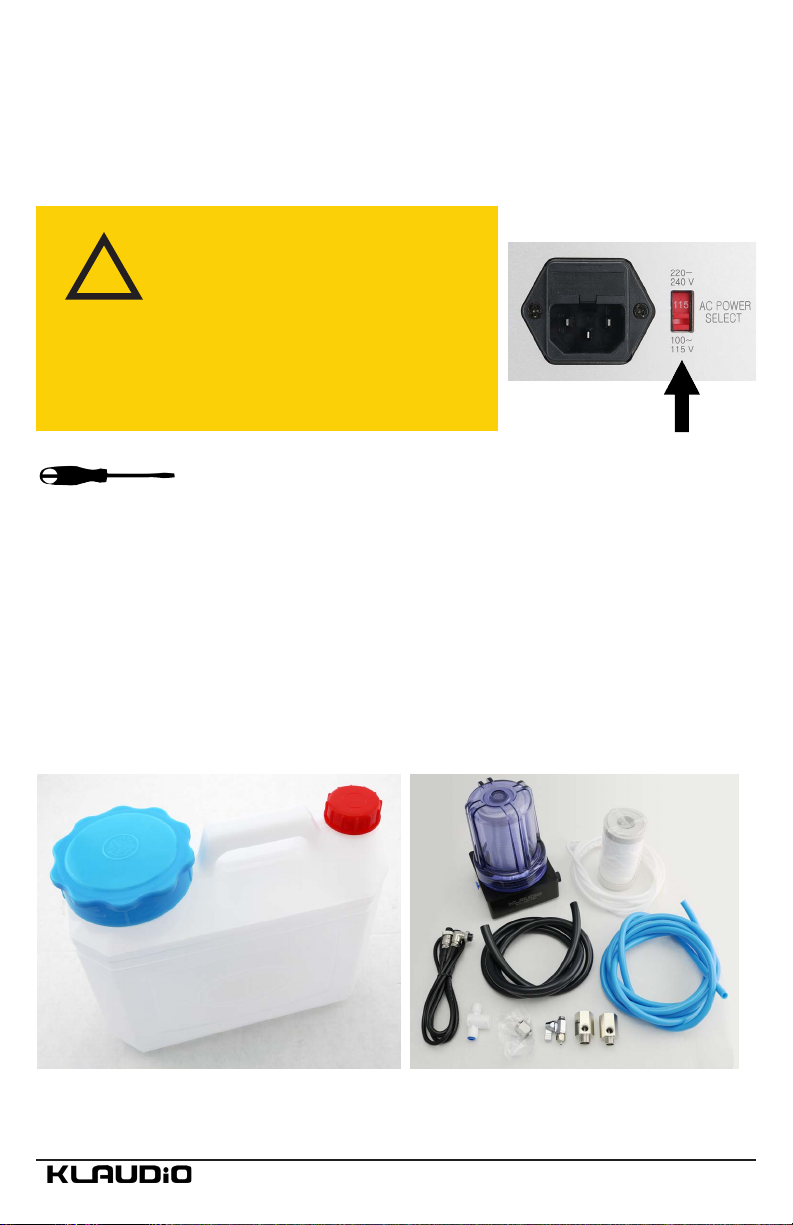
• 115V (60Hz) and 230V (50Hz) AC compatible
• 1-year warranty

4
Chapter 2
Setup
Setup

5
User Manual
CAUTION: Before power-
ing-on the system, the “AC
POWER SELECT” switch
must be set for your local
voltage. The incorrect setting
can damage the product and
is not covered by the product
warranty.
!
Before powering-on the system, the “AC Power Select” voltage switch must be set
for your local voltage.
Voltage Conguration
On the rear of the unit, use a small at-head screwdriver to adjust the AC voltage
switch (115V/60Hz or 230V/50Hz). The incorrect setting can permanently damage
the electronics. This condition is not covered by the product warranty.
Water Sources
KD-CLN-LP200T requires an external source of water for the cleaning process.
There are two options: a container lled with tap or bottled drinking water, or a direct
plumbing connection (requires optional tap water kit).
Option #1 - Reservoir Container
(Included)
Option #2 - Tap Water Kit
(Sold Separately)

6
Reservoir, Filter, and Pump Installation
The LP cleaner must be located above its reservoir. It is recommended to place the
cleaner on a table with the reservoir on the oor below.
Setup

7
User Manual
To extend the period between water changes, Klaudio includes lter core model
KD-FLT-KIT01. This allows about 500 discs per water change. The core should be
changed approximately every year, whether or not the cleaner is used.
Install a lter core and screw the
lter lid into the housing.
Install both tube ttings into the lter assembly.
Hand-tighten ttings to avoid damaging the lter
assembly threads.
The larger elbow tting is placed on the lid cap (inlet).
The smaller elbow tting is placed on the side of the
lter body (outlet).
The LP cleaner comes with three sizes of tubing:
6mm ID (small), 10mm ID (medium), and 13mm
ID (large).
Attach the 6mm tubing to the smaller elbow tting
on the lter body, and tighten the compression nut.
Attach the 10mm tubing to the larger elbow tting
on the lter body, and tighten the compression nut.
Attach the opposite end
of the 10mm tubing to the
pump’s outlet barb.

8Setup
Carefully place the pump into the reservoir so
that it rests at the bottom.
Attach one end of the 13mm tubing to the “Drain
Out” connection on the cleaner, and tighten the
compression nut. This is the drain line.
Attach the available end of the 6mm tubing from
the lter to the “Water In” connection on the
cleaner. Tighten the compression nut.
Connect the pump cable to the “Pump Power” plug on
the rear of the LP cleaner.
Peel the adhesive paper backing from
the lter bracket pads. Apply them to
the bracket in the locations shown in
the photo.

9
User Manual
Slide the lter bracket over the reservoir
handle.
Place the lter assembly onto
the bracket, with the larger
lter inlet above the reservoir
opening.
Use the velcro strap to secure
the lter assembly and bracket
to the reservoir handle.
Drop the 13mm drain line
tubing from the cleaner into
the reservoir.

10 Setup
Fill the reservoir with tap or bottled drinking
water to about 75-90%. Do not completely ll.
Distilled water is not recommended, because
the electrical conductivity may be too low for the
cleaner to begin the wash cycle.
Do not add chemicals, soap, or biocides to the
water. These may react with materials used in the
construction of the record cleaner, or may cause
a malfunction.
There is a large notch in the lter
bracket to help hold the drain line
tube at the proper height (above
water level).
The smaller notch on the other
bracket arm is for retaining the
pump electrical cord.
The 13mm drain line coming from the cleaner
should be as straight and short as possible,
with no elevated sections (only descending).
If necessary, the drain tube can be cut with
scissors to achieve this.
For proper draining, the drain line must also
terminate above the water’s surface within
the reservoir. Do not allow the end of the
drain line to be submerged.
Pump Outlet
Tubing
(to Filter)
Drain
Tubing
Power
Wire
Pump

11
User Manual
Optional Cooling Unit
For heavier usage, Klaudio oers an optional
cooling kit (sold separately) to help reduce
water temperature.
If using the cooling kit, place its pump into
the reservoir alongside the cleaner’s pump.
Plug the power adapter into a wall outlet and
connect the small barrel plug to the cooling unit.
The cooling unit will run automatically whenever the
water temperature reaches 35°C. To check that it is
functioning, hold the “Test” button to hear the fan and
pump operating.
Locate the cooling unit on the oor next to the reservoir.

12
Adjusting Washing and Drying Settings
Connecting the Power Cable
Once the reservoir is lled with water, connect
the main AC power cable to the back of the unit.
Plug the pronged end into an AC outlet.
Turn on the main front power switch. It will illuminate
when switched on.
“WASHING TIME” adjusts the ultrasonic washing time
from 1-5 minutes. Longer cleaning times are intended
for especially dicult-to-clean records. It is suggested to
start with a short time period and increase if needed. If
only drying is desired, select “OFF”.
“DRYING TIME” adjusts the air blower drying time from
1-5 minutes. This setting depends on room temperature
and humidity. If only washing is desired, select “OFF”.
Congure the setting knobs as desired. This can be done at any time before or
during the cleaning operation.
Setup

13
User Manual
Understanding the LED Progress Bar
The LED display bar will show the current status and cleaning progress.
PRIMING
The pump is lling the wash basin from the reservoir.
Washing Cycle
0% 25% 50% 75% 100% Indicates the current washing
progress based on the preset
time.
DRAINING
The wash basin is emptying back into the reservoir.
Drying Cycle
0% 25% 50% 75% 100% Indicates the current drying
progress based on the preset
time.
Once nished, the “Completed” green LED will illuminate. The
system will also emit an audio chime. Remove the disc and insert
another to restart the cleaning cycle.
COMPLETED
If the priming light blinks red, it indicates an operational error.
Please see the “Troubleshooting” section for details.
PRIMING

14
Chapter 3
Operation
Operation

15
User Manual
Loading a Record
After initial setup and conguration, there’s only one step to operation. Carefully
place an LP vinyl record with a diameter of between 296-304mm (11.65-12in) into
the top loading slot. When loading, the disc should be kept vertical and perpendic-
ular to the oor.
The cleaning/drying process will automatically start. Once nished, the “Completed”
green LED will illuminate. Insert a new disc to start again.
Maintenance
When tap or bottled drinking water should be replaced about every 500 discs, every
few weeks, or if the water appears particularly dirty.
If the cleaner will not be used for longer than 3 weeks, the water reservoir should
be emptied to dry.
To avoid scratches, keep disc
perpendicular to the oor when inserting.
Table of contents
Other KLAUDIO Ultrasonic Jewelry Cleaner manuals