Klein Tools 93PLL User manual

INSTRUCTION MANUAL
FRANÇAIS p. 17
ESPAÑOL pg. 9
Rechargeable Self-Leveling
Green Planar Laser Level
ENGLISH
• THREE ORTHOGONAL
360° PLANAR LINES
THREE ORTHOGONAL
PLANAR LINES
IP54
93PLL

2
GENERAL SPECIFICATIONS
Klein Tools 93PLL is a self-leveling laser alignment instrument that can be used to
deliver three orthogonal 360°planar lines in the X, Y, and Z planes.
• Operating Altitude: 6562 ft. (2000 m)
• Relative Humidity: <80% non-condensing
• Operating Temp: 20°F to 120°F (-10°C to 50°C)
• Storage Temp: -5°F to 140°F (-20°C to 60°C)
• Lasers: • 510-530 nm
• ≤1mW each beam, Class 2 Laser Product
• Accuracy: +/- 4.5 mm per 15 m
• Battery Type: Removable Li-Ion, 3.7V 10400 mAH (38.48Wh)
• Battery Life: 9+ Hours (with all three lasers active)
• Dimensions: 5.5" x 4.75" x 3.5" (140 x 120 x 88 mm)
• Weight: 22.6 oz. (640 g) without battery
• Calibration: Accurate for one year
• Standards: Conforms to: EN61326-1:2013, EN60825-1:2014 CE, UKCA, ROHS,
REACH, DOE/CEC, NRCan.
Conforms to NOM-001-SCFI-2018 Electronic Devices: Safety
Requirements and Test Methods, based on NMX-I-60950-1-NYCE-2015
Information Technology Equipment - General Requirements.
Complies with: 21 CFR 1040.10 and 1040.11 except for deviations
pursuant to laser notice No. 50, dated June 24, 2007.
• Ingress Protection: IP54 Dust & Water Resistant
• FCC Compliance: This device complies with part 15 of the FCC Rules. Operation
is subject to the following two conditions: (1) This device may not cause
harmful interference, and (2) this device must accept any interference received,
including interference that may cause undesired operation.
Specifications subject to change.
ENGLISH
3
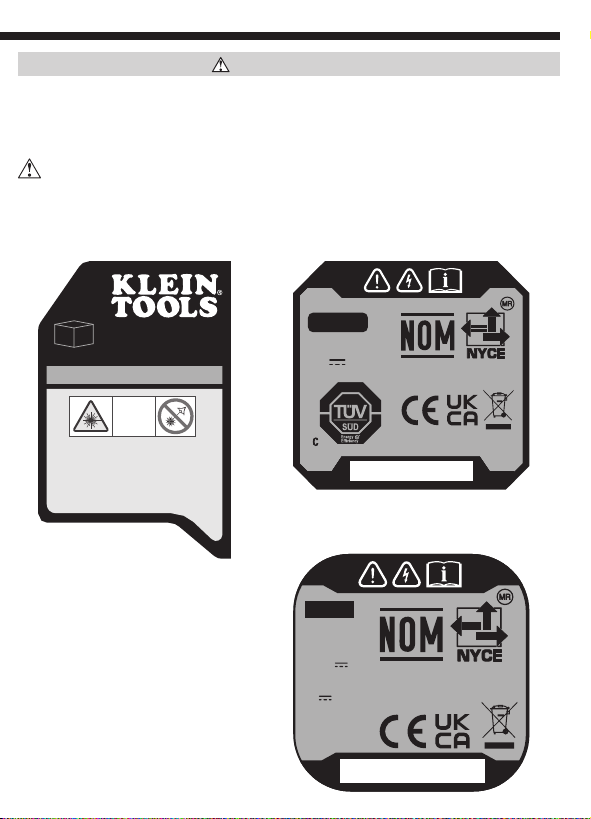
WARNINGS
To ensure safe operation and service of the instrument, follow these instructions.
Failure to observe these warnings can result in serious personal injury, re, or
electrical shock. Retain these instructions for future reference.
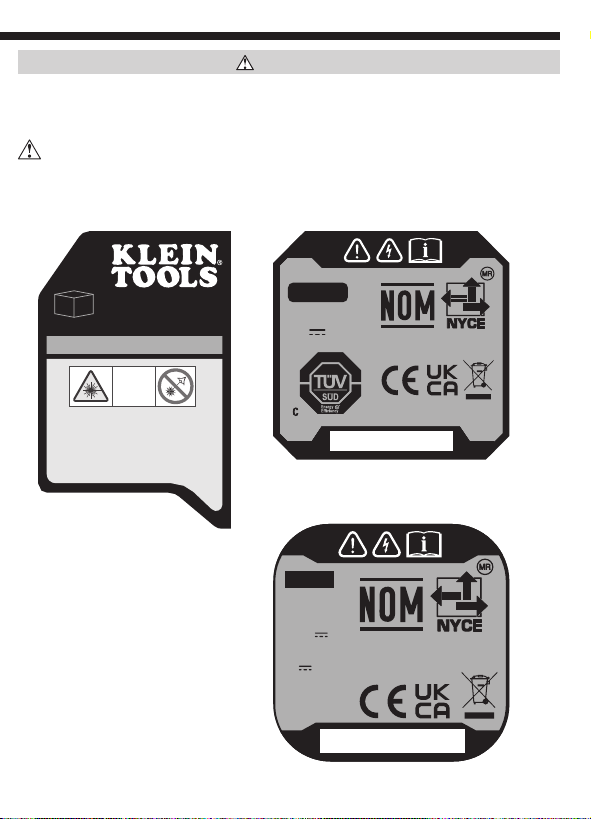
WARNING: LASER RADIATION. DO NOT STARE INTO BEAM. Class 2 Laser.
Warning label on side Warning label on bottom
Battery specications label
IP54
MMYYFF-HS
Input:
5V 2.0A
Model No. 93PLL
www.kleintools.com
Planar Laser Level
≤1mW @ 510-530nm
Complies with 21 CFR 1040.10 and 1040.11 except for
conformance with IEC 60825-1 Ed. 3., as described in
Laser Notice No. 56, dated May 8, 2019
LASER
2
IEC 60825-1:2014
29026
Li-ion battery
INR19/66
MMYYFF-HS
WARNING:
Do not incinerate
Input:
5V 2.0A
Capacity:
10400mAh
(38.48Wh)
3.7V

4
ENGLISH
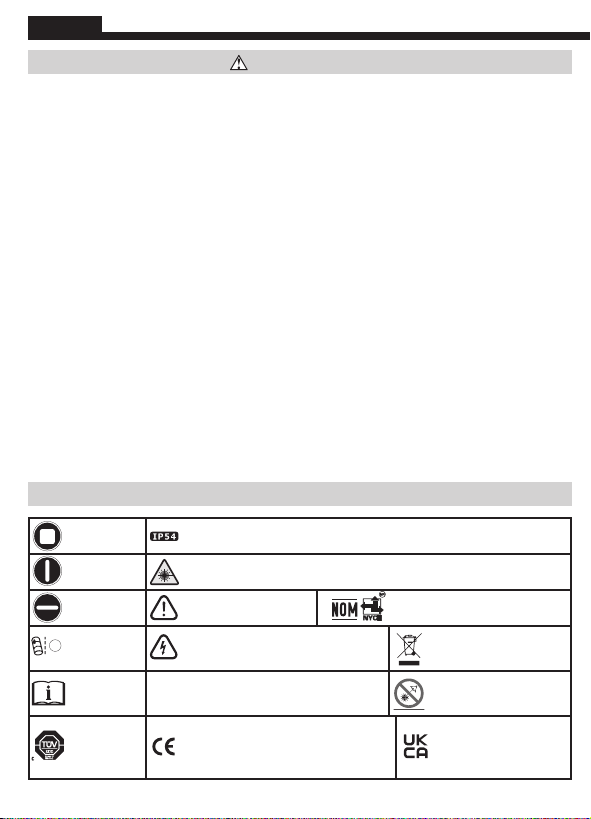
SYMBOLS ON INSTRUMENT
WARNINGS
• Exposing eyes to laser radiation can result in severe and permanent eye injuries. NEVER
look directly into the laser beam emitted by this instrument.
• Do not use the instrument if it appears to be damaged.
• Do not modify the instrument in any way, as to do so could result in emission of hazardous
laser radiation than could result in severe eye injuries.
• Do not use optical equipment such as lenses, prisms, optical scopes, etc. to transmit,
retransmit, or view the laser beam as this could result in severe eye injuries.
• This product should not be used by untrained operators or operators who have not read
and fully understood the instructions.
• This product should not be used in any location that could result in somebody looking at or having
their eyes inadvertently irradiated by the laser beam as this could result in severe eye injuries.
• The instrument should be powered off following use to minimize the risks of inadvertently
exposure to hazardous laser radiation that could result in severe eye injuries.
• Do not remove warning labels from this instrument as this could result in serious personal
injury and increases the risk of exposure to hazardous laser irradiation.
• The instrument should be securely located in a tidy work environment prior to operation as
unexpected drops or movement of the instrument may result in damage to the instrument and
increases the risk of inadvertent exposure to laser radiation that could result in severe eye injuries.
• This instrument is IP54 dust & water resistant. Following any contact with water, thoroughly
dry the instrument with a dry, lint-free cloth.
• There are no user serviceable parts in this instrument.
LASER
2
93PLL Manual Icons (9/15/2021)
X-Plane
Laser
LASER
2
93PLL Manual Icons (9/15/2021)
Ingress Protection IP54 Rating - Dust & Water Resistant
LASER
2
93PLL Manual Icons (9/15/2021)
Y-Plane
Laser
LASER
2
93PLL Manual Icons (9/15/2021)
Hazardous laser radiation, DO NOT stare into beam or view
directly with optical instruments
LASER
2
93PLL Manual Icons (9/15/2021)
Z-Plane
Laser
LASER
2
93PLL Manual Icons (9/15/2021)
Warning or Caution
LASER
2
93PLL Manual Icons (9/15/2021)
NOM-NYCE
LASER
2
93PLL Manual Icons (9/15/2021)
Out-Of-Level
Indicator
LASER
2
93PLL Manual Icons (9/15/2021)
Warning –
Risk of electric shock
LASER
2
93PLL Manual Icons (9/15/2021)
WEEE –
Electronics disposal
LASER
2
93PLL Manual Icons (9/15/2021)
Read
instructions
LASER
2
93PLL Manual Icons (9/15/2021)
Laser Class 2
LASER
2
93PLL Manual Icons (9/15/2021)
Do not stare into beam
LASER
2
93PLL Manual Icons (9/15/2021)
Energy
Efficiency
Verified
LASER
2
93PLL Manual Icons (9/15/2021)
Conformité Européenne:
Conforms with European Economic
Area directives
LASER
2
93PLL Manual Icons (9/15/2021)
UKCA - United
Kingdom Conformity
Assessment
5
15
BRACKET
MATERIAL:
1.
USB PLUG PLASTIC HOUSING: PVC.
A.
B.
WIRE: 24 AWG WITH PVC INSULATION.
C.
COLOR:
2.
PLASTIC HOUSING AND WIRE:
.
A.
METAL: BRIGHT SILVER.
B.
TIE WIRE:
.
C.
INSPECT ALL VISIBLE COLORS.
D.
SPECIFICATIONS:
WEIGHT:TBD
A.
B.
C.
D.
E.
SUPPORT CHARGING VOLTAGE: 5
0.25V.
F.
G.
H.
4.
PROCESSES.
REV
ECO
DESCRIPTION
CH
AP
DATE
1
FIRST RELEASE
WZB
10/24/201
9
DRAWING
NO.
.0005
FRAC.
ANG.
UNLESSOTHERWISE
SPECIFIED
NAME:
1/64
.010
.005
.000
TOLERANCES
DRAWING NO.
.0
.020
450 Bond St.
Lincolnshire, IL.
60069
REV
NUMBEROF
CRITICAL
DIMENSIONS
CRITICAL
DIMENSION
DESIGNATION
INSPECTION
ALL
CRITICAL
ITEMS
C
RITICAL
T
O
Q
TOBE INSPECTED TO STANDARD
UNLESSOTHERWISE SPECIFIED
BILL OF MATERIALS
9/24/19
SHEET:
SIZE:
UNLESS
OTHERWISE
SPECIFIED
A
WZB
DR: CH:
AP:
DATE:
.5°
.00
.0000
SCALE:
11
OF
1
1
N/A
NOTES:
13
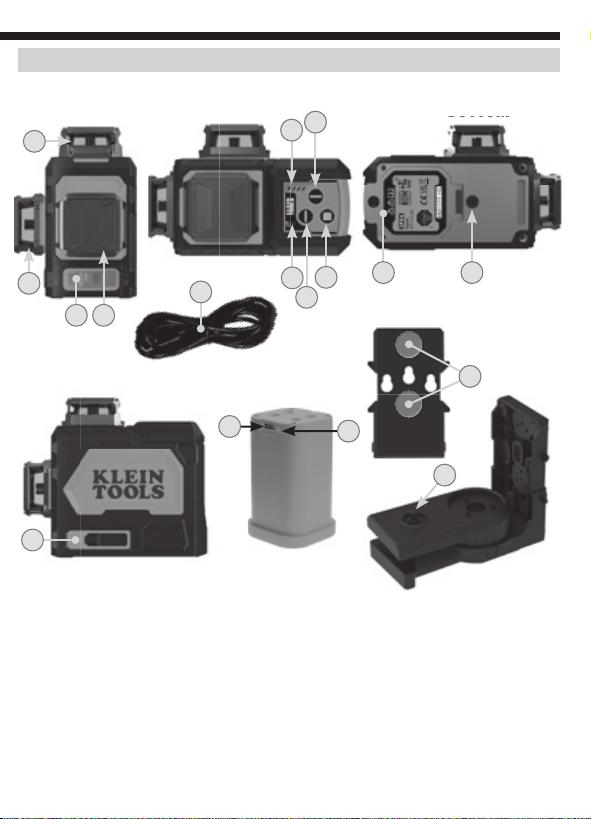
1. X-Plane Line On/Off Button 10. Power/Pendulum Lock/Unlock Switch
2. Y-Plane Line On/Off Button 11. Bracket 1/4-20 Tripod Mount
3. Z-Plane Line On/Off Button 12. Battery Door
4.
Excessive Tilt Indicator
13. USB-C Charging Cable
5. Battery Level Indicator 14. Magnets
6.
USB-C Charge-In Port
15. 1/4-20 Mounting Screw
7. X-Plane Aperture 16. Li-Ion Battery Charge-In Port
8. Y-Plane Aperture 17. Li-Ion Battery Charge Indicator LED
9. Z-Plane Aperture
FEATURE DETAILS
NOTE: No user-serviceable parts inside.
7
810
9
6
41
2
53
TOP
SIDE
FRONT BOTTOM
BOTTOM
1112
BATTERY
16
14
17

6
ENGLISH
OPERATING INSTRUCTIONS
TURNING LASER BEAMS ON/OFF
Push the ON/OFF buttons for the X-Plane
1
, Y-Plane
2
, and Z-Plane
3
lines to
turn ON and OFF their respective laser lines. These buttons are only active once the
Pendulum Lock/Unlock Slider Switch
10
has been set to the Unlocked position. If the
Pendulum Slider Switch is moved from the Unlocked to the Locked position while the
laser beams are active, they will be turned OFF. The different laser lines can be operated
independently or simultaneously.
NOTE: The plumb spot can be found by locating the top and bottom laser line
intersections while projecting both Y-Plane and Z-Plane Laser lines simultaneously. The
bottom laser line intersection can be used to locate a specific point on a floor layout
while the top laser line intersection projects that same point to a ceiling.
PENDULUM SLIDER SWITCH & SELF-LEVELING
The laser assemblies are mounted on a pendulum so that the instrument can self-level.
The Pendulum Slider Switch
10
must be in the unlocked position for the instrument to
self-level. If the instrument is tilted by >4°from the horizontal plane, the pendulum will
not be capable of self-leveling; the active laser beams will flash and the Excessive Tilt
Indicator
4
will blink to indicate that the instrument is not level and cannot self-level.
The instrument must be repositioned on a more level geometry for the self-leveling
pendulum to function appropriately.
Z-Plane Laser LineY-Plane Laser LineX-Plane Laser Line
NOTE: If the instrument indicates that it is not level
(via flashing beams and/or a blinking Excessive Tilt
indicator
4
),
then it should not be used for laying
out level or plumb lines.
NOTE: Following use, the active laser beams must be
turned OFF and the Pendulum Slider Switch must be
placed in the Locked position prior to storage.
Instrument Tilted Excessively
7
OPERATING INSTRUCTIONS
MAGNETIC MOUNTING BRACKET 14
A magnetic mounting bracket is included with the product. The instrument can be
mounted on the bracket via its 1/4" threaded screw
15
. The bracket may be magnetically
attached to any ferrous structure such as steel studs, ducts, structural beams, and steel
doors. The bracket also feature a keyhole for mounting the instrument using a screw or
nail to non-ferrous structures. Once mounted to a structure via the mounting bracket, the
instrument can be rotated on the bracket through 360°to direct the laser beams.
RECHARGING BATTERY
When the Red LED on the Battery Level Indicator blinks, the battery needs to be recharged:
Charging Battery via 93PLL USB-C Port:
1. Connect supplied charging cable’s
13
USB-C connection to the USB-C port
6
of
the 93PLL.
2. Connect the charging cable’s USB-A port to a charging source (5V DC, Min 2.0A, not
included).
3. The Battery Level Indicator
5
will illuminate to indicate charging status (TABLE 1).
4. A full charge can take up to 8.5 hours, depending on the charger’s output. Charge
completely before using.
Charging Battery via Battery Pack
USB-C Port:
1. Ensure 93PLL is turned off by
locking the Power/Pendulum
Switch
10
.
2. Loosen screw from the Battery
Door
12
and remove battery.
3. Connect the supplied charging
cable’s
13
USB-C connection to
battery's Charge-In Port
16
.
4. Connect the charging cable’s
USB-A port to a charging source
(5.0V, min. 2.0A, not included).
5. Battery Charge Indicator LED
17
will blink red while charging,
and turn solid green when fully
charged. When fully charged,
disconnect cable from battery
and reinstall battery in 93PLL.
6. Close the battery door and secure with screw. Do not over-tighten.
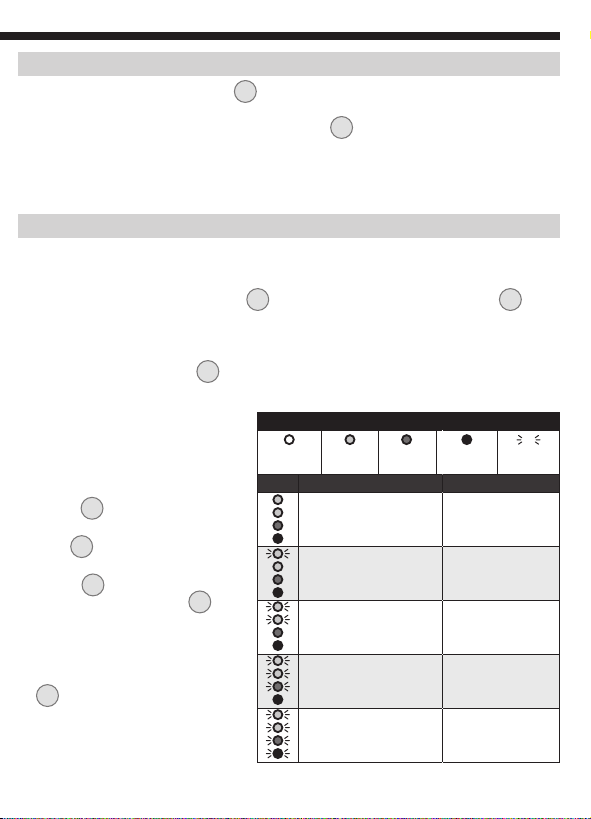
TABLE 1
Not
Illuminated Green Yellow Red Blinking
LED Status % Charged
Solid green
Solid green
Solid yellow
Solid red
100% charged
Blinking green
Solid green
Solid yellow
Solid red
75% to 99% charged
Blinking green
Blinking green
Solid yellow
Solid red
50% to 74% charged
Blinking green
Blinking green
Blinking yellow
Solid red
25% to 49% charged
Blinking green
Blinking green
Blinking yellow
Blinking red
0% to 24% charged

8
ENGLISH
MAINTENANCE
• Regularly inspect ports and charging cable for and debris, dirt, damage, and
corrosion.
• DO NOT attempt to repair device or cable; replace as needed.
CLEANING
Be sure instrument is turned off and disconnected from all power sources. Wipe
with a clean, dry lint-free cloth.
Do not use abrasive cleaners or solvents.
RECHARGING
Recharge as needed. There are no pre-designated intervals at which to recharge as
long as you are using the unit regularly. Avoid discharging completely on a regular
basis, as this can impact overall life.
STORAGE
If storing for more than one month, charge completely before storage, and
recharge approximately every three months to avoid full discharge. Store in
cool temperatures, mild humidity, and away from direct sunlight (See GENERAL
SPECIFICATIONS section).
Leaving in a vehicle or other confined spaces in extreme hot temperatures can lead
to decrease in service life, overheating, or fire. Extreme cold temperatures below the
specified storage range can also harm performance and service life. Keep away from
corrosive chemicals and gases.
After taking out of storage, inspect visually to make sure device and all accessories
look satisfactory. Allow unit to return to ambient conditions before recharging.
WARRANTY
www.kleintools.com/warranty
DISPOSAL /RECYCLE
Do not place equipment and its accessories in the trash. Items must be
properly disposed of in accordance with local regulations. Please see
www.epa.gov/recycle for additional information.
CUSTOMER SERVICE
KLEIN TOOLS, INC.
450 Bond Street Lincolnshire, IL 60069 1-800-553-4676
[email protected] www.kleintools.com

MANUAL DE INSTRUCCIONES
Nivel láser verde de plano
autonivelante recargable
ESPAÑOL
• TRES LÍNEAS DE PLANO
A 360° ORTOGONALES
IP54
93PLL
autonivelante recargable
TRES LÍNEAS DE PLANO
ORTOGONALES

10
ESPECIFICACIONES GENERALES
El 93PLL de Klein Tools es un instrumento de alineación láser autonivelante que se
puede usar para ofrecer tres líneas de plano a 360°ortogonales en los planos X, Y,
y Z.
• Altitud de funcionamiento: 6562' (2000m)
• Humedad relativa: <80%, sin condensación
• Temperatura de funcionamiento: 20°F a 120°F (-10°C a 50°C)
• Temperatura de almacenamiento: -5°F a 140°F (-20°C a 60°C)
• Láseres: • 510-530nm
• ≤1mW por cada haz de luz, producto con láser Clase 2
• Precisión: ± 4,5mm por 15m
• Tipo de batería: de iones de litio de 3,7V/10400mAh extraíble (38,48Wh)
• Vida útil de la batería: 9+horas (con los tres láseres activos)
• Dimensiones: 5,5" × 4,75" × 3,5" (140 × 120 × 88mm)
• Peso: 22,6oz (640g) sin la batería
• Calibración: precisa durante un año
• Normas: Cumple con: EN61326-1:2013, EN60825-1:2014, CE, UKCA, ROHS,
REACH, DOE/CEC, NRCan.
Cumple con la norma NOM-001-SCFI-2018 sobre Dispositivos
electrónicos: requisitos de seguridad y métodos de prueba con base en
la norma NMX-I-60950-1-NYCE-2015 sobre Equipo de tecnología de la
información – Requisitos generales.
Satisface: la norma 21 CFR 1040.10 y 1040.11, excepto en lo referente a
los desvíos, de conformidad con el Aviso sobre láser n.º50, con fecha
del 24 de junio de 2007.
• Protección de ingreso: IP54 resistente al agua y al polvo
• Conformidad con la normativa FCC: Este dispositivo cumple con la Parte 15
de las normas de la FCC. Su funcionamiento está sujeto a las siguientes dos
condiciones: (1) este dispositivo no debe provocar interferencia perjudicial, y
(2) este dispositivo debe aceptar cualquier interferencia recibida, incluida la que
pueda causar un funcionamiento no deseado.
Especificaciones sujetas a cambios.
ESPAÑOL

11
ADVERTENCIAS
Para garantizar el funcionamiento y servicio seguros del instrumento, siga estas
instrucciones. El incumplimiento de estas advertencias puede provocar lesiones
personales graves, incendio o choques eléctricos. Guarde estas instrucciones
paraconsultarlas en el futuro.
ADVERTENCIA: RADIACIÓN LÁSER. NO MIRAR EL HAZ. Láser Clase 2.
Etiqueta de advertencia
en la parte lateral Etiqueta de advertencia
en la parte inferior
Etiqueta de especicaciones
de la batería
IP54
MMYYFF-HS
Input:
5V 2.0A
Model No. 93PLL
www.kleintools.com
Planar Laser Level
≤1mW @ 510-530nm
Complies with 21 CFR 1040.10 and 1040.11 except for
conformance with IEC 60825-1 Ed. 3., as described in
Laser Notice No. 56, dated May 8, 2019
LASER
2
IEC 60825-1:2014
29026
Li-ion battery
INR19/66
MMYYFF-HS
WARNING:
Do not incinerate
Input:
5V 2.0A
Capacity:
10400mAh
(38.48Wh)
3.7V
12
ESPAÑOL
SÍMBOLOS EN EL INSTRUMENTO
ADVERTENCIAS
• Exponer la vista a la radiación láser puede provocar lesiones oculares graves e irreversibles.
NUNCA mire directamente el haz de láser que emite el instrumento.
• No utilice el instrumento si en apariencia está dañado.
• No modifique el producto de ninguna manera, ya que esto puede provocar la emisión de
radiación láser peligrosa que, a su vez, puede ocasionar lesiones oculares graves.
• No utilice equipos ópticos como lentes, prismas, telescopios ópticos, etc. para transmitir,
retransmitir o ver el haz del láser, dado que esto puede ocasionar lesiones oculares graves.
• No deben usar este producto operadores sin capacitación o que no hayan leído ni
comprendido completamente las instrucciones.
• Este producto no se debe utilizar en sitios donde alguien pueda mirar el haz o donde
los ojos queden expuestos accidentalmente a la radiación del haz, dado que esto puede
ocasionar lesiones oculares graves.
• Apague el instrumento después de utilizarlo para minimizar los riesgos de una exposición
accidental a la radiación láser peligrosa que podría provocar lesiones oculares graves.
• No quite las etiquetas de advertencia del instrumento ya que esto puede dar lugar a lesiones
graves y aumentar el riesgo de exposición a radiación láser peligrosa.
• Antes de poner en funcionamiento el instrumento, se lo debe ubicar de modo seguro en
un ambiente de trabajo ordenado. Las caídas inesperadas o el movimiento del instrumento
pueden dañar el equipo y aumentar el riesgo de una exposición accidental a la radiación
láser, que a su vez provocará lesiones oculares graves.
• El instrumento cuenta con clasificación IP54: resistente al agua y al polvo. Después del
contacto con agua, seque cuidadosamente el instrumento con un paño limpio y seco que no
deje pelusas.
• Este producto no incluye piezas que el usuario pueda reparar.
LASER
2
93PLL Manual Icons (9/15/2021)
Láser del
plano X
LASER
2
93PLL Manual Icons (9/15/2021)
Clasificación IP54 de protección de ingreso: resistente al agua y
al polvo
LASER
2
93PLL Manual Icons (9/15/2021)
Láser del
plano Y
LASER
2
93PLL Manual Icons (9/15/2021)
Radiación láser peligrosa, NO mirar el haz de luz ni mirar directa-
mente con instrumentos ópticos
LASER
2
93PLL Manual Icons (9/15/2021)
Láser del
plano Z
LASER
2
93PLL Manual Icons (9/15/2021)
Advertencia o pre-
caución
LASER
2
93PLL Manual Icons (9/15/2021)
NOM-NYCE
LASER
2
93PLL Manual Icons (9/15/2021)
Indicador de
desnivel
LASER
2
93PLL Manual Icons (9/15/2021)
Advertencia:
riesgo de choque eléctrico
LASER
2
93PLL Manual Icons (9/15/2021)
WEEE: Eliminación de
elementos electrónicos
LASER
2
93PLL Manual Icons (9/15/2021)
Lea las
instrucciones
LASER
2
93PLL Manual Icons (9/15/2021)
Láser Clase 2
LASER
2
93PLL Manual Icons (9/15/2021)
No mirar el haz de luz
LASER
2
93PLL Manual Icons (9/15/2021)
Verificación
de eficiencia
energética
LASER
2
93PLL Manual Icons (9/15/2021)
Conformité Européenne:
Cumple con las normas del Espacio
Económico Europeo
LASER
2
93PLL Manual Icons (9/15/2021)
UKCA: Conformidad
evaluada por el Reino
Unido

13
15
SOPORTE
MATERIAL:
1.
USB PLUG PLASTIC HOUSING: PVC.
A.
B.
WIRE: 24 AWG WITH PVC INSULATION.
C.
COLOR:
2.
PLASTIC HOUSING AND WIRE:
.
A.
METAL: BRIGHT SILVER.
B.
TIE WIRE:
.
C.
INSPECT ALL VISIBLE COLORS.
D.
SPECIFICATIONS:
WEIGHT:TBD
A.
B.
C.
D.
E.
SUPPORT CHARGING VOLTAGE: 5
0.25V.
F.
G.
H.
4.
PROCESSES.
REV
ECO
DESCRIPTION
CH
AP
DATE
1
FIRST RELEASE
WZB
10/24/201
9
DRAWING
NO.
.0005
FRAC.
ANG.
UNLESSOTHERWISE
SPECIFIED
NAME:
1/64
.010
.005
.000
TOLERANCES
DRAWING NO.
.0
.020
450 Bond St.
Lincolnshire, IL.
60069
REV
NUMBEROF
CRITICAL
DIMENSIONS
CRITICAL
DIMENSION
DESIGNATION
INSPECTION
ALL
CRITICAL
ITEMS
C
RITICAL
T
O
Q
TOBE INSPECTED TO STANDARD
UNLESSOTHERWISE SPECIFIED
BILL OF MATERIALS
9/24/19
SHEET:
SIZE:
UNLESS
OTHERWISE
SPECIFIED
A
WZB
DR: CH:
AP:
DATE:
.5°
.00
.0000
SCALE:
11
OF
1
1
N/A
NOTES:
13
1. Botón de encendido y apagado para
la línea del plano X 9. Apertura del plano Z
10. Interruptor de bloqueo/desbloqueo del péndulo
2. Botón de encendido y apagado para
la línea del plano Z y de encendido
11. Soporte de montaje para trípode de 1/4-20
3. Botón de encendido y apagado para
la línea del plano Z 12. Tapa del compartimento de la batería
13. Cable de cargaUSB-C
4.
Indicador de inclinación excesiva
14. Imanes
5. Indicador del nivel de batería 15. Tornillo de montaje 1/4-20
6.
Puerto de carga USB-C
16. Puerto de carga de la batería de iones de litio
7. Apertura del plano X 17. LED indicador de carga de
la batería de iones de litio
8. Apertura del plano Y
DETALLES DE LAS CARACTERÍSTICAS
NOTA: no contiene en su interior piezas
que el usuario pueda reparar.
7
810
9
6
41
2
53
VISTA SUPERIOR
VISTA LATERAL
VISTA FRONTAL VISTA INFERIOR
VISTA INFERIOR
1112
BATERÍA
16
14
17

14
ESPAÑOL
INSTRUCCIONES DE FUNCIONAMIENTO
APAGADO/ENCENDIDO DE LOS HACES DEL LÁSER
Presione los botones de encendido y apagado para encender y apagar las líneas del plano X
1
, plano Y
2
, y plano Z
3
para encender y apagar sus líneas láser correspondientes. Estos
botones solo están activos una vez que el interruptor deslizante para bloquear y desbloquear el
péndulo
10
se coloca en la posición de desbloqueado. Si se mueve el interruptor deslizante de la
posición de desbloqueo a la posición de bloqueo mientras los haces del láser están activos, estos
se apagarán. Las diferentes líneas del láser pueden funcionar independientemente o en forma
simultánea.
NOTA: el punto de plomada se puede encontrar ubicando las intersecciones de las líneas
láser superior e inferior al proyectar las líneas láser del plano Y y Z de manera simultánea.
Laintersección de la línea láser inferior se puede utilizar para ubicar un punto específico en el
piso, mientras la intersección de la línea láser superior proyecta ese mismo punto en el techo.
INTERRUPTOR DESLIZANTE DEL PÉNDULO Y AUTONIVELACIÓN
Los conjuntos láser están montados sobre un péndulo para que el instrumento pueda
autonivelarse. El interruptor deslizante del péndulo
10
debe estar en la posición de
desbloqueo para que el instrumento se autonivele. Si se inclina el instrumento un ángulo de
más de 4°respecto del plano horizontal, el péndulo no podrá autonivelarse. Los haces del
láser activos se encenderán en forma intermitente y el indicador de inclinación excesiva
4
parpadeará para señalar que el instrumento no está nivelado y que no puede autonivelarse.
Deberá reposicionar el instrumento en una geometría más nivelada para que el péndulo de
autonivelación funcione correctamente.
Línea láser del plano ZLínea láser del plano YLínea láser del plano X
NOTA: si el instrumento indica que no está nivelado (los
haces del láser se encienden de manera intermitente o el
indicador de inclinación excesiva
4
parpadea),
no se lo
debe utilizar para nivelación de posición de elementos o
líneas de plomada.
NOTA: después del uso y antes de guardar el
instrumento, los haces del láser activos se deben
APAGAR y el interruptor deslizante del péndulo se debe
colocar en la posición de bloqueo.
Inclinación excesiva del
instrumento

15
INSTRUCCIONES DE FUNCIONAMIENTO
SOPORTE MAGNÉTICO DE MONTAJE 14
Se incluye con el producto un soporte magnético de montaje. El instrumento se puede montar en
el soporte utilizando el tornillo roscado de 1/4" 15 . Este soporte se puede fijar magnéticamente
a cualquier estructura ferrosa, como pernos de acero, conductos, perfiles laminados y puertas de
acero. También cuenta con una hendidura que sirve para fijar el instrumento sobre estructuras
no ferrosas utilizando un tornillo o clavo. Una vez que el instrumento se monte a una estructura
utilizando el soporte de montaje, se lo puede rotar sobre el soporte 360°para dirigir los haces del
láser en la dirección que se desee.
CÓMO RECARGAR LA BATERÍA
Cuando parpadee el LED rojo en el indicador del nivel de batería, se necesita recargar la batería:
Cómo cargar la batería mediante el puerto USB-C del 93PLL:
1. Conecte la conexión USB-C del cable de carga proporcionado
13
al puerto USB-C
6
del 93PLL.
2. Conecte el puerto USB-A del cable de carga a una fuente de carga (5VCD, mín. 2A, no incluida).
3. El indicador del nivel de batería
5
se encenderá para indicar el estado de carga (TABLA 1).
4. Una carga completa podría tomar
hasta 8,5horas, dependiendo de
la salida del cargador. Cárguela
completamente antes de usarla.
Cómo cargar la batería mediante el puerto
USB-C del paquete de baterías:
1. Asegúrese de que el 93PLL esté
apagado bloqueando el interruptor del
péndulo y deencendido
10
.
2. Afloje el tornillo de la tapa del
compartimiento de la batería
12
yretirela batería.
3. Conecte la conexión USB-C del
cable decarga proporcionado
13
al
puerto decarga
16
de la batería.
4. Conecte el puerto USB-A del cable de
cargaa una fuente de carga (5V, mín.
2A,no incluida).
5. El indicador LED de carga de la
batería
17
parpadeará en rojo
mientras está cargando, y se mostrará verde fijo cuando esté completamente cargada.
Cuando esté completamente cargada, desconecte el cable de la batería y vuelva a instalarla
en el 93PLL.
6. Cierre la tapa del compartimiento de la batería y asegúrela con un tornillo.
Noloaprietedemasiado.
TABLA1
No se
enciende Verde Amarillo Rojo Intermitente
LED Estado Porcentaje de carga
Verde fijo
Verde fijo
Amarillo fijo
Rojo fijo
100% de carga
Verde intermitente
Verde fijo
Amarillo fijo
Rojo fijo
75% al 99% de carga
Verde intermitente
Verde intermitente
Amarillo fijo
Rojo fijo
50% al 74% de carga
Verde intermitente
Verde intermitente
Amarillo intermitente
Rojo fijo
25% al 49% de carga
Verde intermitente
Verde intermitente
Amarillo intermitente
Rojo intermitente
0% al 24% de carga

16
ESPAÑOL
MANTENIMIENTO
• Inspeccione regularmente los puertos y el cable de carga, verificando que no tengan
residuos, suciedad, daños y corrosión.
• NO intente reparar el dispositivo o el cable, reemplace según sea necesario.
LIMPIEZA
Asegúrese de que el instrumento esté apagado y desconectado de cualquier fuente de
energía. Límpielo con un paño limpio y seco que no deje pelusas.
No utilice solventes
nilimpiadores abrasivos.
CÓMO RECARGAR
Recárguelo según sea necesario. No hay intervalos predefinidos según los cuales se deba
recargar, siempre y cuando use la unidad regularmente. Evite descargarlo completamente
de manera regular, ya que esto puede afectar su vida útil general.
ALMACENAMIENTO
Si lo almacena por más de un mes, cárguelo completamente antes de almacenarlo, y
recárguelo aproximadamente cada tres meses para evitar que se descargue completamente.
Almacénelo en un ambiente fresco, con humedad leve, y lejos de la luz solar directa
(consulte la sección ESPECIFICACIONES GENERALES).
Si lo deja en un vehículo o en otros espacios reducidos bajo temperaturas extremadamente
altas, se puede reducir su vida útil, provocar sobrecalentamiento o un incendio. Las
temperaturas extremadamente frías, por debajo del rango de almacenamiento especificado
también pueden afectar el rendimiento y la vida útil. Manténgalo alejado de gases y
sustancias químicas corrosivas.
Después de retirarlo del almacenamiento, inspeccione visualmente el dispositivo para
asegurarse de que su apariencia y la de todos sus accesorios es correcta. Permita que
launidad regrese a condiciones ambiente antes de recargarla.
GARANTÍA
www.kleintools.com/warranty
ELIMINACIÓN/RECICLAJE
No arroje el equipo ni sus accesorios a la basura. Los elementos se deben
desechar correctamente de acuerdo con las regulaciones locales. Para obtener
másinformación, consulte www.epa.gov/recycle.
SERVICIO AL CLIENTE
KLEIN TOOLS, INC.
450 Bond Street Lincolnshire, IL 60069 1-800-553-4676
[email protected] www.kleintools.com

MANUEL D’UTILISATION
Niveau laser vert à troisplans et à
nivellement automatique rechargeable
FRANÇAIS
• LIGNES SUR TROISPLANS
ORTHOGONAUX (360°)
IP54
93PLL
nivellement automatique rechargeable
LIGNES SUR TROISPLANS
ORTHOGONAUX (360
°
)

18
CARACTÉRISTIQUES GÉNÉRALES
Le niveau93PLL de KleinTools est un appareil d’alignement laser à nivellement
automatique servant à projeter des lignes sur les plans orthogonauxX, Y et Z (360°).
• Altitude de fonctionnement: 2000m (6562pi)
• Humidité relative: <80% sans condensation
• Température de fonctionnement: -10°C à 50°C (20°F à 120°F)
• Température d’entreposage: -20°C à 60°C (-5°F à 140°F)
• Lasers: •510 à 530nm
•≤1mW pour chaque faisceau, produit laser de classe2
• Précision: ±4,5mm par 15m
• Type de batterie: Amovible, lithium-ion, 3,7V/10400mAh (38,48Wh)
• Autonomie de la batterie: 9+heures (lorsque les trois lasers sont activés)
• Dimensions: 140x120x88 mm (5,5x4,75x3,5po)
• Poids: 640g (22,6oz) sans la batterie
• Étalonnage: Précis pendant un an
• Normes: Conforme aux normes: EN61326-1:2013, EN60825-1:2014, CE,
UKCA, ROHS, REACH, DOE/CEC, NRCan.
Conforme à la norme NOM-001-SCFI-2018, Appareils électroniques–
exigences en matière de sécurité et méthodes d’essai, basée sur la
norme NMX-I-60950-1-NYCE-2015, Matériel informatique– exigences
générales.
Respecte les normes: 1040.10 et 1040.11 du Titre21 du CFR,
exception faite des déviations conformément au document «Laser
Notice n°50» daté du 24juin2007.
• Protection contre les inltrations: Conforme à la normeIP54 en ce qui
concerne la résistance à l’eau et à la poussière.
• Conformité à la FCC : L’appareil est conforme à la partie 15 des règles de la
FCC. Son fonctionnement est autorisé aux deux conditions suivantes : (1) cet
appareil ne doit pas causer d’interférences nuisibles et (2) il doit accepter toute
interférence reçue, notamment celles pouvant entraîner son fonctionnement
indésirable.
Les caractéristiques techniques peuvent faire l’objet de modifications.
FRANÇAIS
19
AVERTISSEMENTS
Pour garantir une utilisation et un entretien sécuritaires de votre appareil, suivez
ces consignes. Le non-respect de ces avertissements peut entraîner de sérieux
risques deblessures, d’incendie ou de choc électrique. Conservez ces instructions
à des ns deréférence.
AVERTISSEMENT: RADIATION LASER. NE REGARDEZ PAS DIRECTEMENT LE
FAISCEAU. Laser de classe2.
Étiquette d’avertissement
latérale Étiquette d’avertissement
du dessous
Étiquette de caractéristiques
de la batterie
IP54
MMYYFF-HS
Input:
5V 2.0A
Model No. 93PLL
www.kleintools.com
Planar Laser Level
≤1mW @ 510-530nm
Complies with 21 CFR 1040.10 and 1040.11 except for
conformance with IEC 60825-1 Ed. 3., as described in
Laser Notice No. 56, dated May 8, 2019
LASER
2
IEC 60825-1:2014
29026
Li-ion battery
INR19/66
MMYYFF-HS
WARNING:
Do not incinerate
Input:
5V 2.0A
Capacity:
10400mAh
(38.48Wh)
3.7V
20
FRANÇAIS
SYMBOLES SUR L’APPAREIL
AVERTISSEMENTS
• Faire entrer la radiation laser en contact avec l’œil peut causer des blessures graves et permanentes
aux yeux. NE REGARDEZ JAMAIS directement le faisceau laser émis par cet appareil.
• N’utilisez pas cet appareil s’il semble endommagé.
• Ne modifiez l’appareil d’aucune façon. Autrement, vous risquez de lancer l’émission
deradiations laser dangereuses provoquant de sérieuses blessures aux yeux.
• N’utilisez pas de matériel optique tel que des lentilles, des prismes ou même des jumelles
dans le but de transmettre, retransmettre ou visionner le faisceau laser; vous pourriez subir
desérieuses blessures aux yeux.
• Ce produit ne devrait être utilisé que par des opérateurs qualifiés ou par ceux ayant bien lu
etcompris les directives.
• Ce produit ne devrait pas être utilisé dans un emplacement où quelqu’un pourrait regarder dans
l’appareil par accident ou encore où les faisceaux laser peuvent entrer en contact avec des yeux
par inadvertance. Dans les deuxcas, cela pourrait provoquer des blessures sérieuses aux yeux.
• Après utilisation, l’appareil devrait être éteint pour éliminer les risques d’exposition aux
radiations laser dangereuses pouvant causer de graves blessures aux yeux.
• Ne retirez pas les étiquettes de mise en garde sur l’appareil; cela pourrait augmenter le risque
desubir des blessures sérieuses et le risque d’exposition aux radiations laser dangereuses.
• Après utilisation, l’appareil devrait être mis en lieu sûr dans un environnement propre.
Cela protège l’appareil des chutes et des mouvements accidentels, ces éléments pouvant
endommager l’appareil et donc augmenter les risques d’exposition aux radiations laser
dangereuses pouvant causer de graves blessures aux yeux.
• Cet appareil est conforme à la normeIP54 en ce qui concerne la résistance à l’eau et à la
poussière. En cas de contact avec l’eau, séchez l’appareil avec un linge sec et non pelucheux.
• Cet appareil ne contient aucune pièce réparable par l’utilisateur.
LASER
2
93PLL Manual Icons (9/15/2021)
Laser du
planX
LASER
2
93PLL Manual Icons (9/15/2021)
Conforme à la normeIP54 pour la protection contre
lesinfiltrations– eau et poussière
LASER
2
93PLL Manual Icons (9/15/2021)
Laser du
planY
LASER
2
93PLL Manual Icons (9/15/2021)
Radiations laser dangereuses– NE REGARDEZ PAS directement le
faisceau ni avec des instruments optiques
LASER
2
93PLL Manual Icons (9/15/2021)
Laser du
planZ
LASER
2
93PLL Manual Icons (9/15/2021)
Avertissement ou
mise en garde
LASER
2
93PLL Manual Icons (9/15/2021)
NOM-NYCE
LASER
2
93PLL Manual Icons (9/15/2021)
Indicateur de
défaut
de niveau
LASER
2
93PLL Manual Icons (9/15/2021)
Avertissement–
Risque de choc électrique
LASER
2
93PLL Manual Icons (9/15/2021)
DEEE– mise au rebut des
produits électroniques
LASER
2
93PLL Manual Icons (9/15/2021)
Lire les
instructions
LASER
2
93PLL Manual Icons (9/15/2021)
Laser de classe2
LASER
2
93PLL Manual Icons (9/15/2021)
Ne pas regarder
directement le faisceau
LASER
2
93PLL Manual Icons (9/15/2021)
Vérification
de l’efficacité
énergétique
LASER
2
93PLL Manual Icons (9/15/2021)
Conformité européenne: Conforme
aux directives de l’Espace écono-
mique européen
LASER
2
93PLL Manual Icons (9/15/2021)
UKCA – Évaluation
de la conformité du
Royaume-Uni
Other manuals for 93PLL
1
Table of contents
Languages:
Other Klein Tools Laser Level manuals

Klein Tools
Klein Tools 93LCLG User manual

Klein Tools
Klein Tools 93LCLG User manual

Klein Tools
Klein Tools 93LCL User manual

Klein Tools
Klein Tools LBL100 User manual

Klein Tools
Klein Tools 93LCLGR User manual

Klein Tools
Klein Tools 93LCLS User manual

Klein Tools
Klein Tools 93LCL User manual

Klein Tools
Klein Tools 93PLL User manual


