KNOVA N RO-1200 User manual

KN RO-1200
Router 1200 Watts
Rebajadora 1200 Watts13/4
H.P.
CABALLOS
DE FUERZA

Motor:
120 V ~ 60 Hz 10 A
Power:
1 200 Watts (1-3/4 HP)
Speed:
11 000 – 28 000 RPM.
Collet capacity: 1/4”
Plunge stroke:
2-1/8” (54 mm)
Base dimension:
6-1/4” (158.8 mm)
Weight net/gross:
9,25/10,14 lb
IMPORTANT:
GENERAL SAFETY INSTRUCTIONS
1) WORK AREA SAFETY
a) Keep work area clean and well lit. Cluttered or dark areas
invite accidents.
b) Do not operate power tools in explosive atmospheres
(presence of flammable liquids, gases or dust). Power
tools create sparks that may ignite dust or fumes.
c) Keep children and bystanders away while operating a
power tool. Distractions can cause you to lose control.
SPECIFICATIONS
RULES FOR SAFE OPERATION
KNOW YOUR TOOL
Before operating this tool, carefully read this operating manual
and all of the labels affixed to the router. Keep this manual avail-
able for future reference.
IMPORTANT
This tool should only be serviced by a qualified service
technician.
READ ALL INSTRUCTIONS THOROUGHLY
IMPORTANT: Read this operating manual carefully before using this tool. Pay close
attention to all Safety Instructions, Warnings and Cautions. Use the tool properly
and only for its intended use.
Safety symbols in this manual are used to flag possible hazards. The safety symbols
and their explanations require your full understanding. Simply reading a safety warn-
ing does not eliminate a particular hazard, nor does it substitute for proper accident
prevention procedures.
This Safety Alert Symbol indicates a caution, warning or hazard. Failure to comply
with a safety warning can result in serious injury to yourself or others. Always observe
safety precautions to reduce the risk of injury, fire or electric shock.
2) ELECTRICAL SAFETY
a) A power tool plug must match its outlet. Never modify
the plug in any way. Do not use an adaptor plug on a
grounded power tool. Use the original plug in an
appropriate outlet to reduce the risk of electric shock.
b) Avoid bodily contact with such grounded surfaces as
pipes, radiators, ranges and refrigerators. The risk of
electric shock is greater if your body is grounded.
c) Do not expose power tools to rain or moisture. Leakage of
water into a power tool increases the risk of electric shock.
d)
Do not mishandle the cord. Never use the cord for carrying,
pulling or unplugging the power tool. Keep the cord away
from heat, oil, sharp edges and moving parts. Damaged and
tangled cords increase the risk of electric shock. Replace or repair
damaged cords. Make sure your extension cord is in good condition.
e) Use the appropriate extension cord if operating a power
tool outdoors. Use of a cord suitable for outdoor use
reduces the risk of electric shock. When using an extension
cord, be sure to use one sturdy enough for the amperage
drawn by your tool. An undersized cord will produce a drop in
line voltage, resulting in reduced power and overheating. The
following table illustrates the correct cord size, depending on
cord length and the tool’s ampere rating. If in doubt, use the
next heavier gauge. The lower the gauge, the heavier the cord.
Recommended sizes of extension cords
Tool’s
Amperage rating
Volts Total length of cord in feet
Cord size in A. W. G. (minimum)
120 V~
0 – 6
6 – 10
10 – 12
25’
18
18
16
50’
16
16
16
100’
16
14
14
150’
14
12
12
12 – 16 14 12
Not Recommended
3) PERSONAL SAFETY
a) Stay alert, watch what you are doing and use common
sense when operating a power tool. Do not use a power
tool if tired or under the influence of drugs, alcohol or
medication. A single moment of inattention while
operating a power tool may result in serious personal injury.
b) Use safety equipment. Always wear goggles. Other safety
equipment such as a dust mask, non-skid safety shoes, a
hard hat or a hearing protection device will, when used
under the appropriate conditions, reduce personal injuries.
c) Avoid accidental start-up of the tool. Make sure the
switch is in the “Off” position before plugging it in.
Carrying a power tool with your finger on the switch
or plugging in a power tool with a switch set to “On” is a
dangerous practice.
d) Remove any adjusting key or wrench before turning on
the tool. A wrench or a key left attached to a rotating part
of the power tool may result in personal injury.
e) Do not overreach. Maintain proper footing and balance
at all times. This ensures better control over the power
tool in unexpected situations.

READ ALL INSTRUCTIONS THOROUGHLY
4) USE AND CARE OF THE POWER TOOL
a) Do not force the power tool. Use the correct power
tool for your application. The correct power tool will do
the job better and be safer when used as designed.
b) Do not use the power tool if you cannot use its switch to
turn it on or off. Any power tool that cannot be controlled
by the switch is dangerous and must be repaired.
c) Disconnect the plug from the power source and/or the
battery pack from the power tool before making any
adjustments, changing accessories or storing the tool.
Such safety measures reduce the risk of your power tool
starting up accidentally.
d)
Store idle power tools out of children’s reach and do not allow
those unfamiliar with the tool or with these instructions to operate
it. Power tools are dangerous in the hands of untrained users.
e) Maintain power tools. Check for misalignment or binding
of moving parts, breakage of parts and any other condition
that may affect the power tool’s operation. If damaged,
have the power tool repaired before use. Many accidents
are caused by poorly maintained power tools.
f) Keep cutting tools sharp and clean. Properly maintained
cutting tools with sharp cutting edges are less likely to
bind and are easier to control.
g)
Use the power tool, accessories, tool bits and other
components in accordance with these instructions and in the
intended manner for the particular type of power tool, in view
of the working conditions and the work to be performed. Using
a power tool for operations other than those for which it is
intended could result in a hazardous situation.
5) SERVICE
a) Have the power tool serviced by a qualified repair person
and only use identical replacement parts. Doing so will
ensure that the tool’s safety features are properly maintained.
b) Avoid safety hazards by ensuring that any replacement of
the power tool’s cord is performed by a qualified repair person.
SPECIFIC SAFETY INSTRUCTIONS FOR THE PLUNGE ROUTER
• Hold the power tool by its insulated grips when performing
any operation in which the cutting tool may come into
contact with concealed wiring or its own cord. Contact
with a “live” wire will also make exposed metal parts of the
tool “live” and subject the operator to electric shock.
• Use clamps or another practical means of securing and
supporting the workpiece to a stable platform. Holding the
work by hand or against your body leaves it unstable and
may result in loss of control.
• Keep the handles dry, clean, and free of oil or grease. This
will permit better control of the tool.
• Keep hands away from cutting area. Never place your
hands beneath the workpiece for any reason. Keep the
base of the router in firm contact with the workpiece when
cutting. Grip the router only by its handles. These
precautions will reduce the risk of personal injury.
• Use sharp bits. Dull bits may cause the router to swerve or
stall under pressure.
• Never touch the bit immediately after use. It may be
extremely hot.
WARNING: Read all instructions. Failure to comply
with all of the following instructions may result in elec-
tric shock, fire and/or serious injury.
• Be sure that the motor has completely stopped before you
put the router down. Injury or damage could result from a
head that is still spinning when the tool is laid down.
• Be sure that the router bit is clear of the workpiece before
starting the motor. If the bit is in contact with the workpiece
when the motor starts, the router could jump, resulting in
damage or injury.
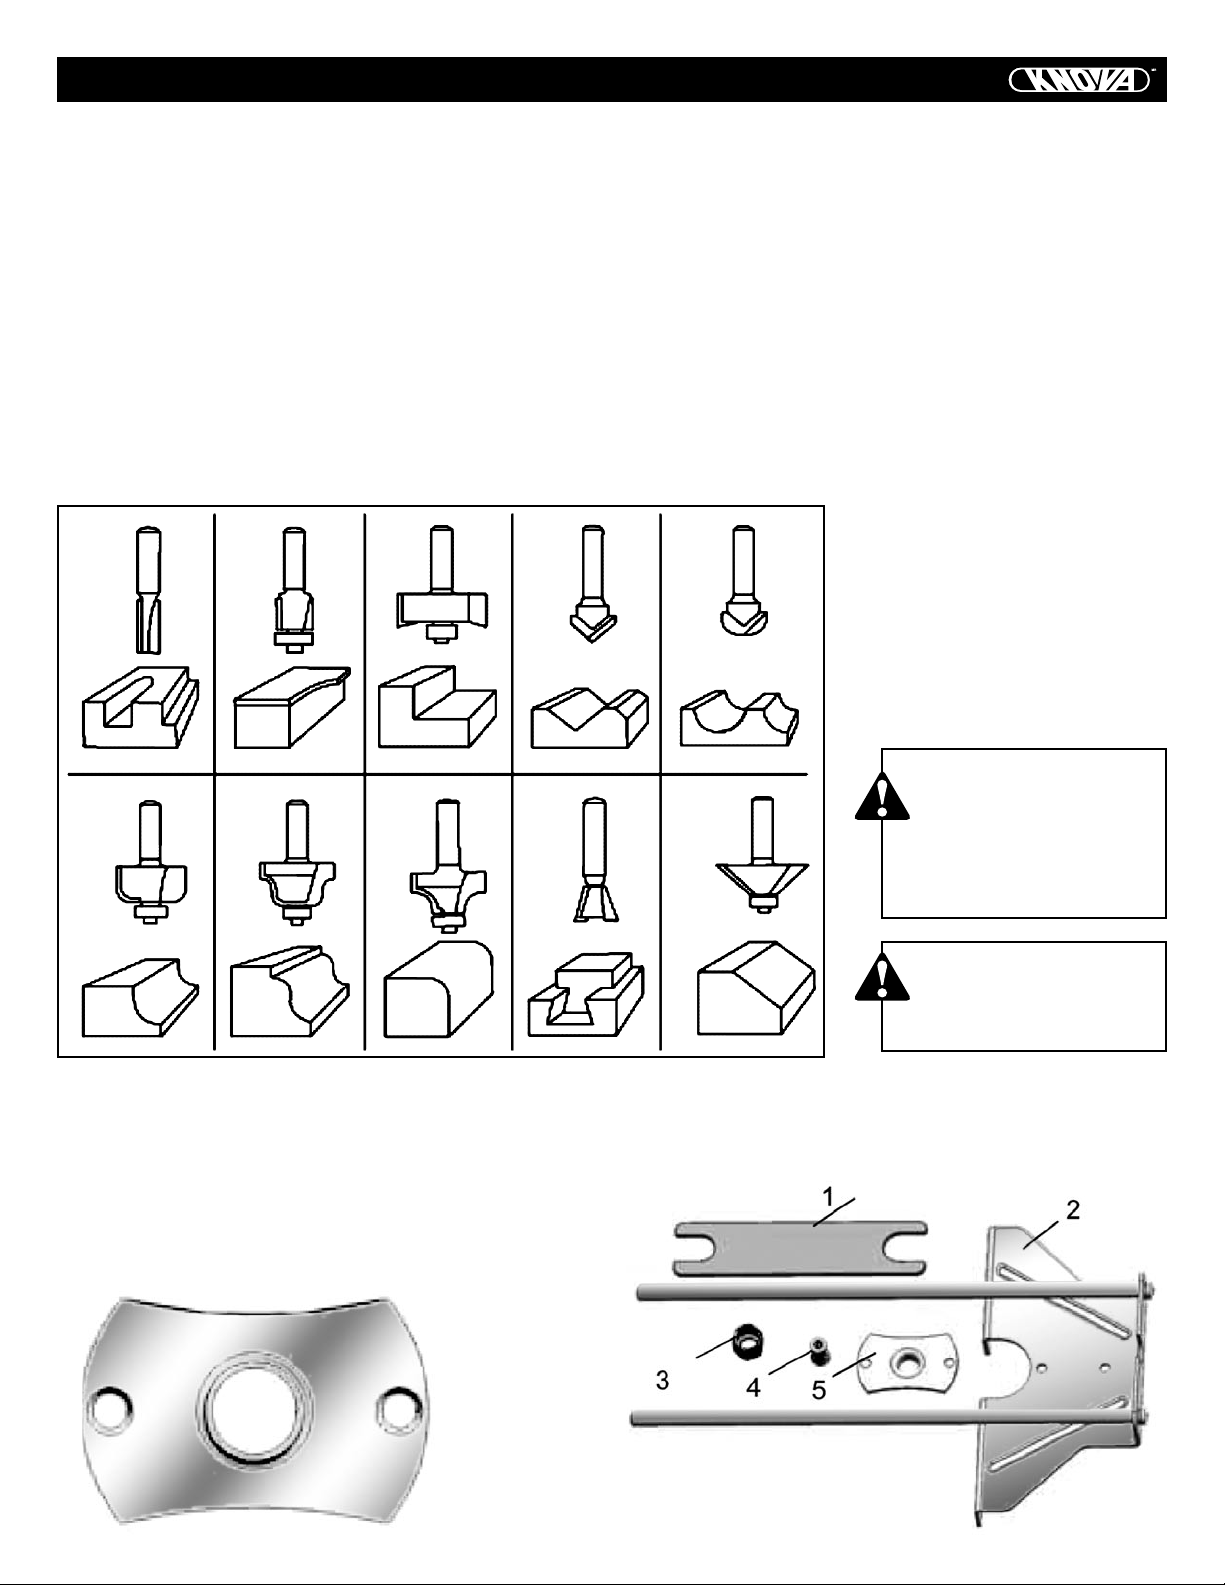
• Only use router bits with a shank diameter equal to
the size of the tool’s collet.
• Only use router bits suitable for the tool’s no-load speed.
• This tool is not intended for use with a router table.
Do not employ the tool in an inverted position.
• Do not attempt to employ the tool in an unpowered
or a stationary mode.
• Make sure the collet nut is securely tightened to prevent
the router bit from slipping during use.
WARNING: Some dust created by power sanding,
sawing, grinding, drilling, and other construction activi-
ties contains chemicals known to cause cancer, birth
defects or other reproductive problems. Examples of
such chemicals include:
• Lead from lead-based paints.
f) Dress properly. Do not wear loose clothing or jewellery.
Keep hair, clothing and gloves away from moving parts.
Loose clothes, jewellery or long hair can get caught in
moving parts. The air vents that often cover moving parts
should also be avoided.
g) Make sure that any devices to be used in conjunction with
dust extraction and collection facilities are connected and
properly employed. Use of these devices can reduce
dust-related hazards.
SPECIFIC SAFETY RULES FOR ELECTRIC ROUTERS
• Crystalline silica from bricks, cement and other masonry products.
• Arsenic and chromium from chemically-treated lumber (CCA).
Your risk from such exposure varies, depending on how often you do
such work. Reduce your exposure to these chemicals by working in a
well-ventilated area and working with approved safety equipment, such
as dust masks specifically designed to filter out microscopic particles.
• Avoid prolonged contact with dust from
power sanding, sawing, grinding, drilling,
and other construction activities. Wear
protective clothing and wash exposed areas
with soap and water. Allowing dust to get
into your mouth, eyes or remain on your skin
may promote absorption of harmful
chemicals.

SPECIFIC SAFETY RULES FOR ELECTRIC ROUTERS
CAUTION: Wear an appropriate personal hear-
ing protective device during use. Noise caused
by this product could contribute to hearing loss
under certain conditions and periods of use.
The label affixed to your tool may
include the following symbols.
V..............Volts
A..............Ampers
Hz............Hertz
W.............Watts
min...........Minutes
~.............Alternating current
.........Direct current
no
............No load speed
............Class II Construction
...........Grounding terminal
..........Safety alert symbol
.../min......Revolutions or reciprocations per minute
!
OPERATION
KNOW YOUR ROUTER (see Fig. 1)
Before attempting to use this plunge
router, familiarize yourself with all its op-
erating features and safety requirements.
The plunge router is only designed to be
used for straight and grooved milling and
the forming of edges in wood or similar
materials. Any other uses of the router not
described in this manual could damage the
tool or seriously injure the operator and
are therefore expressly excluded from ap-
proved applications.
1. Trigger switch
2. Lock-on button
3. Speed adjuster
4. Plunge lock lever
5. Spindle lock
6. Collet nut
7. Depth stop turret
8. Depth stop bar
9. Depth of cut scale
1
2
3
4
5
9
6
7
8
10
11
12
13
14
10. Dust extraction
adaptor
11. Chip shield
12. Locking screw
13. Lock bolt
14. Base plate
Fig. 1
WARNING: Use of this tool can generate and/or
disperse dust, which may cause serious and per-
manent respiratory or other injuries. Always use the
appropriate certified respiratory device to protect
against dust exposure. Direct particles away from
face and body.

Fig. 2
OPERATION
INSTALLING/REMOVING THE ROUTER BIT (see Fig. 2)
To install the bit
• Unplug the router.
• Remove the detachable chip shield (11).
• Keep the spindle lock (5) depressed and rotate the spindle
until the spindle lock fully engages.
• Place the router upside down on a smooth, flat surface.
• Loosen the collet nut (6) using the spanner wrench
provided. Insert the shank of the router bit into the collet.
• Keep the spindle lock button (5) depressed and tighten the
collet nut (6) using the spanner wrench provided.
• Release the spindle lock.
CAUTION: Burn hazard. The router bits get hot dur-
ing use. Allow sufficient time for the bit to cool before
replacing it.
To remove the bit
• Keep the spindle lock button (5) depressed.
• Loosen the collet nut (6) using the spanner wrench
provided and remove the bit.
• Release the spindle lock.
ADJUSTING THE DEPTH OF CUT (see Fig. 3)
WARNING: Turn the router off and disconnect it from
the power supply.
The depth of cut is the distance between the depth stop bar (8)
and the depth stop turret (7). The depth of cut can be set in two
different ways as follows:
ADJUSTING THE DEPTH OF CUT USING THE SCALE
• Unplug the router.
• Loosen the locking screw (12).
• Pull the plunge lock lever (4) up.
• Lower the router until the router bit touches the workpiece.
• Push the plunge lock lever (4) down.
• Move the pointer to the zero position on the scale (9).
• Add the desired depth of cut to the starting position.
• Move the depth stop bar (8) to the calculated position
on the scale.
• Tighten the locking screw (12).
• Fine adjust using the adjusting knob.
• Pull the plunge lock lever (4) up and let the router
return to its original position.
• Switch the router on, then lower the unit to make
the desired cut.
WARNING: To prevent personal injury, always discon-
nect the plug from the power source before assembly,
adjustment or changing of bits. Failure to comply with
these instructions could result in accidental start-up
and possible injury.
WARNING: To reduce the risk of injury, do not over-
load the tool. Let it work at its own pace. Guide the
cord carefully to avoid accidentally cutting it.
Fig. 3
Adjusting knob
Pointer
ADJUSTING THE DEPTH OF CUT USING A PIECE OF WOOD
• Unplug the router.
• Lower the router as described above.
• Pull the depth stop bar (8) up.
• Between the depth stop turret (7) and the depth stop
bar (8), place a piece of wood with a thickness equal
to the desired depth of cut.
• Tighten the locking screw (12).
• Fine adjust using the adjusting knob (21).
• Remove the piece of wood.
• Pull the plunge lock lever (4) up and let the router return
to its original position.
• After switching the router on, lower it to make
the desired cut.

Fig. 5
OPERATION
NOTE: Always feed the workpiece to the router against the di-
rection of the bit’s rotation.
FEED SPEED AND RATE OF CUT
Feed rate depends on the material and bit configuration. Expe-
rience is the best guide. Become familiar with the sound and
feel of the router by making practice cuts on scrap materials.
Perform a preliminary adjustment of the speed control, selecting
a higher speed for smaller diameter bits and a lower speed for
larger diameter bits.
The router bit rotates at a very high speed and may heat up,
causing burn marks if the router is moved too slowly through
the wood. Feeding the router too quickly or trying to remove
too much material in a single pass will overload the motor. Use
two or more passes for extra-large cuts, especially in the case
of hardwood.
DUST EXTRACTION ADAPTOR
When employing the dust extraction adaptor, be sure the vac-
uum cleaner is out of the way and properly secured so that it
will not tip over or interfere with the router or workpiece. The
vacuum hose and power cord must also be positioned so that
they do not interfere with the router or workpiece. If the vacuum
cleaner or vacuum hose cannot be positioned properly, it should
be removed.
• Turn on the vacuum cleaner before turning on the router.
• Empty the vacuum cleaner as necessary.
Straight edge guide for the router (see Fig. 5)
The straight edge guide is an effective aid to cutting a straight
line when chamfering or grooving.
• Loosen the lock bolts.
• Feed the bars on the edge guide through the holes in the
base plate.
• Adjust the distance between the router bit and the edge
guide by moving the guide
until it is situated at
the proper
distance.
• Tighten the lock bolts
to hold the straight edge
guide in position.
Fig. 4
Lock-on
button
Lock-on
button
ADJUSTING THE DEPTH-STOP TURRET
If you want to make several cuts with a different depth, adjust
each depth stop.
• Unplug the router.
• Loosen the locking screw.
• Set the depth stop turret to the desired setting. Turn clockwise
or counter-clockwise to lower or raise the depth stop turret.
• Tighten the locking screw.
SWITCHING THE ROUTER ON AND OFF (see Fig. 4)
Switching the router on Press the trigger switch (1).
Switching the router off Release the trigger switch.
Continuous operation
To lock the trigger switch on for continuous operation, squeeze
the trigger switch (1) and hold it while depressing the lock-on
button (2). Hold the button while you release the trigger switch;
the tool will continue to run. Squeeze and release the trigger
switch to turn the tool off.
ELECTRONIC SPEED ADJUSTER
The speed of your router is variable (6 variable speeds). Use
the electronic speed adjuster (3) to produce uniform results in
wood, plastics and aluminum. Use lower settings for large diam-
eter bits and higher settings for small diameter bits.
USING THE ROUTER
• Make sure that the material to be cut is securely clamped
and provides sufficient stability to support the router while
it is operating.
• To control the router, keep both hands on the grips.
• Rotate the router counter-clockwise when cutting outside
edges. Rotate it clockwise when cutting inside edges.
• Always hold the router from the front, ensuring that
the chip shield is between yourself and the bit.
• After setting the cutting depth as described, position
the router so that the bit is directly above the point you plan
to cut. With the router running, lower the unit smoothly into
the workpiece. (DO NOT FORCE THE ROUTER DOWN.)
When the tool reaches its pre-set depth, tighten the plunge
release lever. Once you have finished routing, loosen the
plunge release lever and allow the spring to lift the router
directly out of the workpiece.

OPERATION
Description Application
(1) Straight bit Grooves and rabbets
(2) Trimming bit Trimming veneers or hardwoods, as well
as precision profiling using a pattern
(3) Rabbeting bit Rabbets on straight or curved workpieces
(4) V-grooving bit Grooving, engraving and edge bevelling
(5) Core box bit Fluting, engraving and decorative edge moulding
(6) Cove bit Decorative edge moulding
(7) Ogee moulding bit Decorative edge moulding
(8) Rounding over bit Rounding over edges
(9) Dovetail bit Dovetail joints
(10) Chamfer bit Chamfered edges
Using the pattern guide (see Fig. 7)
The pattern guide can be used to produce
a cut-out shape (such as a letter) from a
pattern.
• Secure the pattern over the workpiece
using double-sided tape or “G” clamps.
• The router bit must extend below the
flange of the pattern guide to produce a
cut in the shape of the pattern.
MAINTENANCE
Before cleaning or performing any
maintenance, make sure the router
has been disconnected from its pow-
er supply. Keep all ventilation open-
ings clean. Avoid using solvents to
clean plastic parts. Most plastics are
vulnerable to damage from commer-
cial solvents. Use a clean cloth to
remove dirt, oil and grease.
WARNING: Prevent brake
fluid, gasoline, petroleum-
based products, penetrating
oil, etc., from coming into
contact with plastic parts.
These substances contain
chemicals that can damage,
weaken or destroy plastic.
WARNING: To ensure
safety and reliability, make
sure that all repairs are per-
formed by a qualified ser-
vice technician.
• Regularly clean the air vents in your tool using a soft brush or dry cloth.
• Regularly clean the motor housing using a damp cloth. Do not use any
abrasive or solvent-based cleaner.
ACCESSORIES (see Fig. 8)
1. Collet wrench
2. Straight
edge guide
3. Collet nut
4. Collet (1/4”)
5. Pattern guide
TIPS FOR OPTIMAL USE
• Rotate the tool counter-clockwise when
working on outer edges. Rotate the tool
clockwise when working on inner edges.
• Use HSS (high speed steel) router
bits for softwood.
• Use TCT (tungsten carbide tipped) router
bits for hardwood.
•
No guide is required for use of the tool. This
is useful for writing signs and performing
creative work. Only make shallow cuts.
• Refer to the following table for common
types of router bits.
ROUTER BITS (not included) (see Fig. 6)
Fig. 6
1 2 3 4 5
678 9 10
Fig. 7 Fig. 8

1 Tapping Screw
2 Cover
4 Speed Adjuster
5 Tapping Screw
6 Cover
7 Tapping Screw
8 Epoxy Board
9 Brush Holder
10 Brush Bush
11 Carbon Brush
12 Motor Housing
13 Spring
14 Washer
15 Bearing
16 Stator
17 Tapping Screw
18 Rotor
19 Circlips For Shaft
20 Fan Baffle
21 Screw
22 Bearing Clamping Plate
23 Ball Bearing
24 Screw
25 Adjusting Knob
26 O Ring
27 Depth Indicator
28 Depth Adjusting Bolt
29 Depth Stop Bar
30 Screw
31 Plunge Lock Lever
32 Slotted Set Screw
33 Spring
34 Nut
35 Left Handle Cover
36 Hexagon Socket Screw
37 Spring Washer
38 Plain Washer
39 Left Handle
40 Plunge Frame
41 Tapping Screw
42 Nut
43 Spring
44 Spindle Lock
45 Spindle Lock Button
46 Lock Cover
47 Thread Forming Screw
48 Collet
49 Lock Nut
50 Wrench
51 Inner Wire
52 Right Handle Cover
53 Right Handle
54 Cord Anchorage
55 Screw
56 Cord Guard
57 Power Cord & Plug
58 Cover
59 Switch
60 Spring
61 Plunge Rod
62 Upper Cover
63 Hexagon Nut
64 Lower Cover
65 Bellows Seal
66 Slotted Shoulder Screw
67 Waver Washer
68 Turntable
69 Steel Ball
71 Chip Shield
72 Bottom Support
73 Slotted Set Screw
74 Guiding Rod
75 Base Plate
76 Screw
77 Guide Bush
78 Screw
79 Parallel Guide
80 Plain Washer
81 Spring Washer
82 Screw
83 Lock Bolt
84 Cover
Code Description Code Description Code Description
PARTS LIST

GRAPH 0F PARTS / DIAGRAMA DE PARTES
KN RO-1200
Router 1200 Watts
Rebajadora 1200 Watts13
/4
H . P.

1 Tornillo
2 Cubierta
4 Ajustador de velocidad
5 Tornillo
6 Cubierta
7 Tornillo
8 Junta epoxy
9 Portacarbones
10 Forro de carbones
11 Carbones
12 Carcaza del motor
13 Resorte
14 Arandela
15 Baleros
16 Estator
17 Tornillo
18 Rotor
19 Seguro para flecha
20 Deflector
21 Tornillo
22 Placa de sujeción
23 Balero
24 Tornillo
25 Perilla de ajuste
26 Empaque
27 Indicador de profundidad
28 Perno de profundidad
29 Barra tope de profundidad
30 Tornillo
31
Palanca de bloqueo de descenso
32 Tornillo
33 Resorte
34 Tuerca
35
Cubierta izquierda del mango
36 Tornillo
37 Arandela de presión
38 Arandela
39 Mango izquierdo
40 Cuerpo de inmersión
41 Tornillo
42 Tuerca
43 Resorte
44 Seguro de husillo
45
Botón de bloqueo del husillo
46 Bloqueo de la cubierta
47
Tornillo
48 Portaherramienta
49 Tuerca
50 Llave
51 Alambre interno
52
Cubierta derecha del mango
53 Mango derecho
54 Sujetador del cable
55 Tornillo
56 Protector de cable
57 Cable eléctrico y enchufe
58 Cubierta
59 Interruptor
60 Resorte
61 Barra de inmersión
62 Cubierta superior
63 Tuerca
64 Cubierta inferior
65 Sello de fuelle
66 Tornillo
67 Arandela
68 Placa giratoria
69 Balin de acero
71 Protector de chispa
72 Soporte inferior
73 Tornillo
74 Barra de guía
75 Plato base
76 Tornillo
77 Guía
78 Tornillo
79 Guía paralela
80 Arandela
81 Arandela de presión
82 Tornillo
83 Perilla
84 Cubierta
No. Descripción No. Descripción No. Descripción
LISTA DE PARTES

ELECTRICAL DIAGRAM / DIAGRAMA ELECTRICO
Motor
Speed ajustor / Ajustador de velocidad
Switch
Interruptor
120 V~

Motor: 120 V ~ 60 Hz 10 A
Potencia:
1 200 Watts
(1-3/4 caballos de fuerza)
Velocidad:
11 000 – 28 000 r/min (sin carga)
Portaherramientas: 1/4” (6.3 mm)
Carrera de inmersión: 2-1/8” (54 mm)
Dimensión de la base:
6-1/4” (158.8 mm)
Peso neto/bruto: 4.2/4.6 kg
INSTRUCCIONES DE SEGURIDAD GENERALES
1. SEGURIDAD DEL ÁREA DE TRABAJO
a) Mantenga el área de trabajo limpia y bien iluminada.
Las áreas estorbadas u oscuras invitan a accidentes.
b) No utilizar las herramientas eléctricas en las
atmósferas explosivas (presencia de líquidos inflamables,
de gases o de polvo). Las herramientas eléctricas crean las
chispas que pueden encender aserrin.
c) Mantener a niños y personas alejadas mientras funciona
una herramienta eléctrica. Las distracciones pueden
hacerle perder control.
ESPECIFICACIONES
REGLAS PARA LA OPERACIÓN SEGURA
CONOZCA SU HERRAMIENTA
Antes de utilizar esta herramienta, lea detenidamente este man-
ual de instrucciones y todas las etiquetas del rebajador. Man-
tenga este manual práctico para la referencia futura.
IMPORTANTE
El servicio de esta herramienta se debe llevar a cabo solamente
por un técnico calificado del servicio.
LEA TODAS LAS INSTRUCCIONES A FONDO
IMPORTANTE: Lea este manual de instrucciones antes de utilizar su nueva
herramienta. Preste mucha atención a todas las Instrucciones de Seguridad,
Advertencias y Precauciones. Utilice la herramienta adecuada y sólo para el
uso que fue diseñada.
Los símbolos de seguridad en este manual se utilizan para señalar peligros
por medio de una bandera. Los símbolos de seguridad y sus explicaciones
requieren su comprensión completa. Simplemente la lectura de una adver-
tencia de seguridad no elimina un peligro particular, ni substituye para los
procedimientos apropiados de la prevención de accidentes.
Este símbolo de alarma de seguridad indica una precaución, una advertencia
o un peligro. La falta de conformarse con una advertencia de seguridad pu-
ede dar lugar a lesiones serias. Observar siempre las medidas de seguridad
para reducir el riesgo de lesión, de fuego o de descarga eléctrica.
2. SEGURIDAD ELÉCTRICA
a) Un enchufe de herramienta eléctrica debe estar pareja su.
Nunca modificar el enchufe de cualquier manera.
No utilizar un enchufe de adaptador en una herramienta
eléctrica puesta a tierra. Utilizar el original enchufe a un
contacto apropiado para reducir el riesgo de descarga eléctrica.
b) Evitar el contacto corporal con las superficies puestas a
tierra tales como tubos, radiadores ó los refrigeradores.
El riesgo de descarga eléctrica es mayor si se pone a
tierra su cuerpo.
c) No exponer las herramientas eléctricas a la lluvia o a la
humedad. La filtración del agua en una herramienta
eléctrica aumenta el riesgo de descarga eléctrica.
d)
No manejar mal el cable. Nunca utilizar el cable para llevar,
tirar o desenchufar la herramienta eléctrica. Guardar el cable
lejos del calor, del aceite, de filos y de piezas móviles. los
cables dañados y enredados aumentan el riesgo de descarga
eléctrica. Substituya ó repare los cables dañados. Cerciorese
que su cable de extensión esté en buenas condiciones.
e) Utilize el cable de extensión apropiado, si opera una
herramienta eléctrica al aire libre. El uso de un cable
adecuado para el uso al aire libre reduce el riesgo de
descarga eléctrica. Al usar un cable de extensión, debe
estar seguro de utilizar uno bastante robusto para el
amperaje requerido por su herramienta. Un cable de tamaño
insuficiente producirá una caida en la línea voltaje, dando por
resultado energía reducida y el recalentamiento. La tabla
siguiente ilustra el tamaño correcto del cable, dependiendo
de la longitud del cable y del grado de amperios de la
herramienta. Si duda, utilize el calibre siguiente. Cuanto más
bajo es el calibre, más pesada es le cable.
Tamaños recomendados de los cables de extension
Evaluación
Amperaje Voltios
Longitud total del cable en metros
Tamaño de Cable en A. W. G. (mínimo)
120 V~
0 – 6
6 – 10
10 – 12
25’
18
18
16
50’
16
16
16
100’
16
14
14
150’
14
12
12
12 – 16 14 12
No recomendados
3. SEGURIDAD PERSONAL
a) Permanesca alerta, vigile lo qué usted está haciendo y
utilize el sentido común al operar una herramienta
eléctrica. No utilize una herramienta eléctrica si está
cansado o bajo influencia de drogas, alcohol o de
medicación. Un momento de inatención mientras utiliza una
herramienta eléctrica, puede causar daños corporales serios.
b) Utilize equipo de seguridad. Use siempre anteojos.
Otro equipo de seguridad tal como una máscara de polvo,
zapatos de seguridad antideslizantes, un sombrero duro o
un dispositivo de protección de oído. Cuando está utilizado
bajo condiciones apropiadas, reduce daños corporales.
c) Evite el arranque accidental de la herramienta. Cerciorese
de que el interruptor esté en la posición de “OFF” antes de
enchufarla. Llevar una herramienta eléctrica con su dedo
en el interruptor o el tapar una herramienta eléctrica con el
interruptor fijado en “ON” es una práctica peligrosa.
d) Quite cualquier llave o herramienta antes de encender la
herramienta. Una herramienta atada a una pieza de rotación de
la herramienta eléctrica, puede dar lugar a daños corporales.

LEER TODAS LAS INSTRUCCIONES A FONDO
4. USO Y CUIDADO DE LA HERRAMIENTA ELÉCTRICA
a) No force la herramienta eléctrica. Utilize la herramienta
eléctrica correcta para su uso. La herramienta eléctrica
correcta hará el trabajo mejor y será más segura cuando la
utilize según lo diseñado.
b) No utilize la herramienta eléctrica si usted no puede
utilizar el interruptor en ON/OFF. Cualquier herramienta
eléctrica que no se pueda controlar por el interruptor es
peligrosa y debe ser reparada.
c) Desconecte el enchufe de la fuente de energía y/o del
paquete de batería de la herramienta eléctrica antes de
hacer cualesquiera ajuste, cambio o almacenar la
herramienta. Tales medidas de seguridad reducen el riesgo
de que su herramienta eléctrica arranque accidentalmente.
5. SERVICIO
a) Haga que su herramienta eléctrica sea revisada por una
persona calificada en reparación y que utilize solamente
piezas originales. El hacer esto le asegurará que su
herramienta trabajará correctamente.
b) Evite los peligros innecesariós asegurándose que
cualquier reemplazo del cable de su herramienta eléctrica
sea realizado por una persona calificada en su reparación.
e) No se exceda. Mantenga los pies y equilibrio siempre.
Esto asegura un mejor control sobre la herramienta
eléctrica en situaciones inesperadas.
f) Vista correctamente. No use la ropa floja o joyería.
Recoja el pelo, la ropa y los guantes lejos de piezas móviles.
La ropa floja, la joyería o el pelo largo pueden ser atrapados
por piezas móviles. Las salidas de aire que cubren a menudo
piezas móviles, deben también ser evitadas.
g) Cerciorese que cualquier dispositivo que se utilizará
conjuntamente con instalaciones de extracción y de
colección de polvo esté, conectado correctamente. El uso
de estos dispositivos puede reducir peligros relacionados
con el polvo.
INSTRUCCIONES DE SEGURIDAD ESPECÍFICAS PARA EL REBAJADOR
ADVERTENCIA: Lea todas las instrucciones. La falta de
atención a las instrucciones siguientes puede dar lugar
a descargas eléctricas, a fuego y/o a lesiones serias.
• Sostenga la herramienta eléctrica por sus mangos
aislados al realizar cualquier operación en la cual la
herramienta pueda entrar en el contacto con el cableado
oculto o su propio cable. El contacto con un alambre “vivo”
también hará que las partes de metal expuestas de la
herramienta transmitan al operador una descarga eléctrica.
• Utilize prensas u otros medios prácticos de sujeción
para apoyar la pieza de trabajo a una plataforma estable.
Sostener el trabajo a mano o contra su cuerpo lo deja
inestable y puede dar lugar a la pérdida de control.
• Mantenga los mangos secos, limpios y libres de aceite o de
la grasa. Esto permitirá un mejor control de la herramienta.
• Mantenga las manos lejos del área de corte. Nunca ponga
sus manos debajo de la pieza de trabajo por cualquier
razón. Mantenga la base del rebajador en contacto firme
con la pieza de trabajo al cortar. Agarre el rebajador
solamente por sus mangos. Estas precauciones reducirán
el riesgo de daños corporales.
• Utilize fresas afiladas. Las fresas sin filo pueden hacer al
rebajador desviarse o atascarse bajo presión.
• Nunca toque la fresa inmediatamente después del uso.
Puede ser extremadamente caliente.
• Esté seguro que el motor ha parado totalmente antes de
que usted ponga el rebajador abajo. Lesiones o daños podría
d) Guarde las herramientas fuera del alcance de los niños y
no permita que ésos desconocidos usen la herramienta.
Las herramientas eléctricas son peligrosas en manos de
usuarios inexpertos.
e) Manteniendo las herramientas eléctricas. Compruebe si
hay desalineamiento o atascamiento de piezas móviles.
La fractura de piezas y de cualquier otra condición que
puedan afectar la operación de la herramienta eléctrica.
Si está dañada, debe tener la herramienta eléctrica
reparada antes de usar. Muchos accidentes son
causados por herramientas eléctricas mal mantenidas.
f)
Manteniendo las herramientas de corte afiladas y limpias. Las
herramientas de corte correctamente afiladas y limpias son
menos probables que se atasquen y son más fáciles de controlar.
g) Utilize la herramienta eléctrica, los accesorios, los
cortadores componentes de acuerdo con estas
instrucciones y de manera correcta para el tipo de trabajo
a ser realizado. Usar una herramienta eléctrica para
operaciones distintas para las cuales fué diseñada,
puede dar lugar a una situación peligrosa.
resultar de un cabezal que todavía esté girando cuando se
coloca la herramienta.
• Utilize solamente fresas con un diámetro igual al del
portaherramienta.
• Utilize solamente fresas adecuadas para la velocidad
sin carga de la herramienta.
• Esta herramienta no fué diseñada para usarse en
mesas de rebajador.
• No utilize la herramienta en una posición invertida. No
intentar emplear la herramienta de modo inmóvil.
•
Cerciorese que la tuerca del portaherramienta esté apretada
con seguridad para evitar que la fresa se deslice durante uso.
ADVERTENCIA: Algunos polvos generados por lijar,
aserrar, esmerilar, perforar y otro que contengan produc-
tos químicos como solventes pueden causar el cáncer,
defectos de nacimiento u otros problemas reproductivos.
Los ejemplos de tales productos químicos incluyen:
• Silicona cristalina de ladrillos, cemento y de otros productos
de la albañilería.
• Arsénico y cromo de la madera para construcción
químico-tratada (CCA).
Su riesgo de tal exposición varía, dependiendo de cuantas veces ust-
ed hace tal trabajo. Reducir su exposición a estos productos quími-
cos trabajando en un área bien ventilada y trabajando con el equipo
de seguridad aprobado, tal como máscaras de polvo diseñadas es-
pecíficamente para filtrar hacia fuera partículas microscópicas.

1
2
3
4
5
9
6
7
8
11
12
13
14
INSTRUCCIONES DE SEGURIDAD ESPECÍFICAS PARA EL REBAJADOR
ADVERTENCIA: El uso de esta herramienta
puede generar y/o dispersar polvo, que puede
causar lesiones respiratorias u otras serias
y permanentes. Utilize siempre dispositivo
respiratorio certificado apropiado para prote-
gerlo contra la exposición de polvo. Diríja las
partículas lejos de la cara y del cuerpo.
PRECAUCIÓN: Use dispositivos de pro-
tección adecuados durante el uso. El ruido
causado por este producto, podría contri-
buir a la perdida de audición en determina-
das condiciones y plazos de utilización.
• Evite el contacto prolongado de polvo que genere el lijar, aserrar,
las actividades de la construcción esmerilar, perforar y otras. Use
ropa protectora y lave las áreas expuestas con jabón y agua. Evite
que el polvo entre en su boca, ojos o que quede en su piel, pueden
favorecer la absorción de productos químicos dañinos.
10
CONOZCA SU REBAJADOR (véase fig. 1)
Antes de intentar utilizar este rebajador, famil-
iarícese con todas sus características de funcion-
amiento y requisitos de seguridad. Este rebajador
de la eléctrico esta diseñado para ser utilizado
sólo para el fresado de ranuras, formación y el
borde de madera o materiales similares. Cualqui-
er otro uso del rebajador que no está indicado en
este manual podría dañar el rebajador o lesionar
gravemente al operador y por lo tanto, se excluye
expresamente de la gama de aplicaciones.
OPERACION
Fig. 1
1. Interruptor ON/OFF
2. Botón de bloqueo
automático de blancos
3. Ajustador de velocidad
4. Palanca de bloque
de inmerción
5. Bloqueador del husillo
6. Tuerca del
portaherramienta
7. Torreta tope
de profundidad
8. Barra tope de profundidad
9. Escala de profundidad de corte
10. Adaptador de extracción de polvo
11. Protector de viruta
12. Tornillo de fijación
13. Perno de bloqueo
14. Base
Volts............................. V A.............. Ampers
Hertz .......................... Hz W............. Watts
Minutos..................... min ~.............
Corriente alternada
Corriente continua.....
no
............ Velocidad sin carga
Clase II de................. ........... Terminal a tierra
la construcción
Símbolo alerta........... .../min......
Revoluciones
de la seguridad
ó carretas
por minuto
!
La etiqueta puesta a su herramienta
puede incluir los símbolos siguientes.

Fig. 2
OPERACIÓN
ADVERTENCIA: Para evitar daños corporales, desco-
necte siempre el enchufe de la fuente de energía an-
tes del montaje, ajuste o cambio de fresas. La falta
de atención a estas instrucciones podría dar lugar a
arranque accidental y a posibles leciones.
ADVERTENCIA: Para reducir el riesgo de lesión, no
sobrecargue la herramienta. Dejarla trabajar a su pro-
pio paso. Dirigir el cable cuidadosamente para evitar
accidentalmente cortarlo.
PARA MONTAR O DEMONTAR LA FRESA
Para instalar el cortador (ver Fig. 2)
• Desenchufe la máquina.
• Quiter el protector desmontable de viruta (11).
• Mantenga el bloqueador de husillo (5) presionado y gire el
husillo hasta que el bloqueador de husillo enganche
completamente.
• Coloque el rebajador al reves en una superficie plana.
• Afloje la tuerca del portaherramienta (6) usando la llave
proporcionada. Inserte la fresa en el portaherramienta.
• Mantenga el botón del bloqueo del husillo (5) presionado y
apriete la tuerca del portaherramienta (6) usando la llave
proporcionada.
• Libere el bloqueador de husillo.
PRECAUCIÓN: Peligro de quemadura. Las fresas se
calientan durante el uso. De un plazo suficiente para
que la fresa se refresque antes de substituirla.
Para quitar la fresa
• Mantenga el bloqueador del husillo (5) presionado.
• Afloje la tuerca del portaherramienta (6) use la llave
proporcionada y quite la fresa.
• Libere el bloqueador de husillo.
AJUSTE DE LA PROFUNDIDAD DEL CORTE (véase fig. 3)
ADVERTENCIA: Apage el rebajador y desconectete de
la fuente de alimentación. La profundidad del corte es
la distancia entre la barra de la parada de la profundidad
(8) y la torrecilla de la parada de la profundidad (7). La
profundidad del corte se puede fijar en dos maneras
diferentes como sigue:
Fig. 3
Perilla de ajuste
Puntero
Desenchufe el rebajador.
• Aflojar el perno de fijación (12).
• Tire de la palanca de bloque de inmersión (4) hacia arriba.
• Baje el rebajador hasta que la fresa toque la pieza de trabajo.
•
Empuje la palanca del bloqueador de inmersión (4) hacia abajo.
• Mueva el indicador a la posición cero respecto a la escala (9).
AJUSTE DE LA PROFUNDIDAD DEL CORTE USAR
LA ESCALA
•
Ponga a la profundidad deseada del corte a la posición de salida.
• Mueva la barra tope de profundidad (8) a
la posición calculada respecto a la escala.
• Apriete el tornillo de fijación (12).
• Ajuste con precisión usando la perilla de ajuste.
• Tire de la palanca de bloqueo de inmersión (4) hacia
arriba y deje el rebajador en su posición original.
• Encienda el rebajador y baje la unidad para hacer el corte
deseado. presionando.
AJUSTE DE PROFUNDIDAD DE CORTE USANDO
UN PEDAZO DE MADERA
•
Desconectar el rebajador.
• Bajar el rebajador como se describe anteriormente.
•
Tire de la barra tope de profundidad (8) hacia arriba.
• Entre la torrecilla de la parada de la profundidad (7) y la barra
de la parada de la profundidad (8), colocar un pedazo de
madera con a grueso igual a la profundidad deseada del corte.

OPERACION
AJUSTE DE LA TORRECILLA DE PROFUNDIDAD
Si usted quiere hacer varios cortes con una diversa profundi-
dad, ajustar cada parada de la profundidad.
• Desenchufar el rebajador.
• Aflojar el tornillo de cierre.
• Fijar la torrecilla de la parada de la profundidad al ajuste
deseado. Dar vuelta a la derecha o a la izquierda bajar
o levantar la torrecilla de la parada de la profundidad.
• Apretar el tornillo de cierre.
• Apretar el tornillo de cierre (12).
• Ajuste con precisión usando la perilla de ajuste (21).
• Quitar el pedazo de madera.
• Tirar la palanca de la cerradura de la zambullida (4) hacia
arriba y dejar el rebajador volver a su posición original.
• Después de encender el rebajador, bajarlo para hacer
el corte deseado.
CAMBIANDO EL REBAJADOR POR INTERVALOS
(véase fig. 4)
Encendiendo el rebajador
Presionar el gatillo del interruptor (1).
Apagando el rebajador
Liberar el gatillo del interruptor.
Operación contínua
Para trabar el gatillo del interruptor encender para la operación
continua, apriete el gatillo del interruptor (1) y mantengalo presio-
nado mientras que presiona el botón de seguimiento automático
de blancos (2). Sostenga el botón mientras que usted libera el
gatillo del disparador; la herramienta continuará funcionando.
Apriete y libere el gatillo para apagar la herramienta.
Fig. 4
Botón de
bloqueo
Interruptor
de disparo
AJUSTADOR ELECTRONICO DE LA VELOCIDAD
La velocidad de su rebajador es variable (6 velocidades vari-
ables). Utilizar el ajustador electrónico de velocidad (3) para
producir resultados uniformes en madera, plásticos y aluminio.
Utilizar ajustes más bajos para las fresas de diámetro grande y
ajustes más altos para las fresas de diámetro bajo.
USANDO EL REBAJADOR
•
Cerciorarse de que el material que se cortará esté afianzado con
abrazadera y proporcione con seguridad suficiente estabilidad
para apoyar el rebajador mientras que está funcionando.
•
Para controlar el rebajador, utilizar ambas manos en los mangos.
• Girar el rebajador a la izquierda al cortar fuera de los bordes.
Girarlo a la derecha al cortar dentro de los bordes.
• Sostener siempre el rebajador del frente, asegurándose de
que el protector de la viruta está entre usted y la fresa.
• Después de fijar la profundidad de corte según lo descrito,
colocar el rebajador de modo que la fresa esté directo sobre
el punto que usted planea cortar. Funcionando el rebajador,
bajar la unidad suavemente hasta la pieza de trabajo. (NO
FORZAR EL Rebajador ABAJO.) Cuando la herramienta
alcanza su profundidad preestablecida, apriete la palanca de
bloqueo de inmersión. Una vez que usted ha acabado el
encaminamiento, aflojar la palanca de bloqueo de inmersión
y permitir que el resorte levante el rebajador directo de
la pieza de trabajo.
NOTA: Alimentar siempre la pieza de trabajo al rebajador contra
la dirección de rotación de la fresa.
VELOCIDAD DE ALIMENTACIÓN E INDICE DE CORTE
El nivel de entrada depende de la configuración del material y de
la fresa. La experiencia es la mejor guía. Hacer familiar el sonido
y la sensación del rebajador haciendo cortes de práctica en ma-
teriales de desecho. Realizar un ajuste preliminar del control de
velocidad, seleccionando una velocidad más alta para las fresas
de un diámetro más pequeño y una velocidad más baja para las
fresas de un diámetro más grande.
La fresa del rebajador gira a una velocidad muy elevada y puede
calentarse, causando marcas de quemadura si el rebajador se
mueve demasiado lento a través de la madera. La alimentación
del rebajador demasiado rápido o el intentar quitar demasiado
material en un solo paso sobrecargará el motor. Use dos o más
pasos para los cortes mas grandes que lo normal, especial-
mente en el caso de la madera dura.
ADAPTADOR DE LA EXTRACCIÓN DE POLVO
Al emplear el adaptador de extracción de polvo, estar seguro
que el aspirador está apartado y asegurado correctamente
de modo que no se vuelque ni interfiera con el rebajador. La
manguera de vacío y el cable eléctrico deben también ser co-
locados de modo que no interfieran con el rebajador o pieza
de trabajo. Si el aspirador o la manguera de vacío no se puede
colocar correctamente, debe ser retirada.
• Girar el aspirador antes de girar el rebajador.
• Vaciar el aspirador cuanto sea necesario.

OPERACION
Guía de borde recta para el rebajador (véase fig. 5) La guía de
borde recta es un asistente eficaz para cortar en línea recta, al
achaflanar o acanalar.
• Aflojar los tornillos de bloqueo.
• Alimentar las barras en la guía de borde a través de los
agujeros en la base.
• Ajustar la distancia entre la fresa del rebajador y la guía de
borde, moviendo la guía hasta que se sitúe en la distancia
apropiada.
• Apretar los tornillos de bloqueo para llevar la guía de borde
recta a la posición.
Fig. 5
Descripción Aplicación
(1) Fresa recta Las ranuras y rebajes
(2) Fresa de recorte Recorte de chapas o maderas
duras, así como de perfiles de
precisión mediante un patrón
(3) Fresa rebajadora Ranuras en piezas rectas o curvas
(4) Fresa V-ranurado Ranurado, grabado y
el borde biselado
(5) Fresa núcleo caja Estrías, el grabado y el borde
decorativo de moldeo
(6) Fresa cove Borde decorativo de moldeo
(7) Fresa para moldear Borde decorativo de moldeo
(8) Fresa para redondeo Redondeo bordes
(9) Fresa cola de milano Juntas del engajar
(10) Fresa chaflán Chaflanado bordes
FRESAS PARA REBAJADOR (no incluidas) (véase fig. 6)
Fig. 6
1 2 3 4 5
678 9 10
CONSEJOS PARA EL USO ÓPTIMO
• Girar la herramienta a la izquierda al trabajar en los bordes
externos. Girar la herramienta a la derecha al trabajar en los
bordes internos.
• Utilizar las fresas del rebajador en HSS (acero de alta
velocidad) para la madera blanda.
• Utilizar las fresas del rebajador en TCT (carburo de
tungsteno) para la madera dura.
• No se requiere ninguna guía para el uso de la herramienta.
Esto es útil para realizar el trabajo
creativo. Hacer solamente cortes
supeficiales.
• Referirse a la tabla siguiente para
los tipos comunes de fresas del
router.

Usar la guía del patrón (véase fig. 7)
La guía del patrón se puede utilizar para producir una forma del
recorte (tal como una letra) de un patrón.
• Asegurar el patrón sobre la pieza de trabajo usar la cinta de
doble cara o las abrazaderas de “G”.
• La fresa del rebajador debe ponerse debajo del reborde de la
guía del patrón para producir un corte en la forma del patrón.
MANTENIMIENTO
Antes de la limpieza o de realizar cualquier mantenimiento, cer-
ciorarse de que el rebajador se ha desconectado de su fuente de
alimentación. Mantener todas las aberturas de ventilación limpias.
Evitar usar solventes para limpiar piezas plásticas. La mayoría de
los plásticos son vulnerables a solventes comerciales. Utilizar un
paño limpio para quitar la suciedad, el aceite y la grasa.
ADVERTENCIA: Evitar que el líquido de frenos, la gaso-
lina, los productos petróleo-basados, aceite penetran-
te, etc., entren en el contacto con las piezas plásticas.
Estas sustancias contienen los productos químicos
que pueden dañar, debilitar o destruir el plástico.
ADVERTENCIA: Para seguridad y confiabilidad, cercio-
rarse de que todas las reparaciones sean realizadas
por un técnico calificado de servicio.
1. Llave de portaherramienta
2. Guía de borde recta
3. Tuerca del portaherramienta
4. Portaherramienta (1/4”)
5. Guía del patrón
ACCESORIOS (véase fig. 8)
• Limpiar regularmente las salidas de aire en su herramienta
usar un cepillo suave o un paño seco.
• Limpiar regularmente el compartimento del motor usar un
paño húmedo. No utilizar ningún abrasivo o limpiador
solvente-basado.
Fig. 8
Fig. 7
OPERACION

www.knova.com.mx
Table of contents
Languages:
Other KNOVA Power Tools manuals

KNOVA
KNOVA KN 7420-20A User manual

KNOVA
KNOVA KN 7420-12 User manual

KNOVA
KNOVA KN RO-1321 User manual

KNOVA
KNOVA KN 5025 User manual

KNOVA
KNOVA KN DP-3000N User manual

KNOVA
KNOVA KN RO-1313 User manual

KNOVA
KNOVA KN 7402-10PA User manual

KNOVA
KNOVA KN DP-2500N User manual

KNOVA
KNOVA KN 5012 User manual

KNOVA
KNOVA KN DP-2000N User manual