manuals.online logo
Brands
  1. Home
  2. •
  3. Brands
  4. •
  5. Knox
  6. •
  7. Lock
  8. •
  9. Knox KLS-3200 User manual

Knox KLS-3200 User manual

KnoxBox® Shell
Lock Washer
Lock
Shell Nut
Cam
Adjustment Shim
Washers as needed
KnoxBox® Door
Dust Cover Bracket
Knox eLock™ Core
Knox eLock Shell
Knox RainGuard™
Knox eKey™
Stopwasher
Dust Cover
Lock Cam Nut
KnoxBox® Shell
Lock Cam Nut
Lock Washer
Cam
KnoxBox® Door
Dust Cover Bracket
Mechanical Lock Shell
Dust Cover Magnet
Mechanical Lock Core
Mechanical Key
Dust Cover
Lock
Shell Nut
Adjustment Shim
Washers as needed
Stopwasher
KNOX ELOCK CORE RETROFIT
KLS-3200 & KLS-1650 INSTALLATION GUIDE
Figure 2
Knox eLock Core Installation
Figure 1
Mechanical Lock Core Removal
CAUTION:
Activate Knox eKey and Knox eLock Core prior to installation!
The Knox eLock Core and the Knox eKey must be activated before installation
of the Knox eLock Core. See the KnoxConnect™Management System Administrator User Guide for further instructions.
Installation Time:
Less than 10 minutes
OPE-ESYSLR-0286-E
©Knox Company. All Rights Reserved
KNOX ELOCK CORE RETROFIT:
KLS-3200 & KLS-1650 INSTALLATION GUIDE
2
1601 W. DEER VALLEY RD. PHOENIX, AZ 85027 | T. 800-552-5669 | F. 623-687-2290 | TECHSUPPORT@KNOXBOX.COM | KNOXBOX.COM
MECHANICAL LOCK CORE REMOVAL
Disassemble the mechanical lock:
Lift the Dust Cover, insert the key, and
open the lock box.
Push in the Lock Core and remove
the Cam, the remaining Washers,
and the Cam Stop Washer. Put
Cam aside for later use.
Remove the Lock Shell from the outside
of the door.
Remove the Lock Core. Pull out the
Key along with the Lock Core from the
outside of the door.
Use a 7/8" socket or wrench to remove the
Lock Shell Nut from the inside of the door.
Secure the Lock Cam by inserting a
screwdriver to the right of the Lock
Cam, located inside the door. Slide the
screwdriver down through the open slot
at the bottom of the Cam.
Use a 9/16" socket or wrench to remove
the Lock Cam Nut and Lock Washer.
Then remove the screwdriver securing
the Lock Cam.
1
4
Removing the Dust Cover Bracket
and Dust Cover:
For older models, you DO NOT need to
remove the Dust Cover Bracket and Dust
Cover if it does not come loose after the
removal of the Lock Shell. (Older model
1650 & 3200 units have a different design
that utilizes four rivets to afx the Dust
Cover Bracket to the Door.)
For newer models, the Dust Cover and
Dust Cover Bracket will come off with the
Mechanical Lock Shell. Set them aside
for reuse with the new Knox eLock Shell.
Newer 1650 models will also have a plastic
dust cover spacer and two orientation
pins. Set them aside for reuse.
7 8
5 6
2 3
IMPORTANT!
This will prevent damage to the Stop Washer.
IMPORTANT:
Return Lock Shell with the
Lock Core and Mechanical
Key to Knox Company.
Contact Technical Support
for return instructions.
NOTE:
For illustration of part
disassembly, see rst page.
OPE-ESYSLR-0286-E
©Knox Company. All Rights Reserved
KNOX ELOCK CORE RETROFIT:
KLS-3200 & KLS-1650 INSTALLATION GUIDE
3
1601 W. DEER VALLEY RD. PHOENIX, AZ 85027 | T. 800-552-5669 | F. 623-687-2290 | TECHSUPPORT@KNOXBOX.COM | KNOXBOX.COM
CAUTION:
Activate Knox eKey and Knox
eLock Core prior to installation!
The Knox eLock Core and the Knox
eKey must be activated before
installation of the Knox eLock Core.
See the KnoxConnect™Management
System Administrator User Guide for
further instructions.
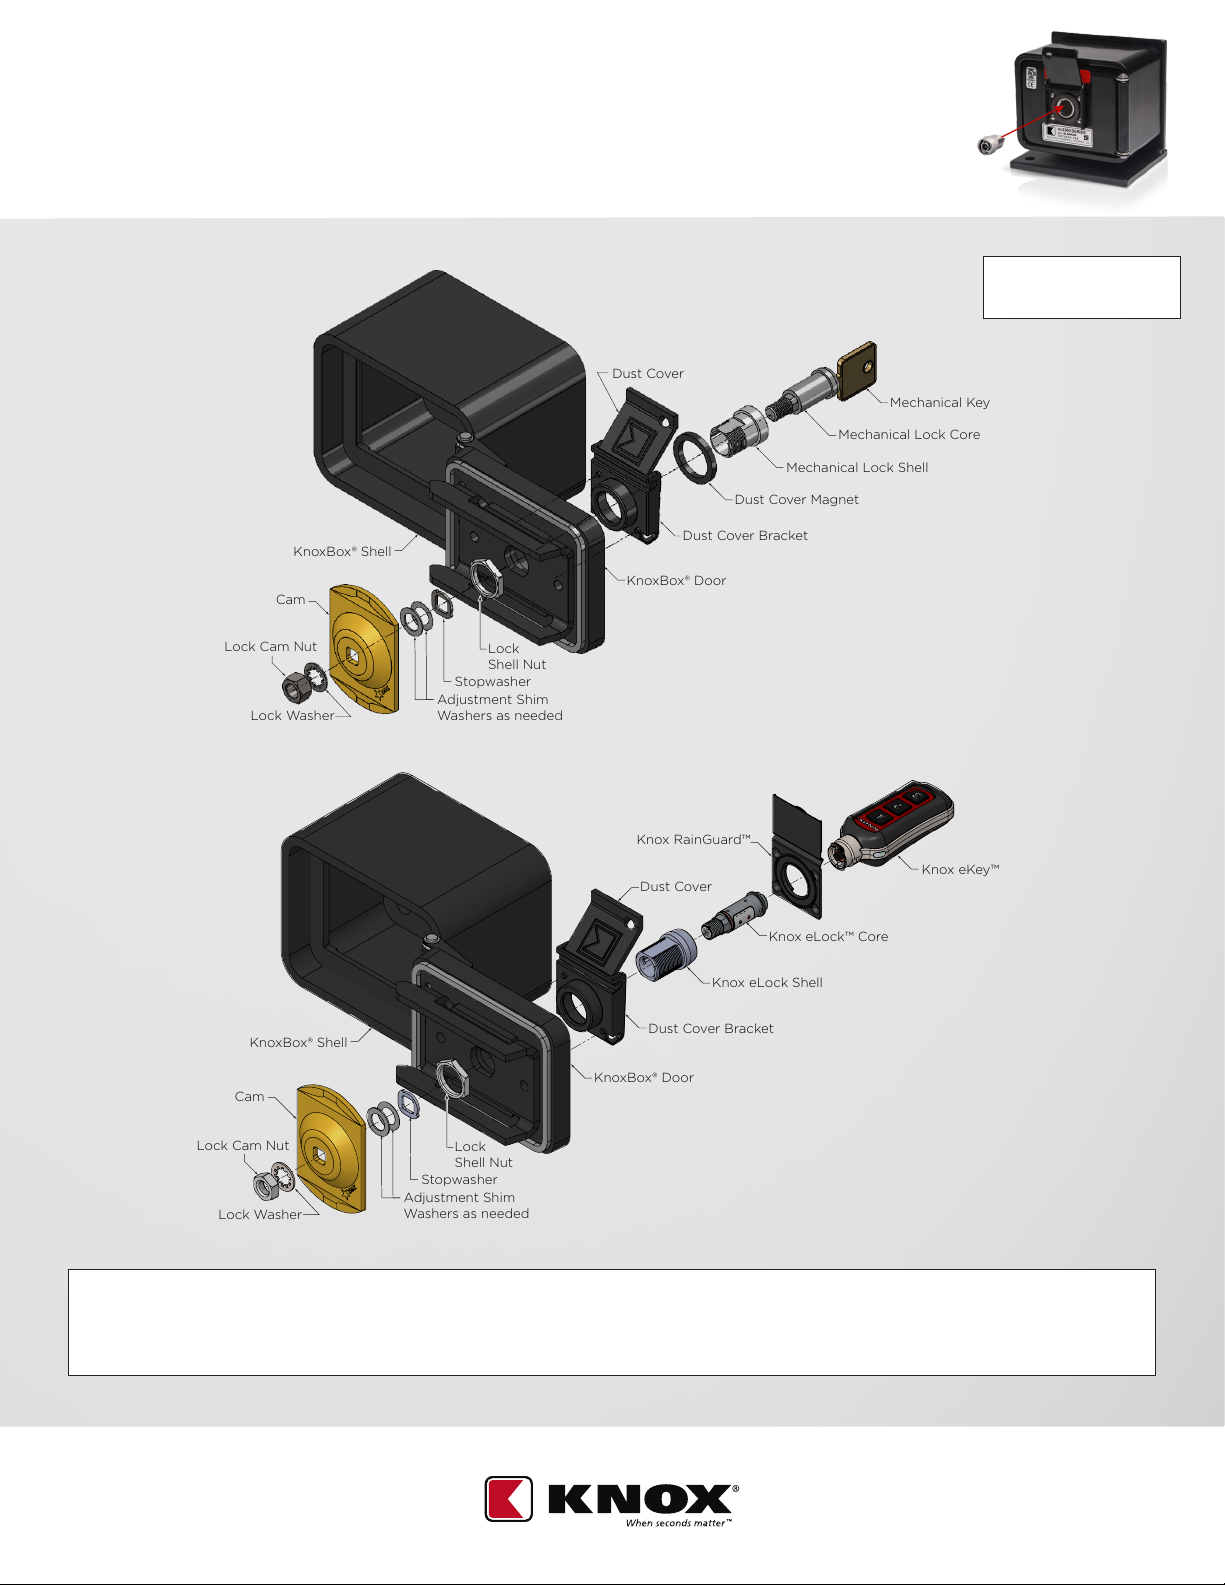
KNOX ELOCK CORE INSTALLATION
Assemble the Knox eLock Core:
Line up the sidebar of the Knox eLock
Core with the groove in the Lock Shell
and slide the Lock Core into the Lock
Shell from the outside of the door.
Insert the Dust Cover, Dust Cover
Bracket, and Knox eLock Shell into the
outside of the door as shown in Figure 2
on page 1.
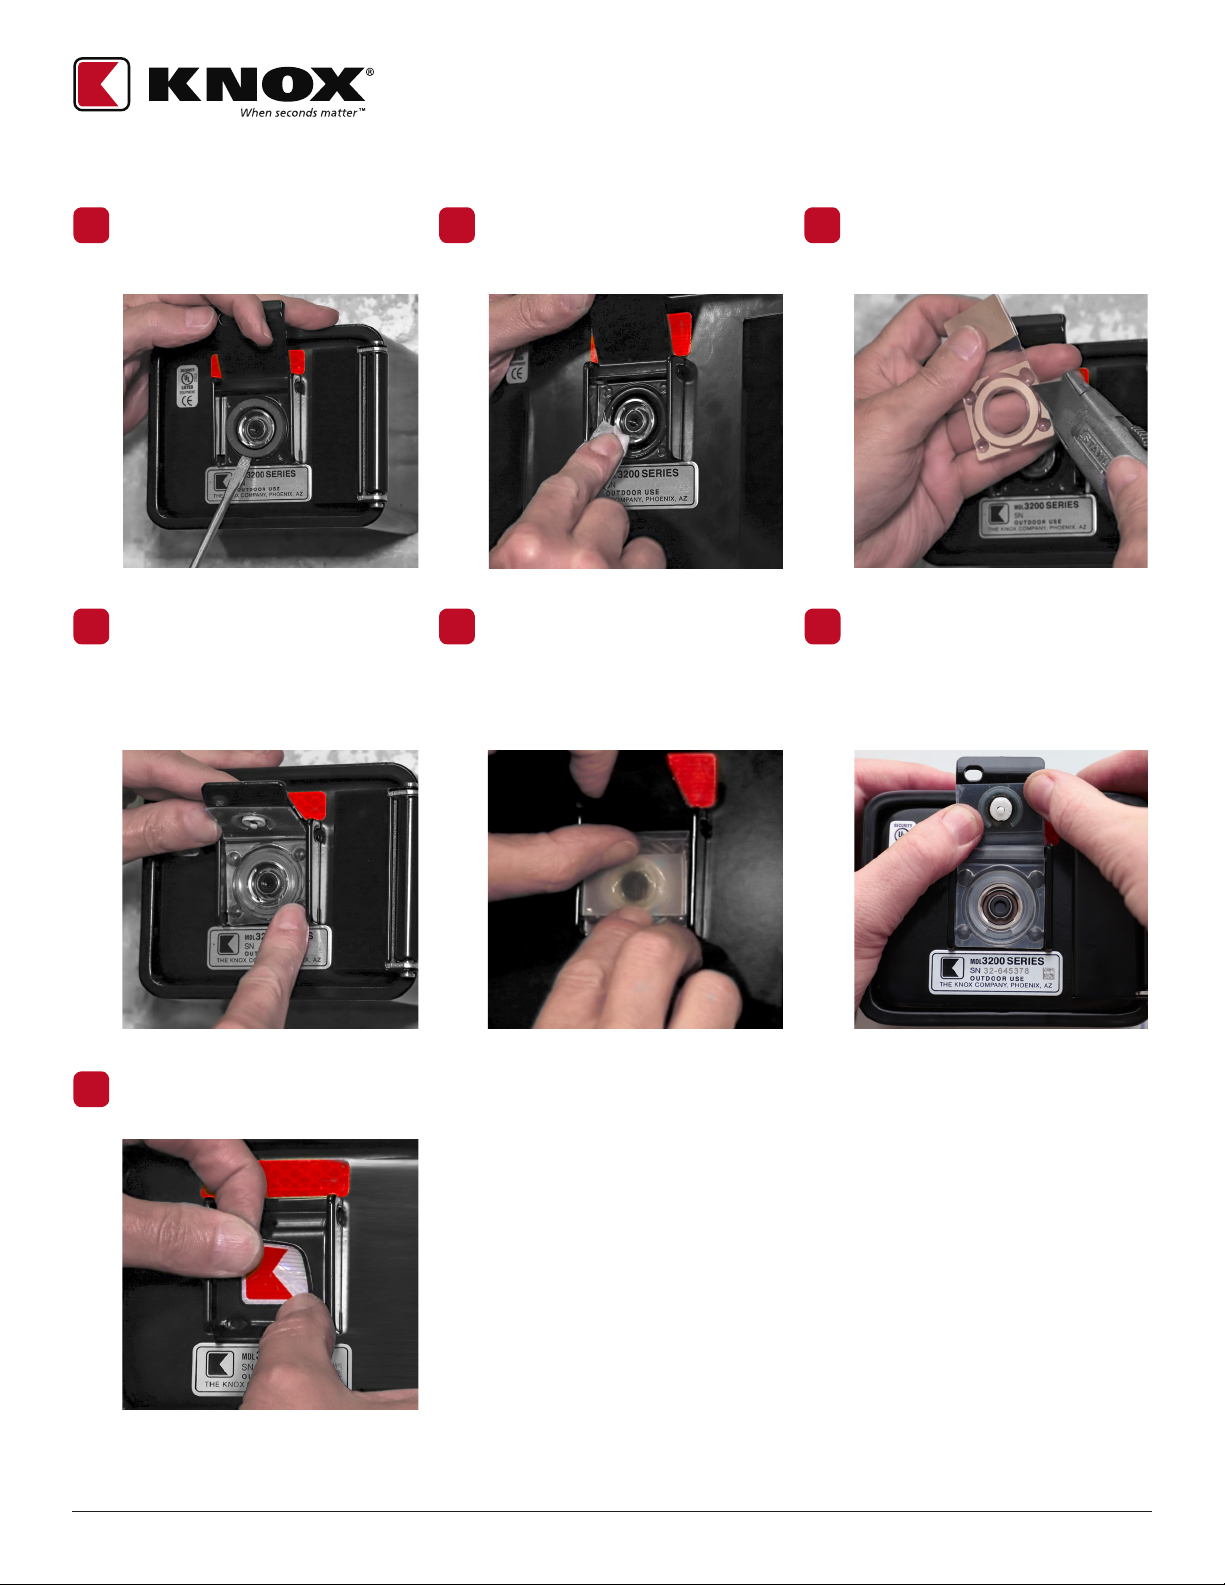
For newer 1650 type units, a
plastic spacer and two orientation pins
must be reinstalled between the KnoxBox
Door and the Dust Cover Bracket.
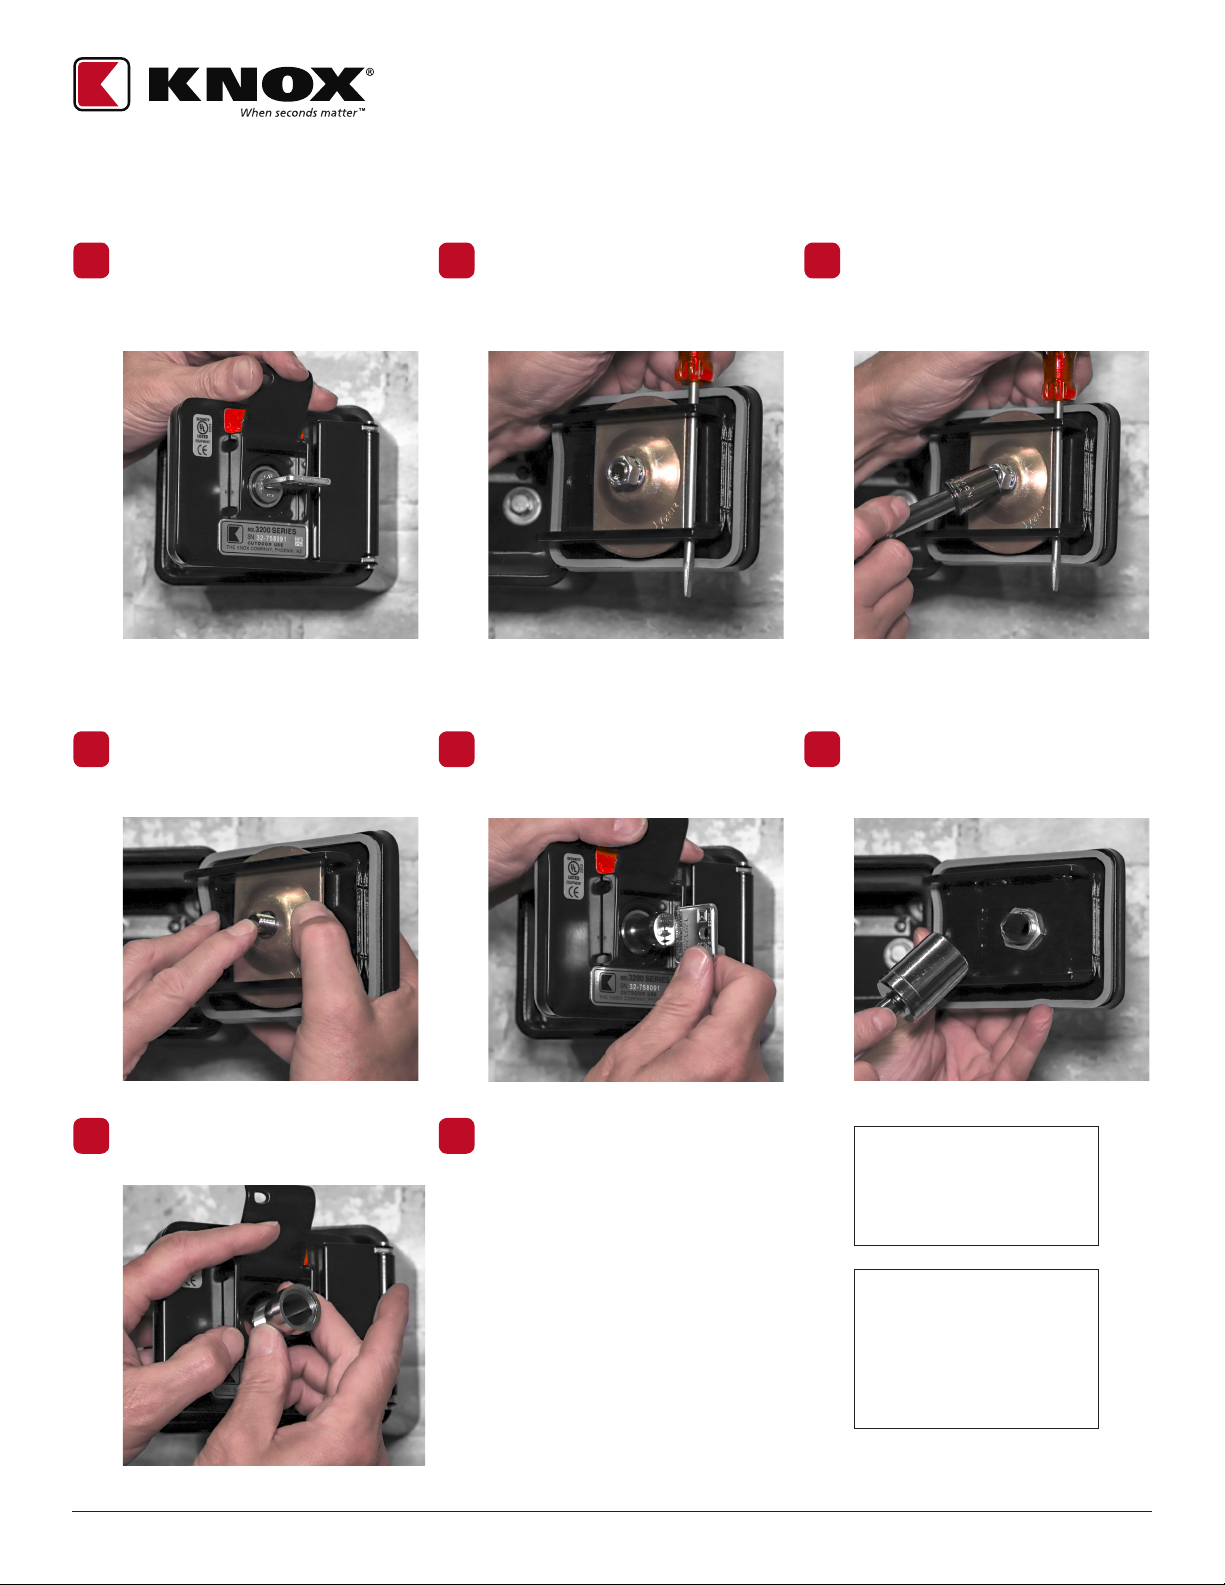
Install the Lock Shell Nut onto the Lock
Shell from the inside of the door. Ensure
the TAB on the Lock Shell is oriented to the
right or away from hinge as you look at it
from the back of the door. Use a 7/8" socket
or wrench to tighten the nut to snug.
3
1 2
Reinstall the Cam Stop Washer onto
the Lock Core from the inside of the door.
Enter your command code and insert the
Knox eKey into the Knox eLock Core to
unlock the unit (see steps below picture).
Insert the Shim Washers up against the
Stop Washer. Reinsert the Lock Cam
followed by the Lock Washer. Reinstall
and hand tighten the Lock Cam Nut.
456
IMPORTANT!
Ensure that the Stop Washer is orientated
facing away from the hinge.
WARNING!
Upon reinstallation of the Lock Cam,
DO NOT CLOSE AND LOCK THE BOX!
NOTE:
Cam shown in the locked position above.
a. Rotate the Knox eKey 90° counter-clockwise.
b. Check the inside of the door to make
certain the Stop Washer is in place and
has not slid off the Lock Core. If so,
re-secure the Stop Washer.
c. If the key turns clockwise rather than
counter-clockwise, go back to Step 4 and
change the position of the Stop Washer.
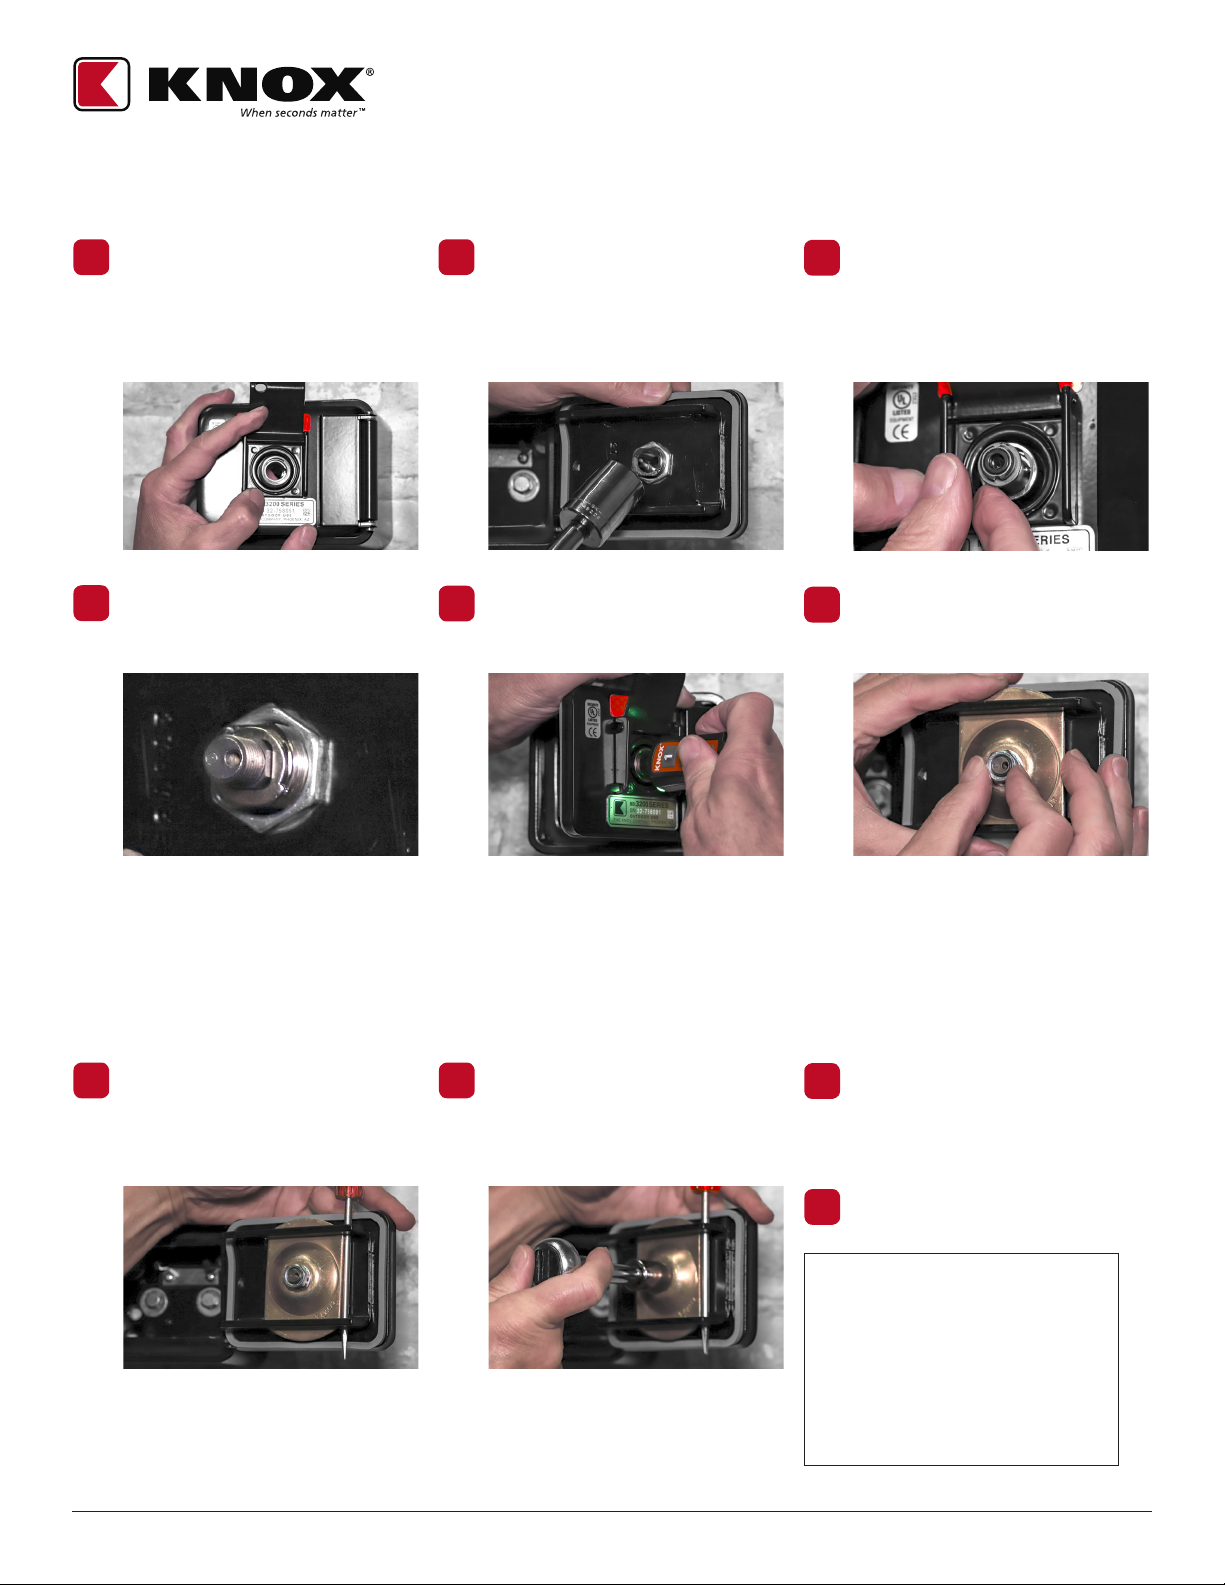
To ensure the Knox eLock Core
installation was successful, test the Knox
eLock Core BEFORE closing the box.
Enter your command code, insert the Knox
eKey & rotate the key counter-clockwise.
9
Close the door. Rotate the Knox eKey
clockwise and remove the key.
10
Tighten the Lock Cam Nut using a 9/16"
socket or wrench to snug.
8
If Cam is not in the locked position, rotate
the Knox eKey 90º clockwise to the
locked position. Secure the Lock Cam by
inserting a screwdriver to the right of the
Cam. Slide the driver down through the
open slot at the bottom of the Cam.
7
IMPORTANT!
Do not attempt without the screwdriver
in place. This will prevent damage to the
Knox eLock Core while tightening the nut.
OPE-ESYSLR-0286-E
©Knox Company. All Rights Reserved
KNOX ELOCK CORE RETROFIT:
KLS-3200 & KLS-1650 INSTALLATION GUIDE
4
1601 W. DEER VALLEY RD. PHOENIX, AZ 85027 | T. 800-552-5669 | F. 623-687-2290 | TECHSUPPORT@KNOXBOX.COM | KNOXBOX.COM
This concludes the Knox eLock Core Retrot Instructions.
Installation of the Knox RainGuard™:
Mount the Knox RainGuard to the Dust
Cover Bracket. The Knox RainGuard’s
open circle will t tightly around the
Lock Shell.
14
Use the provided alcohol wipe to clean the
backside of the Dust Cover and the surface
area all around the Lock (see note below
regarding Dust Cover Magnet).
12
Using the nose of the foam as a guide,
fold upper half of the Knox RainGuard
to align with the Lock Core center. The
nose will fold over and into the Lock
Core for protection.
15 Remove the adhesive backing from the
back side of the Knox RainGuard's upper
half. Pull out and close Dust Cover with
pressure allowing the Knox RainGuard
to rmly attach to the Dust Cover. Lift the
Dust Cover up and press both halves of
the Knox RainGuard for a rm t.
16
Lastly, remove the adhesive backing
from the Knox "K" reective label, and
place front and center of the Dust Cover.
17
Use a at head screwdriver to remove
the Dust Cover Magnet from the Dust
Cover Bracket.
11 Use a sharp instrument to remove the
adhesive backing from the bottom half of
the Knox RainGuard. The bottom half is
the section with the open circle.
13

This manual suits for next models

1

Other Knox Lock manuals

Knox ELOCK CORE RETROFIT User manual

Knox

Knox ELOCK CORE RETROFIT User manual

Knox MedVault User manual

Knox

Knox MedVault User manual

Knox KNOXLOCK SFIC User manual

Knox

Knox KNOXLOCK SFIC User manual

Knox FDC Plug User manual

Knox

Knox FDC Plug User manual

Knox KLS-1500 User manual

Knox

Knox KLS-1500 User manual

Knox KeySecure 5 User manual

Knox

Knox KeySecure 5 User manual

Knox FDC Lock User manual

Knox

Knox FDC Lock User manual

Knox KLS-4400 User manual

Knox

Knox KLS-4400 User manual

Popular Lock manuals by other brands

UNISEM UniTracer L-100 user manual

UNISEM

UNISEM UniTracer L-100 user manual

Waferlock L701 user manual

Waferlock

Waferlock L701 user manual

Waferlock L700 user manual

Waferlock

Waferlock L700 user manual

Sygonix 43172W operating instructions

Sygonix

Sygonix 43172W operating instructions

Nex-tech LA5095 user manual

Nex-tech

Nex-tech LA5095 user manual

Flipo My Safe Block quick start guide

Flipo

Flipo My Safe Block quick start guide

Turbolock SmartLOCK TL111WM manual

Turbolock

Turbolock SmartLOCK TL111WM manual

Salto XS4 Mini installation guide

Salto

Salto XS4 Mini installation guide

Leuze electronic L250 manual

Leuze electronic

Leuze electronic L250 manual

Ojmar OTS BASIC Assembly instructions

Ojmar

Ojmar OTS BASIC Assembly instructions

Hafele Axis 231.98.330 operating instructions

Hafele

Hafele Axis 231.98.330 operating instructions

LOCK ALARM 2503 manual

LOCK ALARM

LOCK ALARM 2503 manual

Schlage L-SERIES Brochure & specs

Schlage

Schlage L-SERIES Brochure & specs

Sargent and Greenleaf AxisBlu Pairing Instructions

Sargent and Greenleaf

Sargent and Greenleaf AxisBlu Pairing Instructions

iLoq S5 user guide

iLoq

iLoq S5 user guide

Assa Abloy Corbin Russwin TL3700 Series installation instructions

Assa Abloy

Assa Abloy Corbin Russwin TL3700 Series installation instructions

Waferlock L701 user manual

Waferlock

Waferlock L701 user manual

Orno OR-ZS-815 manual

Orno

Orno OR-ZS-815 manual

manuals.online logo
manuals.online logoBrands
  • About & Mission
  • Contact us
  • Privacy Policy
  • Terms and Conditions

Copyright 2025 Manuals.Online. All Rights Reserved.