Kodiak KC2100EPC User manual

MAN-KCE
Electric Powered Pressure Washer
Owner's Manual
Overview & Warnings ............................................... 1
Grounding & Extension Cords .................................. 2
Safety Precautions ................................................ 2-3
Assembly Instructions .............................................. 4
Operating Instructions .............................................. 5
Using the Accessories .............................................. 6
Working with Detergent ............................................ 7
Shutdown Instructions ............................................ 8
Storage, Winterizing & Transport .............................. 9
Basic Maintenance ............................................ 9,10
Troubleshooting .................................................. 11,12
Warranty Information .............................................. 13
Customer Service Hotline:
1-866-939-6666
visit our website:
www.kodiakpower.ca
IMPORTANT: Do not operate this equipment until you have carefully read and understand
all of the Owner's Manual. Carefully read ALL Warnings, Safety Precautions, Assembly
and Operating Instructions, Maintenance and Storage Information.
KC2100EPC model shown.
May not be exactly as shown.

1
Never aim water spray at persons, animals, electrical devices, or the machine itself.
Never touch water spray.
Never use hot water.
Never operate pressure washer without the water turned on.
Never drink alcohol or use drugs while operating this equipment.
Never operate while standing in water.
Never touch plug with wet hands.
Never let electrical connections rest in water.
Never allow the pressure washer to freeze.
Always wear safety glasses and protective clothing.
Always ensure anyone operating this equipment, carefully reads
and understands ALL important safety and equipment precautions.
Gun assembly
Nozzle connector
Spray Lance
High pressure hose
Reversible cart handle
Spray nozzles
Nuts
Unloader
Water outlet
Water inlet
Front guard
Pump
Pump oil dipstick
Thermal protector valve
Detergent suction hose
Overview
Warning!
NOTE: Check for visible shipping damage. Shipping damage will cause problems in the operation
of this unit. Contact the Customer Service hotline immediately if there are missing or damaged parts.
Do not return this product to the store.
Item Description
11
KC2100EPC model shown.
May not be exactly as shown.
12
11
10
9
8
7
6
5
4
3
2
1
15
15
14
14
13
13
12
10
9
7
8
6
5
4
3
2
1

2
Safety Overview
The Owner's Manual is an essential part of the
equipment and should be kept in a safe place for
reference. Read this manual carefully before
using the product - know your equipment. Save
these instructions. The Owner's Manual should
remain with unit at all times. If you sell the unit,
the manual should be handed on to the new
owner.
This unit was designed for specific applications. It
should not be modified or used for any application
other than that for which it was designed.
Important Safety Precautions
Grounding Instructions
This product must be grounded. If it should
malfunction or break-down, grounding provides
a path of least resistance for electric current to
reduce the risk of electric shock. This product is
equipped with a cord having a grounding plug.
The plug must be plugged into an appropriate
outlet that is properly installed and grounded in
accordance with all local codes and ordinances.
WARNING: Improper connection can result in
a risk of electrocution. Check with a qualified
electrician if you are in doubt as to whether the
outlet is properly grounded.
DO NOT modify the plug provided with the unit;
if it will not fit the outlet, have a proper outlet
installed by a qualified electrician. Do not use
any type of adaptor with this product.
Extension Cords
Extension cords are NOT recommended for this
product. If an extension cord must be used, the
following requirements must be met:
• 14-3 gauge minimum wire size up to 25 ft. cord.
• 12-3 gauge minimum wire size up to 50 ft. cord.
• Use only 3-wire extension cords that have
3-prong grounding type plugs and 3-pole cord
connectors that accept the plug from the unit.
Use only extension cords that are intended for
outdoor use. These extension cords are identified
by the marking "Acceptable for use with outdoor
appliances; store indoors while not in use." Use
only extension cords having an electrical rating
not less than the rating of the product. Do not use
damaged extension cords. Examine the extension
cord before using and replace if damaged.
Do not abuse extension cord and do not yank on
any cord to disconnect. Keep cord away from heat
and sharp edges. Always disconnect the extension
cord from the receptacle before disconnecting the
product from the extension cord. If you are using
an extension cord, it should always be completely
unwound.
continued ...
Safety Precautions
The following safety precautions are essential to
the safe operation, servicing and storage of your
pressure washer. Make sure anyone using this
pressure washer or the accessories understands
all of the following important safety and equipment
precautions.
If safety precautions are overlooked or ignored,
personal injury or property damage may occur.
Always heed these precautions, as they are
essential whenever using, servicing of storing
your pressure washer.
1. High-pressure spray can be dangerous if
subject to misuse. DO NOT direct the water
spray at persons, animals, electrical devices,
outlets, or the machine itself.
2. Never touch the water spray.
3. Never hold onto the hose or fittings while
operating the pressure washer.
4. Keep operating area clear of all persons. To
reduce the risk of injury, do not operate the
machine near children.
5. Keep work area free of obstacles. Remove
loose objects from spray path. Secure light
objects to be cleaned.
IMPORTANT: Your pressure washer operates
at fluid pressures and velocities high enough
to penetrate human and animal flesh, which
could result in serious injury or loss of life.
Leaks caused by loose fittings, damaged or
worn hoses can result in injection injuries.
WARNING: DO NOT treat fluid injection as
a simple injury. Fluid injection is very
serious. See a physician immediately.

3
Safety Precautions – continued
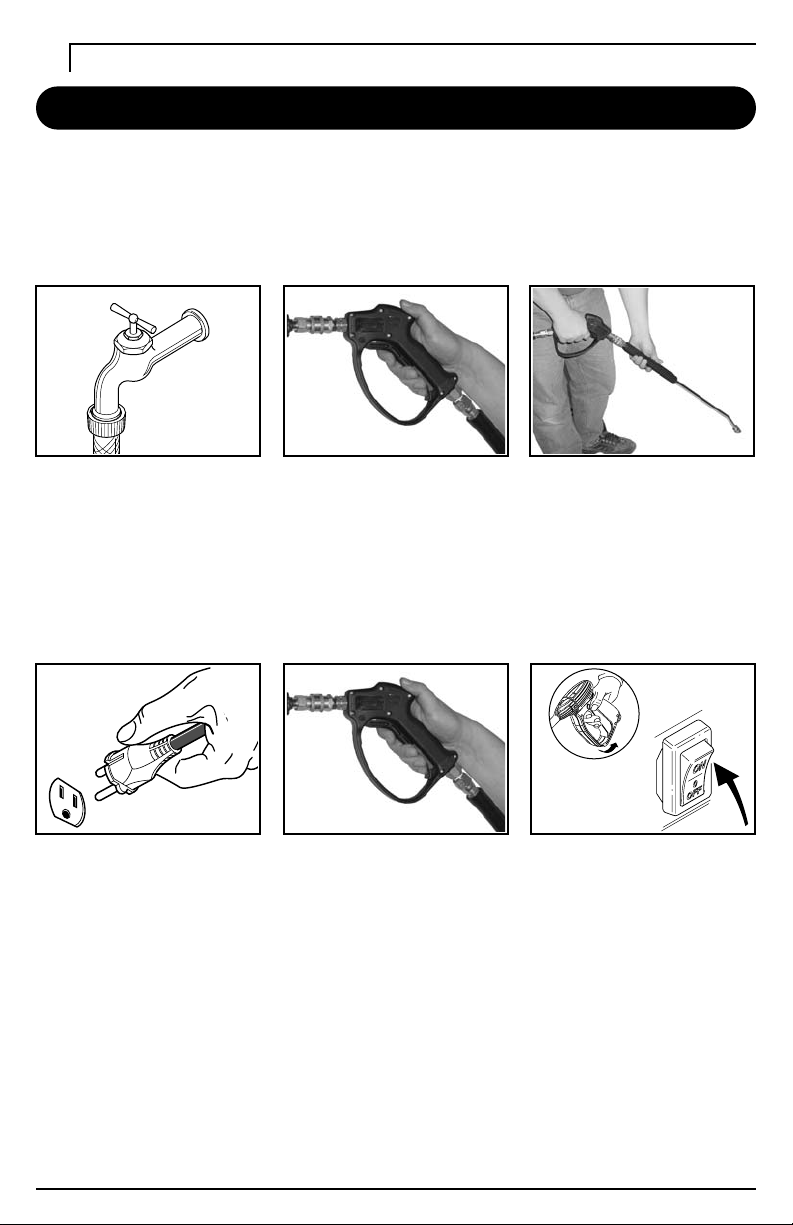
6. Always use both hands during operation to
maintain complete control of the gun/lance
assembly. Expect it to kick back when the
gun is triggered.
7. Always engage the gun safety-lock when not
spraying to prevent accidental triggering.
8. Always wear protective clothing and safety
glasses. Protect your eyes and skin from
contact with sprayed materials.
9. Stay alert - watch what you are doing.
10. DO NOT operate the product when fatigued
or under the influence of alcohol or drugs.
11. Learn how to stop the machine and release
pressure quickly. Be thoroughly familiar with
the controls.
12. Outlets with a third prong ground are required.
DO NOT use without grounded prong.
13. If replacement of the plug or cord is needed,
use only identical replacement parts.
14. Check power cords before using. DO NOT use
damaged cords as that could reduce machine
performance or cause a fatal electric shock.
15. To reduce the risk of electrocution, keep all
connections dry and off the ground. DO NOT
touch the plug or outlet with wet hands.
16. DO NOT pull on the cord to disconnect from
an outlet. Never carry your pressure washer
by the cord.
17. To prevent damage, the cord should not be
crushed, placed next to sharp objects or near
a heat source.
18. Avoid accidental starts. Move switch on unit to
OFF position before connecting or disconnect-
ing cord to electrical outlets.
19. Disconnect the plug from the outlet when not
in use, prior to detaching the high-pressure
hose and/or servicing.
20. Work in a well-ventilated area. The pressure
washer should NOT be used in areas where
gas vapors may be present. An electric spark
could cause an explosion or fire.
21. To allow free air circulation, the unit should
NOT be covered during operation.
22. DO NOT over reach or stand on an unstable
support. Keep good footing and balance at all
times when using this equipment.
23. The narrow pencil-point spray is very powerful.
It is NOT recommended for use on painted
surfaces, wood surfaces or items attached
with an adhesive backing.
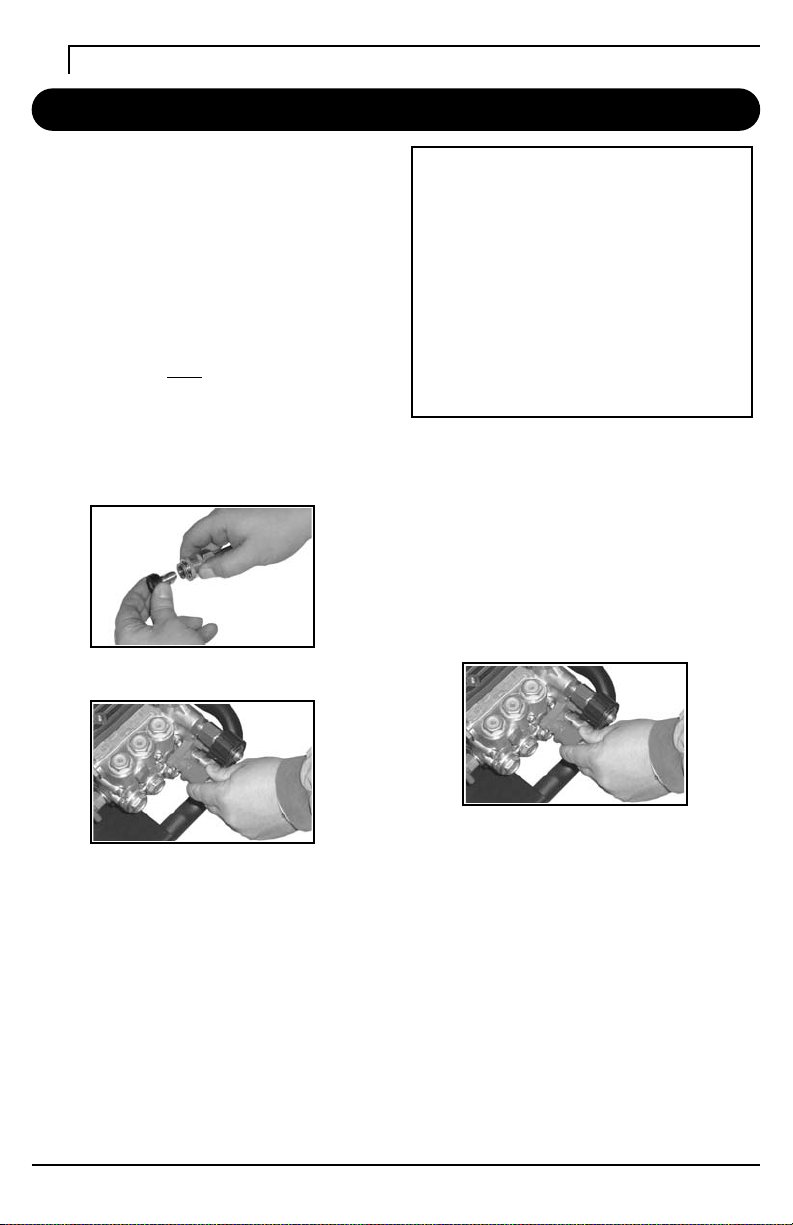
Important Safety Precautions – continued
Water Supply (Cold Water Only)
CAUTION: This machine has been designed
only for use with pressure washer detergents.
CAUTION: The pressure washer must only be
used with clean water; use of unfiltered water
or corrosive chemicals will damage the unit.
1. The supply hose must be at least 5/8 inch
in diameter.
2. The water supply must be at least twice the
pressure washer capacity. (GPM)
3. The water supply pressure must be minimum
20 psi and must not exceed 120 psi.
4. The water supply temperature must not
exceed 104˚F/40˚C.
5. Never use the pressure washer to draw in
water contaminated with solvents (e.g. paint
thinners, gasoline, oil, etc).
6. Always prevent debris from being drawn into
the unit by using a clean water source.
7. Calcium build-up due to hard water is NOT
covered by the warranty.
24. Only use pressure washer detergent with this
product. Carefully observe all instructions and
warnings before using detergents.
25. DO NOT use this machine to spray chemicals,
acids, solvents, insecticides or any flammable
material. These products can cause physical
injuries to the operator and irreversible
damage to the machine.
26. DO NOT allow the pressure washer to freeze
during colder months. Damage as a result of
freezing will void the warranty.
27. Prior to starting the pressure washer in cold
weather, be sure ice has not formed in any
part of the equipment.
28. Never tie knots or kink the high-pressure hose
as damage could result. DO NOT operate the
unit if the high-pressure hose is damaged.
29. The Gun Safety Lock PREVENTS the trigger
from accidentally being engaged. This feature
DOES NOT lock trigger in the ON position.
30. DO NOT allow the pressure washer to run for
more than 3 minutes with the gun closed and
the motor running. Prolonged operation in
bypass mode can result in damage to the
pump.
CAUTION: The pressure has been pre-set by
the manufacturer. DO NOT attempt to adjust the
pressure higher than its factory setting. Doing so
will damage the pump, void warranty and could
result in personal injury or damage.

4
CAUTION: The vented yellow plug/dipstick must be installed.
Failure to install the yellow plug/dipstick will damage the pump
and void the warranty.
NOTE: Comes with a reversible
handle which allows the user the
option of high cart or low cart
configuration by simply switching
handles from one side to the other.
Step 1
Attach handle to the frame.
Insert bolts and tighten
with hardware provided.
Step 2
Remove red shipping plug
from the pump crankcase.
Step 7
Connect the garden hose
hose to the INLET.
Hand tighten.
Step 4
Wrap the threads at the end
of high-pressure hose with
the Teflon tape provided.
Step 5
Connect the high-pressure
hose to the spray gun.
Tighten with a wrench.
Assembly Instructions
NOTE: Check for visible shipping damage. Shipping damage will cause problems in the operation of
this unit. Contact the Customer Service Hotline immediately if there are missing or damaged parts.
DO NOT return this product to the store.
Step 3
Install the provided vented
yellow plug/dipstick.
Step 8
Connect the high-pressure
hose to the OUTLET.
Pull back the collar on the socket.
CAUTION: If the lance is not securely locked into place, it could be ejected under high-pressure
when operating the gun, possibly causing injury and/or damage. Poorly mounted nozzles can become
projectile. Ensure that the connection is securely made.
Step 6
Pull back the collar on the
lance socket to insert a
nozzle. Release the collar.

5
BEFORE GETTING STARTED: Use only accessories and replacement parts authorized by the
manufacturer. The use of original accessories and replacement parts will ensure safe, trouble free
operation.
Ensure that anyone operating this equipment has carefully read and understands ALL Warning,
Safety Precautions, Assembly and Operating Instructions before using this product.
Before starting pressure washer, always ensure unit is receiving water correctly.
WARNING: Operating unit without water can damage seals and void the warranty. Always trigger
gun until steady stream of water flows from nozzle to ensure unit is receiving water correctly before
starting the motor.
Step 4
Connect the electrical cord
to a properly grounded outlet.
WARNING: DO NOT touch the
plug or outlet with wet hands
Step 5
Release gun safety-lock
and squeeze gun trigger
Step 6
Continue to squeeze gun
trigger. Turn the motor switch
to the ON position.
Step 3
Continue to squeeze gun
trigger until a steady stream
of water flows from nozzle
before releasing trigger.
Operating Instructions
Step 1
Connect the garden hose
to the water supply and
turn ON water full force.
Step 2
Release gun safety-lock
and squeeze gun trigger
CAUTION: Always shutdown the pressure washer when it is not in use.
Please refer to the Shutdown Instructions on page 8 for details.

6
Quick-Connect Nozzles
Four colour-coded quick-connect nozzles are
included with the pressure washer:
Red: This nozzle produces a high-pressure
pencil-point spray (0˚) ideal for removing
stubborn dirt.
Yellow: This nozzle produces a high-pressure
flat spray (15˚) suitable for cleaning
large surface areas.
Green: This nozzle produces a high-pressure
flat spray (25˚) suitable for cleaning
larger surface areas.
Black: This nozzle produces a low-pressure
spray that must be used for application
of detergents.
CAUTION: The pencil-point spray (0˚) is very
aggressive. For most cleaning applications, the
flat spray nozzles (15˚ and 25˚) should be used
to avoid damage to the surface being sprayed.
NOTE: The intensity of the spray increases as
you move the lance closer to the surface.
Step 1. Discharge residual pressure by pressing
and holding the gun trigger until no water
comes out of the nozzle.
Changing Nozzles
CAUTION: When installing or changing a spray
nozzle, always do so with the water turned OFF
at the source and the motor turned OFF.
Step 2. Release the gun trigger and engage the
gun safety-lock.
Step 3. Pull back the collar on the lance socket
to insert a nozzle.
Step 4. Release the collar and pull sharply on
the connection to ensure connection is
secure.
CAUTION: When inserting or taking out the
spray nozzles from the rubber grommet (located
on the handle) use a twisting action so that the
rubber grommet does not disengage from the
grommet hole.
Your dealer carries a complete line of
accessories that compliments your pressure
washer and maximizes its usage. Here are just
a few of the accessories that are offered:
• Liquid detergents
• Rotary nozzles
• Wet sandblast nozzles
Using the Accessories
The following KODIAK detergents are available:
• All-Purpose Cleaner
• Deck Wash
• Heavy-duty Degreaser
• House & Window Wash
• Wash 'n Wax
Please contact your local dealer for details,
or visit our website at www.kodiakpower.ca
CAUTION: Your pressure washer operates at fluid pressures and velocities high enough to cause
property damage. Before cleaning any surface, choose an inconspicuous area to test spray pattern
and distance for maximum cleaning results. If painted surfaces are peeling or chipping, use extreme
caution as pressure washer may remove the loose paint from the surface.

7
Cleanup Instructions
Step 1 Insert detergent suction tube into a clean
container (not supplied) with one gallon
(4 L) of fresh water.
Step 2 Pull back the collar on the spray lance
to insert detergent nozzle (see page 6).
WARNING!
• Never use bleach, chlorine products and
other corrosive chemicals
• Never use liquids containing solvents
(i.e., paint thinners, gasoline, oils)
• Never use tri-sodium phosphate products
• Never use ammonia products
• Never use acid-based products
These products can cause physical injuries
to the operator and irreversible damage to
the machine and/or damage the surface
being cleaned.
IMPORTANT: When you have finished using
detergent, always follow the Cleanup Instructions.
Failure to clean properly will cause the injection
system to become clogged and inoperable.
Step 3 Turn adjustable knob counter-clockwise
to open the detergent suction tube.
Step 4 With the motor running, press and hold
the gun trigger for one minute or until the
container of fresh water is empty.
Step 5 After siphoning the water, turn adjustable
knob clockwise to close off the detergent
suction tube.
Step 6 Release the gun trigger and attach one
of the high-pressure nozzles.
Working with Detergent
Detergent Overview
To enhance the efficiency of the pressure washer,
sometimes it is necessary to use detergents to
help loosen tough dirt and grime.
CAUTION: This machine has been designed for
use with pressure washer detergents only. The
use of other detergents or chemicals may affect
the operation of the machine and will void the
warranty.
NOTE: To apply detergent, the black-coloured
detergent nozzle must be used to activate the
low-pressure detergent injection system.
Detergent Application
Step 1 Place suction hose into a container
of pressure washer detergent.
Step 2 Pull back the collar on the spray lance
to insert detergent nozzle (see page 6).
Step 3 Turn adjustable knob counter-clockwise
to open the detergent suction tube.
Step 4 With the motor running, depress the
gun trigger to apply detergent to the work
area; DO NOT allow detergent to dry
on surface.
Step 5 After applying detergent, turn adjustable
knob clockwise to close off the detergent
suction tube.
Step 6 Release the gun trigger and attach one
of the high-pressure nozzles to rinse.

8
Step 5
Disconnect the high-pressure
hose from the water OUTLET.
Step 7
Engage the gun safety-lock.
Step 6
Disconnect the garden hose
from the water INLET.
CAUTION: Failure to discharge the residual pressure could
result in personal injury due to discharge of high-pressure
water.
Thermal Protection Valve
Your pressure washer is equipped with a thermal protection valve, located at the base of the pump.
If the motor is left running for an extended time with the gun closed, the pressure washer will vent
water into the atmosphere through this valve. This will protect against accidental situations but is not
designed for repetitive venting.
NOTE: Always shut the motor OFF and engage
the gun safety-lock when the pressure washer
is not is use.
CAUTION: Never allow the pressure washer to
run for more than 3 minutes with the gun closed
and the engine running. Prolonged operation in
bypass mode can result in damage to the pump.
Shutdown Instructions
Step 1
Turn the motor switch
to the OFF position.
Step 2
Unplug power cord
from the outlet.
Step 3
Turn OFF the water supply.
Step 4
Discharge residual pressure
by pressing and holding the
gun trigger until no water
comes out the nozzle.

9
Storage
CAUTION: Always follow Shutdown Instructions
on page 8 before storing the pressure washer or
the accessories. For your own safety, be sure to
turn the engine OFF and discharge the residual
pressure (see page 8).
Always store your pressure washer in a location
where the temperature will NOT fall below 0˚C.
Store the machine and accessories in a dry place,
protected from freezing. The machine should NOT
be placed near an open flame i.e. furnace, hot
water heater, etc.
WARNING: The pressure washer pump is
susceptible to permanent damage if frozen.
Damage as a result of unit freezing is NOT
covered by the warranty.
1. Turn the motor switch OFF.
2. Shut off water supply and relieve pressure in
the spray gun by depressing the trigger.
3. Disconnect the garden hose from the unit, but
leave the high-pressure hose connected.
4. Connect a short hose (not supplied) to the
water inlet of the pressure washer.
5. Place the other end of this hose into container
of plumbing antifreeze.
6. Start the motor to circulate the plumbing
antifreeze in the pump.
7. Press and hold the gun trigger until the fluid
comes out the nozzle. Stop the unit
immediately and disconnect from power
supply
8. Discharge residual pressure by pressing and
holding the gun trigger, then disconnect the
high-pressure hose.
The plumbing antifreeze will help protect against
freezing during storage, and help prevent the
pistons from sticking.
Winterizing
Always store your pressure washer in a location
where the temperature will NOT fall below 0˚C.
If you must store your pressure washer in a
location where the temperature is below 0˚C,
you can minimize the chance of damage to your
machine by utilizing the following procedure:
Transport
Before transport, make sure that the unit is not
under pressure and that the unit is in a secure
and upright position
Storage, Winterizing & Transport
Basic Maintenance
IMPORTANT: Always follow the Shutdown Instructions on page 8 before working on the pressure
washer or the accessories. For your own safety, be sure to disconnect the plug from the outlet and
discharge the residual pressure (see page 8) before carrying out any maintenance.
Connections
Connections on pressure washer hoses, gun/lance
assembly and spray lances should be cleaned
regularly and lubricated with lithium grease to
prevent leakage and damage to the O-rings.
If you notice an excessive oil leak, see page 11-12
of the Troubleshooting Section, or contact our
Customer Service Hotline at 1-866-939-6666
for further assistance.
Cooling System
The air vents, located in and around the pressure
washer, must be kept clean and free of any
obstructions to ensure proper air-cooling of the
motor during operation.
CAUTION: Prevent water from entering the
vents of the pressure washer to minimize the
risk of damage to the machine and to reduce
the risk of shock to the operator.
IMPORTANT: An authorized service centre
MUST carry out Maintenance and/or repair
of electrical components.

10
Water Screen
CAUTION: If the screen is not kept clean, the
flow of water to the pressure washer will be
restricted and the pump may be damaged.
The pressure washer is equipped with a water
inlet screen to protect the pump. Clogging of the
water screen will restrict flow of water. Cleaning
is immediately required with unit turned OFF.
1. Disconnect the garden hose from the INLET.
2. Remove the water screen from the INLET.
3. Clean screen under warm water.
4. Replace screen immediately to prevent any
foreign matter from entering the pump.
5. Reconnect the garden hose to the INLET.
CAUTION: Do not damage the screen while
removing or cleaning. Any foreign particles
entering the pump will damage the unit.
Basic Maintenance – continued
Nozzle
Clogging of the nozzle causes pump pressure to
be high and a distorted spray pattern can result.
Cleaning is immediately required with unit turned
OFF.
CAUTION: Failure to discharge the residual
pressure could result in personal injury due
to discharge of high-pressure water
1. Disconnect the nozzle from the lance.
2. Flush the nozzle backwards with water.
3. Reconnect the nozzle to the lance.
Restart the pressure washer and depress the
trigger on the spray gun. If the nozzle is still
plugged, repeat steps 1-3.
Step 4. Remove the yellow oil fill plug from pump.
Step 5. Add oil (SAE30 non-detergent motor oil)
until the oil level is halfway up the oil sight
glass.
Step 6. Replace yellow oil fill plug securely.
Step 1. Use a socket wrench to remove the drain
plug, located on the side of the pump.
Step 2. Drain the oil into a suitable container.
Please dispose of oil properly.
Step 3. Replace the oil drain plug securely.
Pump Oil Change
NOTE: Check the pump before every use as well
as the system components. Check Pump oil level
daily. The pump of the pressure washer will
require an oil change once a season or after the
first 50 hours operation and then every 50 hours
after that. Use only SAE30 non-detergent oil
in the pump. The pump also contains an oil sight
glass and a dipstick.

11
Troubleshooting
Symptom Possible Cause Solution
Motor will not start. On/Off switch is in the "OFF"
(O) position.
Power cord is not plugged in.
Extension cord is too long.
Extension cord is damaged.
Extension cord is
not proper gauge.
Electrical outlet does not
supply adequate power.
Overload Cutout tripped.
Trigger not operating properly.
IMPORTANT: Always follow the Shutdown Instructions (see page 8) before working on the
pressure washer or the accessories. Always disconnect the pressure washer from the outlet.
Turn switch to the "ON" (I) position.
Plug in the power cord.
Replace extension cord with either
a 25 ft. 14-gauge cord or
a 50 ft. 12-guage cord.
See Extension Cord section on page 4.
Check that the circuit
is rated for 15 amps.
Wait 2-3 minutes before restarting.
Call Customer Service hotline.
Circuit breaker trips or Circuit overload.
fuse blown in fuse box.
Check that the circuit
is rated for 15 amps.
Disconnect all other loads on the circuit.
Motor running, but Water supply is restricted.
pump is not building
to maximum pressure.
Diameter of garden hose
is too small.
Water inlet screen clogged.
Nozzle obstructed.
Unit has been stored in
freezing temperatures.
Open water faucet to full force.
Check garden hose for kinks,
leaks and blockage.
Use a minimum 5/8" diameter
garden hose.
Remove screen and clean (see page 12).
Clean nozzle (see page 12).
Thaw out unit completely including
hose, gun and wand.
Output pressure varies Water supply is restricted.
between high and low.
Pump is sucking air.
Water inlet screen clogged.
Nozzle obstructed.
Calcified gun, hose
or spray lance.
Open water faucet to full force.
Check garden hose for kinks,
leaks and blockage.
Check that hoses and fittings are airtight.
Turn off machine and purge pump by
squeezing gun trigger until a steady flow
of water emerges through the nozzle.
Remove screen and clean (see Page 12).
Clean nozzle (see Page 12).
Run distilled vinegar through machine.

12
Symptom Possible Cause Solution
No detergent. Detergent suction tube
not properly attached.
Filter on detergent suction
tube is clogged.
Detergent suction tube
damaged or blocked.
Detergent is too thick.
Nozzle obstructed.
Detergent container empty.
Check connection.
Run warm water through filter
to remove debris.
Remove obstruction or replace
detergent suction tube.
Dilute detergent. For best results
always use Kodiak detergent.
Clean nozzle (see Page 12).
Add more detergent.
Garden hose Loose fittings.
connection leaks. Missing or worn rubber washer.
Tighten or replace fittings.
Insert new washer.
Gun/lance assembly Spray lance not
or spray lance leaks. attached properly.
Broken O-ring.
Insert the spray lance into the gun/lance
assembly. Push in and turn clockwise to
lock spray wand in place.
Call Customer Service hotline
to order a replacement O-ring.
Pump is noisy. Pump is sucking air. Check that hoses and fittings are airtight.
Turn off machine and purge pump by
squeezing gun trigger until a steady flow
of water emerges through the nozzle.
Troubleshooting – continued
Water or oil leaking
from bottom of unit.
Check that all fittings are tight.
If excessive leaking occurs,
call Customer Service hotline.
Loose fittings.
A small amount of leakage
is normal.
Excessive leaking may indicate
water seals damaged or worn.
Trigger will not move. Gun safety-lock engaged. Release safety lock.
Unit will not stop when Trigger system
trigger is released. not operating properly.
Call Customer Service hotline for
closest Authorized Repair Centre.
If you encounter any difficulties not listed above, please
contact the Customer Service hotline at 1-866-939-6666
or visit our website at www.kodiakpower.ca.
IMPORTANT: Always follow the Shutdown Instructions (see page 8) before working on the
pressure washer or the accessories. Always disconnect the pressure washer from the outlet.
Water leaking. Loose fittings. Check that all fittings are tight.

13
Warranty
Kodiak Electric Pressure Washer Warranty
This product is warranted to be free from defects in materials and workmanship under normal
use and service, for a period of one year from the date of purchase, when operated and maintained in
accordance with the Maintenance and Operating Instructions supplied with the unit. Hoses, spray lances
and other accessories are warranted for 30 days. Warranty period commences on date of purchase.
The warranty herein is expressly conditioned upon the use of the correct electrical requirement, along
with the customers compliance with all precautions and instructions in the Owner's Manual.
If a difficulty develops with the product, you should contact the Customer Service Hotline for the
location of the closest Authorized Service Centre. Only these locations are authorized to make repairs
to the product or affect replacement of defective parts, which will be done at no charge within a
reasonable time after receipt of the product.
If the machine is still under warranty, the customer has a valid receipt, and the machine meets the
warranty criteria, then the repair will be made at no charge to the customer. Units and parts should
be returned at the customer's expense to the nearest Service Centre. Include the original purchase
receipt with any claim, making sure to keep a copy for your files. Pack the unit in a strong carton and
pad tightly to avoid damage. Damage in transit is NOT covered by warranty.
Warranty is void if any devices or accessories other than those distributed or recommended by Kodiak
are attached to or connected with the equipment in such a manner that the original factory construction
is altered. Warranty is void if repairs are attempted by anyone other than an Authorized Service Centre.
This warranty shall not apply to any problem which is due to misuse, neglect, accident, abuse, improper
handling, freezing, normal wear and tear, use of improper detergents/chemicals, or non-compliance with
precautions and instructions contained in the Owner's Manual. Warranty is void if the equipment is used
for commercial or industrial purposes. This warranty is non-transferable and applies only to products
sold in Canada.
John Brooks Company Limited's liability under warranty is limited to repair of the product and/or
replacement of parts, and is given to the purchaser in lieu of all other remedies including incidental
and consequential charges. There are no expressed warranties other than those specified herein.
Customer Service Hotline:
1-866-939-6666
visit our website:
www.kodiakpower.ca
Table of contents
Other Kodiak Pressure Washer manuals