KOELIS STEADY PRO User manual

Year of CE marking : 2017
EN
INSTRUCTIONS FOR USE
STEADY PRO® range
STEADY PRO® Probe Holding Arm
Steady Pro® Support for 3D End-Fire Endocavitary probe
Steady Pro® Support for 3D Side-Fire Endocavitary probe
KMAN-5001/EN/6.1/ 2019.04.30
Caution : USA Federal Law restricts this device to sale by or on the order of a physician

EN
User manual
Steady Pro® range
KMAN-5001_V6.1_EN
2019.04.30
KOELIS 16 chemin du vieux chêne 38240 Meylan France
2/13
Year of CE marking : 2017
Steady Pro® range comprises:
Reference
Included components
Number of
internal
parts
Number of
external
parts
Compatible KOELIS
probes
Arm
KPHA.00
Steady Pro® Probe Holding Arm with I
and U extension
K3DEC00,
K3DEC00-2, K3DEL00
Transperineal
KPHA.01.EL
Steady Pro® Probe Holding Arm with I
and U extension
Steady Pro® supports for side-fire
probe
5
5
K3DEL00
KPHA.EL.2
Steady Pro® supports for side-fire
probe
5
5
Transrectal
KPHA.01.EC
Steady Pro® Probe Holding Arm with I
and U extension
Steady Pro® supports for end-fire
probe
5
5
K3DEC00/K3DEC00-2
KPHA.00.EC
Steady Pro® Probe Holding Arm with I
and U extension
Steady Pro® supports for end-fire
probe
5
2
KPHA.EC.2
Steady Pro® supports for end-fire
probe
5
5
KPHA.EC
Steady Pro® supports for end-fire
probe
5
2
Note :
In this user manual :
•Everything that applies to KPHA.01.EL will apply to KPHA.00.EL too.
•Everything that applies to KPHA.01.EC will apply to KPHA.00.EC too.
•Everything that applies to KPHA.EL.2 will apply to KPHA.EL.01 and KPHA.EL too.
Everything that applies to KPHA.EC.2 will apply to KPHA.EC.01 and KPHA.EC too.

EN
User manual
Steady Pro® range
KMAN-5001_V6.1_EN
2019.04.30
KOELIS 16 chemin du vieux chêne 38240 Meylan France
3/13
Year of CE marking : 2017
Table of contents
1 General presentation ...................................................................................................................... 4
1.1 Manufacturer .......................................................................................................................... 4
1.2 Meaning of symbols ................................................................................................................ 4
1.3 Intended use............................................................................................................................ 4
1.4 Indications for use................................................................................................................... 4
2 Steady Pro® Probe holding arm (KPHA.00) ..................................................................................... 5
3 Steady Pro® Support’s assembly ..................................................................................................... 5
4 Cleaning procedure ......................................................................................................................... 7
4.1 Manual Cleaning...................................................................................................................... 8
4.1.1 Pre-soaking/Pre-cleaning directly after use .................................................................. 8
4.1.2 Cleaning........................................................................................................................... 8
4.2 Automatic Cleaning ............................................................................................................... 10
4.2.1 Pre-soaking/Pre-cleaning directly after use ................................................................ 10
4.2.2 Cleaning......................................................................................................................... 11
5 Sterilization.................................................................................................................................... 13
6 Service life ..................................................................................................................................... 13
7 Transport, handling and storage ................................................................................................... 13

EN
User manual
Steady Pro® range
KMAN-5001_V6.1_EN
2019.04.30
KOELIS 16 chemin du vieux chêne 38240 Meylan France
4/13
Year of CE marking : 2017
1General presentation
Warning: the present manual does not provide any training in clinical practices.
Before using the Steady Pro® range, the operator must have received medical training. The operator
must be aware that the success of the procedure to be performed partly depends on his/her
knowledge of the system and experience. It is for this reason that operators must familiarize
themselves with the technical and regulatory aspects concerning the device before carrying out the
procedure.
KOELIS cannot be held liable if the device is used incorrectly.
1.1 Manufacturer
KOELIS
16 chemin du Vieux Chêne
38240 MEYLAN - FRANCE
Tel: +33 (0)4 58 17 68 10
Service: +33 (0)4 58 17 68 17
Fax: +33 (0)4 58 17 68 24
Mail: se[email protected]
1.2 Meaning of symbols
Product reference
Manufacturer
Product lot
Warning: consult the instructions
for use
European conformity
Quantity contained in the package
Year of manufacture
Product supplied non-sterile
Consult the instructions before use
1.3 Intended use
The Steady Pro® range is intended to reliably maintain the position of a transrectal ultrasound probe
during ultrasound-guided interventions. Typical applications are biopsy or cancer treatment.
1.4 Indications for use
The Steady Pro® range provides physician a tool for performing ultrasound-guided interventions with
the use of an endocavity ultrasound transducer for adult males requiring prostate biopsy mapping and
cancer treatment.
QTY

EN
User manual
Steady Pro® range
KMAN-5001_V6.1_EN
2019.04.30
KOELIS 16 chemin du vieux chêne 38240 Meylan France
5/13
Year of CE marking : 2017
Internal part 2/3
Washer and screw 3/3
External part 1/3
2Steady Pro® Probe holding arm (KPHA.00)
Refer to the provided user manual of the Steady Pro® Probe holding arm. (Ref: GM402)
Extension’s change
1. Fix the clamping base on a rail firmly. Tighten the handle A firmly. Position the provided 13 wrench at B
and unscrew the “I” or “U” extension. (Fig. 1)
2. Unscrew the handle A and remove the extension from the clamping base. (Fig. 2)
3. Screw the new extension “U” or “I” using the 13 wrench at B, insert the extension into the clamping
base and tighten the handle A. (Fig. 3)
3Steady Pro® Support’s assembly
KPHA.EC.2
KPHA.EL.2
A
A
B
Figure 1
Figure 2
B
A
Figure 3
Internal part 1/3
External
part 3/3
Internal part 2/3

EN
User manual
Steady Pro® range
KMAN-5001_V6.1_EN
2019.04.30
KOELIS 16 chemin du vieux chêne 38240 Meylan France
6/13
Year of CE marking : 2017
Steady Pro® support’s assembly
Setting of the Steady Pro® support on KPHA.00 (Valid for KPHA.EC.2 and KPHA.EL.2)
1) Lift and hold the outer part of the tip and clip it into the head of the Steady Pro® Probe holding arm and untighten the outer part
of the tip. (Fig. 4.a and 4.b)
2) Ensure it is secured by turning the external part. It should be fixed. (Fig. 4.c)
Placement of the probe on the Steady Pro® support
KPHA.EC.2
1) Position the probe in the direction illustrated by the diagram outside of the internal part. (Fig.5.a)
2) Assemble both internal components around the end-fire probe. (Fig.5.a)
3) Loosen the screw of the external component and insert the internal components into the external part. (Fig.5.b)
4) Tighten the screw of the external component to secure the internal components. (Fig.5.c)
KPHA.EL.2
1) Unscrew the inferior screw of the internal component.
2) With the washer on the outside, screw the inferior screw through the rail of the external part and in the internal part. (Fig.6.a)
3) Position the internal component so that “KOELIS” and “BACK” is facing you. (Fig.6.a)
4) Loosen screw number 2 and open the internal component. (Fig.6.b)
5) Insert the side-fire probe. (Fig.6.b)
6) Tighten screw number 2. (Fig.6.c)
Figure 6
a.
b.
c.
Figure 5
a.
b.
c.
c.
Figure 4
a.
b.
Screw 2

EN
User manual
Steady Pro® range
KMAN-5001_V6.1_EN
2019.04.30
KOELIS 16 chemin du vieux chêne 38240 Meylan France
7/13
Year of CE marking : 2017
Warning:
-If the external component is not correctly secured, the Steady Pro® support can turn or fall
accidentally.
-Do not use a damaged Steady Pro®.
-A damaged or dropped Steady Pro® should be replaced.
-Use only compatible probes with Steady Pro®.
-To prevent drops, verify that the probe is secured.
-Comply with cleaning and sterilization procedure. (cf 4.Cleaning procedure, 5.Sterilization)
-Comply with storage condition. (cf. 7.Transport, handling and storage)
-Manipulate the support above a sterile area.
Note :
-A sterile endoscope cover can be installed on the Steady Pro® arm (e.g : ref. 10-1112, 22.9cm
x 203.2 cm, “Camera drape (universal)”, Premier Guard™).
4Cleaning procedure
The following cleaning and disinfection procedure only applies to the Steady Pro® supports
manufactured by Koelis. Regarding the on-shelf arm system, refer to the user manual GM402.
Using an inappropriate cleaning agent may damage the product.
Warnings:
Always use protective eyewear and gloves when cleaning the product.
Always comply with the instructions provided with the cleaning agent.
Steady Pro® supports are packaged non-sterile and are reusable. Before the first use and after
each use, the Steady Pro® supports must be pre-soaked/pre-cleaned, cleaned and sterilized
according to the recommendations in force.
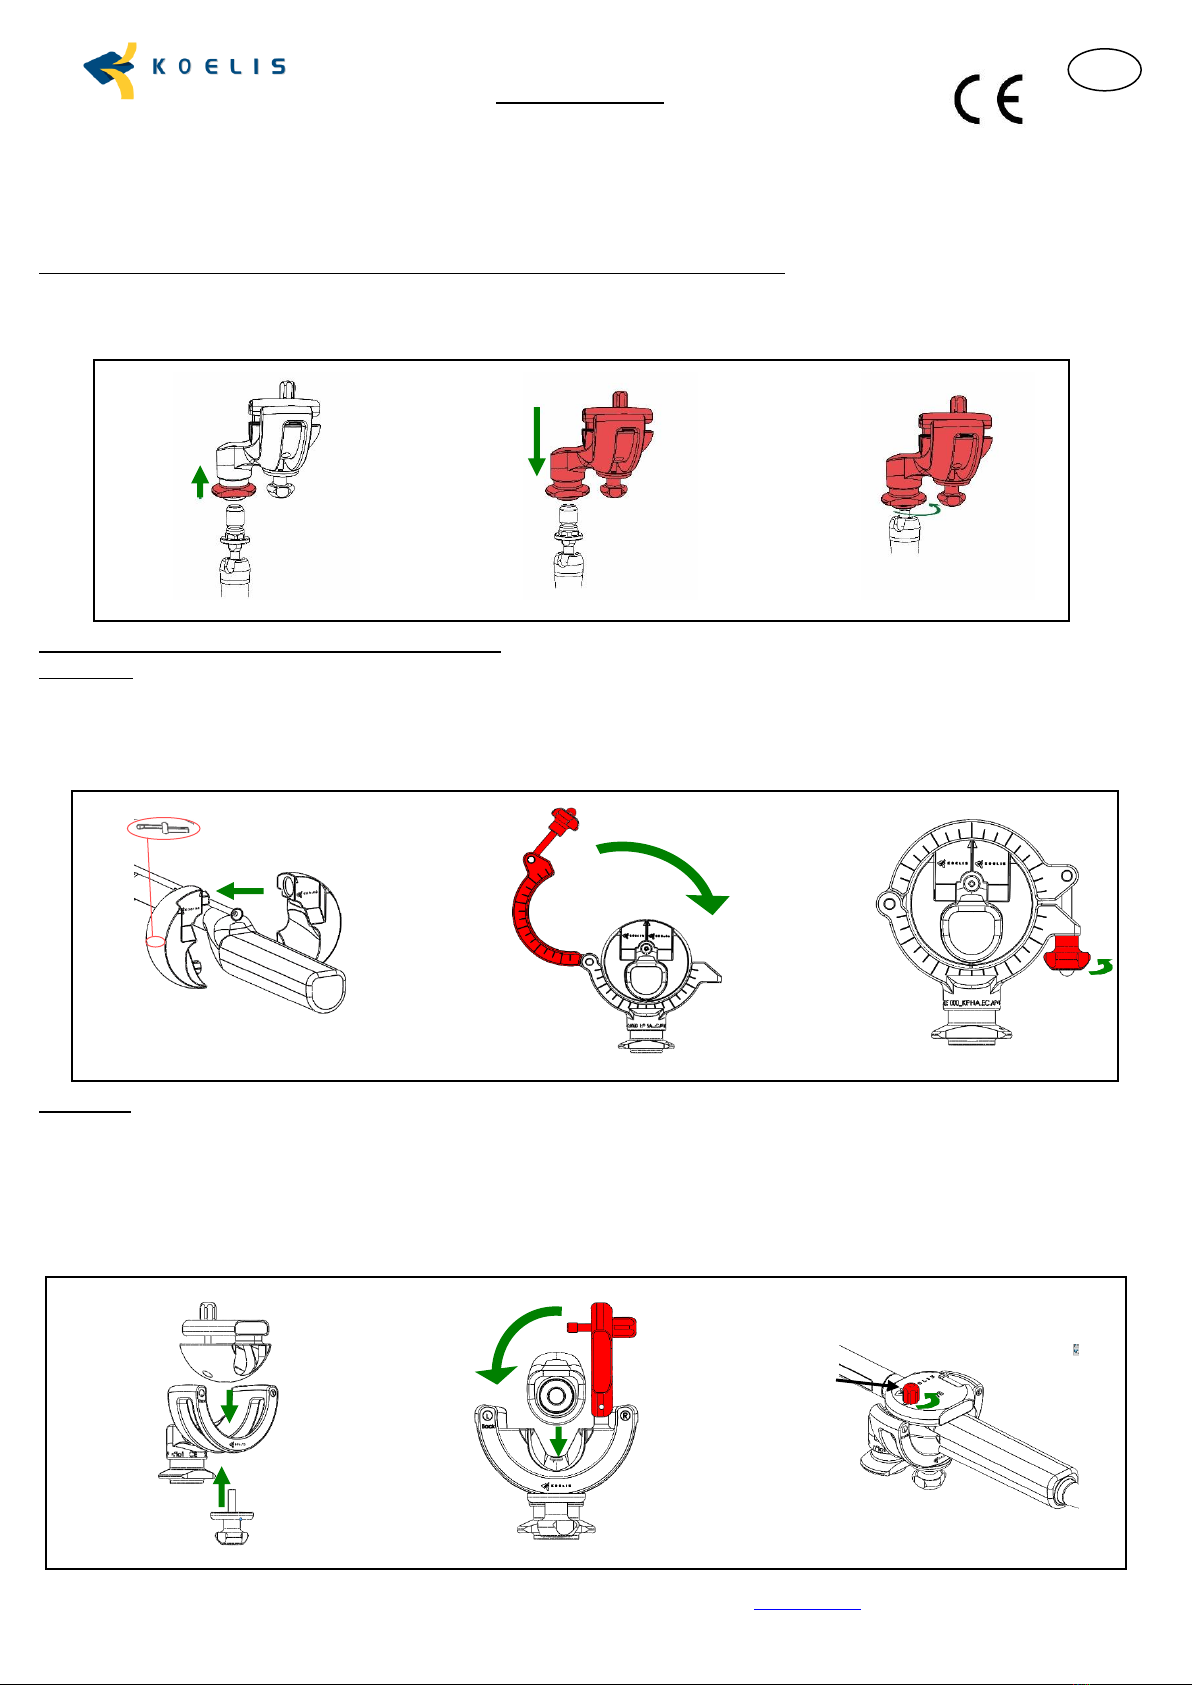
Remove the probe from the Steady Pro® support and unplug the Steady Pro® probe holding
arm.
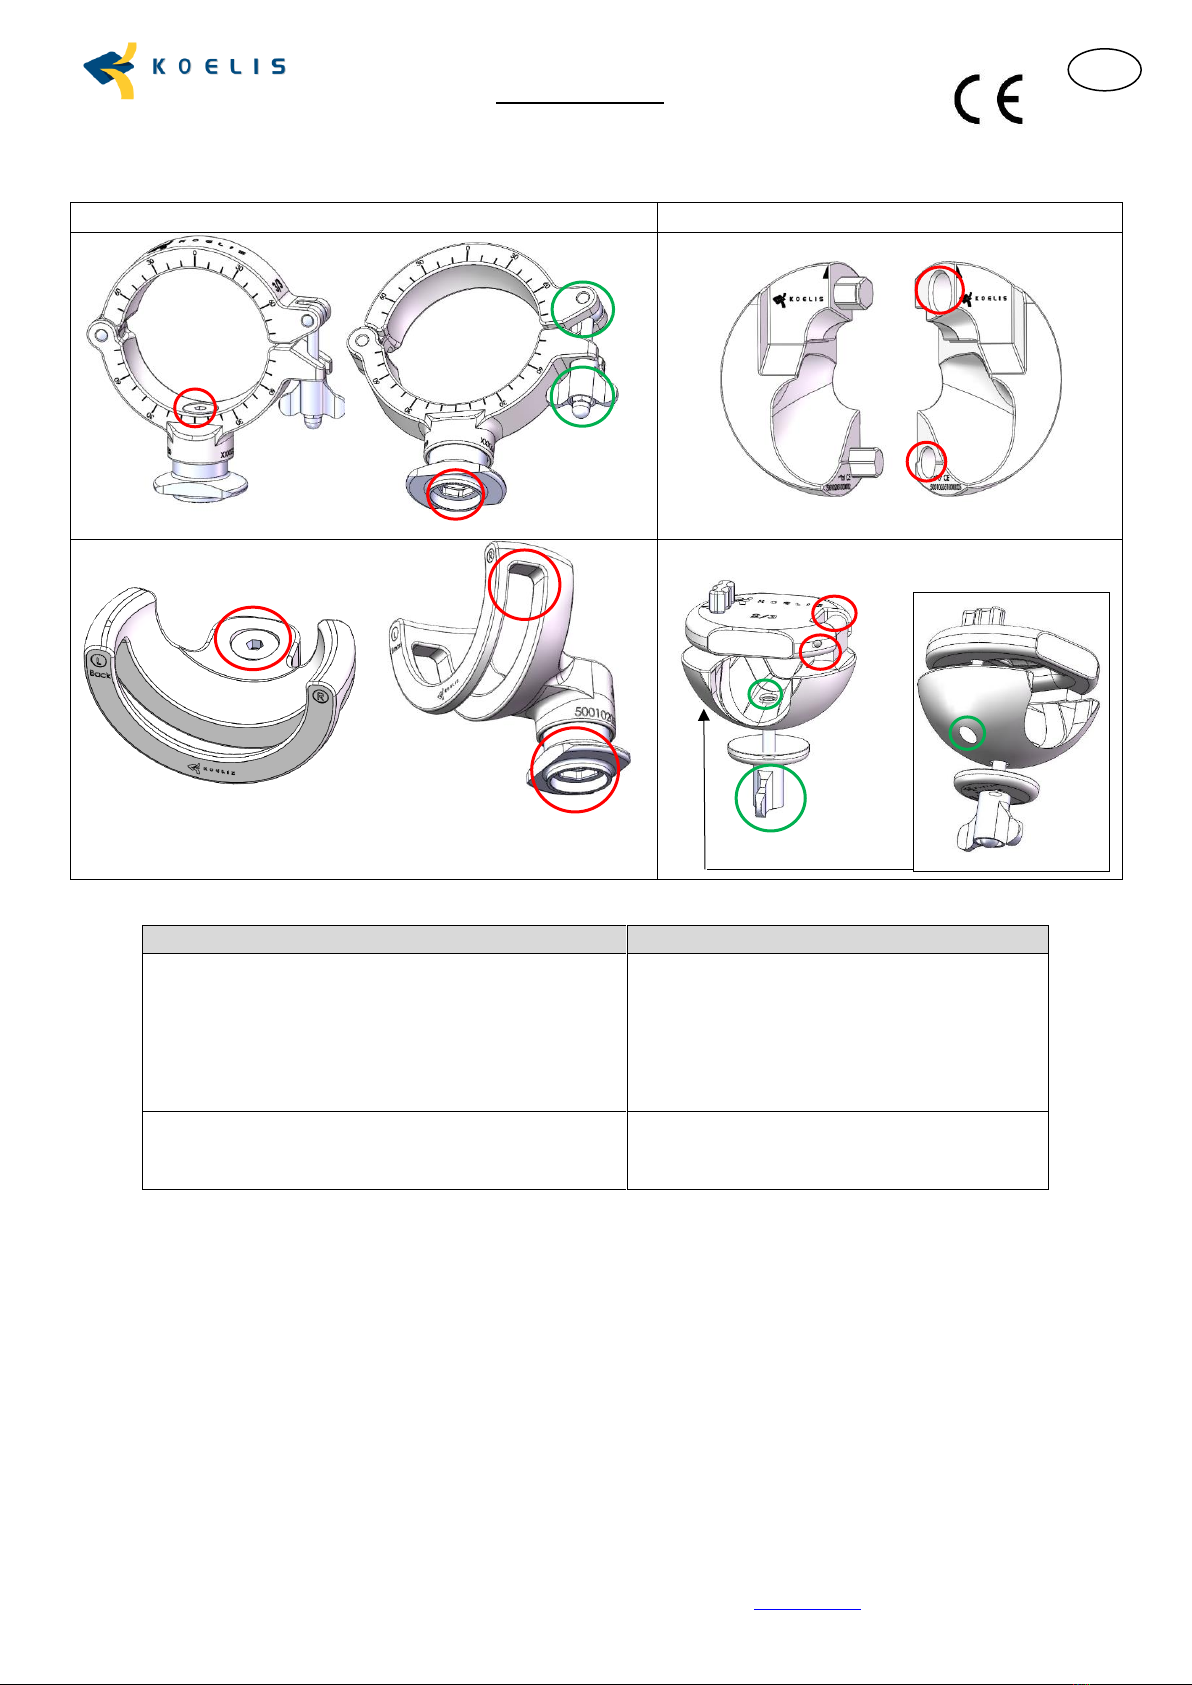
Do not dismount the internal or external support by removing the pins.
The Steady Pro® supports must be pre-cleaned/pre-soaked immediately and within 20 minutes
after use to reduce the possibility of drying before cleaning.
Do not (re-)use the Steady Pro® range in case of mechanical deterioration.
Two procedures are validated by KOELIS: manual and automatic. One or the other (§4.1 or
§4.2) must be performed before the sterilization procedure.
Extending immersion for several hours is not recommended as the contact with certain
products may cause the instruments to deteriorate.
For a routine use, some substances are incompatible with the constituent materials of the
instruments: strong mineral acids (sulphuric acid, nitric acid, hydrochloric acid, etc.), strong
Lewis acids (zinc chloride, sodium hypochlorite, caustic soda etc.), ethylene dichloride
solvents, phenolic solution and aniline.
Highly acidic or alkaline detergents must not be used for a routine use.

EN
User manual
Steady Pro® range
KMAN-5001_V6.1_EN
2019.04.30
KOELIS 16 chemin du vieux chêne 38240 Meylan France
8/13
Year of CE marking : 2017
Recommendation:
▪During the pre-soaking/pre-cleaning phase, the conditions of use of the pre-soaking/pre-cleaning
agents must be strictly observed. Adequate personal protection measures must be taken.
▪Follow the instructions for use from the detergent manufacturers, regarding concentration,
duration, contact and post-process control procedures.
▪Regardless of the cleaning method used, the instrument must be stored quickly in order to avoid
recontamination.
▪The temperature shall not exceed (137°C/278,6°F) to avoid deterioration of the devices.
4.1 Manual Cleaning
4.1.1 Pre-soaking/Pre-cleaning directly after use
Detach the internal support from the external one by detaching the screws.
Prepare a bath with an enzymatic detergent (e.g.: ENZOL® Enzymatic Detergent (Johnson &
Johnson), or ANIOSYME DD1 (Laboratoires ANIOS)) or equivalent, at air temperature (20 ±
5°C/68 ± 9°F). Realize the dilution according to the concentration specified by the detergent
manufacturer.
Immerse all the parts of the support for the time specified by the detergent manufacturer.
Rinse the Steady Pro® supports for 1 minute with cold water from hospital network before
proceeding to cleaning phase.
4.1.2 Cleaning
Care must be taken not to shock or damage the instruments.
Before starting the cleaning, each part of the disassembled Steady Pro® supports must be inspected
in order to highlight any damage in the devices.
The cleaning procedure is composed of several cleaning steps:
1. Brush the disassembled Steady Pro® supports for maximum 2 minutes in order to remove
visible soils with legally marketed and appropriate brushes detailed below or equivalent.
As a recommendation, Koelis provides a detailed procedure for each part of the supports:
Caution for the Steady Pro® support for 3D end-fire and side-fire probe:
Critical zone to brush with brush 2 (see table below)
Critical zone to brush with the tube brush (see table below)

EN
User manual
Steady Pro® range
KMAN-5001_V6.1_EN
2019.04.30
KOELIS 16 chemin du vieux chêne 38240 Meylan France
9/13
Year of CE marking : 2017
External parts
Internal parts
Several type of brush are used:
Device/parts to clean
Brush/Tube brush
KPHA.EC.2
KPHA.EL.2
Brush 2
L 25 mm, Width 2 mm
Tube brush
Ø 8 mm, L 50 mm
Support surface
Screw
Brush 1
L 35 mm, Width 10 mm
Ø : diameter
L : Length
Brush with insistence and with the brush 2 the recesses. It is important to pay particular attention to
these zones.
The screws are brushed with the brush 1 for the surfaces and the tube brush for the hollow parts.
2. Prepare the cleaning bath with a protease enzyme based-detergent. We recommend pH-
neutral detergents in order to preserve the integrity of the device (e.g.: ENZOL® Enzymatic
Detergent (Johnson & Johnson) or ANIOSYME DD1 (Laboratoires ANIOS)) or equivalent at air
temperature (20 ± 5°C/68 ± 9°F). Realize the dilution according to the concentration specified
by the detergent manufacturer.

EN
User manual
Steady Pro® range
KMAN-5001_V6.1_EN
2019.04.30
KOELIS 16 chemin du vieux chêne 38240 Meylan France
10/13
Year of CE marking : 2017
3. Immerse all parts of the Steady Pro® support, disassembled, in the cleaning bath for the
duration specified by the manufacturer.
4. During immersion, perform manual brushing for 2 minutes with a brush and a tube brush (see
table above).
5. Rinse with purified water (at ambient temperature) from the hospital network for 1 minute
until full elimination of the detergent on the surface of all the parts of the Steady Pro®
supports.
6. In case soil is still visible, repeat steps 3, 4 and 5 of the procedure.
7. Dry the parts carefully with a clean absorbent cloth. Hollow parts can be dried with forced-air
at a pressure below 3 bars and at ambient temperature until full elimination of water.
8. After drying, all parts are visually inspected in order to validate effectiveness of cleaning and
to detect damages or mechanical deteriorations.
4.2 Automatic Cleaning
4.2.1 Pre-soaking/Pre-cleaning directly after use
a. Immersion and surface brushing :
1. Prepare a bath with an enzymatic detergent at air temperature (20 ± 5°C/68 ± 9°F).
Suitable solutions can include but are not limited to : ENZOL® Enzymatic Detergent
(Johnson & Johnson), ANIOSYME DD1 or ANIOSYME X3 (Laboratoires ANIOS),
Neodisher® MediClean Forte (Dr. Weigert). Realize the dilution according to the
concentration specified by the detergent manufacturer.
2. Detach the internal support from the external one by detaching the screws.
3. Immerse the Steady Pro® support for the duration specified by the detergent
manufacturer.
4. Brush the support until elimination of soils (30 seconds minimum) with a legally
marketed and appropriate brush: TecCare reference STR BR18035 (Length x Width =
38 x 10 & 25 x 2) or equivalent.
5. Rinse the support with cold water from hospital network.
b. Compressed air/ compressed water/ steam gun for cavity precleaning:
6. Use one of these guns until complete elimination of visible soils in the critical zones
(see table below). Use the following parameters:
o3 bar pressure
oAmbient temperature for the air or water compressed guns; follow the
temperature manufacturer recommendations for the steam gun and do not
exceed 137°C/278,6°F.
Critical zone to treat with the chosen cleaning gun (see table below)

EN
User manual
Steady Pro® range
KMAN-5001_V6.1_EN
2019.04.30
KOELIS 16 chemin du vieux chêne 38240 Meylan France
11/13
Year of CE marking : 2017
External parts
Internal parts
4.2.2 Cleaning
Put the devices in a cleaning basket of proper size. Koelis recommends to use the cleaning basket of
dimension 241x251x92mm (e.g. : JG114R, BRAUN) for the Steady Pro® supports. Equivalent references
can be used.
The cleaning procedure is composed of several steps all included in the washer disinfector program:
1: JG114R

EN
User manual
Steady Pro® range
KMAN-5001_V6.1_EN
2019.04.30
KOELIS 16 chemin du vieux chêne 38240 Meylan France
12/13
Year of CE marking : 2017
STEP
CLEANING PARAMETERS
CLEANING PRODUCT
1-
Rinse
Tap water, 2 minutes at ambient temperature
(20°C ± 5°C/68 ± 9°F)
Not applicable
2-
Wash
Demineralized water for the duration and
temperature provided by the detergent
manufacturer.
For instance, for the Neodisher® MediClean
Forte (Dr. Weigert), the parameters are: (55 ±
5°C/131 ± 9°F) for 10 minutes using
demineralized water.
Enzymatic Detergent (neutral or
slightly alkaline). Suitable solutions
can include but are not limited to:
Aniosyme DLM Maxi (Laboratoire
Anios), Neodisher® MediClean Forte
(Dr. Weigert) or ENZOL® Enzymatic
Detergent.
Follow the recommendations of
concentration provided by the
detergent manufacturer.
For instance, for the Neodisher®
MediClean Forte (Dr. Weigert), the
concentration is ranging from 0.2 to
1%.
3-
Rinse
Purified water for 5 minutes at ambient
temperature (20°C ± 5°C/68 ± 9°F)
Not applicable
4-
Thermal
disinfection
Purified water for 5 minutes at 90°C ± 5°C/194
± 9°F
Not applicable
5-
Drying
45°C/113°F for 10 minutes
Not applicable
If the device is not dried, repeat step 5.
Check the device for visible soil. Repeat the cleaning procedure if soil is still visible.
Note:
The given settings are the conditions of the automated cleaning efficacy validated by Koelis.

EN
User manual
Steady Pro® range
KMAN-5001_V6.1_EN
2019.04.30
KOELIS 16 chemin du vieux chêne 38240 Meylan France
13/13
Year of CE marking : 2017
5Sterilization
The recommended method for the Steady Pro® supports sterilization is pre-vacuum steam autoclaving
at 132°C/270°F for a 4 minutes cycle (for USA only) or at 134°C (-0°C/+3°C) / 273.2°F (-0°F/+5.4°F) for
a 3 to 18-minutes cycle (for all other countries, not for USA) followed by 20 minutes of dry time on
product packaged on legally marketed double peel pouches.
Obtaining and maintaining device sterility is the responsibility of the healthcare institution, according
to the current local directives relative to the sterilization of medical devices in healthcare institutions.
Recommendation:
▪For the sterilization, all the parts of the disassembled Steady Pro® supports shall be individually
packaged in legally marketed double peel pouches.
▪The temperature shall not exceed (137°C/278,6°F) to avoid deterioration of the devices.
6Service life
Steady Pro ® supports can be used 50 times without functional degradation (number of cleaning and
sterilization cycles validated by Koelis).
Improper handling or protection may result in a shortened life span of the device.
7Transport, handling and storage
Recommendation:
It is important to take particular care of the Steady Pro® supports during transport, handling and
storage, in order to prevent any deterioration (torsion, breakage, etc.). More particularly, it is
recommended to use rigid and padded containers for Steady Pro® supports transportation, and to
store them in maximal hygiene conditions at ambient temperature.
This manual suits for next models
7
Table of contents
Other KOELIS Medical Equipment manuals
Popular Medical Equipment manuals by other brands

Schulze & Bohm
Schulze & Bohm medisun HF 54 Instructions for use

Otto Bock
Otto Bock 1D35 Dynamic Motion Instructions for use

Atos Medical
Atos Medical Provox XtraHME Instructions for use

Dräger
Dräger PressurePod Instructions for use

Fukuda Denshi
Fukuda Denshi CardiMax FX-8322 Service manual

Fukuda
Fukuda LX-8000 Series Service manual

Otto Bock
Otto Bock DynamicArm 12K100N Instructions for use

Datex-Ohmeda
Datex-Ohmeda 7100 Technical reference manual

PhotoniCare
PhotoniCare TOMi Scope Quick Start Pocket Guide

Insulet
Insulet mylife OmniPod manual

Carroll
Carroll Spirit Series User instruction manual

Innovaid
Innovaid HAPPY REHAB 2 - Small Instructions for use