manuals.online logo
Brands
  1. Home
  2. •
  3. Brands
  4. •
  5. Kogan
  6. •
  7. Cell Phone
  8. •
  9. Kogan Agora 6Plus User manual

Kogan Agora 6Plus User manual

This manual suits for next models

1

Other Kogan Cell Phone manuals

Kogan KHPHN05ANDA User manual

Kogan

Kogan KHPHN05ANDA User manual

Kogan Agora 4G Pro KHPHN4GOCA User manual

Kogan

Kogan Agora 4G Pro KHPHN4GOCA User manual

Kogan AGORA GO KAPH4AGMA User manual

Kogan

Kogan AGORA GO KAPH4AGMA User manual

Kogan KAPHN4G6PA User manual

Kogan

Kogan KAPHN4G6PA User manual

Kogan KAPHNHDQCXA User manual

Kogan

Kogan KAPHNHDQCXA User manual

Kogan Agora 6 User manual

Kogan

Kogan Agora 6 User manual

Kogan Aurora 6Plus User manual

Kogan

Kogan Aurora 6Plus User manual

Kogan AGORA XI User manual

Kogan

Kogan AGORA XI User manual

Kogan Agora Lite User manual

Kogan

Kogan Agora Lite User manual

Kogan Agora 6 User manual

Kogan

Kogan Agora 6 User manual

Kogan KHPHN4GQCA User manual

Kogan

Kogan KHPHN4GQCA User manual

Popular Cell Phone manuals by other brands

Gigabyte GSmart t600 null

Gigabyte

Gigabyte GSmart t600 null

Sony Ericsson Z200 null

Sony Ericsson

Sony Ericsson Z200 null

Gigabyte GSmart t600 null

Gigabyte

Gigabyte GSmart t600 null

Gigabyte GSmart t600 null

Gigabyte

Gigabyte GSmart t600 null

Sony Ericsson K700i null

Sony Ericsson

Sony Ericsson K700i null

Zte BLADE A520 quick start guide

Zte

Zte BLADE A520 quick start guide

Nokia Lumia 620 user guide

Nokia

Nokia Lumia 620 user guide

Blackbe;rry KEYone Safety and product information

Blackbe;rry

Blackbe;rry KEYone Safety and product information

Bea-fon X5 Premium quick guide

Bea-fon

Bea-fon X5 Premium quick guide

Blackbe;rry 8707 Series user guide

Blackbe;rry

Blackbe;rry 8707 Series user guide

Blackbe;rry Storm Troubleshooting

Blackbe;rry

Blackbe;rry Storm Troubleshooting

LG LM-X420QN user guide

LG

LG LM-X420QN user guide

LifeWatch V user guide

LifeWatch

LifeWatch V user guide

Bea-fon SILVER LINE SL860 user guide

Bea-fon

Bea-fon SILVER LINE SL860 user guide

IKI Mobile KF4.5i user manual

IKI Mobile

IKI Mobile KF4.5i user manual

Hitech HT-850 user guide

Hitech

Hitech HT-850 user guide

Yezz Fashion F10 user manual

Yezz

Yezz Fashion F10 user manual

Point Mobile PM60 user manual

Point Mobile

Point Mobile PM60 user manual

manuals.online logo
manuals.online logoBrands
  • About & Mission
  • Contact us
  • Privacy Policy
  • Terms and Conditions

Copyright 2025 Manuals.Online. All Rights Reserved.

Table of Contents
Safety Notes.................................................................................................................................................................... 2
Welcome........................................................................................................................................................................... 3
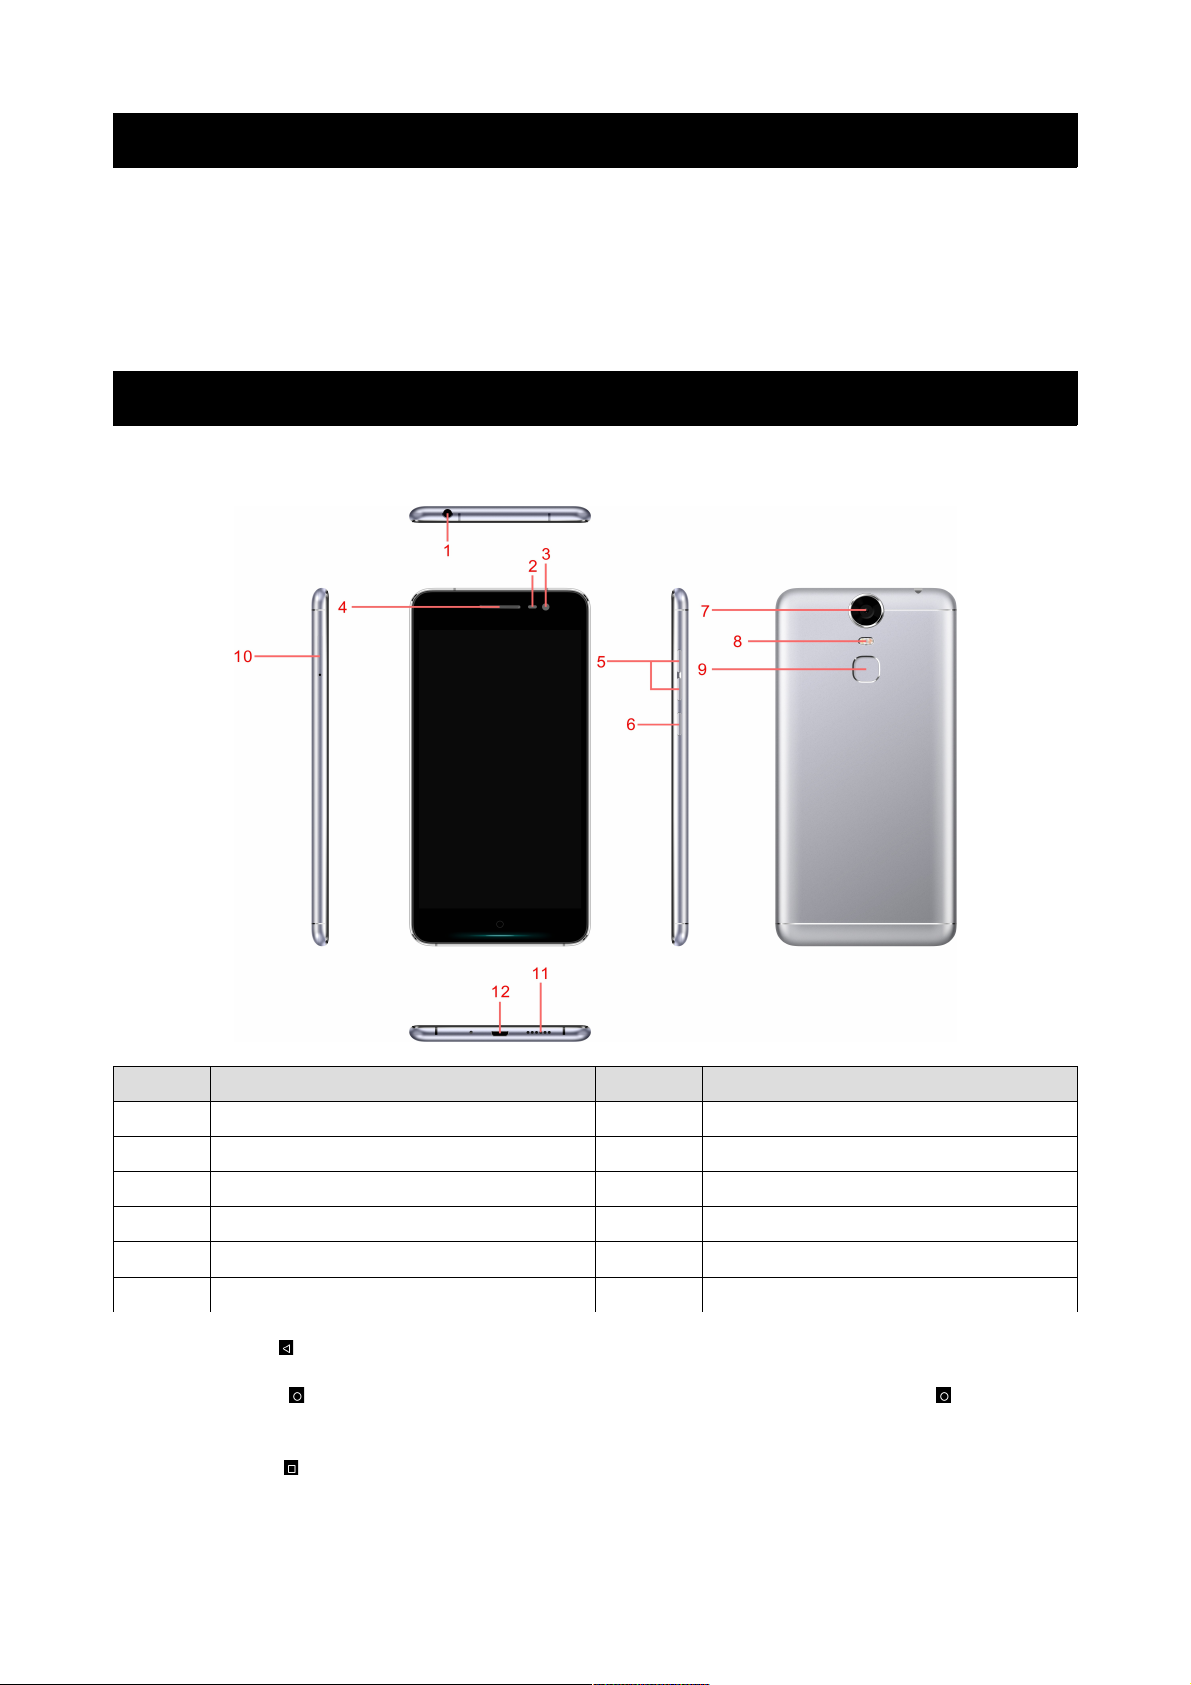
Introduction..................................................................................................................................................................... 3
Phone Display............................................................................................................................................................ 3
Getting Started............................................................................................................................................................... 4
Inserting the SIM card and SD card................................................................................................................... 4
S itch ON/OFF........................................................................................................................................................ 4
Unlocking the SIM Card......................................................................................................................................... 4
Connecting to your Net ork...............................................................................................................................4
Charging the Battery............................................................................................................................................... 5
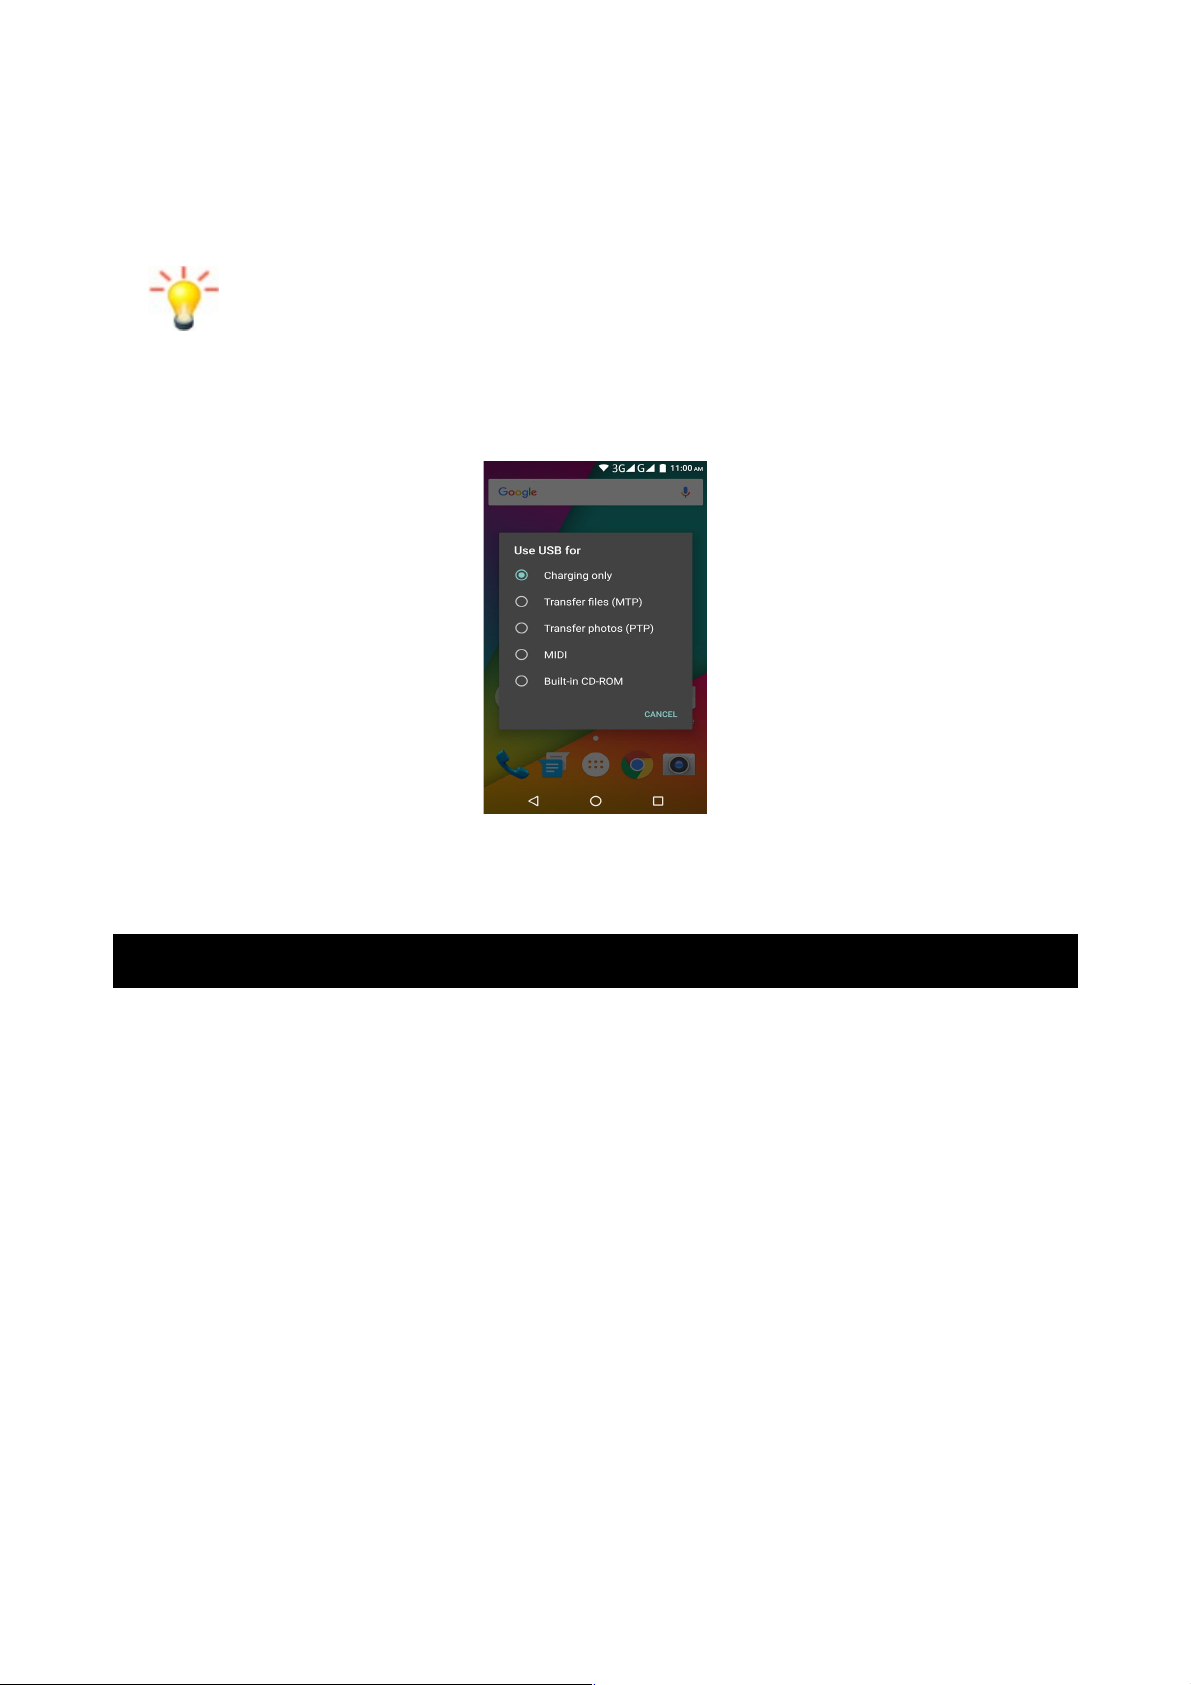
Connecting your Phone to your PC................................................................................................................... 5
Basic Functions............................................................................................................................................................... 5
Make Calls................................................................................................................................................................... 5
Make Domestic Calls............................................................................................................................................... 5
Call Extension Phone.............................................................................................................................................. 5
Make International Calls......................................................................................................................................... 6
Make Listed Calls...................................................................................................................................................... 6
Emergency Calls....................................................................................................................................................... 6
Ans ering Calls........................................................................................................................................................ 6
Connection Options................................................................................................................................................ 6
Menu Functions.............................................................................................................................................................. 7
Bro ser........................................................................................................................................................................ 7
Calculator.................................................................................................................................................................... 7
Calendar...................................................................................................................................................................... 7
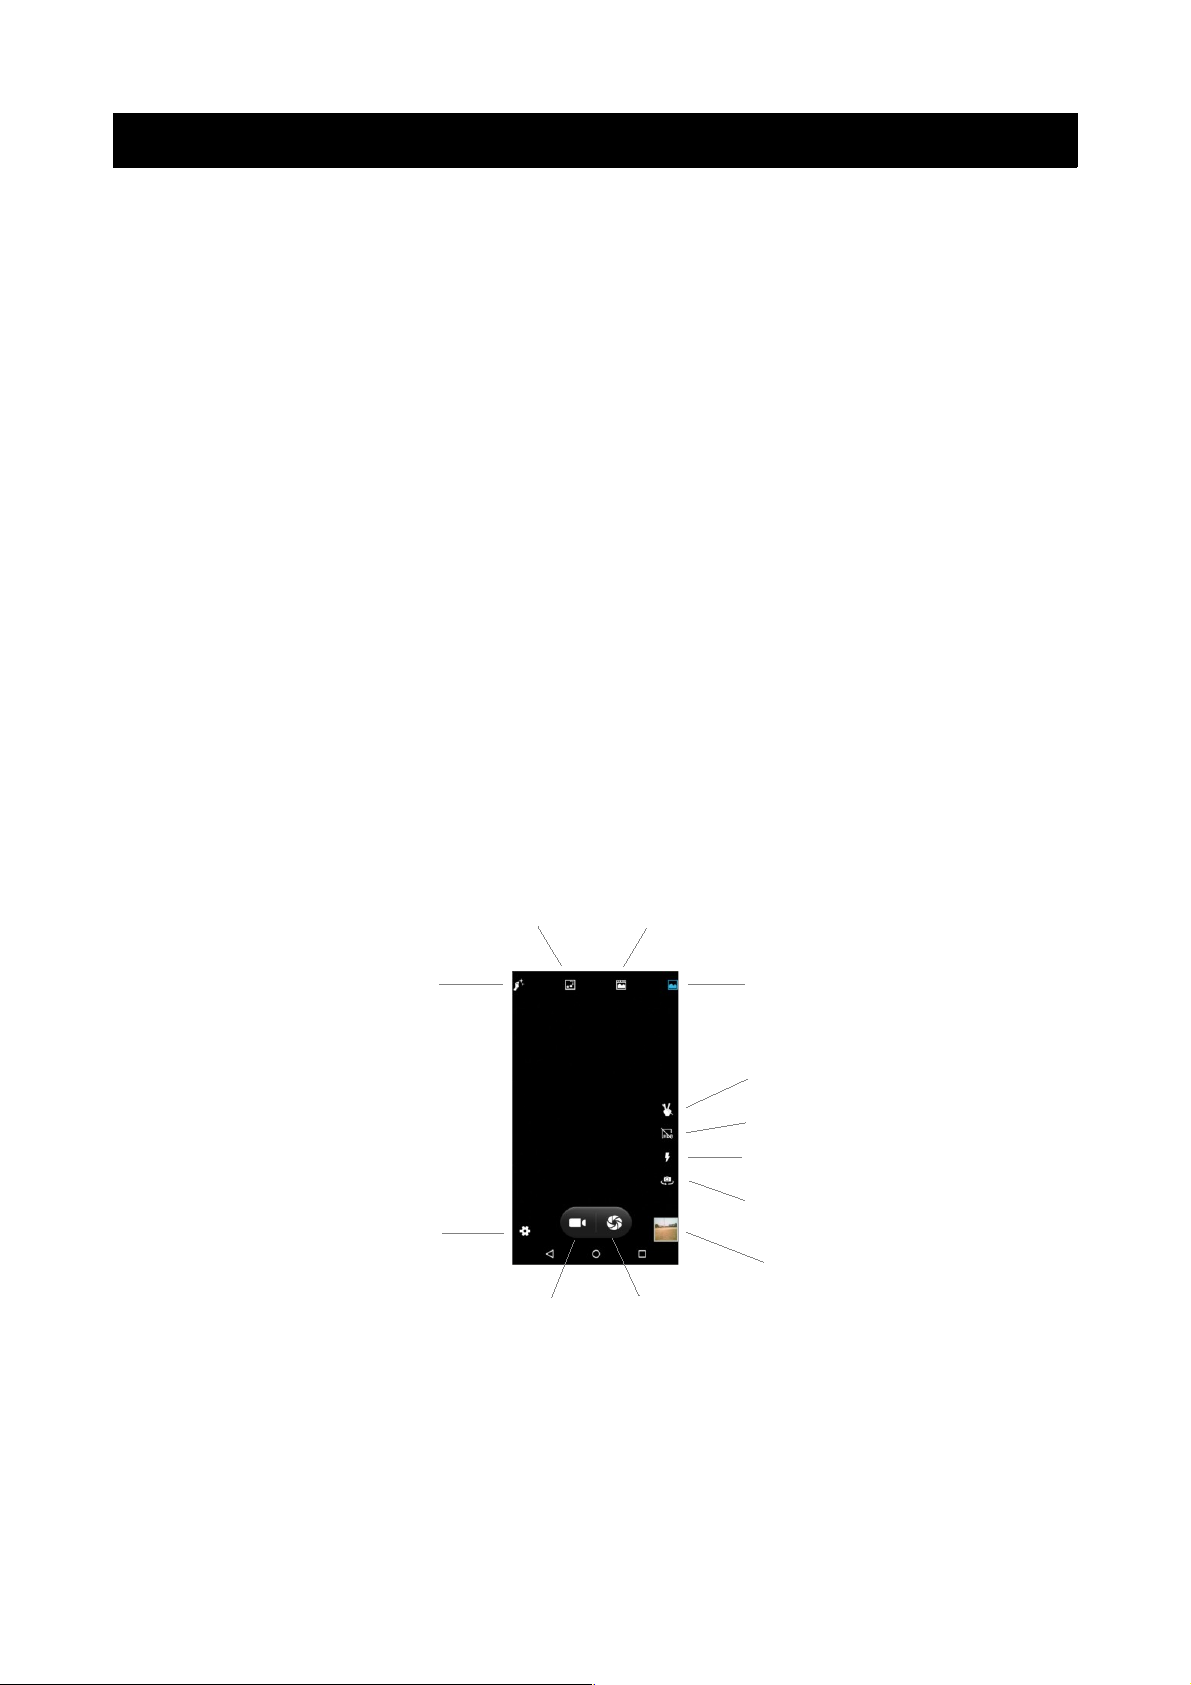
Camera......................................................................................................................................................................... 7
Clock............................................................................................................................................................................. 7
Contacts...................................................................................................................................................................... 8
Do nloads.................................................................................................................................................................. 8
Email............................................................................................................................................................................. 8
File Manager............................................................................................................................................................... 8
Flashlight..................................................................................................................................................................... 8
FM Radio..................................................................................................................................................................... 8
Gallery.......................................................................................................................................................................... 8
Gmail™.......................................................................................................................................................................... 8
Google.......................................................................................................................................................................... 8
Maps.............................................................................................................................................................................. 8
Messages..................................................................................................................................................................... 9
Music............................................................................................................................................................................. 9
Phone........................................................................................................................................................................... 9
Play Store.................................................................................................................................................................... 9
All Settings................................................................................................................................................................. 9
SIM Toolkit.................................................................................................................................................................. 11
Sound Recorder........................................................................................................................................................ 11
Videos.......................................................................................................................................................................... 11
YouTube™.................................................................................................................................................................... 11
Input................................................................................................................................................................................... 11
Troubleshooting............................................................................................................................................................ 12
Safety Information and Notices............................................................................................................................... 13
Using the mobile phone and charger.............................................................................................................. 13
Using the mobile phone....................................................................................................................................... 13
Using the battery.................................................................................................................................................... 13
Using the charger................................................................................................................................................... 14
Cleaning and Maintenance........................................................................................................................................ 14
1
© 2016. All rights are reserved. No part of this document may be reproduced ithout permission.
While all efforts have been made to ensure the accuracy of all the contents in this manual, e
assume no liability for errors or omissions or statements of any kind in this manual, hether such
errors or omissions or statements resulting from negligence, accidents, or any other cause. The
contents of this manual are subject to change ithout notice.
Protect our environment! We strive to produce products in compliance ith global
environmental standards. Please consult your local authorities for proper disposal.
Note: User Manual is just to guide the user about the functionality of the phone. It is not a
certificate of technology. Some functions may vary due to modifications and upgrade of
soft are, or due to print mistake.
Safety Notes
Do not s itch your phone on hen the use of ireless devices is prohibited or hen
the ireless device may cause interference or danger.
Do not use your phone hile driving.
Follo relevant rules or regulations in hospitals and health care facilities.
S itch your phone off near medical devices.
S itch your phone off in an aircraft.
The radio signal from it may cause interference in signals of the aircraft.
S itch your phone off near high-precision electronic devices.
It may affect the performance of these devices.
Do not attempt to disassemble your phone or its accessories.
Only qualified personnel may service or repair the phone.
Do not place your phone and its accessories in containers ith strong
electromagnetic field.
Do not place magnetic storage media near your phone.
Radiation from the phone may erase the information stored on them.
Do not put your phone in a high-temperature place or use it in a place ith flammable
gas such as a petrol pumps.
Keep your phone and its accessories a ay from children.
Do not allo children to use your phone ithout guidance.
Respect others' privacy and legal rights hen using your phone.
2
Welcome
Congratulations on your purchase of the KAPHN4G6PA mobile phone. Your phone provides
many functions hich are practical for daily use, such as a hands-free loudspeaker, camera, MP3
player, internet bro ser and much more.
You can read this manual to understand ho to use the Mobile phone and experience the
functions and simple operation method. Please use original accessories in order to achieve the
best results.
Introduction
Phone Display
No Description No Description
1 Earphone Jack 2 Light Sensor
3 Front Camera 4 Receiver
5 Volume +/- Key 6 Po er ON/OFF Key
7 Back Camera 8 Flash
9 Finger Print 10 SIM Card Slot
11 Loud Speaker 12 USB Jack
Back Key: Press to open the previous screen you ere orking on.
Home Key: Press at a non-standby screen to go back to the home screen. Hold to enter
Google No ™/Google™ Search.
Menu Key: Press to open a list of thumbnail images of apps you've orked ith recently.
Volume +/- Key: Press to change the volume.
3
Getting Started
Please read the safety instructions prior to first use.
Inserting the SIM card and SD card
Make sure the phone is s itched off. Make sure that the clipped corner of the MicroSIM card is
facing the correct direction and the metallic contacts are facing up ards. Slide the SIM card into
the card slot until it stops.
Please note: you can either insert a microSD card and a micro SIM card, or t o micro SIM cards.
Switch N/ FF
Hold do n the ON/OFF key to s itch the phone on and off.
If inserting a ne SIM card, the screen ill sho the notes in the follo ing order hen the phone
is s itched on:
•Type in PIN — if you have already set the SIM code.
•Search — The handset ill be searching for proper net ork connection.
Unlocking the SIM Card
To avoid illegal use, the SIM card is locked ith a PIN (personal identification number) as a
protection. When this function is ON and you have already set a PIN code, you need to type in
the PIN code every time the handset is s itched on in order to unlock SIM card.
You can turn off the SIM PIN code, ho ever the SIM card on't be locked from illegal use.
Input PIN code, (press the arro head icon to erase any typing errors) and press OK.
For example, if the PIN code is set as 1234, then type "1234" then press OK.
The SIM card ill be locked if you type in rong code for three times continuously. The handset
ill then inform you to type in PUK code.
Attention: Your net ork provider ill set a standard PIN code (four to eight numbers) for your
SIM card. It is recommended that you change the code to a personal code as soon as possible.
Connecting to your Network
When the SIM card is successfully unlocked, the handset ill automatically search for available
net orks (the lock screen sho s searching). The handset ill sho information of the net ork
provider, and the status bar ill sho the signal strength and the net ork condition once the
handset is successfully connected to a net ork.
Note: if the lock screen sho s “Emergency”, this means you are out of net ork
coverage, or your SIM card is not valid. You ill still be able to make emergency
calls to 000 based on signal strength.
4
Charging the Battery
To charge the battery, plug in the charger connector at the top of your phone (USB interface)
and then plug the other end into an AC po er socket.
The battery icon indicates the charging state. While charging, the charge indicate lightning icon
ill display.
Note: if the battery is completely empty, it may take a fe minutes of charging
before any icons or information ill be displayed on-screen.
Connecting your Phone to your PC
Once phone is connected to a PC by USB cable, the belo screen ill sho :
You can no exchange/manage data bet een your phone and PC.
Once finished, for USB storage mode, click (“Turn off USB storage”) to unmount storage from
computer and use it ith phone again. For other modes, just unplug the USB cable.
Basic Functions
Make Calls
When the net ork provider icon appears on the standby screen, you can call out or ans er calls.
The indicator on the upper right part shall sho the signal strength.
Quality of connection ill be greatly influenced by obstructions. So movement in a small range
may effectively improve the quality of connection.
Make Domestic Calls
Use virtual keyboard to enter phone numbers and then press Dial icon to call. If you need to
change the phone number, please press the delete key on the touch screen to delete. When the
call is ans ered, the screen shall sho the connection status.
Call Extension Phone
Some extension phones can't be directly connected to. Using the virtual keyboard, enter the
s itchboard number, open the option menu and choose " Add 2-sec pause", and then dial the
extension phone number.
Type in as follo s to call extension phone:
Zone description > s itchboard number > Add 2-sec pause > extension phone number › call
5
Make International Calls
If you need to make an international call, hold do n the 0 key on the virtual keyboard until the
"+" sign appears for international call prefix, hich helps you call from any country, even if you
don't kno the international call prefix of that country.
You can make an international call according to the follo ing typing order: + › country code ›
complete phone number › dialling icon (type in the prefix code, and then continue to enter the
country code and complete phone number). Country code usually follo s conventional practice:
Germany is 49, UK 44, S eden 46 and so on.
When making international phone calls, the "0" in the city code should be omitted.
Make Listed Calls
Every dialled and received phone number is recorded in the call log list. Recently dialled,
ans ered and missed phone numbers are chronologically (ne est to oldest) listed in the "ALL"
log.
You can also choose and check missed, ans ered and dialled list according to your needs.
Listed phone numbers can be called out by pressing the respective log.
In the call history interface, users can do a long press to save or delete the number.
In the details interface, the phone number save function is preset.
Emergency Calls
You can call for emergency services as long as you are in any net ork coverage (check the signal
strength indication bar on the upper right side of the handset screen). If your net ork provider
doesn't provide roaming service in this area but another net ork does, there ill be "Emergency
Calls " on the lock screen. If you are ithin any net ork coverage, you can even make emergency
calls ithout a SIM card.
Answering Calls
Drag the middle icon to right to ans er an incoming call. If your headphones are connected to
the handset, you can use the headphone key on the headphones to ans er calls.
Attention: A short press of the headphone key ill ans er the call hile holding the key do n
ill reject the call.
Connection ptions
These options can only be seen during a call. The aiting call, hold call, multi-party call functions
require the support of the net ork. Please contact your net ork provider for information.
In the connection option, you can do the follo ing operations:
Dialpad: Enter the dialling screen of the current call.
Speaker: S itching hands-free and handheld modes.
Mute: Turn on/off Mute. When the mute is ON, the other person can't hear audio.
Hold: Temporarily hold the current one-line call.
Start recording: Record the current call.
Add Call: Enter the dialling screen for a ne call.
End: End the current call.
Conference*: In Conference call mode, you can ans er the incoming call and add it to the
conference in accordance ith the instructions; Hold multiparty conference; Have a private
conversation ith one party and hold other parties' call; Connect one party to the other and end
the conference call; Put one party on hold; End current call and all hold on calls.
Note: conference call mode is only available under certain conditions. Users ill
need to ensure that conference call functions are available from their service
provider.
6
Menu Functions
Browser
Your phone comes ith a bro ser. You can use Bro ser to access and bro se the Internet. Open
the bro ser options menu and to perform one of the operations, press Menu key then tap it.
Calculator
The handset is provided ith a calculator ith basic functions. Use the calculator to solve simple
arithmetic problems or use its advanced operators to solve more complex equations.
1. Touch Calculator to open the application.
2. Flick the screen to the left or make the screen horizontal to s itch to the Advanced panel
on the Calculator screen.
Attention: the accuracy is limited ith extremely long numbers and round-off errors may occur.
Calendar
Use the Calendar to create and manage events, meetings, and appointments. Depending on your
synchronization settings, the calendar on your phone can stay in synchronization ith your
calendar on the eb.
Press the touch screen to bro se date and the calendar information on the screen shall be
correspondingly updated.
Camera
Under vie ing condition, press the bottom icons to do the corresponding operations. Press the
Capture icon to capture a picture. Press the Record icon to record video. The Thumbnail icon
sho s the currently captured picture or video.
In the camera previe interface, you can press the volume keys for zoom In/Out.
Clock
Enter the clock menu and touch the alarm icon to enter the alarm list interface. You can add a
ne alarm. The Countdo n and Stop atch function can also be used inside the Clock.
7
Normal Mode
Settings
Gesture Capture
HDR on/off
Live Photo Mode
Camera Flash
Motion Track Mode
Beauty Filter Mode
S itch Camera
Save Picture
Footage Stills Photograph
Contacts
Entering the Contacts, you can check all the contacts, search for contacts or add ne contact.
Ne contact means a ne ly added phone number that is recorded in the SIM card or the
handset. You can also check contact group.
Downloads
You can check the do nloaded or being-do nloaded contents.
Email
When using the Email application for the first time, you must configure your email account. The
Email setup izard helps you set up your account for many popular email systems.
Using Email, you can send or receive emails from other email accounts.
File Manager
You can manage files, including music, videos, documents and other formats files. Enter the file
manager, you can select external or internal SD card, and touch the icons of the lo er screen to
do some operations.
Flashlight
Tap this icon to turn the flashlight on/off.
FM Radio
FM Radio lets you listen to FM radio stations on your mobile phone. Since FM Radio uses the
provided ired stereo headset as the antenna, connect the headset first to the audio jack of your
phone before you open the application.
Gallery
In the gallery interface, there are different folders. Select a folder and press to enter it. Press
image or video to vie pictures or videos.
When vie ing the picture, if you touch the screen, you ill see the share icon. Touch "share icon"
to send the file through Bluetooth or via a messages. Touch the option menu to delete or edit
the picture.
Gmail™
Gmail (also kno n as Google Mail) is a free email service ith innovative features such as
"conversation vie " email threads, search-orientation, tagging etc.
Google
Google is a eb search engine o ned by Google Inc. you can search the online information,
including ebpages, images, videos and more.
Maps
The phone provide maps service for your travel.
8
Messages
Compose ne message
Press edit ne message to get a ne text message:
Click the edit frame, type in after a virtual keyboard pops out.
Press the number frame and enter number, or press add contact icon and select stored
contact number from Contacts.
Input contents into the typing frame on the touch screen.
Touch the add attachment icon of left screen to add files.
Press upper right corner option icon to insert quick text, Insert contact, Add subject and
Discard.
After editing, press send icon to send the text.
Message Settings
Include SMS Enabled Text Message (SMS), Multimedia Message (MMS), notifications and General.
Music
Use the Music player to play music files. The songs saved in your SD Card can be played using
the Music Player of the device.
The songs are categorized by Artists, Albums and Songs. You can make your favourite playlist by
holding your finger on a song and selecting Add to playlist. While listening to the music, you can
choose among various sound effects.
Phone
Press the keyboard, enter the phone number then press the Dial icon.
Google Play™ Store
Google Play Store is dedicated to establishing the latest, fastest and most comprehensive third-
party application store, making the Android™ system simpler. You can pick soft are and games
to your taste from thousands of applications any here and at anytime.
All Settings
•Wi-Fi
To use Wi-Fi on your mobile phone, you need to have an access to ireless access points
(hotspots). Obstacles that block the Wi-Fi signal ill reduce its strength.
•Turbo Do nload
Do nload large files (over 20MB) faster using Wi-Fi and 4G/3G net orks at the same
time. The Turbo Do nload icon ill be sho n on the status bar hen it is running. To use
Turbo Do nload, both Wi-Fi and Mobile data must be turned on. When it is enabled, any
application data that your have selected to do nload via Wi-Fi only ill be do nloaded
via WLAN and 4G/3G net orks any ay.
•Bluetooth
If you are using Bluetooth, remember to stay ithin 10 meters (33 feet) of other
Bluetooth devices. Be a are that obstacles like alls or other electronic equipment may
interfere ith your Bluetooth connection.
Touching your Bluetooth device name lets others can find your Device
Touching Refresh to scan and search devices
Touching other device name to Pair.
Pressing menu key to do other operations. Such as Refresh,Rename this device and Sho
received files.
9