manuals.online logo
Brands
  1. Home
  2. •
  3. Brands
  4. •
  5. Kogan
  6. •
  7. Coffee Maker
  8. •
  9. Kogan KACOFAUTWTA User manual

Kogan KACOFAUTWTA User manual

Table of Contents
Product Guide................................................................................................................................................................. 2
Parts description...................................................................................................................................................... 2
Control Panel............................................................................................................................................................. 2
Important Safeguards.................................................................................................................................................. 3
Suitable locations..................................................................................................................................................... 3
Cleaning and storing the machine..................................................................................................................... 4
Fire Safety Precaution............................................................................................................................................ 4
Preliminary Operations.......................................................................................................................................... 4
djustable Coffee Grinders.................................................................................................................................. 4
Coffee Brewing using Coffee Powder..............................................................................................................4
Hot Water Dispensing............................................................................................................................................ 4
General Cleaning...................................................................................................................................................... 4
Brew Cleaning with Coffee Oil Remover......................................................................................................... 5
Descaling..................................................................................................................................................................... 5
Disposal....................................................................................................................................................................... 5
Usage................................................................................................................................................................................. 5
First installation........................................................................................................................................................ 5
Making mericano................................................................................................................................................... 6
Making Espresso....................................................................................................................................................... 6
Making hot water..................................................................................................................................................... 6
Making cappuccino.................................................................................................................................................. 7
Making latte................................................................................................................................................................ 7
Making hot milk/milk foam................................................................................................................................... 7
Milk foam control..................................................................................................................................................... 8
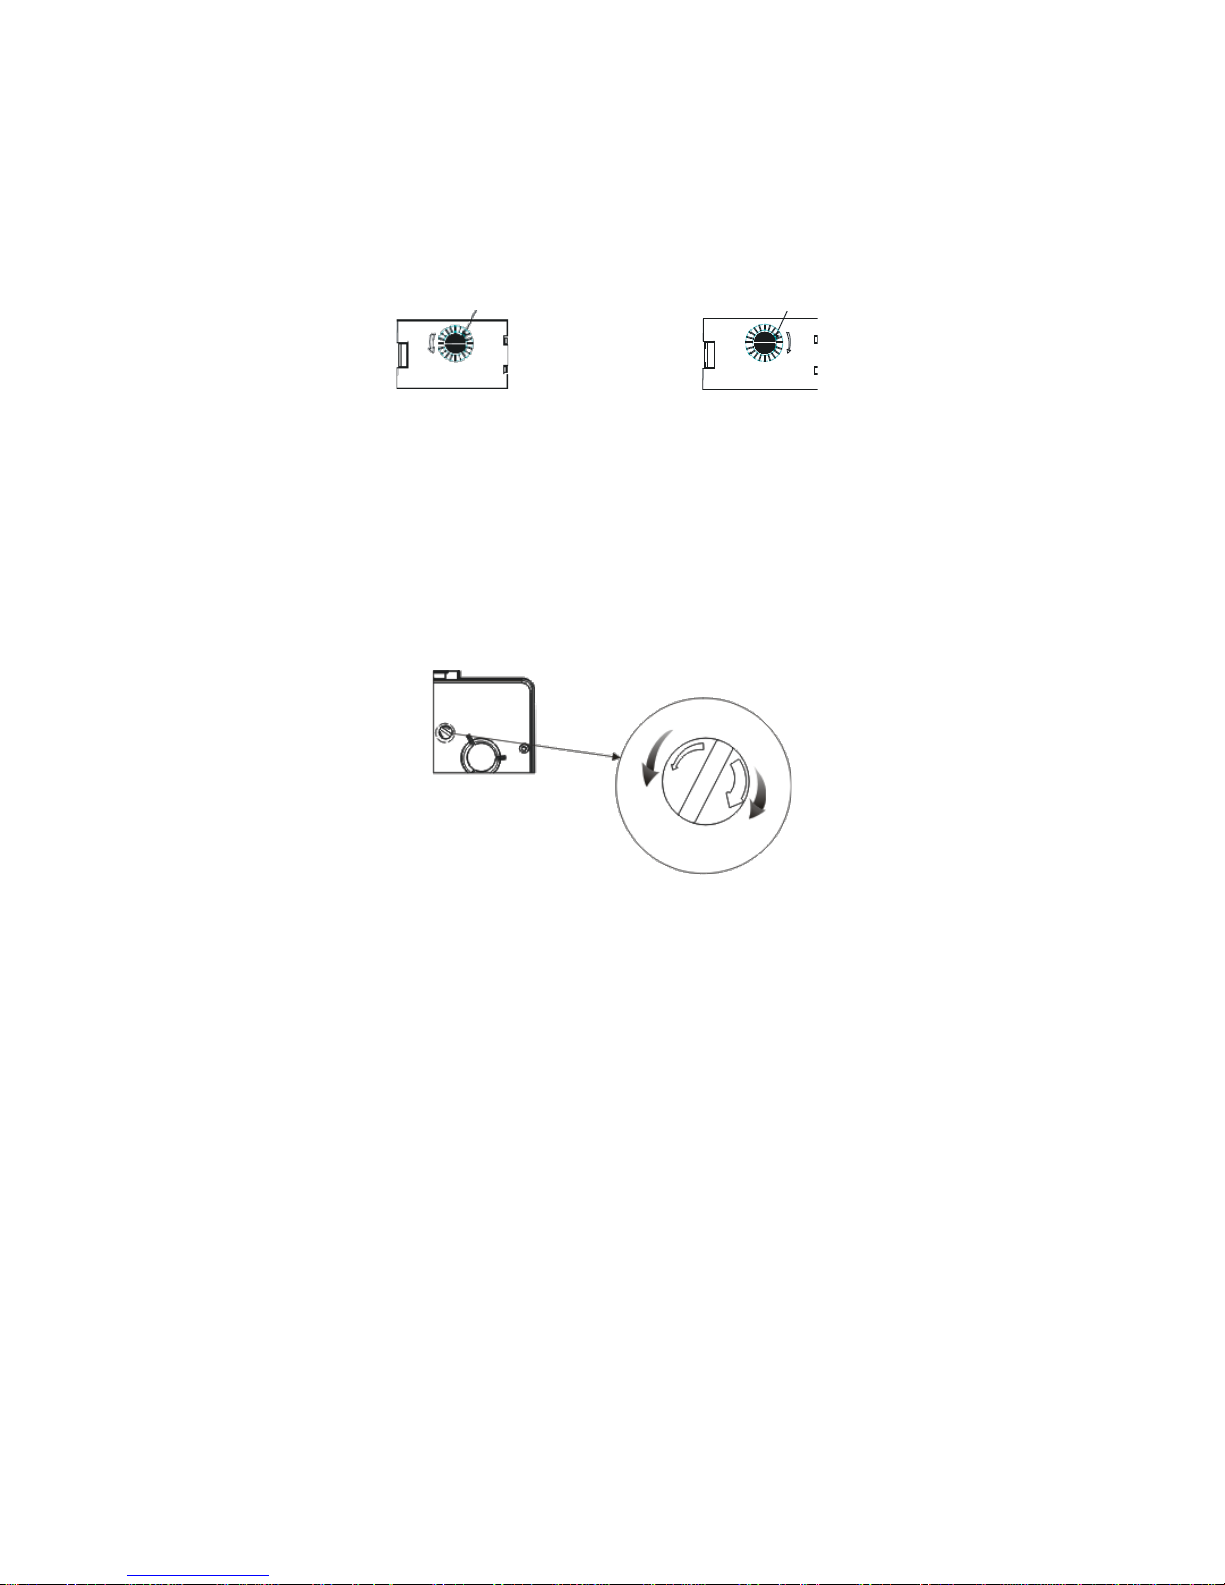
djusting coffee grinder........................................................................................................................................ 8
Custom and maintenance menu............................................................................................................................... 9
Personalised coffee settings................................................................................................................................ 9
Descaling..................................................................................................................................................................... 9
Setting stand-by mode........................................................................................................................................ 10
Sound settings......................................................................................................................................................... 10
Display settings....................................................................................................................................................... 10
Language settings................................................................................................................................................... 11
Coffee counter.......................................................................................................................................................... 11
Factory Reset............................................................................................................................................................ 11
Cleaning the Milk Frother...................................................................................................................................... 11
Brew unit cleaning.................................................................................................................................................. 12
Error Messages.............................................................................................................................................................. 12
Troubleshooting............................................................................................................................................................ 13
1
Product Guide
Parts description
1 Drip Tray 2 Coffee Spout 3 Milk Frother
4 Water Tank 5 Left Door 6 Power Cord
7 Control Panel 8 Filler Funnel Lid 9 Filler Funnel for Ground Coffee
10 Bean Tank 11 Right Door 12 Brew Unit
13 Waste Bin 14 Grinder djustment Switch 15 Milk Frother Control
Control Panel
2
Espresso
mericano
Cappuccino
Settings Menu
Latte
Hot Water
Milk Foam
dd Powder
Power
Important Safeguards
When using electrical appliances, basic safety precautions should always be followed, including
the following:
1. Read all instructions
2. Do not touch hot surfaces. Use handles or knobs.
3. To protect against fire, electric shock and injury to persons do not immerse cord, plugs,
or appliance in water or other liquid.
4. Close supervision is necessary when the appliance is used near children.
5. Unplug from power outlet when not in use and before cleaning. llow to cool before
putting on or taking off parts, and before cleaning the appliance.
6. Do not operate any appliance with a damaged cord or plug, or after the appliance
malfunctions or has been damaged in any manner. Contact the Kogan customer support
team for information.
7. The use of accessory attachments not recommended by Kogan.com may result in fire,
electric shock or injury to persons.
8. Do not use outdoors.
9. Do not let cord hang over edge of table/counter, or touch hot surfaces.
10. Do not place on or near a hot gas or electric burner, or in a heated oven.
11. lways attach plug to appliance first, then plug cord into wall outlet. To disconnect, turn
any control to “off”, then remove plug from wall outlet.
12. Do not use appliance for anything other than its intended use.
13. Save these instructions for future reference.
•This appliance is for household or commercial use only . ny servicing, other than
cleaning and user maintenance, should be performed by the Kogan service center.
•Do not immerse machine in water.
•To reduce the risk of fire or electric shock, do not disassemble the machine. There are no
parts inside the machine serviceable by the user. Repairs should be done by Kogan
service technicians only.
•Check voltage to be sure that the voltage indicated on the nameplate corresponds with
your voltage.
•Never use warm or hot water to fill the water tank. Use cold water only.
•Keep your hands and cord away from hot parts of the appliance during operation.
•Never clean with scrubbing powders or harsh cleaners. Simply use a soft damp cloth with
water.
•For optimal taste of your coffee, use purified or bottled water. Periodic descaling is
recommended every 2-3 months.
•Do not use caramelised or flavoured coffee beans.
Suitable locations
For best use, it is recommended that you :
•Choose a safe, level surface, where there will be no danger of overturning the appliance
accidentally;
•Choose a location that is sufficiently well-it, clean and near an easily reachable power
socket;
•While switching on or off the machine, we suggest placing an empty glass under the
dispensing spout.
•Do not keep the machine at temperatures below 0 degree. Frost may damage the
machine. Do not use the coffee machine outdoors. In order to prevent its housing from
melting or being damaged, do not place the machine on very hot surfaces and close to
open flames.
3
Cleaning and storing the machine
Keep the machine at its best by cleaning and storing it properly. Since the machine uses natural
ingredients as brew beverages (coffee beans, water, milk, etc.), some residues of ground coffee
or condensed water could be present on its supporting surface. For this reason we recommend
to periodically clean both the visible parts of the machine and the area beneath it.
Before storing the machine we strongly recommend you thoroughly clean it.
Water left in the tank and/or in the water circuit for several days should not be consumed. If the
machine is going to remain inactive for a long time, dispense water as described in the “hot
water”section.
Turn off the power button and clean the machine. Finally, remove the plug from the socket. Wait
for the machine to cool down.
Never immerse the machine in water! Store it in a dry place, out of the reach of children. Keep it
protected from dust and dirt. It is strictly forbidden to tamper with the internal parts of the
machine.
Fire Safety Precaution
In the event of fire, use a carbon dioxide (Co2) extinguisher. Do not use water or dry powder
extinguishers.
Preliminary Operations
•NEVER remove the drip tray when the machine is on. Wait for a couple of minutes after
turning on/off, as the machine will be carrying out a rinse/self-cleaning cycle (see
“rinse/self-cleaning cycle” section).
•Fill the tank only with fresh, non-sparkling water. Hot water or any other liquid may
damage the tank and/or the machine. Do not operate the machine without water. Make
sure there is enough water in the tank.
•Only coffee beans must be put into the coffee bean tank. Ground coffee, instant coffee or
any other substance in the coffee bean tank may damage the machine.
Adjustable Coffee Grinders
Warning: the grinder adjustment knob, which is located inside the coffee bean tank, must be
turned with the coffee grinder adjustment key only when the coffee grinder is working. Do not
put any material other than coffee beans into the tank. Do not pour ground and/or instant coffee
into the bean tank.
Warning: The coffee grinder contains moving parts that may be dangerous. Do not insert fingers
and/or other objects into the grinder. In case of malfunction, turn off the appliance by pressing
the power button and remove the plug from the socket before carrying out any other type of
operation inside the coffee bean tank. Do not pour coffee beans into the tank while the coffee
grinder is working.
Coffee rewing using Coffee Powder
Warning: dd only coffee powder to the compartment. Other substances and objects may
cause severe damage to the machine. Such damage will not be covered by warranty.
Hot Water Dispensing
Warning: t the beginning, short spurts of hot water may come out. There is a high risk of
burning. The device may reach high temperatures so do not touch it with bare hands.
General Cleaning
Do not immerse the machine in water. Do not wash any of its parts in the dishwasher. Do not use
sharp objects or harsh chemical products (solvents) for cleaning. Use a soft, dampened cloth to
clean the machine. Do not dry the machine and/or its parts using a microwave and/or oven.
4
rew Cleaning with Coffee Oil Remover
Warning: The coffee oil remover is to be used for cleaning only and does not have a descaling
function. For descaling, use descaling solution and follow the procedure described in the
“descaling”chapter.
Descaling
Not doing this will ultimately make your appliance stop working properly and such repair is not
covered by warranty.
Warning: Never drink the descaling solution or any products dispensed until the cycle has been
carried out to the end. Never use vinegar as a descaling solution.
Disposal
Do not dispose of electrical appliances as unsorted municipal waste, use separate collection
facilities.
Contact you local government for information regarding the collection systems available.
If electrical appliances are disposed of in landfills or dumps, hazardous substances can leak into
the groundwater and get into the food chain, damaging your health and well-being.
Usage
First installation
1. Unpack the machine;
2. Remove the water tank. Fill it with fresh drinking water;
3. Fill the coffee beans;
4. Insert the power plug into the wall socket.
5. Press the Kogan logo;
6. llow the Machine to Warm up
7. The machine is now ready for use and will be in the Standby mode.
5
Making Americano
1. djust the height of the dispensing spout.
2. Press the mericano icon to brew mericano style coffee.
Making Espresso
1. djust the height of the dispensing spout.
2. Press the Espresso icon to brew espresso style coffee.
Making hot water
1. Place the cup below the dispensing spout.
2. Press the hot water icon. The machine will start to disperse hot water.
3. Once you have the desired amount of hot water, press the power icon to stop.
6
Making cappuccino
1. Insert the milk frother into the machine.
2. Place the milk hose into the milk (we recommend using whole milk)
3. Press the cappuccino icon. The machine will start to make a cappuccino.
4. Once you have your desired amount of milk, you can press the power icon to stop the
process.
Making latte
1. Insert the milk frother into the machine.
2. Place the milk hose into the milk (we recommend using whole milk).
3. Press the latte icon. The machine will start to make a latte.
4. Once you have your desired amount of milk, you can press the power icon to stop the
process.
Making hot milk/milk foam
1. Insert the milk frother into the machine.
2. Place the milk hose into the milk (we recommend using pure milk).
3. Press the milk icon, the machine will start to add the milk into your cup.
4. Once you have reached your desired amount of milk you can press the power icon to
stop the process.
7
Milk foam control
Open the left-hand door and you will see the milk frother control.
The quality of the milk foam will depend on the milk you use and the temperature of the milk.
When frothing the milk, please ensure you turn the milk frother control counter-clockwise if it is
not in the correct position and the milk is not frothing enough. If there is only steam coming out,
please turn the milk frother control clockwise.
Make sure you clean the milk frother device after use to avoid blockages.
Adjusting coffee grinder
The grinder adjustment knob, which is placed inside the coffee bean tank, must be turned with
the coffee grinder adjustment key only when the coffee grinder is in operation. Do not put any
material other than coffee beans into the tank. Do not pour coffee ground and/or instant coffee
into bean tank. NEVER use coffee beans that have been stored in a freezer.
When making a coffee, if the coffee flow is very slow (powder is too fine) press and turn the
adjustment button, clockwise to set the grinder to a coarser setting.
When making a coffee, if the coffee flow is very fast and very light in colour (powder is too
coarse), press and turn the adjustment button counter-clockwise to adjust the grinder to a finer
setting.
8
Counter-
clockwise Clockwise
More steam Less steam
Fine
Coarse
Custom and maintenance menu
Personalised coffee settings
1. Press the menu button
2. Press the coffee settings icon
mericano
Settings
The unit disperses coffee, followed by hot
water. You can adjust the flow of the
espresso coffee, the temperature, the
grams of beans and the flow of hot water.
Once you have programmed your
preference, press exit to save your
settings.
Cappuccino
Settings
You can choose the flow of the espresso
coffee, the temperature, the grams of
coffee beans and the amount of time to
froth the milk. Once you have
programmed your preferences, press exit
to save your settings.
Espresso
Settings
You can choose the flow of the espresso
coffee, the coffee temperature, the grams
of coffee beans and the pump pressure
(high or low). Once you have
programmed your preferences, press exit
to save your settings.
Latte
Settings
You can choose the flow of the espresso
coffee, the temperature, the grams of
coffee beans and the amount of time to
froth the milk. Once you have
programmed your preferences, press exit
to save your settings.
Descaling
1. Pour descaling solution into the tank.
2. Fill the water tank with fresh water.
3. Press the descaling icon in the menu.
4. The descaling solution will be dispensed at intervals.
5. The machine will finish its descaling cycle.
6. Once the tank, take out the water tank and fill it with new fresh water.
7. The machine will start the rinse cycle.
8. Once the unit has finished the rinse cycle, it will return to standby mode.
9
Setting stand-by mode
You can select 30 minutes, 1 hour, 1.5 hour ….. 24 hours.
Sound settings
fter pressing the audio settings icon, you can turn sound on or off.
Display settings
fter pressing the energy-saving icon, you can select power saving mode, semi-saving mode or
disable energy saving mode.
10
Descale solution
Fresh
water
Language settings
You can select your preferred language, or you can just use the icons.
Coffee counter
You can view a counter of the different varieties of coffee you have made with your coffee
machine.
Factory Reset
The coffee machine comes preprogrammed with the recommended default factory settings. If
you are selling the coffee machine or giving it away, we recommend you perform this reset so
that the new owners can start fresh and customise the settings to suit their own needs.
Cleaning the Milk Frother
1. Insert the milk frother into the machine.
2. Place the milk hose into a cup of water and place another cup under the milk dispenser.
3. Press the milk icon to start cleaning.
4. t the end of the operation, empty the container and repeat these steps until the pipeline
has been completely flushed out and cleaned of any old milk.
11
rew unit cleaning
1. Open the right side door.
2. Remove the waste bin and dispose of the coffee dregs.
3. Remove the brew unit and rinse with warm water.
4. Insert the brew unit back into place and press until you hear a click to confirm it is locked
back in place.
5. Replace the waste bin.
Error Messages
Refill the water tank. dd coffee beans to
the bean tank.
Drip tray missing ~
insert the drip tray
correctly.
Coffee waste bin
missing ~ insert the
coffee waste bin
correctly.
Brew unit missing ~
the brew unit must be
inserted into the
machine correctly.
Full waste bin ~ the
waste bin is full of
used coffee
pods/coffee dregs.
The right door is open
~ close the door.
Ventilate ~ the water
tank is not in the
correct place.
Push the tank into the
correct position.
12
Troubleshooting
If in the event that the machine should fall to the ground and malfunction, you should
immediately unplug the machine from power point. If a mechanical failure to the machine should
occur, you should contact the Kogan customer service team for information regarding repairs,
even if the unit is no longer under warranty.
Kogan.com does not assume any responsibility for damages or malfunctions caused to the
coffee machine by customers that have not complied with operating instructions and for general
care maintenance of their coffee machine.
If the coffee machine is faulty, immediately unplug the power cord and contact the Kogan
customer service team.
13

This manual suits for next models

1

Other Kogan Coffee Maker manuals

Kogan KAESSPCOFFB User manual

Kogan

Kogan KAESSPCOFFB User manual

Kogan KAESSPCOFFA User manual

Kogan

Kogan KAESSPCOFFA User manual

Kogan KACOFNESDA User manual

Kogan

Kogan KACOFNESDA User manual

Kogan KACOFXXNESA User manual

Kogan

Kogan KACOFXXNESA User manual

Kogan Premium Ez-press User manual

Kogan

Kogan Premium Ez-press User manual

Kogan Ez-press User manual

Kogan

Kogan Ez-press User manual

Kogan KACOFXXAUTB User manual

Kogan

Kogan KACOFXXAUTB User manual

Kogan KACOFXXAUTA User manual

Kogan

Kogan KACOFXXAUTA User manual

Kogan KACOFESPRSA User manual

Kogan

Kogan KACOFESPRSA User manual

Kogan KACOFXXAUTC User manual

Kogan

Kogan KACOFXXAUTC User manual

Kogan KACOFXXNESA User manual

Kogan

Kogan KACOFXXNESA User manual

Kogan KGNCMAVAA User manual

Kogan

Kogan KGNCMAVAA User manual

Kogan KACOFXXNESB User manual

Kogan

Kogan KACOFXXNESB User manual

Kogan KGNCMAVAA User manual

Kogan

Kogan KGNCMAVAA User manual

Popular Coffee Maker manuals by other brands

Coffee crafters Artisan X-e Base manual

Coffee crafters

Coffee crafters Artisan X-e Base manual

Morphy Richards Redefine instruction manual

Morphy Richards

Morphy Richards Redefine instruction manual

Rancilio Classe 9S specification

Rancilio

Rancilio Classe 9S specification

Toddy Cold Brew System Instructions & recipes

Toddy

Toddy Cold Brew System Instructions & recipes

Centurion KE240 instruction manual

Centurion

Centurion KE240 instruction manual

Montgomery Ward CM 40527 instruction manual

Montgomery Ward

Montgomery Ward CM 40527 instruction manual

Rohnson R-917 instruction manual

Rohnson

Rohnson R-917 instruction manual

Olympia Cremina Owners book

Olympia

Olympia Cremina Owners book

Bonavita BV01002US instruction manual

Bonavita

Bonavita BV01002US instruction manual

Bosch Tassimo Charmy TAS 55 CH Series instruction manual

Bosch

Bosch Tassimo Charmy TAS 55 CH Series instruction manual

Bifinett KH 1 operating instructions

Bifinett

Bifinett KH 1 operating instructions

Curtis GEM-12D Specification sheet

Curtis

Curtis GEM-12D Specification sheet

Rancilio EPOCA E specification

Rancilio

Rancilio EPOCA E specification

Miele CVA 2660 operating instructions

Miele

Miele CVA 2660 operating instructions

Cimbali M1 MilkPs Specifications

Cimbali

Cimbali M1 MilkPs Specifications

Nespresso GEMINI CS 220 PRO user manual

Nespresso

Nespresso GEMINI CS 220 PRO user manual

Rowenta CT3811 manual

Rowenta

Rowenta CT3811 manual

Black & Decker TCM1000 Use and care book

Black & Decker

Black & Decker TCM1000 Use and care book

manuals.online logo
manuals.online logoBrands
  • About & Mission
  • Contact us
  • Privacy Policy
  • Terms and Conditions

Copyright 2025 Manuals.Online. All Rights Reserved.