Kogan KACOFESPRSA User manual


IMPORTANT SAFEGUARDS
Before using this electrical appliance, the following basic precautions should always be followed:
•Read all instructions.
•Before use, check that the voltage of the wall outlets match the rated voltage marked on the
rating plate.
•This appliance has been incorporated with a grounding plug. Please ensure that the wall
outlets of your house or office are well earthed.
•To protect against fire, electric shock and/or in ury to persons, do not immerse the cord or
plug in water or any other liquids.
•Remove the plug from the wall outlet before cleaning and when not in use. Allow the
appliance to cool down completely before taking off or attaching any components, or before
cleaning.
•Do not operate any appliance with a damaged cord or plug, after the appliance
malfunctions or is dropped or damaged in any manner. Contact the Kogan customer
support team for advice and to make arrangements for any examinations, repairs or
ad ustments.
•The use of accessory attachments not recommended by Kogan may result in fire, electric
shock or in ury.
•Place the appliance on a flat surface or table, with the power cord not hanging down over
the edges.
•Ensure the power cord does not touch any of the hot surfaces of the appliance or any
nearby appliances.
•Do not place the coffee maker on a hot surface or beside a fire, stove, oven or kettle to
avoid it being damaged.
•To disconnect, remove the plug from the wall outlet. Always hold the plug when
unplugging, never pull on the cord itself.
•Do not use the appliance for any uses other than the intended use, and place it in a dry
environment.
•Close supervision is always necessary when being used near children.
•Be careful not to get burned by steam.
•Do not touch the hot surface of the appliance (such as a steam wand and the steel mesh
ust after boiling). Always handle the appliance by the handles or knobs.
•Do not let the coffee maker operate without water.
•WARNING: The filling aperture must not be opened during use.
•Do not remove the metal funnel when the appliance is brewing coffee or when steam and
hot water escape from the metal funnel. Be sure to release the pressure in the water tank
before removing the metal funnel.
•Connect the plug to the wall outlet before use, and turn all switches to the OFF position
prior to removing the plug from the wall outlet.
•This appliance is not intended for use by persons (including children) with reduced physical,
sensory or mental capabilities, or lack of experience and knowledge, unless they have been
given supervision or instruction concerning use of the appliances by a person responsible
for their safety.
•Children should be supervised to ensure they do not play with the appliance.
•Never operate the appliance with the water tank empty. During operation, if the water tank
becomes empty you should stop operations immediately, otherwise it may damage the
pump. Operate the appliance again only after you have refilled the water tank.
•This appliance is intended to be used in households and similar applications such as:
- Staff kitchen areas in shops, offices or other working environments.
- Farm houses
- By clients in motels, hotels or other residential type environments
- Bed and breakfast type environments
•Do not user outdoors.
•Save a copy of these instructions for future reference.
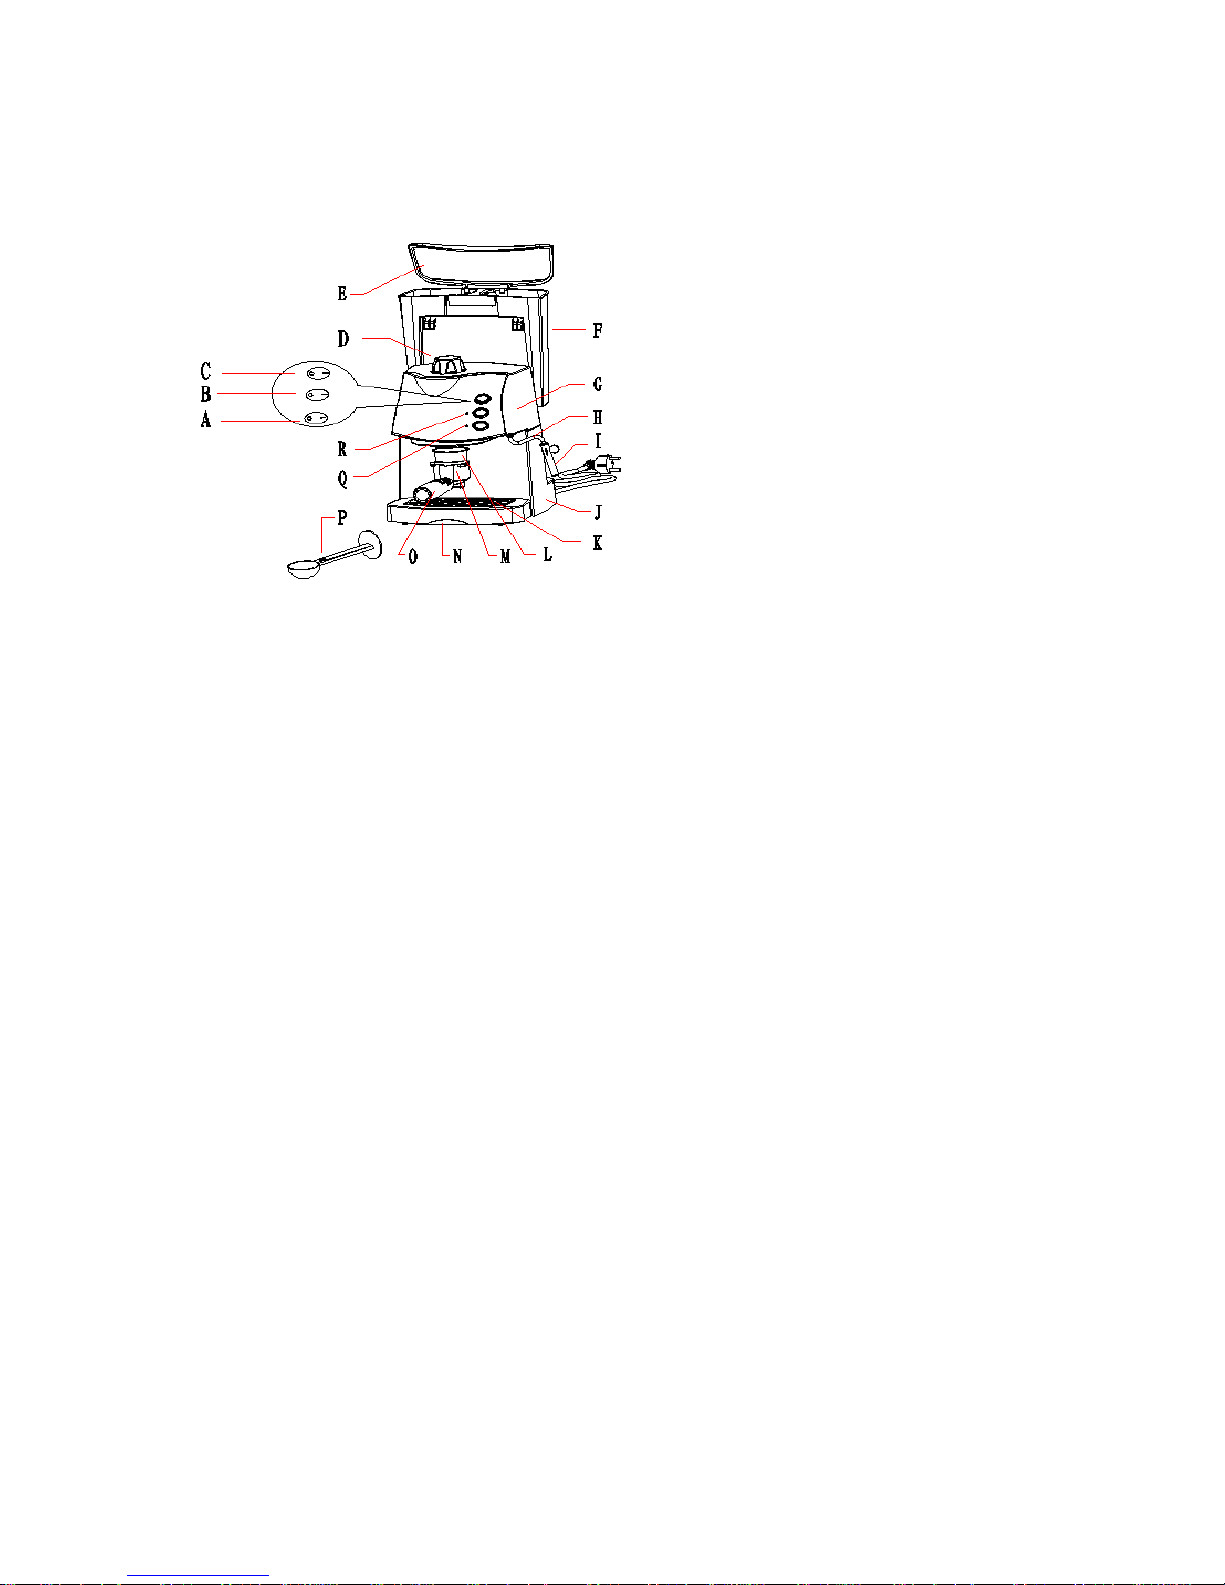
KNOW YOUR COFFEE MAKER
(Product may be sub ect to minor design change without prior notice)
A: On/Off switch
B: Steam switch
C: Coffee switch
D: Steam control knob
E: Water tank cover
F: Water tank
G: Top cover
H: Steam wand water tank
I: Froth device
J: Main body
K: Removable shelf
L: Coffee powder mesh
M: Metal funnel
N: Bottom cover
O: Metal funnel handle
P: Measuring spoon and tamper
Q: Power indicator
R: Ready indicator
BEFORE FIRST USE
To ensure the first cup of coffee tastes excellent, you should rinse the inner workings of the coffee
machine with warm water as follows:
1. Pour water into the water tank. The water level should not exceed the “MAX” mark in the
tank, then replace the water tank cover.
Note: The appliance is supplied with a detachable tank for easy cleaning. You can fill the
tank with water firstly, then put the tank into the appliance.
2. Set coffee powder mesh into the metal funnel (no coffee in the mesh).
3. Insert the funnel into the appliance from the “Insert” position and release the press bar. You
can then fix them into the coffee maker firmly by turning it anticlockwise until it is in the
LOCK position.
4. Place a ug on the removable shelf. Make sure the steam control knob is on the minimum
position.
Note: The appliance is not equipped with a ug. Please use your own ug or coffee cup.
5. Connect to a power source, then the “On/Off” switch to the “-” position. The power indicator
will be illuminated.
6. Turn the coffee switch to the “-” position. The pump will begin to pump water, and when
there is water flowing out, turn the coffee switch to the “O” position and turn the steam
switch to the “O” position. After a moment, the appliance will begin to pre-heat, at which
point the ready indicator will illuminate, showing that the pre-heating is complete. Turn the
coffee switch to the “I” position again, and water will flow out.
7. Once the water stops flowing out, you can pour the water in the containers out and clean
them thoroughly. You are now ready to start brewing!
Note: There may be a noise when pumping the water for the first time. This is normal, as
the appliance is releasing internal air. After about 20s, the noise will disappear.

PRE-HEATING
To make a cup of good, hot Espresso coffee, we recommend you preheat the appliance before
making the coffee, including the funnel, filter and cup so that the coffee flavour is not influenced by
the cold parts.
1. Remove the detachable tank and open the tank cover to fill it with the desired amount of
water. The water level should not exceed the “MAX” mark in the tank. Then place the tank
back into the appliance properly.
2. Set the coffee powder mesh into the metal funnel, then insert the funnel into the appliance
from the “Insert” position and release the press bar, then fix them into the coffee maker
firmly by turning the unit anticlockwise until it is in the LOCK position.
3. Place an espresso cup (your cup) on the removable shelf.
4. Connect the appliance to a power supply source. Make sure the steam control knob is on
the minimum position.
5. Turn the “On/Off” switch to the “-” position, where the power indicator will be illuminated.
Make sure the steam switch is on the “O” position, then turn the coffee switch to the “-”
position. When water starts to flow out, turn the coffee switch to the “O” position
immediately. The purpose of this step is to pump the water from the tank into the housing.
6. When the ready indicator is illuminated, you should turn the coffee switch to the “-” position
again, and hot water will flow out. When the ready indicator goes out, turn the coffee
switch back to the “O” position. Pre-heating is now finished.
MAKING ESPRESSO COFFEE
1. Remove the metal funnel by turning it clockwise, then set your coffee powder into the metal
funnel. Add ground coffee to the mesh with the measuring spoon, then press the ground
coffee tightly into the mesh using the tamper. (A spoon of ground coffee will make about a
cup of top-grade coffee).
2. Insert the funnel into the appliance from the “Insert” position, then fix it firmly into the
appliance by turning it anticlockwise until it is in the LOCK position.
3. Pour the hot water in your cup out. Then place your hot cup back onto the removable shelf.
4. When the ready indicator is illuminated, you should turn the coffee switch to the “-” position,
then shortly afterwards coffee will begin flowing out.
Note: During brewing or while making steam, it is normal for the ready indicator to go out,
which simply means that the heating element is switching on to keep the temperatures in
the required range.
5. You should turn the “On/Off' switch to the “O” position manually when the desired amount of
coffee is in your cup or the colour of the coffee changes to show the strength of the coffee
is weakening. When this is done, the power indicator and ready indicator will go out and
the coffee maker will stop operating. Your coffee is now ready.
Warning: Do not leave the coffee maker unattended during the making of coffee, as you
may need to operate manually sometimes!
6. After you have finished making your coffee, you can take the metal funnel out by turning it
clockwise, and then pour the coffee residue out of the mesh by using the press bar.
7. Let them cool down completely, then rinse the funnel and mesh under running water.

MAKE CAPPUCCINO
You get a cup of cappuccino when you top up a cup of espresso with frothing milk.
Note: while making steam, the metal funnel must be assembled in position.
1. Prepare espresso first, while making sure the steam control knob is set to the minimum
position.
2. Turn the steam switch to the “-” position, waiting until the ready indicator is illuminated.
3. Fill a ug with about 100g of milk for each cappuccino to be prepared. We recommend that
you use full fat milk at refrigerator temperature.
Note: In choosing the size of ug, it is recommended that the diameter is not less than
70mm, and bear in mind that the milk increases in volume by up to 2 times, so ensure the
ug is high enough.
4. Insert the frothing device into the milk by about 2cm.
5. Turn the steam control knob slowly anticlockwise, and steam will come out from the frothing
device. Froth the milk by moving the ug around and up and down.
Note: Never turn the steam control knob quickly, as the steam will accumulate rapidly in a
short time, which make increase the potential risk of explosion.
6. When the required frothiness of milk is reached, you can turn the steam control knob back
to the minimum setting.
Note: Clean the steam outlet with a wet sponge immediately after the steam stops being
generated, being careful not to touch the steaming device with your bare hands.
7. Pour the frothed milk into the espresso and the cappuccino is ready. Sweeten to taste and
if desired, sprinkle the top of the froth with a little cocoa powder.
8. Turn the “On/Off” switch to the “O” position to cut off the power source.
Note: after making steam, we recommend you allow the coffee maker to cool down for at least 5
minutes before making coffee again, otherwise a burning odour may occur in your espresso coffee.
PRODUCING STEAM TO HEAT IQUIDS OR FROTH MI K
The steam wand can be used to froth milk or make hot beverages like drinking chocolate, water or
tea without the need to make an espresso coffee.
1. Open the water tank, remove the detachable tank and fill with the desired amount of water.
The water level should not exceed the “MAX” mark in the tank. Then place the tank back
into the appliance correctly.
2. Replace the tank cover and then connect the appliance to the power source.
3. Turn the “On/Off” switch to the “-” position, where the power indicator will illuminate.
4. Turn the coffee switch to the “-” position and set the steam switch to the “O” position. When
there is water flowing out, turn the coffee switch to the “O” position immediately, then turn
the steam switch to the “I” position and wait for a moment. When the ready light
illuminates, it means that the heating is finished.
5. Dip the steam wand into the liquid to be heated or into the prepared milk froth. Turn the
steam control knob in an anticlockwise direction slowly to start making steam.
6. When the required temperature is reached or the milk is adequately frothed, you can turn
the steam knob back down to the minimum position.
7. Press the “On/Off” switch to the “O” position to cut off the power source.

C EANING AND MAINTENANCE
1. Cut off the power source and let the coffee maker cool down completely before cleaning.
2. Clean the housing of the coffee maker with a moisture-proof sponge often, and clean the
water tank, drip tray and removable shelf regularly and dry them.
Note: Do not clean with alcohol or cleaning solvents. Never immerse the housing in water.
3. Detach the metal funnel by turning it clockwise, then get rid of any coffee residue inside.
You can then clean it with a cleanser, ensuring you then rinse it clean with clear water.
4. Clean all attachments in water and dry thoroughly.
C EANING MINERA DEPOSITS
To make sure your coffee maker is operating efficiently, internal piping is clear and the peak flavour
of coffee is being delivered, you should clean away mineral deposits every 2-3 months.
1. Fill the tank with water and descaler to the MAX level (the scale of water and descaler is
normally 4:1. Refer to the descaler instructions for exact measurements. Please use
“household descaler”, however you can use citric acid (available from chemists) instead of
descaler (one hundred parts water to three parts citric acid).
2. According to the program of pre-heating, put the metal funnel (no coffee powder in it) and
carafe ( ug) in place. Brew the water as per the instructions in “PRE-HEATING”.
3. Press the “On/Off” switch to the “-” position, where the power indicator will be illuminated.
You should turn the coffee switch to the “-” position, making sure the steam switch is at the
“O” position. When there is water flowing out, turn the coffee switch to the “O” position and
wait for a moment as the coffee machine heats up.
4. When the ready indicator is illuminated, it shows that heating is finished. Turn the coffee
switch to the “-” position and fill two coffee mugs with water, then turn the coffee switch to
the “O” position and wait for 5 seconds.
5. Turn the steam switch to the “-” position, waiting until the ready indicator is illuminated.
Make steam for 2 minutes, then turn the steam control knob to the minimum position to stop
making steam. Turn the “On/Off” switch to the “O” position to stop the unit, then leave the
unit with the descaling mixture in it for 15 minutes.
6. Restart the unit and repeat steps 3-5 at least 3 times.
7. Turn the steam switch to the “O” position, then when the ready indicator illuminates, turn
the coffee switch to the “-” position to brew until no descaler is left.
8. Then brew coffee (with no coffee powder) with tap water from the MAX level, repeating the
steps of 3-5 for at least 3 times. (It is not necessary to wait for 15 minutes in step 5 again).
Keep repeating until the water tank is left empty.
9. Repeat step 9 at least 3 times to make sure the piping is clean.

TROUB ESHOOTING
Symptom Cause Correction
Water leaks from
bottom of coffee
maker.
There is too much water in
the drip tray.
Please clean the drip tray out.
The coffee maker is
malfunctioning.
Contact the Kogan customer service team.
Water leaks out the
side of the filter.
There is coffee powder stuck
on the edge of the filter.
Get rid of the stuck powder.
Acid (Vinegar) taste
exists in Espresso
coffee.
Hasn't been cleaned
correctly after cleaning away
mineral deposits.
Clean the coffee maker as per the instructions in the “Before first
use” section a few times.
The coffee powder is stored
in a hot, wet location for a
long time and has turned
bad.
Please use fresh coffee powder, or store all unused coffee powder
in a cool, dry place. After opening a package of coffee powder,
reseal it tightly and store it in a refrigerator to maintain its
freshness.
Coffee maker does
not work any more.
Power outlet is not
connected properly.
Check that the power plug is connected properly and the outlet is
switched on. If the unit still does not work, contact the Kogan
customer support team.
Steamer cannot
froth milk.
The steam ready indicator is
not illuminating.
Only after the steam ready indicator is illuminated can the steam be
used for froth.
The container is too big, or
the shape is not compatible.
Use a high, narrow cup.
You have used skim/skinny
milk.
Use whole milk or half-skimmed milk.
Do not take the unit apart yourself. In the case of failure, please contact the Kogan customer
support team.
ENVIRONMENT FRIEND Y DISPOSA
Please help us to protect the environment! Remember to respect the local regulations in regards
to the disposal or non-working electrics and white-goods. Please contact your local municipal
council tip for information.
Table of contents
Other Kogan Coffee Maker manuals

Kogan
Kogan KGNCMAVAA User manual

Kogan
Kogan KAESSPCOFFA User manual

Kogan
Kogan Premium Ez-press User manual

Kogan
Kogan KACOFXXAUTC User manual

Kogan
Kogan KACOFXXAUTA User manual

Kogan
Kogan KACOFXXNESA User manual

Kogan
Kogan KACOFXXNESA User manual

Kogan
Kogan KGNCMAVAA User manual

Kogan
Kogan KACOFXXNESB User manual

Kogan
Kogan KACOFXXAUTB User manual


