1349085-2A-A 2
1349085-2A-A 3
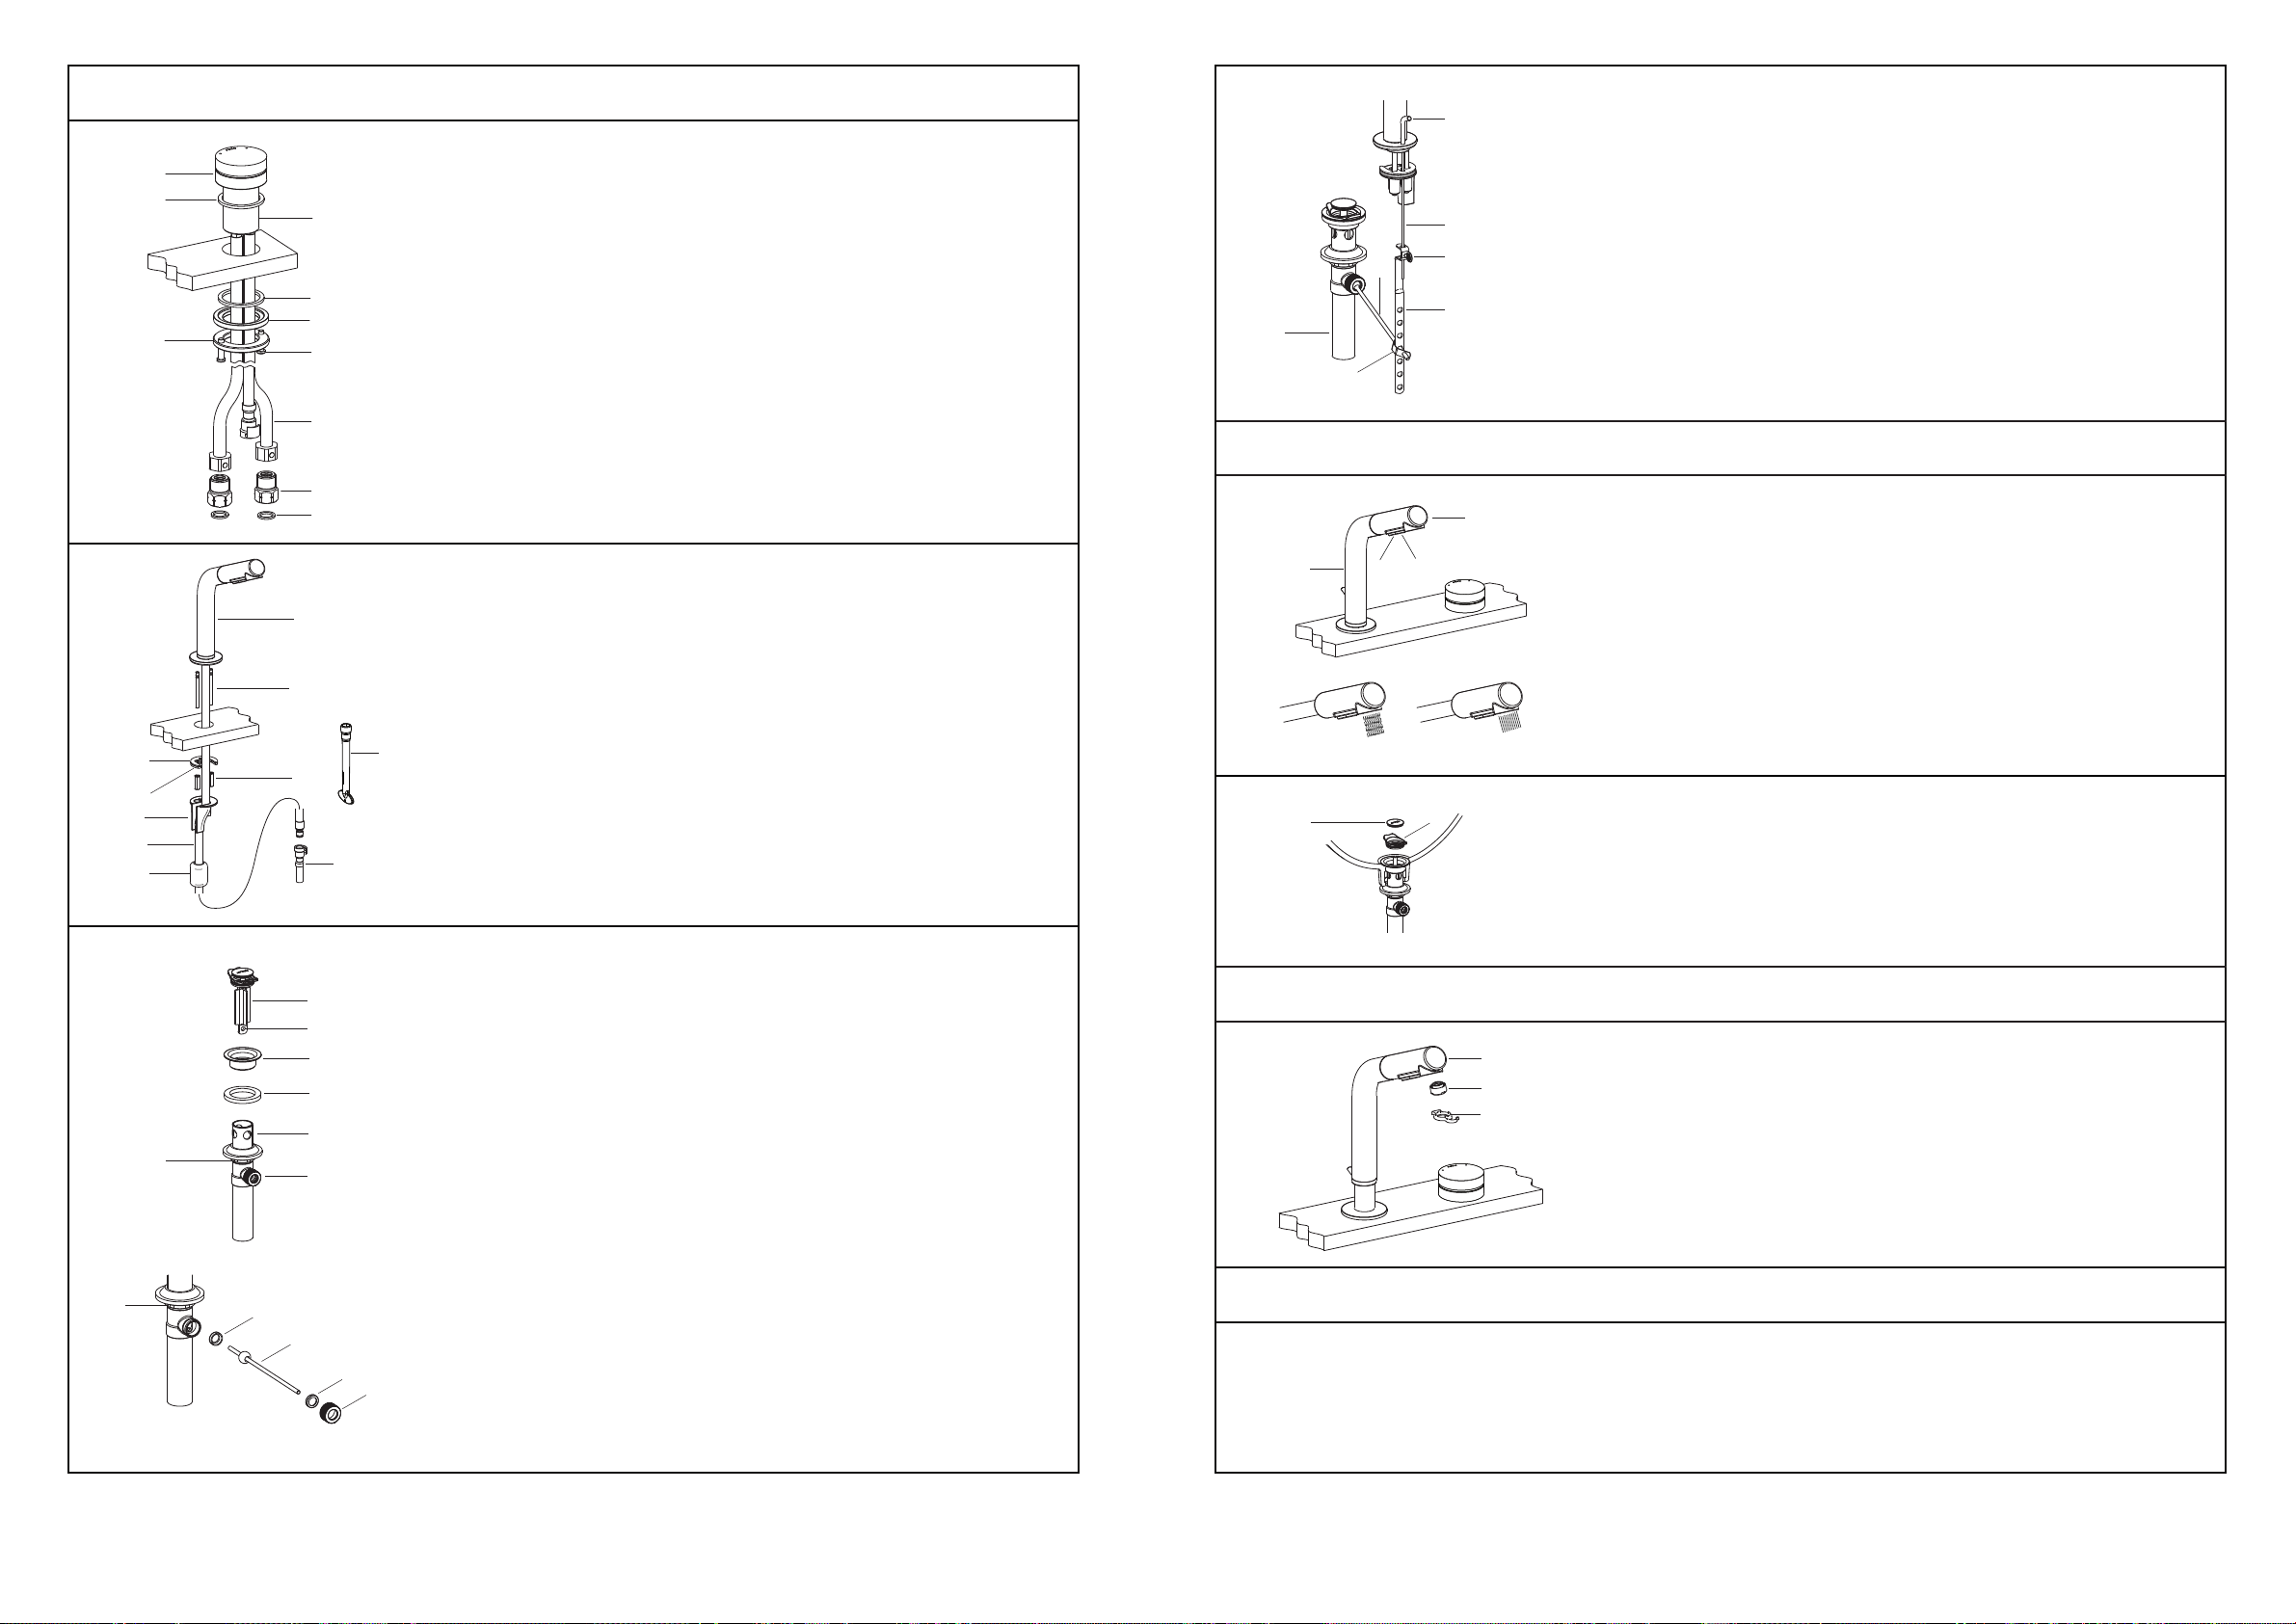
INSTALLATION
How to Install the Handle kit
Install the washer(2) into the groove of the handle kit(1). Insert the handle
kit with washer to the mounting hole. Adjust the handle. Make sure the
handle with red dot is on the left side and blue dot on the right side.
Ensure the screws(7) are in the threaded ring(6). From underside, slide
the washer(4), metal washer(5) and threaded ring to the body(3).
Position the body so that the inlet hoses(8) with red dot or blue dot are
symmetrical and the inlet hose with red dot is on the left. Screw the
threaded ring(6). Tighten the screws(7) to secure the handle kit.
Attach the connectors(9) with the washers(10) to water supplies. Attach
the inlet hoses to the connectors. The inlet hose with red dot connects to
hot water. The inlet hose with blue dot connects to cold water.
How to Install the Drain
Remove flange(23) from drain body(25). Slide the washer(24) onto the
underside of the drain flange. Insert drain body from underside of lavatory
with drain lever hole(27) facing to the back of the lavatory. Thread flange
onto drain body. Tighten the locknut(26) by hand from the underside.
Place stopper kit(21) into drain body aligning the flat side of stopper
hole(22) with the drain lever hole.
NOTE: If needed apply a ring of plumbers putty around the underside of
the drain flange(23), instead of using washer(24).
Place the rubber washer(28) into the drain lever hole. Put another plastic
washer(30) and retaining nut(31) into the long end of the ball lever
rod(29). Insert the ball lever assembly into the drain lever hole and
through the stopper hole, and tighten the retaining nut.
Be sure that the ball lever points to the back of the lavatory. Tighten the
locknut(26) on the drain body. Remove any excess putty. NOTE: Do not
reposition the drain after the locknut is tightened, or you may break the
putty seal.
Insert the lift rod assembly(33) into the rear hole of spout. Slide lift rod
into the hole in link(35). Connect the link onto ball lever rod(29) with “V”
clip(36). Assemble thumb screw(34) to link.
Push the ball lever down to the open position. Position the lift rod, make
sure the bottom of the lift rod knob(32) beyond about 10mm from the
lavatory table. Tighten thumb screw.
Connect the tailpiece(37) to the trap.
OPERATING INSTRUCTION
INSTALLATION CHECKOUT
Ensure that all coupling nuts are tight. Ensure that the lever handle is in
the off position. Turn on the main water supply and drain, and check for
leaks. Repair as needed.
Remove the spray(38). Remove the aerator(41) with the key(42). Turn on
the faucet. Run hot and cold water for about one minute to remove any
debris. Remove any debris from the filter washer and aerator. Shut off the
faucet. Reinstall the aerator and spray.
CLEANING INSTRUCTIONS
All Finishes: Clean the finish with mild soap and warm water. Wipe entire surface completely dry with clean soft
cloth. Many cleaners may contain chemicals, such as ammonia, chlorine, toilet cleaner etc, which could adversely
affect the finish and are not recommended for cleaning.
Do not use abrasive cleaners or solvents on Kohler faucets and fittings.
3
4
1
2
5
67
8
9
10
11
12
14
19
17
16
18
20
15
13
23
22
28
24
26
25
27
30 31
29
21
26
How to Install the Spout
Insert the mounting stud(12) into the bottom of the spout kit(11). Fit the
spout kit into the hole of the lavatory. From underside, install the
washer(13), the stainless steel washer(14) and the nut(15). Position the
spout kit. Tighten the nut(15) to secure the spout kit by wrench(20).
Remove the hose(16) protector, put the hose into the hose guide(17).
Insert the hose guide into the mounting stud(12).
Insert the hose(16) into counter balance weight(18). Connect the hose kit
and the hose(19) of handle kit.
34
32
35
36
37
29
33
In front of the user, push the handle back gently, turn clockwise for hot
water, and counter-clockwise for cold water.
Position the spout kit(11) height by lifting the spout. Turn on the faucet,
the form of water as figure(a) shown. Press the button(A) as shown for
figure(b) form of water flow. Press the button(B) as shown for the water
close.
If you want to use the spray(38) by hand, take the spray and pull out the
hose. NOTE: Please pull it gently and do not draw out the spray hose too
long, or you may damage the hose and connector.
How to Clean the Drain
Turn counterclockwise the drain stopper(39). Remove and clear filter(40).
Reinstall the filter and stopper.
38
A
B
a b
11
39 40
38
41
42


