Komos ND-1600 User manual

SAFETY NOTICE
CO2may be dangerous if not used in a
well ventilated area. It is important to
always check for gas leaks aer setting
up the unit as well as when kegs are
replaced.
WARNING
If the unit has just been moved (or
tilted at more than a 45 degree angle)
DO NOT PLUG IN OR TURN ON until the
unit has been upright for 24 hours.
TABLE OF CONTENTS
Included Features............................ 2
General Instructions ....................... 3
• Safety............................................ 3
• Installation.................................... 3
Assembly Instructions .............. 4–11
Operation Instructions...........12–14
• Operation.............................. 12–13
• Care/Maintenance .................... 14
• Couplers/Connections.............. 14
Troubleshooting ............................. 15
Technical Specs ............................. 15
1
INSTRUCTION MANUAL
STAINLESS STEEL
COMMERCIAL
KEGERATORs

INCLUDED
FEATURES
1. Cabinet
2. Door
3. Stainless Steel Handle
4. Lock
5. Vent
6. Top Cover
7. Guard Rail
8. Tower,Faucet & Handle
9. Light Switch
10. Fan
11. Return-Airway
12. Control Panel
13. Strap For CO2 Tank
14. 4 Adjustable feet
15. 4 Optional Casters (Not Pictured)
2

GENERAL INSTRUCTIONS
To ensure the kegerator is properly used please review and follow the safety and installation
notices below.
Safety:
Installation:
3
• Plug into a grounded 3-prong outlet.
• Do not use extension cords or adapters to connect the unit to an electrical power source.
• The fuse for the outlet where the unit will be plugged in should be at least 15 amps.
• The kegerator should not be installed in an area where it will be exposed to any water.
• Never allow children to climb inside the appliance. If no longer in use - remove the door or secure shut so children
cannot become trapped inside the unit.
• California Proposition 65 Warning: This product contains a chemical or chemicals known to the State of
California to cause cancer and birth defects or other reproductive harm.
• After moving the unit it is best to allow it to stand upright for 24 hours prior to plugging in to the power source.
• Do not pinch/kink the power supply cord.
• For proper heat dissipation make sure there is sufficient and proper air ventilation around the kegerator. The
kegerator dispenser vents from the grill below the door. The right side is “cold air in” and the left side is “warm air
out”. Make sure the kegerator can vent adequately from the front vent. This will allow the heat to escape quickly
enough to ensure consistent cooling. Not installing properly may cause the kegerator to fail prematurely and void
the warranty.
• Place out of direct sunlight and other sources of heat. The best room temperature range is from 65°F– 80°F.
• Once the unit is in place, level it by adjusting the feet on the bottom.
• Clean the interior with a soft damp washcloth.
• And finally, after plugging in the kegerator allow it to cool down for 4 hours prior to putting a keg inside.

ASSEMBLY INSTRUCTIONS
Assemble the kegerator prior to installing/plugging in the unit.
1. CO2tubing
2. Beer line tubing
3. Intertap Faucet(s) with black tap handle
4. Tower collar (hides tower screws)
5. Tower gasket
6. Tower shank with Duotight tailpiece
7. Multi-purpose wrench
8. CO2tank strap
9. Stainless drip tray
10. Guard rail with 4 screws
11. Door handle with 2 screws
12. Allen wrench for guard rail & handle
13. Feet knobs (4)
14. Casters (4)
15. Long casters screws (8)
16. Short casters screws (8)
17. Tower to kegerator screws (4)
18. Lock key (2)
19. Duotight tees (Included with 2 & 3 faucet towers only)
20. Stepless clamps (Included in case Duotight connections are not used)
Take stock of what comes with the kegerator.
Remove all the items from inside the unit and unpack the tower box and
tubing bag. You should have:
•Multi-purpose wrench (included)
•Allen wrench (included)
•#1 Phillips head screwdriver
•Tubing cutter or scissors
To assist in assembly we suggest having the following tools on hand:
If Using Stepless Clamps Instead of Duotight:
•Needle-nose pliers
•Pinch clamp pliers (preferred)
•If you don’t have pinch clamp pliers, regular wire
cutters will work
4

Depending on where you plan to place your kegerator, attaching casters is optional. If you would like
to use the casters, then it is recommended to attach the casters before installing the tower and CO2
tank. This step is simple, however you will need to place the unit on its backside. For this reason you
will want to WAIT 24 HOURS after attaching the casters before plugging in the unit. We recommend
placing a piece of cardboard or a cloth under the unit to prevent dents and scratching.
NOTE 1: There are two pairs of casters - 1 pair with a lock & 1 pair without. The two
locking casters should be fastened at the front of the unit.
NOTE 2: There are a total of 16 screws for your casters, 8 long & 8 short. The 8 long screws
are for the outer holes shown below in red. The 8 short screws are for the inner holes
shown below in yellow. See image to the right.
Empty the unit.
Remove the 4 original adjustable feet.
Unscrew the BACK lower left & lower right side
screws from the base plate and set aside (these will
be longer screws).
Lineup the NON-LOCKING casters with the 4
pre-drilled holes. Use the 4 longer screws (red
circles) on the outer holes and the 4 short screws
(yellow circles) on the inner holes and tighten.
Unscrew the FRONT lower left and lower right side
screws from the base plate and set aside (these will
be longer screws).
Lineup the LOCKING casters with the 4
pre-drilled holes. Use the 4 longer screws
(red circles) on the outer holes and the 4 short
screws (yellow circles) on the inner holes and
tighten.
Attach The Casters/Adjustable feet:
1.
2.
5
BACK
FRONT
1.
2.

1. Place the guard rail on
top of the kegerator and
align the rail holes with
the mounting pegs.
2. Secure the guard rail
to the kegerator by
tightening the provided
screws with the provided
Allen wrench.
3. Once done tightening,
pull back slightly on rail
to ensure it has been fully
secured. If any give is felt
continue tightening until
it feels secure.
1. Align the 2 holes in door handle with the 2 pegs on
the door.
2. Use the supplied screws and Allen wrench to
tighten. Once done tightening, pull back slightly
on handle to ensure it has been fully secured to the
door. If any give is felt continue tightening until
handle feels secure.
Attach The Guard Rail:
Attach The Door Handle:
6
1.
2.

Whether you have a single, double, or triple faucet tower the process is the same.
TIP: For those setting up a triple faucet tower - start with the lowest faucet.
1. Set the tower's bottom collar sleeve onto tower.
2. Feed the beverage line tubing up through the
bottom of the tower so tubing comes out both
the top and the bottom of the tower.
3. Attach the Duotight fitting to the beverage
line coming from the top end of the tower.
Feed the Duotight fitting and tubing through
the tap hole. To attach the Duotight fitting,
push the fitting onto the tubing then pull back
slightly to lock in place. NOTE: repeat this step
for each additional faucet your tower has.
4. Locate the tower shank and remove the nut and
white convex collar and set them aside. From
the outside of the tower, attach the Duotight
fitting to the tower shank. Slide the shank and
tubing into the faucet hole.
5. Turn the tower upside down. Slip the white
convex collar and shank nut onto the beverage
line with the white convex collar first and the
shank nut second.
6. Using your finger to hold the tower shank in
place, align shank with convex collar first and
then the shank nut and tighten by hand.
7. Next tighten the shank nut with the included
multipurpose wrench.
8. Attach the faucet to the shank; tighten with
the included multipurpose wrench. Attach the
tap handle and tower cap.
Assemble The Tower:
7
1.
3.
5.
7.
2.
4.
6.
8.

NOTE: The hose is intentionally long because some may choose to install the tower onto a raised counter
rather than directly onto the kegerator.
1. The easiest way to measure the tubing is to insert it into the tower until it reaches the top. Once fully inserted
(with the extra tubing from the beer lines this can be snug) make an estimate of how many inches need to be cut
o. Don’t worry, a best guess will work just fine.
2. Pull the hose out, and with scissors or a knife cut the tubing at an angle -- we don’t want the hose to push flush
against the top of the tower which will restrict airflow.
3. Re-insert the hose into the tower. Don’t worry if the tubing is a little short or long, it will properly cool the tower.
8
1. Remove the 4 screws from the top of the kegerator
and set aside.
2. Place the tower gasket onto the kegerator and align
the gasket holes with the pre-drilled holes.
3. Drop tubing from the bottom of the tower through
the hole into the kegerator.
4. Align the tower with the pre-drilled holes and screw
into place using the 4 screws you removed in “Step 1”.
Attach the tower to the kegerator.
Attach The Tower:
The Tower Cooling Hose is the large diameter corrugated hose coming o the back fan. To cool the
tower eectively we want to fit the cooling hose into the tower and have it reach the top.
Insert Tower Cooling Hose:
1. 2. 3.
3. 4.

If Using Duotight Push To Connect Fittings:
Remove nut and barb from the regulator and replace with Duotight fitting. Then tighten by
hand an additional 180° turn. Push gas line into Duotight fitting and pull back on tubing slightly
to ensure connection. (See Photo Below).
If Using Stepless Clamps:
Dip tubing in very hot water for 15 seconds to soften. Place stepless clamp onto tubing. Insert
needle-nose pliers into tubing and expand the pliers. Connect to the barbed on your regulator.
Crimp clamp securely onto tubing. (See Photo Below).
Remaining Steps:
1. Attach the regulator to the tank using the included multipurpose wrench.
2. Tighten firmly, but be careful not to over tighten. NOTE - there must be a regulator gasket between the regulator
and tank. Some regulators come with a gasket already attached to the regulator.
3. Using the provided CO2tank strap, attach one end to the fixing hook inside the kegerator. Place the CO2tank on
its shelf in the right hand corner of the kegerator. (See Photo Below).
4. Once CO2tank is in place, attach the remaining end of the tank strap to remaining fixing hook. (See Photo Below).
We recommend you attach the tubing to the regulator prior to connecting it to the tank. There are
two ways to connect your CO2regulator. We strongly recommend using a Duotight push-to-connect
fitting which is designed to work the EVA Barrier line that is included with your KOMOS Kegerator.
9
:
Connecting The Gas Line & CO2Regulator To The Tank:
DUOTIGHT CLAMP 3. 4.
DUOTIGHT
FITTING
STEPLESS
CLAMP

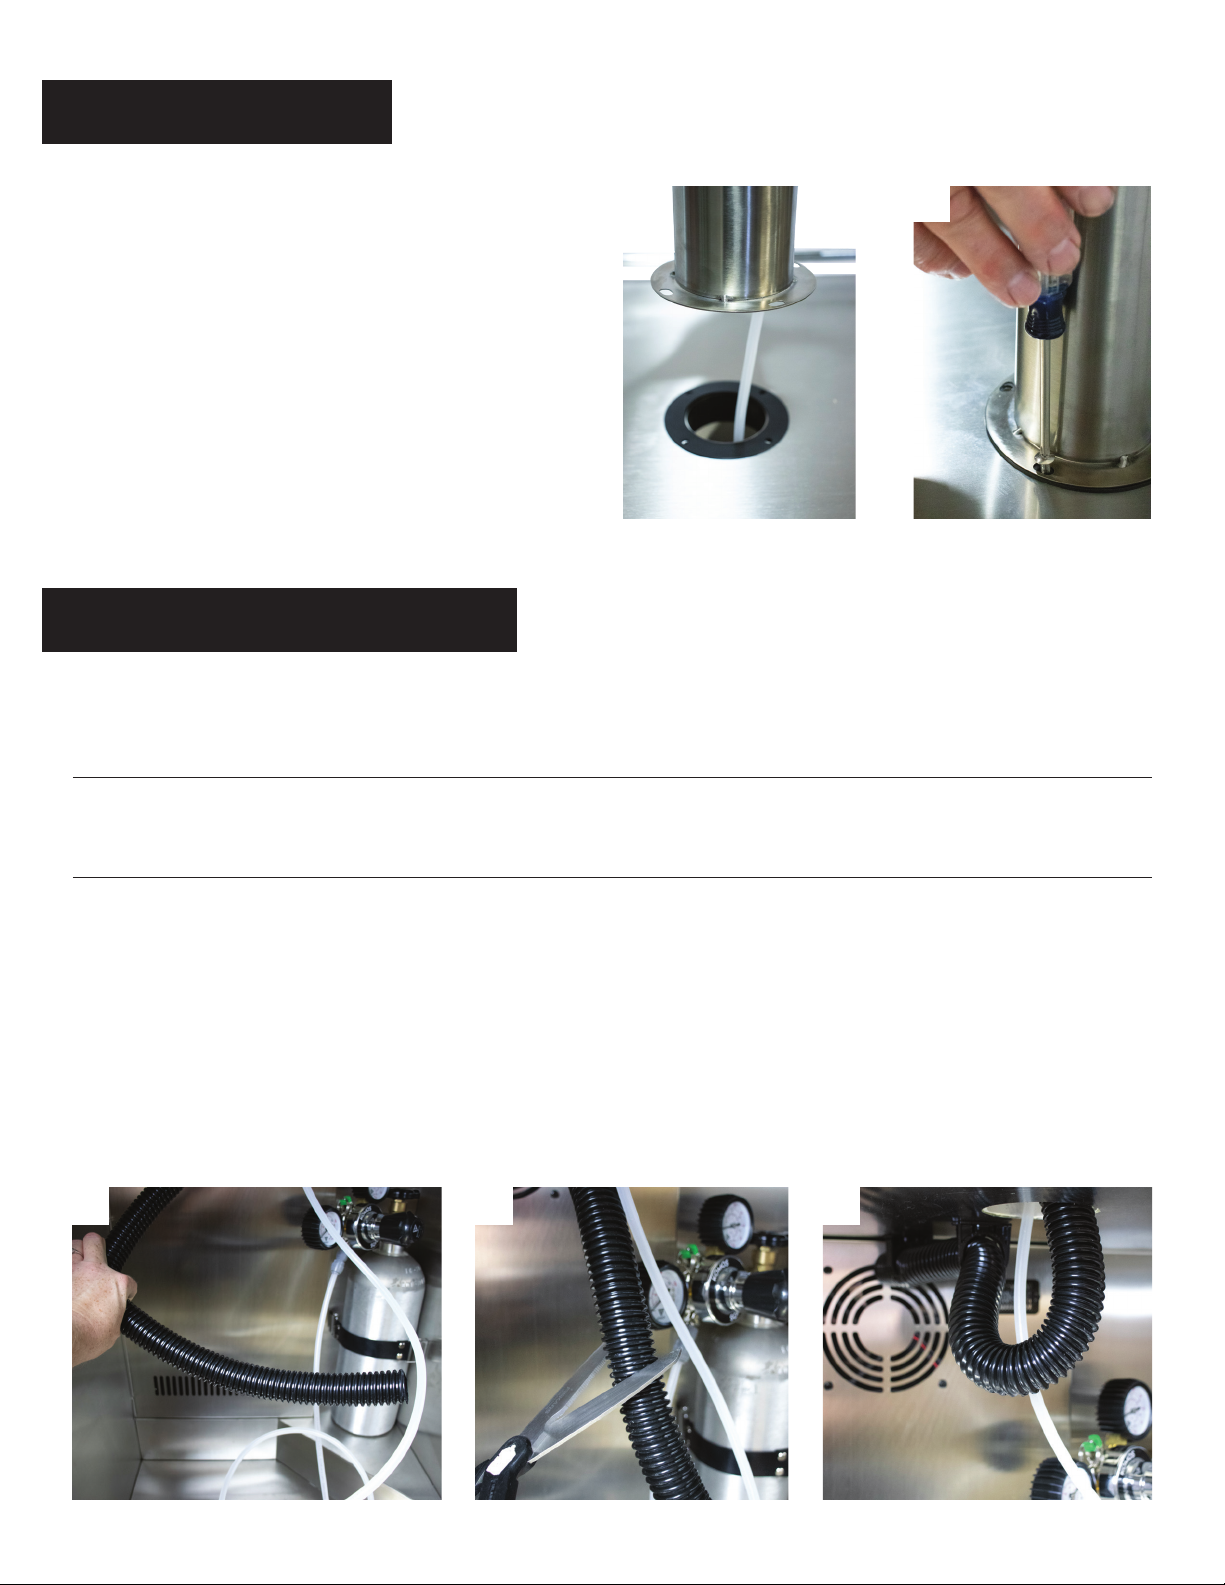
CO2Gas Tubing (larger inner diameter tubing):
The length of your gas tubing won’t aect serving the beer. Extra
gas line is included to accommodate dierent set ups. We suggest
you cut to length for your set up or roll up the extra and zip tie it.
If you have a 2 or 3 faucet tower you will need to cut your gas line
and install the Duotight tees to split the gas line.
Beer Line Tubing (smaller inner diameter tubing):
Do not cut the beer line. It is already cut to the correct length to
ensure there is enough resistance to reduce foaming.
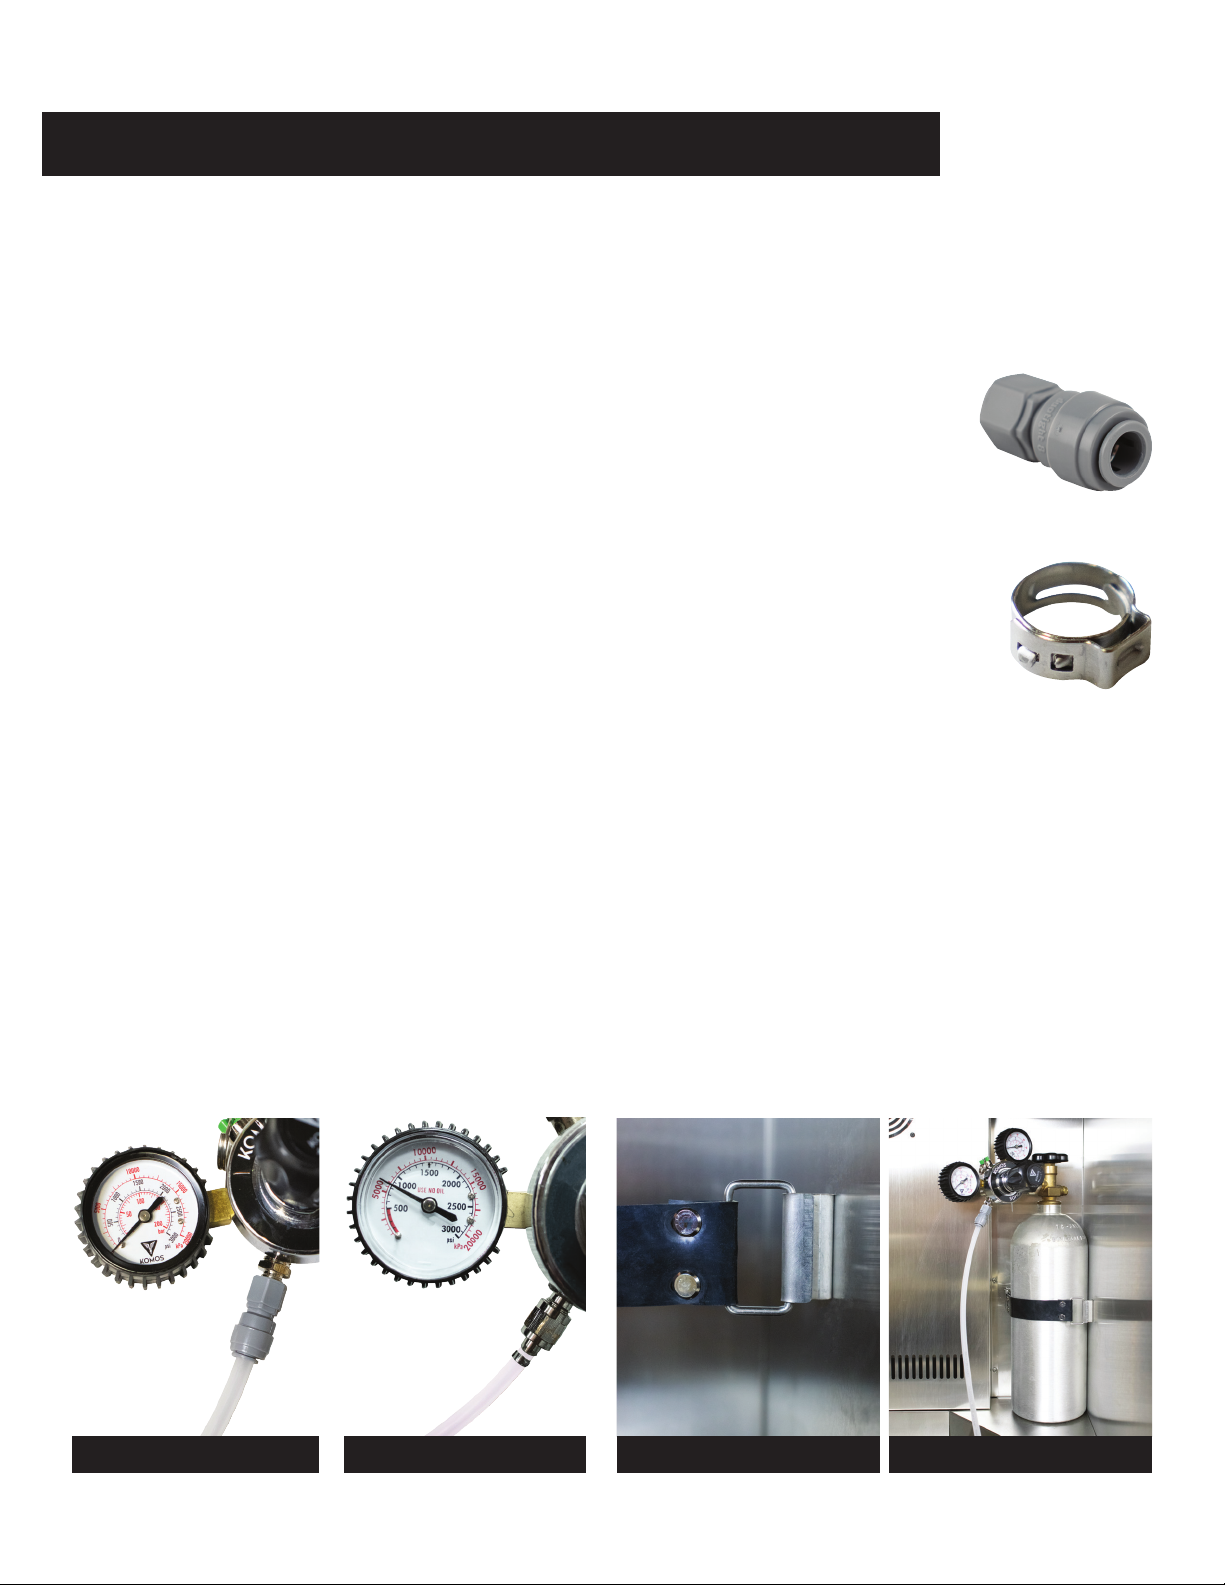
Using Duotight:
Attach the correct Duotight fittings to the keg coupler or quick
disconnects you are using. Duotight fittings should be threaded
on as tight as possible by hand and then turned an additional 180
degrees with a wrench. For pictures of additional styles of couplers
or quick disconnects see page 14.
Not Using Duotight:
If you did not purchase Duotight fittings and have couplers or quick
disconnects with traditional barbs we have included some stepless
clamps. Because the EVA Barrier tubing is an advanced two layer
tubing it is dicult to fit over barbs. Follow these steps:
1. Boil a cup of water and dip the end of tubing for 15 seconds to
soften.
2. Place stepless clamp onto tubing.
3. Insert needle-nose pliers into tubing and expand the pliers to
increase the size of the opening.
4. Push tubing onto the barb fitting and crimp the clamp securely
with pinch clamp pliers or wire cutter pliers.
CONNECTING THE GAS TUBING & BEER LINE:
Your Komos Kegerator includes very high quality EVA Barrier tubing that is designed to work best with
Duotight connectors. Compared to standard PVC tubing, EVA Barrier is a double lined tubing that is
BPA free and greatly reduces CO2loss.
10
Duotight Gas Line Tee
GAS BEVERAGE
Gas & Beverage Quick Disconnects
With Duotight Fittings
GAS IN BEER
OUT
Commercial Tap
With Duotight Fittings

Before we start serving the beer we want to confirm that the regulator and all attached hoses are
properly sealed so there are no CO2leaks in the system. Pressure leaks need to be fixed ASAP
because if left unchecked they will cause the CO2tank to drain, which can be potentially dangerous
if located in a closed area. Testing is relatively straightforward:
Once your system is fully set up:
• Open the CO2tank valve.
• Turn up the pressure through the regulator to 20 PSI.
• Turn o the CO2tank valve.
• Wait a couple hours then check the pressure on the regulator.
If it has not dropped, then there are no leaks. Release the pressure and reset the regulator to your
desired serving pressure.
If there was a drop in pressure, then spray/wipe soapy water on all the points where there may be a
leak. Such as:
• All tubing connections.
• Where the regulator attaches to the CO2tank.
When gas escapes and hits the soapy water it will create bubbles. Wherever you find these bubbles
tighten the connection.
Critical Final Step – CO2Pressure Check:
Place The Drip Tray:
11
Place Drip Tray under the tower... simple as that!

OPERATION INSTRUCTIONS
How To Use The Digital Control Board:
Preset Settings:
Auto Defrost:
12
• When power is o, the kegerator will save the temperature setting data and remain at that
temperature setting when the power is turned back on.
• The kegerator is equipped with an automatic defrost system. During the process of defrosting the
compressor will stop working and the interior fan will run continuously. The temperature inside will
rise to 42°F. The beer fridge is still running normally. When setting temperature lower (e.g. setting
temperature at 32°F), and with a full load of kegs inside, the temperature reading on the display may
be higher than the preset temperature. This is not a failure.
1. UP arrow. Used to raise (warm) the set temperature by 1°F or 1°C. Maximum temperature 76°F or 24°C.
2. DOWN arrow. Used to lower (cool) the set temperature by 1°F or 1°C. Minimum temperature 28°F or -2°C.
3. Temperature Display. The display indicates the current operating temperature.
4. F°/C° Display.
5. Set Temperature. Press this to set the temperature, then press the Up (1) or Down (2) arrow to select your desired
temperature. The Temperature Display (3) will flash then count down from the current temperature to your
selected temp.
6. The F°/C° button allows you to set the display to read in either Fahrenheit or Celsius.
7. Power Button. Turns the kegerator on or o.
1
4
3 2 5 6 7

Helpful Tips:
Beer Temperature:
13
• It is normal to see condensation form on the faucet. It is caused by the dierence in temperature between the cold
beer and the inside of the faucet when beer is flowing through the line.
• To ensure that your beer dispenser works to the maximum eciency for which it was designed, keep it in a location
where there is proper air circulation and electrical outlets.
Correct consistent temperature is an important factor to consider when storing and dispensing
draft beer. Therefore, it is best to adhere to the following guidelines:
• Beer can freeze, so it’s important to select and maintain proper operating temperatures inside your kegerator.
Beer will start to freeze at 28°F (- 2 °C).
• Temperatures too cool or too warm may cause flavor loss, o taste and/or dispensing problems.
• Periodically monitor temperatures inside your kegerator (adjust as necessary).
• Keep the kegerator door closed as much as possible to avoid temperature fluctuations
• A good target temperature for most beers is in the 36°F– 40°F range. However, you will find that certain types
will be better served at warmer temperatures.
• At this point the next question on most minds is … how long will it take to get the keg to serving temperature?! In
general, if the keg is at room temperature it can take up to 2 days to chill to proper serving temp, depending on
the keg volume. Fortunately most kegs are stored cold so it shouldn’t take that long. Still, a keg at 48°F will take
roughly 10 hours to cool down to 38°F. Bottom line – plan ahead and give the beer as long as possible to chill
prior to serving.

Cleaning/Maintenance:
Keg Couplers/Connectors:
14
•Do not use any solvent-based cleansers or abrasive
pads on the kegerator. Wiping the outside using warm
water and a mild liquid detergent with a soft cloth will
do the job.
•Beer lines need to be cleaned periodically because of a
crystallized build up which forms on the fittings, lines,
and taps commonly referred to as “beer stone”. If the
beer stone is not completely removed in a cleaning
process it will leave an unsanitary surface that can
harbor microorganisms, which will cause an undesirable
flavor.
•Your beer line should be cleaned approximately once
every 2–3 months. The dispenser faucet should be
cleaned on a weekly basis or prior to every use if not
used on a regular basis. NOTE - If you have trouble
manipulating the faucet lever, it usually indicates the
faucet may require cleaning. DO NOT apply force to
move the handle in this situation, as this will likely lead
to damaging the handle and/or faucet.
•We recommend purchasing a Beer Line Cleaning Kit
to make the job of cleaning your line and taps easier!
•About every 6 months it is good practice to clean the
front grill of the unit (turn the power o first). This will
help maximize the life of the compressor.
•When the kegerator is not in use it is best to remove
any beer in your line. First, turn o the CO2and
dispense beer until no more beer is flowing. This will
release pressure in the keg so that the coupler can
safely be detached.
By now you most likely know which types of kegs you’ll be serving through your kegerator - commercial, homebrew,
or maybe both (!?). Below is the list of the coupler options. When purchasing a commercial keg it is best to confirm
the Coupler Type with the liquor store/distributor.
Commercial Couplers By Type/System (subject to change):
Homebrew Disconnects For Corny/Soda Kegs:
D TYPE
Most US breweries
BALL LOCK FITTINGS: aka Pepsi-style (most common among homebrewers)
GRAY = Gas Fittings BLACK = Liquid Fittings
PIN LOCK FITTINGS: aka Coke-style
2 PRONG GRAY = Gas Fittings 3 PRONG BLACK = Liquid Fittings
S TYPE
Newcastle, Becks, Heineken
U TYPE
Guinness, Harp
A TYPE
Paulaner, Spaten
G TYPE
Anchor, Boddington

Trouble Shooting:
Technical Specifications:
15
Model #
Kegerator does not turn on
Dimensions (W x D x H)
Kegerator does not seem cold enough
Net Volume Total (cu /L)
Kegerator shuts o/on too oen
Refrigerant Type
Product Weight Max (lbs/kg)
Kegerator seems to make too
much noise
Error Code On Temperature Display
Control Type
Rated Voltage Frequency
Ambient temperature
Cooling System
Input Power
Temperature Range
Light
Current
ND-1600
With Stainless Steel Top Cover: 23.85" x 24.9" x 35.43"
Without Stainless Steel Top Cover : 23.85" x 24.86" x 34.375"
Check temperature setting by placing cup of water with a
thermometer inside fridge. Check aer 2 hours & compare
against set kegerator temperature. Kegerator may need to
cool longer or the door gasket may not be sealing correctly.
6.6cu /187L
Check to see if the door gasket is sealing correctly. Or the
ambient room temperature is too high so the unit is working
harder to cool to set temperature
104lbs/47.5kg
Humming is normal. Gurgling sounds are caused by cooling
liquid used by the kegerator. Or unit may not be not level.
E0: Defrost sensor malfunctions.
E1: Cabinet inner temperature sensor malfunctions.
E2: Short circuit of the sensors or thermostat control board.
Digital Touch Pad
32°F–104°F/0°C–40°C
R600a
115v/60Hz
130W
1.6A
Auto Defrost
28.4°F–76°F/-2°C–24°C
LED Interior Light
Check circuit breaker, fuse and check plugs.
Distributed By Brewmaster™
Still have issues? Call customer service at 1–800–600–0033
CAUTION
• If the unit loses power (unplugged, moved, turned o) you will need to wait 3 minutes before restarting otherwise the unit may
not properly turn on and you can cause damage to the compressor.
• When turning on for the first time, or after being o for a few days, the temperature read-out will be o by a few degrees for 3–4
hours. Once the temperature normalizes it will read correctly.
Table of contents
Other Komos Kegerator manuals