manuals.online logo
Brands
  1. Home
  2. •
  3. Brands
  4. •
  5. Konica Minolta
  6. •
  7. All In One Printer
  8. •
  9. Konica Minolta PC-408 User manual

Konica Minolta PC-408 User manual

Other Konica Minolta All In One Printer manuals

Konica Minolta bizhub C550 Series User manual

Konica Minolta

Konica Minolta bizhub C550 Series User manual

Konica Minolta PagePro 1390 MF Configuration guide

Konica Minolta

Konica Minolta PagePro 1390 MF Configuration guide

Konica Minolta bizhub 360 Instruction and safety manual

Konica Minolta

Konica Minolta bizhub 360 Instruction and safety manual

Konica Minolta bizhub C654 User manual

Konica Minolta

Konica Minolta bizhub C654 User manual

Konica Minolta bizhub C451 User manual

Konica Minolta

Konica Minolta bizhub C451 User manual

Konica Minolta magicolor 2400W Quick start guide

Konica Minolta

Konica Minolta magicolor 2400W Quick start guide

Konica Minolta Magicolor 2590 MF User manual

Konica Minolta

Konica Minolta Magicolor 2590 MF User manual

Konica Minolta BIZHUB PRO C6500E User manual

Konica Minolta

Konica Minolta BIZHUB PRO C6500E User manual

Konica Minolta bizhub C450 User manual

Konica Minolta

Konica Minolta bizhub C450 User manual

Konica Minolta Di470 User manual

Konica Minolta

Konica Minolta Di470 User manual

Konica Minolta PagePro 1380 MF User manual

Konica Minolta

Konica Minolta PagePro 1380 MF User manual

Konica Minolta DF-601 User manual

Konica Minolta

Konica Minolta DF-601 User manual

Konica Minolta bizhub 28e User manual

Konica Minolta

Konica Minolta bizhub 28e User manual

Konica Minolta BIZHUB C450P User manual

Konica Minolta

Konica Minolta BIZHUB C450P User manual

Konica Minolta bizhub PRO 950 Series User manual

Konica Minolta

Konica Minolta bizhub PRO 950 Series User manual

Konica Minolta bizhub 652 User manual

Konica Minolta

Konica Minolta bizhub 652 User manual

Konica Minolta bizhub C452 Series Guide

Konica Minolta

Konica Minolta bizhub C452 Series Guide

Konica Minolta magicolor 1690MF User manual

Konica Minolta

Konica Minolta magicolor 1690MF User manual

Konica Minolta bizhub 223 Operating manual

Konica Minolta

Konica Minolta bizhub 223 Operating manual

Konica Minolta bizhub 215 User manual

Konica Minolta

Konica Minolta bizhub 215 User manual

Konica Minolta bizhub PRO 950 Series User manual

Konica Minolta

Konica Minolta bizhub PRO 950 Series User manual

Konica Minolta bizhub 361 User manual

Konica Minolta

Konica Minolta bizhub 361 User manual

Konica Minolta bizhub C652 Series User manual

Konica Minolta

Konica Minolta bizhub C652 Series User manual

Konica Minolta bizhub 361 Instruction and safety manual

Konica Minolta

Konica Minolta bizhub 361 Instruction and safety manual

Popular All In One Printer manuals by other brands

Brother MFC-J220 Basic user's guide

Brother

Brother MFC-J220 Basic user's guide

Brother MFC-8510DN Basic user's guide

Brother

Brother MFC-8510DN Basic user's guide

Ricoh Aficio FX200 Service training

Ricoh

Ricoh Aficio FX200 Service training

Olivetti d-Copia 16W Operation manual

Olivetti

Olivetti d-Copia 16W Operation manual

Lexmark MX310 Series Service manual

Lexmark

Lexmark MX310 Series Service manual

Ricoh Aficio 3224C operating instructions

Ricoh

Ricoh Aficio 3224C operating instructions

Sagem MF 3625 user manual

Sagem

Sagem MF 3625 user manual

Epson Epson Stylus NX530 quick guide

Epson

Epson Epson Stylus NX530 quick guide

Brother MFC9800 - MFC 9800 B/W Laser owner's manual

Brother

Brother MFC9800 - MFC 9800 B/W Laser owner's manual

Ricoh Aficio MP 161F operating instructions

Ricoh

Ricoh Aficio MP 161F operating instructions

Epson WorkForce WF-2510 Basic guide

Epson

Epson WorkForce WF-2510 Basic guide

Epson Stylus Scan 2000 Product information guide

Epson

Epson Stylus Scan 2000 Product information guide

Epson PictureMate Snap PM 240 Start here

Epson

Epson PictureMate Snap PM 240 Start here

Brother MFC-J430w user guide

Brother

Brother MFC-J430w user guide

Lexmark MX710 Series setup sheet

Lexmark

Lexmark MX710 Series setup sheet

Brother MFC-9760 owner's manual

Brother

Brother MFC-9760 owner's manual

Sharp MX-2310U Start guide

Sharp

Sharp MX-2310U Start guide

Lexmark XC8155 user guide

Lexmark

Lexmark XC8155 user guide

manuals.online logo
manuals.online logoBrands
  • About & Mission
  • Contact us
  • Privacy Policy
  • Terms and Conditions

Copyright 2025 Manuals.Online. All Rights Reserved.

E-1
INSTALLATION MANUAL
A0XW-9552-01
PC-408 Paper Feed Cabinet
Note:
Lifting the machine in an awkward position or
transporting it in a poorly balanced position could
result in personal injury. When transporting the
machine, assign an adequate number of persons
to the job and ensure that each person can take a
good position of not being excessively loaded
(mass: approx. 30.5 kg (67 lb)).
I. Accessory parts
Note:
This manual provides the illustrations of the acces-
sory parts and machine that may be slightly differ-
ent in shape from yours. In that case, instead of
the illustrations, use the appearance of your
machine to follow the installation procedure. This
does not cause any significant change or problem
with the procedure.
Note:
When removing the paper feed cabinet from its
shipping carton, do not hold the reinforcement
bracket (as a personal injury or a deformed frame
could result).
No. Name Shape Q’ty
1. Fixing leg A
3
2. Fixing leg B
1
3. Fixing leg
cover A
3
4. Fixing leg
cover B
1
5. Fixing
bracket A 3
6. Fixing
bracket B 1
7. Screw A
(black)
(4 × 8 mm) 5
4348U020MA
4348U020MB
4348U099MA
4348U099MB
4658U021AA
A093IXC004DA
4038IXC033DA
8. Screw B
(4 × 8 mm) 12
9. Screw C
(4 × 10 mm) 4
10. Installation
manual 1
set
After unpacking, be sure to get rid of the
packaging materials and keep them out of
the reach of children.
Putting the head in the plastic bag
involves danger of suffocation.
No. Name Shape Q’ty
4038IXC033DA
4038IXC033MA
4980IXC019MA
A093IXC027DA
Reinforcement bracket
II. Installation procedures
1. Turn off the machine.
2. Remove the cord clamp and unplug the power
cord from the machine (one screw).
3. Remove the protective tape from the paper feed
cabinet.
Note:
Do not peel the tape that fixes the paper feed cab-
inet hookup harness in position until the machine
is attached to the paper feed cabinet.
4. Insert the proper tool such as a screwdriver to the
hole on the back of the paper feed cabinet to take
out the drawer.
5. Remove the shipping preservatives and protec-
tive tape from the inside of the drawer.
6. Slide the drawer back in.
7. Pull out the handles.
A0XWMXC031MA
A0XWMXC036MB
Hookup
harness
A0XWMXC037MA
A0XWMXC038MB
A0XWMXC039MA
A0XWMXC101MB
Applied Machines: C360/C280/C220
COLOR MFP: 36 ppm/28 ppm/22 ppm
Product Code: A0ED
E-2
8. Holding the transportation handles at the right
and left of the machine, place the machine onto
the paper feed cabinet. When placing the
machine, use the positioning pins in the rear of
the paper feed cabinet to align the machine cor-
rectly with the cabinet.
Note:
• When transporting or moving the machines,
assign adequate number of persons.
• When attaching the machine, as the reference
fit the machine with the corner A and B of the
paper feed cabinet
.
9. Remove the drawer rear under cover from the
machine (one screw).
10. Peel the tape that fixes the paper feed cabinet
hookup harness in position.
11. Connect the two connectors of the paper feed
cabinet hookup harness to the machine.
12. Secure the paper feed cabinet to the machine by
the two fixing bracket A’s (two screw A’s fur-
nished with the paper feed cabinet).
When holding the transportation handles,
be careful not to catch your fingers in the
machine.
A0XWMXC102MA
B
A
A0XWMXC105MA
A0XWMXC001MB
A0XWMXC002MB
A0XWMXC003MB
A0XWMXC004MB
13. Reinstall the drawer rear under cover which has
been removed in step 9(one screw).
14. Insert the proper tool such as a screwdriver to
the hole on the back of the paper feed cabinet to
take out the drawer.
15. Slide out the second drawer from the paper feed
cabinet.
16. Secure the paper feed cabinet to the machine by
the fixing bracket A (right) and the fixing bracket
B (left).
Fixing bracket A :
one screw A furnished with the paper feed cabi-
net.
Fixing bracket B :
two screw A’s furnished with the paper feed cab-
inet.
Note:
The fixing bracket B can be placed upside down.
17. Slide the drawers back in.
18. Move the machine and paper feed cabinet to the
installation site. Then, adjust the two adjusters at
the front to let the paper feed cabinet sit on the
floor.
A0XWMXC005MB
A0XWMXC040MB
A0XWMXC028MA
A0XWMXC106MA
E-3
19. Install the fixing leg A’s at two locations in the
front shown in the illustration (six screw B’s fur-
nished with the paper feed cabinet).
Note:
When mounting the finisher at the same time, do
not install the fixing leg A or fixing leg cover A at
the left front side.
20. Install the fixing leg cover A’s (two pieces) at two
locations in the front shown in the illustration.
Note:
• Insert the fixing leg cover A’s in the direction
shown by arrow until they click into position.
• Insert the protruded portions of the fixing leg
cover A’s shown by the arrows into the fixing
leg.
21. Install the fixing leg A (left rear) and the fixing leg
B (right rear) shown in the illustration.
Tighten the screw C's into the hole A's to install
the fixing leg B.
Fixing leg A :
three screw B’s furnished with the paper feed
cabinet.
Fixing leg B :
four screw C’s furnished with the paper feed
cabinet.
Note:
If the screw C's cannot be tightened into the hole
A's because the machine is installed on cushioned
floor such as a carpet, use the hole B's.
To reduce the risk of injury due to unsta-
ble equipment, set stabilizers before use.
A0XWMXC029MA
➀
➁
➂
➂
➁
➀
A0XWMXC030MA
To reduce the risk of injury due to unsta-
ble equipment, set stabilizers before use.
A0XWIXC002MA
➁
➀
➀
➁
➃➂
B
A
➂
BA
22. Install the fixing leg cover A (left rear) and the
fixing leg cover B (right rear) shown in the illus-
tration.
Note:
• Insert the fixing leg cover A and B in the direc-
tion shown by the arrows until they click into
position.
• Insert the protruded portions of the fixing leg
cover A and B shown by the arrows into the fix-
ing leg.
23. Plug the power cord into the machine and put
the cord clamp that has been removed in step 2
through the power cord to install it (one screw).
III. Loading paper
1. Turn on the machine’s main and sub power
switches.
2. Press the drawer release button and then slide
out the drawer from the paper feed cabinet.
3. Align the edges of the paper stack and place the
stack into the drawer.
Note:
• Make sure that the top level of the paper stack
does not exceed the ▼(MAX) paper level indi-
cator.
• Correct any curl in the paper before loading.
4. Align the edges of the paper stack and place the
stack into the drawer.
Note:
Make sure that the top level of the paper stack
does not exceed the ▼(MAX) paper level indica-
tor.
5. Slide the drawer back in.
A0XWIXC003DA
A0XWMXC031MA
A0XWMXC032MA
A0XWMXC033MA
A0XWMXC034MA
A0XWMXC035MA
E-4
IV. Making settings for paper size
1. Display the Service Mode screen (For details of
how to display the Service Mode screen, see the
Service Manual).
2. Touch “System 2.”
3. Touch “LCT Paper Size Setting.”
4. Check to see that “A4 ” is displayed with white
text on black.
5. Touch “END.”
V. Checking the paper reference position
<Centering>
1. Touch “Machine.”
2. Touch “Printer Area.”
3. Touch “Centering.”
4. Touch “3rd.” and then press the Start key.
A test print will be produced.
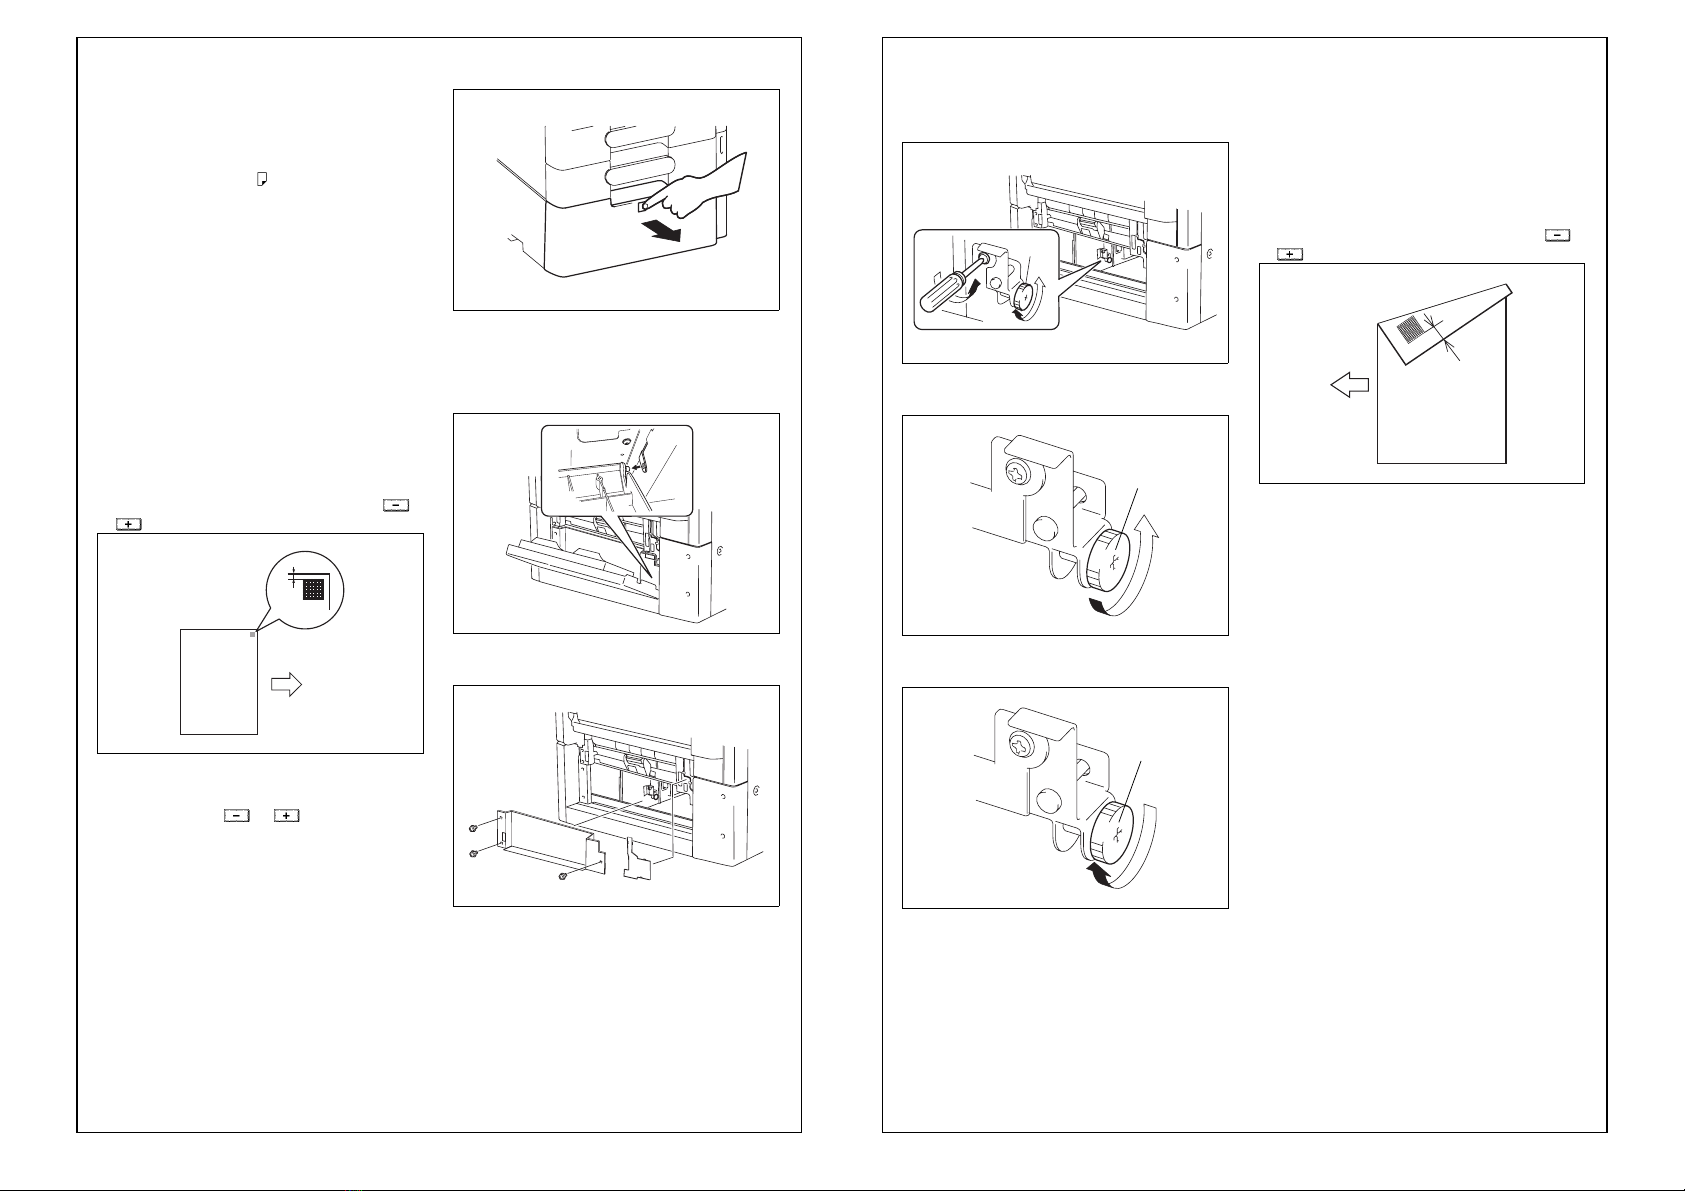
5. Measure width A from the edge of the paper to
the pattern printed on the test print and check that
it falls within the specified range.
Specifications: 3.0 mm ± 1.0 mm
• Adjusting the paper reference position
If the measured width A falls outside the specified
range, enter the correction value using the or
key.
6. Produce another test print and check to see if
width A falls within the specified range.
* If the use of the or key does not allow
the measurement to fall within the specified
range, perform the following steps.
7. Press the drawer release button and then slide
out the drawer from the paper feed cabinet.
8. Pull the release of right door and open the right
door.
9. Detach the protruded portion of the right door
from the paper feed cabinet to remove the right
door.
10. Remove the harness cover and the three fixing
screws to remove the plate.
Paper exit
direction
A
4061IXC147DA
A0XWMXC032MA
A0XWMXC050MA
A0XWMXC051MA
11. Loosen the adjusting screw and turn the screw D
clockwise or counterclockwise as necessary.
Note:
Use care not to damage or dent the paper path
surface inside the right door.
• If width A is greater than the specified value, turn
the screw D counterclockwise.
• If width A is greater than the specified value, turn
the screw D clockwise.
12. Load paper and let the machine produce
another test print. Then, check width A.
* Make the adjustment until width A falls within the
specified range.
13. Tighten the adjusting screw which has been
loosened in step 11.
<Centering (Duplex 2nd side)>
1. Touch “Centering (Duplex 2nd side).”
2. Touch “3rd.” and then press the Start key.
A test print will then be produced.
3. Measure width A of the test pattern on the back-
side of the test print produced and check that it
falls within the specified range.
Specifications: 3.0 mm ± 2.0 mm
• Adjusting the Paper Reference Position
If the measured width A falls outside the specified
range, enter the correction value using the or
key.
4. Produce another test print and check to see if
width A falls within the specified range.
5. Touch “END.”
6. Touch “Exit” on the Service Mode screen.
7. Turn OFF and ON the Main Power Switch.
Note:
When displayed the Service Mode screen, be sure
to turn off the main power after exiting the Service
Mode screen and wait for 10 seconds or more
before turning on.
A0XWMXC052MA
A093IXC079DA
D
A093IXC080DA
D
4061IXC152DA
Paper exit
direction
A