KOOFU CS-1 User manual

取扱説明書
Instruction Manual
cs1_manual_v2023.indd 1cs1_manual_v2023.indd 1 2023/07/14 15:542023/07/14 15:54

警 告 次の文章は必ずお読みください。
このたびは、弊社製品をお買い上げいただき、誠にありがとうございます。
ヘルメットの外観、内装に傷や割れが無いか、付属品が不足していないかをご確認のうえご使用ください。
この取扱説明書は、ヘルメットの正しい取扱方法について説明しております。
ご使用前には必ず最後までこの説明書をお読みいただき、
お読みの後は当説明書を大切に保管していただきますようお願いいたします。
ヘルメットは、いかなる事故にも絶対という訳ではなく、万一の際に危険の度合いを減らす装備の一つで、安全の一要素
としてご理解のうえご使用ください。安全快適なバイシクルライフを楽しむためにも、以下の注意事項をよくご理解いた
だきますようお願いいたします。
「あごひもは必ずしっかり締めてください。」
あごひもを締めなかったり、締め方が緩かったりすると、万一転倒した時などに脱げてしまい、頭を守ることができず非常に危険です。
また、ヘルメットと頭の間には何もかぶらないようにしてください。ヘルメットがずれたり、落ちるおそれがあります。
このヘルメットは「自転車専用」です。
オートバイやその他の用途には絶対に使用しないでください。
国で定められている交通規則に必ず従ってください。
ご使用になる前に
01
「大きな衝撃を受けたヘルメットは外観上に損傷がなくても、ご使用にならないでください。」
ヘルメットはシェルおよび衝撃吸収ライナーが潰れることで、衝撃エネルギーを吸収します。大きな衝撃を受けたヘルメットは、既にライナーが潰
れていることが多く、そのまま使用すると、再度衝撃エネルギーを吸収できず非常に危険です。外観にキズがなくても使用しないでください。
cs1_manual_v2023.indd 3cs1_manual_v2023.indd 3 2023/07/14 15:542023/07/14 15:54

ご注意
「ヘルメットは大切に取り扱ってください。」
ヘルメットを床等に放り投げたり、上に座ったりしないでください。その度に衝撃を吸収するため衝撃吸収力が低下します。
万一のために大切に取り扱ってください。また、乗車時での頭を保護する以外の目的には使用しないでください。
「ヘルメットの保管について」
ヘルメットは直射日光の当たる場所への長時間の放置、自転車の上や車の中および、暖房機のそばなど、高温(50℃以上)の場所に長時
間放置しないでください。ヘルメットに使われている材質等が変質して性能が低下するおそれがあります。
「長期間の日光照射によるヘルメットの変色について」
ヘルメットのカラーによっては、長期間日光を浴びることにより、ヘルメット表面の色調が変色する場合があります。
「マット(つや消し)カラーについて」
マットカラーは表面処理の都合上、あらかじめ貼付されているステッカーをはがすと、表面のマット(つや消し)処理がはがれる事があ
りますので、ステッカーは絶対にはがさないでください。またお客様がご購入後にご自身で貼付したステッカーを再度はがし取る場合
も、同様のことが考えられますので、ステッカーを貼付される際は十分にご注意ください。
「ヘルメットの改造および分解は絶対にしないでください。」
ヘルメットに穴を開けたり、内部の衝撃吸収ライナーを削ったり、またあごひもなどは絶対に改造しないでください。
ヘルメット本来の性能が発揮できなくなり非常に危険です。
「ヘルメットのお手入れは薄めた中性洗剤でふき取るようにしてください。」
ガソリン、シンナー、ベンジン、熱湯(50℃以上)や塩水等は絶対に使用しないでください。
「ヘルメットのペイントは絶対にしないでください。」
衝撃吸収ライナーは、塗料や熱の影響により材質が侵され衝撃吸収力が低下する場合がありますので、ペイントは絶対におやめください。
02
cs1_manual_v2023.indd 4cs1_manual_v2023.indd 4 2023/07/14 15:542023/07/14 15:54

ご注意
正しい位置でヘルメットを装着する
ヘルメットを前から後ろにかけて水平になるように着用してください。このときにヘルメットの先端がまゆ毛のすぐ上にない場合
は、正しく装着できていません。(装着の際は鏡を見ながら調整してください)また、あごひもの長さやアジャストロック(あごひ
も調整具)の調整もヘルメットを正しくかぶるうえで大変重要な部分です。当説明書の該当項目をよくお読みのうえ、正しくかぶっ
てください。
ヘルメットは正しい位置で正しくかぶり、あごひもを正確に締める事で、はじめてヘルメット本来の安全性能を発揮します。
ヘルメットは走行前にしっかり正しく装着しましょう。
正しい
かぶり方の例
誤った
かぶり方の例
03
ヘ ル メット の 先 が
まゆ 毛 の すぐ上 に
ある
ヘ ル メット の 先 が 上
を向き、前頭部が見
えている
cs1_manual_v2023.indd 5cs1_manual_v2023.indd 5 2023/07/14 15:542023/07/14 15:54

部位名称ともくじ
1あごひもについて
2アジャスター(頭周調整具)について
3インナーパッド(内装)・フロントバイザーについて
4
インナーパッド(内装)のお手入れ・補修パーツについて
English -11
横
後ろ
ご使用になる前に -01
警告(ご使用前に必ずお読みください) -01
正しい位置でヘルメットを装着する -03
部位名称ともくじ -04
ワンタッチバックル(あごひも留め具)の脱着 -05
あごひもの長さを調整する -05
アジャストロック(あごひも調整具)の高さを調整する -06
アジャスターの調整方法 -07
インナーパッドの取付位置 -08
フロントバイザーの脱着方法 -08
インナーパッドのお手入れについて -09
補修用パーツについて -09
シェル
アジャスター(頭周調整具) アジャスター(頭周調整具)
フ ロントバ イザ ー
ライナ ー
あごひも
イン ナ ー パッド
(内装)
( トッ プ パッド )
アジャスター
(頭周調整具)
ワンタッチバックル
(あごひも留め具)
04
アジャストロック
(あごひも調整 具)
イ ン ナ ー パ ッド( 内 装 )
( フ ロント パッド )
ライナ ー
シェル
内側
cs1_manual_v2023.indd 6cs1_manual_v2023.indd 6 2023/07/14 15:542023/07/14 15:54

あごひもについて
あごひもは万一転倒などアクシデントの際に、ヘルメットが容易に脱落しないようにする重要なパーツです。ヘルメット本来の性能を発揮させるために
も 、「 あ ご ひ も の 長 さ 」 や 「 ア ジ ャ ス ト ロ ッ ク ( あごひも調整具)
の位置」を適切に調整し、「ワンタッチバックル
(あごひも留め具)
」を 正 し く 留 め てく だ さ い 。
ワンタッチバックルは、頭にしっかりヘルメットを固定するための重要な装置ですので、確実にとめましょう。
あなたの頭にぴったりフィットするよう、あごひもの長さは必ず調整
しましょう。長さ調整は、ワンタッチバックルを締めたとき、指が1〜
2本入る程度が一般的です。
ご使用前に必ず試着を行い、「あごひも」の長さや「アジャストロック」の位置、
「アジャスター(頭周調整具)」の締め具合などを適度に調整し、頭にぴったり
フィットするようにしてください。※「アジャスター」の調整については「 2 ア
ジャスター(頭周の調整具)」を参照。
リリースボタンを 押 すと、ワン
タッチバックルが 外れます。
あごひものバタつきを押さえるために、長さ調整後にあごひもの
先端を「Oリング」と「ストラップホルダー」で 留めてください。
ワ ン タッ チバッ クル の と め 方:
ワンタッチ
バックル
ワンタッチ
バックル
ワンタッチバックル
リリースボタン
外れる
あごひも
Oリング
ストラップ
ホルダー
リリース ボタンを押 す
リリース ボタンを押 す
ワンタッチバックルの外し方:
●あごひもは正しくしっかり締めてください。締めないままの走行は、万一転倒した際に大変危険ですので、絶対におやめください。
●ワンタッチバックルは、必ず最後まで(カチッと音がするまで)きっちり押し込んでください。押し込みが不完全ですと、万一転
倒した際にワンタッチバックルが外れてしまい、大変危険です。
ワンタッチバックルを留める
ときは、お肌を挟まないよう
ご注意ください。顔などケガ
をするおそれがあります。
1
ワンタッチバックル(あごひも留め具)の脱着
あごひもの長さを調整する
警 告
警 告
05
短くする
ワンタッチバックル(差し込む側)の
向きにご注意ください。
長くする
cs1_manual_v2023.indd 7cs1_manual_v2023.indd 7 2023/07/14 15:542023/07/14 15:54

ワンタッチバックルをとめ、しっかり顔の側面に合うように「アジャストロック」の高さを調整します。
ヘルメットをかぶり、あごひものAの部分がすっきり納まっているか確認し、耳の部分が緩いまたはキツい場合、
「アジャストロック」を移動させて高さを調整します。
アジャストロック
(あごひも調整具)
アジャストロック
(あごひも調整具)
正しい
あごひもの位置
●●あごひもの先端は安全を考慮し、ワンタッチバックルから外れにくく設計しております。あごひも破損の原因となりますので、無
理にワンタッチバックルから取りはずさないでください。
●あごひもの改造などは絶対に行わないでください。あごひもの強度が低下し、万一のときに保護性能が発揮できなくなるおそれが
あります。
●あごひもを締めなかったり、締め方がゆるかったりすると、万一転倒したときなどにヘルメットが脱げてしまい、頭を守る事がで
きず非常に危険です。あごひもは必ずしっかりお締めください。
警 告
アジャストロック(あごひも調整具)の高さを調整する
06
cs1_manual_v2023.indd 8cs1_manual_v2023.indd 8 2023/07/14 15:542023/07/14 15:54

アジャスター(頭周調整具)について
「アジャスター」は、ヘルメットのズレやブレを抑えるために、ヘルメット後頭部に装備されたサイズ調整機構の事です。
あなたの頭にぴったりフィットさせ、しっかりホールドするように、アジャスターを調整しましょう。
2
アジャスターの調整方法
07
ヘルメットの前を押さえながら、
アジャスターのダイヤルを適度に締めます。
緩める ダイヤルを左へ回す 締める ダイヤル を 右 へ 回 す
ダイヤルダイヤル ダイヤルダイヤル
前を押 さえ な がらダイヤルを回す
ご注意
●アジャスターの調整時は必ずダイヤルをご使用ください。ダイヤルを使わず無理に広げるなどすると内部の機構が破損します。
●アジャスターを調整する際、毛髪が絡まないようご注意ください。
cs1_manual_v2023.indd 9cs1_manual_v2023.indd 9 2023/07/14 15:542023/07/14 15:54
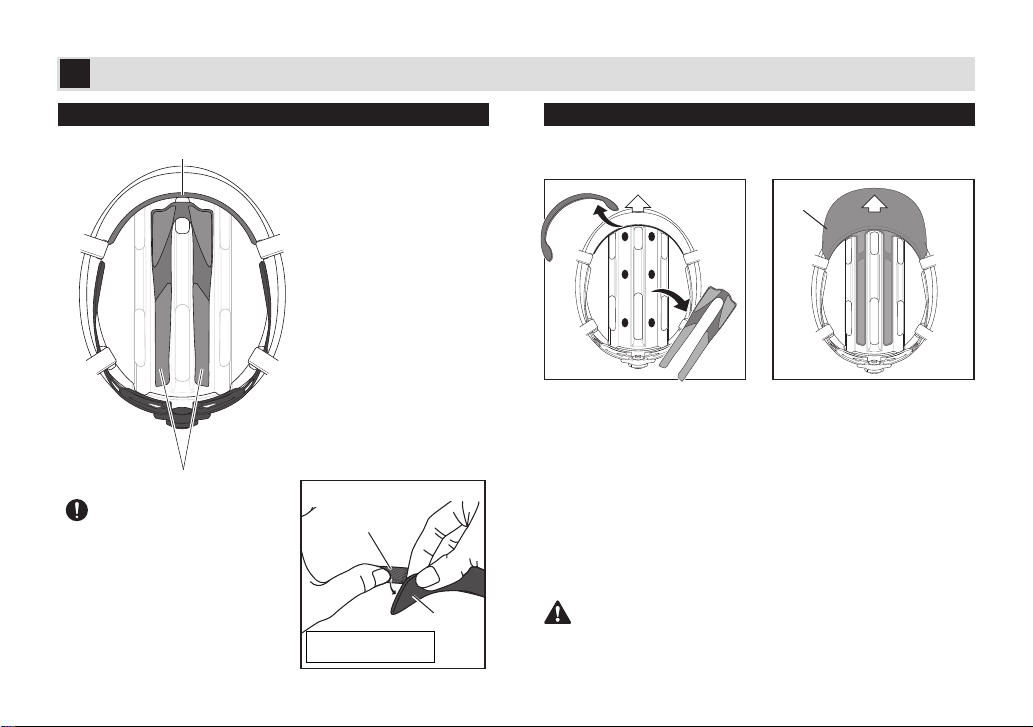
トッ プパッド
■ 取り外しかた
フロントパッド、トップ
パッドは面ファスナーで
付いています。
それぞれのインナーパッ
ドをゆっくり引っ張る
と、取り外せます。
08
インナーパッド(内装)・フロントバイザーについて
3
この製品は、状況・お好みによりフロントバイザーを脱着で
きます。
フロントパッド
ご注意
インナーパッドを取り外す際
は、面ファスナーがヘルメット
本体から剥がれないように注意
しながら、面ファスナーから各
パッドをゆっくり引っ張って取
り外してください。
インナーパッドの取付位置 フロントバイザーの脱着方法
■ 取り外して使用する場合
■ 取り付けかた
①ヘルメットに付いているフ
ロントパッド、トップパッ
ドを取り外します。
②フロントパッド、トップ
パッドが装着されていた箇
所にフロントバイザーを取
り付けます。このとき取り
付け箇所にしっかり押し付
けます。
逆の手順でフロントバイザーを取り外し、同じ場所にフロント
パッドとトップパッドを取り付けます。
フロントパッド、トップ
パッドをそれぞれ左図の
位置にしっかり取り付け
ます。
走行中に脱落するおそれがありますので、正しく取り付けられ
ているか確認してください。
警 告
前前
フロント
バイザー
面 フ ァス ナ ー
フロント
パッド
面ファスナーを押さえなが
ら イ ン ナ ー パッド を 外す
※フ ロントパッド の 場 合
cs1_manual_v2023.indd 10cs1_manual_v2023.indd 10 2023/07/14 15:542023/07/14 15:54

09
インナーパッド(内装)のお手入れ・補修パーツについて
4
汗などで汚れたインナーパッドは、取り外して洗うことができますので、定期的にお手入れすることでインナーパッドを清潔に保て
ます。インナーパッドを洗う場合は、水もしくはぬるま湯(35℃以下)にごく少量の洗髪用シャンプーもしくは家庭用中性洗剤を入
れ、やさしく手もみ洗いを行ってからよくすすいでください。洗い終わったら乾いた布などで水気をやさしく取り除き、直射日光の
当たらない風通しのよい場所で陰干しを行ってください。
Kabutoでは、ヘルメットを快適にご使用いただくために、各種パーツをご用意しております。
ご購入の際は、お使いのヘルメットに適合した補修パーツをお選びください。
パーツ各種の詳細は、弊社カタログもしくはホームページに掲載のパーツリストをご覧ください。 Kabuto 検索
インナーパッドのお手入れについて
(別売)補修用パーツについて
ご注意 補修用パーツをお買い求めの際は、お使いのヘルメットのモデルをよくご確認のうえ、販売店などへご注文ください。
CS-1 バイザー
カラー : ブラック
サイズ : 全サイズ共通
アジャスターバンドセット -9
カラー : ブラック
CS-1 インナーパッドセット
カラー : ブラック
サイズ : 全サイズ共通
cs1_manual_v2023.indd 11cs1_manual_v2023.indd 11 2023/07/14 15:542023/07/14 15:54

10
10
Instruction Manual
English
11
cs1_manual_v2023.indd 13cs1_manual_v2023.indd 13 2023/07/14 15:542023/07/14 15:54

12
WARNING Be sure to read these instructions.
Thank you for purchasing Kabuto helmet.
Before using, please make sure that there is no scratch, no crack both on the external surface and in the internal components of
the helmet. Please also make sure that all the components are in the package.
This manual explains how to use your Kabuto helmet correctly.
Please take time to read this instruction manual before using the helmet, and keep the manual in a safe place for future reference.
No helmet can protect the user 100% in any case of accidents, but it can reduce the risk of injury.
Please make sure you understand the following warnings and enjoy riding your bicycle safely.
●The helmet should be worn in a way that it protects your forehead, with the edge just above your eyebrows, and never pushed
far over the back of your head. Wear the helmet from the front to the rear horizontally.
●No helmet can protect the wearer against all injuries or foreseeable impacts.
●Your helmet is eective as protection only when it is worn properly. Never put anything on your head that prevents you from
wearing the helmet properly.
●Before riding a bicycle, make sure to adjust the helmet so it ts your head correctly. The strap should be positioned not to cover
the ears, the buckle positioned away from your jawbone, and the strap and buckle adjusted to be both comfortable and secure.
●This helmet is for bicycle use only.
Do not use this helmet for motorcycle riding or any other activities.
●Please obey all trac rules.
NOTES BEFORE USE
cs1_manual_v2023.indd 14cs1_manual_v2023.indd 14 2023/07/14 15:542023/07/14 15:54

WARNING
●Please handle the helmet with care. The helmet is designed to absorb shock by partial destruction of the liner and its damage
may not be visible. DO NOT sit on it, drop it on the oor or otherwise cause impact.
●If subjected to a severe impact, the helmet should be discarded and destroyed.
●Wipe the helmet with common ph-neutral detergent diluted with clear water.
Never use any petroleum, thinner, benzine, hot water above 50°C/122ºF or saline water.
●
Do not leave the helmet in the direct sunlight or where the temperature may surpass 50ºC/122ºF such as in a car or near a heater, and/
or avoid leaving in a humid place for a long time. Doing so will aect the materials and the performance of the helmet will diminish.
●Do not paint the helmet. Paints may reduce the original protective performance of the helmet considerably.
●Do not modify the helmet. In order to fully maintain the performance of the helmet, do not attempt to take it apart or change it in
any manner that involves making holes in it or cutting it (or any of its parts) other than as recommended by the manufacturer.
●This helmet should not be used by children while climbing or doing other activities when there is a risk of strangulation/hanging if
the child gets trapped with the helmet.
THE EFFECTS OF THE DIRECT SUNLIGHT
Do not leave the helmet in the direct sunlight. The UV potentially deteriorates and discolour the shell.
CAUTION FOR MATTE COLOUR PRODUCT
Matte processing on the surface of this product could be peeled o if the attached sticker is removed from the surface. To prevent
this, never remove the sticker. The same problem may occur also when other stickers are attached and removed. If you attach
stickers on the product, please be aware of the risk.
13
cs1_manual_v2023.indd 15cs1_manual_v2023.indd 15 2023/07/14 15:542023/07/14 15:54

Wearing Helmet Properly
Wear the helmet from the front to the rear horizontally.
Make sure to put the front side of the helmet on just above your eyebrows (Please see a mirror to check).
It is necessary to adjust the length of the chinstrap and Adjustment-lock.
Please make sure to read and follow the instruction before use.
Your helmet is only e ective as protection in case of an accident if it is positioned correctly on your head and the strap is
fastened securely. Be sure you are wearing the helmet properly before riding.
WRONG
Make sure the front
edge of the helmet
is just above your
eyebrows.
Wear it from the
front to the rear
horizontally.
The front of the
helmet is too
far up, and your
forehead is not
properly covered.
WARNING
14
CORRECT
Shell
cs1_manual_v2023.indd 16cs1_manual_v2023.indd 16 2023/07/14 15:542023/07/14 15:54

Part Names and Table of Contents
1 Chinstraps
2 Adjuster
3 Linings /Front Visors
4 How to Clean Linings/Replacement Parts
NOTES BEFORE USE -12
WARNING -13
Wearing Helmet Properly -14
Part Names and Table of Contents -15
Fastening the Strap Buckle -16
Adjusting the Chinstrap -16
Adjusting the Adjustment-locks -17
Adjusting the Adjuster -18
Replacing the Inner Pad -19
Detach/Attach the Front Visor -19
How to Clean the Linings -20
Replacement Parts -20
15
Side
Rear
Shell
Liner
Inner Pad
(Top)
Inner Pad
(Front)
Inside
Adjuster
Front Visor
Strap Buckle
Chinstrap
Adjustment-lock
Liner
Shell
AdjusterAdjuster
cs1_manual_v2023.indd 17cs1_manual_v2023.indd 17 2023/07/14 15:542023/07/14 15:54

Adjust the chinstrap to fit your head. It generally should be just long
enough to leave space for 2 to 3 ngers horizontally when fastening the
chinstrap.
See " 2 :Adjuster" for how to adjust the Adjuster.
16
Chinstraps
Chinstraps play an important role under an accident, preventing the helmet from coming o. In order to maintain the original performance of the
helmet, make sure to adjust "Chinstraps length" and "Adjustment-locks positions" properly and fasten "Strap buckle" correctly before riding.
Make sure to fasten the strap buckle.
Strap buckles will be released
by pushing the release button.
Fastening the strap buckle
Strap
Buckle
Strap
Buckle
Release
Push
Push
Releasing the strap buckle
•Make sure to fasten the strap rmly. It is dangerous to ride a bicycle without fastening the chinstrap.
•If the strap buckle is not fastened (ie, you don’t hear it click), or if it is fastened loosely, the helmet may come o in an
accident, leading to death or serious injury.
Be careful not to pinch
your skin when fastening
the strap buckle.
1
Fastening the Strap Buckle
Adjusting the Chinstrap
WARNING
WARNING
Bind the strap with the “O-ring” and “Strap
holder” at the end.
cs1_manual_v2023.indd 18cs1_manual_v2023.indd 18 2023/07/14 15:542023/07/14 15:54

17
Put on the helmet, fasten the strap buckle and adjust the Adjustment-locks so they can be placed rmly on the side of your
face. Check that the A part is placed correctly. If the chinstrap around your ears is loose or tight, change the position of the
Adjustment-lock.
•Do not force the chinstrap out of the buckles as this may damage the chinstrap. The end of the chinstrap is designed
to be dicult to remove from the buckles for safety reasons.
•Do not modify the chinstrap in any way. The strength of the chinstrap may be reduced and the protective performance
may not be eective in the event of an accident.
•Be sure to tighten the chinstrap securely. The helmet may come off in a fall and cannot protect your head if the
chinstrap is not fastened or is loose.
Adjusting the Adjustment-locks
How to change the Adjustment-lock position
WARNING
Correct
positions of the
chinstraps
Adjustment
lock
Adjustment
lock
cs1_manual_v2023.indd 19cs1_manual_v2023.indd 19 2023/07/14 15:542023/07/14 15:54

18
Adjuster
"Adjuster" is the mechanism at the rear of the helmet to keep the helmet from moving.
Adjust the Adjuster so it will keep the helmet on your head securely.
2
Adjusting the Adjuster
Hold the front side of the helmet and tighten the
Adjuster using the adjuster dial.
Loosen Tighten
Turn the dial
counter-clockwise
Turn the dial
clockwise
•Use the Adjuster dial for adjustment. Do not forcibly loosen/tighten the adjuster without using the dial.
It may break the mechanical system inside the dial.
•Be careful with your hair, especially long hair, so it does not get tangled in the Adjuster.
DialDial DialDial
WARNING
Hold the front part and turn the dial.
cs1_manual_v2023.indd 20cs1_manual_v2023.indd 20 2023/07/14 15:542023/07/14 15:54

※In case of Front pad
19
Linings / Front Visor
3
Replacing the Inner Pad Detach/Attach the Front Visor
Front visor is attachable.
Stick the Inner pad
(Front pad, Top Pad)
on the hook-and-loop
fasteners properly.
Front pad
Top pad
Detaching the Front Visor
Remove the Front Visor and replace it with the Front pad and
Top pad rmly in position.
When removing the inner
pad, be careful not to detach
the hook and loop fastener
from the helmet body, and
slowly pull each pad away
from the hook and loop
fastener.
Make sure that a Front Visor is attached firmly before
riding. Otherwise, it may come o.
CAUTION
WARNING
1.Remove the top pad and
front pad.
2. Attach the front visor where
the front pad and top
pad were attached. And
press firmly hook and loop
fasteners when attaching
the front visor.
Front Front
Front
Visor
Hook-and-loop
Inner
Pad
Remove the inner pad while holding
down the hook and loop fastener.
cs1_manual_v2023.indd 21cs1_manual_v2023.indd 21 2023/07/14 15:542023/07/14 15:54

How to Clean Linings / Replacement Parts
4
Linings are removable and washable. Keep linings clean by washing periodically. Use warm water (35ºC/95ºF or cooler) with small
amount of hair shampoo or ph-neutral detergent. Hand wash them gently and rinse thoroughly. Dry linings with a dry cloth after
washing, and leave them in a shaded and well-ventilated place. Avoid direct sunlight.
Replacement parts are available for purchase.
Please refer to Parts List on our website for more information about replacement.
https://www.ogkkabuto.co.jp/bicycle/products/cycling/koofu_cs-1/option_parts.html
How to Clean the Linings
Replacement Parts
Contact the shop you purchased the helmet when you purchase replacement parts. Make sure the model of your helmet.
20
CAUTION
CS-1 Visor
Color: Black
Size: Common in all sizes
CS-1 Inner pad set
Color: Black
Size: Common in all sizes
Adjuster Band Set-9
Color: Black
cs1_manual_v2023.indd 22cs1_manual_v2023.indd 22 2023/07/14 15:552023/07/14 15:55
Other manuals for CS-1
1
Table of contents
Popular Safety Equipment manuals by other brands

ISOtunes SPORT
ISOtunes SPORT IT-77 manual

Mini Gadgets
Mini Gadgets BBSElectricalBox user manual

CBS ArcSafe
CBS ArcSafe RSA-184F Installation and operation

3M
3M Protecta Carros AM401G User instruction manual

Elkron
Elkron FAP54 Programming manual

MSA
MSA PremAire Cadet Escape Respirator Maintenance and Repair