Korg Krome User manual

ENGLISH
Quick Start Guide
Contents
Precautions . . . . . . . . . . . . . . . . . . . . . . . . . . . . . . .2
Regarding the LCD screen . . . . . . . . . . . . . . . . .2
Data handling . . . . . . . . . . . . . . . . . . . . . . . . . . . . .2
About this manual. . . . . . . . . . . . . . . . . . . . . . . . .3
Main Features. . . . . . . . . . . . . . . . . . . . . . . . 4
Front Panel . . . . . . . . . . . . . . . . . . . . . . . . . . 5
Rear Panel. . . . . . . . . . . . . . . . . . . . . . . . . . . . . . . . .6
Connecting the keyboard and
turning the power on . . . . . . . . . . . . . . . . . 7
Turning the power on . . . . . . . . . . . . . . . . . . . . .7
Turning the power off . . . . . . . . . . . . . . . . . . . . .8
About the display and the modes . . . . . 9
Display . . . . . . . . . . . . . . . . . . . . . . . . . . . . . . . . . . . .9
Selecting modes. . . . . . . . . . . . . . . . . . . . . . . . . 10
Playing sounds. . . . . . . . . . . . . . . . . . . . . . 11
Playing Programs and Combinations . . . . . 11
Using controllers to modify the sound. . . . 12
Performing with the arpeggiator . . . . . . . . . 13
Using the Drum Track. . . . . . . . . . . . . . . . . . . . 13
Simple program and combination
editing . . . . . . . . . . . . . . . . . . . . . . . . . . . . . . . . . . 14
Using the sequencer . . . . . . . . . . . . . . . . . 15
Recording your performance. . . . . . . . . . . . . 15
Editing MIDI . . . . . . . . . . . . . . . . . . . . . . . . . . . . . 16
Template songs . . . . . . . . . . . . . . . . . . . . . . . . . 17
Using effects . . . . . . . . . . . . . . . . . . . . . . . . 18
Routing and effect settings . . . . . . . . . . . . . . 18
Saving and loading data . . . . . . . . . . . . . 19
Saving your edits . . . . . . . . . . . . . . . . . . . . . . . . 19
Writing . . . . . . . . . . . . . . . . . . . . . . . . . . . . . . . . . . 19
Saving and loading . . . . . . . . . . . . . . . . . . . . . . 19
Listening to the demo songs . . . . . . . . . 21
Loading the demo song data. . . . . . . . . . . . . 21
Listening to the demo songs . . . . . . . . . . . . . 21
Playing multiple songs in succession . . . . . 22
Performing with RPPR . . . . . . . . . . . . . . . . . . . 22
Specifications (summary) . . . . . . . . . . . . 23

En-2
Precautions
Location
Usingtheunitinthefollowinglocationscanresultinamal‐
function.
•Indirectsunlight
•Locationsofextremetemperatureorhumidity
•Excessivelydustyordirtylocations
•Locationsofexcessivevibration
•Closetomagneticfields
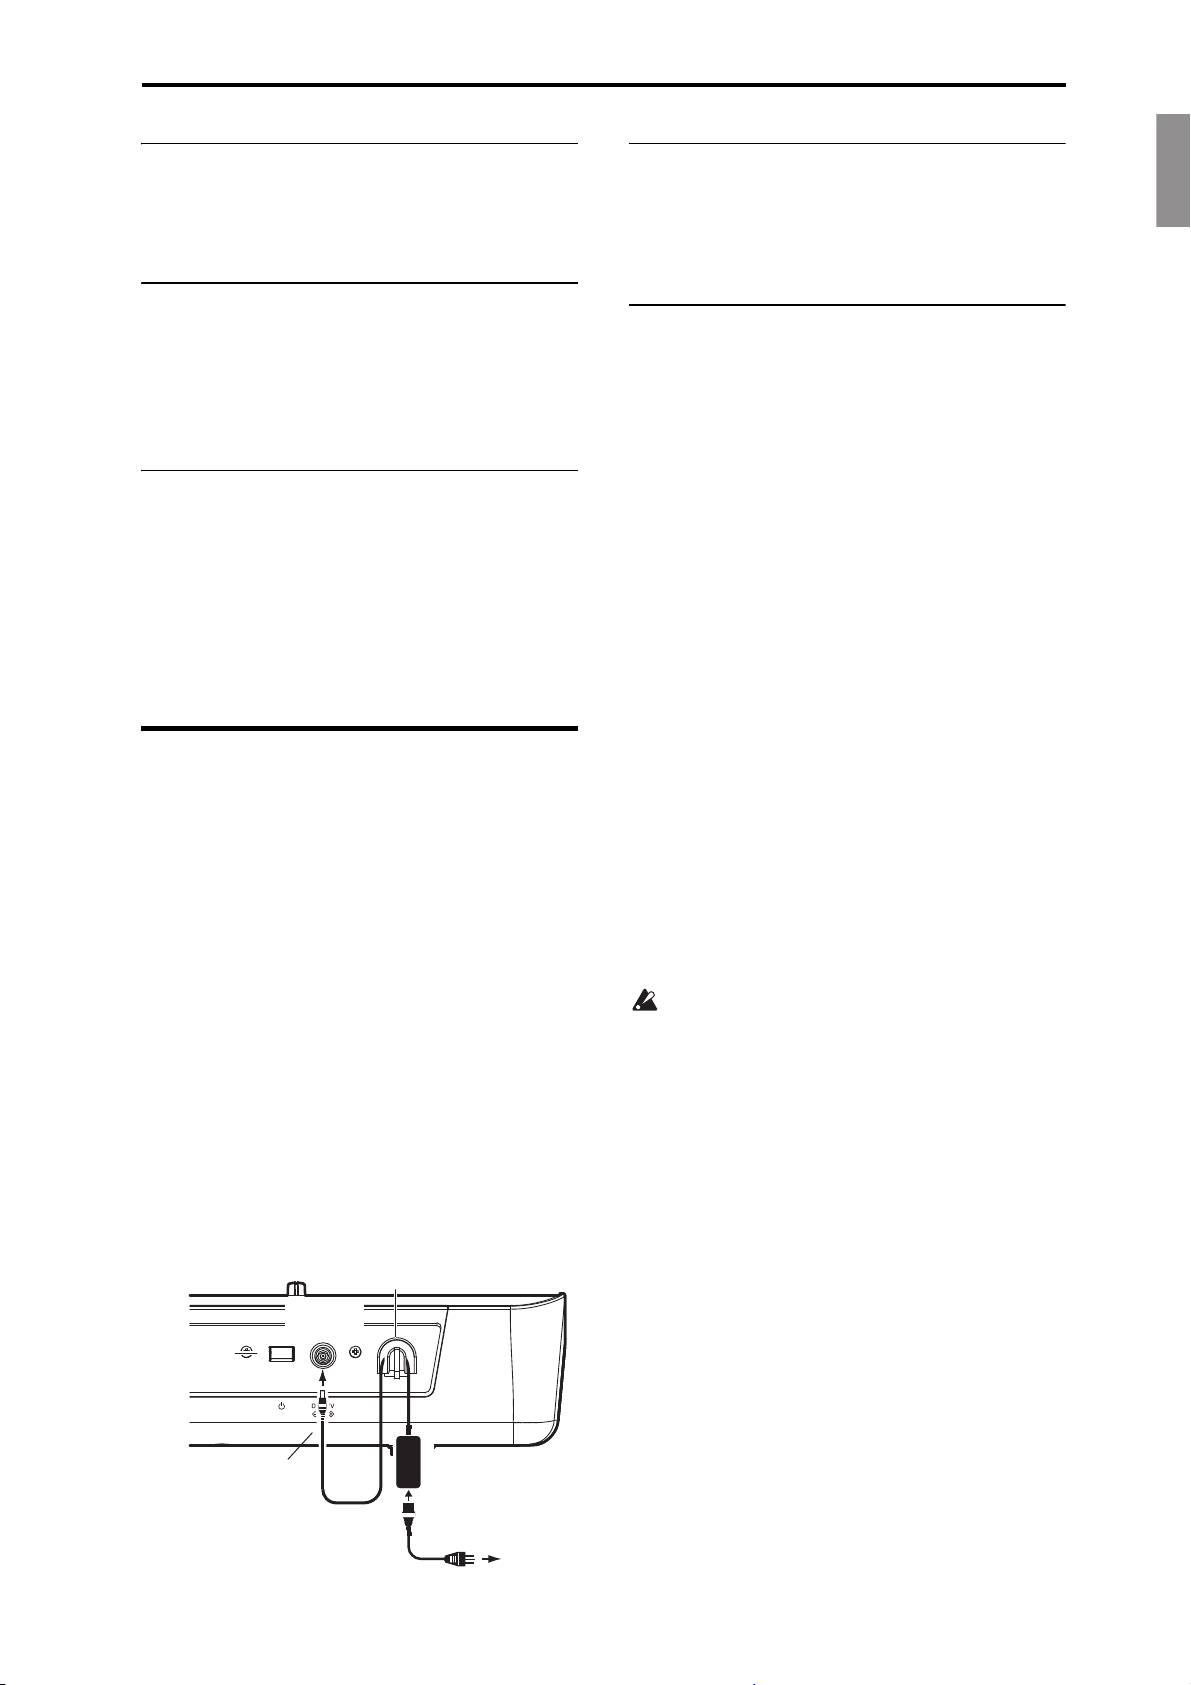
Power supply
PleaseconnectthedesignatedACadaptertoanACoutletof
thecorrectvoltage.DonotconnectittoanACoutletofvolt‐
ageotherthanthatforwhichyourunitisintended.
Interference with other electrical devices
Radiosandtelevisionsplacednearbymayexperiencerecep‐
tioninterference.Operatethisunitatasuitabledistancefrom
radiosandtelevisions.
Handling
Toavoidbreakage,donotapplyexcessiveforcetothe
switchesorcontrols.
Care
Iftheexteriorbecomesdirty,wipeitwithaclean,drycloth.
Donotuseliquidcleanerssuchasbenzeneorthinner,or
cleaningcompoundsorflammablepolishes.
Keep this manual
Afterreadingthismanual,pleasekeepitforlaterreference.
Keeping foreign matter out of your equipment
Neversetanycontainerwithliquidinitnearthisequipment.
Ifliquidgetsintotheequipment,itcouldcauseabreakdown,
fire,orelectricalshock.
Becarefulnottoletmetalobjectsgetintotheequipment.If
somethingdoesslipintotheequipment,unplugtheAC
adapterfromthewalloutlet.ThencontactyournearestKorg
dealerorthestorewheretheequipmentwaspurchased.
Regarding the LCD screen
TheKROMELCDscreenisaprecisiondevice,andcareful
attentionhasbeenpaidtoitsproductquality.Althoughyou
maynoticesomeoftheissueslistedbelow,pleasebeaware
thattheseareduetothecharacteristicsofLCDscreens,and
arenotmalfunctions.
•Theremaybepixelsinthescreenthatarealwaysdark
(unlit)oralwaysbright(lit).
•D
epend
ingonthedisplayedcontent,thebrightnessofthe
screenmayappearuneven.
•Dependingonthedisplayedcontent,horizontalstripesof
shadingmaybevisible.
•Dependingonthedisplayedcontent,flickeringormoire
patternsmaybevisible.
Data handling
Incorrectusageormalfunctionsmaycausethecontentsofthe
memorytobelost.PleaseusetheincludedEditortobackup
yourimportantdatatoyourcomputerorremovablemedia.
PleasebeawarethatKorgwillacceptnoresponsibilityforany
damageswhichmayresultfromlossofdata.
ThankyouforpurchasingtheKorgKROMEMusic
Workstation.Tohelpyougetthemostoutofyournew
instrument,pleasereadthismanualcarefully.
DECLARATION OF CONFORMITY (for USA)
ResponsibleParty:KORGUSAINC.
Address:316SOUTHSERVICEROAD,MELVILLE
Telephone:1‐631‐390‐6500
EquipmentType:MusicWorkstation
Model:KROME‐61/KROME‐73/KROME‐88
ThisdevicecomplieswithPart15ofFCCRules.
Operationissubjecttothefollowingtwoconditions:
(1)Thisdevicemaynotcauseharmfulinterference,and
(2)thisdevicemustacceptanyinterferencereceived,
includinginterferencethatmaycauseundesiredoperation.
THE FCC REGULATION WARNING (for USA)
NOTE:Thisequipmenthasbeentestedandfoundtocomply
withthelimitsforaClassBdigitaldevice,pursuanttoPart15
oftheFCCRules.Theselimitsaredesignedtoprovidereason‐
ableprotectionagainstharmfulinterferenceinaresidential
installation.Thisequipmentgenerates,uses,andcanradiate
radiofrequencyenergyand,ifnotinstalledandusedinaccor‐
dancewiththeinstructions,maycauseharmfulinterferenceto
radiocommunications.However,thereisnoguaranteethat
interferencewillnotoccurinaparticularinstallation.Ifthis
equipmentdoescauseharmfulinterferencetoradioortelevi‐
sionreception,whichcanbedeterminedbyturningtheequip‐
mentoffandon,theuserisencouragedtotrytocorrectthe
interferencebyoneormoreofthefollowingmeasures:
• Reorientorrelocatethereceivingantenna.
•Increasetheseparationbetweentheequipmentand
receiver.
•Connecttheequipmentintoanoutletonacircuitdifferent
fromthattowhichthereceiverisconnected.
•Consultthedealeroranexperiencedradio/TVtechnician
forhelp.
Ifitemssuchascablesareincludedwiththisequipment,you
mustusethoseincludeditems.
Unauthorizedchangesormodificationtothissystemcanvoid
theuser’sauthoritytooperatethisequipment.
Notice regarding disposal (EU only)
Whenthis“crossed‐outwheeledbin”symbolisdis‐
playedontheproduct,owner’smanual,battery,orbat‐
terypackage,itsignifiesthatwhenyouwishto
disposeofthisproduct,manual,packageorbattery
youmustdosoinanapprovedmanner.Donotdis‐
cardthisproduct,manual,packageorbatteryalong
withordinaryhouseholdwaste.Disposinginthecor‐
rectmannerwillpreventharmtohumanhealthandpotential
damagetotheenvironment.Sincethecorrectmethodofdis‐
posalwilldependontheapplicablelawsandregulationsin
yourlocality,pleasecontactyourlocaladministrativebodyfor
details.Ifthebatterycontainsheavymetalsinexcessofthe
regulatedamount,achemicalsymbolisdisplayedbelowthe
“crossed‐outwheeledbin”symbolonthebatteryorbattery
package.

EnglishFrançaisDeutschEspañol
En-3
About this manual
The manuals and how to use them
TheKROMEcomeswiththefollowingmanuals.
•VideoManual(approximately60minutes)
•QuickStartGuide(printedandPDF)
(thisdocument)
•OperationGuide(PDF)
• ParameterGuide(PDF)
•VoiceNameList(PDF)
Allofthesemanualsareontheincludedaccessory
disc.
AprintedcopyisincludedonlyfortheQuickStart
Guide.
Video Manual
Thisvideoillustratesthemainfunctionalityofthe
KROME.
Quick Start Guide
ThisprovidesasimpleexplanationoftheKROME’s
functions.Tobegin,pleasewatchtheVideoManual
andreadtheQuickStartGuide.
Operation Guide
Putsimply,theOperationGuideisdesignedtoanswer
thequestion,“HowdoIdothis?”
Itexplainsthenamesandfunctionsofeachpartofthe
KROME,basicoperation,anoverviewofeachmode,
howtoeditsounds,howtorecordonthesequencer,
andhowtosample.Thisguidealsoexplainsthebasics
oftheArpeggiator,effects,DrumKits,andtheDrum
Track.
Finally,italsocontainsatroubleshootingguideand
supplementalinformationsuchasspecifications.
Parameter Guide
TheParameterGuideisdesignedtoanswerthe
question,“Whatdoesthisdo?”
Organizedbymodeandpage,theParameterGuide
includesinformationoneachandeveryparameterin
theKROME.
Voice Name List
TheVoic e NameListlistsallofthesoundsandsetups
thatareintheKROMEwhenitisshippedfromthe
factory,includingPrograms,Combinations,
Multisamples,Drumsamples,DrumKits,Arpeggio
Patterns,DrumTrackPatterns,TemplateSongs,and
EffectPresets.
PDF versions
TheKROMEPDFmanualsaredesignedforeasy
navigationandsearching.TheyincludeextensivePDF
contentsinformation,whichgenerallyappearsonthe
sideofthewindowinyourPDFreaderandletsyou
jumpquicklytoaspecificsection.Allcross‐references
arehyper‐links,sothatclickingonthemautomatically
takesyoutothesourceofthereference.
Conventions in this manual
References to the KROME
TheKROMEisavailablein88‐key,73‐key,and61‐key
models.Themanualsrefertoallmodelswithout
distinctionas“theKROME.”Thefrontpanelandrear
panelillustrationsinthemanualshowthe61‐key
model,buttheyapplyidenticallytotheothermodels.
Abbreviations for the manuals: QS, OG, PG,
VNL
Inthedocumentation,referencestothemanualsare
abbreviatedasfollows.
QS:QuickStartGuide
OG:OperationGuide
PG:ParameterGuide
VNL:TheVoiceNameList
Symbols , , Note, Tips
Thesesymbolsrespectivelyindicateacaution,aMIDI‐
relatedexplanation,asupplementarynote,oratip.
Example screen displays
Theparametervaluesshownintheexamplescreensof
thismanualareonlyforexplanatorypurposes,and
maynotnecessarymatchthevaluesthatappearonthe
LCDscreenofyourinstrument.
MIDI-related explanations
CC#isanabbreviationforControlChangeNumber.
InexplanationsofMIDImessages,numbersinsquare
brackets[]indicatehexadecimalnumbers.
*Allproductnamesandcompanynamesarethe
trademarksorregisteredtrademarksoftheirrespective
owners.

Main Features
En-4
Main Features
New realms of sound for the keyboard
player and the musical creator
• The KROME’s EDS-X (Enhanced Definition
Synthesis-eXpanded) is a newly designed sound
engine that delivers the synthesis, modulation,
effect functionality and quality of the EDS sound
engine acclaimed by professionals, while
additionally allowing more than ten times as much
PCM sound data to be controlled.
• Voicing technology developed for the KRONOS has
been lavishly applied, giving you a total of 4GB of
high-quality PCM data that includes long stereo
samples captured for each key. From the sound’s
attack to its decay, every detail has been carefully
designed for subtle and dynamic expressive power.
The emotion in your fingertips will be faithfully
transmitted to your listeners via this wide array* of
sounds: acoustic pianos, electric pianos, organs,
wind instruments, synths, and drums.
* The KROME contains 640 preload programs (basic
sounds) and 384 preload combinations that can
use multiple programs.
Effects
• The KROME contains 193 different types of effects,
ranging from chorus, delay, reverb, overdrive, and
simulations of vintage effects and amps, each
boasting professional-level quality and flexibility.
Effect Presets let you easily store and recall all of
the settings for an individual effect.
• You can use up to 16 of these effects
simultaneously, with 6 Insert Effects, 2 Master
Effects (for reverb sends, for instance), and 1 Total
Effects (for stereo bus processing). Each program
provides a three-band EQ, letting you use up to
sixteen such EQs in each combination or song. In
addition, there is also a 3-band EQ for each of the
sixteen MIDI tracks.
• The master effects and total effect can be turned
on/off from the front panel.
Dual polyphonic arpeggiators
In addition to the traditional arpeggio patterns of the
past, these arpeggiators can generate guitar or bass
riffs as well as drum patterns. They can also be used as
part of the sound designing process to create pads,
synth sounds, and sound effects that include a subtle
sense of movement. In Combination mode and
Sequencer mode, you can use two arpeggiators
simultaneously.
There are 900 user arpeggio patterns, giving you
amazing potential for powerful performances.
Original patterns can be created quickly and easily by
editing patterns in the piano roll screen.
Drum track patterns
The drum track is a built-in drum machine function
that uses the KROME’s high-quality drum sounds.
There are 605 patterns.
Keyboard and controllers for richly
expressive performances
• The KROME 61 and 73 feature a Semi-Weighted
Keyboard that provides a great-feeling way to play
everything from piano sounds to synthesizer
sounds.
The KROME 88 features a NH (Natural Weighted
Hammer Action) keyboard that is especially
advantageous when you’re playing sounds that
allow subtle nuances of expression such as piano
and electric piano.
• In addition to the joystick, tonal changes can be
controlled by buttons (SW1, 2) where you can
assign functions such as octave shift or joystick
lock, and realtime controllers that you can use to
adjust cutoff, resonance, or effects while you play,
making your performances even more expressive.
• Three jacks where you can connect a damper pedal,
foot switch, and foot pedal are provided. These
allow you to use your foot to adjust the volume,
control the effects, or switch sounds.
Sequencer for music production or
performance
The internal sequencer provides 16 MIDI tracks and
one master track. There’s a full complement of
functionality for music production and performance,
including Auto Song Setup that lets you start
producing a song the moment inspiration strikes,
template songs, RPPR, and cue lists.
You can edit tracks and patterns in the track view or in
a piano roll screen.
SMF data can also be imported or exported, allowing
smooth integration with another platform such as your
computer.
Computer connection via USB
SD card slot
You can connect the KROME to your computer via
USB for easy transfer of MIDI data. You can also use an
SD card (commercially available) to easily manage the
KROME’s file data.
KROME sound editor
The KROME Editor and the KROME Plug-In Editor
allow you to edit on your computer while viewing
large numbers of parameters simultaneously, or to use
the KROME as a software synthesizer on your
computer.
* Please download the latest version of the KROME
sound editor from the Korg website
(http://www.korg.com/).

EnglishFrançaisDeutschEspañol
Front Panel
En-5
Front Panel
Volume
1. VOLUME knob
ThisknobadjuststhevolumeoftheAUDIOOUTPUT
L/MONO,Routputs,aswellasthevolumeofthe
headphonejack.
SW1, 2 and Joystick
2. SW1, SW2 buttons
Youcanassignthesebuttonstoadesiredfunctionsuch
aschangingtheoctaveofthekeyboard,turning
portamentoon/off,orlockingthejoystick.Youcanalso
usethesetocontrolthesoundoreffectsin
sophisticatedwaysbyassigningthemtoanAMS
parameterofthesoundgeneratororaDmod
parameterofaneffect.
3. Joystick
Youcancontrolsynthesisparametersoreffect
parametersbymovingthejoystickup/down/left/right.
REALTIME CONTROLS
Theserealtimecontrollersconsistoffourknobsand
onebutton.Youcanusethemtodothefollowing
things.
4. SELECT button
5. Knobs 1–4
UsetheSELECTbuttontoselectthefunctionsthatyou
wanttobecontrolledbyknobs1–4.Byusingknobs1–4
youcancontrolthesound,effects,andthearpeggiator.
(See“Realtimecontrols”onpage 12.)
Arpeggiator
6. ARP button
Thisbuttonturnsthearpeggiatoron/off.Thebutton
willbelitupifthearpeggiatorison.(Seepage 13)
DRUM TRACK
7. DRUM TRACK button
ThisbuttonturnstheDrumTrackfunctiononoroff.
Thisbuttonalsoindicatestheoperatingstateofthe
drumtrack.(Unlit:off,Blinking:waitingfortrigger,
Lit:on.Seepage 13.)
Effect buttons
8. MASTER FX button, TOTAL FX button
Thesebuttonsturnthemastereffectandtotaleffect
on/off.Whenthebuttonison(LEDlit),theeffect
settingsoftheprogram,combination,orsongwillbe
enabled.Whenthebuttonisoff(LEDunlit),the
correspondingeffectwillbeoff.
Theon/offstatusofthesebuttonsisrememberedeven
whenyouswitchprograms,combinations,orsongs.
Display
9. Display
TheTouchViewdisplayfeaturessimpletouchcontrol
andselectionofnumerousfeaturesandparameters.
(Seepage 9)
Mode
10. COMBI, PROG, SEQ buttons
11. GLOBAL, MEDIA buttons
TheKROMEhasfivedifferentoperationalmodes,each
oneoptimizedforaspecificsetoffunctions.
Pressoneofthesebuttonstoenterthecorresponding
mode.
Fordetails,pleasesee“Selectingmodes”onpage 10.
3
2
5 11 9 13 15 20 10 12 22
6
24
71819 16 21 23
814
1
4
17
* The diagram shown is for KROME-61

Front Panel
En-6
PROG/COMBI BANK
12. A, B, C, D, E, F buttons
ThesebuttonsselectprogrambanksA–Fand
combinationbanksA–D(seepage 11).Youcanalsouse
thesebuttonstoselectthebankoftimbreprogramsina
combination,orthebankoftrackprogramsinasong.
IfyouwanttoselectaGMbank,usethenumerickeys
(see“15”,bellow,page 11)ortheBank/ProgramSelect
menu(seepage 12).
VALUE controllers
Usethesecontrollerstoedittheparameterthat’s
selectedinthedisplay.
13. INC and DEC buttons
14. VALUE dial
15. 0–9, – and . buttons
16. ENTER button
Usethesetospecifythevalueoftheselected
parameter.
17. COMPARE button
Comparesyourcurrentsoundeditstothesound
beforeitwasedited.
PAGE SELECT, EXIT
18. PAGE button
Whenyoupressthisbutton,alistofthepageswithin
theselectedmodewillappearinthedisplay.Pressthe
buttonofthedesiredpage.(Seepage 9)
19. EXIT button
Pressthisbuttontoreturntothemainpageofthe
currentmode.
Save (Write)
20. WRITE button
Usethisbuttontosaveprograms,combinations,global
settings,drumkits,orarpeggiopatternstotheinternal
memory(seepage 19).
You’llalsousethisbuttontosavesongstomedia(see
page 20).
Sequencer
Thebuttonsinthissectionareusedforoperationsin
Sequencermode,suchasrecordingandplayback(see
page 54oftheOperationGuide).Inadditiontoitsuse
duringrecording,theRECbuttonisalsousedtosavea
programorcombination,orwhenusingtheAutoSong
Setupfunction.(seepage 15).
21. PAUSE ( ) button, REW ( ) button,
FF ( ) button, LOCATE ( ) button,
REC ( ) button, START/STOP ( ) button
TEMPO controls
22. TEMPO knob, TEMPO LED
Thisknobadjuststhetempoofthearpeggiator,drum
track,orinternalsequencer.
ThisLEDwillblinkatquarter‐noteintervalsofthe
currenttempo.
23. TAP button
Bypressing(ortapping)thisbuttononthebeat,you
canenterthetempousedbythearpeggiator,drum
track,orinternalsequencer.
Headphone
24. Headphone jack
Connectyourheadphoneshere.
ThisjackwilloutputthesamesignalastheAUDIO
OUTPUTL/MONOandRjacks.
TheheadphonevolumeiscontrolledbytheVOLUME
knob.
Rear Panel
Power supply
Besuretoseethe“Connectingthekeyboardand
turningthepoweron”sectiononpage 7andfollowthe
correctproceduredescribedthere.
Note:TheKROMEhasanautopower‐offfunctionthat
automaticallyturnsoffthepowerwhenthekeyboard
orfrontpanelbuttonshavenotbeenusedforacertain
lengthoftime.Withthefactorysettings,thisissetto4
hours(see“Theautopower‐offfunction”onpage 8).
1. Power switch
Thisswitchturnsthepoweron/off.
2. AC adapter connector
TheincludedACadapterisconnectedhere.
Connectionsmustbemadewiththepowerturned
off.Pleasebeawarethatcarelessoperationmay
damageyourspeakersystemorcause
malfunctions.
3. Cable hook
UsethistosecurethecableoftheincludedACadapter.
1 2 3
4
678 5

EnglishFrançaisDeutschEspañol
Connecting the keyboard and turning the power on
En-7
AUDIO OUTPUTS
4. AUDIO OUTPUT L/MONO jack
Thesearethemainstereoaudiooutputs.Usethe
VOLUMEknobtoadjustthevolume.
PEDALS
5. ASSIGNABLE PEDAL jack, ASSIGNABLE
SWITCH jack, DAMPER jack
Youcanconnectadamperpedal,footswitch,andfoot
pedaltothesejacks.Thisgivesyouabroaderrangeof
functionsandeffectstocontrol.
MIDI
6. MIDI IN connector, MIDI OUT connector
MIDIletsyouconnecttheKROMEtoacomputeror
otherMIDIdevices,forsendingandreceivingnotes,
controllergestures,soundsettings,andsoon.
SD
7. SD card slot
YoucaninsertanSDcardhere,anduseittosave/load
KROMEprograms,combinations,orsongdata.(See
page 19)
USB
8. USB connector (for connecting to
computer)
Youcanconnectyourcomputertothisconnector.
UsingasingleUSBcable,yourKROMEcansendand
receiveMIDIinformationdirectlytoandfroma
computer,withoutrequiringaMIDIinterface.
Note:TheUSBconnectoroftheKROMEisonlyableto
transmitandreceiveMIDIdata.
Connecting the keyboard and turning the power on
Turning the power on
Note:Checkthefollowingbeforeyouturnthepower
on.
•Makesurethatyou’reusinganACoutletthat
suppliesthecorrectvoltageforyourunit.
•UseonlytheincludedACadapter.
•TurntheKROME’sfrontpanelVOLUMEknoball
thewaytothelefttominimizethevolume.
•MakesurethattheKROME’spowerisoff.
•Ifyou’reconnectingtoanexternaloutputdevice
suchasamixerorapoweredmonitorspeaker,
minimizeitsvolumeandturnoffitspower.
Here’showtoconnectthepower.
1. ConnecttheincludedACadapter’sDCplugtothe
KROME’srearpanelpowerjack.
PlugtheACadapterintoanACoutlet.
TopreventtheDCplugfrombeingdisconnected
accidentally,fastenthecablearoundtheKROME’s
cablehook.
AC adapter connections
ConnectthepowercordtotheACadapter.
2. ConnecttheKROME’sAUDIOOUTPUT
L/MONOandRjackstoyourmixerorpowered
monitorspeakers.
•Ifyou’remonitoringthroughheadphones,connect
themtotheheadphonejackthat’slocatedonthe
leftsideofthefrontoftheKROME.Thisheadphone
jackwilloutputthesamesignalasthestereooutput
(AUDIOOUTPUTL/MONOandR).
3. Turnonthepowerbypressingthepowerswitch
locatedontherearpaneloftheKROME.
Iftheautopower‐offfunctionisenabled,a
messagewillappearatstart‐up,informingyouof
thetimeuntilthepowerwillturnoff
automatically.Ifthisdialogboxdoesnotappear,
autopower‐offisnotenabled;thepowerwillnot
turnoffautomatically.(See“Theautopower‐off
function”onpage 8.)
4. Power‐onyourexternaloutputdevices,andadjust
theirvolumeappropriately.
5. Whileplayingthekeyboard,graduallyturnthe
VOLUMEknobtowardtherighttoadjustthe
volume.
Power switch
d: Cable hook
AC adapter
When fastening the
cable to the cable
hook, take care not
to bend this portion
any more than
necessary. c: Power cord for AC adapter
a: Power
supply jack
b: Plug into AC outlet.

Connecting the keyboard and turning the power on
En-8
Turning the power off
Whenyou’vefinishedusingtheKROME,turnoffthe
powerbypressingthepowerswitchthat’slocatedon
therearpaneloftheKROME.
Whenyouturnoffthepower,anyprogram,
combination,orglobalsettingsyoumayhave
editedwillreturntoitsoriginalstate.Ifyouwant
tokeeptheresultsofyourediting,youmustsave
(write)theeditedsettings.
Inthesameway,thesongdatawillalsobelost
whenyouturnoffthepower.Ifyouwanttouse
thesongdataagainlater,youmustsaveitbefore
youturnoffthepower,andthenloaditagain
whendesired.(See“Savingyouredits”on
page 19.)
IftheKROME’sautopower‐offfunctionis
enabled,thepowerwillautomaticallyturnoff
afteracertainlengthoftimehaselapsedwithout
anyuserinput.Thisautomaticpower‐offwillalso
causeallunsaveddatatobelost.
Ifthepoweristurnedoffwhiledataisbeing
writtentotheinternalmemory,thedatainthe
internalmemorymaybedamaged.Neverturnoff
thepowerwhileanyprocessisbeingexecuted.
Whileprocessingisoccurring,thefollowing
messagewillappear:
“Nowwritingintointernalmemory”
The auto power-off function
TheKROMEhasanautopower‐offfunctionthat
automaticallyturnsoffthepowerwhenthekeyboard
orfrontpanelbuttonshavenotbeenused(*)fora
certainlengthoftime.
*TheVOLUMEknobisnotincluded.
Note:Withthefactorysettings,thepowerwillturnoff
whentherehasbeennouserinputforapproximately
fourhours.
Whenthepowerturnsoff,anysettingsyouhad
beeneditingwillbelost.Ifyouwanttokeepyour
editedsettings,youmustsavethembeforethe
powerturnsoff.
Changing the auto power-off setting
Changing the settings in the start-up dialog box
Iftheautopower‐offfunctionisenabledsothatthe
powerwillturnoffautomatically,thecurrently
specifiedautopower‐offtimeisdisplayedimmediately
afterthesystemstartsup.
1. Whilethismessageisshown,presstheChange
Settingbuttoninthedialogbox.
Thefollowingdialogboxwillappear.
2. Pressthepopupbuttonandselectthedesiredtime
forautopower‐offtooccur.Ifyoudon’twantthe
powertoturnoffautomatically,chooseDisabled.
Note:Ifthisdialogboxdoesnotappearimmediately
afterstart‐up,theautopower‐offfunctionissetto
Disabled;thepowerwillnotturnoffautomatically.
Note:Youcanalsochangetheautopower‐offsetting
duringoperation(seepage 16oftheOperationGuide).
Auto power-off warning message
Whenthespecifiedtimehaselapsed,amessagewill
warnyouthattheautopower‐offfunctionisaboutto
turnoffthepower.
IfyouwanttocontinueusingtheKROME,pressthe
keyboard,abutton,orthedisplay.Autopower‐offwill
bereset,andthesamemessagewillappearwhenthe
specifiedtimehasagainelapsedwithoutanyuser
input.

EnglishFrançaisDeutschEspañol
About the display and the modes
En-9
About the display and the modes
Display
TheKROMEusesKorg’sTouchViewgraphicaluser
interface.
Bypressingordraggingobjectsshowninthedisplay,
youcanselectprogramsorcombinations,oredit
parametervalues.Herewe’llexplainthenamesand
functionsoftheseobjects.
a: Mode button
Thisindicatesthecurrentlyselectedmode.
Whenyoupressthisbutton,theModemenuwill
appear.Inthemodemenu,pressthenameofthemode
thatyouwanttomove.Ifyouselectthecurrently
selectedmode,thePageSelectmenuforthatmodewill
appear.Eveninanothermode,pressingtherightside
ofthenamewilldisplaythePageSelectmenuforeach
mode.
Toclosethemenu,presstheClosebuttonortheEXIT
button.
Youcanalsochoosemodesandpagesbypressingthe
frontpanelbuttons.Pressamodeselectbuttonto
selectamode,andthenpressthePAGEbuttonto
accessthepageselectscreen.
b: Current page
Thisindicatesthecurrentpagewithintheselected
mode.
Beginningattheleft,thisareashowsthepagenumber:
name,andtabname.
c: Tab
Mostpagesaredividedintotwoormoretabs.
d: Parameters
Theparametersforvarioussettingsareshowninthe
display.Selectaparameterinthedisplay,andeditits
value.
YoucanusetheVALUEdialandothervalue
controllers(seepage 6)toeditavaluebydragging
yourfingerinthedisplay,orturnasettingon/offby
pressingitinthedisplay.
Forsomeparameters,youcanpresstheparameter
twiceinsuccessionorlong‐pressandthenreleaseitto
accessanon‐screeneditpadwhereyoucaneditthe
value.see“Editpad”onpage 6oftheOperation
Guide.
e: Popup buttons
Whenyoupressapopupbutton,theavailable
parametervalueswillappearasapopupmenuora
tabbedmenu.
f: Menu command button
* Menu
Whenthisbuttonispressed,alistofmenucommands
willappear.
Themenucommandsthatappearwilldiffer
dependingonthepagethat’scurrentlyselected.
Themenuwillclosewhenyoupressthedisplay
somewhereotherthanthemenu,orwhenyoupress
theEXITbutton.
* Dialog box
Whenyouselectamenucommand,you’llseeascreen
containingthesettingsneededtoexecutethe
command.Thisiscalledadialogbox.Thedialogbox
thatappearswilldependonthemenucommandthat
youselect.Somecommands,suchasExclusiveSolo,
donotdisplayadialogbox.
* Text edit button
Whenyoupressthisbutton,thetexteditdialogbox
appearsforchangingthenamesofPrograms,
Combinations,Songs,etc.
a: Mode button
b: Current page
c: Tab
d: Parameters
e:
Popup
buttons
f: Menu command button
Mode button Page number: name Tab name
Menu command button
Menu button
Text edit button
Cancel button OK button

About the display and the modes
En-10
* OK and Cancel buttons
Afterperformingtheotheroperationsinthedialog
box,youcanexecutethecommandbypressingtheOK
button.Tocancelwithoutexecuting,presstheCancel
button.Thedialogboxwillclose.
TheEXITbuttoncorrespondstotheCancelbuttonand
Donebutton.
Selecting modes
TheKROMEprovidesalargenumberoffunctions,
suchasplayingoreditingprogramsandcombinations,
recordingandplayingbacksongs,andmanaging
media.Thesefunctionsaregroupedinto“modes.”The
KROMEhasfivemodes.Toaccessamode,pressthe
correspondingmodebutton(Seepage 5).
Program mode
ProgramsarethebasicsoundsoftheKROME.
InProgrammode,youcan:
• SelectandplayPrograms.
•Useonearpeggiatorinyourperformance.
•PlaybackDrumTrackpatternswhileyouperform
usingaProgram.
•EditPrograms
YoucanusetherealtimecontrolsandtheTone
Adjustfunctiontoeasilyedittheprogram.
Youcanadjusttheparametersandsettingsofthe
oscillators,filters,amps,EGs,LFOs,effects,
arpeggiator,drumtrack,etc.
Youcanuseuptofiveinserteffects,twomaster
effects,andonetotaleffect.
•Plus,youcancreatedrumprogramsusingdrum
kits(ascreatedinGlobalmode).
Combination mode
Combinationsaresetsofupto16programsthatcanbe
playedsimultaneously,lettingyoucreatesoundsthat
aremorecomplexthanasingleProgram.In
Combinationmode,youcan:
• SelectandplayCombinations.
•Usemultipletimbrestoplayarpeggiopatterns
generatedbytwoarpeggiators.
•Useoneormoretimbrestoplaybackthepatterns
inthedrumtrack.
•UsetheKROMEasa16‐partmultitimbraltone
generator.
•EditCombinations
Youcanusethetoneadjustfunctiontoeasilyedit
theprogramofeachtimbre.
YoucanassignProgramstoeachofthe16Timbres,
eachwithseparatevolume,pan,EQ,andkeyboard
andvelocityzones;adjustsettingsforeffects,
arpeggiatorandthedrumtrack.
•Plus,youcanuseuptofiveinserteffects,two
mastereffects,andonetotaleffect.
Sequencer mode
Sequencermodeletsyourecord,playback,andedit
MIDItracks.Youcan:
•Usethesixteen‐trackMIDIsequencertorecordand
playbacksongs.
•RecordasingleMIDItrackatatime,orrecordas
manyasallsixteentrackssimultaneously.Youcan
alsorecordexclusivemessages.
•Usemultipletrackstorecordandplayback
performancesgeneratedbytwoarpeggiators.
•Useoneormoretrackstoplaybackthepatternsin
thedrumtrack.
•Editsongs.
•UsetheKROMEasa16‐trackmulti‐timbralsound
module.
•GM/GM2playbackisalsosupported.
•UsetheToneAdjustfunctiontoeasilyeditthe
programofeachtrack.
•Useuptofiveinserteffects,twomastereffects,and
onetotaleffect.
•Recordpatternsandassignthemtoindividual
keys,usingRPPR(RealtimePattern
Play/Recording).
• CreateaCueListthatwillplaybackmultiplesongs
intheorderthatyouspecify.Youcanalsocombine
thesesongsintoasinglesong.
• CreateuserDrumTrackpatterns.
Global mode
Globalmodeletsyouadjustoverallsettingsforthe
entireKROME,andeditdrumkitsandarpeggio
patterns.InGlobalmode,youcan:
•AdjustsettingsthataffecttheentireKROME,such
asmastertuneandtheglobalMIDIchannel.
• Createuserscales.
• Createdrumkitsusingdrumsamples.
• Createuserarpeggiopatterns.
• Renameprogramandcombinationcategories.
•Setthefunctionoftheassignablepedalsand
assignableswitches.
•TransmitMIDISystemExclusivedatadumps.
Media mode
YoucansaveorloaddatausinganSDcard.InMedia
mode,youcan:
• SaveandloadPrograms,Combinations,Songs,and
Globalsetupdata.
•FormatanSDcard,copyandrenamefiles,etc.
•Performfileoperationssuchascopyingdatatoor
frommedia.
•ExportandimportsequencestoandfromSMF
(StandardMIDIFiles).
•UsetheDataFilerfunctiontosaveorloadMIDI
SystemExclusivedata.

EnglishFrançaisDeutschEspañol
Playing sounds
En-11
Playing sounds
Playing Programs and
Combinations
Selecting Programs by bank and
number (A)
Here’showtoselectaprogram.
FormoreaboutthefeaturesandfunctionsofProgram
mode,see“Programmode”onpage 10.
1. Pressthefront‐panelPROGbutton(theLEDwill
lightup)toenterProgrammode.
TheupperleftsideoftheLCDscreenshowsthename
ofthecurrentpage,PROGP0:Play.Thisisagood
homebaseforplayingPrograms.
Noticethelarge,highlightedcharactersintheupper
partoftheLCDdisplay.Thesearethenameand
numberofthecurrentProgram.Whentheseare
highlighted,youcanpresstheINC/DECbuttonsto
selectthenextorpreviouslynumberedProgram.
YoucanalsoturntheVALUEdialtomovethroughthe
Programsinlargersteps,orenterProgramnumbers
directlyfromthenumerickeypad.
2. UsetheBANKA...FbuttonstoselectPrograms
fromotherbanks.
ToselectaGMbank,holddownnumerickey0and
pressoneofthe‐,1–9,or(.)buttons.TheGMbank,GM
variationsg(1)–g(9),orGMdrumprogramsg(d)will
beselectedrespectively.
Selecting Programs by Category (B)
ThereareotherwaystoselectPrograms,butherewe’ll
explainhowtoselectprogramsbytheircategory,such
askeyboard,organ,bass,ordrumsounds.
1. IntheLCDscreen,presstheCategory/Program
Selectpopupbutton.
TheCategory/ProgramSelectpopupmenuwill
appear.
Intheillustration,theKeyboardcategoryisselected.
Themenushowstheprograminthatcategory.
2. Ifyouwanttoselectadifferentcategory,pressthe
tabsattheleftandrightsideofthedisplay.
3. Toselectaprogram,pressitsprogramnameinthe
menu.
Theselectedprogramwillbehighlighted,andthe
programwillchange.YoucanalsousetheINC/DEC
buttonsortheVALUEdialtoswitchprograms.
Themenushowssixteenprogramsatonce.Tosee
otherprograms,usethescrollbartoscrollthelist.
Playthekeyboardtohearthesoundoftheprogram
thatyou’veselected.
A
1
-4
INC/DEC buttons
A
1
-3
Program Select
A
1
-5
VALUE dial A
2
-2
BANK GM
Numeric keys 0 + (–), 1–9, (.)
A
1
-6
Numeric keys
and ENTER button
A
1
-2
PROG P0: Play
Selecting programs by bank and number
A
2
-1
BANK A–F
A–F buttons
COMBI button
A
1
-1
PROG button
Bank/Program Select popup button
B1-1
Selecting programs by category
(Selecting a program by bank)
Category/Program Select menu
Bank/Program Select menu B2-1 Tabs
B4-1 to sub-categories
B3-2
Scroll bar
B5-1 OK button to conrm
B3-1 Program names
Category/Program Select
popup button

Playing sounds
En-12
4. Ifyouwanttochooseprogramsbysub‐category,
pressthe“JumptoSub”buttontoaccesstheSub
Category/ProgSelectmenu.
Pressatabonthelefttoselectasubcategory.
Selectaprogramasdescribedinstep3.
Toconfirmyourchoice,presstheOKbutton.Ifyou
wanttocancel,presstheCancelbutton.Youwillreturn
tothemaincategory.
5. Ifyou’rehappywiththeselectedprogram,press
theOKbuttontoclosethemenu.
IfyoupresstheCancelbutton,yourselectionherewill
bediscarded,andyouwillreturntotheprogramthat
hadbeenselectedimmediatelybeforeyouopenedthe
menu.
Note:Ifyoupressthepopupbuttontotheleftof
“ProgramSelect,”theBank/ProgramSelectmenu
organizedintobankswillappear.Theprocedureisthe
sameasdescribedin“SelectingProgramsbyCategory
(B)”.
ForotherwaystoselectPrograms,see“Selecting
Programs”onpage 21oftheOperationGuide.
Program Bank Contents
TheKROMEhasatotalof1,033programs.Whenthe
unitisshippedfromthefactory,theinternalmemory
contains640preloadprogramsand265GMprograms
forimmediateuse.Theremaining128programsare
initializedprograms,providedforyoutosaveyour
ownoriginalprograms.Youarealsofreetoeditand
overwriteanyoftheprogramsinbanksA–F,butnot
theprogramsofbanksGM–g(d).
Programbankcontents
Selecting Combinations
Here’showtoselectacombination.
Formoreaboutcombinations,see“Combination
mode”onpage 10.
1. PresstheCOMBIbuttontoenterCombination
mode.
TheCOMBILEDwilllightup.
Onceyou’reinCombimode,youcanselectandplay
Combinationsbyeitherbank/numberorcategory,in
thesamewayasyoudidPrograms.
Combinationbankcontents
Using controllers to modify
the sound
Joystick, SW1 and SW2
Thejoystick(seepage 5)andSW1/SW2(seepage 5)
locatedontheleftsideoftheKROME’sfrontpanelare
controllersforyoutousewhileperforming.Youcan
usethesecontrollerstomodifythesound.
Theeffectproducedbyeachcontrollerwilldifferfor
eachProgramorCombination.Inadditiontothe
typicalfunctions,thecontrollersinsomecasesmight
havetheeffectofemphasizingindividualsounds,or
mightapplyacombinationofseveraleffects.Sotry
themallouttoseewhateachcontrollerdoesforthe
selectedsound.
StandardJoystickfunctions
Realtime controls
Therealtimecontrollers(seepage 5)locatedontheleft
sideofthefrontpanelareusedtocontrolthesound
whileplayingaprogramorcombination,orforsimple
soundediting.Theyarealsousedtocontrolthe
arpeggiator.
1. PresstheSELECTbuttontochoosethefunctions
thatknobs1–4willcontrol(thecorresponding
LEDwilllightup).
TheknobswillcontrolthesoundifTONEorUSERare
selected,orthearpeggiatorifARPisselected.
2. Turnknobs1–4,andnoticehowthesound,effects,
orarpeggiopatternchanges.
Whenyouturnaknob,apopupwillappearonthe
display,indicatingthenameofthecontrollerandits
value.
•IfSELECTTONEisselected,theknobswillcontrol
thefiltercutoff,filterresonance,filterEGintensity,
andfilterEGreleasetimerespectively.
•IfSELECTUSERisselected,knobs1–4willcontrol
awidevarietyofparametersindividuallyassigned
byeachprogramorcombination.Inmany(butnot
all)cases,knobs1and2willcontrolsynth
parameters,knob3willcontrolthedepthofa
modulationeffectsuchaschorus,andknob4will
controlreverbdepth.
•FordetailsonSELECTARP,refertothenext
section.
Bank No. Contents
A...E 000...127 Preload programs
F000...127 Initialized programs
GM
001...128
GM2 capital programs
g(1)…g(9) GM2 variation programs
g(d) GM2 drum programs
Bank No. Contents
A...C 000...127 Preload combinations
D000...127 Initialized combinations
Move the joystick… Normally controls…
Left Pitch bend down
Right Pitch bend up
Forwards (away from yourself) Vibrato
Backwards (towards yourself) Filter LFO (wah)

EnglishFrançaisDeutschEspañol
Playing sounds
En-13
Performing with the
arpeggiator
Aprogramallowsyoutouseasinglepolyphonic
arpeggiator.Whenplayingacombinationorusingthe
sequencer,you’llbeabletousetwopolyphonic
arpeggiators.
Turning the arpeggiator on/off
1. Selecttheprogramorcombinationthatyouwant
toplay.
2. PresstheARPbuttontomaketheLEDlightup.
Thearpeggiatorwillturnon.
3. Playthekeyboard.
Thearpeggiowillstartplaying.(Pleasenotethatfor
somesounds,thearpeggiatorissettorespondonlyto
aspecificrangeofnotesonthekeyboard.)
Controlling the arpeggio pattern
1. PresstheSELECTbuttontomaketheARPLED
lightup.
2. Turnknobs1–4(GATE,VELOCITY,SWING,
STEP)tomodifythepattern.
ItisalsoeffectivetosettherealtimecontrolstoTONE
orUSERandusethemtomodifythesoundwhilethe
arpeggiatorisplaying.
Arpeggiopatternsappropriateforeachsoundare
assignedtoeachofthefactory‐setprogramsand
combinations.Tryselectingprogramsand
combinationsfromavarietyofcategories,andplay
themwiththearpeggiatorturnedon.
3. UsetheTEMPOknobortheTAPbuttontoadjust
thetempo(seepage 6).
Program mode
Thearpeggiopatternofaprogramcanbeswitchedby
theP0:Play‐Arpeggiatorpage“Pattern”parameter.
1. PressthePROGbutton,andthentheARPtab.
2. Pressthe“Pattern”popupbutton,andselecta
pattern.
IftheLatchsettingonthispageisselected,the
arpeggiowillcontinueplayingevenafteryoutake
yourhandoffthekeyboard.Ifthissettingisnot
selected,thearpeggiowillstopplayingwhenyoutake
yourhandoffthekeyboard.
Combination mode and Sequencer mode
InCombinationandSequencermodes,arpeggiator
settingsareadjustedintheP0ArpeggiatorAandBpages.
Using the Drum Track
Turning the Drum Track on and off
1. PresstheDRUMTRACKbutton.
Dependingonvarioussettings,theDrumTrackmay
begintoplayimmediately,ormaywaituntilyoustart
toplayonthekeyboard.Ifthebutton’sLEDisblinking
onandoff,it’swaitingforyoutoplay.
2. UsetheTEMPOknobortheTAPbuttontoadjust
thetempo(seepage 6).
Selecting the Drum Track pattern &
sound
Program mode
InProgrammode,theDrumTrackhasaspecial
reservedmixerslotandadedicatedProgramselect
parameter.TosetuptheDrumTrackinProgram
mode:
1. PressthePROGbutton,andthentheMixer&
Drumtab.
TheMixer&DrumTRACKpagewillappear.
2. Ontherightsideofthedisplay,usethetwo
PatternBank/No.popupbuttonstoselectaDrum
Trackpattern.
Note:PleasenotethattheDRUMTRACKbuttonwill
notturnonforapatternthatcontainsnodatasuchas
theUserbankInitDrumPattern,orforthePresetbank
P000:Offpattern.
3. Ontherightsideofthedisplay,usetheDrum
TrackProgram“Program”popupbuttontoselect
theprogramthatwillsoundthepattern.
4. Usethebuttonsonthelefttocontrolthemuteand
solosettings,andusetheslidertoadjustthe
volume.YoucanusetheDrumTrackEQtoadjust
theEQofthedrumtrackprogram.
Combination mode, Sequencer mode
InCombinations(andSongs),theDrumTracksimply
sendsMIDItoplayoneormoreofthe16
Timbres/Tracks.
Formoreinformation,see“DrumTrackfunction
settingsinCombinationmode”onpage 101ofthe
OperationGuide.
Latch
Arppegio Pattern
Arpeggio
Pattern
Preview
Pattern
Bank/No.
Drum Track
Program
Drum Track Play/Mute, Solo On/O, Volume
Drum Track
EQ

Playing sounds
En-14
Simple program and
combination editing
Adjusting the EQ and volume balance
Foraprogram,theprogram’sEQandmastereffect
returnamountcanbeadjustedintheP0:Play–Main
page.
IntheP0:Play–Mixer&DrumTrackpageyoucan
adjustthevolumebalanceofoscillators1and2,and
thedrumtrack.HereyoucanalsoadjusttheEQofthe
drumtrackprogram.
Using Tone Adjust
TheKROME’sToneAdjustfunctionassignsprogram
parametersthatareusefulforeditingwithbuttonsand
slidersinthedisplay.Youcanusethesetoeditthe
soundefficiently.
1. AccesstheProgrammodeP0:Play–ToneAdjust
page.PressthePROGbutton,andthentheTone
Adjusttab.
2. Usetheslidersandbuttonsinthedisplaytomake
adjustments.YoucanalsousetheVA L U E
controllerstomakeadjustments.
Theparametersassignedtotheslidersandknobswill
differdependingontheprogramorcombination.(For
somesounds,theresultmaybedifficulttonotice.)
Forexample,the“PitchStre.”sliderproducesrich
tonalchangesandvariationswithoutimpairingthe
characteroftheoriginalsound.“1:FlfoIA”controls
wah,“1:lfoIA”controlsvibrato,and“1:Drive”can
subtlyfattenthesoundorapplyextremedistortion.
“F/AEGA,”“F/AEGD,”“F/AEGS,”and“F/AEGR”
respectivelycontroltheattacktime,decaytime,sustain
level,andreleasetimeofthefilterandampEGs.
Ifyouturnthe1:Trspbuttonon,theoscillator1
transpositionwillbemodifiedbythevalueshown
belowthebutton,raisingorloweringthepitch.
Changing the program or volume
balance of the timbres
Uptosixteenprogramscanbeassignedtoa
combination,allowingyoutoproducedenseandrich
textures.
1. InCombinationmode,presstheCategorySelect
popupbutton;thenfromtab1“2BassSplits,”
chooseA003:Bass&Piano.ThecategoryBass
Splitscontainssplit‐typecombinationswherethe
lowerrangeofthekeyboardplaysabasssound
andtheupperrangeplaysadifferentsound.
Bass&Pianoassignsanacousticpianototimbre1and
anacousticbasstotimbres2and3.
2. Let’strychangingtheprogramassignmentsothat
anorganisplayedinsteadofthepiano.
Pressthetimbre1Category/TimbreProgrampopup
buttontoaccessthelist.
Attheleftsideofthelist,pressthe01Organtab,and
thenselectaprogramfromthelist.PresstheOK
buttontoconfirmyourchoice.
3. Playthekeyboard.NotesC4andabovewillplay
anorgansound,andlowernoteswillplayabass
sound.
4. Nowlet’sadjustthepan(stereoposition)and
volumeoftheorganandbasssounds.
Inthelowerpartofthedisplay,presstheMixer1–8tab.
AdjustthePanknobandVolumesliderofeachtimbre.
5. Let’strychangingthesplitpointthatdividesthe
organandbasssounds.
PressthePAGEbutton;theninPageSelect,pressP4
Zone/Delay.PresstheKeyZ1–8tabtoaccesstheP4:
Zone/Delay–KeyZoneT01–T08page.
Whilepressingthetimbre1“BottomKey,”playanote
onthekeyboard.Thiswillspecifythelowestkeythat
playstheorgansound.
Whilepressingthe“TopKey”ofthetimbrethatplays
thebasssound,pressthenotethat’sasemitonebelow
thelowestnoteoftheorganrangeyouspecifiedinthe
previousstep.Thiswillspecifythehighestkeythat
playsthebasssound.
Category/Combination Select popup button
Category/Timbre Program popup buttons
A.Piano A.Bass (Velocity SW)
Bottom
Key
Top
Key

EnglishFrançaisDeutschEspañol
Using the sequencer
En-15
Using the sequencer
Recording your performance
Auto Song Setup
TheAutoSongSetupfeaturecopiesthecurrent
ProgramorCombinationintoaSong,andthenputs
thesysteminrecord‐readymode.Wheninspiration
strikes,youcanusethisfunctiontostartrecording
immediately.TodosofromProgrammode:
Selecttheprogramthatyouwanttouseforrecording.
Ifdesired,youcanturnontheARPorDRUMTRACK
buttonstoaddanarpeggiatorordrumkit
performance.
1. WhileholdingdowntheENTERbutton,pressthe
SEQUENCERREC()button.
Themessage“Doyoucontinue?”willappearinthe
SetuptoRecorddialogboxinthedisplay.
2. PresstheREC()buttononceagain.
(Alternatively,youcanusetheOKbuttonorthe
ENTERbutton.)
TheKROMEwillautomaticallyswitchtoSequencer
modeandentertherecord‐standbystate,andtheclick
willbeginsoundingintimewiththetempo().Adjust
thetempo()asdesired(see“TEMPOcontrols”on
page 6.).
3. PresstheSTART/STOP()buttontostartthe
sequencerandbeginrecording.
Withthedefaultsettings,therewillbeatwomeasure
count‐downbeforerecordingstarts.
4. Playwhatyou’dliketorecord,andthenpressthe
START/STOP()buttontostoprecording.
Thesequencerwillautomaticallyreturntothe
beginningoftheSong.
5. PresstheSTART/STOP()buttontohear
whatyourecorded.
SinceyoustartedinProgrammode,yourplayingwill
havebeenrecordedonTrack1.IfyouusedtheDrum
Track,itwillhavebeenrecordedonTrack10.For
Combinations,moretracksareusedasneeded.
Adding another track
Let’saddanothertracktotheperformancethatyou
recordedusingAutoSongSetup.
1. PressthePreferencetabtoaccesstheP0–1:
Play/REC–Preferencepage.Attheright,clearthe
“MultiREC”checkbox.
Note:AutoSongSetupturnsthisontorecordthe
Program’sDrumTrack,ormultiplechannelsina
Combination.
2. PresstheProg1–8tabtoaccesstheP0–1:
Play/REC–ProgramT01–08page.
3. BelowtheSongname,opentheTrackSelect
popupandselectMIDITrack02.
Thiscontrolsboththetrackthatyouplayfromthe
keyboard,and(withMultiRECturnedoff)thetrack
that’srecorded.
4. UsingtheCategoryorBank/ProgramSelectpopup
menus,selectaProgramforTrack02.
5. IfyouhadturnedontheARPandDRUMTRACK
buttons,turnthemoff.
6. PresstheLOCATE()buttontogobacktothe
startoftheSong.
7. PresstheREC()buttontoenablerecording,and
thenpresstheSTART/STOP()buttonto
start.
8. Playwhatyou’dliketorecord,andthenpressthe
START/STOP()buttonwhenyou’redone.
Multi REC
T
rack
Select
T
rack 2
Program

Using the sequencer
En-16
Editing MIDI
Youcanmodifyyourperformanceafterrecording,if
youwish.Forinstance,youcanerasemisplayednotes,
orcorrecttheirpitchandtiming.
Correcting the timing
TimingcorrectionisdonethroughQuantization.This
takesthenotesyouplayedandlinesthemuptothe
nearestbeatorfractionofabeat,basedonthe
resolutionyouselect.Itcanalsobeusedtoadda
“swing”feel.Let’stryquantizingtheMIDItrackwe
justrecorded.
1. PressthePAGEbutton;theninPageSelect,press
P6TrackEdit.ThenpresstheTrackEdittabto
accesstheP6:TrackEdit–TrackEditpage.
Thispageincludesagraphicwhichshowseachtrack
inthesequence.Thesmallrectanglesrepresent
measureswhichcontainperformancedata.
2. SelectMIDITrack01fromthepopupabovethe
graphic.
3. Usingthe“FromMeasure”and“ToEndof
Measure”parametersatthebottomofthedisplay,
settherangeofmeasuresthatyouwishtomodify.
Fornow,set“From”to001,and“ToEnd”to064.
4. Inthemenucommand,selecttheQuantize
command.
TheQuantizedialogappears.
5. SettheResolutiontothedesiredrhythmicvalue.
Asageneralrule,choosetheshortestnote‐valueused
intherecordedperformance.
6. PresstheOKbuttontoquantizetheselecteddata.
Iftheresultwasdifferentfromwhatyouhadexpected,
presstheCOMPAREbuttontorestorethesongtothe
originalstatebeforethequantizationwasapplied.
ExperimentwithdifferentResolutions,setthe
Intensitytolessthan100%inordertopreservesome
ofthenaturalfeel,orraisetheSwingvaluetocreatea
shuffleorswingfeel.
Youcanalsoapplyquantizationduringrecording,
usingtheRECResolutionparameteratthetopofthe
P0page.Choosethedesiredresolution,and
quantizationwillbeappliedasyourecord.
Correcting or adding notes
Youcanedityourperformancedatabymovingor
erasingnotes,modifyinganote’sdurationorstrength,
oraddingnotes.
It’sconvenienttouseTrackVieweditingwhenyou
wanttoerase,move,orcopydatainunitsofentire
tracksormeasures.
1. (PressthePAGEbutton;theninPageSelect,press
P6:TrackEdit.)ThenpresstheTrackViewtabto
accesstheP6:TrackEdit–TrackViewpage.
2. Usingthetools,specifythestartandendmeasures
toselecttheeditregion.
3. Usethetoolstomove,copy,orerasedata.
Fordetails,seepage 68oftheOperationGuide.
It’sconvenienttousepianorolleditingwhenyouwant
toeditindividualnotesindetail.
1. Usingthetools,specifythestartandendmeasures
toselecttheeditregion.
2. Pressthepagemenubutton,andchoose“Piano
Roll.”
Alternatively,pressthebottomtoolboxintheP6:
Track‐TrackViewpage.
Thepianorolldialogboxwillappear.
3. Usethezoombuttonstoselectaconvenientzoom
ratio.
4. Usethetoolstoeditthenotes.
Fordetails,seepage 70oftheOperationGuide.
Starting measure Ending measure
Toolbox:
Move the events of the
selected measures
Copy the events of the
selected measures
Erase the events of the
selected measures
Specify the starting measure
Specify the ending measure
Jump to the piano roll
Zoom
Scroll (view control)
Note event
Playback
Switch the note event
display
Exit
Toolbox:
Select or move a note
Change a note’s duration
Enter notes
Erase notes
Move the displayed note
view area

EnglishFrançaisDeutschEspañol
Using the sequencer
En-17
Template songs
Templatesongscontainsoundsandeffectsthatare
suitableforaspecificmusicalstyle,soyoucan
immediatelygetstartedcreatingasongsimplyby
selectinganappropriatetemplate.Inadditiontothe
presettemplates,youcancreateyourownoriginal
templatesongscontainingyourfrequently‐used
sounds.
Thesixteenpresettemplatesongs(P00–P15)contain
trackparametersettingssuchasprogram,volume,and
pan,aswellaseffect,arpeggiator,trackparameter,and
temposettings.
NotethatTemplateSongsdonotincludeMIDIdatafor
songtracksandpatterns,andsoon.
1. IntheSequencerP0:Play/RECpage,pressthe
pagemenubuttonandselecttheLoadTemplate
Songcommand.
Adialogboxwillappear.
2. IntheFromfield,choosetheTemplateSongthat
youwanttoload.
3. Checkthe“CopyPatterntoMIDITracktoo?”
check‐box.
Whenthisboxischecked,adialogboxforcopyinga
patternwillautomaticallyappearafterLoadTemplate
Songiscomplete.
Ifthisisnotchecked,onlytheselectedTemplateSong
willbeloaded.
4. PresstheOKbuttontoloadthetemplatesong,or
presstheCancelbuttontoexitwithoutmaking
changes.
WhenyoupressOK,theTemplateSong’ssettingswill
becopiedintothecurrentSong.
IfCopyPatterntoMIDITracktoo?wascheckedin
step3,theCopyPatternToMIDITrackdialogbox
willappear.
5. UsetheBank(UserorPreset)andPatternpopups
toselectapatterntocopy.
6. IntheToTrackfield,selectthetracktouseforthe
pattern.
Note:IneachofthesixteenpresetTemplateSongs,
track1isalwaysassignedtoaDrumProgram.(In
somecases,othertracksmayalsohaveDrum
Programs.)
7. IntheMeasurefield,setthemeasurewhereyou’d
likethepatterntostart.
Followingthenamesforeachofthe605preset
patterns,themusicalstyleandthenameofthemost
suitableDrumProgramsarepartiallydisplayed.
ByloadingaDrumProgramandthecorresponding
presetpattern,youcaninstantlysetupadrumtrackto
matchtheTemplateSong.
8. Toloadthepattern,presstheOKbutton.
Afterthepatternisloaded,theMeasurewillcountup
automatically.Youcanthencopyanotherpatternif
desired.Forinstance,youcanusedifferentpatterns
oneaftertheothertobuildupasong,withdifferent
patternsforverse,chorus,andbridge.
Afteryou’vefinishedaddingpatterns,presstheExit
button,andyou’redone!
Fordetailsonhowtorecord,see“A d d i n g another
track”onpage 15.

Using effects
En-18
Using effects
Youhaveachoiceof193differentdigitaleffects.
TheKROME’seffectsectionconsistsoffiveinsert
effects,twomastereffects,onetotaleffect,andamixer
thatcontrolstheroutingbetweentheseeffect
processors.Eachoftheseprovidesstereoinputand
output.
Youcanfreelycontroltheeffectsviadynamic
modulation(Dmod),whichletsyouusetheKROME’s
controllerstocontroltheeffectsinrealtimewhileyou
perform,aswellassynchronizedifferenttypesof
modulationeffectsviathecommonLFO,oruse
MIDI/TempoSynctoproducetempo‐synchronized
effects.
Routing and effect settings
You’lluseroutingtospecifytheeffectstowhichthe
soundwillbesent.
Here’sanexampleofthesesettingsforasong.
1. Selecttheinserteffectsthatyouwanttouse.
AdjustthesesettingsintheSeqP8:Routing/IFX–
InsertFXSetuppage.
2. Specifytheeffectwheretheoutputofeachtrack
willbesent.IntheSeqP8:Routing/IFX–Routing1
T01–08page,use“Bus(IFX/Output)Select”to
adjustthesesettings.Forexampleifyouwantthe
outputoftrack2tobetheinputtoinserteffect3,
assignthetrack2“Bus(IFX/Output)Select”to
IFX3.
Theupperpartofthescreenshowsthestatusofthe
routing,inserteffects,andchainsettings.Inthis
example,T01(track1)isassignedtoDKit,anduses
IFX1and2.Thisusesthesettingsofthedrumkit.T02
isconnectedtoIFX3,andT04ischain‐connectedto
IFX4andIFX5.
3. “Send1”and“Send2”specifythesendlevelsto
themastereffectforeachtrack.“Send1”
correspondstoMFX1,and“Send2”correspondsto
MFX2.
Inthispage,“Send1”and“Send2”canbeselectedonly
if“Bus(IFX/Output)Select”issettoL/RorOff.
If“Bus(IFX/Output)Select”issettoIFX1–5,thesend
levelsarespecifiedby“Send1”and“Send2”afterthe
signalhaspassedthroughtheinserteffects(P8:
Routing/IFX–InsertFXSetuppage).
4. SeqP9:MFX/TFX/LFO–Routingpage.Hereyou
canselectthemastereffectsandthetotaleffect
thatwillbeused.Thispagealsoshowsthesignal
flow.

EnglishFrançaisDeutschEspañol
Saving and loading data
En-19
Saving and loading data
Saving your edits
Understanding Write and Save
TherearetwowaystostoreyourworkontheKROME:
WriteandSave.
Note:IfyouturnoffthepowerbeforeyouWriteor
Save,thedatayoumodifiedwillbelost.Besuretosave
importantdatatointernalmemoryoranSDcard.
“Writing”referstosavingdatatotheinternalmemory
oftheKROMEitself.YoucanusetheWriteoperation
forprograms,combinations,arpeggiopatterns,drum
kits,andglobalsettings.
Note:Songdatacannotbewrittentointernalmemory
(see“SavingdataontheKROME”onpage 113ofthe
OperationGuide).
“Saving”referstosavingdataonanSDcard.Youcan
usetheSaveoperationtosavethesongdatathat
cannotbewrittentointernalmemoryaswellasthe
datathatcanbewrittentointernalmemory.
Note:TheSaveoperationallowsyoutosaveindividual
itemsofdataaswellasalloftheKROME’sdata
together.Bysavingtheentiresetofsounddata(i.e.,
programsandcombinations),globalsettings,and
sequencersongdata,youcanmanagetheentire
currentstateoftheKROMEasasinglesetofdata.This
isausefulwaytomanageyoursettingsforseparate
projectsorliveperformances.
Writing
Writing Programs
Here’showtowriteaneditedProgramtointernal
memory.
1. PresstheWRITEbutton.
Adialogboxwillappear.Hereyouhavetheoptionof
savingthedatatoadifferentnumber,orofchanging
theprogramnameorcategory.Ifyouwanttosimply
overwritetheexistingdatawithoutmakinganyof
thesechanges,proceedtostep2.
• Changingtheprogramname:
Pressthe“T”buttontoaccessthetexteditdialog
box.
Usetheon‐screenkeyboardtoenteraname,and
thenpresstheOKbuttontoreturntotheprevious
dialogbox.
• Changingthecategoryandsub‐category:
PresstheCategoryorSubCategorypopupbutton,
andchoosethedesiredcategoryfromthelist.You
willreturntothepreviousdialogbox.
•Specifyingthewriting‐destinationbankand
number:
PresstheProgrampopupbutton,usethetabsto
selectabank,andselectanumberfromthelist.
PresstheOKbuttontoreturntothepreviousdialog
box.
2. OnceagainpresstheWRITEbuttontoperformthe
Writeoperation.(Youcanalsoexecutebypressing
theOKbuttonortheENTERbutton.)
Writing other data
Towriteacombination,selectthecombinationthat
youwanttowrite,andwriteitjustasyoudidfora
program.Otherdatasuchasarpeggiopatternsare
writteninthecorrespondingpage.Fordetails,see
page 113oftheOperationGuide.
Note:AsanalternativetousingtheWRITEbutton,you
canalsousetheWritecommandinthepagemenu.
EffectpresetscanonlybewrittenbyusingtheWrite
command.
Saving and loading
Saving data to an SD card
Datayou’vecreatedoreditedontheKROMEcanbe
savedtoanSDcard.TheKROMEcanhandleseveral
typesoffilesanddata,butherewe’llexplaintwo
commontypesoffile:.PCGfilesand.SNGfiles.
PCGstandsfor“Program,Combination,andGlobal.”
ThesefilescanalsoincludeuserArpeggiopatterns,
DrumKits,anduserDrumTrack.
SNGstandsfor“Song.”Thesefilesstoreallofthe
SongsfromSequencermode.
Saving programs and songs together
Whensavingasongthatyoucreatedusingedited
programsorrearrangedprograms,youcansavethe
programdataalongwiththesongdata.
1. InsertyourSDcardintotheSDcardslot.
Withthelabelofthemediafacingupward,insertthe
connectorendofthecardintotheSDcardslot,and
pressitinuntilitclicksintoplace.
2. PresstheMEDIAbuttontoenterMediamode(the
LEDwilllightup).
3. PresstheSavetabtoaccesstheMedia‐Savepage.
4. Selectthedirectorywhereyouwanttosavethe
data.
PresstheOpenbuttontomovetoalowerlevel,or
presstheUpbuttontomovetoanupperlevel.
Tocreateanewdirectory,movetothelevelwhereyou
wanttocreatethedirectory,andusetheCreate
DirectorymenucommandontheDisk–Utilitypage.
5. OntheDisk–Savepage,pressthepagemenu
buttontoopenthepagemenu,andselecttheSave
Allcommand.
Thiscommandwillsaveasetof.PCGand.SNGfiles
allatonce.

Saving and loading data
En-20
Adialogboxwillappear.
6. Pressthetexteditbutton(“T”)andenteraname
forthefiles.
Allofthefileswillsharethesamename,withdifferent
suffixestoshowthedatatype(.PCG,.SNG).
7. PresstheOKbuttontoSavethedatatotheSD
card.
Whenthesaveiscomplete,thesystemreturnstothe
Savepage,andthedisplaywillshowtheresulting
file(s).Theamountoftimerequiredwilldependonthe
amountofdatabeingsaved.
Note:Youcanusethevarious“Selection”buttonsinthe
dialogboxtospecifythebankusedforsaving;
howeverwhensavingasong,youshouldalsosavethe
programsanddrumkitsusedbythesongtogether
withit.
Similarlywhensavingacombination,youshouldsave
theprogramsanddrumkitsusedbythecombination
togetherwithit.
Saving a song
InSequencermode,youcanpresstheWRITEbuttonto
savetheSNGfiletoyourSDcard.
Whenthedialogboxappears,presstheWRITEbutton
onceagaintoexecutetheSaveoperation.
Loading data
Youcanloadtheentirecontentsofthememoryatonce,
includingsounddata(Programs,Combinations,etc.),
andSongsdata.Todoso:
1. InserttheSDcardcontainingthefileyouwantto
loadintotheSDcardslot.
Withthelabelofthemediafacingupward,insertthe
connectorendofthecardintotheSDcardslot,and
pressitinuntilitclicksintoplace.
2. PresstheMEDIAbuttontoenterMediamode(the
LEDwilllightup).
3. PresstheLoadtabtoaccesstheMedia‐Loadpage.
4. Navigatetothedirectorythatcontainsthefileyou
wanttoload,andselectthe.SNGfile.
Selectadirectory(shownasafoldericon)andpress
theOpenbuttontomovetoalowerlevel,orpressthe
Upbuttontomovetoahigherlevel.
Theselected.SNGfilewillbehighlighted.
5. PresstheredLoadbuttonatthebottomofthe
page.
(YoucanalsousetheLoadSelectedmenucommand.)
Adialogboxwillappear,containinganumberof
options.
6. Selectthe“Load[filename].PCGtoo”checkbox.
Whentheseboxesarechecked,thesystemlooksfor
.PCGfilewiththesamenameasthemain.SNGfile.
7. Use“Select.SNGAllocation”tospecifyhowthe
Songswillbeloaded,andwhetherornotexisting
Songswillbeerased.
AppendloadstheSongsintothefirstfreeSong
numbersfollowingthesong(s)whicharealreadyin
memory.
Clearwilleraseallsongsfrominternalmemory,and
loadtheSongsintotheexactnumbersfromwhichthey
weresaved.
8. PresstheOKbuttontoloadthedata.
NeverturnoffthepowerorremovetheSDcard
whiledataisbeingloadedorsaved.
WhenloadingPrograms,Combinations,Songs,
DrumKits,oruserArpeggiopatterns,makesure
thattheGlobalBasicSetuppage’sMemoryProtect
settingsareturnedoff(unchecked).Iftheyareon,
youwon’tbeabletoloadthedata.
Other manuals for Krome
3
Table of contents
Other Korg Musical Instrument manuals

Korg
Korg M1R User manual

Korg
Korg Concert-5500 User manual

Korg
Korg SP 250 User manual

Korg
Korg TRITON proX User manual

Korg
Korg TR music workstation Operation User manual

Korg
Korg N264 User manual

Korg
Korg SP-300 User manual

Korg
Korg iS35 User manual

Korg
Korg PA4X Use and care manual

Korg
Korg MICROSTATION KLC M1 Manual