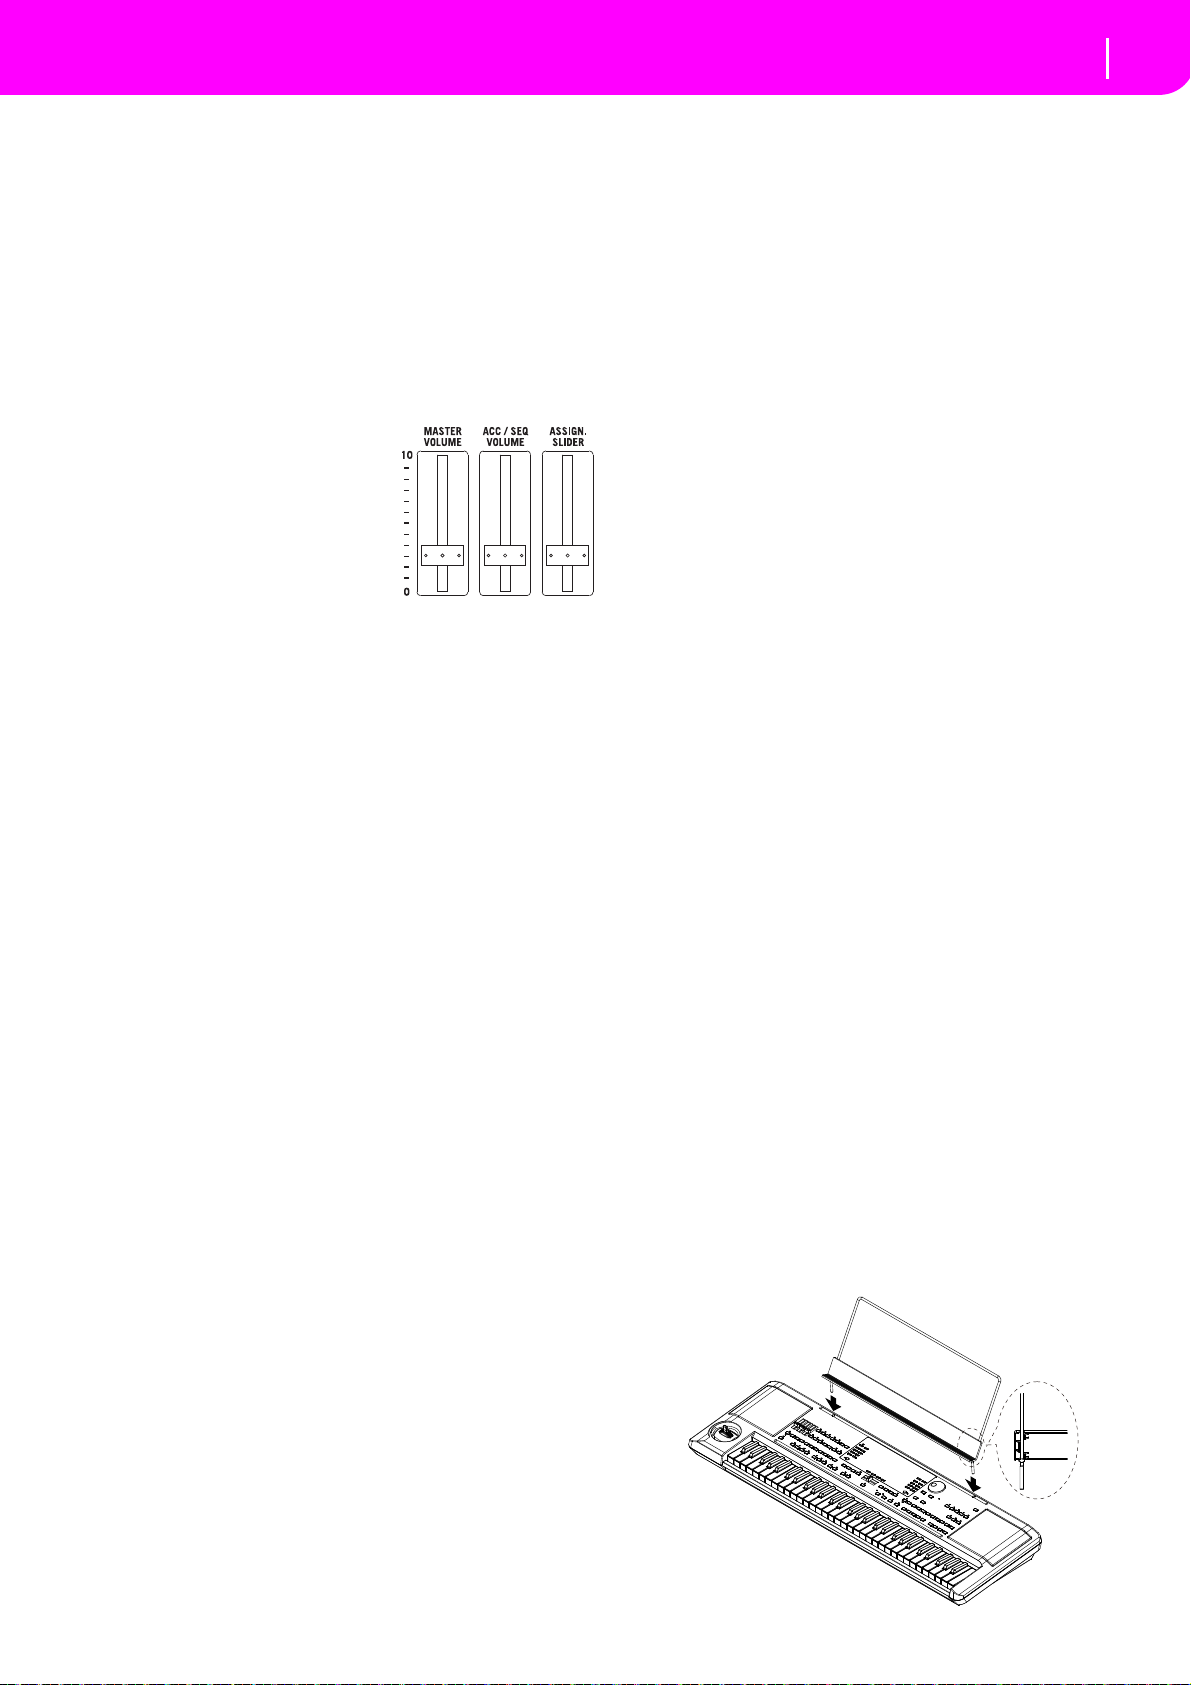
Korg micro arranger User manual

Quick Start Guide
E 1

PRECAUTIONS
LOCATION
Usingtheunitinthefollowinglocationscanresultinamal‐
function.
•Indirectsunlight
•Locationsofextremetemperatureorhumidity
•Excessivelydustyordirtylocations
•Locationsofexcessivevibration
•Closetomagneticfields
POWER SUPPLY
PleaseconnectthedesignatedACadaptertoanACoutletof
thecorrectvoltage.DonotconnectittoanACoutletofvolt‐
ageotherthanthatforwhichyourunitisintended.
INTERFERENCE WITH OTHER ELECTRICAL
DEVICES
Radiosandtelevisionsplacednearbymayexperiencerecep‐
tioninterference.Operatethisunitatasuitabledistancefrom
radiosandtelevisions.
HANDLING
Toavoidbreakage,donotapplyexcessiveforcetothe
switchesorcontrols.
CARE
Iftheexteriorbecomesdirty,wipeitwithaclean,drycloth.
Donotuseliquidcleanerssuchasbenzeneorthinner,or
cleaningcompoundsorflammablepolishes.
KEEP THIS MANUAL
Afterreadingthismanual,pleasekeepitforlaterreference.
KEEPING FOREIGN MATTER OUT OF YOUR
EQUIPMENT
Neversetanycontainerwithliquidinitnearthisequipment.
Ifliquidgetsintotheequipment,itcouldcauseabreakdown,
fire,orelectricalshock.
Becarefulnottoletmetalobjectsgetintotheequipment.If
somethingdoesslipintotheequipment,unplugtheAC
adapterfromthewalloutlet.
ThencontactyournearestKorgdealerorthestorewherethe
equipmentwaspurchased.
THE FCC REGULATION WARNING (FOR USA)
Thisequipmenthasbeentestedandfoundtocomplywith
thelimitsforaClassBdigitaldevice,pursuanttoPart15
oftheFCCRules.Theselimitsaredesignedtoproviderea‐
sonableprotectionagainstharmfulinterferenceinaresi‐
dentialinstallation.Thisequipmentgenerates,
uses,andcanradiateradiofrequencyenergyand,ifnot
installedandusedinaccordancewiththeinstructions,
maycauseharmfulinterferencetoradiocommunications.
However,thereisnoguaranteethatinterferencewillnot
occurinaparticularinstallation.Ifthisequipmentdoes
causeharmfulinterferencetoradioortelevisionreception,
whichcanbedeterminedbyturningtheequipmentoff
andon,theuserisencouragedtotrytocorrecttheinterfer‐
encebyoneormoreofthefollowingmeasures:
•Reorientorrelocatethereceivingantenna.
•Increasetheseparationbetweentheequipmentand
receiver.
•Connecttheequipmentintoanoutletonacircuitdiffer‐
entfromthattowhichthereceiverisconnected.
•Consultthedealeroranexperiencedradio/TVtechni‐
cianforhelp.
Unauthorizedchangesormodificationtothissystemcan
voidtheuser’sauthoritytooperatethisequipment.
NOTICE REGARDING DISPOSAL (EU ONLY)
Whenthis“crossed‐outwheeledbin”symbolis
displayedontheproduct,owner’smanual,bat‐
tery,orbatterypackage,itsignifiesthatwhenyou
wishtodisposeofthisproduct,manual,package
orbatteryyoumustdosoinanapprovedmanner.
Donotdiscardthisproduct,manual,packageor
batteryalongwithordinaryhouseholdwaste.
Disposinginthecorrectmannerwillpreventharmto
humanhealthandpotentialdamagetotheenvironment.
Sincethecorrectmethodofdisposalwilldependonthe
applicablelawsandregulationsinyourlocality,pleasecon‐
tactyourlocaladministrativebodyfordetails.Ifthebattery
containsheavymetalsinexcessoftheregulatedamount,a
chemicalsymbolisdisplayedbelowthe“crossed‐out
wheeledbin”symbolonthebatteryorbatterypackage.
IMPORTANT NOTICE TO CONSUMERS
Thisproducthasbeenmanufacturedaccordingtostrict
specificationsandvoltagerequirementsthatareapplicable
inthecountryinwhichitisintendedthatthisproduct
shouldbeused.Ifyouhavepurchasedthisproductviathe
internet,throughmailorder,and/orviaatelephonesale,
youmustverifythatthisproductisintendedtobeusedin
thecountryinwhichyoureside.
WARNING:Useofthisproductinanycountryotherthan
thatforwhichitisintendedcouldbedangerousandcould
invalidatethemanufacturer’sordistributor’swarranty.
Pleasealsoretainyourreceiptasproofofpurchaseother‐
wiseyourproductmaybedisqualifiedfromthemanufac‐
turer’sordistributor’swarranty.

DATA HANDLING
Datastoredinmemorymayoccasionallybelostduetoincor‐
rectuseraction.Besuretosaveyourimportantdatatoa
memorycard.KORGwillnotberesponsiblefordamages
causedbydataloss.
LCD DISPLAY
SomepagesofthemanualsshowLCDscreensalongwithan
explanationofoperationandfunctionality.Allsoundnames,
parameternames,andvaluesaremerelyexamplesandmay
notalwaysmatchtheactualdisplaythatyouareworkingon.
TRADEMARKS
Mac,theMaclogoandtheAudioUnitslogoaretrademarks
ofAppleInc.,registeredintheU.S.andothercountries.
MS‐DOSandWindowsareregisteredtrademarksofMicro‐
softCorporation,registeredintheU.S.andothercountries.
Allproductnamesandcompanynamesarethetrademarks
orregisteredtrademarksoftheirrespectiveowners.
TABLE OF CONTENTS
Welcome! . . . . . . . . . . . . . . . . . . . . . . . . . . 1
Usefullinks....................................1
Aboutthismanual..............................1
Start up . . . . . . . . . . . . . . . . . . . . . . . . . . . . 1
ConnectingtheACpoweradapter................1
Turningtheinstrumentonandoff................1
ControllingtheVolume.........................2
TheBALANCEslider...........................2
Headphones...................................2
AudioOutputs.................................2
AudioInputs..................................2
MIDIconnections...............................2
DamperPedal..................................2
Demo.........................................2
Themusicstand................................2
Front panel . . . . . . . . . . . . . . . . . . . . . . . . . 3
Display and User Interface . . . . . . . . . . . . 9
Displaycontrols................................9
Interfacestructure.............................10
Messagewindows.............................11
SymbolsandIcons.............................11
Grayed‐outnon‐availableparameters............11
Rear panel . . . . . . . . . . . . . . . . . . . . . . . . 11
Basic operations . . . . . . . . . . . . . . . . . . . 12
Playingonthekeyboard........................12
Selecting,muting/unmutingandsoloingatrack...12
SelectingaPerformance........................12
SelectingaProgram............................13
SelectingaStyle...............................14
SelectingaSingleTouchSetting(STS)............14
Changingallkeyboardtracksatonce.............14
Shortcuttoseetheoriginalbank
foraStyle,PerformanceorProgram............14
Tutorial . . . . . . . . . . . . . . . . . . . . . . . . . . . 15
PlayingaStyle
(AutomaticAccompaniment)..................15
PlayinginRealtime
(WithoutusingAutomaticAccompaniment)....16
RecordingaSong
(Simultaneouslyrecording
theStyleandrealtimeperformance)............18
PlayingaSongfromacard.....................19
Specifications . . . . . . . . . . . . . . . . . . . . . 20

1
Start up
Useful links
1. WELCOME!
ThankyouforpurchasingtheKorgProfessionalArranger
microARRANGER.
Thisinstrumentisanidealkeyboardforsongproduction—
itletsyouselectadesiredmusicalstyleandgenerateahigh‐
qualitybandaccompanimentsimplybyplayingchords,and
thenyoucanplaythemelodyyourselftoeasilycreatean
originalsong.
USEFUL LINKS
YourpreferredKORGdealeralsocarriesawiderangeof
Korghardwareandsoftwareaccessories.Pleaseaskyour
dealeraboutadditionalPrograms,Styles,andotheruseful
musicmaterials.
EachKORGdistributorcansupplyyouwithusefulinforma‐
tion.IntheEnglish‐speakingworld,herearetherelevant
addresses:
USA KORGUSA,316SouthServiceRoad,Melville,
NewYork,11747,USA
Tel:1‐516‐333‐9100,Fax:1‐516‐333‐9108
UK KORGUKLtd,1HarrisonClose,Knowlhill,
MiltonKeynes,MK5,8PA,UK
Tel:01908304600,Fax:01908304699
UKTechnicalSupport
Tel:01908304637
E‐mail:info@korg.co.uk
ManyKORGdistributorsalsohavetheirownwebpageon
theinternet,whereyoucanfindinformationandsoftware.
UsefulwebpagesinEnglisharethefollowing:
http://www.korg.com/
http://www.korg.co.uk/
Aplacetofindoperatingsystemupdatesandvarioussystem
files(forexample,afullbackupofthefactorydata)isatthe
followinglink:
http://www.korgpa.com/
ABOUT THIS MANUAL
ThedocumentationforthisinstrumentconsistsoftheʺQuick
StartGuideʺ (thedocumentyouʹrereading)andamore
detailedPDFownerʹsmanualprovidedontheaccessorydisc.
ThePDFownerʹsmanualisdividedintothefollowingthree
sections.
•ABasicGuide,containinganoverviewoftheinstru‐
ment,aswellasaseriesofpracticalguides(named
“Tutorials”).
•AReferenceGuide,witheachpageandparameter
describedindetail.
•AnAppendix,withalistofdataandusefulinformation
fortheadvanceduser.
ThequickstartguideandPDFownerʹsmanualusethefol‐
lowingabbreviations.
TheparametercanbesavedontoaPerfor‐
mancebypressingtheWRITEbutton.
Theparametercanbesavedontothecurrent
StylePerformancebypressingtheWRITEbut‐
ton.
TheparametercanbesavedontoaSingle
TouchSettingbypressingtheWRITEbutton.
TheparametercanbesavedontoaGlobalset‐
tingbygoingtotheGlobalenvironmentand
pressingtheWRITEbutton.
2. START UP
CONNECTING THE AC POWER ADAPTER
ConnectthesuppliedACpoweradaptertothededicated
socketontherearoftheinstrument.Then,plugitintoawall
socket.
Warning:Useonlythesuppliedadapter,oranadaptersug‐
gestedbyKorg.Otheradaptersmaylooksimilar,butthey
maydamageyourinstrument!
TURNING THE INSTRUMENT ON AND OFF
Turningthepoweron
•Pressthepowerbutton()locatedontheupperright
sideofthefrontpanel.
ThestartupscreenwillappearintheLCD,andaftera
timeitwilldisplaythemainpageinStylePlaymode
andtheunitwillbereadyforsoundoutput.
Turningthepoweroff
•Pressthepowerbutton()locatedontheupperright
sideofthefrontpaneltoturnoffthepower.
Warning:Whenturningtheinstrumentoff,alldatacon‐
tainedinRAM(avolatilememory,usedforSongediting)will
belost.Onthecontrary,datacontainedintheSSDdisk(a
non‐volatilememory,usedforFactoryandUserdata)willbe
preserved.
Note:NeverturnoffthepowerwhiletheSDcarddatais
beingreadorwritten.

2
Start up
Controlling the Volume
ABOUT THE AUTO POWER-OFF FUNCTION
Withthefactorysettings,thisinstrumentwillautomatically
power‐offwhenfourhourshavepassedsinceyoulastplayed
thekeyboardorusedthebuttons.Ifdesired,youcanturnoff
(disable)thisfunction.
Thepowerwillalsoturnoffautomaticallyafterfourhours
passwithonlysongsordemosongsbeingplayed.
Toadjustpoweron/offsettings,pressthe[GLOBAL]button
toentertheGLOBALpage,andadjustthesettingsonthe
Page1‐Gen.Controlspage.
CONTROLLING THE VOLUME
•UsetheMASTERVOLUME
slidertocontroltheoverall
volumeoftheinstrument.
Thisslidercontrolsthevol‐
umeofthesoundgoingto
theinternalspeakers,
theL/MONO&RIGHT
OUTPUTS,andtheHEAD‐
PHONESconnector.
Note:Startatamoderatelevel,
thenraisetheMASTERVOLUMEup.Don’tkeepthevolume
atanuncomfortablelevelfortoolong.
•UsetheACC/SEQVOLUMEslidertocontroltheStyle
tracks(drums,percussion,bass…)volume.Thisslider
alsocontrolsbothoftheSequencerstracks,excluding
theRealtime(Keyboard)tracks.
•Bydefault,youcanusetheASSIGN.SLIDERtocontrol
thekeyboardtracksvolume.Thissliderisuser‐assign‐
able,butissettotheKeyboardExpressionparameterby
default.
THE BALANCE SLIDER
TheBALANCEslidersetstherelativevolumeofthetwo
onboardsequencers(Sequencer1andSequencer2).
•MoveitfullylefttosetSequencer1tothemaximum
levelandSequencer2tozero.
•MoveitfullyrighttosetSequencer1tozeroand
Sequencer2tothemaximumlevel.
•MoveittothecentertosetbothSequencersatthesame
level.
Note:Whenturningtheinstrumenton,movethisslidertothecen‐
ter,toavoidstartingaSongattheminimumlevel.
HEADPHONES
Youcanconnectapairofheadphonestotherearpanelhead‐
phonejack(PHONES:stereomini‐jack).Youcanusehead‐
phoneswithanimpedanceof16–200Ω(50Ωrecommended).
AUDIO OUTPUTS
Youcansendthesoundtoanexternalamplificationsystem,
insteadoftheinternalspeakers.Thisisusefulwhenrecord‐
ing,orwhenplayinglive.
AUDIO INPUTS
Youcanconnecttheoutputofanotherelectronicmusical
instrument,anunpoweredmixer,oranyaudiodevicetothe
rearpanelinputjack(INPUT:stereomini‐jack).Sincethisisa
line‐levelinput,youʹllneedtouseaseparatelysoldmicpre‐
ampormixerifyouʹreconnectingamic.
Usetheconnecteddevice’svolumecontroltoadjusttheinput
level.Becarefulnottomakeitdistort(or“clip”).Hereishow
tosetthevolumeoftheconnecteddevice:
•ifthesoundheardonmicroARRANGER’soutputsistoo
low,youshouldincreasetheoutputlevelofthecon‐
necteddevice.
•ifitsoundsfine,it’sok.
•ifitdistorts,youshouldlowerthelevelalittle,untilthe
soundsisfineagain.
MIDI CONNECTIONS
YoucanplaytheinternalsoundsofyourmicroARRANGER
withanexternalcontroller,i.e.amasterkeyboard,aMIDI
guitar,awindcontroller,aMIDIaccordion,oradigitalpiano.
1. ConnectastandardMIDIcablefromtheMIDIOUTof
yourcontrollertotheMIDIINconnectoronthemicro‐
ARRANGER.
2. SelectatransmissionMIDIchannelonyourcontroller.
Somecontrollers,liketheMIDIaccordions,usually
transmitonmorethanonechannel.
3. OnthemicroARRANGER,selecttheMIDISetupthat
bestfitsyourcontroller’stype.
DAMPER PEDAL
ConnectaDamper(Sustain)pedaltotheDAMPERconnector
onthebackpanel.UseaKORGPS‐1,PS‐3orDS1Hfoot‐
switchpedal,oracompatibleone.
DEMO
Listentothebuilt‐inDemoSongstoappreciatethepowerofthe
microARRANGER.Thereare16DemoSongstochoosefrom.
1. PresstheSTYLEPLAYandSONGPLAYbuttons
together.TheirLEDsstartblinking.
Atthispoint,ifyoudon’tpressanyotherbutton,allthe
DemoSongswillbeplayedback.
2. ChooseapageusingthePAGEbuttons.Therearetwo
differentpagesintheDemomode.
3. SelectaDemoSongbypressingthecorrespondingVOL‐
UME/VALUEbuttonaroundthedisplay.TheDemowill
automaticallystart.
4. StoptheDemobypressingSTART/STOP.
5. ExittheDemomodebypressingoneoftheMODEbuttons.
THE MUSIC STAND
AmusicstandcomesstandardwithyourmicroARRANGER.
Fititintothetwodedicatedholesinthefrontpanel.

3
Front panel
The music stand
3. FRONT PANEL
1 Power switch ( )
ThisturnsthemicroARRANGERʹspoweronoroff.
2 MASTER VOLUME
Thisslidercontrolstheoverallvolumeoftheinstrument,
bothoftheinternalspeakers,theL/MONOandRIGHTout‐
puts,andtheHEADPHONESoutput.
Warning:Atthemaximumlevel,withrich‐soundingSongs,Styles
orPrograms,theinternalspeakerscoulddistortduringsignal
peaks.Shouldthishappen,lowertheMasterVolumealittle.
3 ACC/SEQ VOLUME
Thisslidercontrolstheaccompanimenttracksvolume(Style
Playmode)ortheSongtracksvolume,excludingtheReal‐
timetracks(SongandSongPlaymodes).Thisisarelative
control,wheretheeffectivemaximumvalueisdeterminedby
theMASTERVOLUMEsliderposition.
4 ASSIGN.SLIDER
Thisisafreelyprogrammableslider.Bydefault,itactsasthe
KeyboardExpressioncontrol,toletyoubalancetherelative
volumeoftheRealtime(Keyboard)tracks.
5 MODE section
Eachofthesebuttonsrecallsoneoftheoperatingmodesof
theinstrument.Eachmodeexcludestheothers.
STYLEPLAY StylePlaymode,whereyoucanplayStyles
(automaticaccompaniments)and/orplayupto
fourRealtimetracksonthekeyboard.
Inthemainpage,Realtime(Keyboard)tracks
areshownontherighthalfofthedisplay.You
canreachthemainpagebypressingEXITfrom
anyoftheStylePlayeditpages.Ifyouareina
differentoperatingmode,pressSTYLEPLAY
torecalltheStylePlaymode.IftheTRACK
SELECTLEDison,pressTRACKSELECTto
turnitoffandseetheRealtimetracks.
Thisoperatingmodeisautomaticallyselected
whentheinstrumentisturnedon.
SONGPLAY SongPlaymode,whereyoucanplayback16‐
trackSongsinStandardMidiFile(SMF)format
directlyfromthememorycard.Youcanalso
play“.MID”and“.KAR”filesdirectlyfromthe
memorycard.SincethemicroARRANGERis
equippedwithtwosequencers,youcaneven
playtwoSongsatthesametime,andmixthem
withtheBALANCEslider.
InadditiontotheSongtracks,youcanplay
onetofourRealtime(Keyboard)tracks,along
withtheSong(s).Inthemainpage,Realtime
(Keyboard)tracksareshownontherighthalf
ofthedisplay.Youcanreachthemainpageby
pressingEXITfromanyoftheSongPlayedit
pages.Ifyouareinadifferentoperatingmode,
pressSONGPLAYtorecalltheSongPlay
mode.IftheTRACKSELECTLEDisonor
flashing,pressTRKSELECToneortwotimes
toturnitoffandseetheRealtimetracks.
B.SEQ BackingSequencemode,whereyoucanrecord
anewSongbasedontheRealtimeandStyle
tracks,andsaveitasanewStandardMIDIFile.
SONG Songmode,whereyoucanplay,record,oredit
aSong.
PROGRAM Programmode,toplaysingleSoundPrograms
onthekeyboard,oreditthem.
PresstheSTYLEPLAYandSONGPLAYbut‐
tonstogethertoselecttheDemomode.This
modeletsyoulistentosomeDemoSongs,to
letyouhearthesonicpowerofthemicroAR‐
RANGER.
6GLOBAL
ThisbuttonrecallstheGlobaleditenvironmentwhereyou
canselectvariousglobalsettings.Thiseditenvironmentover‐
lapsanyoperatingmode,whichwillstillremainactiveinthe
background.PressEXITtogobacktotheunderlyingoperat‐
ingmode.
7 SD CARD
ThisbuttonrecallstheCardeditenvironment,whereyoucan
executevariousoperationsonfilesandcards(Load,Save,For‐
mat,etc…).Thiseditenvironmentoverlapsthecurrentoper‐
atingmode,whichwillstillremainactiveinthebackground.
PressEXITtogobacktotheunderlyingoperatingmode.
39
38
34
35
40
1
43
4746452625
242320
1916
15
1817 21 22
49
44 42413736
3331
29
30
28
30
32
2 53 67
4
8 9 10 11 12 13 14
27
48
DEMO

4
Front panel
The music stand
8 MEMORY (TIE)
ThisbuttonturnstheLowerandChordMemoryfunctionson
oroff.Gotothe“Page24‐Preferences:controls”editpageto
decideifthisbuttonshouldbeaChordMemoryonly,ora
Lower/ChordMemorybutton.WhenitworksasaLower/
ChordMemory:
ONThesoundtotheleftofthesplitpoint,andthe
chordfortheautomaticaccompaniment,are
keptinmemoryevenwhenyouraiseyour
handfromthekeyboard.
OFF Thesoundandchordsarereleasedassoonas
youraiseyourhandfromthekeyboard.
ThisbuttondoublesasaTIEfunctionfortheSongmode.
9 BASS INV. (REST)
ThisbuttonturnstheBassInversionfunctiononoroff.
ON
Thelowestnoteofachordplayedininverted
formwillalwaysbedetectedastherootnoteof
thechord.Thus,youcanspecifytothearranger
compositechordssuchasAm7/Gor“F/C”.
OFF Thelowestnoteisscannedtogetherwiththe
otherchordnotes,andisnotalwaysconsid‐
eredastherootnote.
ThisbuttondoublesasaRESTfunctionfortheSongmode.
10 MAN. BASS
ThisbuttonturnstheManualBassfunctiononoroff.
Note:WhenyoupresstheMAN.BASSbutton,theBasstrackvol‐
umeisautomaticallysettothemaximumvalue.Thevolumeis
automaticallysetbacktotheoriginalvaluewhentheMAN.BASS
buttonisdeactivated.
ON Theautomaticaccompanimentstopsplaying
(apartfortheDrumandPercussiontracks),
andyoucanmanuallyplaytheBasstrackon
theLowerpartofthekeyboard.Youcanstart
theautomaticaccompanimentagainbypress‐
ingoneoftheCHORDSCANNINGbuttons.
OFF Thebasstrackisautomaticallyplayedbythe
Style.
11 SPLIT POINT (<)
KeepthisbuttonpressedtoopentheSplitPointwindow.
Whilethiswindowisopen,youcansetthesplitpointsimply
byplayingthesplitpointnoteonthekeyboard.Then,release
theSPLITPOINTbutton.
Tomemorizetheselectedsplitpointnote,presstheGLOBALbut‐
ton,thenpressWRITEtosavetheGlobalsettingsintomemory.
ThisbuttondoublesasaPREVIOUSEVENTfunctionfor
theBackingSequenceandSongmodes.
12 G.QUANTIZE (>)
PressthisbuttontoopentheGrooveQuantizewindow,
whereyoucanselectarealtimegroovequantizationtobe
appliedtotheSong(onlySequencer1).
ThisbuttondoublesasaNEXTEVENTfunctionforthe
BackingSequenceandSongmodes.
13 TEMPO (= LOCK)
ThisbuttonturnstheTempoLockfunctiononoroff.
ON WhenyouselectadifferentStyleorPerfor‐
mance,thetempodoesn’tchange.Youcanstill
changeitusingtheDIALortheTEMPObuttons.
OFF WhenyouselectadifferentStyleorPerfor‐
mance,thememorizedtempovalueisauto‐
maticallyselected.
14
ThisbuttonturnstheSingleTouchfunctiononoroff.
ON WhenadifferentStyle(orthesameagain)is
selected,aSingleTouchSetting(STS1)isauto‐
maticallyselected,meaningthattheRealtime
tracksandeffectswillchange,togetherwith
theStyletracksandeffects.
OFF WhenyouselectadifferentStyle(orthesame
again),theStyletracksandeffectsarechanged,
whiletheRealtimetracksarenotchanged.
15 STYLE section (NUMERIC KEYPAD)
UsethesebuttonstoopentheStyleSelectwindowandselect
aStyle.See“SelectingaStyle”onpage 14.
Theleftmostbuttonletsyouselecttheupperorlowerrowof
Stylebanks.Pressituntilyou’veselectedtherowyou’relook‐
ingfor.(AfterbothLEDshaveturnedon,pressthebutton
againtoturnthemoff).
UPPERLEDON
Upper‐rowStylesselected.
LOWERLEDON
Lower‐rowStylesselected.
AwordaboutStylebanksandnames.Stylesfrom“8/16
BEAT”to“WORLD3”,andfrom“LATIN1”to“TRAD”are
standardStyles,theusercan’tnormallyoverwritewitha
Loadoperation.
“DIRECTSD”StylesareStylesdirectlyaccessedfromthe
memorycard(noneedtoloadfromcard).
Stylesfrom“USER1”to“USER3”arelocationswhereyou
canloadnewStylesfromthememorycard.
Eachbutton(Stylebank)contains2pages,eachwithupto8
Styles.BrowsethroughtheStylesusingthePAGEbuttons.
Thereisashortcut
toseetheoriginalbankforaStyle.
You
canseetheoriginalbankwhereaStyleiscontained.Justkeep
theSHIFTbuttonpressed,andthenpressthelefmostbuttonof
theSTYLEsection.Amessagewindowwillappear,showing
thenameoftheoriginalbank.ReleasetheSHIFTbuttontoexit
thewindow.
Thereisashortcuttoseeallpagesoftheselectedbank.To
cycleallpagesforaselectedbank,pressthebank’sbutton
untilyouseethepagethatyou’relookingfor.
Thesebuttonsdoubleasa
numerickeypad
oncertainpages.
16 FADE IN/OUT
WhentheStylestopped,pressthisbuttontostartitwitha
volumefade‐in(thevolumegoesfromzerotothemaximum).
WhentheStyleisplaying,pressthisbuttontostopitwitha
volumefade‐out(thevolumegraduallydecreases).
Youdon’tneedtopressSTART/STOPtostartorstoptheStyle.
17 VARIATION 1–4 (NOTE LENGTH) buttons
Eachofthesebuttonswillselectoneofthefourvariationsof
thecurrentStyle.Eachvariationcanvaryinpatternsand
sounds.
ThesebuttonsdoubleasaNOTELENGTHfunctionforthe
Songmode.
18 FILL 1–2 (NOTE LENGTH) buttons
Thesetwobuttonstriggerafill‐in.Pressthemtwice(LEDblink‐
ing)toletthemplayinloop,andselectanyotherStyleelement
(Fill,Intro,Variation…)toexittheloop.
TheyalsodoubleasaNOTELENGTHfunctionforthe
Songmode.
SINGLE TOUCH

5
Front panel
The music stand
19 COUNT IN / BREAK
WhiletheStyleisnotrunning,pressthisbutton,thenpress
START/STOP.Thiscombinationtriggersaone‐barinitial
count,thentheStylestartsplaying.
WhiletheStyleisalreadyinplay,thisbuttontriggersabreak
(anemptymeasurebeginningwithakick+crashshot).Press
ittwicetoletitplayinloop,andselectanyotherStyleele‐
ment(Fill,Intro,Variation…)toexittheloop.
20
ENDING 1–2 (DOT, TRIPLET) buttons
WhiletheStyleisrunning,thesetwobuttonstriggeranEnd‐
ing,andstoptheStyle.Pressoneofthem,andtheStylewill
stoprunningwithanEnding.IfpressedwhiletheStyleis
stopped,theyactasanadditionalcoupleofIntros.
Pressthemtwice(LEDblinking)toletthemplayinloop,and
selectanyotherStyleelement(Fill,Intro,Variation…)toexit
theloop.
ENDING1alsodoublesasaDOTfunction,andENDING2
doublesasaTRIPLETfunction,tobeusedinSongmode.
Note:Ending1playsashortsequencewithdifferentchords,while
Ending2playsonthelastrecognizedchord.
21 INTRO 1–2 buttons
ThesetwobuttonssetthearrangerinIntromode.Afterpress‐
ingoneofthesebuttons,starttheStyle,anditwillbeginwith
theselectedintro.TheINTROLEDwillautomaticallygooff
attheendoftheintro.
Pressthemtwice(LEDblinking)toletthemplayinaloop,
andselectanyotherStyleelement(Fill,Intro,Variation…)to
exittheloop.
Note:Intro1playsashortsequencewithdifferentchords,while
Intro2playsonthelastrecognizedchord.
22 START/STOP
StartsorstopstheStylethat’srunning.
Youcanresetall‘frozen’notesandcontrollersonthe
microARRANGERandanyinstrumentconnectedtoitsMIDI
OUT,byusingthe“Panic”keycombination.JustpressSHIFT
+START/STOPtostopallnotesandresetallcontrollers.
23 SYNCHRO START / STOP (DELETE)
ThisbuttonturnstheSynchroStartandSynchroStopfunc‐
tionsonoroff.Pressitrepeatedlytoturnthefunctionsonor
off.TheLEDswillcycleinthisorder:START
START+STOPOFF.
STARTLEDON
WhenthisLEDislit‐up,justplayachordinthe
chordrecognitionareatoautomaticallystart
theStylerunning.Ifyoulike,youcanturnone
oftheINTROsonbeforestartingtheStyle.
START+STOPLEDsON
WhenbothLEDsarelit‐up,raisingyourhand
fromthekeyboardmomentarilywillstopthe
Stylefromplaying.Ifyouplayachordagain,
theStylestartsagain.
OFF AllSynchrofunctionsareturnedoff.
ThisbuttondoublesasaDELETEfunctionfortheBacking
SequenceandSongmodes.
Itisalsousedtodeletetheselectedcharacter,duringtext
editing.
24 TAP TEMPO/RESET (INSERT)
Thisisadouble‐functionbutton,actinginadifferentway
dependingontheStylestatus(stop/play).
TapTempo:WhentheStyleisnotplaying,youcan“beat”the
tempoonthisbutton.Attheend,theaccompanimentstarts
playing,usingthe“tappedin”tempo.
Reset:WhenyoupressthisbuttonwhiletheStyleisinplay,
theStylepatterngoesbacktothepreviousstrongbeat.
ThisbuttondoublesasanINSERTfunctionfortheBacking
SequenceandSongmodes.
Itisalsousedtoinsertacharacteratthecursorposition,dur‐
ingtextediting.
25 WRITE/CARD IN USE
InStylePlaymode,thisbuttonopenstheWritewindow,that
letsyousaveallthetracksontoaPerformance,theRealtime
(Keyboard)tracksinaSingleTouchSetting(STS),orthe
accompanimenttracksontoaStylePerformance.
IntheGlobaleditenvironment,pressittosaveGlobalparam‐
etersinmemory.
Thisbutton’sLEDworksasaCARDINUSEindicator,and
turnsonwhenthecardslotisinuse.
26 ENSEMBLE
ThisbuttonturnstheEnsemblefunctiononoroff.Whenon,
theright‐handmelodyisharmonizedwiththeleft‐hand
chords.
Note:TheEnsemblefunctionworksonlywhenthekeyboardisin
SPLITmode,andtheLOWERChordScanningmodeselected.
27 RECORD
ThisbuttonsetstheinstrumentinRecordmode(depending
onthecurrentoperatingmode).
28 MENU
ThisbuttonopenstheMenupageforthecurrentoperating
modeoreditenvironment.Afteropeningamenu,youcan
jumptooneoftheeditpagesbypressingthecorresponding
VOLUME/VALUEbuttons;orbrowsethemusingthePAGE
buttons.Otherwise,gobacktothemainpageofthecurrent
operatingmode,orclosetheeditenvironment,bypressing
theEXITbutton.
Seetherelevantchapterdevotedtoeachoperatingmodeor
editenvironment,toseetheir“maps”indetail.
29 PAGE -/+
AfterpressingMENUtoopenamenu,usethesebuttonsto
browsetheeditpagesofanoperatingmodeoreditingenvi‐
ronment.PressEXITtogobackfromaneditpagetothemain
pageofthecurrentoperatingmode,ortoclosetheGlobalor
CardEditenvironment.
Inaddition,youcanusethesebuttonstoselectadifferent
pageinaStyleSelectorProgramSelectwindow.

6
Front panel
The music stand
30 VOLUME/VALUE (MUTE) A–H buttons
Withinthisuser’smanual,eachbuttonpairismarkedwithan
alphabeticletter(A–H).See“DisplayandUserInterface”on
page 9formoredetails.
Acorrespondingtracknameisprintedovereachbuttonpair.
Thesenamesshowthecorrespondingtrackthebuttonpair
affectsinthemainpageoftheStylePlaymode.
•Thelefthalfisforthemainpage,whereyoucanseethe
Realtimetracks,andtheStyletracksgroupedtogether:
•TherighthalfisfortheStyletrackspage,whereyoucan
seeeachoftheaccompanimenttracks:
See“SymbolsandIcons”onpage 11.
Usethesebuttonstoperformvariousoperationsonthecom‐
mandsandfunctionsappearinginthedisplay.
SELECTING Useeachbuttonpairtoselectthecorrespond‐
ingiteminthedisplay(i.e.atrack,aparameter
oracommand).Useeithertheleftorrightbut‐
toninapair.
VOLUME Whileyouareinthemainpagesofanyoperat‐
ingmode,selectatrackandusethesebuttons
tochangethetrack’svolume.Usetheleftbut‐
tontodecreaseit,ortherightbuttonto
increaseit.
MUTE Pressbothbuttonsinapairtomutethecorre‐
spondingtrack.Pressbothbuttonsagainto
unmutethetrack.
SOLO WhileintheStylePlay,SongPlayand
Songmodes,youcansolooneofthetracks.
JustkeeptheSHIFTbuttonpressed,andpress
bothoftheVOLUME/VALUEbuttonscorre‐
spondingwiththetrackyouwishtosolo.
Toexitthesolomode,keeptheSHIFTbutton
pressedagain,andpressboththeVOLUME/
VALUEbuttonscorrespondingtothesoloed
track.
VALUE Useeachbuttonpairtochangethecorrespond‐
ingparameter’svalue.Theleftbuttondecreases
thevalue,therightbuttonincreasesit.
31 TRACK SELECT
Dependingontheoperatingmode,thisbuttonswitches
betweenthevarioustracksview.
STYLEPLAYMODE
SwitchesbetweentheRealtimetracksandthe
Styletracks.
SONGPLAYMODE
Switchesbetweenthemainpage(showingthe
Realtime/Keyboardtracks),Songtracks1–8,
andSongtracks9–16.
SONGMODE
Switchesbetweenthemainpage,Songtracks
1–8andSongtracks9–16.
TheTRACKSELECTLEDshowsthecurrentpageview:
Off Mainpage(Realtimetracks,orSongcontrols)
On 2ndpage(Styletracks,orSongtracks1–8)
Flashing 3rdpage(Songtracks9–16)
32 SINGLE TOUCH SETTING
(F-1–F-4 FUNCTION KEYS) buttons
WhileinthemainpageoftheStylePlayorBackingSequence
mode,thesebuttonsselectaSingleTouchSettingeach.Each
oftheStylesincludesamaximumoffourSingleTouchSet‐
tings(STS),toautomaticallyconfiguretheRealtimetracks
andeffectsatthetouchofafinger.WhentheSINGLE
TOUCHLEDislit,anSTSisautomaticallyselectedwhen
selectingaStyle.
InEditmode,thesebuttonsdoubleasfunctionkeys,to
selectthecorrespondingitemsinthedisplay.
33 SHIFT
Withthisbuttonhelddown,pressingcertainotherbuttons
willaccessasecondfunction.
34 TEMPO/VALUE section
TheDIALandtheDOWN/‐andUP/+buttonscanbeusedto
controltheTempo,assignadifferentvaluetotheselected
parameterinthedisplayorscrollalistoffilesintheSong
SelectandCardpages.TheVALUELEDshowsthestatusof
thissection.
DIAL Turnthedialclockwisetoincreasethevalueor
tempo.Turnitcounter‐clockwisetodecrease
thevalueortempo.
WhenusedwhilepressingtheSHIFT
button,thiscontrolalwaysactsasaTempo
control.
DOWN/‐andUP/+
DOWN/‐ decreasesthevalueortempo;UP/+
increasesthevalueortempo.
KeeptheSHIFTbuttonpresseddown,
andpresseithertheDOWN/‐or
UP/+buttontoresettheTempotothevalue
that’ssavedontotheselectedStyle.

7
Front panel
The music stand
35 VALUE LED
ThisLEDshowsthestatusoftheDIALandDOWN/‐andUP/
+buttons.
ON TheDIALandDOWN/‐ andUP/+buttonsact
asValuecontrols,tochangethevalueofthe
selectedparameterinthedisplay.
OFF TheDIALandDOWN/‐andUP/+buttonscon‐
troltheTempo.
36 EXIT/NO
Usethisbuttontoperformvariousactions,leavingthecur‐
rentstatus:
•exitadialogbox
•answer“No”toanyquestionthatappearsinthedisplay
•exittheMenuwindow
•gobacktothemainpageofthecurrentoperatingmode
•exittheGlobalorCardEditenvironment,andgobackto
themainpageofthecurrentoperatingmode
•exitfromaStyle,PerformanceorProgramSelectwin‐
dow
37 ENTER/YES
Usethisbuttontoperformvariousactions,confirmingthe
currentselectedstatus:
•answer“Yes”toanyquestionthatappearsinthedisplay
•confirmacommand
38 DISPLAY HOLD
ThisbuttonturnstheDisplayHoldfunctiononoroff.
ON Whenyouopenatemporarywindow(likethe
ProgramSelectwindow),itremainsinthedis‐
playuntilyoupressEXIT/NO,oranoperating
modebutton.
OFF Anytemporarywindowclosesafteracertain
time,orafterselectinganiteminthewindow.
39 CHORD SCANNING section
InStylePlayandBackingSequencemode,usethesebuttons
todefinethewaychordsarerecognizedbythearranger.
LOWER Chordsaredetectedbelowthesplitpoint.The
numberofnotesyoushouldplaytoforma
chordisdefinedbytheChordScanningMode
parameter.
UPPER Chordsaredetectedabovethesplitpoint.You
mustalwaysplaythreeormorenotestoletthe
arrangerrecognizeachord.
FULL(bothLEDson)
Chordsaredetectedonthefullkeyboard
range.Youmustalwaysplaythreeormore
notestoletthearrangerrecognizeachord.
OFF Nochordswillbedetected.Afterpressing
START/STOP,onlytheDrumandPercussion
accompanimenttrackscanplay.
40 KEYBOARD MODE section
ThesebuttonsdefinehowthefourKeyboard(orRealtime)
tracksarepositionedonthekeyboard.
SPLIT TheLowertrackplaysbelowthesplitpoint,
whiletheUpper1,Upper2andUpper3tracks
playaboveit.Bydefault,selectingthiskey‐
boardmodeautomaticallyselectstheLower
chordscanningmode.
FULLUPPER
TheUpper1,Upper2and/orUpper3tracks
playonthewholekeyboardrange.TheLower
trackdoesnotplay.Bydefault,selectingthis
keyboardmodeautomaticallyselectstheFull
chordscanningmode.
41 STYLE CHANGE
ThisbuttonturnstheStyleChangefunctiononoroff.
ON WhenyouselectaPerformance,theStylecould
change,accordingtowhichStylenumberis
memorizedontothePerformance.
OFF WhenyouselectaPerformance,theStyleand
Styletracksettingsremainunchanged.Only
Realtime(Keyboard)trackssettingsare
changed.
42
PressthisbuttontousethePROGRAM/PERFORMANCE
sectiontoselectaPerformance.
43
PressthisbuttontousethePROGRAM/PERFORMANCE
sectiontoselectaProgram,andassignittotheselectedtrack.
44 PROGRAM/PERFORMANCE section
UsethesebuttonstoopentheProgramSelectorPerformance
Selectwindow,andselectaProgramoraPerformance.See
“SelectingaProgram”onpage 13,or“SelectingaPerfor‐
mance”onpage 12.
TheleftmostbuttonselectstheupperorlowerrowofPro‐
gramorPerformancebanks.Pressituntilyou’veselectedthe
rowthatyou’relookingfor.(AfterbothLEDshaveconsecu‐
tivelyturnedon,pressthebuttonagaintoturnthemoff).
UPPERLEDON
UpperrowofProgramsorPerformancesselected.
LOWERLEDON
LowerrowofProgramsorPerformancesselected.
Onthefrontpanel,Programbanksareidentifiedbythe
instrumentnames,whilePerformancebanksareidentified
bynumbers(1–10;0=bank10).
AnoteaboutProgrambanksandnames.Programsfrom
“PIANO”to“SFX”arestandardPrograms,theusercan’t
directlymodify.
Programs“USER1”and“USER2”arelocationswhereyou
canloadnewProgramsfromthememorycard.
“USERDK”iswhereyoucanloadnewdrumkits.
EachProgrambankcontainsvariouspages,eachwithupto8
Programs.YoucanbrowsethemusingthePAGEbuttons.
PERFORM.
PROGRAM

8
Front panel
The music stand
ShortcuttoseetheoriginalbankforaPerformanceorPro‐
gram.YoucanseetheoriginalbankwhereaPerformanceor
Programiscontained.JustkeeptheSHIFTbuttonpressed,
andthenpressthelefmostbuttonofthePROGRAM/PER‐
FORMANCEsection.Amessagewindowwillappear,show‐
ingthenameoftheoriginalbank.ReleasetheSHIFTbutton
toexitthewindow.
Shortcuttoseeallpagesoftheselectedbank.Tocycleallof
thepagesforaselectedbank,pressthebank’sbutton.
45 PADS (1–4, STOP)
Theseprogrammablepadscanbeusedtotriggerasound
effect.UsetheSTOPbuttontostopacyclicsound.
EachPadcorrespondstoadedicatedPadtrack.
46 TRANSPOSE
Thesebuttonstransposethewholeinstru‐
mentinsemitonesteps(MasterTranspose).
Thetranspositionvalueisshown(asanote
name)onthetoprightofthedisplay.
Pressbothbuttonstogether,toresettheMas‐
terTransposetozero.
Note:TheMasterTransposehasnoeffectontrackssettoDrum
mode(and,evenifsetinadifferentstatus,ontheDrumandPer‐
cussiontracks).
LowerstheMasterTransposeasemitone.
RaisestheMasterTransposeasemitone.
47 OCTAVE
Thesebuttonstransposetheselectedtrack
instepsofawholeoctave(12semitones;
max±2octaves).Thetranspositionvalueis
shown(inoctaves)onthetoprightareaof
thedisplay.
Pressbothbuttonstogether,toresetthe
OctaveTransposetozero.
Note:TheOctaveTransposehasnoeffectontrackssettoDrum
mode(and,evenifsetinadifferentstatus,ontheDrumandPer‐
cussiontracks).
–Lowerstheselectedtrackanoctave.
+Raisestheselectedtrackanoctave.
48 BALANCE slider
InSongPlaymode,thissliderbalancesthevolumeofthetwo
on‐boardsequencers.Whenfullyontheleft,onlySequencer
1canbeheard.Whenfullyontheright,onlySequencer2can
beheard.Wheninthemiddle,bothsequencerswillplayat
fullvolume.
49 SEQUENCER TRANSPORT CONTROLS - SEQ1
and SEQ2
Theinstrumentisequippedwithtwosequencers(Sequencer
1andSequencer2),eachwithitsownsetoftransportcon‐
trols.
<<and>> RewindandFastForwardcommands.Ifyou
usethemwhiletheSongisinplay,theymakeit
scrollbackorforward.
Whenpressedonce,thesebuttonsmovethe
Songtothepreviousorfollowingmeasure.
Whenkeptpressed,theymaketheSongscroll
continuously,untilyoureleasethem.
InJukeboxmode(Sequencer1),keep
theSHIFTbuttonpressed,andpressthesebut‐
tonstoscrolltothepreviousornextSongin
theJukeboxlist.
PAUSE PausestheSongatthecurrentposition.Press
PAUSEorPLAY/STOPtostarttheSongplay‐
ingagain.
PLAY/STOP StartsorstopsthecurrentSong.Whenyou
stoptheSong,theSongPositiongoesbackto
measure1.
InSongPlaymode,pressingthisbutton
whilekeepingSHIFTpressed,startsboth
sequencersatthesametime.

9
Display and User Interface
Display controls
4. DISPLAY AND USER INTERFACE
ThedisplayshowsthecurrentstatusofthemicroAR‐
RANGERanditsperformanceandeditingparameters.You
canselecteachparameterbyusingtheVOLUME/VALUE(A–
H)buttonsonthesideofthedisplay,oreachpagecommand
appearingalongthelastlineusingtheF‐1–F‐4buttons.You
canvarymanyoftheparameter’svaluesbypressingtheleft
(‐)orright(+)buttonofanyVOLUME/VALUEpair.
DISPLAY CONTROLS
VOLUME/VALUE (A–H) buttons and display parameters.
Thesebuttonsareusedtoselectthecorrespondingparameter
orcommandinthedisplay,tochangetheparameter’svalue,
ortochangethevolumeofthecorrespondingtrack.
Whileyouareonthemainpage,thesebuttonscanselecta
track,changethetrack’svolume,ormute/unmuteatrack.
See“VOLUME/VALUE(MUTE)A–Hbuttons”onpage 6for
moreinformation.
F-1–F-4 buttons. WheninanEditpage,thesebuttonsmay
beusedwhentherearefourparametersinarow,asinthefol‐
lowingexample:
First,selectthelineusingaVOLUME/VALUE(A–H)button.
Then,selectacolumnusingtheF‐1–F‐4functionbutton.
IntheCardEditenvironment,theF‐1–F‐4buttonscanbe
usedalsotoselectoneofthepagecommandsappearingin
thelastlineofthedisplay.
See“SINGLETOUCHSETTING(F‐1–F‐4FUNCTIONKEYS)
buttons”onpage 6formoreinformation.
PAGE. ThePAGEbuttonsselectthepreviousornextedit
page.WhenselectingaStyleoraProgram,theyselectadif‐
ferentpageofStylesorPrograms.See“PAGE‐/+”onpage 5
formoreinformation.
MENU.
TheMENUbuttonopensthecurrentoperatingmode
oreditenvironment’sMenu.WheninaMenu,youcanusethe
VOLUME/VALUEbuttonstoselectaneditsectiontojumpto.
TRACK SELECT. Eachoftheoperatingmodeshaveadiffer‐
entnumberoftracks:
StylePlay 4Realtimetracks,8Styletracks,4Pads.
SongPlay 4Realtimetracks,2x16SongTracks,4Pads.
BackingSequence
4Realtimetracks,8Styletracks,4Pads.
Song 16Songtracks.
Youcanonlyseeupto8tracksinthedisplay.So,usethe
TRACKSELECTbuttontoswitchtotheother(hidden)
tracks.Forexample,wheninStylePlay,youcanusethisbut‐
tontoswitchfromtheRealtimetracksandtheStyletracks.
Realtime (Keyboard) tracks
Style (accompaniment/backing) tracks
Status icons area

10
Display and User Interface
Interface structure
INTERFACE STRUCTURE
Thankstoitsmultitaskingoperatingsystem,themicroAR‐
RANGERuserinterfaceisstructuredin“overlapping”,active
layers.Fromthelowerlevel:
•operatingmodes(StylePlay,BackingSequence,Song
Play,Song,Program)
•editenvironments(Global,Card)
• selectingwindows(StyleSelect,SongSelect,Program
Select,PerformanceSelect).
Whenopeninganeditenvironmentoraselectingpage,the
currentoperatingmodeisstillworkinginthebackground.
Operating modes. (Seediagramatthebottomofthispage).
Atthelowestlevel,anoperatingmodeisalwaysactive.The
currentoperatingmodeisindicatedbythelitLEDonthe
STYLEPLAY,B.SEQ,SONGPLAY,SONGorPROGRAMbut‐
tonintheMODEsection.Therelevanticonlightsupinthe
display.
Anoperatingmodeisdividedintoamainpage(thepage
whereyouusuallyplayaStyle,aSongoraProgram),a
menu,andaseriesofeditpages.
PressMENUtoaccesstheMenu.UsetheMENUandPAGE
buttonstobrowseacrossthevariouseditpages.PressEXITto
gobacktothemainpage.
Edit environment. (Seediagramatthebottom).Whenyou
pressGLOBALorSDCARD,aneditenvironmentoverlaps
thecurrentoperatingmode.PressEXITtogobacktothecur‐
rentoperatingmode.
Aneditenvironmentismadeupofamenuandaseriesof
editpages.UsetheMENUandPAGEbuttonstobrowse
acrossthevariouseditpages.
Selecting windows. WhenyoupressoneoftheSTYLEor
PROGRAM/PERFORMANCEbuttons,youopenaselecting
window.Thiswindowclosesafterselectingoneoftheitems
init,orafterpressingEXIT.
IftheDISPLAYHOLDLEDislightup,thewindowdoesn’t
closeafterselectinganitem.PressEXITtoclosethewindow,
andgobacktotheunderlyingpage.
Operating modes
Main page Menu Edit pages
Edit environment
Menu Edit pages

11
Rear panel
Message windows
MESSAGE WINDOWS
Sometimes,amessagemightappearinthedisplay,warning
aboutanerrororanincorrectoperation:
PressENTERorEXITtoexitoneofthesewindows.
Othermessagesaskforananswer,asinthe“A r e yousure”
windowbelow:
PressENTER/YESforYes,orEXIT/NOforNo.
SYMBOLS AND ICONS
Manyiconsandsymbols,onthecustomdisplay,showthe
statusofaparameterorthedisplaycontent.
Realtime/Keyboardtrack
(Upper1–3,Lower).
Drumtrack(Styletrackview).
Percussiontrack(Styletrackview).
GroupedDrumandPercussiontracks.
Basstrack(Styletrackview).
Groupedaccompanimenttracks.Thissymbol
indicatesthefivegroupedaccompaniment
tracks(Acc1–5).
Accompanimenttracks(Styletrackview).
Sequencertracks.
Selectedtrackorparameter.Whenthissymbol
appears,youcanexecuteanyavailableopera‐
tionontheselecteditem.
(noicon) Thetrackisinmute,andcan’tplayonthekey‐
board.
GRAYED-OUT NON-AVAILABLE
PARAMETERS
Currentlynon‐availableparametersarenowshownin“gray”
inthedisplay,i.e.witha“ghost”texture.Hereisanexample
ofagrayed‐outparameter,comparedtoanormalparameter:
5. REAR PANEL
1 PHONES
Usethisjacktoconnectapairofheadphones.Youcanuse
headphoneswithanimpedanceof16–200Ω(50Ωsuggested).
Useaheadphonedistributortoconnectmorethanonepairof
headphones.
2INPUT
Usetheseunbalancedconnectorstoinputanotherkeyboard/
synthesizer,a(non‐powered)mixer’soutput,oraCD/tape
player(lineimpedance).Thesignalisautomaticallyroutedto
thespeakers,theAudioOutputsandthePhones.
3OUTPUTS
Usetheseunbalancedconnectorstosendtheaudiosignal
(sound)toamixer,aPAsystem,asetofpoweredmonitors,
oryourhi‐fisystem.SettheoutputlevelwiththeMASTER
VOLUMEslider.
4DAMPER
UsethistoconnectaDamperpedal,liketheKORGPS1,PS3
orDS1H.
5 ASSIGN. PDL/SW
Usethistoconnectacontinuousorfootswitchpedal,likethe
KORGEXP2orXVP10.
6 MIDI interface
TheMIDIinterfaceallowsyourmicroARRANGERtobecon‐
nectedtoanexternalcontroller(masterkeyboard,MIDIgui‐
tar,windcontroller,MIDIaccordion…),toanexpander,orto
acomputerrunningasequenceroraneditor.
IN ThisconnectorreceivesMIDIdatafromacom‐
puteroracontroller.Connectittoanexternal
controller’sorcomputer’sMIDIOUT.
OUT ThisconnectorsendsMIDIdatageneratedby
themicroARRANGER’skeyboard,controllers,
and/ortheinternalsequencer.Connectittoan
expander’sorcomputer’sMIDIIN.
7 DC 12V (AC power adapter connector)
Plugthesuppliedpoweradapterintothisconnector.
8 SD Card Slot
ToinsertanSDcard(orSDHCcard),pushit
intotheslotuntilitclicksintoplace.To
removetheSDcard,pushitin;thecardwill
popoutslightly,allowingyoutopullitout.
Note:Carefullyreadtheownerʹsmanualthat
camewithyourSDcard,andobservetheinstruc‐
tionsregardingcareandhandling.
Note:TakecaretoinserttheSDcardinthecor‐
rectdirectionandorientation,andbesureto
pressitallthewayintotheslot.Donotuse
excessiveforce.
Text in solid black
Text in gr ay
12 3 45 6 7 8
Connector
side

12
Basic operations
Playing on the keyboard
6. BASIC OPERATIONS
PLAYING ON THE KEYBOARD
Justplayonthekeyboard.YouwillheartheRealtimetracks
playing.TherearefourRealtimetracks:Upper1–3and
Lower.Theymayplayallatthesametime,orjustoneora
fewofthem,dependingontheirMutestatus.Ifyoucannot
hearatrack,checkthemutestatusofthatpart.
Trackscanbesetindifferentways:usetheKEYBOARD
MODEsectiontoselectthewaytheyareconfiguredonthe
keyboard.
•PressFULLUPPERtoplaytheUpper1–3tracksonthe
fullrangeofthekeyboard,justasyouwouldonapiano.
•PressSPLITtolettheUpper1–3tracksplayontheright
oftheSplitPoint,andtheLowertrackontheleft.
• KeeptheSPLITPOINT
buttonpressed,and
playanotetochange
thepointwherethe
keyboardisdividedin
anUpperandaLower
part.
Tosavetheselectedsplitpoint
note,presstheGLOBALbut‐
ton,thenpressWRITEtosave
theGlobalinmemory.
SELECTING, MUTING/UNMUTING AND
SOLOING A TRACK
Selecting. UsetheVOLUME/VALUE(A–H)buttonstoselect
atrack.
Theselectedtrackisshownwithasolidsquaresurrounding
itsstatusicons.
Ifyoucan’tseethetrackthat
you’relookingfor,usethe
TRACKSELECTbuttontoscroll
upordownthetracks,andfind
thehiddenones.
Mute/unmute.
PressbothVOLUME/VALUE(A
–
H)
buttonstomuteorunmuteatrack.For
example,ifyouareonthemainpage
thatappearsafterturningtheinstru‐
menton,andyouwanttomutetheUpper1track,presstheE
(UPPER1/ACC2)buttonstogether.
Themute/playstatusisshownbytherelevanticoninthedis‐
play:
Playstatus;thetrackplaysonthekeyboard.
(noicon) Mutestatus;thetrackdoesn’tplayonthekey‐
board.
Solo.
WhileintheStylePlay,SongPlayandSongmodes,you
cansolooneofthetracks.JustkeeptheSHIFTbuttonpressed,
andpressbothVOLUME/VALUEbuttonscorrespondingtothe
trackyouwishtosolo.
Toexitthesolomode,keeptheSHIFTbuttonpressedagain,
andpressbothVOLUME/VALUEbuttonscorrespondingto
thesoloedtrack.
SELECTING A PERFORMANCE
APerformanceisasetofProgramsandsettingsfortheKey‐
boardandStyletracks,thatmakesselectingcomplexcombi‐
nationslivefastandeasy.WhentheSTYLECHANGELEDis
on,aPerformancecanalsoselectadifferentStyle.
ItisalwaysadvisabletousePerformances,ratherthansingle
Programs,whenplayingevenasolosound,sinceaPerformance
letsyouselecttherighteffects,transposition,plusmanyother
parameters,togetherwiththePrograms
.
Other“performance”parametersaresavedintheGlobal.
1. PressthePERFORMbutton.This
changesthePROGRAM/PERFOR‐
MANCEsectionintoaPerformance
selector.
2. UsetheleftmostbuttonofthePROGRAM/PERFOR‐
MANCEsectiontoselectthefirstrowoftenbanks(1–
10,upperLEDturnedon),orthesecondrowoften
banks(11–20,lowerLEDturnedon).
Upper 1
Upper 2
Upper 3
Upper 1
Upper 2
Upper 3
Lower
Split Point
LOWER UPPER
Selected track
Data type Parameters
Realtime
Tracks
Upper 1, Upper 2
Upper 3, Lower
Master Transpose, Program, Vol-
ume, Pan, Octave, Scale, Detune,
Pitch Bend, Poly/Mono/Drum, Int/
Ext, Damper, Dynamic Range,
Joystick, C&D Effect Send level,
Type,
Parameters,
Program parameters, Pads
Style
Tracks
Drum, Percussion,
Bass, Acc1, Acc2,
Acc3, Acc4, Acc5
Program, Volume, Pan, Octave,
Detune, Pitch Bend, Poly/Mono/
Drum, Int/Ext, Wrap Around, Key-
board Range, A&B Effect Send level,
Type, Parameters, Program parame-
ters, Drum Mapping, Kick&Snare
Assignment
Global Chord Recognition Mode, Memory Mode, Velocity
Trigger, Lock

13
Basic operations
Selecting a Program
3. Pressoneofthe1–0buttonstoselectthePROGRAM/
PERFORMANCEbankcontainingthePerformanceyou
arelookingfor.
ThePerformanceSelectwindowappears.Thereare8
Performancesforeachbank.
4. SelectaPerformanceusingtheVOLUME/VALUE(A–H)
buttons.
5. IftheDISPLAYHOLDLEDison,pressEXITtoexitthis
window.
The STYLE CHANGE button
WhenyouselectaPerformance,theStylemayormaynot
change,dependingonthestatusoftheSTYLECHANGEbut‐
ton.(WhenyousaveaPerformance,thecurrentStylenumber
isalwaysmemorized).
•IftheSTYLECHANGELEDison,theStylesavedinthe
Performancewillbeselected.
•IftheSTYLECHANGELEDisoff,theStyledoesn’t
change.
SELECTING A PROGRAM
YoucanselectadifferentProgram(i.e.,sound)tobeplayedby
atrack.BeforeselectingaProgram,youmustselectthetrack
thatyouwanttoassigntheProgramto.
Note:ToassigndifferentProgramstotheStyletracks,press
TRACKSELECTtoseetheStyletracks.IfyouselectaProgram
whilegroupedtracks(Drum/PercussionorACC)areselected,the
Programwillbeassignedtothelastselectedtrack.
EachStyleElement(Variations,Fills…)canhavedifferent
Programs,soyourselectionmightbeautomaticallyreset
whenselectingadifferentElement.
1.
UsetheVOLUME/VALUE(E
–
H)buttonsontherightside
ofthedisplay,toselecttheRealtime(Keyboard)trackyou
wishtoassignadifferentProgramto
.
2. PressthePROGRAMbutton.This
changesthePROGRAM/PERFOR‐
MANCEsectionintoaProgramselec‐
tor.
3. UsetheleftmostPROGRAM/PERFOR‐
MANCEbuttontoselectarowofPro‐
grambanks(upper,lower).
4. SelectthePROGRAM/PERFORMANCE
bankcontainingtheProgramyouare
lookingfor(Programbanksareidentifiedbyinstrument
names).
TheProgramSelectwindowappears.
5. BrowsealltheProgramsintheselectedbankusingthe
PAGEbuttons.Therecanbevariouspagesforeach
bank,containingupto8Programseach.
6. AsyoufindtheProgramyouarelookingfor,selectit
usingtheVOLUME/VALUE(A–H)buttons.
7. IftheDISPLAYHOLDLEDison,pressEXITtoexitthis
window.
Last selected Performance
Last selected Program Selected track

14
Basic operations
Selecting a Style
SELECTING A STYLE
AStyleisasetofrhythmandaccompanimentpatterns.You
canselectaStylefromtheinternalmemory,orfromamem‐
orycard.
1.
UsetheleftmostSTYLEbuttontoselecta
rowofStylebanks(upper,lower)
.
2. SelecttheSTYLEbankcontainingthe
Stylethatyou’relookingfor.
TheStyleSelectwindowappears.
3. Thereare2pagesforeachbank,eachcontaining8
Styles.SelectapageusingthePAGEbuttons.
4. AsyoufindtheStyleyouarelookingfor,selectitusing
theVOLUME/VALUE(A–H)buttons.
Note:ThenewStylewillenteratthenextstrongbeat.
5. IftheDISPLAYHOLDLEDison,pressEXITtoexitthis
window.
The SINGLE TOUCH button
WhenyouselectaStyle,theRealtime(Keyboard)trackscan
bechanged.
•IftheSINGLETOUCHLEDison,theSingleTouchSet‐
ting(STS)#1isautomaticallyselected,andtheRealtime
tracksarechanged.Programs,andtheKeyboardMode,
maychange.
•IftheSINGLETOUCHLEDisoff,Realtimetracksdon’t
change.
SELECTING A SINGLE TOUCH SETTING (STS)
ASingleTouchSetting(STS)containsRealtime(Keyboard)
tracks’settings.FourSTSareincludedineachStyle,andcan
berecalledbypressingtheSINGLETOUCHSETTING(F‐1–
F‐4)buttonsunderthedisplay.
Note:YoucanselectaSTSonlywhenyouareinthemainpageof
theStylePlayorBackingSequenceoperatingmode.
CHANGING ALL KEYBOARD TRACKS AT ONCE
SelectaPerformanceoraSingleTouchSetting(F‐1
–
F‐4buttons,
whenyouareintheStylePlaymainpage)tochangekeyboard
Programsandeffectsatthetouchofabutton.
SHORTCUT TO SEE THE ORIGINAL BANK FOR
A STYLE, PERFORMANCE OR PROGRAM
YoucanseetheoriginalbankwhereyourStyle,Performanceor
Programcamefrom.JustkeeptheSHIFTbuttonpressed,and
pressthelefmostbuttonoftheSTYLEorPROGRAM/PERFOR‐
MANCEsection.Amessagewindowwillappear,showingthe
nameoftheoriginalbank.
ReleasetheSHIFTbuttontoexitthewindow.

15
Tutorial
Playing a Style (Automatic Accompaniment)
7. TUTORIAL
Thischapterisfullydevotedtostep‐by‐stepinstructions,that
wehopemaybeusefultolearnthebasics—inthefield.
PLAYING A STYLE
(Automatic Accompaniment)
AStylewillbeyourvirtualbandforyourbestsolos.Select
oneofthe304Styleswefittedinthismachine…
1 OK, select your favorite musical Style.
ThereareplentyofStylestochoosefrom.Wewillgowitha
JazzStyle—the“JazzBrush”.
1. SelectthesecondrowofStyles.PresstheleftmostSTYLE
buttontoswitchthelowerLEDon.
2. Now,youarefreetopressbuttonnumber4,called
“JAZZ1”.
TheStyleSelectwindowappears.
3. PressoneoftheAVOLUME/VALUEbuttonstoselect
“JazzBrush”.
2 Call an Intro.
YoucanengageanIntrotobeplayedbeforetheStyle.Press
INTRO1orINTRO2.Theformerplaysmorefreely,without
lettingyoudecidethechords.Thelatterletsyouplayachord
progressionwhileit’splaying.
3 Start the Style!
Playachord,andpresstheSTART/STOPbutton.
Thenbeginplaying.
Usually(whentheSPLITLEDison)chordsarerecognized
underthesplitpoint,i.e.ontheLowerpartofthekeyboard.
WiththeUPPERorFULLChordScanningmode,youmust
playthreeormorenotestohaveachordrecognized.
4 Play your chords and your melody.
Goonplaying.Asyoumaynotice,themicroARRANGER
featuresaverysophisticatedchordrecognitionengine.Rec‐
ognizedchordsareshowninthedisplay.
5 Make a break—or should we say “a fill”?
Duringyourplaying,youarefreetocallaone‐barbreak.Try
it:
PRESS BREAK
Doyousee?Musicstoppedforonebar.Then,itisbackagain.
Afterawhile,let’sgoforsomethingdifferent…
PRESS FILL1 OR FILL2
Nosilence,thistime.microARRANGERplaysacomplexpas‐
sagetoletyoutakeabreath.FILL1isthesimplerone,where
FILL2ismoresophisticated.Usually,youwilluseFILL1
whenplayingwithVariations1and2(themosteasy),FILL2
whenworkingwithVariations3and4(morecomplexones).
6 Select other Variations.
TherearefourVARI ATIONbuttons.Thesearefourdifferent
versionsofthesameStyle.Trythemall!
YoucangotoaVariationafteraFill.JustpressaFILLbutton,
then,immediatelyafterpressaVARIATIONbutton.
The selected Style

16
Tutorial
Playing in Realtime (Without using Automatic Accompaniment)
7 Stop it!
OK,youcouldsay:“Oh,that’seasy,Iknowhowtodoit,Ican
justpressthatbigredSTART/STOPbuttonagain”.
Yes,youareperfectlyright.Butthat’stheeasyway.Letus
suggestamorecolorfulway:
PRESS ENDING1 OR ENDING2
Anendingisinstantaneouslycalled,andwillbeginplaying,
toleadtheStyletoacolorfulend.Asusual,ENDING1ispre‐
programmed,whileENDING2asksforyourchordprogres‐
sion.
In Sync
“WhatifIwanttoavoidallthatSTART/STOPstuff?Imean,Ipre‐
fertohavemyhandsfreeforplayingmusic!”
Goodpoint.TheSYNCHRObuttonisthererightforthispur‐
pose.
1 While the Style is stopped, press the SYN-
CHRO button.
TheSYNCHRO‐STARTLEDbeginsblinking.TheSynchro
Startfunctionisenabled.
2 Play a chord on the keyboard.
Youmustplayachordforthechordrecognitionengine.Usu‐
ally,itwillbetotheleftofthesplitpoint,butitdependson
theCHORDSCANNINGsection(see“CHORDSCANNING
section”onpage 7).
TheStylestarts.
3 Stop the Style using your chosen method.
PLAYING IN REALTIME
(Without using Automatic Accompaniment)
AssoonasyouturnyourmicroARRANGERon,itisinStyle
Playmode,andyoucanplayitinrealtime.Pleasefollow
me…
1 Play on the keyboard.
WhenyouturnthemicroARRANGERon,Performance1‐1is
automaticallyselected.
ThissetstheRealtime(Keyboard)tracksforyou.Inthiscase
yougettheUpper1trackplayingonthefullkeyboardrange,
withtheGrandPianoProgramselected.
Asyoumayknow,therearefouravailableRealtimetracks:
Upper1–3andLower.UpperRealtimetracksmayplayon
thefullrangeofthekeyboard(theselectedKEYBOARD
MODEshallbeFULLUPPER).Otherwise,theLowertrack
playsontheleftoftheSplitPoint,andtheUppertrackson
theright(KEYBOARDMODEshallbeSPLIT).
Ifyouarenotsatisfiedwiththissettingatstartup,youcan
simplyselectanotherPerformance.Orchangethetrack’sset‐
tings—asyouwillseeinthistutorial—andsavetheminto
Performance1‐1.You’llsoonseehowtodoit.
2 Select a different Performance.
IsthePERFORM.LEDon?
Ifso,pressoneofthePROGRAM/PERFORMANCEbuttons,
andselectaPerformancewiththeVOLUME/VALUEbuttons
(onthesideofthedisplay).
GoaheadandtryoutthedifferentPerformances.Wepro‐
vided160ofthemforyou.
3 Select Performance 1-1 (“Grand Piano”) again.
Asabove:pressPerformancebank1,andusetheAVOL‐
UME/VALUEbuttonstoselectPerformance1‐1.
Performance bank-number
Select a Performance with the VOLUME/VALUE buttons

17
Tutorial
Playing in Realtime (Without using Automatic Accompaniment)
4 Unmute the Upper 2 track.
PressbothFVOLUME/VALUEbuttons.
TheUpper2trackwillbeselectedand
unmuted.ThePlayiconwillappear,sur‐
roundedbythe“selectedtrack”frameand
accompaniedbythepointingarrow.YouwillheartheDarkPad
ProgramplaytogetherwiththeGrandPiano.
5 Press SPLIT on the KEYBOARD MODE section,
and play.
Now,thekeyboardissplitintwoparts:theLowerpartonthe
left,andtheUpperpartontheright.TheAnalogStrProgram
isplayingontheLowerpart,whiletheGrandPianoandthe
DarkPadareplayingontheUpperpart.
6 Set the split point.
Nothappywiththecurrentsplitpoint?KeeptheSPLIT
POINTbuttonhelddown,andplaythenewsplitpointonthe
keyboard.Youcanevensavethissettinginmemory.
7 Mute/unmute various tracks.
PressbothHVOLUME/VALUEbuttons.Youwillmutethe
Lowertrack.
PressthemagaintounmutetheLowertrack.
TryalsowiththeUppertracks,usingtheE,FandGVOL‐
UME/VALUEbuttons.Youwillnoticethesoundbecomes
moreorlessfuller‐sounding,dependingonthenumberof
tracksmutedorunmuted.
8 Set the relative volume of the Realtime tracks.
UseeachE–HVOLUME/VALUEbuttonpairtosetthevol‐
umeoftheRealtimetracks.PressoneoftheVOLUME/
VALUEbuttontoselectatrack.Thenpresstherightoneto
increasethevolume,theleftonetolowerit.
9 Press FULL UPPER on the KEYBOARD MODE
section, and play.
Again,theUppertrackscanplayacrossthefullkeyboard
range.
10 Save your track configuration in a Perfor-
mance.
That’sall!Whenyoufindtherightsound,youcanpressthe
WRITEbuttontosavethetrackconfigurationintoaPerfor‐
mance,aSingleTouchSetting(STS),oraStylePerformance.
ThePerformanceisahandywaytosaveRealtimetracks.
Press the F VOLUME/VALUE buttons
Press the H VOLUME/VALUE buttons
Press the E–G VOLUME/VALUE buttons
Press the left one to lower…
…and the right one to raise.
This manual suits for next models
1
Table of contents
Other Korg Musical Instrument manuals

Korg
Korg CONCERT C-720 User manual

Korg
Korg EXB-RADIAS for M3 User manual

Korg
Korg N264 - 76 User manual

Korg
Korg TRITON Extreme Technical manual

Korg
Korg M1 User manual

Korg
Korg SP-170DX User manual

Korg
Korg NAUTILUS-61 User manual

Korg
Korg X2 User guide

Korg
Korg Concert NC-500 Series User manual

Korg
Korg TRITON Le User manual