manuals.online logo
Brands
  1. Home
  2. •
  3. Brands
  4. •
  5. Korg
  6. •
  7. Recording Equipment
  8. •
  9. Korg SQ-64 SYSTEM Version 2.0 User manual

Korg SQ-64 SYSTEM Version 2.0 User manual

1
En New features available in SQ-64 system
version 2.0
The system version (2.0) for the SQ-64 adds the following
features.
- Improved step input for pitch and keyboard modes
- Drum pad mode added to Track D
- New Rec Quantize settings
- New step recording functionality
- New Step Copy function
- Other features
Improved step input for pitch and keyboard
modes
You can now use the parameter knobs to add and delete notes
while you hold down the button for the step to input.
1. Press the PITCH button to enter pitch mode.
2. Move the cursor to the note you wish to edit, and use the
PARAM1 knob to edit the note. Turn the knob all the way coun-
terclockwise to delete the note.
3. Move the cursor to a location where there is no note (steps
marked with a hyphen), and use the PARAM1 knob to add a
note.
Input for keyboard mode has been improved.
1. Hold down the PITCH button and press Track buttons A–C to
enter keyboard mode.
2. Hold down a step and use the keyboard to register new notes
in that step.
EJ 1
2022
www.korg.com
Published 10/2022
SQ-64
POLY SEQUENCER
OwnerʼsManual
取扱説明書
En
Ja
SYSTEM Version 2.0
(→p.5)
(→p.1)
2
3. While holding down the step, use the keyboard to register
new notes in succession. Also, you can press the notes on the
keyboard to delete them if they’re already registered.
When you delete a note, the note is not output via MIDI/CV.
You can’t use the parameter knobs for step editing while you are
using the keyboard to input notes.
Drum pad mode added to track D
A new drum pad mode has been added for Track D, in con-
trast with keyboard mode for melody tracks A–C.
In drum pad mode, you can make this unit output MIDI/CV
signals in real time when you press the pads. It is also possible
to record in real-time.
Also, when you use drum pad mode during step edit, you can
edit each sub-track for track D by using the same steps as
with keyboard mode for tracks A–C.
1. Press the GLOBAL button to enter global mode.
2. You can select from four different layouts by using the
“DRUMPAD” that was newly added to pad B-13 in global
mode.
3. Hold down the PITCH button and press track button D to enter
track D drum pad mode.
¢Drum pad mode layout
Pad position Global parameter
name
PARAM knob Value (initial value is in boldface) Parameter
details, remarks
B-13 DRUMPAD PARAM1 4x4-A, 4x4-B, 16+Velocity, 8x2
StepNumber
DSUB-TRACKS1-16
D
1 2 3 4
4x4-ALAYOUT:
5 6 7 8
9 10 11 12 13 14 15 16
1 2 3 4
5 6 7 8
9 10 11 12
13 14 15 16
StepNumber
DSUB-TRACKS1-16
D
1 2 3 4
4x4-BLAYOUT:
5 6 7 8
9 10 11 12 13 14 15 16
1 2 3 4
5 6 7 8
9 10 11 12
13 14 15 16
1 2 3 4
16+VelocityLAYOUT:
5 6 7 8 9 10 11 12 13 14 15 16
2H 3H 4H 5H 6H 7H 8H 9H 10H 11H 12H 13H 14H 15H 16H
1L
1M
1H
2M 3M 4M 5M 6M 7M 8M 9M 10M 11M 12M 13M 14M 15M 16M
VelL=32
VelM=80
VelH=127
2L 3L 4L 5L 6L 7L 8L 9L 10L 11L 12L 13L 14L 15L 16L
StepNumber
DSUB-TRACKS1,2..
1 2 3 4
8x2LAYOUT:
5 6 7 8 9 10 11 12 13 14 15 16
StepNumber
DSUB-TRACKS1-8
DSUB-TRACKS9-16
12345678
9 10 11 12 13 14 15 16
3
New “Rec Quantize” settings
You can now record in real time while applying quantization.
1. Press the GLOBAL button to enter global mode.
2. Set the quantize threshold (boundary value) in the “RECORD-
INGS” setting, which was newly added to pad A-12 in global
mode.
Rec Input
Quantized time
STEPSTEP STEP
(value: 1/1Step)
♪ ♪ ♪ ♪
♪ ♪
♪♪
¢Rec Quantize settings
Pad position Global parameter
name
PARAM knob Value (initial value is in
boldface)
Parameter details, remarks
A-12 RECORDINGS PARAM1 None, 1/8Step, 1/4Step,
1/2Step, 1/1Step
The “None” setting produc-
es no effect
(same as previous version).
New step recording functionality
In addition to the existing input method in which you turn on/
off the desired steps in gate mode, a method of step recording
has been added for inputting notes in order, starting with the
rst step.
1. With the sequencer stopped, press the (REC) button and
then click the Track buttons A–D.
2. The unit switches to keyboard mode (or drum pad mode for
track D) and the rst step blinks, indicating that the unit is
waiting for input (all steps that are waiting blink white).
REST
Next Step (or TIE)
STOP (and Exit)
3. Press a note on the keyboard (64 pads), the REST button or
elsewhere. The note name, rest or other information is shown
in the display.
4. When you take your nger off the keyboard, the note, rest, or
tie is recorded in that step, and the sequencer automatically
moves to the next step.
Recording notes
The note names for the keys you press on the keyboard (or for
track D, the drum pad) are shown on the display. Check the
note name in the display. If it is correct, release your nger to
record that note.
TIP You can input a chord by pressing more notes on the keyboard
without taking your ngers off.
Recording a rest
You can record a rest by pressing the REST button.
4
Other functions
SHIFT button latch
Quickly press the SHIFT button twice to make it “latch”, which
makes the buttons behave as if the SHIFT button is always
pressed.
This is useful when you need to operate the buttons frequently
while the SHIFT button is held down. The SHIFT button blinks
while it is in latched mode. Press the SHIFT button once more
while it is blinking to unlatch.
Changes to how loop mode works
The loop is no longer canceled when you switch to gate mode
or pitch mode while setting the loop.
Changes to how keyboard mode works
The “OVERWRITE” mode has been newly added, in addi-
tion to the previous “TRANSPOSE” and “OVERDUB” (name
changed from “OVERRIDE”) settings. In OVERWRITE mode,
the sequence playback sound is not heard while you are
inputting notes with the keyboard.
Optimized LED brightness
The LED brightness has been optimized when the unit is pow-
ered with the AC adapter, making the GATE ON/OFF easier to
distinguish.
The LED brightness works the same as the previous version when
the unit is powered via USB.
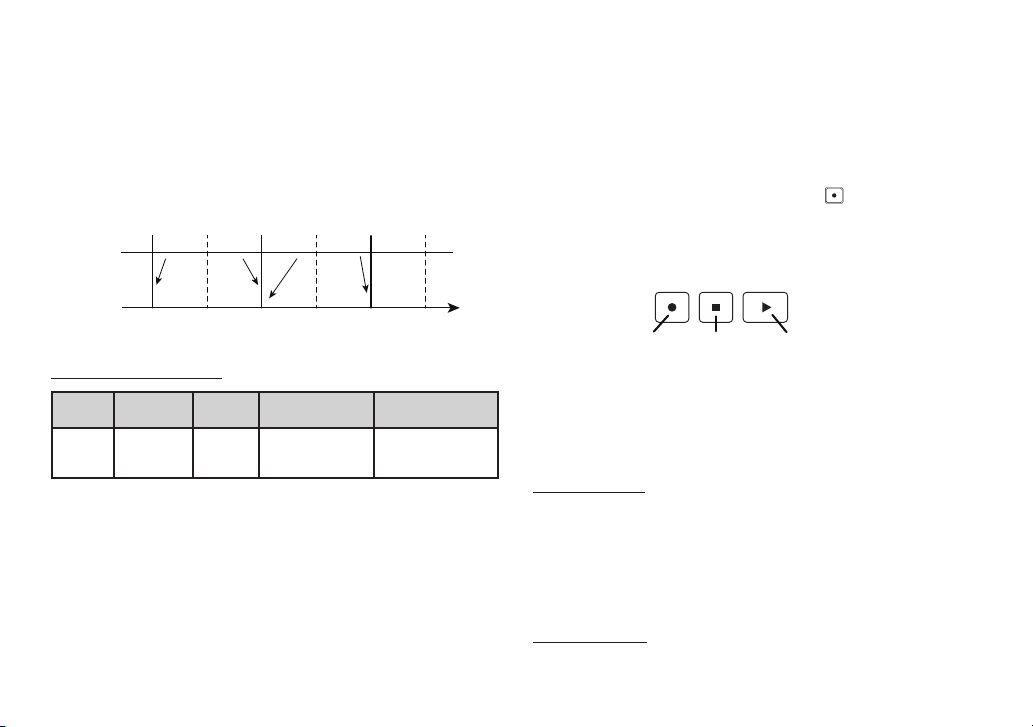
Recording a tie
Press the Next Step button while holding down a key on the
keyboard. The note will be tied to the same note in the previ-
ous step and recorded.
TIP You can select the step for input by pressing a step button.
5. When you’ve nished inputting the set number of steps, step
recording automatically ends.
You can also exit step recording at any time by pressing the
stop button or by switching to a different mode.
New Step Copy function
You can now copy all data from one or more steps to other
steps. This works in gate, pitch and modulation modes.
1. If you press the SHIFT button while holding down a step you
wish to copy, “Copy Step, Select Dest. Start Step” is shown in
the display, and the white LED for the copy source step button
and the LED for the SHIFT button blinks.
TIP When you press multiple steps, all steps in between are set as
the copy source.
TIP To cancel, press the SHIFT button again or switch to a different
mode.
2.
Press the rst step to which you wish to copy (copy destination).
“Step Copied” appears, and the copy operation is nished.
TIP In order to copy to a different track, press the corresponding
track button.
You can’t copy from melody tracks A–C to track D. Conversely, you
can’t copy from drum track D to tracks A-C.
All steps that exceed step 64 are discarded, such as in the case
where you try to copy multiple steps.
5
Ja
SQ-64システム・バージョン2.0の新機能
システム・バージョン(Version 2.0)では、以下の機能が追加さ
れました。
・ピッチ・モード、キーボード・モードでのステップ入力の改善
・トラック D にドラムパッド・モードを追加
・Rec Quantize 設定の追加
・新しいステップ・レコーディング
・Step Copy 機能の追加
・その他の機能
ピッチ・モード、キ ーボード・モ ードで のステップ
入力の改善
入力対象のステップを押しながら、パラメーター・ノブでノート
の追加や削除が可能になりました。
1. PITCH ボタンを押してピッチ・モードに入ります。
2. 変更したいノートにカーソルを合わせてパラメーター・ノブ 1 を
操作することでノートを変更できます。このとき、左に回し切る
ことでノートの削除が可能です。
3. ノートがない箇所("-" 表示のステップ)にカーソルを合わせて、
パラメーター・ノブ 1 を操作することでノートを追加できます。
キーボード・モードでの入力を改善しました。
1. PITCH ボタンを押しながらトラック・ボタン A 〜 C を押してキー
ボード・モードに入ります。
2. ステップを押しながらキーボードを押すことで、ステップにノー
トを新規登録します。
3. ステップを押したままキーボードを順次押すことでノートを追加
登録することができます。また、既に登録済のキーボードを押し
た場合はノートを削除します。
 ノートを削除する動作の場合、MIDI/CV からは出力されません。
 キーボードを使った入力操作中はパラメーター・ノブによるステッ
プ・エディットはできません。
トラックDにドラムパッド・モードを追加
メロディ・トラック A 〜 C のキーボード・モードに対して、トラッ
ク D に新たにドラムパッド・モードを追加しました。
ドラムパッド・モードでは、パッドを押すことでリアルタイムに
MIDI/CV から出力できます。また、リアルタイム・レコーディン
グも可能です。
また、ステップ・エディットにおいてドラムパッド・モードを使
うと、トラック A 〜 C におけるキーボード・モードと同じ手順
でトラック D の各サブトラックの編集ができます。
1. GLOBAL ボタンを押して、グローバル・モードに入ります。
2. グローバル・モードのパッド B-13 に追加された「DRUMPAD」
でレイアウトを 4 種類から選択します。
3. PITCH ボタンを押しながらトラック D ボタンを押してトラック D
のドラムパッド・モードに入ります。
■ドラムパッド・モードのレイアウト
パッド位置 グローバル・パ
ラメーター名
PARAM ノブ Value(太字は初期値) パラメーターの
詳細、備考
B-13 DRUMPAD PARAM1 4x4-A, 4x4-B, 16+Velocity, 8x2
6
StepNumber
DSUB-TRACKS1-16
D
1 2 3 4
4x4-ALAYOUT:
5 6 7 8
9 10 11 12 13 14 15 16
1 2 3 4
5 6 7 8
9 10 11 12
13 14 15 16
StepNumber
DSUB-TRACKS1-16
D
1 2 3 4
4x4-BLAYOUT:
5 6 7 8
9 10 11 12 13 14 15 16
1 2 3 4
5 6 7 8
9 10 11 12
13 14 15 16
1 2 3 4
16+VelocityLAYOUT:
5 6 7 8 9 10 11 12 13 14 15 16
2H 3H 4H 5H 6H 7H 8H 9H 10H 11H 12H 13H 14H 15H 16H
1L
1M
1H
2M 3M 4M 5M 6M 7M 8M 9M 10M 11M 12M 13M 14M 15M 16M
VelL=32
VelM=80
VelH=127
2L 3L 4L 5L 6L 7L 8L 9L 10L 11L 12L 13L 14L 15L 16L
StepNumber
DSUB-TRACKS1,2..
1 2 3 4
8x2LAYOUT:
5 6 7 8 9 10 11 12 13 14 15 16
StepNumber
DSUB-TRACKS1-8
DSUB-TRACKS9-16
12345678
9 10 11 12 13 14 15 16
RecQuantize設定の追加
リアルタイム・レコーディング時にクオンタイズをかけながら
の記録が可能になりました。
1. GLOBAL ボタンを押して、グローバル・モードに入ります。
2. クオンタイズの境界値はグローバル・モードのパッド A-12 に追
加された「RECORDINGS」で設定します。
Rec Input
Quantized time
STEPSTEP STEP
(value: 1/1Step)
♪ ♪ ♪ ♪
♪ ♪
♪♪
■ RecQuantizeの設定値
パッド位置 グローバル・パ
ラメーター名
PARAM ノブ Value(太字は初期値) パラメーターの詳細、備考
A-12 RECORDINGS PARAM1 None, 1/8Step, 1/4Step,
1/2Step, 1/1Step
None では効果なし
(旧バージョン同等).
7
新しいステップ・レコーディング
従来のゲート・モードで任意のステップをオン / オフする入力
方法のほか、最初のステップから順に入力するステップ・レコー
ディング方式を追加しました。
1. シーケンサーが停止している状態で、 (REC)ボタンを押して
からトラック A 〜 D ボタンを押します。
2. キーボード・モード(トラック D の場合はドラムパッド・モード)
に切り替わり、最初のステップが点滅して入力待機状態になりま
す(待機中のステップが白色で点滅します)。
REST
Next Step (or TIE)
STOP (and Exit)
3. キーボード(64 パッド)または REST ボタン等を押さえます。ディ
スプレイにノート名、REST などが表示されます。
4. キーボードから指を離すと、そのステップにノート、休符、タイが
記録され、自動的に次のステップに進みます。
ノートの入力
キーボード(トラック D の場合はドラムパッド)を押さえると、
ディスプレイにノート名が表示されます。ノート名を確認し、よ
ければキーボードから指を離すと、ノートが記録されます。
TIP キーボードから指を離す前に複数押さえることで和音も入力で
きます。
休符の入力
REST ボタンを押すと、休符が記録されます。
タイの入力
キーボードを押したまま Next Step ボタンを押します。ノートは
前のステップの同じノートに繋がって記録されます。
TIP 入力対象のステップはステップ(パッド)を押すことで変更でき
ます。
5. 規定のステップ数まで入力が終わると、自動的にステップ・レコー
ディングが終了します。
停止ボタンを押すか、別のモードに移るとステップ・レコーディ
ングの途中でも終了します。
StepCopy機能の追加
1つあるいは複数のステップの全情報を別のステップにコピー
できるようになりました。ゲート / ピッチ / モジュレーション
の各モードで使用できます。
1. コピーしたいステップを押しながら SHIFT ボタンを押すとディス
プレイに「Copy Step, Select Dest. Start Step」と表示され、コピー
元のステップの白 LED と SHIFT ボタン LED が点滅します。
TIP 複数のステップボタンを押した場合は、その間のすべてのステッ
プがコピー元になります。
TIP もう一度 SHIFT ボタンを押すか、別のモードに移るとキャンセ
ルされます。
2. コピー先の開始ステップを押します。
「Step Copied」と表示されコピーが完了します。
TIP 他のトラックにコピーするときは、他のトラック・ボタンを押し
ます。
 メロディ・トラック A 〜 C からトラック D へのコピーはできません。
逆に、ドラム用のトラック D からトラック A 〜 C へのコピーもでき
ません。
8
 複数ステップをコピーするときなどで、ステップ 64 を超える場合
は超えた部分が切り捨てられます。
その他の機能
SHIFT ボタンのラッチ
SHIFT ボタンを素早く 2 回押すと SHIFT ボタンがラッチされ、
SHIFT ボタンを押したままの状態と同じになります。
SHIFT ボタンを押しながら他のボタンを押す操作を行うときに
便利です。ラッチ中は SHIFT ボタンが点滅し、点滅中にもう一度
SHIFT ボタンを押すと、ラッチが解除されます。
LOOP モードの仕様変更
ループ設定中、ゲート・モードやピッチ・モードに移ってもルー
プ動作が解除されないようにしました。
キーボード・モードの仕様変更
従来の "TRANSPOSE"、"OVERDUB(OVERRIDE から名称 変更し
ました)" 設定に加え、新たに "OVERWRITE" を追加しました。
OVERWRITE の場合、キーボード入力をしている間はシーケンス
の再生音が鳴らなくなります。
LED 輝度の最適化
AC アダプター使用時、LED 輝度を最適化し、GATE ON/OFF の
差をわかりやすくしました。
 USB バスパワーで使用中のときは旧バージョン同等になります。

Other Korg Recording Equipment manuals

Korg EASYSTART M50 User manual

Korg

Korg EASYSTART M50 User manual

Korg KAOSS PAD KP2 User manual

Korg

Korg KAOSS PAD KP2 User manual

Korg D8 User manual

Korg

Korg D8 User manual

Korg volca sample User manual

Korg

Korg volca sample User manual

Korg ToneWorks AX10B User manual

Korg

Korg ToneWorks AX10B User manual

Korg Volca Sample User manual

Korg

Korg Volca Sample User manual

Korg A5 Guitar User manual

Korg

Korg A5 Guitar User manual

Korg MPS-10 User manual

Korg

Korg MPS-10 User manual

Korg EX-800 User manual

Korg

Korg EX-800 User manual

Korg EASYSTART D1600MKII Product information sheet

Korg

Korg EASYSTART D1600MKII Product information sheet

Korg Electribe SX ESX-1SD User manual

Korg

Korg Electribe SX ESX-1SD User manual

Korg Pa5X Installation and operation manual

Korg

Korg Pa5X Installation and operation manual

Korg SDD-3000 User manual

Korg

Korg SDD-3000 User manual

Korg ih User manual

Korg

Korg ih User manual

Korg Pandora PX1 User manual

Korg

Korg Pandora PX1 User manual

Korg SDD-200 User manual

Korg

Korg SDD-200 User manual

Korg i30 User manual

Korg

Korg i30 User manual

Korg D32XD Installation and operation manual

Korg

Korg D32XD Installation and operation manual

Korg volca-fm2 User manual

Korg

Korg volca-fm2 User manual

Korg ToneWorks Pandora PX3B User manual

Korg

Korg ToneWorks Pandora PX3B User manual

Korg M3 User manual

Korg

Korg M3 User manual

Korg PA800 User manual

Korg

Korg PA800 User manual

Korg SQD-8 User manual

Korg

Korg SQD-8 User manual

Korg KAOSS PAD KP3 Product information sheet

Korg

Korg KAOSS PAD KP3 Product information sheet

Popular Recording Equipment manuals by other brands

Valcom V-9927A user guide

Valcom

Valcom V-9927A user guide

Festo CPX Series Brief description

Festo

Festo CPX Series Brief description

Kenwood DX-7 instruction manual

Kenwood

Kenwood DX-7 instruction manual

Test-Um TG100 operating instructions

Test-Um

Test-Um TG100 operating instructions

KAP JAGUAR 2008 - XF instruction manual

KAP

KAP JAGUAR 2008 - XF instruction manual

KLING & FREITAG CP+ user manual

KLING & FREITAG

KLING & FREITAG CP+ user manual

Lexicon PCM-41 owner's manual

Lexicon

Lexicon PCM-41 owner's manual

Bender COMTRAXX CP9-Kit Series quick start

Bender

Bender COMTRAXX CP9-Kit Series quick start

RTW TouchControl 5 quick start guide

RTW

RTW TouchControl 5 quick start guide

Blueshape MVQUICKAL operating instructions

Blueshape

Blueshape MVQUICKAL operating instructions

Siemens 538-735 installation instructions

Siemens

Siemens 538-735 installation instructions

Dakota Digital DSL-1 E quick start guide

Dakota Digital

Dakota Digital DSL-1 E quick start guide

Roland SDE-1000 Service notes

Roland

Roland SDE-1000 Service notes

Motorline professional SCMV150 installer and user manual

Motorline professional

Motorline professional SCMV150 installer and user manual

PRESONUS FIREPOD manual

PRESONUS

PRESONUS FIREPOD manual

Mitsubishi Electric DX-TL2500E Installation and operation manual

Mitsubishi Electric

Mitsubishi Electric DX-TL2500E Installation and operation manual

Teknion UTS installation guide

Teknion

Teknion UTS installation guide

tau T-COMM installation guide

tau

tau T-COMM installation guide

manuals.online logo
manuals.online logoBrands
  • About & Mission
  • Contact us
  • Privacy Policy
  • Terms and Conditions

Copyright 2025 Manuals.Online. All Rights Reserved.