Korg prologue User manual

E 1

2
Contents
Introduction............................................................................ 3
About the owner’s manual...........................................................3
prologue Key Features................................................................3
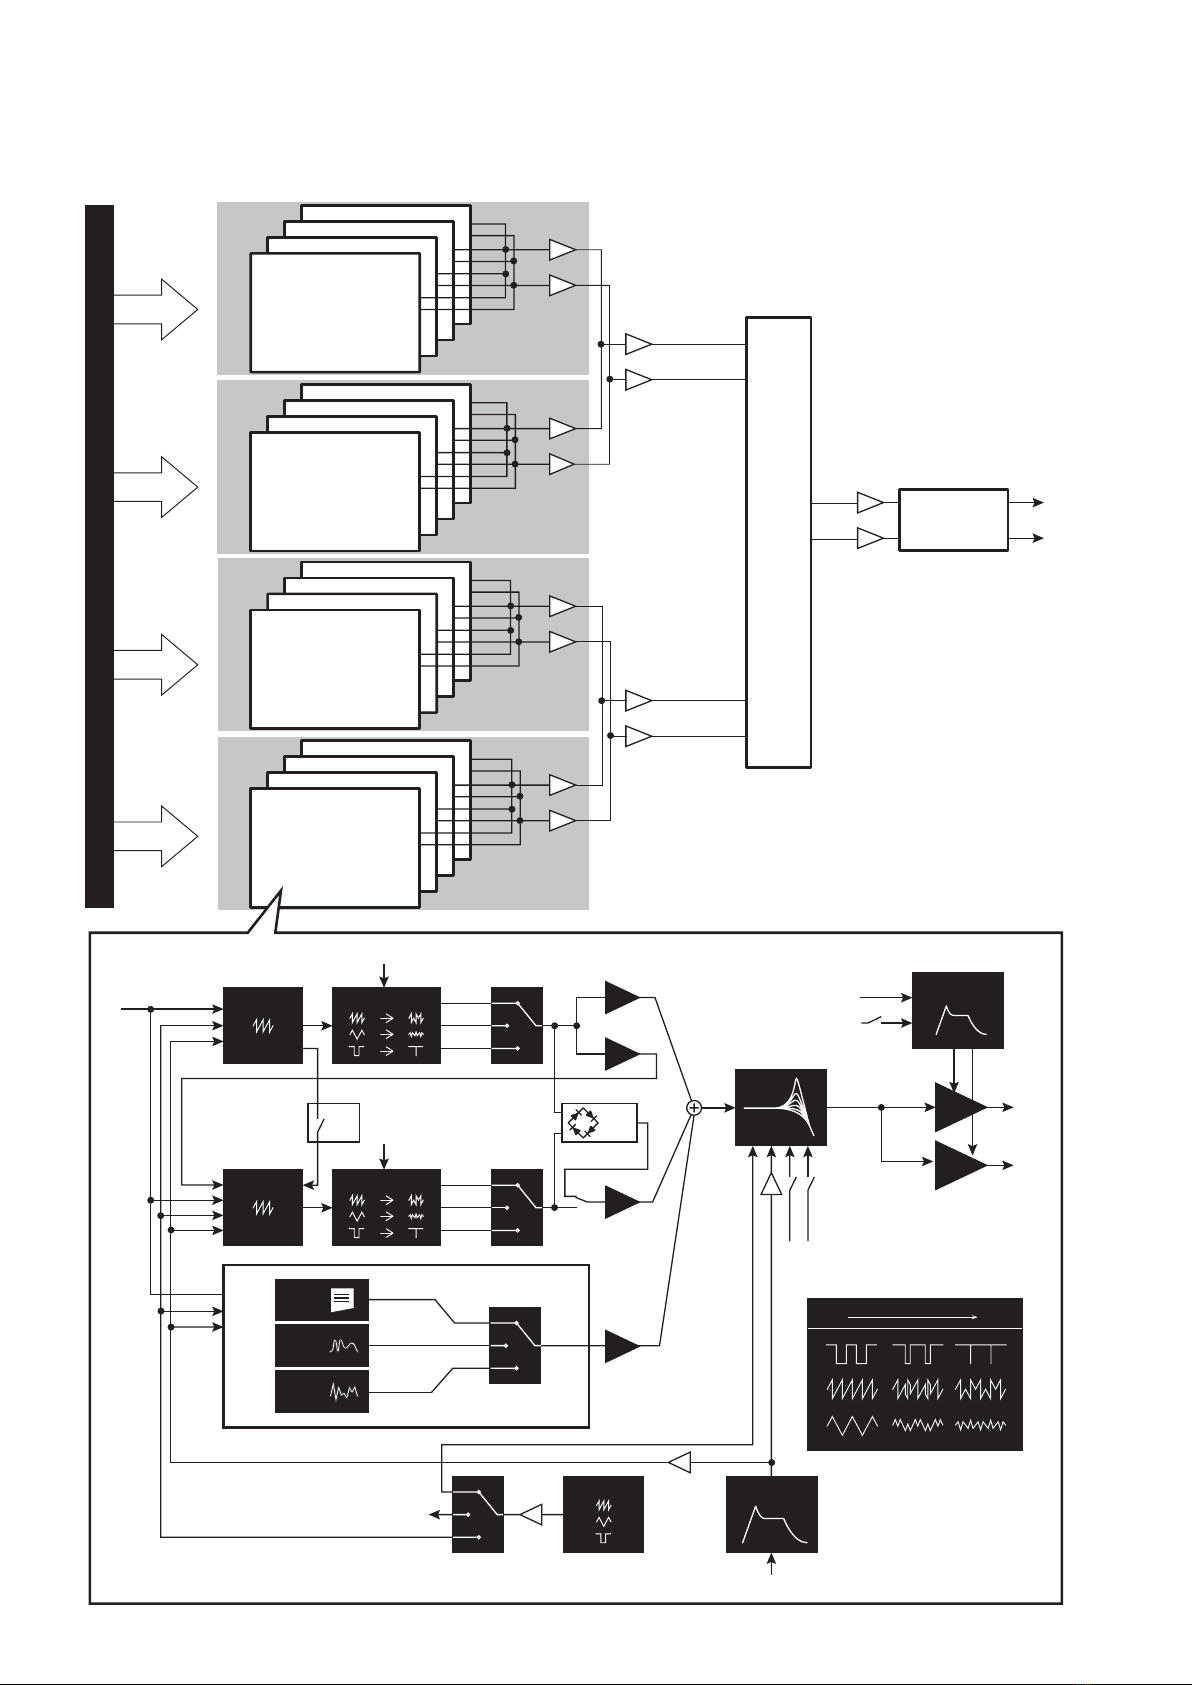
Block Diagram ............................................................................4
Controls and Connections .................................................... 5
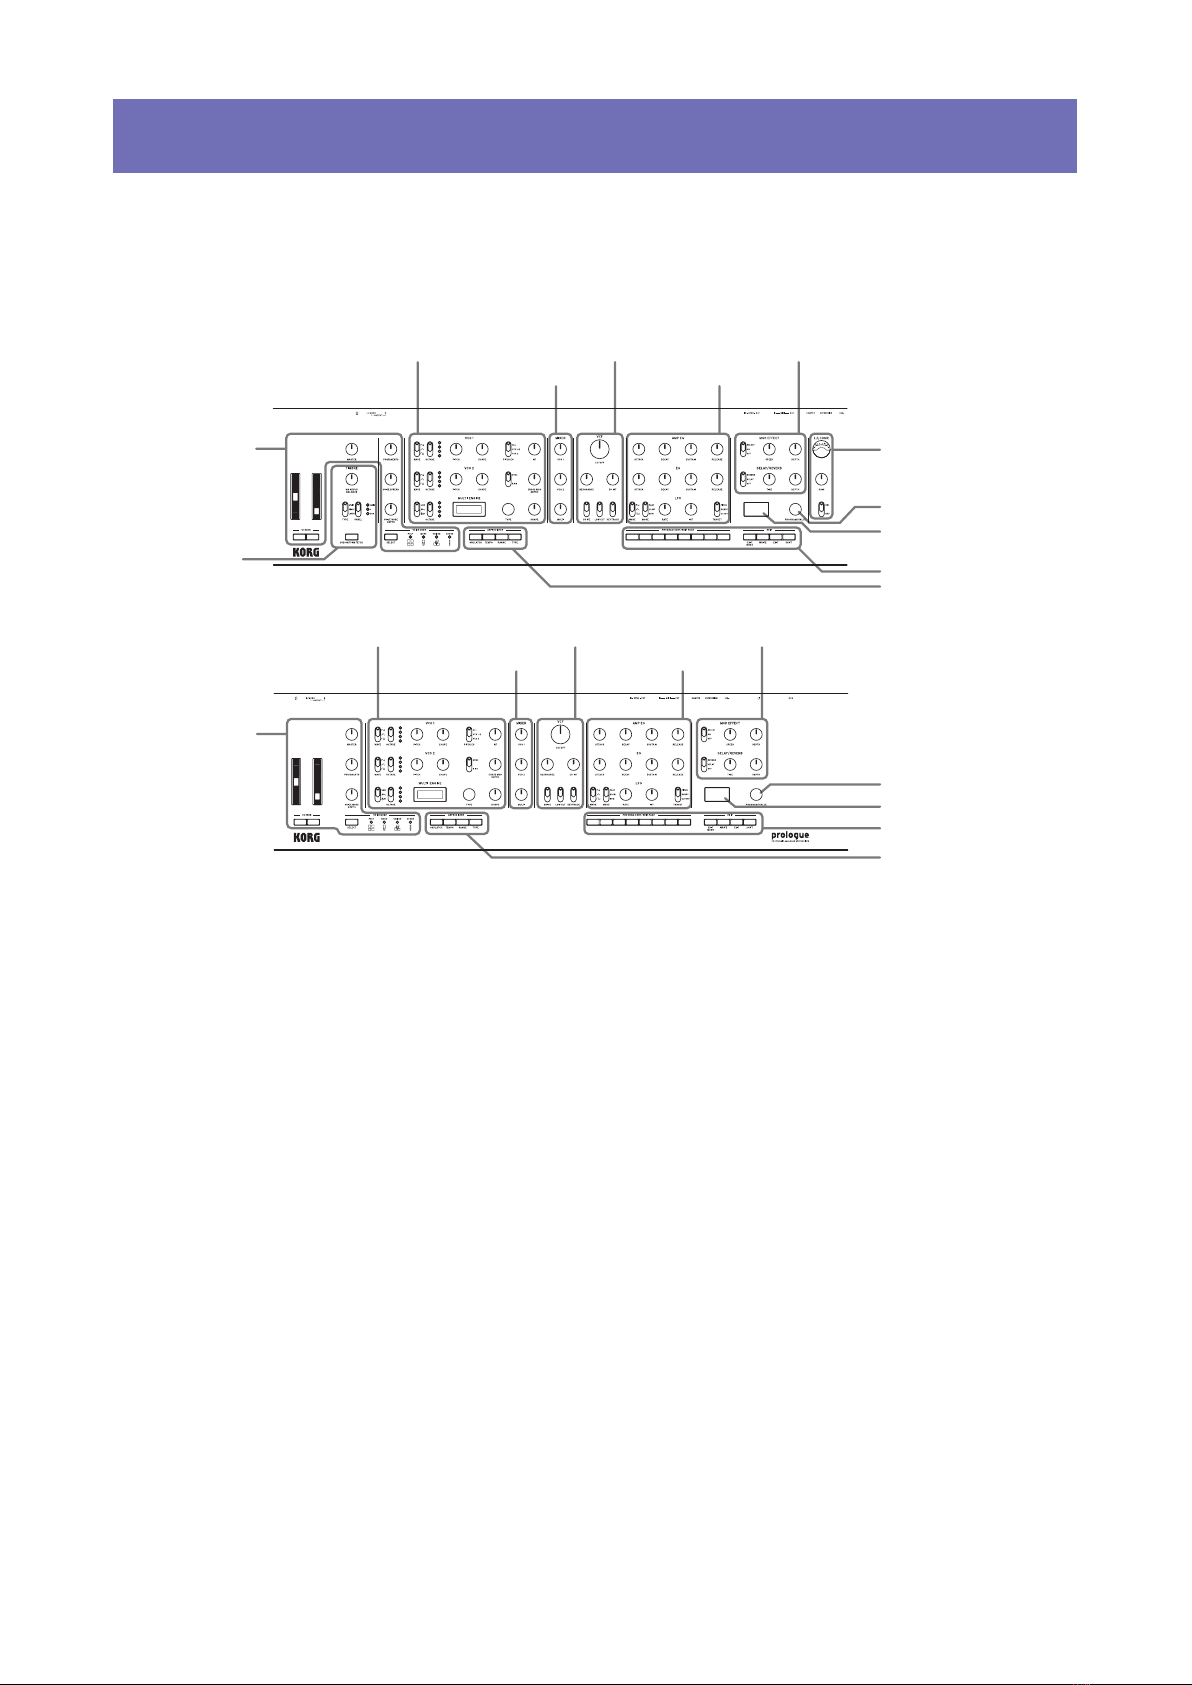
Front Panel Controls ...................................................................5
Rear Panel Connections .............................................................7
Turning the prologue On and Off.................................................9
Playing Programs..................................................................11
Selecting and Playing a Program .............................................. 11
Using the program sort function ................................................12
Using the live set.......................................................................13
Using the arpeggiator................................................................15
Programs .............................................................................. 17
Program Architecture ................................................................ 17
Creating Sounds .......................................................................18
Saving a Program .....................................................................19
Basic Parameter Editing...................................................... 20
MASTER controls .....................................................................20
TIMBRE section........................................................................22
VCO 1/VCO 2/MULTI ENGINE section .....................................24
MIXER section ..........................................................................30
FILTER section .........................................................................31
EG/LFO section ........................................................................33
EFFECT section........................................................................36
L.F. COMP. section (prologue-16 only) ......................................38
About timbre .............................................................................39
Edit Mode.............................................................................. 43
How to enter the Edit mode.......................................................43
PROGRAM EDIT mode ............................................................45
FUNCTION mode .....................................................................52
GLOBAL EDIT mode ................................................................54
Other functions .................................................................... 62
Tuning .......................................................................................62
Restoring the Factory settings ..................................................62
Shortcuts using the SHIFT button .............................................63
Using with other devices..................................................... 64
Syncing to instruments with SYNC IN/OUT jacks......................64
Using with other MIDI devices...................................................66
Data list................................................................................. 70
Specications ...................................................................... 78
MIDI Implementation Chart ................................................. 80

3
Introduction
About the owner’s manual
Prologue comes in two variations, prologue-16 with a 61-key keyboard, and pro-
logue-8 with a 49-key keyboard.
The documentation for this product consists of the following:
•
Quick Start Guide (included)
•
Owner’s Manual (what you’re reading)
prologue Key Features
•
The prologue is a keyboardist-oriented analog synthesizer featuring the best of
Korg’s expertise.
•
Redesignedandrenedanalogcircuitry.Theprologue-16andtheprologue-8pro-
vide respectively 16 and 8 analog voices.
•
Each voice includes a MULTI ENGINE providing a noise generator, a VPM oscilla-
tor, and the possibility to load user programmed oscillators.
•
Equippedwithhighqualitydigitaleects(MODULATION,REVERB,DELAY).
•
Canbeusedasatwotimbresynthesizer,insplit,crossfade,orlayerconguration.
•
Anewlydesignedanalogeect(L.F.COMP.)providesaboostandcompressionin
the low frequency band for a powerful sound (only on prologue-16).
•
500 program locations (250 loaded with factory presets) can be recalled instantly,
and used to store programs.
•
Provides multiple ways to sort and search through programs.
•
Real-time oscilloscope provides visual feedback of parameter changes.
•
Sync In and Sync Out jacks allow you to expand your session setup.

4
Block Diagram
16/8 VOICE ASSIGNER
VOICE 1
VOICE 2
VOICE 3
VOICE 4
LEFT
RIGHT
LEFT
RIGHT
VOICE 5
VOICE 6
VOICE 7
VOICE 8
LEFT
RIGHT
DIGITAL
EFFECTS
LEFT
RIGHT
VOICE 9
VOICE 10
VOICE 11
VOICE 12
LEFT
RIGHT
LEFT
RIGHT
VOICE 13
VOICE 14
VOICE 15
VOICE 16
LEFT
RIGHT
OUTPUT
L
OUTPUT
R
*prologue-16 only
*prologue-16 only
*prologue-16 only
L.F. COMP
VOICE
VCO 1 SAW
SQR
PITCH
PITCH
LFO
EG
LFO
VCO 2 WAVE SHAPE
OSC
SYNC
SAW
EG Intkeytrack
PITCH EG
int
SQR
TRI
TRI
FM
LFO
WAVE SHAPE
RING
MOD
VCA
VCF
AMP EG
EG
int
velocity
velocity
VCO1
level
VCO2
level
MULTI
level
CROSS MOD
depth
gate
gate
0% 100%
wave shape amount
VCA
L
R
EG
USR
VPM
NOISE
MULTI ENGINE
EG
LFO
NOISE
VPM
SHAPE LFO
LFO
LFO
PITCH
USR

5
Controls and Connections
Front Panel Controls
Thisdiagramshowsthelayoutofthefrontpanelknobs,switches,andbuons.
1. MASTER controls
2. TIMBRE section
3.
VCO 1/VCO 2/MULTI
ENGINE section
4. MIXER section
5. FILTER section
6. EG/LFO section
9. EDIT section
10. ARPEGGIATOR sectio
n
7. EFFECT section
8. L.F. COMP. section
(prologue-16 only)
prologue-16
1. MASTER controls
3.
VCO 1/VCO 2/MULTI
ENGINE section
4. MIXER section
5. FILTER section
6. EG/LFO section
9. EDIT section
10. ARPEGGIATOR sectio
n
7. EFFECT section
2. TIMBRE section
For the prologue-8, TIMBRE
related parameters are
available in program edit
mode.
prologue-8
11.
PROGRAM/VALUE knob
12. Display
11.
PROGRAM/VALUE knob
12.
Display
1.
MASTER controls
Pitch bend wheel
Modulation wheel
OCTAVEbuons
MASTERknob
PORTAMENTOknob
VOICESPREADknob(prologue-16
only)
VOICE MODE
VOICEMODESELECTbuon
VOICEMODEDEPTHknob
2.
TIMBRE section
SUBON/PGMFETCHbuon
(pro-
logue-16 only)
MAIN/SUBBALANCEknob
TYPEswitch
PANELswitch
3.
VCO 1/VCO 2/MULTI ENGINE section
VCO 1
WAVEswitch
OCTAVEswitch
PITCHknob
SHAPEknob
VCO 2
WAVEswitch
OCTAVEswitch
PITCHknob
SHAPEknob
MODULATION
PITCHEGswitch
INT knob
SYNC/RINGswitch
CROSSMODDEPTHknob

6
MULTI ENGINE
NOISE/VPM/USRswitch
OCTAVEswitch
Display
TYPEknob
SHAPEknob
4.
MIXER section
VCO 1 knob
VCO 2 knob
MULTI knob
5.
FILTER section
VCF
CUTOFFknob
RESONANCEknob
EG INT knob
DRIVEswitch
LOW CUT switch
KEYTRACKswitch
6.
EG/LFO section
AMP EG
ATTACKknob
DECAYknob
SUSTAINknob
RELEASEknob
EG
ATTACKknob
DECAYknob
SUSTAINknob
RELEASEknob
LFO
WAVEswitch
MODEswitch
RATEknob
INT knob
TARGETswitch
7.
EFFECT section
MOD EFFECT
OFF/ON/SELECTswitch
SPEEDknob
DEPTHknob
DELAY/REVERB
OFF/DELAY/REVERBswitch
TIME knob
DEPTHknob
8.
L.F. COMP. section (prologue-16 only)
VU meter
GAINknob
OFF/ONswitch
9.
PROGRAM/VALUE knob
10.
Display
11.
EDIT section
PROGRAM SORT/EDIT PAGE
Buons1–8
EDIT
EDITMODEbuon
WRITEbuon
EXITbuon
SHIFTbuon
12.
ARPEGGIATOR section
ON/LATCHbuon
TEMPObuon
RANGEbuon
TYPEbuon

7
Rear Panel Connections
The illustration below shows a typical example of connections for the prologue.
Connect your equipment according to the needs of your own system.
Besurethatthepoweronallofyourdevicesisturnedobeforeyoumake
connections. Leaving the power on when you make connections may cause
malfunctions, or damage your speaker system and other components.
1.
~ACV (AC power connector)
ConnecttheACpowercord(included)tothisjack.
2.
(Power switch)
Thisturnsthepoweron/o.
3.
(USB B connector)
ThisconnectorallowstheprologuetoexchangeMIDImessageswithyourcom-
puter.
4.
EXPRESSION jack
ConnectanoptionalXVP-20volume/expressionpedal(soldseparately)oran
XVP-10 expression pedal (sold separately) to control the assigned parameters.
5.
DAMPER jack
ConnectanoptionalDS-1Hdamperpedal(soldseparately)oraPS-1/PS-3pedal
switch(soldseparately)tocontrolthedampereect.
This instrument does not feature a half-damper function.
Computer
Sound module, rhythm machine, etc. MIDI keyboard, rhythm machine, etc.
Groove machine
Powered monitor
Headphones
MIDI cable
USB cable
MIDI OUT
MIDI IN
SYNC IN
USB
INPUT
INPUT
Expression Pedal
Damper Pedal, Pedal Switch, etc.
to AC outlet
Power cord
(included)
mini cable
6. MIDI IN/OUT connectors
7. SYNC IN/OUT jacks5. DAMPER jack
8. OUTPUT L/MONO, R jacks
1. ~ACV (AC Power connector)
4. EXPRESSION jack2. (Power switch)
3.
(
USB B connector
)
9. (Headphones jack)
prologue-16

8
6.
MIDI IN/OUT connectors
TheseconnectorsallowtheprologuetoexchangeMIDImessageswithanexter-
nalMIDIdevice.Referto“UsingwithotherMIDIdevices”(p.66) for details.
7.
SYNC IN/OUT jacks
Use a stereo mini-cable to connect the prologue to the Korg volca series and
other instruments. This is used to synchronize the steps of the prologue with the
pulsessentfromtheaudiooutjackofconnecteddevices,DAWsandsoon.Refer
to“SyncingtoinstrumentswithSYNCIN/OUTjacks”(p.64) for details.
8.
OUTPUT L/MONO, R jacks
These jacks are for stereo output. Connect these jacks to a powered monitor
speakerormixer.ThevolumelevelisadjustedusingtheMASTERknob.Toout-
putmonauralsound,usetheOUTPUTL/MONOjack.
9.
(Headphone jack)
This jack outputs the same signal as that of the OUTPUT jack. Connect your
headphone plug here.
Connecting to audio devices
•
Connect your powered monitor speaker, mixer or other components to the OUT-
PUTjack(monauraloutput)oftheprologue.Adjustthevolumelevelusingthe
MASTERknob.
•
Connect your headphones to the headphones jack. This jack outputs the same sig-
nal as that of the OUTPUT jack.
Connecting to MIDI devices or a computer
•
ToexchangeMIDImessageswithanexternalMIDIdevice,connectthedeviceto
theMIDIIN/OUTconnectorsontheprologue.
•
ToexchangeMIDImessageswithyourcomputer,connectyourcomputertothe
USBBconnectorontheprologue.
TIP Referto“UsingwithotherMIDIdevices”(p.66)fordetails.
Connecting the SYNC IN and OUT jacks
•
UsetheSYNCINandOUTjackswhenyouwanttosynchronizetheoutputpulses
andstepsfromtheSYNCIN/OUTjacksoftheKorgvolcaseriesortheaudioout
jacksofaDAW. Use a stereo mini-cable for this connection.
•
TheSYNCOUTjacksendsa5Vpulseof15msatthebeginningofeachstep.
TIP Referto“SyncingtoinstrumentswithSYNCIN/OUTjacks”(p.64) for
details.

9
Turning the prologue On and O
Connecting the power cord included (with this keyboard)
Makesurethattheprologue’spoweristurnedo.
1. Connect the included power cord to the AC Power connector.
MakesurethatyourACoutletisthecorrectvoltageforyourinstrument.
Useonlytheincludedpowercord.Usinganydierentpowercordmay
cause malfunctions or other issues.
2. Make sure that any external output devices such as powered monitor speakers
are turned o before connecting them to the prologue.
TIP IfyouwanttoconnectaMIDIdeviceorcomputertotheprologue’sMIDI
connectorsorUSBBconnectorinordertousetheprologue’skeyboard
andcontrollerstocontrolanexternalMIDItonegenerator,orifyouwant
touseanotherMIDIkeyboardorasequencertoplaytheprologue’ssound
generator,youwillneedtoconguretheseings.Referto“Usingwith
otherdevices”(p.64)fordetails.
Turning the prologue On
1. Make sure that both the prologue and any external output devices such as
powered monitor speakers are turned o, and turn the volume of all devices
all the way down.
2. Turn on the Power switch on the rear panel of the prologue.
Theword“Tuning...”willappearonthedisplay,andtheinstrumentwillenter
Tuningmodefortheanalogsynthesizercircuit,foraround15seconds.After
this, the prologue will return to Play mode.
3. Turn on any external output devices such as powered monitor speakers.
4. Adjust the volume of your external output equipment, and adjust the pro-
logue’s volume using the MASTER knob.
Turning the prologue O
AnyProgramdataintheprologuethathasnotbeensavedwillbelostwhenthe
poweristurnedo.BesuretosaveanyProgramandotherimportantdatathatyou
haveedited(p.19,“SavingaProgram”).

10
1. Lower the volume of your powered monitors or external output system, and
turn them o.
2. Turn o the Power switch on the rear panel of the prologue.
Onceyouhaveturnedtheprologueo,waitabout10secondsbeforeturn-
ing the prologue on again.
Auto Power O Feature
TheprologuefeaturesanAutoPowerOfeaturethatcanautomaticallyturnthe
prologueoafter4hourshaveelapsedwithnooperationoftheknobs,switches,
buons,orkeyboardoftheprologue.Bydefault,thefactoryseingfortheAuto
PowerOisenabled.TheAutoPowerOcanbedisabledusingthestepsbelow.
1. Press the EDIT MODE buon.
The prologue will enter the Edit Mode, and the display will look like the illustra-
tion shown below.
2. Turn the PROGRAM/VALUE knob, and select GLOBAL EDIT.
TIP GLOBALEDITcanalsobeselectedbypressingtheEDITMODEbuon.
3. Press buon 8 twice.
“AutoPowerO”willbedisplayed.
4. Turn the PROGRAM/VALUE knob, and select “O”.
5. Press the EXIT buon.
The prologue will enter the Play mode, and the display will indicate the current
Program.
TIP SeingsinGLOBALEDITaresavedautomatically.
2, 4
531

11
Playing Programs
Selecting and Playing a Program
The prologue has 500 program locations of which 250 are preloaded with factory
presets.Thepresetprogramsareassignedtotherst250 locations and are organized
into sound categories for easy selection. The remaining locations contain the initial-
ization program that can be used as a starting point when creating user programs.
1. Enter the Play mode.
When the prologue is turned on, it will automatically enter the Play mode.
InthePlaymode,verifythattheEDITMODEbuononthefrontpanelareunlit.
2. Turn the PROGRAM/VALUE knob to select a Program.
ThedisplaywillindicatetheProgramnameandnumber.Referto“Program
List”(p.72)fordetails.
TIP In addition to showing Program name and number, the display can also
be used as an oscilloscope, to show the electrical signals created by the
waveform of the sound.
3. Play the keyboard and use the controls on the front panel, such as the OC-
TAVE buons or the wheel.
TheOCTAVEbuons on the left can be used to transpose the
sound within a range of -2 to +2 octaves.
Move the pitch bend wheel up and down to change the pitch, and
move the modulation wheel up and down to change the assigned
parameters.
2
1Make sure the button is unlit.

12
InPlaymode,theLEDstotheright
oftheVOICEMODESELECTbuon
show the Voice mode status of the
selected program. Press the VOICE
MODESELECTbuontoswitch
betweenandplayindierentVoice
modes.Referto“VOICEMODE”
(p.20) for details.
Using the program sort function
Sorting and selecting programs
The Korg prologue features a program sort function that lets you search for pro-
gramsinmanydierentways.Usethisfunctiontoquicklyndyourfavoritepro-
grams from the multitude of programs available, using the method you like.
1. In Play mode, press one of the PROGRAM SORT/EDIT PAGE buons from 1
to 8.
The programs before and after the currently selected program will be resorted,
accordingtothesortfunctionbuonthatyoupressed.Pressthesamebuon
againtojumptothenextblock(thenextcategory,alphabeticalleerandsoon),
while the programs remain in order.
Program sort function list
Button Type Details
1PROG NUM Sorts by program number.
2CATEGORY
Sorts by program category.
Holddownbuon2toenterthecategorypageinPRO-
GRAMEDITmode(p.45,“Category”)andchangethe
programcategory.PresstheWRITEbuontosavethe
program if you have made any changes (p.19,“Saving
aProgram”).
3ALPHABETICAL Sortstheprogramsinalphabetical(ABCorder).
Holddownbuon3toenterthecategorypageinPRO-
GRAMEDITmode(p.45,“Buon2(PROGRAM
NAME)”)andchangetheprogramname.Pressthe
WRITEbuontosavetheprogramifyouhavemadeany
changes (p.19,“SavingaProgram”).

13
Button Type Details
4LIKE Sortsbyprogramsthatyouhave“liked.”
Holddownbuon4tolikeaprogram.Toremovealike
from a program, select the program and then hold down
buon4again.
5FREQUENT Sorts programs by how often how you have used them.
6ENVELOPE
Sorts programs by the length of the EGs on the main tim-
bre.
7RANDOM Sorts programs in random order.
8LIVE SET Sorts the programs that have been registered in the live
set.
Refer to “Usingtheliveset”(p.13)for more details on
the live set.
2. Turn the PROGRAM/VALUE knob to select a program.
Using the live set
With the live set feature on the prologue, you can register programs to use on the
PROGRAMSORT/EDITPAGEbuons1through8,andthenusetheprogramsort
functiontoquicklyrecallthem.Therearefourbanksintheliveset,fromAtoD.
Registering programs to the live set
Use the live set to register programs that you frequently use when performing live.
1. In Play mode, select a program to register to the live set.
2. Hold down PROGRAM SORT/EDIT PAGE buon 8.
“REGISTER”willappearonthedisplay.
3. Turn the PROGRAM/VALUE knob to select the bank (A–D) where the pro-
gram will be registered.
ThePROGRAMSORT/EDITPAGEbuons(from1–8)willlightupforpro-
gramsthatareregisteredtotheliveset.Ifnoprogramisregisteredtoabuon,
thatbuonwillblink.
TIP PresstheEXITbuontocancel.

14
4. Press a buon for the program you wish to register, using PROGRAM SORT/
EDIT PAGE buons 1–8.
Theexistingprogramwillberegisteredasaliveset,andthemessage“Complete”
will appear on the display.
Deleting a program registered to the live set
Youcandeleteprogramsthathavebeenregisteredtotheliveset.
Using step 4 (p.13,“Registeringprogramstotheliveset”),holddownthebut-
ton(whichwillbelit)fortheprogramyouwishtodelete,usingPROGRAM
SORT/EDITPAGEbuons1–8.
Theprogramregisteredtothebuonyouhavehelddownwillbedeleted,and
themessage“Cleared”willappearonthedisplay.
Recalling a program from the live set
1. In Play mode, press PROGRAM SORT/EDIT PAGE buon 8.
“LIVE SET”willappearonthedisplay.
2. Turn the PROGRAM/VALUE knob to select the bank (A–D).
IfaprogramhasbeenregisteredtoalivesetforoneofthePROGRAMSORT/
EDITPAGEbuons1–8,thatbuonwillblink.
3. Press one of the PROGRAM SORT/EDIT PAGE buons 1–8 to recall the pro-
gram.
Theprogramregisteredtothebuonyouhavepressedwillberecalled,andthe
program name will appear on the display.

15
Using the arpeggiator
The Korg prologue includes an arpeggiator function, which automatically plays pro-
grams in patterns based on the keys you press.
Performing with the arpeggiator
1. In Play mode, press the ARPEGGIATOR ON/LATCH buon.
Thearpeggiatorwillturnon,andtheON/LATCHbuonwilllight.
2. Play the keyboard.
The arpeggiator will operate using the key you pressed as a base note, while you
are playing the keyboard.
TIP HoldingdowntheON/LATCHbuonwillturnLATCHon,andtheON/
LATCHbuonwillblink.WhenLATCHison,thearpeggiatorwillcon-
tinuetofunctionevenwhenyoutakeyourhandsothekeyboard.Press
theON/LATCHbuononcemoretoturnLATCHo.
Changing the arpeggiator settings
Setting the tempo
This sets the arpeggiator tempo.
1. Turn the PROGRAM/VALUE knob while pressing the ARPEGGIATOR
TEMPO buon.
YoucanadjusttheBPMwithinarangeof30.0to600.0.
YoucanalsotaptheTEMPObuonrepeatedlytoinputtheBPMusingthetap
tempo feature.
Setting the octave range
1. Press the ARPEGGIATOR RANGE buon to switch between octave ranges.
EachtimetheRANGEbuonispressed,theoctaverangewillchangewithin
1–4octaves.

16
Setting the arpeggiator type
This sets the arpeggiator type.
1. Press the ARPEGGIATOR TYPE button to set the arpeggiator to one of the
following types.
Type Function
Manual The arpeggio will play in the order you play the keys.
Rise The arpeggio will play from lower notes to higher notes.
Fall The arpeggio will play from higher notes to lower notes.
RiseFall The arpeggio will play from lower notes to higher notes, and
then go back down from high to low.
Random One random note will be selected and played at a time for each
note that you play.
Poly Random Two random notes will be played at a time from the notes that
you play.
ThiswillonlyworkwhentheVOICEMODEissetto“POLY”.

17
Programs
Program Architecture
Aprogramincludesseingsforsounds,eects,timbres,Voicemodeandarpeggia-
tor.(MASTERknob,pitchbendwheel,OCTAVEbuons,L.F.COMP.sectionand
arpeggiatorLATCHseingsarenotincludedinaprogram.)
Try editing each related parameter, and enjoy the sounds of the prologue.
VCO 1
WAVE
OCTAVE
PITCH
SHAPE
VCO 2
WAVE
OCTAVE
PITCH
SHAPE
MODULATION
PITCH EG
PITCH EG INT
SYNC/RING
CROSS MOD DEPTH
MULTI ENGINE
NOISE/VPM/USR
OCTAVE
TYPE
SHAPE
MIXER
VCO1
VCO2
MULTI
VCF
CUTOFF
RESONANCE
EG INT
DRIVE
LOW CUT
KEYTRACK
AMP EG
ATTACK
DECAY
SUSTAIN
RELEASE
EG
ATTACK
DECAY
SUSTAIN
RELEASE
LFO
WAVE
MODE
RATE
INT
TARGET
MOD EFFECT
OFF/ON/SELECT*
SPEED*
DEPTH*
DELAY/REVERB
OFF/DELAY/REVERB*
TIME*
DEPTH*
ARPEGGIATOR
ON/LATCH*
TEMPO*
RANGE*
TYPE*
SORT
Category*
PROGRAM NAME*
TIMBRE
Sub Timbre*
Edit Timbre*
Timbre Type*
Main/Sub Balance*
Main/Sub Position*
Split Point*
PEDAL & WHEEL
M.Wheel Assign
M.Wheel Range
E.Pedal Assign
Bend Range +
Bend Range −
MODULATION
LFO Key Sync
LFO Voice Sync
EG Velocity
Amp Velocity*
OTHER SETTINGS
Multi Routing
Arpeggiator*
Voice Spread
Pan Width
Portamento Mode*
Program Level*
MULTI ENGINE
Param 1-6
EFFECTS
Chorus Type*
Ensemble Type*
Flanger Type*
Phaser Type*
User Eects Type*
Delay Type*
Reverb Type*
Mod Eect Sub Type
*
Reverb/Delay Sub Type
*
Mod Eect Assign*
Reverb/Delay Assign
*
Basic Parametres
Detail Parametres
*: When the sub-timbre is enabled, changing these parameters will have no effect on timbres set in “EDIT TIMBRE”,
PROGRAM EDIT mode.
prologue-16

18
Creating Sounds
Editing a program means changing the Program’s parameters to alter its sound.
There are two way to create sounds on the prologue.
•
Select an existing Program that’s close to the sound you want, and edit that Pro-
gram’s parameters to achieve your own custom sound.
•
YoucanalsoinitializealltheProgramparameterstocreateyourownsoundfrom
scratch.
Editing an Existing Program
1. In Program mode, select the Program that you want to use as a starting point.
2. Use the knobs and switches on the front panel.
TakeamomenttoconsiderthedierencesbetweenthecurrentProgramandthe
sound you have in mind, and use the front panel controls to edit the necessary
parameters.
TIP Fordetailsonhowthepitch,sound,andvolumechangewhenusingthe
knobsandswitches,referto“BasicParameterEditing”(p.20).
We recommend that you save the Program on the prologue after editing
thesound.Anyeditsthatyoumakewillbelostifyouturnothepower
orrecalladierentProgram.Fordetails,referto“SavingaProgram”
(p.19).

19
Saving a Program
We recommend that you save your Program on the prologue after editing the sound.
Anyeditsthatyoumaketothecurrentprogramwillbelostifyouturno
thepowerorrecalladierentprogrambeforesaving.
1. Edit the program in Play mode.
Fordetails,referto“BasicParameterEditing”(p.20).
2. Press the WRITE buon; the prologue will enter the Write standby mode, and
the WRITE buon will blink.
Themessage“Wheretowrite?”willappearinthedisplay.
3. Turn the PROGRAM/VALUE knob to select the Program number where your
new sound will be saved.
TIP PresstheEXITbuontocanceltheoperation.
4. Press the WRITE buon once more.
TheProgramwillbesavedininternalmemory,andthemessage“Complete”
will appear in the display.
NeverturnothepowerwhileProgramsarebeingsaved.Doingsomay
destroy the internal data.

20
Basic Parameter Editing
In this section, we’ll explain the basic parameters that make up a program.
The basic parameters are assigned to the knobs and switches on the front panel.
MASTER controls
Fordetailsonthemodulationwheel,pitchbendwheel,OCTAVEbuonsandMAS-
TERknob,referto“SelectingandPlayingaProgram”(p.11).Fordetailsonthe
SUBON/PGMFETCHbuon,referto“Enablingthesub-timbre”(p.39).
PORTAMENTO knob [OFF, 0...127]
Speciesthelengthoftheportamento.
The further the knob is turned to the right, the longer the portamento time will be.
VOICE SPREAD knob (prologue-16 only) [0...127]
Thisadjuststheamountofvoicespreadthatisappliedtoachieveastereoeect.
Thefurthertheknobisturnedtotheright,thestrongerthevoicespreadeectwillbe.
Thisissetin“VoiceSpread”(p.49)inPROGRAMEDITmodeontheprologue-8.
VOICE MODE
The prologue-16 features a 16-voice analog synthe-
sizer engine, and the prologue-8 features a 8-voice
analog synthesizer engine. The Voice mode func-
tioncanbeusedtocombinethesevoicesindierent
ways when playing.
Thereare4dierentVoicemodes.UsetheSELECT
buontoswitchbetweenthem.
TurntheVOICEMODEDEPTHknobtocontrola
widevarietyofeectsforeachVoicemode.
Other manuals for prologue
1
Table of contents
Other Korg Synthesizer manuals

Korg
Korg PS60 User manual

Korg
Korg Volca Drum Use and care manual

Korg
Korg Wavedrum User manual

Korg
Korg OASYS 76 User manual

Korg
Korg Mono/Poly User manual

Korg
Korg MONOLOGUE User manual

Korg
Korg Concert-5000 User manual

Korg
Korg MS-10 User manual

Korg
Korg TRITON taktile User manual

Korg
Korg minilogue User manual