Kroeger Marine LakeEze User manual

LakeEze™Ladder
Assembly Instructions
Kroeger Marine
HAND-CRAFTED IN THE USA

Important Safety Instructions:
• It is recommended that this ladder be assembled by ages 18+.
• Use personal protective equipment (not included) when operating power tools.
• Do not expose power tools to water. Use a GFCI protected power supply when operating near water.
• This ladder contains a spring-assisted lift. Use caution when springs are under tension to avoid injury.
• Ladder must be assembled in the instructed order to prevent injury.
Thank You For Your Purchase!
Our focus at Kroeger Marine has been simple—to build the highest quality, handcrafted lake
products on the market. Our innovative solutions deliver both form and function, a fine balance
between design and first-class aesthetics. Every Kroeger product is designed with you in mind.
We hope you enjoy your LakeEze™ Ladder for years to come. - Kroeger Marine
Scan the QR code to view our installation tutorial video.
Packing List
Tools
For questions contact us at 864-882-7671 or email dockandrock@kroegermarine.com
1 2/22 2/22 2
Tools Included:
• 7/16’’ Flat Wrench
• 9/16’’ Socket
• Drill/Impact Socket Adapter
• 5/32’’ and 7/32’’ Allen Wrench
• 5/16’’ Drill
Box:
• Long Ladder Side Rail (x2)
• Short Ladder Side Rail (x2)
• Plastic Step (x5)
• Corner Angle Plate (x2)
• Spring Housing (x2)
Bag A:
• 1⁄4-20 x 1 3⁄4’’ Pan Head Bolt (x18)
• 1⁄4’’ Flat Washer (x18)
• 1⁄4’’ Brass Lock Nut (x18)
Bag D:
• 1/4-20 X 2 1/2” Pan Head Bolt (x2)
• 1/4-20 x 3 1/2” Pan Head Bolt (x2)
• 1/4” Flat Washer (x4)
• 1/4” Brass Lock Nut (x4)
Bag B:
• 3/8-16 x 1 1/4” Pan Head Bolt (x8)
• 3/8-16 x 1” Pan Head Bolt (x16)
Bag E:
• 3/8 x 5” Lag Bolt (x6)
• 3/8 x 1 1/2” Lag Bolt (x6)
• 3/8” Flat Washer (x12)
Bag C:
• 3/8-16 x 1” Pan Head Bolt (x8)
Bag F:
• Lockdown Latch
• Lockdown Catch
• 10 x 1”Wood Screw (x2)
• 1/4-20 x 1 3/4” Pan Head Bolt (x1)
Additional Tools Needed (Not Included):
• Drill with 3/8’’ Chuck
• Socket/ Ratchet Wrench
• Impact Driver
• Razor Knife
• Pencil
• Measuring Tape
• Handrail Upright (x2)
• Bent Handrail (x1)
• Inner Handrail Bar (x2)
• Dock Handrail (x2)
Assembly
1) Arrange rails so that the steps will be installed upside-down (angled cuts are pointing up).
2) Bolt the steps onto the ladder rails using hardware from bag A. (Note: gure b indicates where handrail
bolts (bag D) will go. Leave these holes empty on the side you choose the handrail to go on.)
a. b.

3 2/22 2/22 4
5) Bolt spring housings to ladder using the 1 1/4”
bolts from bag B.
3) Bolt angled plates to the inside of the Long Ladder
Side Rails using the 1” bolts from bag B. (Note: short
side of angled plate bolts to the Long Ladder
Side Rail.)
7) Assemble handrail with hardware from bag C.
6) Flip ladder over and set aside.
4) Bolt the Short Ladder Side Rails to the other end
of the angled plates using the 1”bolts from bag B.
8) Bolt assembled handrail to desired side of ladder
using hardware from bag D. Use the longer bolts for
the holes that line up with the step.
Installation
The images below represent the most frequent installation situations. Cutting your deck boards is not necessary,
the cut-out views are for visualization purposes only.
9a) If dock is on 16’’ centers and the desired ladder
location is perpendicular to the deck boards, mount
as shown below with the provided backing plate.
9b) If dock is on 16’’ centers and the desired ladder
location is parallel to the deck boards, mount as
shown below directly into the frame.
9c) If dock is on 24’’ centers and the desired ladder
location is perpendicular to the deck boards, mount
as shown below directly into the frame. Line up
such that the maximum number of lags hit the
frame.
9d) If dock is on 24’’ centers and the desired ladder
location is parallel to the deck boards, mount as
shown below with the provided backing plate.

Usage And Maintenance
Workmanship Warranty
5 2/22 2/22 6
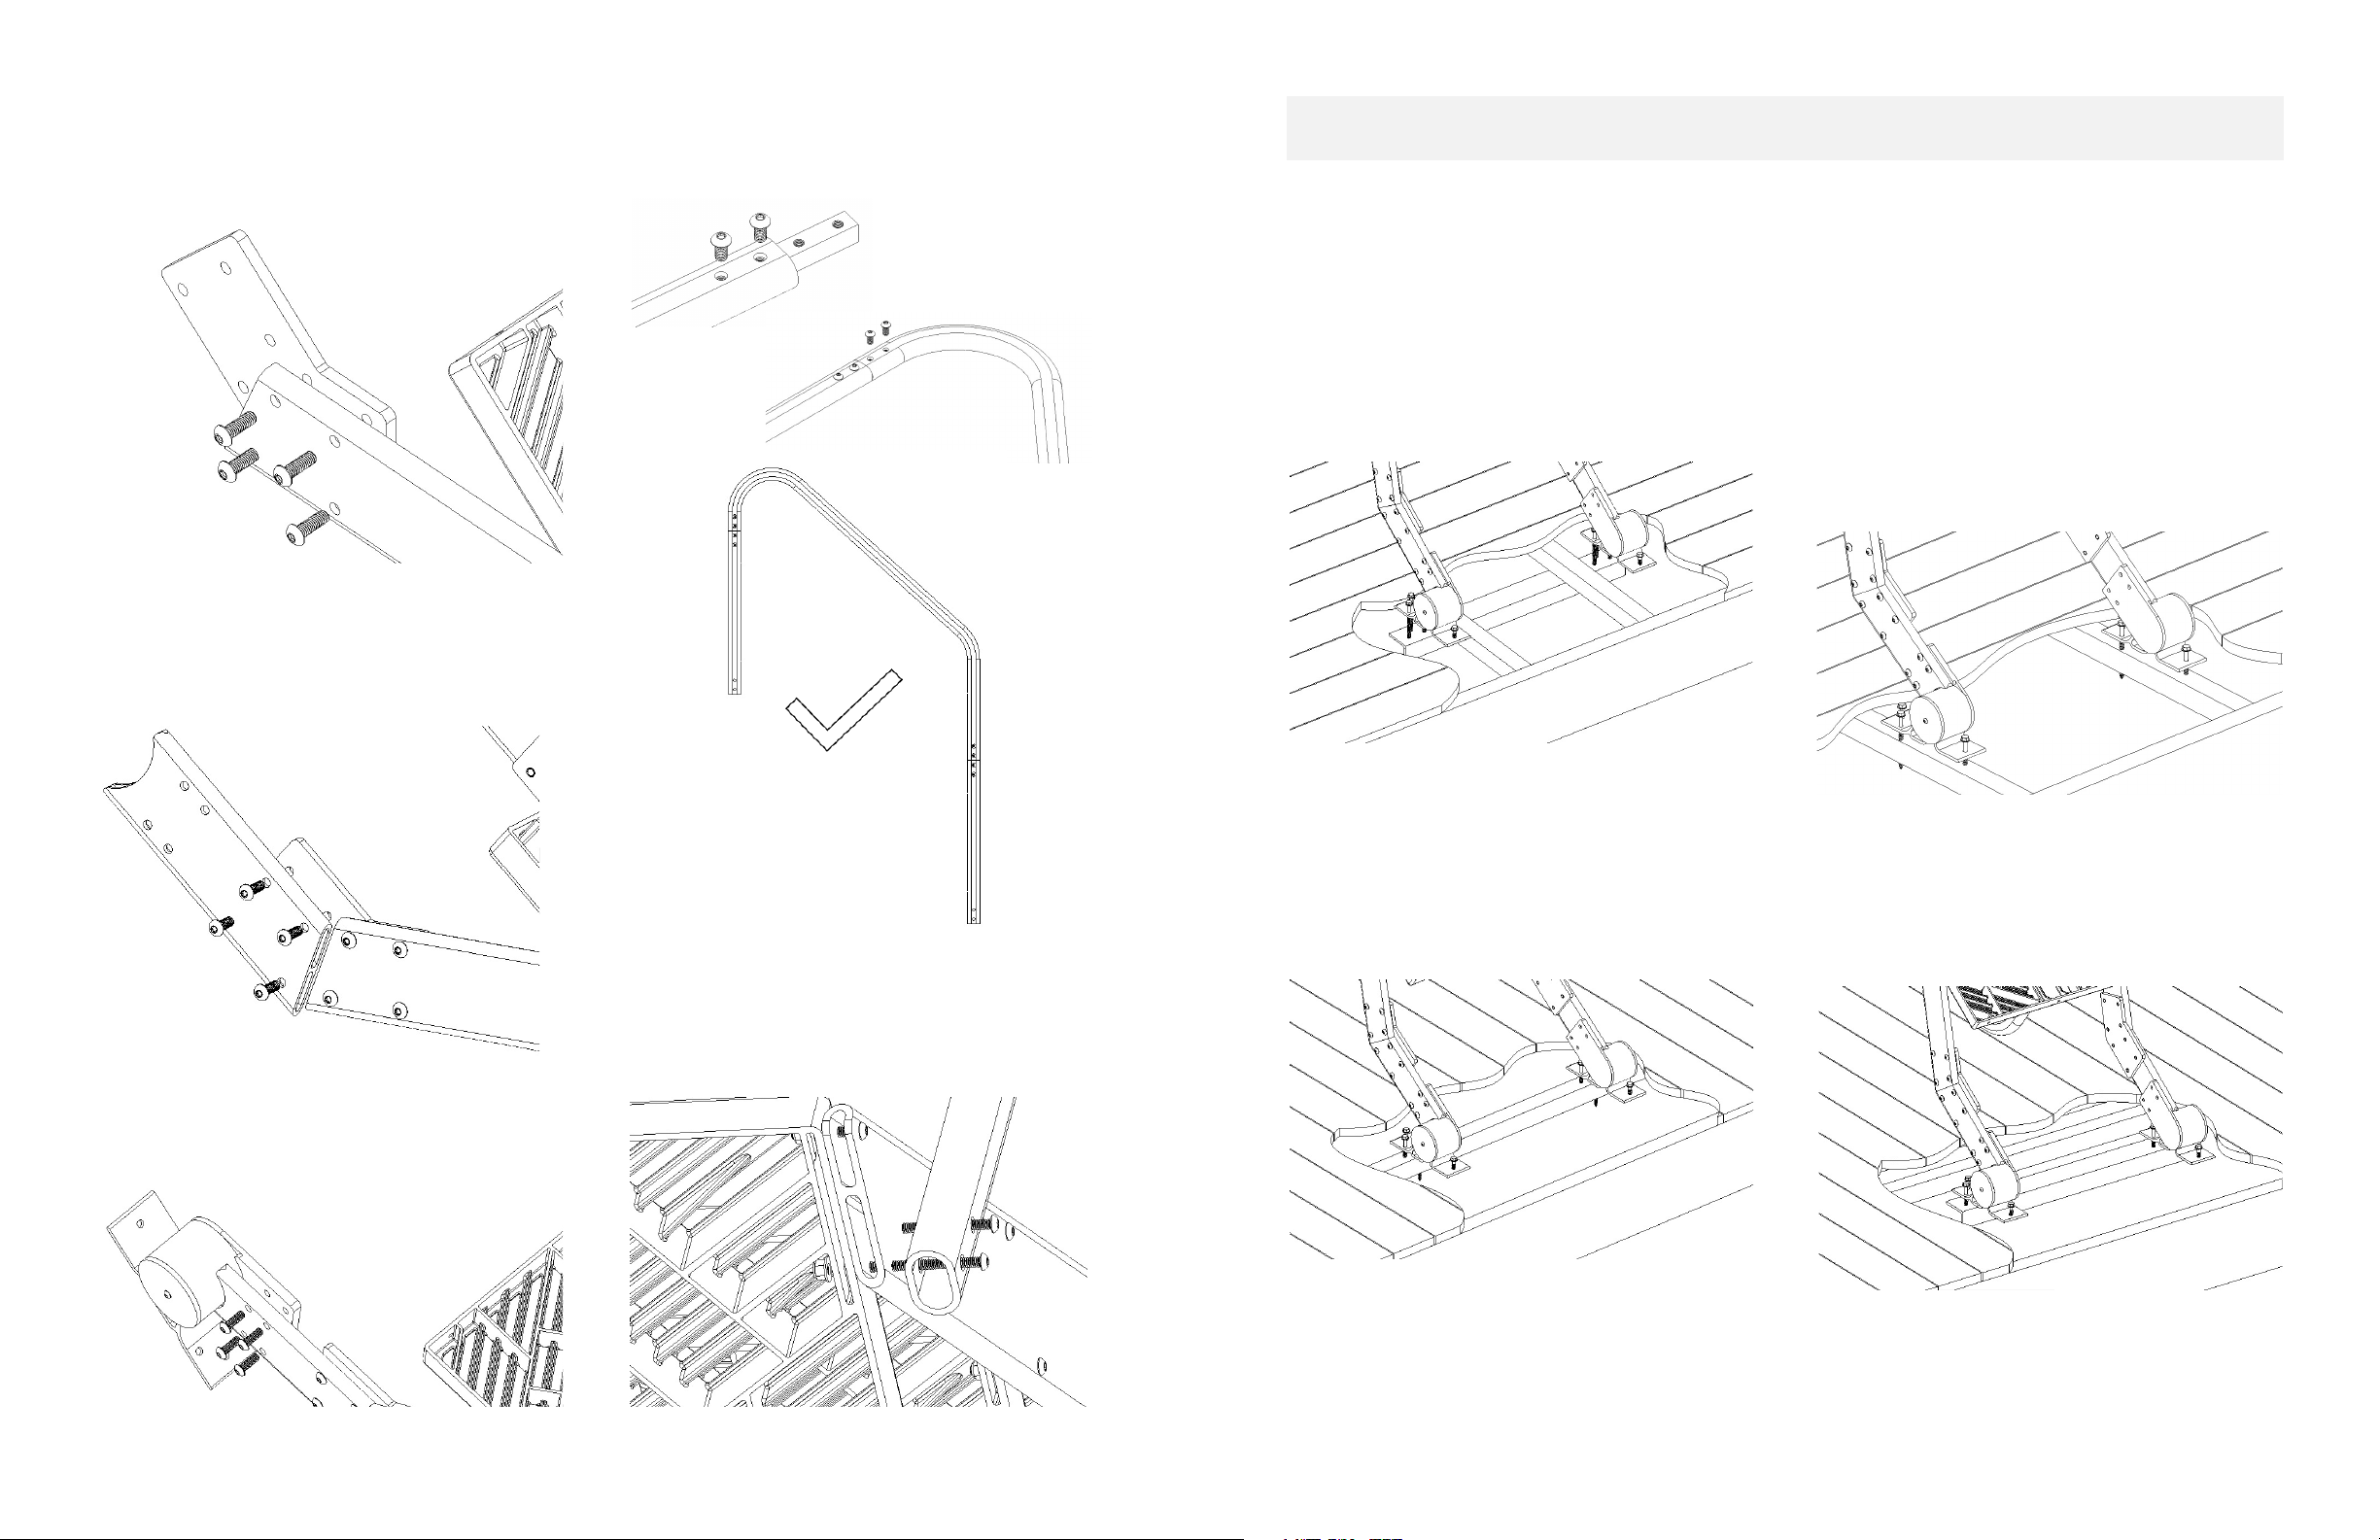
11) Drill all holes using the 5/16” drill bit provided.
If using backing plates as indicated in 9a or 9d,
remove any boards necessary to gain access to the
underside of the dock. Insert lag bolts from bag
E into the drilled holes and lag into the provided
backing plate using the pre-punched holes or into
the dock frame as indicated in 9b or 9c. The front
holes get lagged into the decking if using backing
plates.
12) Position the handrails at the desired location
adjacent to the spring housings. Drill with the 5/16”
bit and lag using the 1 ½” lags from bag E.
13) Using the 1 ¾” Bolt and latch from bag F, attach
the lockdown latch to the spring housing plate on
the desired side using the hole on the end of the
plate.
14) With the ladder in the down position, set the
lockdown catch from bag F over the bottom of the
lockdown latch and mark both holes. Lift the ladder
into the upright position and insert the wood
screws into the lockdown catch.
15) Cycle the ladder to make sure it functions
properly and the lockdown latch engages in the
down position. Trim bumper if necessary. (Note
you may need to relieve some pressure from the
lockdown latch to be able to disengage it.)
10) Place the assembled ladder at the desired
location with the front of the spring housing
approximately 9’’ from the edge of the dock.
Mark all holes and remove ladder from positioning. • When lowering the LakeEze™ Ladder into the
water ensure area is clear of swimmers and boat
trac.
• Do not swim in inclement weather.
• Do not exceed capacity of 350 lbs on ladder.
• Do not jump on or from ladder.
• Never run up or down ladder.
• Always use handrail when using ladder to prevent
slipping.
• Ladder is not designed for unsupervised children
under 5 years old.
• Always keep ladder in the upright position resting
on handrail when not in use.
• Be aware of pinch points when raising and
lowering ladder.
• Check that all fasteners are tight before using.
• Check for electrical current before using ladder.
• Be aware of toe-catches around ladder mounting
points.
Kroeger Marine Construction, Inc. warrants any
new product manufactured against manufacturing
defects in material and workmanship when
properly assembled, installed, and maintained
under normal use and service for a period of one
year. Such warranty extends only to the original
customer.
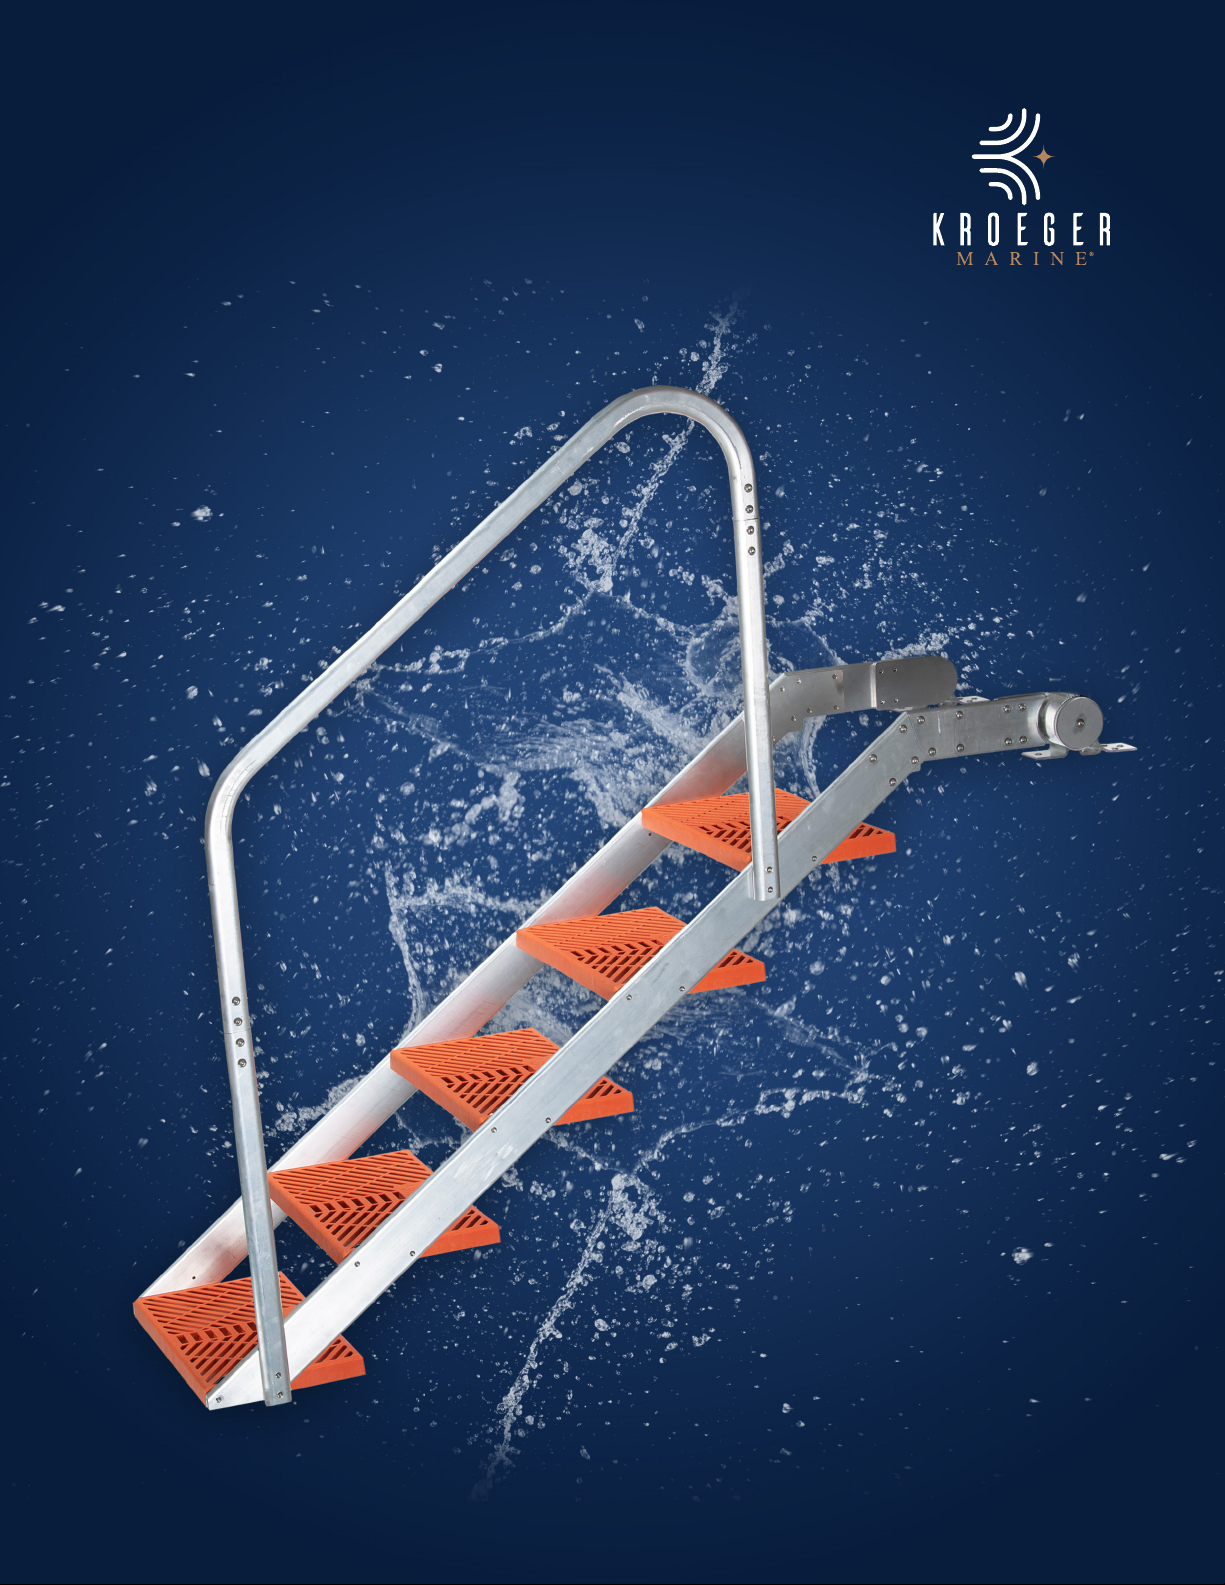
Installation of LakeEze™Ladder is Complete.
To learn more about our innovative products, visit us at kroegermarine.com

2227 Blue Ridge Boulevard
Seneca, SC 29672
dockandrock@kroegermarine.com
864-882-7671
kroegermarine.com
Table of contents
Other Kroeger Marine Ladder manuals
Popular Ladder manuals by other brands

Fontanot
Fontanot SKY030 manual

Stromberg Carlson Products
Stromberg Carlson Products LA-460 installation instructions

Hailo
Hailo FlexLine T80 Instructions for use

Main Access
Main Access 200400T Assembly instructions

Power Step
Power Step PSA-773D-FS manual

TB Davies
TB Davies LuxFold User's guide & instructions