Kroeger Marine LakeEze User manual

LakeEze™Ladder
Assembly Instructions
Kroeger Marine
HAND-CRAFTED IN THE USA

Important Safety Instructions:
• It is recommended that this ladder be assembled by ages 18+.
• Use personal protective equipment (not included) when operating power tools.
• Do not expose power tools to water. Use a GFCI protected power supply when operating near water.
• This ladder contains a spring-assisted lift. Use caution when springs are under tension to avoid injury.
• Ladder must be assembled in the instructed order to prevent injury.
Thank You For Your Purchase!
Our focus at Kroeger Marine has been simple—to build the highest quality, handcrafted lake
products on the market. Our innovative solutions deliver both form and function, a fine balance
between design and first-class aesthetics. Every Kroeger product is designed with you in mind.
We hope you enjoy your LakeEze™ Ladder for years to come. - Kroeger Marine
Scan the QR code to view our installation tutorial video.
Packing List
Tools
17/14 7/14 2
Tools Needed for Installation:
• 7/16’’ Flat Wrench
• 9/16’’ Socket
• Drill/Impact Socket Adapter
• 5/32’’ and 7/32’’ Allen Wrench
• 5/16’’ Drill
Box:
• Long Ladder Side Rail (x2)
• Short Ladder Side Rail (x2)
• Plastic Step (x5)
• Corner Angle Plate (x2)
Bag A:
• 1⁄4-20 x 1 3⁄4’’ Pan Head Bolt (x18)
• 1⁄4’’ Flat Washer (x18)
• 1⁄4’’ Brass Lock Nut (x18)
Bag D:
• 1/4-20 x 2 1/2” Pan Head Bolt (x2)
• 1/4-20 x 3 1/2” Pan Head Bolt (x2)
• 1/4” Flat Washer (x8)
• 1/4” Brass Lock Nut (x4)
Bag B:
• 3/8-16 x 1 1/4” Pan Head Bolt (x8)
• 3/8-16 x 1” Pan Head Bolt (x14)
Note: If upper rail assembly is pre-assembled, Bag B
will only contain 3/8-16 x 1”Pan Head Bolts (x8)
Bag E:
• 3/8 x 5” Lag Bolt (x8)
• 3/8 x 1 1/2” Lag Bolt (x4)
• 3/8” Flat Washer (x12)
Bag C:
• 3/8-16 x 1” Pan Head Bolt (x8)
Note: This bag is for 3-piece handrails only. If
handrail is pre-assembled/one-piece handrail
assembly, Bag C is not necessary.
Bag F:
• Latch Plate (x1)
• 5/16” x 1 1/2 “ Hitch Pin (x1)
• Tether Cable (x1)
• Self-Tapping Metal Screw (x2)
• Drill with 3/8’’ Chuck
• Socket/ Ratchet Wrench
• Impact Driver
• 11/64” Drill Bit
• 3/8”-1/2” Drill Bit
• Bent Handrail (x1)
• Dock Handrail (x2)
• Angle Backer Plate (x1)
• Spring Housing (x2)
Assembly
1) Arrange rails so that the steps will be installed upside-down (angled cuts are pointing up).
2) Bolt the steps onto the ladder rails using hardware from bag A. (Note: gure b indicates where handrail
bolts (bag D) will go. Leave these holes empty on the side you choose the handrail to go on.)
a. b.
• Inner Handrail Bar (x2)*
• Handrail Upright (x2)*
* Not Included With 1 Piece
Handrail Assembly
• Razor Knife
• Pencil
• Measuring Tape

37/14 7/14 4
5) Bolt spring housings to ladder using the 1 1/4”
bolts from bag B.
3) Bolt angled plates to the inside of the Long Ladder
Side Rails using the 1” bolts from bag B. (Note: Short
side of angled plate bolts to the Long Ladder
Side Rail.)
7) Assemble handrail with hardware from bag C.
(Note: Depending on which version LakeEze™
Ladder, you may have a single piece handrail. If
so, skip this step.)
6) Flip ladder over and set aside.
4) Bolt the Short Ladder Side Rails to the other end
of the angled plates using the 1”bolts from bag B.
(Note: Leave the marked hole empty for using the
latch system.)
8) Bolt assembled handrail to desired side of ladder
using hardware from bag D. Use the longer bolts for
the holes that line up with the step. (Note to make
sure to put a washer under the bolt head and the
lock nut of each bolt.)
Installation
The images below represent the most frequent installation situations. Cutting your deck boards is not necessary,
the cut-out views are for visualization purposes only.
9a) If dock is on 16’’ centers and the desired ladder
location is perpendicular to the deck boards, mount
as shown below with the provided backing plate.
9b) If dock is on 16’’ centers and the desired ladder
location is parallel to the deck boards, mount as
shown below directly into the frame.
9c) If dock is on 24’’ centers and the desired ladder
location is perpendicular to the deck boards, mount
as shown below directly into the frame. Line up such
that the maximum number of lags hit the frame.
9e) If dock is on 24’’ centers and the desired ladder
location is parallel to the deck boards, mount as
shown below with the provided backing plate.
Additional Note: This step may already be completed if
ladder is a curbside pick-up or dealer ladder.
Additional Note: This step may already be completed if
ladder is a curbside pick-up or dealer ladder.
9d) If dock is on 24’’ centers and the desired ladder
location is perpendicular to the deck boards and
cannot go into two frame members, mount as
shown below straddling the single frame member
with the provided backer plate. Tighten the backer
plate equal amounts on each side till rmly secured.

57/14 7/14 6
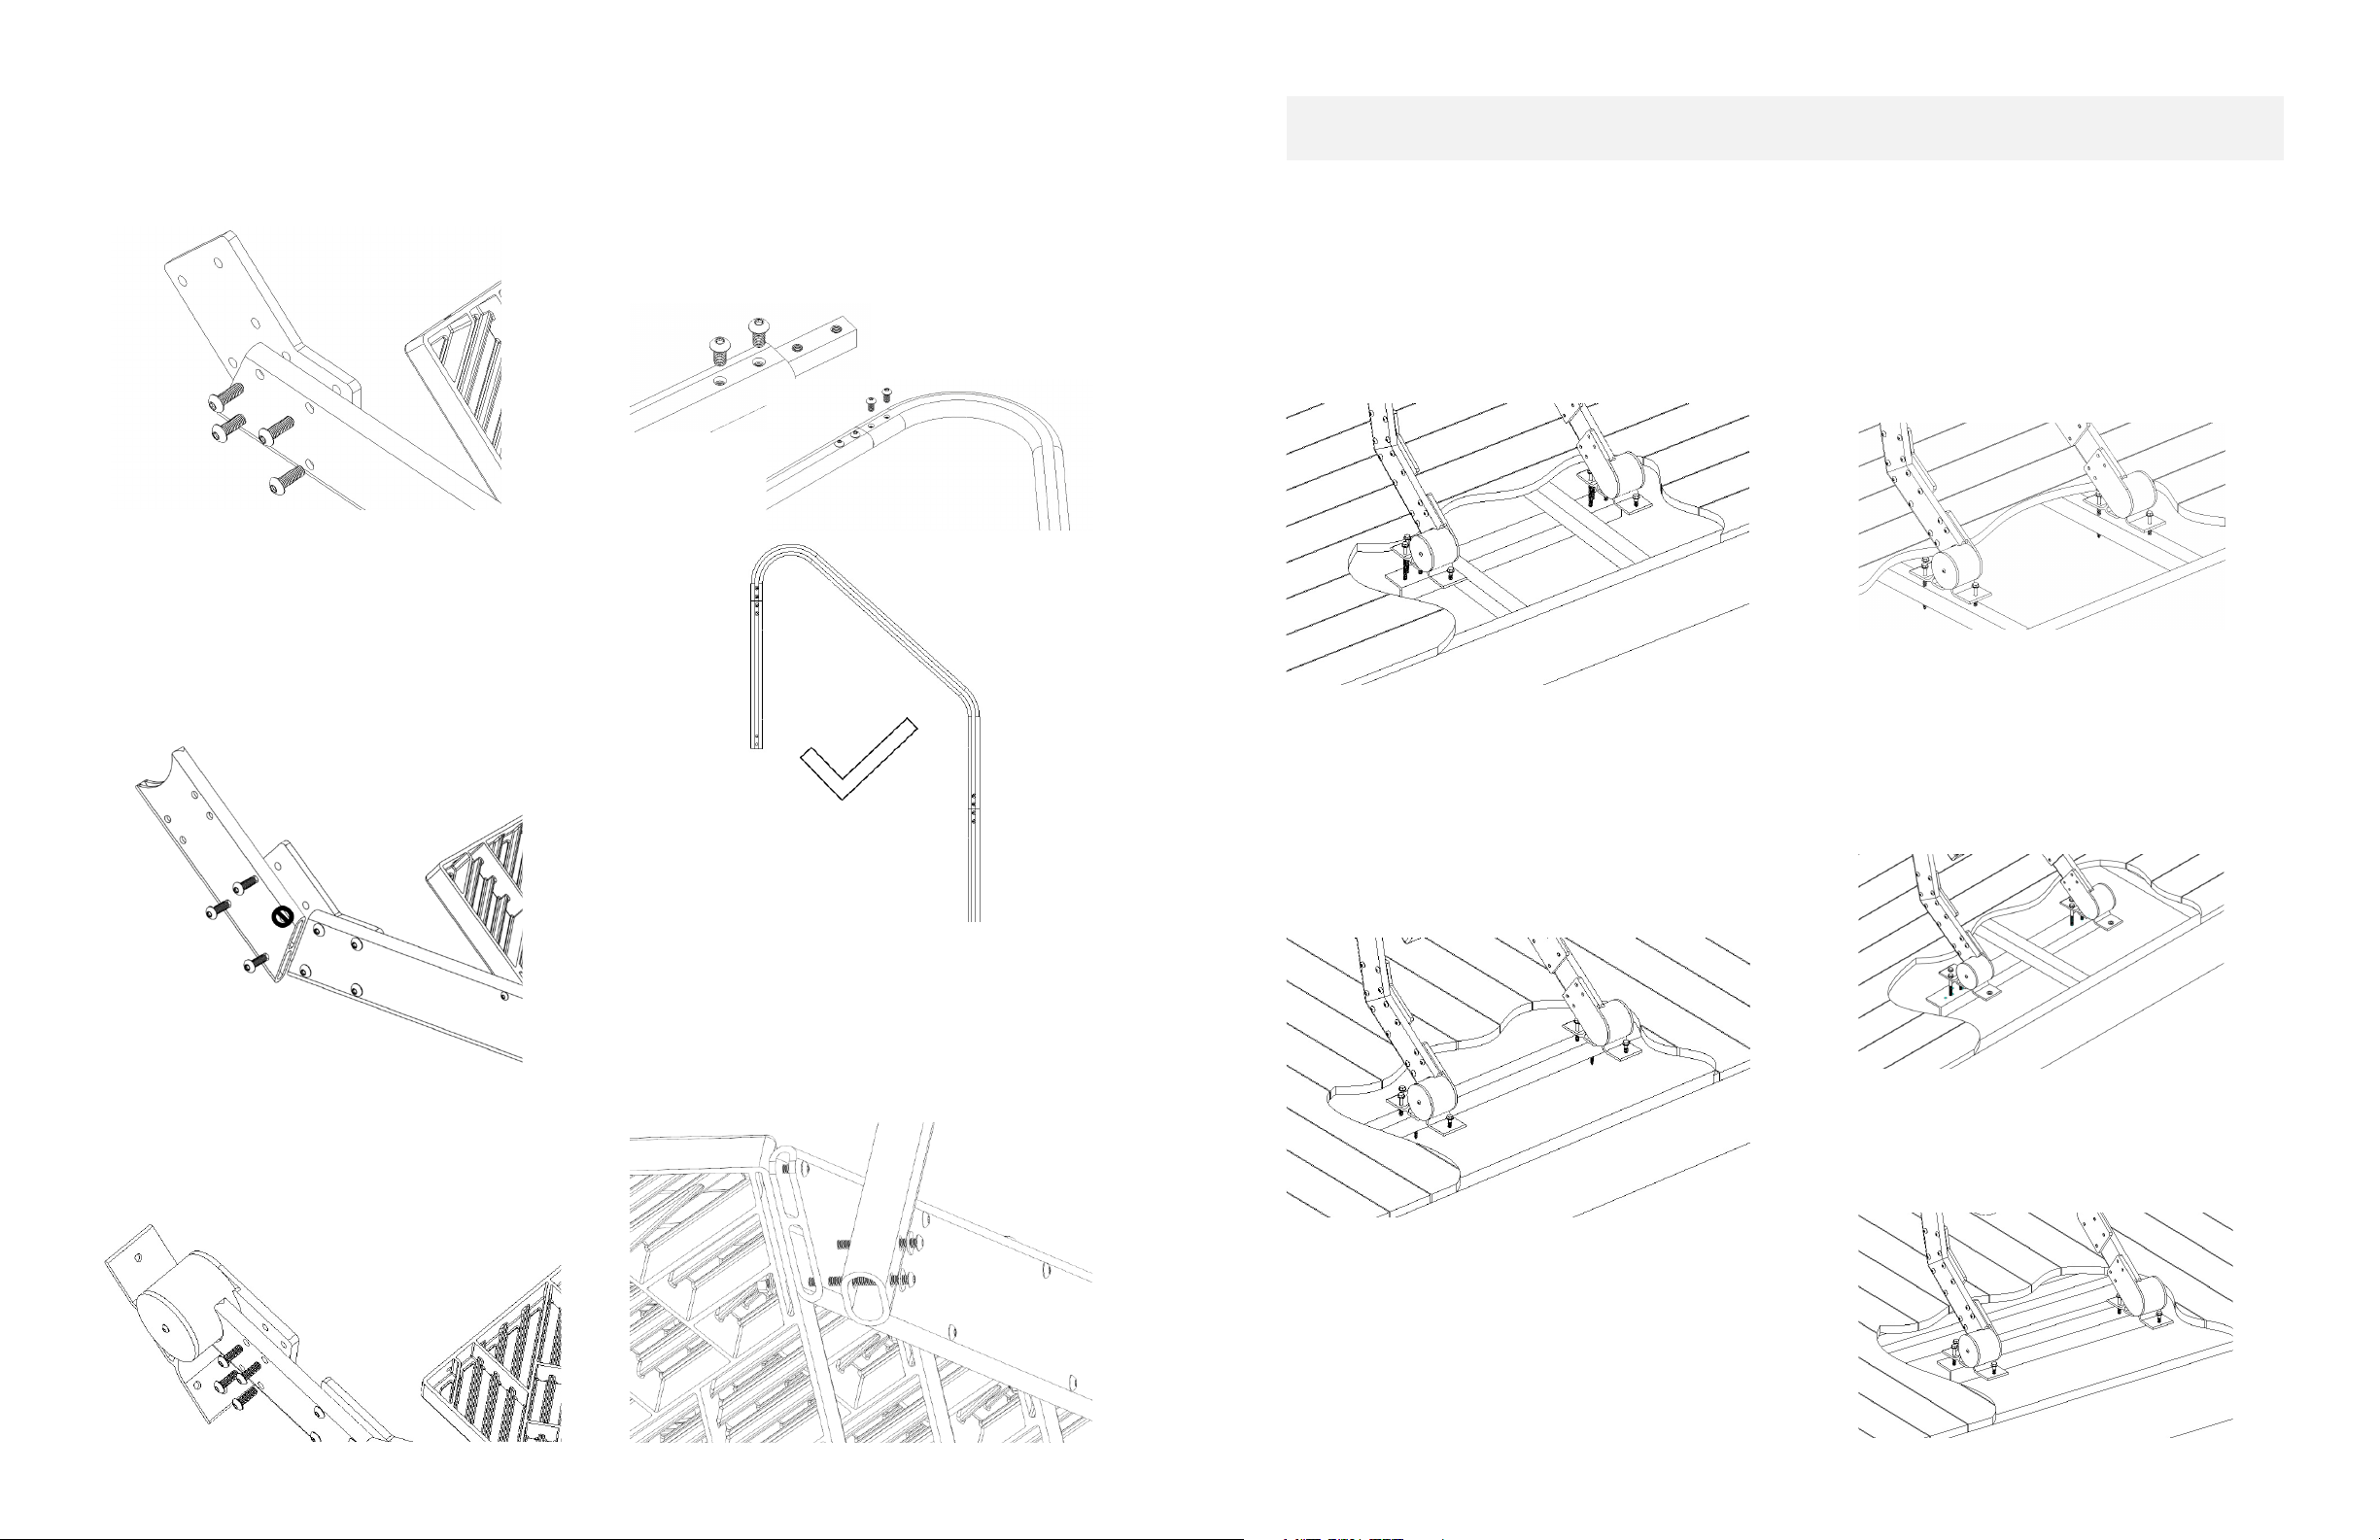
11a) If using backing plates as indicated in 9a or
9d, drill the REAR HOLES in the decking using the
3/8”-1/2” Drill Bits, a larger hole allows for easier
alignment of the lags to the backer plate and the
ladder to self-align when tightened. Drill the FRONT
HOLES with the 5/16 Drill Bit to ensure the lags
have material to bite into. If using backing plates as
indicated in 9a or 9d, remove any boards necessary
to gain access to the underside of the dock. Insert
1 1/2” lag bolts from Bag E into the FRONT drilled
holes FIRST, then insert the 5” lags into the OUTER
REAR holes and lag into the provided backing plate
using the pre-punched holes (The front holes get
lagged into the decking if using backing plates. )
Tighten the outer rear lag most of the way but DO
NOT fully tighten yet. With the Front and Outer
Rear Lag in place, lower the ladder into the down
position (It is very important NOT to put ANY
weight on to the ladder and to make sure that
the outer rear lag has a good bite into the backer
plate). With the ladder down, insert the Inner Rear
lag, THEN the Center Rear lag into each housing
and fully tighten all lags while it is still in the down
position.
12) Position the handrails with the rear hole in-
line with the two holes on the back of the Spring
Housing. Mark your holes and drill with the 5/16”
Drill Bit. Make sure to drill all the way through the
backer plate on the rear hole of the dock handrails.
Lag the dock handrails into the backer plate in the
rear hole using the 5”Lag and into the decking in
the front hole using the 1 1/2”Lag.
13) Using the empty hole in the angle plate on
your preferred side, push the hitch pin in Bag F all
the way through towards the outside of the ladder.
14) On the outside of the ladder, align the latch
plate so that the hitch pin is through the slot and
the mounting holes are over the edge framing of
the dock. Mark and drill the holes using the 11/64”
Drill Bit. Attach using the Self-Tapping Metal Screws,
making sure they go through the frame of your
dock. Fasten the Pin Tether where it is convenient
and safe.
15) Cycle the ladder to make sure it functions
properly. Insert the Pin Latch and remove it several
times to ensure that it is operating properly. Trim
bumper if necessary. (Note you may need to
relieve some pressure from the lockdown latch
to be able to disengage it.)
10) Place the assembled ladder at the desired
location with the front of the spring housing
approximately 8’’ from the edge of the dock.
Mark all holes and remove ladder from positioning.
Installation of LakeEze™Ladder is Complete.
11b) If you are connecting directly into your dock
frame as indicated in Step 9B or 9C, Drill ALL holes
5/16” to ensure the lags have material to bite into.
Insert the 1 ½” lags into the Front Holes First and the
5” lag into the Outer Rear hole SECOND directly into
the dock frame as indicated in 9b or 9c (Note if the
outer rear hole does not go into the dock frame,
use the Center Rear hole instead.) Tighten the rear
lag that is in the frame most of the way but DO NOT
fully tighten yet. With the Front and Outer Rear Lag
in place, lower the ladder into the down position
(Note it is very important NOT to put ANY weight
on to the ladder and to make sure that the outer
rear lag has a good bite into the backer plate.)
Insert the remaining lags into the rear holes and
tighten all lags until the ladder housings are rmly
pressed against the dock.

2227 Blue Ridge Boulevard
Seneca, SC 29672
dockandrock@kroegermarine.com
864-882-7671
kroegermarine.com
Usage And Maintenance
• When lowering the LakeEze™ Ladder into the water ensure area is clear of swimmers and boat trac.
• Do not swim in inclement weather.
• Do not exceed capacity of 350 lbs on ladder.
• Do not jump on or from ladder.
• Never run up or down ladder.
• Always use handrail when using ladder to prevent slipping.
• Ladder is not designed for unsupervised children under 5 years old.
• Always keep ladder in the upright position resting on handrail when not in use.
• Be aware of pinch points when raising and lowering ladder.
• Check that all fasteners are tight before using.
• Check for electrical current before using ladder.
• Be aware of toe-catches around ladder mounting points.
Kroeger Marine Construction, Inc. warrants any new product manufactured against
manufacturing defects in material and workmanship when properly assembled,
installed, and maintained under normal use and service for a period of one year.
Such warranty extends only to the original customer.
Workmanship Warranty
To learn more about our innovative products, visit us at kroegermarine.com
Table of contents
Other Kroeger Marine Ladder manuals
Popular Ladder manuals by other brands

Primal Vantage
Primal Vantage HEH00595 Instruction and safety manual

FourStar
FourStar 11222461 Assembly instructions

TIE DOWN
TIE DOWN Roof Zone 48589 Assembly instructions

Dolle
Dolle BEAM-IT-UP quick start guide

l'echelle europeenne
l'echelle europeenne 7076 Assembly and use instructions

Marchetti
Marchetti CLASS02 quick start guide