manuals.online logo
Brands
  1. Home
  2. •
  3. Brands
  4. •
  5. KROHNE
  6. •
  7. Media Converter
  8. •
  9. KROHNE MAC 100 User manual

KROHNE MAC 100 User manual

Quick Start
For initial set up, we strongly recommend that you also refer to the relevant manual!
01/2022 – 4009110601 - QS MAC 100 R01 en
1
MAC 100
Multiparameter signal converter
Wall mounting of multiple devices (Stainless steel)
2 Electrical connection
Opening the housing Loose lid screws , lift lid at top
and bottom at the same time and
slide it backwards . You have
access to the terminal compartment
now .
Terminal compartment
Cover of power supply terminal
Cover of relay outputs terminal
Current output terminal
Shield terminals
Terminals for sensor input A
Terminals for sensor input B
Possibility to connect a functional earth
(only relevant for 24 V version)
Cable glands
[mm] [“]
a ∅6.5 ∅0.26
b 40 1.6
c 268 10.5
d 336 13.2
e
257
10.1
Installation, assembly, start-up and maintenance may only be performed by appropriately trained personnel.
Check the nameplate for correct operating conditions.
Never install or operate the device in potentially explosive areas, it might cause an explosion that can result
in fatal injuries.
The responsibility as to the suitability, intended use and corrosion resistance of the used materials against
the measured fluid of this device rests solely with the operator.
1 Installation
Mark the holes with a suitable pen
Drill the 3 holes and fasten the device securely to the wall
Wall mounting of multiple devices (Die-cast aluminium)
[mm]
[“]
a ∅
6.5
∅
0.26
b 87.2 3.4
c 241 9.5
d 310 12.2
e 257 10.1
Danger:
All work on the
electrical connections may only be carried out with the power disconnected.
Take note of the voltage data on the nameplate.
Observe the national regulations for electrical installations.
01/2022 – 4009110601 - QS MAC 100 R01 en
2
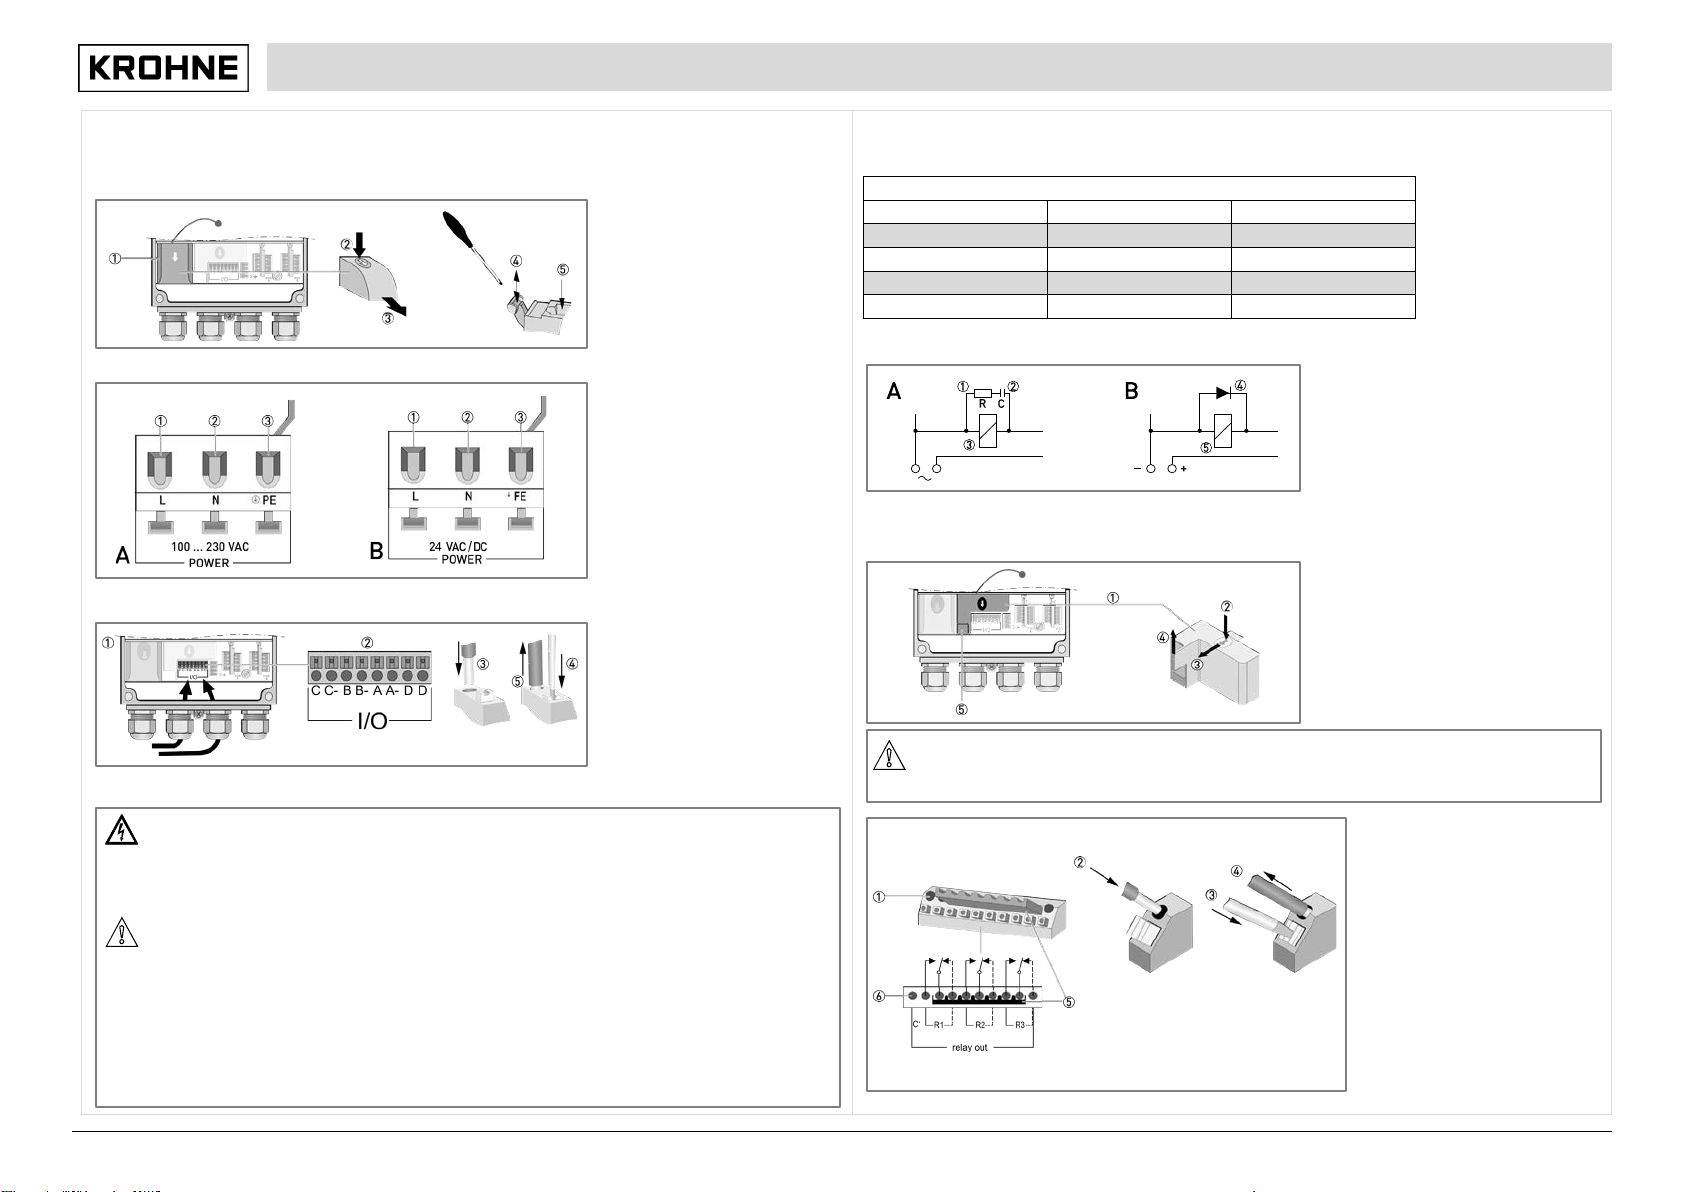
Connecting the power supply 100…230 VAC (fig. A) or 24 VAC/DC (fig. B)
Remove the cover of the power supply terminal by pressing it down and pulling forwards at the same time and ,
be careful and do not disrupt the retaining band (it prevents the cover from getting lost)!
Use a slotted screwdriver with a tip
of 3.5 x 0.5 mm / 0.14 x 0.02" to
push down the lever, connect the
wires to the terminals and pull up the
levers again and . Remount
cover.
Live (L)
Neutral (N)
Protective Earth (PE) or
Functional Earth (FE)
Connecting the current outputs
Conduct the cables with
prefabricated shielding through the
correct cable glands and .
Insert the cable into the terminal .
To remove the cable push the lever
down with a suitable tool and pull
the cable out of the terminal .
Connecting the relay outputs
In delivery condition, the relay contacts are also suitable for low signal currents (from approx. 1 mA). Please note that
the gold plating burns off during the switching operation when larger currents are used (from approx. 100 mA).
Afterwards, the relays can no longer reliably switch small currents!
Interference suppression (A = AC, B = DC)
Resistor, R = 47...390 Ω, see table before
Capacitor, C = 10...220 nF, see table
before (e.g. Siemens MKC B 81 921)
Relay coil
Free-wheeling diode
Relay coil
Required cable properties
• Maximum wire cross section: 1.5 mm2/ 0.06 square inch
• Minimum stripping length for wires: 8 mm / 0.31" Start to remove the cover of the relay outputs
by pressing it down .
Pull the cover forward , then upward out of
the clip and remove it.
Remove the cover of the earth terminal by
pulling it upwards .
You see the 10-pin terminal block which is
fitted with a connected bridge.
Connect the cables to the single relay
terminals (+).
To release a cable from the relay
terminals, first unlock the locking
device with a suitable tool and pull
out the cable .
If a switching voltage is applied to
connection "C" , relay contacts R1,
R2 and R3 are supplied in parallel
with the help of the link plug .
This allows the voltage switched from
the relays to be passed on. You can
remove the bridge if this supply is not
needed.
After you have connected all cables,
refasten the cover of the relay
outputs.
AC voltage: required capacitors and resistances for dejamming
Current up to
Capacitor
Resistor
60 mA 10 nF / 260 V 390 Ω/ 2 W
70 mA 47 nF / 260 V 22 Ω/ 2 W
150 mA
100 nF / 260 V
47 Ω/ 2 W
1.0 A 220 nF / 260 V 47 Ω/ 2 W
Danger:
To avoid dangerous voltages, the switching voltage for the relay contacts must fulfill one of the following
conditions: it must
either originate from the same network as the signal converter power supply including pre-
fuse and separator or come from a SELV or PELV network. When installing, always comply with the
prevailing national and international regulations and standards.
CAUTI
ON!
If you want to switch inductive loads (even relays or protection coils), you always have to dejam them!
Otherwise there may occur interferences with the measuring signal. Also note the following items:
•
If you use DC voltage, dejam the relay coil with a free-wheeling diode; refer to the following table and the
following drawing "Interference suppression"!
•
If dejamming is not possible, you have to assure that the relay contact is protected by a RC protection
circuit! Also refer to the following table.
•
If you use potential-free relay outputs, assure that a suitable shut-off device and a pre-fuse is installed in
the feed line on site.
•
When switching inductive loads, the manufacturer recommends a protective circuit to avoid unnecessarily
high contact burn on the relay contact!
CAUTION!
T
he screw under the cover is not to be used as a cable connection. Do not loosen or remove the cover of
the screw!
01/2022 – 4009110601 - QS MAC 100 R01 en
3
Connecting the sensor(s)
When ordering the one channel version, only the interface "Pos.A" is populated. In the version with two channels the
interfaces "Pos.A" and "Pos.B" are populated (see also terminal compartment). The configuration of the signal converter
(i.e. the number and type of sensor inputs) has to be set in the factory and cannot be changed later. The number and
type of sensor inputs is specified via the order code and visible on the nameplate.
For all information concerning the signal cables of the used sensor(s) and their connection refer to the relevant sensor
handbook(s).
After sensor connection close the converter housing and tighten all screws of the housing.
3 Quick Setup
The manufacturer delivers the device preconfigured and ready for operation with the sensor(s) specified in the
customer's order. Though due to the physics of the measurement, the operator has to perform an onsite calibration or an
adjustment to the relevant sensor(s) and to the environmental conditions at the initial start-up. For more details refer to
the manual of the relevant sensor!
For start-up switch on the power with the help of a disconnecting device (switch, circuit breaker). The device performs a
self test; afterwards it begins to measure immediately in the measuring mode if a sensor is connected and the display
shows the current value(s).
Note that the display can only show a temperature reading if a temperature sensor is attached! If this is not the case, the
maximum or minimum range of the measuring range appears in the last line.
Key functions and menu level
The function of a key depends on the mode of the device and on the menu level:
This function allows checks with respect to custody transfer; it can be used in few situations, e.g. if the display is
disturbed
Main menu A, quick setup
When you are in the menu mode press >to enter quick setup, which groups the most important functions of the other
main menus.
Key
Measuring mode
Menu mode
Main menu level
Sub-menu or
function level
Parameter and data
level
>
Switch from measuring
mode to menu mode; press
key for 2.5 seconds (display
shows "keep key pressed"
and countdown) and release
it after further 2.5 seconds
(display shows "release key
now" and countdown)
Access to displayed
menu, then 1st
submenu is displayed
Access to displayed
sub-menu or
function
Numerical values:
move curser one
position to the right
↵
Reset of the display
controller 
Return to measuring
mode (prompt
appears whether the
data should be saved)
Return to next
higher level or
sublevel, data are
saved
Return to sub-menu or
function, data are
saved
↑or↓
Switch between measuring
pages
Select sub-menu,
moving up or down
Select sub-menu or
function, moving up
or down
Change parameter/data
marked by the cursor,
move the decimal point
Esc:
>+
↑
No function
No function
Return to main
menu level, data not
saved
Return to next higher
level, data not saved
Measuring
mode
Main menu
Submenu
Parameter
3 or 4
pages,
scrolling
with
↑
or
↓
>2.5s
↵
A
quick
setup
>
↵
A1 language
>
↵
For further
information
see
function
tables
A2 Tag
A3 manual hold
A4 set clock
A5 reset errors
A6 analog outputs
>
↵
A6.1 measurement
A6.2 unit
A6.3 range
A6.4 time constant
A9...A11: calibration menus for process input A; existence of the
single sub-menus depends on the hardware setting and the used
sensor (e.g. if you use a pH sensor then only the menu A8 with the
name "pH cal." appears); refer to sensor manual for further
information.
A12...A19: calibration sub-menus for process input B, existence
also depending on the hardware setting and the used sensor.
↑↓
↑↓
↑↓
↑↓
01/2022 – 4009110601 - QS MAC 100 R01 en
4
Main menu B, test
Measuring
mode
Main menu
Submenu
Parameter
3 or 4
pages,
scrolling
with
↑
or
↓
>2.5s
↵
B
test
>
↵
B1 Simulation
Process Input A
>
↵
B1.1...B1.7: simulation menus for
process input A; existence of the single
sub-menus depends on the hardware
setting and the used sensor, refer to
sensor manual for further information.
>
↵
For further
information
see function
tables
B2 Simulation
Process Input B
B2.1...B2.7: simulation menus for
process input B; existence of the single
sub-menus depends on the hardware
setting and the used sensor, refer to
sensor manual for further information.
B3 simulation IO
B3.1 - / current output A
B3.2 - / current output B
B3.3 - / current output C
B3.4 - / control input D
B3.5 - / status output R1 or limit switch
R1
B3.6 - / status output R2 or limit switch
R2
B3.7 - / status output R3 or limit switch
R3
B4 actual values
B4.1...B4.8: menus which show the
corresponding actual reading; existence
of the single sub-menus depends on the
hardware setting and the used sensor;
refer to sensor manual for further
information.
B5 logbooks
B5.1 status log
B5.2 calibration log
B6 information
B6.1 C number
B6.2 process input A
B6.3 process input B
B6.4 SW.REV. MS
B6.5 SW.REV. UIS
B6 Electronic Revision ER
↑↓
↑↓
↑↓
↑↓
Main menu C, setup
Measuring
mode
Main menu
Submenu
Parameter
3 or 4
pages,
scrolling
with
↑
or
↓
>2.5s
↵
C
setup
>
↵
C1 process input A
>
↵
C1.1...C1.18: menus for the setup of the
corresponding process input; existence
of the single sub-menus depends on the
hardware setting and the used sensor;
refer to sensor manual for further
information.
>
↵
For further
information
see function
tables
C2 process input B
C2.1...C2.17: menus for the setup of the
corresponding process input; existence
of the single sub-menus depends on the
hardware setting and the used sensor;
refer to sensor manual for further
information.
C3 I/O
C3.1 hardware
C3.2 current output A
C3.3 current output B
C3.4 current output C
C3.5 control input D
C3.6 status output R1 or limit switch R1
C3.7 status output R2 or limit switch R2
C3.8 status output R3 or limit switch R3
C5 device
C5.1 device info
C5.2 display
C5.3 1.meas.page
C5.4 2.meas.page
C5.5 graphic page
C5.6 special functions
C5.7 units
↑↓
↑↓
↑↓
↑↓
D service: This menu is password protected and contains functions to be used by service personnel only.
Download documents and software
Scan the code on the nameplate or scan the
following code and enter the serial number.
Contact
Select your country from the region / language selector to
view your local KROHNE contact details on:
www.krohne.com

Other manuals for MAC 100

1

Other KROHNE Media Converter manuals

KROHNE ifc 300 User manual

KROHNE

KROHNE ifc 300 User manual

KROHNE UFC 400 Wiring diagram

KROHNE

KROHNE UFC 400 Wiring diagram

KROHNE UFC 400 Wiring diagram

KROHNE

KROHNE UFC 400 Wiring diagram

KROHNE MFC 400 Wiring diagram

KROHNE

KROHNE MFC 400 Wiring diagram

KROHNE IFC 010 K User manual

KROHNE

KROHNE IFC 010 K User manual

KROHNE ifc 300 User manual

KROHNE

KROHNE ifc 300 User manual

KROHNE IFC 090 K User manual

KROHNE

KROHNE IFC 090 K User manual

KROHNE UFC 400 Wiring diagram

KROHNE

KROHNE UFC 400 Wiring diagram

KROHNE MAC 100 User manual

KROHNE

KROHNE MAC 100 User manual

KROHNE IFC 050 User manual

KROHNE

KROHNE IFC 050 User manual

KROHNE MFC 081 Operating instructions

KROHNE

KROHNE MFC 081 Operating instructions

KROHNE IFC 070 User manual

KROHNE

KROHNE IFC 070 User manual

KROHNE H250 M40 ESK4-Basic User manual

KROHNE

KROHNE H250 M40 ESK4-Basic User manual

KROHNE UFC 300 V2 Wiring diagram

KROHNE

KROHNE UFC 300 V2 Wiring diagram

Popular Media Converter manuals by other brands

Konig CMP-2DTO3DCONV user manual

Konig

Konig CMP-2DTO3DCONV user manual

Patton electronics 1104 Series user manual

Patton electronics

Patton electronics 1104 Series user manual

Vertiv NetSure IPE Series Installation and user manual

Vertiv

Vertiv NetSure IPE Series Installation and user manual

AJA HA5 user manual

AJA

AJA HA5 user manual

KTI Networks KC-351 Series installation guide

KTI Networks

KTI Networks KC-351 Series installation guide

Grand ULTIMATE WIRELESS user manual

Grand

Grand ULTIMATE WIRELESS user manual

PCB Piezotronics 422E21 Installation and operating manual

PCB Piezotronics

PCB Piezotronics 422E21 Installation and operating manual

PS Audio DirectStream Junior Owner's reference

PS Audio

PS Audio DirectStream Junior Owner's reference

Baer ConvBox user manual

Baer

Baer ConvBox user manual

VigilLink VL-DA2PE-1 user manual

VigilLink

VigilLink VL-DA2PE-1 user manual

Audizio Prato quick start guide

Audizio

Audizio Prato quick start guide

MuxLab 500054 Quick installation guide

MuxLab

MuxLab 500054 Quick installation guide

Baumer Hubner Berlin microGen PMG10 operating manual

Baumer

Baumer Hubner Berlin microGen PMG10 operating manual

Sena DirectPort-USB user guide

Sena

Sena DirectPort-USB user guide

evertz 7700 Series manual

evertz

evertz 7700 Series manual

ADF Web HD67072-B2 user manual

ADF Web

ADF Web HD67072-B2 user manual

Baumer HOGS 100 S Installation and operating instructions

Baumer

Baumer HOGS 100 S Installation and operating instructions

Sima GoDVD! CT-100 user manual

Sima

Sima GoDVD! CT-100 user manual

manuals.online logo
manuals.online logoBrands
  • About & Mission
  • Contact us
  • Privacy Policy
  • Terms and Conditions

Copyright 2025 Manuals.Online. All Rights Reserved.