Kronen KA-1 User guide

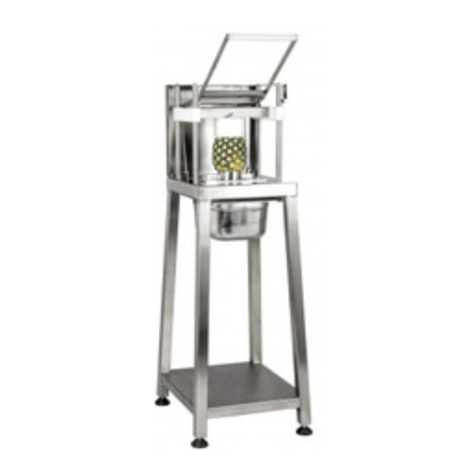
PINEAPPLE PEELER
Type: KA-1
Translation of the
Original Instruction Manual
English

Instruction Manual KA-1
2
Instruction Manual KA-1
Version: 1.0
Date of release: 30.09.2010

Instruction Manual KA-1
3
Contents
1. General Information.....................................................................................................4
2. Safety...........................................................................................................................8
3. Technical Characteristics...........................................................................................10
4. Installation and Function............................................................................................11
5. Transportation and Packaging...................................................................................14
6. Installation and Initial Operation................................................................................15
7. Use and Operating.....................................................................................................16
8. Malfunctions...............................................................................................................21
9. Maintenance ..............................................................................................................22
10. Appendix....................................................................................................................23
11. Index..........................................................................................................................24

Instruction Manual KA-1
4
1. General Information
Always keep the instruction manual and all the other documents near the pi-
neapple peeler. Before using the machine the first time, make sure that you
read the instruction manual first.
Explanation of the symbols used in the documents
Limitation of liability
If you do not follow the instruction manual, the manufacturer is not liable.
Manufacturer
Kronen Küchengeräte GmbH
Gewerbestr. 3
D-77731 Willstätt
Telefon: +49 (0) 78 54/96 60-0
Telefax: +49 (0) 78 54/96 60-50
info@kronen-germany.de
Caution, risk of injury! Follow the instruction to avoid
injuries.
Attention, you have to follow the instructions to avoid
harm for you and the machine.

Instruction Manual KA-1
5
Defects and Claims
1. Claims based on material defects shall be subject to a limitation period of 2
years after surrender of the merchandise. The Seller does not assume any
liability for material defects in pre-owned merchandise.
2. We will, at our discretion, make new delivery for or subsequently improve any
and all rendered services which are verifiably determined to be defective as a
consequence of circumstances existing before the transfer of risk.
3. We reserve title to any and all parts which have been replaced.
4. In particular, no warranty will be assumed for damage or loss resulting from
the following causes, but for which we are not accountable:
Natural wear and tear, intervention or repair work improperly performed by
the Buyer or third parties, unsuitable or incorrect use, incorrect operation,
installation, commissioning, incorrect or negligent handling, improper main-
tenance, use of unsuitable operating materials and cleaning agents, chemi-
cal, electrochemical or electrical factors, any modifications of the merchan-
dise performed without our consent.
5. The Buyer shall allow the Seller the necessary time and opportunity to per-
form any subsequent improvement or substitute delivery which we regard, in
our reasonable judgment, to be necessary.
6. In the event of legitimate complaints, the Seller shall bear the immediate
costs of the subsequent improvement or substitute delivery. The total costs
which we must bear shall be limited to the value of the order in the event that
the places of delivery are outside the territory of Germany.
7. In cases in which the Buyer shares accountability for causing the defect, in
particular in the event of breach of the obligation to prevent and reduce loss or
damage, the Seller reserves the right to assert a corresponding damage com-
pensation claim.
8. The Buyer shall, at his discretion, have the right to cancel the contract if and
when –taking into account the statutory exceptions –a period which has been
set for us for subsequent improvement or substitute delivery due to material
defects has lapsed in vain.
9. The Buyer’s rights arising from the liability for material defects may not be
assigned without the Seller’s consent.


Instruction Manual KA-1
6
Terms and Conditions of Warranty
1. The Seller hereby grants to the end customer a warranty for newly manufac-
tured Kronen Küchengeräte GmbH appliances, provided that they remain in
Germany. The warranty period shall be 12 months as of the delivery of the
appliance to the end customer, but shall not exceed 18 months from the dis-
patch of the appliance from the works.
2. Kronen Küchengeräte GmbH will perform subsequent improvement or substi-
tute delivery of the defective parts within the scope of the warranty, provided
that the functional capability of the Kronen Küchengeräte GmbH appliance has
been significantly impaired. Further claims within the scope of the warranty are
excluded.
Following notification in due time of a warranty case, the Kronen Küchengeräte
GmbH service department will decide how the defect is to be remedied and will
discuss the subsequent actions with the customer, engaging an Kronen
Küchengeräte GmbH authorised customer service centre if necessary. If and
when the appliance must be shipped to a service centre for repair within the
scope of the warranty, shipment shall be made at the customer’s expense and
risk.
3. Warranty claims are excluded in the following cases:
- Normal wear and tear
- Incorrect installation of the appliance
- Wilful damage or incorrect operation
- Damage caused by calcium deposits
- Damage caused by inspection or repair by persons who are not authorised
by Kronen Küchengeräte GmbH
4. Kronen Küchengeräte GmbH restricts the terms and conditions of warranty
for appliances which are intended for sale abroad. In such cases, Kronen Küch-
gengeräte GmbH grants a warranty covering the original Küchengeräte GmbH
spare parts. This warranty covers the functional capability of the spare parts,
provided that they are installed correctly. Kronen Küchengeräte GmbH shall
provide a replacement part in the event of a functional defect. No installation or
personnel expenses which may be incurred will be assumed.
The warranty in this case is limited to 12 months as of the transfer of risk.

Instruction Manual KA-1
7
5. The warranty services described above are subject to the condition that all
required maintenance and care work is carried out by a customer service
authorised by Kronen Küchengeräte GmbH and that any and all care and op-
erational instructions from Kronen Küchengeräte GmbH have been followed.
The warranty may not be transferred without the written consent of Kronen
Küchengeräte GmbH.
6. Kronen Küchengeräte GmbH grants a function warranty of 6 months for each
and every original Kronen Küchengeräte spare part, provided that it has been
installed correctly. Kronen Küchengeräte GmbH shall provide an original part in
the event of failure. No further claims, including claims for the cost of the re-
placement
Copyright Protection
It is forbidden to copy all the documents delivered with the pineapple peeler
partly or completely without the permission of the manufacturer.
Disposal of the Machine
The pineapple peeler, respectively all the parts have to be disposed recycled
according to the local rules and laws. It is forbidden to dispose the pineapple
peeler with the household garbage.

Instruction Manual KA-1
8
2. Safety
General Sources of Danger
That is why, we advise you to respect and follow the safety instructions.
-Make sure that unauthorized persons or untrained persons, especially
children, do not work with the pineapple peeler.
-It is strictly prohibited to change or remove all the safety appliances on
the pineapple peeler because this could result in serious danger for the
user.
-While you are using the machine stay concentrated and never get dis-
tracted.
-Just slice goods which are listed in the instruction manual.
-Always keep your working environment clean and dry to make sure
you don’t slip and fall.
-Don’t put objects on the pineapple peeler which don’t belong there and
don’t use the machine as a storage place.
Wrongful use or limited knowledge of the safety instruc-
tions could result in accidents and injuries on hands and
fingers.

Instruction Manual KA-1
9
Intended Use
The pineapple peeler is a technical tool which exclusively should be used for its’
intended purpose.
Its only purpose is to peel and coring, slicing or top removing pineapples. To
achieve the results you want you have to use the intended blade and plunger.
Approved food is only pineapple. You can process the food only raw. Under no
circumstances can the food be frozen.
Any different use of the machine is strictly forbidden.
A misuse of the machine could occur if one uses no or a wrong blade or plun-
ger.
The pineapple peeler is intended for industrial use and only should be used by
trained workers of the company.
Personal protective equipment is not needed for the use of the pineapple pee-
ler. Stricter company rules still apply.
It is strictly prohibited to make any reconstructions on the pineapple peeler.
The full responsibility for the intended use and the compliance with safety in-
structions takes the operating company.

Instruction Manual KA-1
10
3. Technical Characteristics
Weight: 18 kg
Dimensions : 375 x 480 x 945 mm
Requirements for
intended place: - horizontal and flat
- Not slippery
- table height between
600 and 900 mm
- Workstations is not
made of wood

Instruction Manual KA-1
11
4. Installation and Function
Depending on what blade and plunger, the pineapple peeler processes pineap-
ples. These can be top removed with the blades and plungers, peeled, cut in
slices or in corners.
Included in delivery
Delivery includes the fully assembled pineapple peeler made of stainless steel,
one blade and one plunger with the size of 89 mm. Also in the box are all the
documents including the instruction manual and the optional other blades, plun-
gers and accessories.
Parts and Description
Body (1): built of stainless steel; He has a support surface where the
blades are placed.
Pushing Handle (2): The pushing handle press the plunge to the pi-
neapple. It's routed on four pole on the body.
Plunger (3): The plunger pushes the pineapple through the blade. He
is attached to the pushing handle.
Blade (4): The blade is placed on the support surface on the body.
Spring Plate (5): The spring plate ensures that the pushing handle
remains in its upper end position.
Mounting Pin (6): The mounting pin fastened the plunger on the push-
ing handle. For taking the plunger, the mounting pin have to be re-
moved.
Collecting Chute (7) : The collecting chute is used to gently collect
the top removed pineapple.
Splash Protection: The splash protection is attached to the back of
the body. It prevents the underlying area (e.g. walls) while processing
the pineapples for being splashed.
GN-Tray : The tray is placed below the blade support surface. The cut
is falling directly inside the tray after finishing the process.

Instruction Manual KA-1
12
2
6
3
5
4
1
7
Assembled Parts
1
Body
2
Pushing Handle
3
Plunger
4
Blade
5
Spring plate
6
Mounting Pin
7
Collecting Chute

Instruction Manual KA-1
13
Accessories
Blade for top removing pineapples
110 mm
120 mm
Plunger for top removing pineapples
110 mm
120 mm
Blade for peeling
74 mm
89 mm
96 mm
102 mm
Plunger for peeling
74 mm
89 mm
96 mm
102 mm
Blade for slicing cut
17 mm
Plunger for slicing cut
17 mm
Blade for six fold corner cut
Plunger for six fold corner cut
Collecting chute
GN - Tray
Splash protection

Instruction Manual KA-1
14
5. Transportation and Packaging
Always transport the pineapple peeler in the intended box.
Always transport the machine upright and make sure pineapple peeler is se-
cured.
In case there is more than one pineapple peeler on the pallet do not put another
pallet on top of it.
Check the box of possible damages when the machine is shipped.
In case of damages, talk to the responsible shipping company.
Open the box by slicing the tape with a tape slicer. Do not use sharp knives.
Lift the pineapple peeler out of the box and put it on the table.
Make sure that shipment consists out of the things you ordered. In case the
shipment is not complete talk to the responsible salesman.
There are no transportation devices installed on the pineapple peeler.
Dispose or recycle the pineapple peeler according to the local laws.
Always lift and hold the machine at the body. Never at the
lever.

Instruction Manual KA-1
15
6. Installation and Initial Operation
The pineapple peeler is shipped ready for use. The installation and the initial
operation can be done by the user.
The table has to fulfill certain requirements:
-Horizontal and flat
-Not slippery
-Table height between 600 and 900 mm
-Workstation is not made of wood
After you have placed the pineapple peeler to the intended working place, push
it briefly to the work surface. The suction feet of the pineapple peeler suck
thereby firmly on the countertop. The pineapple peeler is secured against
slipping.
Before the first use make sure you cleaned the pineapple peeler. Follow the
instructions in chapter “7 Use and Operating” passage cleaning.

Instruction Manual KA-1
16
7. Use and Operating
Safety instruction for operating the slicer
“To-do-list” before operating the machine
Make sure the pineapple peeler is clean especially in those areas that come in
contact with the food. This includes e.g. the plunger (3) and the blade (4). In
case it is necessary clean those areas according to the instructions given in
paragraph cleaning.
The pineapple peeler have sharp knives. Be careful when
touching the blade to avoid injuries.
Release the pushing handle, when not using the
pineapple peeler, in the down position to avoid injury
from accidental falling of the plunger.
It is strictly forbidden to put your hands between the
plunger and blade. There is an acute danger of injury.

Instruction Manual KA-1
17
4
6
3
Mounting and removal the plunger
Make sure that when installing or removing
the plunger (3) no knife (4) inserted.
To remove the plunger (3) pull out the
mounting pin (6) with one hand. Keep
simultaneously with the other hand the plun-
ger (3) to prevent a fall. Then remove the
plunger (3). To install the plunger you go in
the opposite way.
Note: The mounting pin (6) must necessarily
be mounted to ensure the function of the
pineapple cutter.
Insertion and removal the knife
To remove the blade (4) hold with a hand
the pushing handle (2) and take the blade
(4) with the other hand. To insert the blade
(4), proceed in reverse order. The correct
have to pay attention for the orientation of
the blade (4), as due to the three pins in
the blade (4) there is only one possible
insertion of the blade (4).

Instruction Manual KA-1
18
5
Safety equipment
To prevent accidental dropping of the pushing handle
(2), there is on the right side of the pineapple peeler
a spring plate (5). To depress the pushing handle (2)
You have to overcome by slight pressure the resis-
tance of the spring plate (5). The same applies to lock
the pushing handle (2) in its upper position.
Note: Always make sure that the spring plate (5)
engages when the lever (2) is in its upper position.
Top removing of the pineapple
To remove the top of a pineapple, mount the blade (4) for top removing and the
associated plunger (3). If present, mount the collecting chute (7). Place the
pineapple in the middle with the leaves left on the blade (4). Pull the pushing
handle in a single movement till it stops down. Remove the top removed
pineapple.
Note: The plunger for top removing in the size of 110 mm corresponds to the
plunger for peeling in the size of 74 mm. The plunger for top removing in the
size of 120 mm corresponds to the plunger for peeling in the size of 89 mm.
Peel the pineapple
To peel a pineapple, mount the blade (4) for Peeling and the associated plunger
(3). Place the top removed pineapple with the flower side up on the blade (4).
Press the pushing handle (2) in a single movement till it stops down. Take the
peeled pineapple.

Instruction Manual KA-1
19
Corner cut of the pineapple
To slice corner parts of a pineapple, mount the blade (4) for corner cuts and the
associated plunger (3). Place the top removed pineapple with the flower side up
on the blade (4). Press the pushing handle (2) in a single movement till it stops
down. Take the sliced pineapple.
Slices cut of the pineapple
To Slice a pineapple, mount the blade (4) for slicing and the associated plunger
(3). Place the top removed, peeled or cut into corners pineapple horizontally on
the blade (4). Press the pushing handle (2) in a single movement till it stops
down. Take the sliced pineapple.
Note: Place a 120 mm long top removed pineapple to the right end of the blade.
After cutting, you get 7 equal pieces.
Note: Place a 110 mm long top removed pineapple center to the blade. You will
receive 5 same size and two somewhat narrower pieces.

Instruction Manual KA-1
20
Cleaning
Before you use the pineapple peeler the first time make sure you clean it tho-
roughly. Also, clean the machine multiple times during the day after use.
Always use standard cleansers for cleaning the pineapple peeler.
To clean the pineapple peeler You have to remove the blade (4) and the plun-
ger (3) and clean them separately in a water bath or in the machine dishwasher.
Clean now to pineapple peeler with a common household dish detergent and
remove stubborn remaining product with a brush. Then rinse thoroughly with
clean water after to remove traces of detergent and rub the pineapple peeler
with a tea towel dry.
After cleaning, disinfect the blades (4) and the plunger (3) and rinse them with
water.
Do not use any hard items to clean the pineapple peeler.
Table of contents
Other Kronen Kitchen Appliance manuals

Kronen
Kronen KG-253 Quick start guide

Kronen
Kronen KW-81 A User manual

Kronen
Kronen KA-2 Quick start guide

Kronen
Kronen KG-201 User guide

Kronen
Kronen KG-453 Quick start guide

Kronen
Kronen KA-3 Quick start guide

Kronen
Kronen KG-353 Quick start guide

Kronen
Kronen KG-251 Quick start guide

Kronen
Kronen MT-6 User manual