Krups BeerTender User manual

cove B90onewayAmste dam_Couve tu eB90onewa#2699F0.qxd30/05/1313:54Page2

eNGlISH
1Safety r leS
This appliance is not intended for use by
persons (including children) with reduced
physical, sensory or mental capabilities, or lack
of experience and knowledge, unless they have
been given supervision or instruction
concerning use of the appliance by a person
responsible for their safety.
Children must be supervised to ensure that they
do not play with the appliance.
This appliance is intended to be used only in
the household.
It is not intended to be used in the following
applications, and the guarantee will not apply
for:
- Staff kitchen areas in stores, offices and
other working environments;
- farms and client use of hotels, motels and
other residential environments;
- Bed and breakfast type environments.
- restaurants and other similar venues,
except where retail sales are involved
Do not store explosive substances such as
aerosol cans with a flammable propellant in this
appliance.
If the power cord is damaged, do not use the
appliance. The Power cord must necessarily be
replaced by the manufacturer, by its after-sales
service or by similarly qualified persons in order
to avoid all risks.
This appliance can be used by children over 8
years old and by persons with reduced
physical, sensory or mental capacities, or
lacking experience or knowledge, only if they
are properly supervised or if they have received
instructions as to how to use of appliance safely
and they understand the implicit risks.
Children must not play with the appliance.
Children should not clean or perform
maintenance procedures on the appliance
3
1-B90 oneway Amsterdam_UK_1-B90 oneway Amsterdam_UK.qxd 30/05/13 13:57 Page3

eNGlISH
unless they are supervised by a responsible
adult.
Only connect the machine to a mains voltage supply that coincides
with the voltage indicated on the sign plate of your appliance. The
connection to an incorrect supply voltage will invalidate the
guarantee and could be dangerous.
In case of inappropriate use or failure to follow the instructions, the
manufacturer guarantee is declared void. Use only "Beer Tender
Compatible" barrels.
Always use the machine on a flat, stable, heat-resistant surface
which is protected from other heat sources or water splashes.
In order to protect people against fire, electric shocks and wounds,
avoid immersing the power cord or plug in water or any other liquid.
Never unplug the appliance with wet hands. In case of an
emergency, unplug the the appliance immediately.
Do not use the appliance without its draining tray and grill.
After use, empty and clean the draining tray every day.
Unplug the machine from the mains whenever you are not using
it.
Unplug the machine from the mains before cleaning. Never clean
the machine with running water and do not immerse it in any liquid.
Never use detergents to clean the machine. Clean the machine
using only soft sponges and brushes.
In case of a prolonged period without use (vacations, storage,
etc.), unplug, empty and clean the machine.
Any functioning, cleaning or maintenance which is outside the
limits of normal use should be reserved to the staff at the local
authorized service centres. Do not disassemble the appliance or
place any objects in any of its openings.
The use of accessories not recommended by the manufacturer
could cause fires, electric shocks or wounds.
Do not let the power cord hang from the edge of a table or work
top, nor come into contact with hot surfaces or sharp edges.
Do not let the electric cord hang (to avoid the risk of stumbling).
Never touch the cord with wet hands.
Do not place the machine on a gas or electric stove, nor near such
heat sources, nor inside a hot oven.
Before unplugging the appliance, make sure the ON/OFF button is
set to OFF, then remove the plug from the outlet. Do not unplug the
machine by pulling on the cord.
In case you need to use the machine with an extension cord,
respect the corresponding load recommendations for the
extention.
If the wall outlet does not correspond to the machine plug, have the
plug replaced by the after-sales service or by similarly qualified
persons in order to avoid all risks.
The wrapping is made up of recyclable materials. Contact the local
authorities for more information on recycling programs. Your
machine contains materials that can be recovered or recycled.
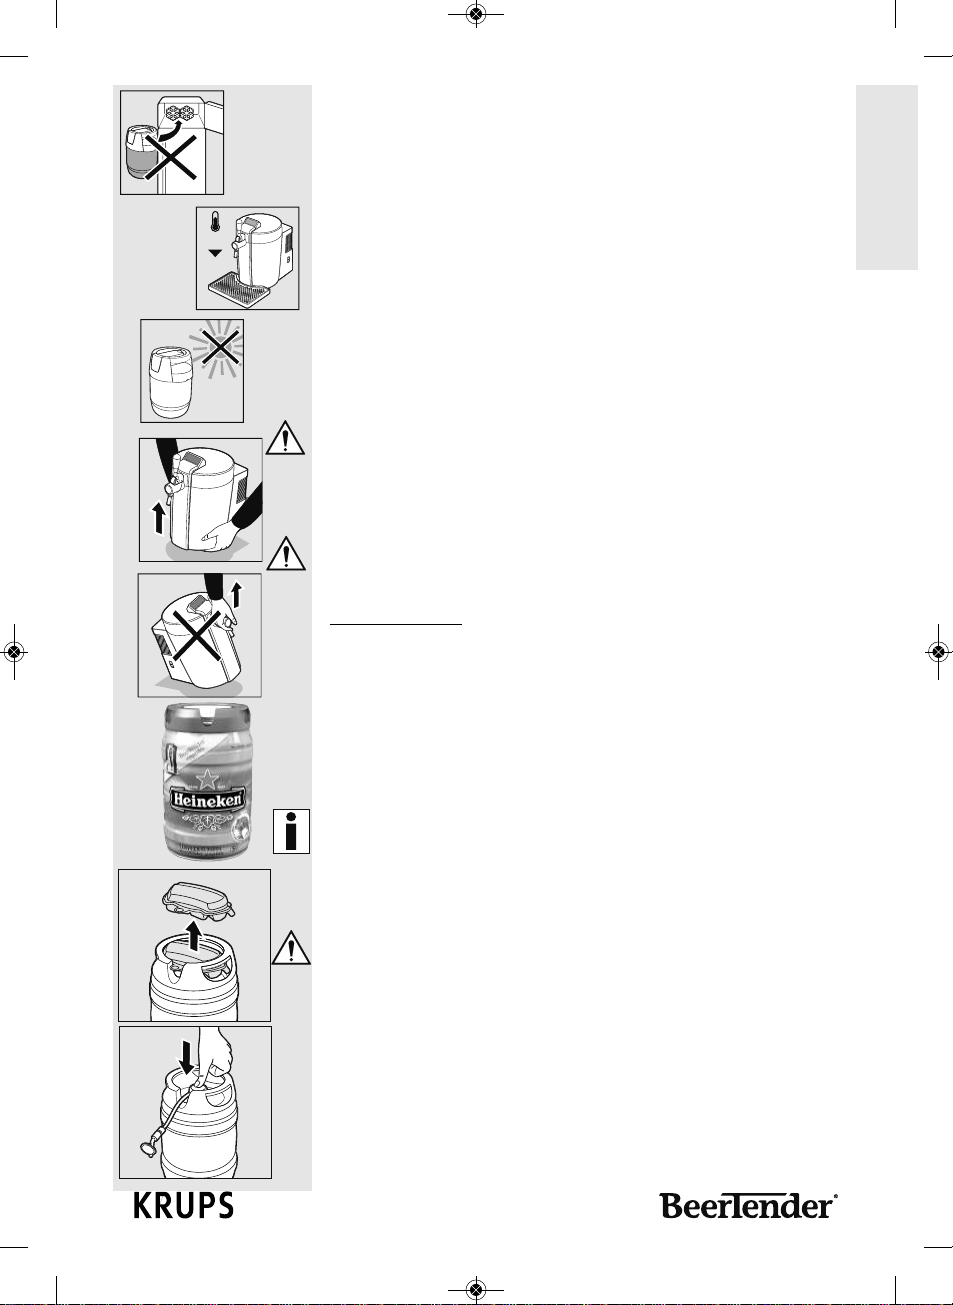
IMPORTANT: Always leave the beer engine on if you have a barrel
inside the machine.
4
1-B90 oneway Amsterdam_UK_1-B90 oneway Amsterdam_UK.qxd 30/05/13 13:57 Page4

eNGlISH
1-Safety rules 3
2-General Information 6
Guidelines for reading these instructions
Using these operating instructions
3-technical specifications 7
4-Cautionary notes 8
Using the BeerTender system
Using the keg
5-Getting the Beertender ready 10
Cooling the Beertender keg
Installing the BeerTender appliance
Connecting to the power supply
6-sing the Beertender system 12
Inserting a BeerTender keg
Control display
Sound emitted by the BeerTender appliance
7-Dispensing beer 14
Phase 1: Preparing a glass
Phase 2: Dispensing beer
Phase 3: Beer in the glass
Phase 4: The quality of a glass of beer
8-Cleaning 16
Cleaning after daily use
Cleaning after installation of a new BeerTender keg
Routine cleaning
9-Children’s safety 17
10 -Information of a legal nature 18
11 -Disposal 18
12 -troubleshooting 19
5
1-B90 oneway Amsterdam_UK_1-B90 oneway Amsterdam_UK.qxd 30/05/13 13:57 Page5

eNGlISH
6
2 General information
The BeerTender is designed to dispense cool beer from
a special container (BeerTender Keg) fitted inside the
appliance itself.
This elegantly designed machine has been engineered
for domestic use and is not suitable for continuous
professional use.
Warning: The manufacturer will accept no liability for
damage caused as a result of:
* Improper use and use for purposes other than those
envisaged;
* Repairs not performed at authorised service centers;
* Tampering with the power cord;
* Tampering with any BeerTender appliance component;
* Use of spare parts and accessories other than those
supplied by the manufacturer;
* Attempts to access internal parts of the appliance.
The warranty will be invalidated in such cases.
Guidelines for reading these instructions
The warning triangle indicates instructions that are
important for the user’s safety.
Please adhere strictly to these directions to ensure
proper use and avoid serious injury!
This symbol highlights information that is especially
important for making the best use of the machine.
sing these operating instructions
Keep these operating instructions in a safe place and
make them available to any other person who uses the
appliance.
If you have any problems or queries please contact our
Customer Relations Team first for expert help and
advice.
(see details per country at the end of this manual)
1-B90 oneway Amsterdam_UK_1-B90 oneway Amsterdam_UK.qxd 30/05/13 13:57 Page6

eNGlISH
7
3 technical specifications
Rated voltage: 220-240 V
Rated power: 61W
Power supply: 50 z
Insulation class: II
Cooling class: SN
Casing material: Thermoplastic
Size 300 x 452 x 494
(w x h x d) (mm) (419 without drip tray)
Weight: 6,1 kg. (5,6 kg. without drip tray)
Cord length: 1.4 m
Beer container: BeerTender Keg
Control panel: Top
Operating conditions With 80% R. .
min 12°C, max 30°C
The manufacturer reserves the right to make
constructive and engineering changes as warranted by
technological advances.
Appliance complying with European Directive
89/336/EEC (Legislative Decree 476 of 04/12/92)
concerning electromagnetic compatibility.
Never place powered components in contact with water.
There is a danger that this may cause a short circuit.
Intended use
This appliance has been manufactured exclusively for
dispensing beer in a domestic setting.
Only original BeerTender Kegs mentioning “Compatible
BeerTender” can be used with the appliance; you should
not use any other commercially available beer containers.
Before using a keg, check the “best before end” date
shown at the bottom of the keg. Do not insert or use
BeerTender Kegs after the date shown.
You should not use the appliance for purposes or with
containers other than those specified above.
You should not introduce any materials other than
BeerTender Kegs inside the appliance.
You should not make technical changes or use the
appliance in any manner other than as directed, due to
the risks involved!
The appliance should be used solely by adults in full
possession of their mental and physical capacities.
Cleaning
Before cleaning the appliance, it is essential to turn off the
main switch and then pull the plug out of the socket.
Never immerse the appliance in water!
1-B90 oneway Amsterdam_UK_1-B90 oneway Amsterdam_UK.qxd 30/05/13 13:57 Page7

eNGlISH
Please note that too much dust can affect the efficiency of
the cooling system of your BeerTender. It is possible that
dust enters in the machine through the vent grid at the rear
of the machine. We recommend that, using a vaccuum
cleaner, you clean regularly this particular area. This will
allow your BeerTender to last longer and remain efficient
over time.
You should never attempt to access internal parts of the
appliance.
Machine Components
Beertender
1. BeerTender dispensing system
2. Refrigerating chamber
3. Lid
4. Lid opening handle
5. LED control panel
6. Tap cover
7. Dispensing spout
8. Beer tap handle
9. Drip grate
10. Drip tray
11. Main switch
12. Power cord with plug
Beertender Keg
13. BeerTender Keg
14. Beer tube
15. BeerTender Keg tap
4 Cautionary Notes
sing the Beertender system
To obtain draft beer of optimal quality you should keep
two basic factors in mind, the temperature of the beer
and hygienic conditions.
1. Pre-chill the beer keg to prevent excess foam.
Always use a chilled keg. If you fail to chill the keg
sufficiently too much foam will be produced when
you start to pour your beer.
2. Always clean the appliance after use. Beer is a
natural product that can spoil. Therefore, you
should always keep the appliance clean to maintain
the quality of the beer dispensed and avoid
unpleasant odours (see “Cleaning”). The
dispensing spout should be cleaned before a new
keg is installed and the drip tray and grate should
be emptied after every use.
8
15
14
13
1-B90 oneway Amsterdam_UK_1-B90 oneway Amsterdam_UK.qxd 30/05/13 13:57 Page8

eNGlISH
You should also follow these other rules when using the
BeerTender system:
1. Do not attempt to chill a BeerTender Keg in your
freezer. Just like glass bottles, a keg may burst when
placed in the freezer. Moreover, freezing diminishes
the quality of the beer;
2. Your BeerTender uses a technology that delivers
ultimate cooling results when the ambient
temperature is between 12°C and 30°C. At colder
temperature, the appliance cooling system could be
damaged. At warmer temperature, the cooling
system will not be able to reach the set regulation
temperature of 3°C.
Warning! To avoid overheating, always keep the
BeerTender keg out of direct sunlight. To obtain good
cooling performance, never install your machine in a room
with an ambient temperature above 30°C.
3. Always hold the appliance by the bottom edge when
lifting it.
Warning! Do not use the handle or power cord to lift the
BeerTender.
sing the Keg
Make sure that you chill the keg before using it. If you fail
to chill the keg sufficiently too much foam will be produced
when you start to pour beer.
Please also be aware that the first glass that you pour
from every new keg will contain mostly foam. Draught
beer in a bar behaves in exactly the same way!
The BeerTender Keg “Compatible BeerTender” features a
patented system for storing and dispensing beer. It
guarantees beer of higher, long-lasting quality and a
BeerTender system that is very easy and pleasant to use.
Important: Before installing a keg inside the appliance,
check the “best before end” date shown at the bottom of
the keg. This date is a reliable indication if the keg has
been stored at room temperature.
The use of kegs “Compatible BeerTender” in the
BeerTender system necessitate the use of beer tubes. A
bag of tubes is delivered with the BeerTender appliance.
To receive, free of charge, additional beer tubes please
contact our customer service via.
(see details per country at the end of this manual)
9
12°C
30°C
1-B90 oneway Amsterdam_UK_1-B90 oneway Amsterdam_UK.qxd 30/05/13 13:57 Page9

eNGlISH
Fix a beer tube at the top of the keg by simply pressing
firmly on the push button.
Warning: Contents under pressure. Do not shake or
drop. Do not expose to sunlight or temperatures above
30°C. Even when the keg is empty, do not force it open
and do not expose to flame or fire.
5 Getting the Beertender ready
For your own and others’ safety, please keep
meticulously to the “Safety rules” described in chap.3.
Cooling the Beertender Keg
BeerTender kegs must be chilled before use. Using a
BeerTender keg that is too warm will result in too much
foam.
There are two ways to chill the BeerTender Keg:
1. Inside the BeerTender (see “Using the
BeerTender”). It will take about 15hours to cool the
keg down to 3°C if the BeerTender Keg and the
appliance are stabilized at a room temperature of
20°C.
2. In a refrigerator. This will take about 12 hours
depending on the cooling capacity of your
refrigerator.
tip: we recommend that you always keep an extra
BeerTender Keg in the refrigerator. That way you will
always have a chilled keg available.
We also recommend you to switch the appliance at least
one hour before intended use to get full benefit from the
pre-cooling of the keg.
Warning! Do not attempt to chill the keg in a freezer.
Just like glass bottles, a keg may burst when placed in
the freezer. Moreover, freezing diminishes the quality of
the beer.
Installing the Beertender appliance
The original packing is designed and made to protect
the appliance.
You are recommended to keep it for future transport.
10
1-B90 oneway Amsterdam_UK_1-B90 oneway Amsterdam_UK.qxd 30/05/13 13:57 Page10

eNGlISH
Remove the BeerTender appliance from the packing
container and place it on a dry, clean, level, stable
surface that is sufficiently large to accommodate it.
The temperature of the room must be between 12°C and
30°C. If ambient temperatures is outside these brackets,
your BeerTender will not be able to deliver the set
regulation temperature of 3°C.
Set the drip tray and grate in place at the front of the
appliance. Make sure the drip tray is properly fitted and
positioned.
Do not install the appliance near sources of heat or in
places exposed to direct sunlight.
Note: keep in mind that during use the drip tray will have
to be emptied and rinsed regularly. When the
BeerTender system is not being used, you can remove
the drip tray and place it elsewhere to save space.
Warning! The drip tray must be positioned on a level
surface and must not jut out from the surface it is resting
on.
After installing the BeerTender appliance you must clean
the dispensing spout; this is the only part of the
appliance that will come into contact with the beer.
It is vital that you wash the dispensing spout before
using the appliance for the first time and at least every
time a new keg is connected inside the BeerTender
system. This part can also be washed in a dishwasher.
To clean the spout, remove it from its housing.
After washing the spout, screw it back into place.
Connecting to the power supply
Electricity can be dangerous! Therefore you must always
scrupulously abide by the safety rules.
The appliance must be plugged into a suitable, properly
installed electric socket with an earth connection.
The voltage of the appliance has been set in the factory.
Check that the mains voltage matches the voltage
indicated on the rating plate on the rear of the appliance.
11
12°C
30°C
1-B90 oneway Amsterdam_UK_1-B90 oneway Amsterdam_UK.qxd 30/05/13 13:57 Page11

eNGlISH
Make sure the main switch on the right is set on “0”
before connecting the BeerTender to the mains.
Insert the plug into a socket with the correct voltage and
turn on the appliance by moving the main switch to “I”.
6 sing the Beertender system
Inserting a Beertender Keg
Note: the BeerTender may only be used with
BeerTender Kegs “Compatible BeerTender” containing
beer sold by the eineken group.
The appliance can only be used if it contains a
BeerTender Keg and only if the main switch is set on “I”.
The control display on top of the lid, when illuminated,
tells you that the appliance is switched on.
The appliance will immediately start cooling the inner
chamber as soon as the main switch is moved to “I”.
You can open the appliance by pushing the front handle.
When the handle is released, you can lift the lid up.
Note: do not force the lid beyond the set opening
position as this could damage it.
When the lid is completely open, insert a BeerTender
Keg as shown in the figure.
Open the tap cover by turning it anti-clockwise.
Note: this cover can be removed for cleaning.
12
1-B90 oneway Amsterdam_UK_1-B90 oneway Amsterdam_UK.qxd 30/05/13 13:57 Page12

eNGlISH
Take the tap of the BeerTender Keg “Compatible
BeerTender” and fit it into place.
Position the beer tube as shown on drawing.
Close the tap cover by turning it clockwise.
Make sure the tap handle is positioned vertically before
lid is closed.
Carefully close the appliance lid.
13
1-B90 oneway Amsterdam_UK_1-B90 oneway Amsterdam_UK.qxd 30/05/13 13:57 Page13

eNGlISH
Control display
Your appliance features a large display providing you
with important and useful information.
On the left side of the display:
a. Volume indicator
The BeerTender Keg volume is indicated with 4 levels.
The 4 levels are visible when the keg is full. They
disappear progressively while emptying the keg. The last
level starts to blink when only two glasses of beer (+ / -
one) are left in the keg. This gives you the possibility to
prepare in advance a new keg to be insereted in the
appliance.
b. Temperature indicator
The temperature indicator goes from red, for a beer
which is too warm, to orange when cooling of the beer is
almost complete. The perfect draught beer temperature
is attained when the indicator is green.
Warning: never use your BeerTender with ambient
temperature above 30°C. Above that level, the 3°C set
regulation temperature can not be attained and the
temperature indicator will never reach the green level.
Sound emitted by the Beertender appliance
The cooling function of the BeerTender produces sound.
The BeerTender features a cooling system which
controls the temperature of the BeerTender Keg. There
are two cooling modes:
1. Stand-by cooling, which is used in normal operating
conditions. In this mode the cooling fan produces a
barely audible noise;
2. Active cooling, which is triggered when temperature
inside the cooling chamber is too high. As soon as
the cooling chamber reaches the right temperature,
the appliance will switch back into the stand-by
mode.
7 Dispensing beer
Note: always check the “best before end” date shown at
the bottom of the BeerTender Keg. Do not use the
BeerTender Keg beyond this date.
Note: the beer must be dispensed into suitable
containers; the dispensing funtion is started and stopped
manually by the user.
14
1-B90 oneway Amsterdam_UK_1-B90 oneway Amsterdam_UK.qxd 30/05/13 13:57 Page14

eNGlISH
Step 1 - Preparing a glass
In order to obtain perfect draft beer, it is essential to start
with a clean, cool glass.
Rinse the glass in cold water before dispensing beer
(the colder the glass the better).
tip: we recommend using your beer glasses for drinking
beer alone. Some beverages, like milk, leave a small
residue in the glass which will reduce the head on your
beer.
Step 2 – Dispensing beer
tip: verify on the control display that the beer has
reached the right drinking temperature.
Position a glass beneath the tap, holding it at an angle
of 45 degrees (see picture).
Avoid contact between the dispensing spout and the
glass. This could cause excessive foaming.
Firmly and quickly pull the handle down as far as it will
go. Let the beer run into the glass.
Avoid contact between the dispensing spout, glass and
beer already in the glass.
Note: Every time you install a new keg in the
BeerTender, the first glass of beer will fill up with too
much foam. When this occurs, allow the glass to stand
on the drip tray. As soon as the foam has settled, fill up
the glass.
Note: Too much foam will also be generated if the tap
handle is opened just slightly or slowly, several beers can
be dispensed in sequence when the tap handle is open.
The beer will flow out more slowly after the first glass has
been filled.
Step 3 – Beer in the glass
Place the glass of beer on the grate and wait for the
foam to settle.
15
1-B90 oneway Amsterdam_UK_1-B90 oneway Amsterdam_UK.qxd 30/05/13 13:57 Page15

eNGlISH
Step 4 – the quality of a glass of beer
An excellent draft beer has the following characteristics:
1. A head of about 3 cms;
2. A head evenly distributed around the wall of the
glass and adhering to the surface of the beer;
3. A crystal clear colour, with bubbles of carbon
dioxide escaping from the sides and bottom of the
glass;
Note: to prevent excessive foam from forming, always
use a pre-chilled BeerTender Keg and a clean glass
rinsed in cold water.
8 Cleaning
In addition to routine cleaning, the BeerTender should be
cleaned after daily use and when you install a new
BeerTender Keg.
Warning! Do not dry the appliance and/or its
components in a microwave and/or conventional oven.
Cleaning after daily use
The drip tray and grate should be cleaned after every
use.
Remove the grate before emptying out the drip tray. The
grate must be set back in place during normal use of the
BeerTender.
Note: You can wash the drip tray with warm water and a
mild detergent. The drip tray is also dishwasher safe.
Warning! Never use aggressive cleaning agents such
as vinegar, acids, solvents or petrol.
Cleaning after installation of a new Beertender Keg
When you install a new BeerTender Keg you must clean
the dispensing spout. The spout is the only part of the
appliance that comes into contact with the beer.
It is essential to wash the spout either normally by hand
or in a dishwasher.
16
1-B90 oneway Amsterdam_UK_1-B90 oneway Amsterdam_UK.qxd 30/05/13 13:57 Page16

eNGlISH
Note: the dispensing spout comprises plastic and metal
parts that are permanently joined together and do not
pose any problems of hygiene. Do not attempt to
separate these parts.
The beer dispensing mechanism must be cleaned using
a damp cloth and a mild detergent.
Note: use a piece of cotton to thoroughly clean all the
parts.
Warning! Do not attempt to clean the mechanism using
hard and/or sharp objects: it is a precision component
and you will risk damaging it.
routine cleaning
Clean the appliance cooling chamber on a regular basis
using a damp cloth and mild detergent.
Warning! Do not fill the cooling chamber with water as
this may result in permanent damage. Never use
aggressive agents such as vinegar, acids, solvents or
petrol.
The tap cover can be removed.
Open the cover and remove it. Clean it with warm water
and a mild detergent.
Warning! Do not wash the tap cover in a dishwasher, as
it could be damaged and lose its shine. Never use
aggressive agents such as vinegar, acids, solvents or
petrol.
9 Children’s safety
To prevent children from using the appliance, you can
remove the tap handle.
To remove the handle, make sure it is in an upright
position and pull it upwards.
17
1-B90 oneway Amsterdam_UK_1-B90 oneway Amsterdam_UK.qxd 30/05/13 13:57 Page17

eNGlISH
18
10 Information of a legal nature
· These operating instructions contain the necessary
information for the proper use and upkeep of the
appliance.
· It is essential to read this information and comply with
these instructions in order to use and maintain the
appliance in complete safety.
· Please note, moreover, that the contents of these
operating instructions do not form part of a previous
or already existing legal agreement or contract, hence
they do not affect the terms of the latter.
· The manufacturer’s obligations are based solely on
the contract of sale, which also contains complete and
exclusive terms pertaining to the warranty service
provided.
· The warranty conditions as set forth in the contract
are neither limited nor extended on the basis of the
explanations herein.
· These operating instructions contain information
protected by copyright.
· They may not be photocopied or translated into
another language without the manufacturer’s prior
written consent.
11 Disposal
· Appliances that are no longer used should be
rendered unusable.
· Unplug the appliance and cut the power cable.
· Appliances no longer in use must be taken to a
suitable waste collection facility so that the special
components contained in the appliance may be duly
disposed of.
· The “TEM - Module” (or Peltier’s cell) must be
disposed of in accordance with the regulations
currently in force in the user’s country.
This marking indicates that this product should not
be disposed with other household wastes throughout
the EU. To prevent possible harm to the environment
or human health from uncontrolled waste disposal, recycle it
responsibly to promote the sustainable reuse of material
resources. To return your used device, please use the return
and collection systems or contact the retailer where the
product was purchased. They can take this product for
environmental safe recycling.
1-B90 oneway Amsterdam_UK_1-B90 oneway Amsterdam_UK.qxd 30/05/13 13:57 Page18

eNGlISH
12 troubleshooting
19
Problem Possible causes remedies
The appliance
does not turn
on.
The appliance is
not connected to
the mains power
supply.
Connect the
appliance to the
power supply.
You can not fit
the BeerTender
Keg tap in the
tapping unit.
The BeerTender
Keg tap has been
activated by hand.
Put the BeerTender
Keg tap back in its
original position.
You can not
close the tap
cover.
The BeerTender
Keg tap is not
inserted correctly.
Remove the
BeerTender Keg
tap from the
appliance and fit it
again following
chapter 6 – Using
the BeerTender.
No beer is
being
dispensed.
The BeerTender
Keg is empty (last
level of volume
indicator is blinking).
Replace the
BeerTender Keg
with a new one.
There is no keg
inside the
BeerTender
appliance (the
4 levels of the
volume indicator
are blinking).
Install a keg inside
the BeerTender
appliance.
The BeerTender
appliance tap
handle is not
correctly
installed/positioned.
Install/position the
tap correctly.
The
BeerTender
appliance
produces too
much foam
when
dispensing
beer (see also
chapter 7:
Dispensing
beer).
The BeerTender
Keg has not
reached the right
dispensing
temperature.
Allow the
BeerTender Keg to
cool to the right
temperature. You
can rely on the
temperature
indicator on the
control display of
your BeerTender
appliance.
1-B90 oneway Amsterdam_UK_1-B90 oneway Amsterdam_UK.qxd 30/05/13 13:57 Page19

eNGlISH
20
If you have any problems or queries please contact our
Customer Relations Team first for expert help and advice.
(see details per country at the end of this manual)
The BeerTender
Keg has been
shaken.
Wait 4 hours before
dispensing beer.
The tap handle is
being moved too
slowly.
Firmly and quickly
pull the handle
down and forward
as far as it will go.
Beer flows out
too slowly. The tap handle is
not open all the way. Open the tap
completely.
The
BeerTender
appliance is
dispensing
warm beer.
The BeerTender
Keg has not been
chilled for long
enough in the
refrigerator and is
thus not at the right
serving
temperature.
Allow the
BeerTender Keg to
cool in the
refrigerator for
about -12 hours.
The beer has been
tapped before it
has attained the
right drinking
temperature (see
temperature
indicator).
Allow the
BeerTender Keg to
cool long enough in
the appliance.
The
temperature
indicator on
the control
display never
reaches a
ready-to-drink
level.
The BeerTender
appliance is
exposed at a too
hot temperature or
to direct sunlight
(see also chapter 5
– “Cooling the keg”
and “Installing the
BeerTender”).
Use the appliance
indoor and move it
in a room where
ambient
temperature does
not exceed 30°C.
The control
display shows
an increasing
temperature.
A warm keg was
installed in a cold
appliance.
Allow the
BeerTender system
to compensate
effect of the
temperature
change. Displayed
temperature should
start decreasing
after 1 hour
maximum.
1-B90 oneway Amsterdam_UK_1-B90 oneway Amsterdam_UK.qxd 30/05/13 13:57 Page20
Other manuals for BeerTender
2
This manual suits for next models
4
Table of contents
Other Krups Kitchen Appliance manuals

Krups
Krups JC100810 User manual

Krups
Krups THE SUB User manual

Krups
Krups Vacupack Plus 380 User manual

Krups
Krups AJ1508 User manual

Krups
Krups COOK 4 ME User manual

Krups
Krups SEMI PRO TR522341 User manual

Krups
Krups Cook4Me User manual

Krups
Krups THE SUB User manual

Krups
Krups F608 User manual

Krups
Krups Beertender VB31 User manual

Krups
Krups XL2000 User manual

Krups
Krups CZ715815 User manual

Krups
Krups AJ1000 User manual

Krups
Krups Extra Crisp User manual

Krups
Krups AJ1000 User manual

Krups
Krups KZ700 User manual

Krups
Krups ZX7000 User manual

Krups
Krups XL1008 User manual

Krups
Krups VB215850 User manual

Krups
Krups COOK 4 ME User manual