Kyocera TJEP ULTRA GRIP 25 User manual

www.tjep.eu
TJEP ULTRA GRIP
MODEL 25, 40 AND 58

2
www.tjep.eu

English..............................................................4
Dansk .............................................................14
Svenska..........................................................24
Norsk ..............................................................34
Deutsch ..........................................................44
Nederlands .....................................................54
Français..........................................................64

4
Specications and technical information
Warning: Read this user guide before use. The user guide should be
kept together with the re-bar binder.
Front of the machine
Release lever
Window
Main switch
Adjusting knob
Cover
LED
Curl guide
Trigger lock
Machine mouth
Handle
Arm A unit
Trigger
Specications and technical information ..........6
Machine specication........................................6
Wire specication ..............................................6
Safety features...................................................6
Battery................................................................6
Safety instructions .............................................7
Precautions........................................................8
How to use .........................................................9
Loading the wire coil..........................................9
How to replace the wire coil ............................10
Correct use ......................................................10
Maintenance ....................................................11
Storage.............................................................11
Troubleshooting / repairs ................................11
Troubleshooting ...............................................12
Contents

5
English
Back of machine
Battery
Charger
Power cord
Main plug
Reel stopper
Wire guide C
Reel stay
Wire coil
Battery cover
Battery lock
Battery terminals
LED
LED Charger terminals

6
Applications
Tying of re-bars used for: prefab. concrete elements,
on-site concrete constructions, oors and walls.
Tying of oor heating pipes.
Safety features
To increase safety when tying, the re-bar binder is
equipped with safety features.
WARNING! Before use, make sure that the
device works as intended. Otherwise, do not
use the re-bar binder.
Trigger lock
The re-bar binder is equipped with a trigger lock.
Lock the trigger and remove the battery when the
re-bar binder is not in use.
!
Trigger
Trigger lock
Machine specication
Technical info. ULTRA GRIP 25 ULTRA GRIP 40 ULTRA GRIP 58
TJEP no. 124012 124002 124022
Weight 2.5 kg 2.6 kg 2.8 kg
Size (L × B × H) 281 × 109 × 300 mm 297 × 109 × 300 mm 312 × 109 × 310 mm
Wraps per tie 2 or 3 2 or 3 2 or 3
Workpiece thickness 8 - 25 mm 12 - 40 mm 30 - 58 mm
Ties per charge +5.000 (3 wraps)+4.500 (3 wraps)+4.000 (3 wraps)
Battery 18V 4,0Ah Li-ion
Charger Use only approved battery charger Li18C
(TJEP no. 124201).
Charging time Full charge = 90 min.
Wire specication
Model Box: 20 coils (TJEP no. 124152)
Box: 40 coils (TJEP no. 124153)
Diameter 0.8 mm
Length approx. 100 m
Material Galv.
Ties per coil ULTRA GRIP 25 ULTRA GRIP 40 ULTRA GRIP 58
2 wraps approx. 220 approx. 160 approx. 120
3 wraps approx. 160 approx. 120 approx. 90
When you start tying, release the trigger lock by
pushing the lock left and upwards.
Curl guide
If you pull the trigger while the curl guide is open, the
re-bar binder will make a warning sound and refuse
to tie. To start tying, release the trigger and make
sure that the curl guide is closed.
Battery
Durability of the battery
If the battery is fully charged, but the operating time
is signicantly reduced, the battery is defective and
must be replaced. If the battery temperature is low
(10°C or lower) the charging time will be prolonged.
WARNING! Do not use defective batteries.
The re-bar binder will not work properly.
!
Curl guide

7
English
!
Disposal of batteries
Batteries contain substances that can be harmful
to human health and the environment if they are
not handled properly. Batteries are marked with the
crossed trash bin. It symbolises that waste batteries
must not be disposed with unsorted waste but must
be collected separately.
It is important that you hand in your waste batteries to
the collection points that are established. In this way,
you help to ensure that the batteries are recycled in
accordance with legislation and do not unnecessarily
damage the environment. Your local waste authori-
ties can inform you how to dispose and recycle this
type of battery correctly.
Safety instructions
WARNING! To avoid serious injuries to per-
sons or property, please read these safety
instructions carefully and make sure you
understand them.
Points of attention when using the re-bar binder
Using the re-bar binder for other purposes or other
applications than described in this manual can result
in serious accidents. Please make sure that you fol-
low all instructions in the manual. People who have
nothing to do on the work site, especially children,
should be kept out of the work site and should not
have access to this equipment.
Use appropriate protection gear.
Employer and operator must make sure that the
operator uses proper eye protection when the tool is
used. This protection must comply with current laws
and norms.
NB: Glasses without side protection and single-sided
protection screen do not provide adequate protection.
Earmuffs can be necessary.
On a lot of work sites, it can be necessary to wear
earmuffs, to avoid permanent damage to the hear-
ing. Employers and employees must make sure that
proper earmuffs can be found and is used on the
work site.
No children near the re-bar binder.
Do not allow spectators, especially children, near the
machine while working with it.
Do not use the re-bar binder near ammable
substances.
Never use the re-bar binder near any ammable
substances or fumes. The fumes from these can be
sucked into the engine and cause an explosion.
Do not use the re-bar binder in wet or damp
environments.
If the re-bar binder is used in direct rain or water,
damp environments or similar, the risk of getting an
electrical chock is increased. Do not leave the re-bar
binder where it can be exposed to this.
Check the parts of the re-bar binder before slid-
ing in the battery.
Check that all screws are tightened properly. Im-
proper tightening of screws can result in an accident
or breakage. Make sure that all parts are intact. Parts
will be worn out over time. Check also that no parts
are damaged, defective or worn. If parts are missing
or need to be repaired, contact your dealer immedi-
ately. Use only parts approved by the manufacturer.
Set the main switch in OFF position and lock the
trigger when changing the battery or changing/
adjusting the wire coil. Remove the battery if an
error occurs and the machine cannot be used.
If the machine is left on, it may cause damage.
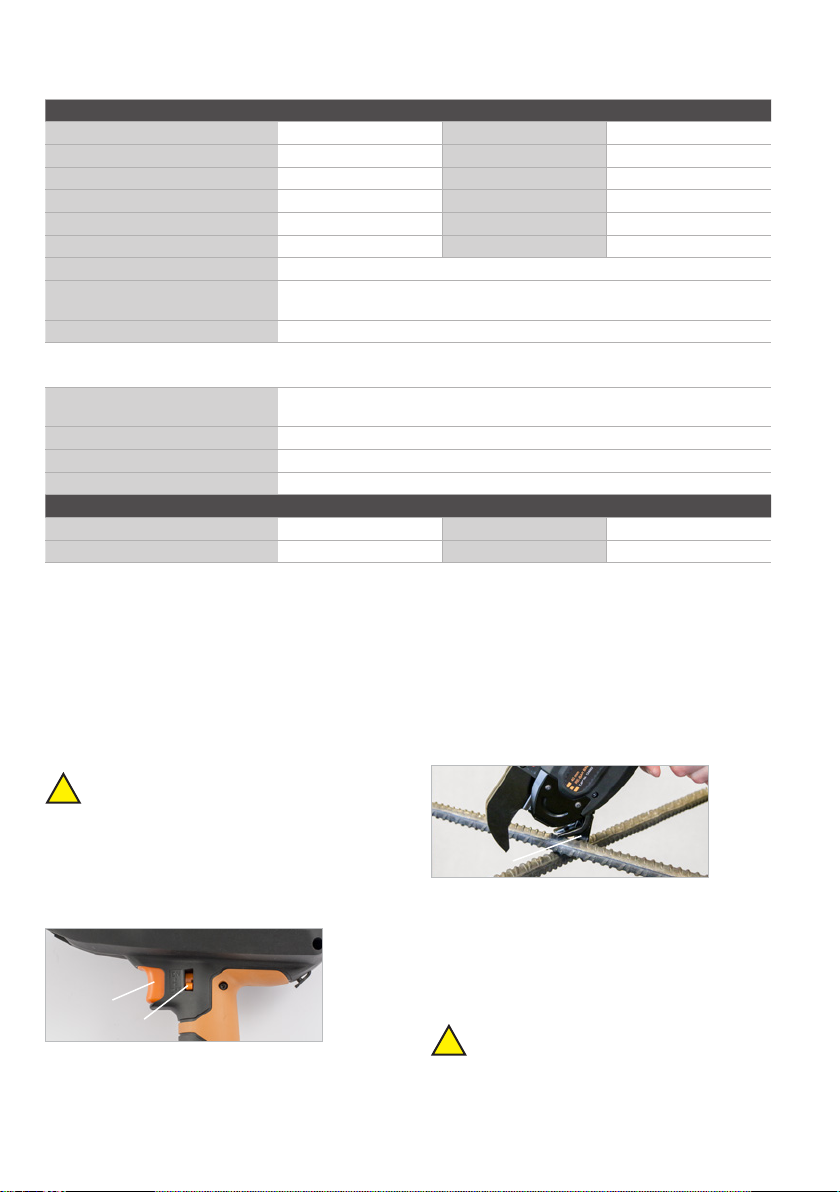
Keep clear of the nose, feeding gears and wire
coil during use of the re-bar binder.
DO NOT hold your ngers near the nose or other
moving parts as the wire and moving parts easily can
cause damage.
Keep clear of the machine mouth during use of
the re-bar binder.
Do not touch the wire or the machine mouth when the
machine is tying. You may get caught in the wire loop
and suffer serious injury.
Do not point the re-bar binder towards others
during use.
People can get hurt if they are caught in the machine
during use. When tying, be careful and stay clear of
the moving parts.
Do not touch the trigger unless you have to.
When carrying the re-bar binder and when not tying,
remember to set the main switch in OFF position,
and lock the trigger. If not, you will risk activating the
re-bar binder unintentionally and cause a dangerous
situation.
Do not use the re-bar binder during a malfunc-
tion.
If the re-bar binder does not work correctly, set the
main switch in OFF position, lock the trigger and
remove the battery before checking what is wrong. If
necessary, contact your dealer and have the re-bar
binder repaired.

8
When sliding in the battery, check the following
points. Do not load a wire coil in the re-bar binder
if:
• There is a sound from the curl guide, even though
the re-bar binder is not in use.
• The re-bar binder is warmer than usual, smells
odd, or a noise is coming from the machine when
not in use.
If one of the above-mentioned points occur and you
continue to use the re-bar binder without correction
the error, it may cause damage to the machine. If it is
not possible to correct the error, contact your dealer.
Do not make any modications to the re-bar
binder.
Modifying the re-bar binder does not only reduce the
function of it, but also the level of security. Do not
make any modications to the re-bar binder.
Make sure that the re-bar binder is in good condi-
tion.
To maintain the functionality and the quality from the
work of the re-bar binder, maintain it properly and
make sure that it is being serviced on a regular basis.
Remember to keep the handle free of oil and dirt.
Use only approved batteries.
Use only the approved type of battery 18V 4.0Ah
Li-ion for this re-bar binder. If using another power
source, for example another type of battery, dry cell
battery or a car battery, the machine can break down
or burst into ames.
Charge the batteries before use.
A new battery or a battery which has not been used
for a long period of time, may be discharged and has
to be fully recharged before use.
Precautions for battery charging,
chargers and batteries
Use only an approved charger.
Use only the approved charger which comes with the
re-bar binder and batteries. The batteries cannot be
recharged with other chargers – this may cause dam-
age, overheating or re.
Recharge the batteries with the correct voltage.
Make sure that the charger is connected to an
ordinary 100-240V AC power source. Do not connect
the charger to a power source with another voltage
than 100-240V AC. If using another voltage than 100-
240V AC will cause a malfunction and/or overheating,
causing damage to the battery and charger.
Never use a booster-type transformer.
Never charge the battery in a wet or damp envi-
ronment.
Charging a wet or damp battery or using a damp
charger may cause an electric shock or short circuit.
Do not touch the plug or charger with a wet hand
or glove.
You will risk injury from electric shock.
Do not cover or place anything on the charger
during use.
The charger may become overheated and eventually
catch re.
Make sure not to place charger and battery next
to a heating source or open re.
Do not place the battery near ammable items.
Charge the battery in a well ventilated place.
Avoid placing it in direct sunlight.
Charge the battery at a temperature between +5°
and +40° Celsius.
Leave the charger to rest between charges.
Keep the charger’s connectors clean.
All objects on the connectors can cause electric
shock or malfunction. Use the charger in a dust- and
dirt-free environment.
Handle the charger cord carefully.
Do not carry the charger in the cord, and do not un-
plug it by pulling the cord. You will risk that the cord
becomes damaged and will cause a malfunction. A
damaged cord must be replaced or repaired.
Put the battery cover on the battery terminals
when not in use.
This must be done to prevent a short circuit in the
battery.
Make sure that the battery terminals do not touch
each other. A short circuit between the terminals will
overheat and damage the batteries.

9
English
How to use
Loading the wire coil.
WARNING! Set the main switch in OFF po-
sition, activate the trigger lock and remove
the battery.
1. Push the release lever until it is caught by the
release stopper.
2. Push the reel stopper to open the reel stay.
3. Insert the wire coil with the wire-end upwards and
forward. Carefully close the reel stay and secure the
reel stopper.
4. Release the wire and remove the rubber band.
5. Insert the tip of the wire into wire guide C, through
the gap of the feeding gears and all the way into the
pipe. (10 - 20 mm)
If the window is dirty and it is difcult to deter-
mine the position of the wire guide C.
Clean the inside of the window with a soft cloth.
Close the window again to prevent the ingress of
foreign bodies in the machine.
6. Push the release stopper and make sure that the
release lever is back in original position and that the
feeding gears are clamping the wire.
7. Make sure that the wire is tight and rm. Prevent
the wire from curling up behind the wire coil. This
may cause a jam.
WARNING! When the main switch is set
to ON, do not place your ngers near the
machine mouth or other moving parts of the
machine! Avoid switching the main switch repeatedly
between ON and OFF. This can cause a machine
breakdown. Do not touch the wire while the machine
is running.
8. Slide in the battery and set the main switch to ON.
9. Release the trigger lock, before starting to tie.
!
Release stopper
Release lever
Reel stopper
Reel stay
Wire guide C Pipe 10-20 mm
Feeding gears Release lever
Release stopper
!
Trigger lock

10
10. Adjusting the wraps
By default the machine is set for 3 wraps. Changing
the setting to 2 wraps: Turn off the machine on the
main switch. Press and hold the trigger while turning
on the main switch. The machine is now set for 2
wraps per tie. If the machine is turned off, it will auto-
matically be set for 3 wraps again.
11. Battery-saving function.
The machine will automatically shut down after 10
min stand-by without being used.
How to replace the wire coil.
WARNING! Set the main switch to OFF po-
sition, activate the trigger lock and remove
the battery.
1. Push the release lever until it is caught by the
release stopper.
2. Remove the wire coil.
3. Push the reel stopper to release the reel stay and
open it at the same time, and remove the wire coil.
4. Load new wire coil (refer to the instructions for
loading wire coil on page 9).
5. The torque dial adjusts the tension of the ties.
We recommend:
• 2 wraps = position 1 - 6
• 3 wraps = position 6 - 10
6. Perform a test tie, to check if the torque dial is set
correctly.
Correct use
1. Place the arm A unit in a 45° angle over the re-bar
cross surface and push the mouth towards the re-bar.
2. Place Arm A perpendicularly on top of the re-bar
cross surface and with the mouth centred over the
cross.
WARNING! Do not move the re-bar binder
while it is tying.
3. The ties should be made in alternating directions.
Release stopper
Release lever
Wire
Pipe
Reel stay
Reel stopper
45°
!
!

11
4. Cross-tying.
Bend down the knot of the rst tie, before you make
the second tie.
Maintenance
1. Clean and check the re-bar binder on a regular
basis.
2. Clean the feeding gear and surrounding areas on a
regular basis, to avoid dust and metal residue getting
into the machine and causing problems. This can be
done with an air blow gun.
3. Clean the brake gear with compressed air and
apply non-acid oil.
Storage
The re-bar binder must not be stored in cold condi-
tions. It should be kept at approx. 20°C. When the
machine is not in use, it should be stored under warm
and dry conditions. Keep the machine out of the
reach of children.
Troubleshooting / repairs
The re-bar binder will eventually need maintenance
service and replacement of worn parts due to normal
wear and tear. Troubleshooting and/or repairs are
only to be carried out by authorised dealers or
specialists.
The re-bar binder warns about malfunctions using
beep sounds. Follow the matrix on page 12 to nd out
what is wrong.
WARNING! If one of the problems listed on
page 12 occurs, set the main switch to OFF
position, before trying to solve the issue.
When the main switch is set to ON - do not place your
ngers near the curl guide or other moving parts of
the machine. If the problem still occurs, set the main
switch to OFF and contact the dealer.
English
!

12
Normal Operation Problem Warning Sound Cause What to Check Solution
Power on → The Tip Axis is initialized
and the wire-cutter operates auto-
matically.
No operation takes
place.
No sound emitted. Battery completely empty. Conrm the battery is charged. Perform normal charge.
Electrode plate has been
oxidized.
Take out the battery and see if
the electrode has been brown.
Polish terminal part of battery
pack with dury cloth, etc.
Pi, pi, pi... Curl guide is open. Open/close curl guide. Fully close curl guide.
Binding wire has been entangled
around Twist section.
Turn off power and take out
the battery to conrm if binding
wire has been entangled inside
curl guide.
Turn off power, remove binding
wire inside curl guide.
Pi-pi-pi-pi-pi..... Battery is empty. Conrm the battery is charged. Perform normal charge.
Tip Axis Initializing fails 7 beeps.
Pi-pi-pi-pi-pi-pi-pi, Pi-pi-pi-
pi-pi-pi-pi…
There is foreign substance be-
tween Magnetic plate (Pos. 326)
and Route PWB unit (Pos. 325).
Or bad connection of connecting
wire ”P“ and/or ”M“.
Check if there is foreign sub-
stance between Magnetic plate
(Pos. 326) and Route PWB unit
(Pos. 325). Or check the wire
”P“ and/or ”M“ connection.
Remove the foreign substance
between Magnetic plate (Pos.
326) and Route PWB unit (Pos.
325). Or replace a new connect-
ing wire ”P“ and/or ”M“.
1 beep Bad connection of connecting
wire ”A“ and/or ”U“. Or twisting
motor is burned.
Check the wire ”A“ and/or ”U“
connection.
Reconnect or replace the wire
”A“ and/or ”U“. Or replace a new
twisting motor.
Trigger ON → Wire is sent out. No wire is sent out. 2 beeps
Pi-pi, Pi-pi...
Curl guide is open. Open/close curl guide. Fully close curl guide.
3 beeps
Pi-pi-pi, Pi-pi-pi…
Tie-wire has run out. Check if the Tie-wire has been
run out.
Set the new tie wire.
Wire caught inside reel. Check if wire inside reel has
been loosened and caught.
Remove fray on reel.
A foreign object or a loop on the
wire is blocking the wire guide
or mouth.
Check for foreign objects or
loops on the wire.
Remove the foreign objects with
compressed air etc. Cut of the
loop and insert the wire again.
Poor connection on the wire
guide engine or the engine is
defective
Check the connections and wire
guide engine.
Clean the connections. Replace
if necessary the wire guide
engine.
A wire is caught in the cutter
section or Wire guide A.
Check if any wire is caught. Diassemble the cutter section
and remove the caught wire.
Troubleshooting

13
English
Normal Operation Problem Warning Sound Cause What to Check Solution
Binding wire draws a circle. Curl is disordered and
steps out of curl guide.
No sound emitted. Wire, by hitting reinforcing bars,
was repelled.
Check if wire hits reinforcing
bars at binding.
Pay attention so that wire
does not hit reinforcing bars at
binding.
Wire is subject to cutting. No wire cutting takes
place.
No sound emitted. Cutter section is blocked with
foreign substance or the cutting
knife is worn out.
Check that all parts of the cutter
section is working.
Clean the cutter unit with com-
pressed air and replace worn
out parts if necessary.
Wire twisting takes place. Wire gets entangled. No sound emitted. Wire, by hitting reinforcing bars,
was repelled.
Check if wire hits reinforcing
bars at binding.
Pay attention so that wire
does not hit reinforcing bars at
binding.
7 beeps.
Pi-pi-pi-pi-pi-pi-pi, Pi-pi-pi-
pi-pi-pi-pi…"
There is foreign substance be-
tween Magnetic plate (Pos. 326)
and Route PWB unit (Pos. 325).
Or bad connection of connecting
wire ”P“ and/or ”M“.
Check if there is foreign sub-
stance between Magnetic plate
(Pos. 326) and Route PWB unit
(Pos. 325). Or bad connection of
connecting wire ”P“ and/or ”M“.
Remove the foreign substance
between Magnetic plate (Pos.
326) and Route PWB unit (Pos.
325). Or bad connection of con-
necting wire ”P“ and/or ”M“.
The wire is stuck around the
twister.
Check if the wire got entangled
in the twister.
Remove the unwanted wire.
4 beeps
Pi-pi-pi-pi, Pi-pi-pi-pi…"
Bad connection of connecting
wire ”A“ and/or ”U“. Or twisting
motor is burned.
Check the wire ”A“ and/or ”U“
connection.
Reconnect or replace the wire
”A“ and/or ”U“. Or replace a new
twisting motor.
Binding power is week. No sound emitted. Reinforcing bars is not of desig-
nated size.
Conrm size of reinforcing bars
to be bound.
Use approriate diameter scope.
The tool is not held correctly
against the work piece or the
torque dial has not been adjust-
ed correctly.
Conrm how to hold the tool
against the work piece.
Adjust the Torque dial to a
higher level and use the tool
correctly.
Twisting-off takes
place.
No sound emitted. Reinforcing bars is not of desig-
nated size.
Conrm size of reinforcing bars
to be bound.
Use approriate diameter scope.
Erroneous handling such as
improper application of machine.
Conrm how to apply machine
to reinforcing barts.
Adjust the Torque to a lower
lever and insert in vertical direc-
tion, use as tilting at 45°.
Ingen fejl Pi-pi-pi-pi-pi..... Low power remains in the
battery pack.
Conrm the battery is fully
charged.
Perform normal charge.
6 beeps
Pi-pi-pi-pi-pi-pi, Pi-pi-pi-pi-
pi-pi…”
The tool is used at high tem-
perature.
Check the temperature at the
job site.
Leave the tool and the battery
pack at normal temperature in
the room for some time, and
then continue the operation.

14
Specikationer og tekniske data
OBS: Det anbefales at gennemlæse vejledningen inden brug. Denne
vejledning bør opbevares sammen med maskinen.
Forside på maskinen
Spærre
Vindue
Hovedafbryder
Momentknap
Sikringsplade
LED
Underkæbe
Aftrækkerlås
Næse
Håndtag
Snabeldel
Aftrækker
Specikationer og tekniske data ....................14
Maskindata ......................................................16
Tråddata ..........................................................16
Sikkerhedsanordning ......................................16
Batteri...............................................................16
Sikkerhedsinstruktioner...................................17
Sikkerhedsforhold............................................18
Anvendelse ......................................................19
Isætning af bindetrådsrulle..............................19
Sådan udskiftes bindetråden...........................20
For korrekt stamhed.........................................20
Vedligeholdelse ...............................................21
Opbevaring ......................................................21
Fejlsøgning / reparationer ...............................21
Problemløsning................................................22
Indholdsfortegnelse

15
Dansk
Bagside på maskinen
Batteri
Lader
Ledning
Stikprop
Rulleholderlås
Trådstyring
Rulleholder
Trådrulle
Beskyttelsesdæksel
Batterilås
Batteripoler
Batteriindikator
LED Ladestik

16
Anvendelsesområder
• Fastgørelse af armeringsjern til præfabrikerede
betonelementer, gulve, vægge, broelementer osv.
• Fastgørelse af gulvvarmeslanger
Sikkerhedsanordning
For at øge sikkerheden ved anvendelse er maskinen
udstyret med sikkerhedsanordninger.
ADVARSEL! Kontrollér før anvendelse,
at anordningerne fungerer som tilsigtet.
Anvend ikke bindemaskinen, hvis dette ikke
er tilfældet.
Aftrækkerlås
Maskinen er som standard udrustet med en aftræk-
kerlås. Lås aftrækkeren og fjern batteriet, når maski-
nen ikke anvendes.
!
Aftrækker
Aftrækkerlås
Maskindata
Modelbetegnelse ULTRA GRIP 25 ULTRA GRIP 40 ULTRA GRIP 58
TJEP nr. 124012 124002 124022
Vægt 2,5 kg 2,6 kg 2,8 kg
Størrelse (L × B × H) 281 × 109 × 300 mm 297 × 109 × 300 mm 312 × 109 × 310 mm
Antal viklinger pr. binding 2 eller 3 2 eller 3 2 eller 3
Emnetykkelse 8 - 25 mm 12 - 40 mm 30 - 58 mm
Antal bindinger pr. opladning +5.000 (v/3 vikl.) +4.500 (v/3 vikl.) +4.000 (v/3 vikl.)
Batterienhed 18V 4,0Ah Li-ion
Oplader Anvend kun godkendt oplader af typen Li18C
(TJEP nr. 124201).
Tid for opladning Fuld opladning = 90 min.
Tråddata
Modelbetegnelse Box med 20 ruller (TJEP nr. 124152)
Box med 40 ruller (TJEP nr. 124153)
Diameter 0,8 mm
Længde ca. 100 m
Materiale Galvaniseret
Antal bindinger ULTRA GRIP 25 ULTRA GRIP 40 ULTRA GRIP 58
2 viklinger ca. 220 ca. 160 ca. 120
3 viklinger ca. 160 ca. 120 ca. 90
Når du begynder at binde, deaktiveres låsen ved at
trykke aftrækkerlåsen til venstre og opad.
Underkæbe
Hvis du trykker aftrækkeren ind mens underkæben er
åben, afgiver maskinen et advarselssignal og spær-
rer bindefunktionen. For at binde skal du først slippe
aftrækkeren og sørge for, at underkæben er lukket.
Batteri
Batteriets holdbarhed
Hvis batterienheden er fuldt opladet, men driftstiden
er mindsket betydeligt, er batteriet opbrugt og skal
udskiftes med et nyt. Hvis batteriets temperatur er lav
(10°C eller lavere), forlænges opladetiden.
ADVARSEL! Anvend ikke opbrugte batte-
rier. Maskinen vil ikke fungere korrekt.
Bortskaffelse af batterier
Batterier indeholder stoffer, der kan være skadelige
for menneskers sundhed og for miljøet, hvis de ikke
håndteres korrekt. Batterier er mærket med den
!
Underkæbe

17
Dansk
!
overkrydsede skraldespand. Den symboliserer, at
udtjente batterier ikke må bortskaffes sammen med
usorteret husholdningsaffald, men skal indsamles
særskilt.
Det er vigtigt, at du aeverer dine udtjente batterier til
de indsamlingsordninger, der er etableret. På denne
måde er du med til at sikre, at batterierne genanven-
des i overensstemmelse med lovgivningen og ikke
unødigt belaster miljøet. Alle kommuner har etableret
indsamlingsordninger, hvor udtjente, bærbare batte-
rier bliver afhentet direkte fra husholdningerne, eller
gratis kan aeveres af borgerne på genbrugsstatio-
ner og andre indsamlingssteder. Nærmere informa-
tion kan fås hos kommunens tekniske forvaltning.
Sikkerhedsinstruktioner
ADVARSEL! For at undgå alvorlige skader
på personer eller ejendom, bør du før an-
vendelse læse alle sikkerhedsinstruktioner
nøje og sikre dig, at du forstår dem.
Sikkerhedsforhold ved anvendelse af binde-
maskinen
At anvende maskinen til andre formål eller på en
måde, som ikke angives her i manualen, kan medføre
alvorlige ulykker. Sørg derfor for, at du følger alle
anvisninger i manualen. Personer, som ikke har
noget med arbejdet at gøre, specielt børn, bør holdes
borte fra arbejdsområdet og bør ikke få adgang til
maskinen.
Anvend beskyttelsesmaske eller beskyttelses-
briller.
Arbejdsgivere og brugere skal sikre sig, at brugeren
bærer forsvarlig øjenbeskyttelse ved brug af maskin-
en. Beskyttelsen skal opfylde gældende krav og nor-
mer samt give beskyttelse både forfra og fra siden.
OBS: Briller uden sidebeskyttelse samt enkeltsidet
beskyttelsesskærm giver ikke tilstrækkelig beskyt-
telse.
I en del arbejdsmiljøer behøves høreværn.
Da en del arbejdsmiljøer indebærer eksponering for
høje lydniveauer, som kan lede til vedvarende høre-
nedsættelse, bør arbejdsgivere og brugere sørge for,
at nødvendigt høreværn forendes og anvendes af
operatøren og andet personale inden for arbejdsom-
rådet.
Ingen børn i nærheden af bindemaskinen!
Tillad ingen tilskuere, specielt ikke børn, at komme i
nærheden af maskinen under anvendelse.
Bind ikke i nærheden af brandfarlige emner.
Anvend aldrig bindemaskinen i nærheden af letan-
tændelige væsker og dampe (fortynder, benzin etc.).
Dampe fra sådanne væsker kan suges ind i moto-
rerne og på den måde medføre risiko for eksplosion.
Anvend ikke bindemaskinen i vådt miljø.
Hvis du benytter bindemaskinen i regn, hvor vand
drypper, på et vådt sted, i et fugtigt lokale eller på
lignede steder, øges risikoen for elektrisk stød og
fejlfunktion. Efterlad ikke maskinen, hvor den kan
blive våd.
Kontroller delene, inden du sætter batteriet i.
Kontroller, at alle skruer er korrekt tilspændte.
Mangelfuld tilspænding kan forvolde ulykke eller
maskinhavari. Kontroller, at alle dele er hele. Dele
slides med tiden. Se også efter, at ingen dele er
beskadigede, defekte eller slidte. Hvis du skal bytte
eller reparere dele, tag da direkte kontakt til forhand-
leren. Anvend kun komponenter, som er godkendt af
producenten.
Sæt hovedafbryderen på OFF og lås aftrækkeren,
når du skal skifte batteri eller skifter/justerer bin-
detråden. Fjern desuden batteriet, hvis der sker
fejl og når maskinen ikke anvendes.
Hvis du efterlader maskinen tændt, kan følgerne
være maskinhavari eller anden skade.
Ingen ngre i nærheden af næsen, fremførings-
hjul eller trådrullen.
Du må IKKE have ngrene i nærheden af næsen eller
andre bevægelige dele, da bindetråden og de bevæ-
gelige dele meget let kan forårsage skader.
Rør ikke bindetråden, når maskinen kører.
Rør ikke bindetråden, når maskinen kører, da du kan
fastgøres i bindetråden og komme til skade.
Peg ikke bindemaskinen mod andre.
Personer kan skades, hvis maskinen træffer bruge-
ren eller nogen i nærheden. Når du binder med
maskinen, skal du være meget forsigtig, således at
ingen kropsdele kommer i nærheden af de bevæge-
lige dele.
Undgå at have ngeren unødigt på aftrækkeren.
Når du bærer bindemaskinen eller ikke binder, sætter
du hovedafbryderen på OFF og låser aftrækkeren. I
modsat fald kan det let ske, at du uhensigtsmæssigt
aktiverer bindemaskinen og forvolder skade.
Bind ikke med maskinen ved funktionsfejl.
Hvis maskinen ikke fungerer korrekt, sætter du
hovedafbryderen på OFF, låser aftrækkeren, fjerner
batteriet og undersøger fejlen. Kontakt forhandleren
ved behov, og sørg for at maskinen repareres.

18
Efter isætning af batteriet skal du kontrollere ne-
denstående punkter. Sæt ikke en bindetrådsrulle
i maskinen i disse tilfælde.
• Når du har isat et nyt batteri: Høres der lyd fra
maskinens bindemekanisme, selvom den ikke
anvendes?
• Afgiver maskinen varme, lugt eller usædvanlig
lyd efter isætning af batteriet selvom den ikke
anvendes?
Hvis maskinen starter af sig selv, eller hvis den
afgiver varme, lugt eller usædvanlig lyd efter isætning
af batteriet, kan der foreligge en funktionsfejl. Hvis du
anvender bindemaskinen uden først at rette fejlen er
der risiko for at skade maskinen. Anvend derfor ikke
bindemaskinen uden først at kontakte forhandleren
med henblik på eftersyn og eventuel reparation.
Foretag ikke ændringer ved bindemaskinen.
At ændre bindemaskinen nedsætter ikke blot funk-
tionen, men også sikkerhedsniveauet. Foretag ingen
ændringer ved bindemaskinen.
Sørg for, at bindemaskinen er i god stand.
For at opretholde den mest sikre funktion og det
bedste resultat, bør du i god tid udskifte nedslidte
eller beskadigede komponenter. Hold også håndtaget
tørt og rent, og sørg frem for alt for, at det er frit for
olie og fedt.
Anvend kun godkendte batterier.
Anvend derfor udelukkende godkendte 18V 4,0Ah Li-
ion batterier af den type, som medfølger ved købet.
Hvis du kobler bindemaskinen til en anden strømkilde
som f.eks. genopladeligt batteri, tørcellebatteri eller
et bilbatteri, kan maskinen gå i stykker, overophedes
eller bryde i brand.
Oplad batteriet før anvendelse.
Et nyt batteri, eller et batteri, som ikke har været
anvendt længe, kan være aadet og skal derfor fuldt
genoplades. Sørg for, inden anvendelse, at batteri-
erne oplades i laderen.
Sikkerhedsforhold for batterioplad-
ning, ladere og batterier
Anvend kun godkendte ladere.
Anvend udelukkende laderen, som medfølger batte-
rierne. Batteriet kan ikke oplades med andre ladere –
dette kan medføre skade, overophedning eller brand.
Oplad batteriet med den angivne netspænding.
Sørg for, at du kobler opladeren til et almindeligt 100-
240V AC udtag. At oplade med anden spænding end
100-240V AC giver funktionsfejl og/eller overophed-
ning, og batteriet/laderen kan bryde i brand. Tilslut
derfor ikke opladeren til udtag med anden spænding
end 100-240V AC.
Anvend aldrig transformator af boostertype.
Oplad ikke batteriet i vådt eller fugtigt miljø.
Opladning af fugtigt eller vådt batteri eller opladning
med fugtig lader kan give elektrisk stød eller forår-
sage kortslutning.
Rør ikke stikket eller oplader med våd hånd eller
handske.
Du kan skades af elektrisk stød.
Undgå at overdække eller placere ting på laderen
under opladning.
Laderen ophedes, og batteriet kan brænde og ska-
des. Laderen kan bryde i brand.
Sørg for, at batteri og oplader ikke kommer i
nærheden af varme eller åben ild.
Oplad ikke batteriet i nærheden af letantændelige
emner.
Oplad batteriet på et vel-ventileret sted.
Undgå at oplade i direkte sol.
Oplad batteriet ved temperatur mellem 5ºC -
+40ºC.
Anvend ikke opladeren uden pauser.
Hvis du anvender samme oplader uden pauser mel-
lem opladningerne, vil den ikke fungere korrekt. Sørg
for, at opladeren ikke anvendes i 15 minutter efter
hver fuld opladning.
Hold opladerens kontakter rene.
Alle emner, som sidder på kontakterne kan give elek-
trisk stød eller funktionsfejl. Oplad på et sted, som er
fri for støv, snavs og andre fremmedlegemer.
Håndter ledningen varsomt.
Bær ikke laderen dinglende i ledningen. Træk ikke
stikket ud ved at trække i ledningen uden at trække i
stikket. I modsat fald kan ledningen ødelægges, og
lederne trækkes løs, hvilket kan forårsage kortslut-
ning. En beskadiget ledning skal repareres eller
udskiftes.
Sæt beskyttelseshætten på batterikontakterne.
Sæt beskyttelseshætte over kontakterne for at forhin-
dre kortslutning, når enheden ikke anvendes.
Sørg for, at batterikontakterne ikke rører hinan-
den på nogen måde.
En kortslutning mellem kontakterne skaber en meget
stærk strøm, som overopheder batteriet, der skades.

19
Dansk
Anvendelse
Isætning af bindetrådsrulle
ADVARSEL! Sæt hovedafbryderen på OFF,
lås aftrækkeren og fjern batterienheden.
1. Tryk på frigøreren og sørg for, at den stoppes af
spærren.
2. Aktivér rulleholderlåsen for at åbne rulleholderen.
3. Sæt en bindetrådsrulle i holderen med trådenden
opad og fremad. Luk forsigtigt rulleholderen, og sørg
for at rulleholderlåsen lukker ordentligt.
4. Frigør tråden og fjern elastikken
5. Før spidsen af den udstrakte bindetråd ind i tråd-
guiden og derefter ind i styringen (10 - 20 mm).
Hvis vinduet er beskidt og tragtens position ikke
kan bestemmes.
Åbn vinduet og fjern snavset på vinduets inderside
med en blød klud. Luk vinduet igen, så der ikke kom-
mer fremmedlegemer ind i maskinen.
6. Udløs spærren og tjek, at frigøreren er tilbage i sin
oprindelige position, og at fremføringshjulene griber
om bindetråden.
7. Sørg for at bindetråden er helt stram. Undgå at
bindetråden sætter sig fast bag ved trådspolen. Dette
kan medføre blokering.
ADVARSEL! Når du sætter hovedafbryd-
eren på ON, må du ikke have ngrene i
nærheden af hverken bindekæberne eller
maskinens bevægelige dele! Undgå at skifte hurtigt
mellem ON og OFF, da det kan få maskinen til at
bryde sammen. Rør ikke ved bindetråden, mens
maskinen kører.
8. Monter batteriet på maskinens fod. Tænd for
maskinen
9. Frigør aftrækkerlåsen, inden du anvender maski-
nen
!
Spærre
Frigører
Rulleholderlås
Rulleholder
Trådguide Styring
10-20 mm
Fremføringshjul Frigører
Spærre
!
Aftrækkerlås

20
10. Justering af viklinger
Som udgangspunkt foretager maskinen 3 viklinger.
For 2 viklinger gøres følgende: Sluk maskinen på
hovedafbryderen. Aktiver og hold aftrækkeren inde,
mens hovedafbryderen tændes. Maskinen kører nu 2
viklinger. Hvis maskinen afbrydes, vil den automatisk
starte med 3 viklinger igen.
11. Batterisparefunktion
Maskinen slukker automatisk efter 10 min. stand-by
uden anvendelse.
Sådan udskiftes bindetråden
ADVARSEL! Sæt hovedafbryderen på OFF,
lås aftrækkeren og fjern batteriet.
1. Tryk på frigøreren og sørg for, at den stoppes af
spærren.
2. Fjern bindetråden.
3. Tryk på rulleholderlåsen for at udløse holderen, og
fjern derefter bindetråden.
4. Monter ny bindetråd (se vejledningen i montering
af bindetråd side 19).
5. Juster tilspændingsmomentet.
Vi anbefaler:
• 2 viklinger = indstilling 1 - 6
• 3 viklinger = indstilling 6 - 10
6. Foretag en prøvebinding for at kontrollere, om
tilspændingsmomentet er OK.
For korrekt stramhed
1. Hold snablen i en vinkel på 45° mod armeringsjern-
et i krydset, og tryk maskinen mod armeringsjernet.
2. Placer maskinen vinkelret på overaden af arme-
ringsjernet og med næbet centreret over krydset.
ADVARSEL! Bevæg ikke maskinen mens
bindingen foretages.
3. Bindingerne bør foretages i skiftende retninger.
Spærre
Frigører
Tråd
Trådguide
Rulleholder
Rulleholderlås
45°
!
!
Other manuals for TJEP ULTRA GRIP 25
1
This manual suits for next models
2
Table of contents
Languages:
Other Kyocera Binding Machine manuals