INSTRUCTION MANUAL
Water-proof
Handheld Infrared
Thermometer
MODEL 5510
KYORITSU ELECTRICAL INSTRUMENTS
WORKS, LTD.
Safety Precautions
● Do not contact this product with a measuring object.
This is a contactless thermometer. Contact with a hot section may
cause unrepairable damages or inaccurate readings.
● Do not damage the measuring window (plastic lens).
Do not contact a hard object with the measuring window.
Do not let a foreign object penetrate the measuring window, or drop
a hard object on the measuring window.
●
Although this instrument applies a shockproof structure, do not give
an excessive shock to the instrument.
● Do not bring the instrument closer to an electrostatic object.
●
Emissivity of this instrument can be selected (0.8 to 1.0). When the
emissivity setting is different from that of a measuring object, an
inaccurate reading will occur.
● The sudden changes of the ambient temperature will cause
inaccurate readings. Wait a while to let the temperature of the
instrument stabilize, and then measure.
●
Remove batteries from the instrument, if the instrument is not in use
for a long period or is put in storage.
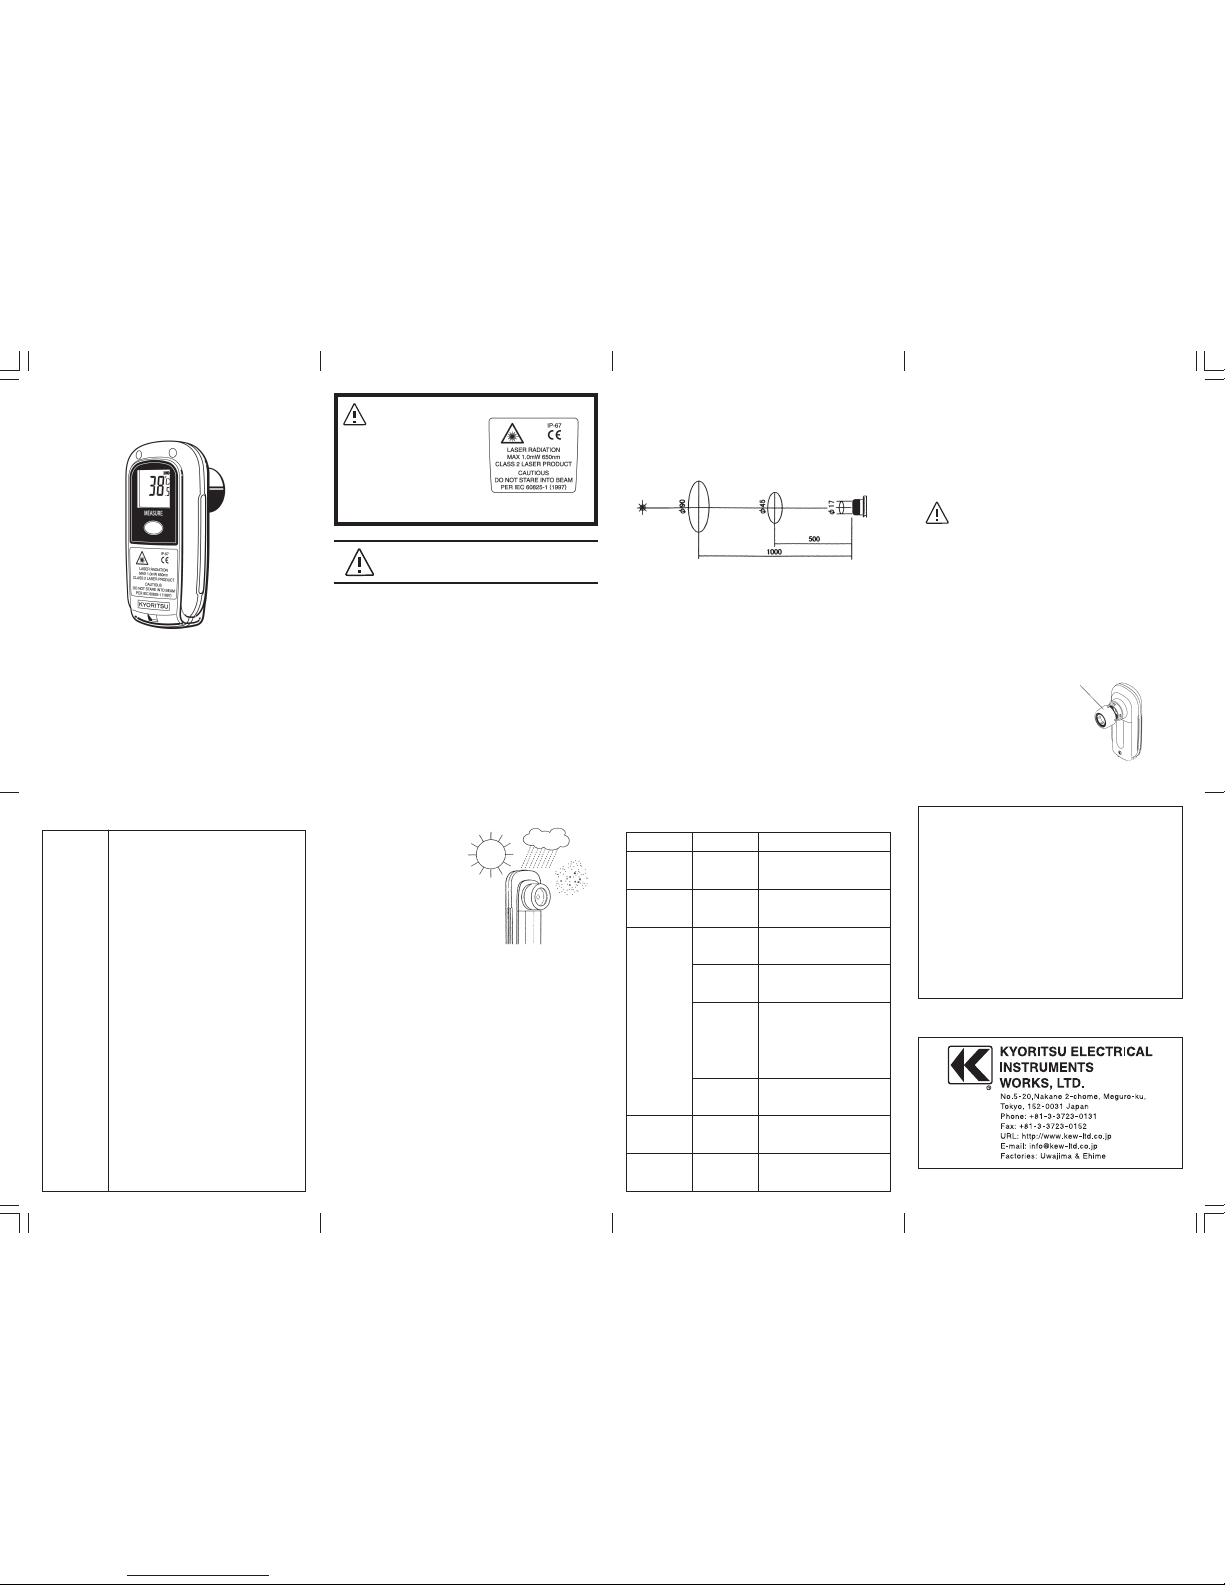
■ Relation of Distance and Measuring Diameter
The relation between the distance and measuring diameter is as
follows.
The more the distance increases, the larger area is needed.
For accurate reading, a sufficient measuring area should be ensured.
The above measuring diameter is defined as an area which allows
capture of more than 90% of energy.
■ Maintenance
Measuring Window
The measuring window applies a waterproof structure (IP67). If water-
soluble stains adhere to the window, wash the measuring window with
the tap water. Dry the measuring window well after washing. Please
note that measurement with the measuring window wet will cause
inaccurate readings. If oil-soluble stains adhere to the measuring
window, wipe it with a cloth dipped in the diluted neutral detergent and
rinse it.
Note
Do not use chemical agents such as thinner, benzin or alcohol since
these may cause a crack or fog on the surface of the measuring
window, and consequently it may change the infrared radiation
transmittance of the plastic lens.
Plastic Lens
Dust, stains and scratches on the measuring window cause inaccurate
readings. Wipe such stains off with a soft cloth or cotton bud for camera
or glasses. To get rid of tough stains, remove the top hood(rubber) by
drawing it, wipe the lens with a cloth dipped in the diluted neutral
detergent and rinse it. After getting rid of the stains, put the top hood
back to the previous place by putting the projection along its edge and
the ones on the case together. After putting it, make sure of fitting it to
the correct position.
■ Specifications Environmental Precautions
●
Do not use or store the
instrument in a location
where the instrument is
exposed to the direct
sunlight, dust, lampblack
and corrosive gas, or where
the temperature and/or
humidity is high. Otherwise
the measuring window gets
soiled or deteriorated, which
causes inaccurate readings.
●
As this instrument applies a waterproof structure (IP67), a slight
wetting will not damage the instrument. When the plastic lens is wet,
however, wipe the lens carefully so as not to scratch it as the wetting
condition will cause inaccurate readings.
●
Keep the instrument away from an object which radiates a strong
electromagnetic wave.
Please follow the precautions below for use
to keep the instrument's functions proper and
to enable accurate measurement.
Caution
5510 is one of the portable
laser applied instruments which
are regulated by the consumer
product safety law.
●
Do not look into the laser beam.
● Do not aim the laser beam at
human beings.
● Keep the instrument out of
children's reach.
Symptoms
No display appears
Cause
Batteries have
been exhausted
or they are not
placed correctly.
Battery voltage is
low.
Plastic lens is dirty.
A heat source nearby
affects.
Emissivity is not
selected properly.
Measuring target
area is too small.
Unit is affected by
a rapid temperature
change.
Out of measuring
temperature
range.
Countermeasures
Replace or place them correctly.
Measurement is possible. Replace
batteries when the laser marker is
necessary.
Clean the plastic lens referring
to the "Maintenance" section.
Shield the heat source by a shielding
plate.
If emissivity is unknown, refer to
"Reference" section. Also, measure the
temperature by a contact type
thermometer and select adequate
emissivity so that temperature of this
instrument becomes equivalent to that
of the contact type thermometer.
Check the target area and keep a
sufficient area for measurement.
Leave the unit for stabilizing its
temperature and measure.
Check the target to be measured.
Laser beam is not
emitted or is weak.
Abnormal reading
Unstable reading
No reading appears
but display is 'OL.'
Type
Measuring Range
Display Resolution
Measuring Accuracy
Repeatability
Response
Measuring Diameter
Collimation
Water -Proof Property
Auto Power Off
Shock Proof Property
Operating Temperature
Operating Humidity
Storage Temperature
Battery
Battery Life
Housing material
Dimension
Weight
Accessories
Approved Standard
5510
−40 to 300℃
0.5℃. 1℃ for below−20℃ and over 100℃ .
When the ambient temperature is 25±2℃ and the emissivity
(ε) is 1,
0 to 300℃ :
bigger value of either of ±1% of the
measured value ±1dg't or ±2℃ ±1dg't.
0 to−30℃ : ±3℃±1dg't
below −30℃ : ±5℃±1dg't
within 1℃±1dg't
1sec (90% response)
φ45mm/500mm (Optical sensitivity:90%)
Before shipment: 0.95. The value can be altered between 0.8
and 1.0 with the slide switch at the lower part of the battery
compartment (by 0.05 steps).
Laser beam (650nm 1mW JIS class2) specifies the center.
IP67
If no key is pressed for 30 seconds, the power is shut off
automatically.
This instrument or its function/performance will not be
damaged even if it is dropped on the vinyl tile floor from 1
meter high.
0 to 50℃
90% rH and below (no condensation)
−20 to 55℃ (no condensation) (Note): In the case of long-
term storage, the batteries should be removed.
2 AAA alkaline cell batteries
Approximately 10 hours for continuous use
ABS (antibacterial)
120×60×54mm (Maximum value for each direction)
Approx. 123g
2 AAA alkaline cell batteries, instruction manual, strap
CE marking:EMI EN61326 ClassB ,EMS EN61326 Annex C
Stability:±5.0℃ under EMC test environment at 25℃
■ Troubleshooting
92
—
1513B
DISTRIBUTOR
Hood