LA Fitness MI100A User manual

TableOf Contents
Mtl00A Mtl50A
Congratulationsonthe purchase
ofyournewmotorized
treadmill.Tohelpensuretheenjoyable
andtrouble-
freeoperationofyournewtreadmill,we strongly
suggest
you read
thismanualcarefullyandfollowitsrecom-
mendations.
I lmpoftant
Safety
Instruction...........1 | PresetProgram
Ml100A ......................8
I Assembly
Instruction 2 M1150A............................................9
I ConsoleOperation I Utiliztion ..................10
Mt100A ......................4
Ml150A 6 IMaintenance ...........11

IMPORTANT
SAFETY
INSTRUCTION$
NANGED
gllllt EIl - To reducefre risk of electical shock.always
unplugthisappliancefromtheelecticaloutet immediatelyafrerusing
andbeforecleaning.
a Usethisapplianceonlyforib intended
useasdescribed
inlhismanual.
a Donotuseattadrments
notrecommenddbythemanufacfurer.
a Todisconnecl,
tumallthecontrolstotheoffposition,
thenrernove
he
plug
fromtheoutlet.
a Conne6{thisappliancetoapropergrounded
outetonly.
SeeGroundingInstruc{ions.
a This
aoolianceisintendedforhouseholduse.
a When
you
arenot
going
touse
your
Ueadmill,orlvhenfinished,
please
removehe safutykeyfrcmtheconsole.Thenalways
place
thesafety
key
\,vfiere
childrencannotreach.
a Donotuseoutdoors.
a Alwaysunplugthetreadmillfromthe
outletimmediately
afrerusing,
beforecleaning,
assemblingorservicing.
a Neverleave
treadmillunattendedwhen
plugged
in.Disconnec't
by
tumingoffthemaster
po^/er
switchandunplugfromtheoufet.
. Never
operaiethisbeadmillifithasanydamagetotheleadorplug.
AlsoifitisnotopeEtingconec{y,hasbeendropped,damaged
orifit
has
beenexoosedtowater.
a Donotoperaiewhereaero€ol
prcduc'ts
arebeingusedorwhere
oxygenisbeingadministered.
a Don't
pull
thetreadmillbyitspo\,t/er
cordoruse
lhecordasahardle.
a Keepdosesupervisioniftheteadm lisbeing
usedbyornear
d|ildren,
persons
withdisabilities
orpets.
a Keep
dry Donotoperatethistreadmillinwetormoist
conditions.
a Neverinsert
anyobjecls
into
anyopenings.
a To
prevent
injuries,
always
warm
up
your
muscles
beforeusingthe
treadmill.
a Always
attachthedipofthesafetykeytoyour
clothing
beforeinserting
safetykey.Pleasealwayswearsafetykeyincaseofanaccident.
a MAXuserweightPleaserefertothemaximumuser
weight
informationonthetreadmillbebreusino.
a Keepunplugged
andhavethesafetykeyoutofreadrofdrildren,
when
notinusetoorevent
accidents.
a Keep
eleclricalmd away
fom heatedsurfaces.
a Keep
handsclearofallmoving
parb.Never
place
handsorfeetunder
thetreadmill.
a Each
time
youusethetreadmill,check
thattherunningbeltisaligned
andcenteredonhe treadmillbaseand
allvisiblefastenersonlhe
feadm laresufficientytightenedandsec1lred.
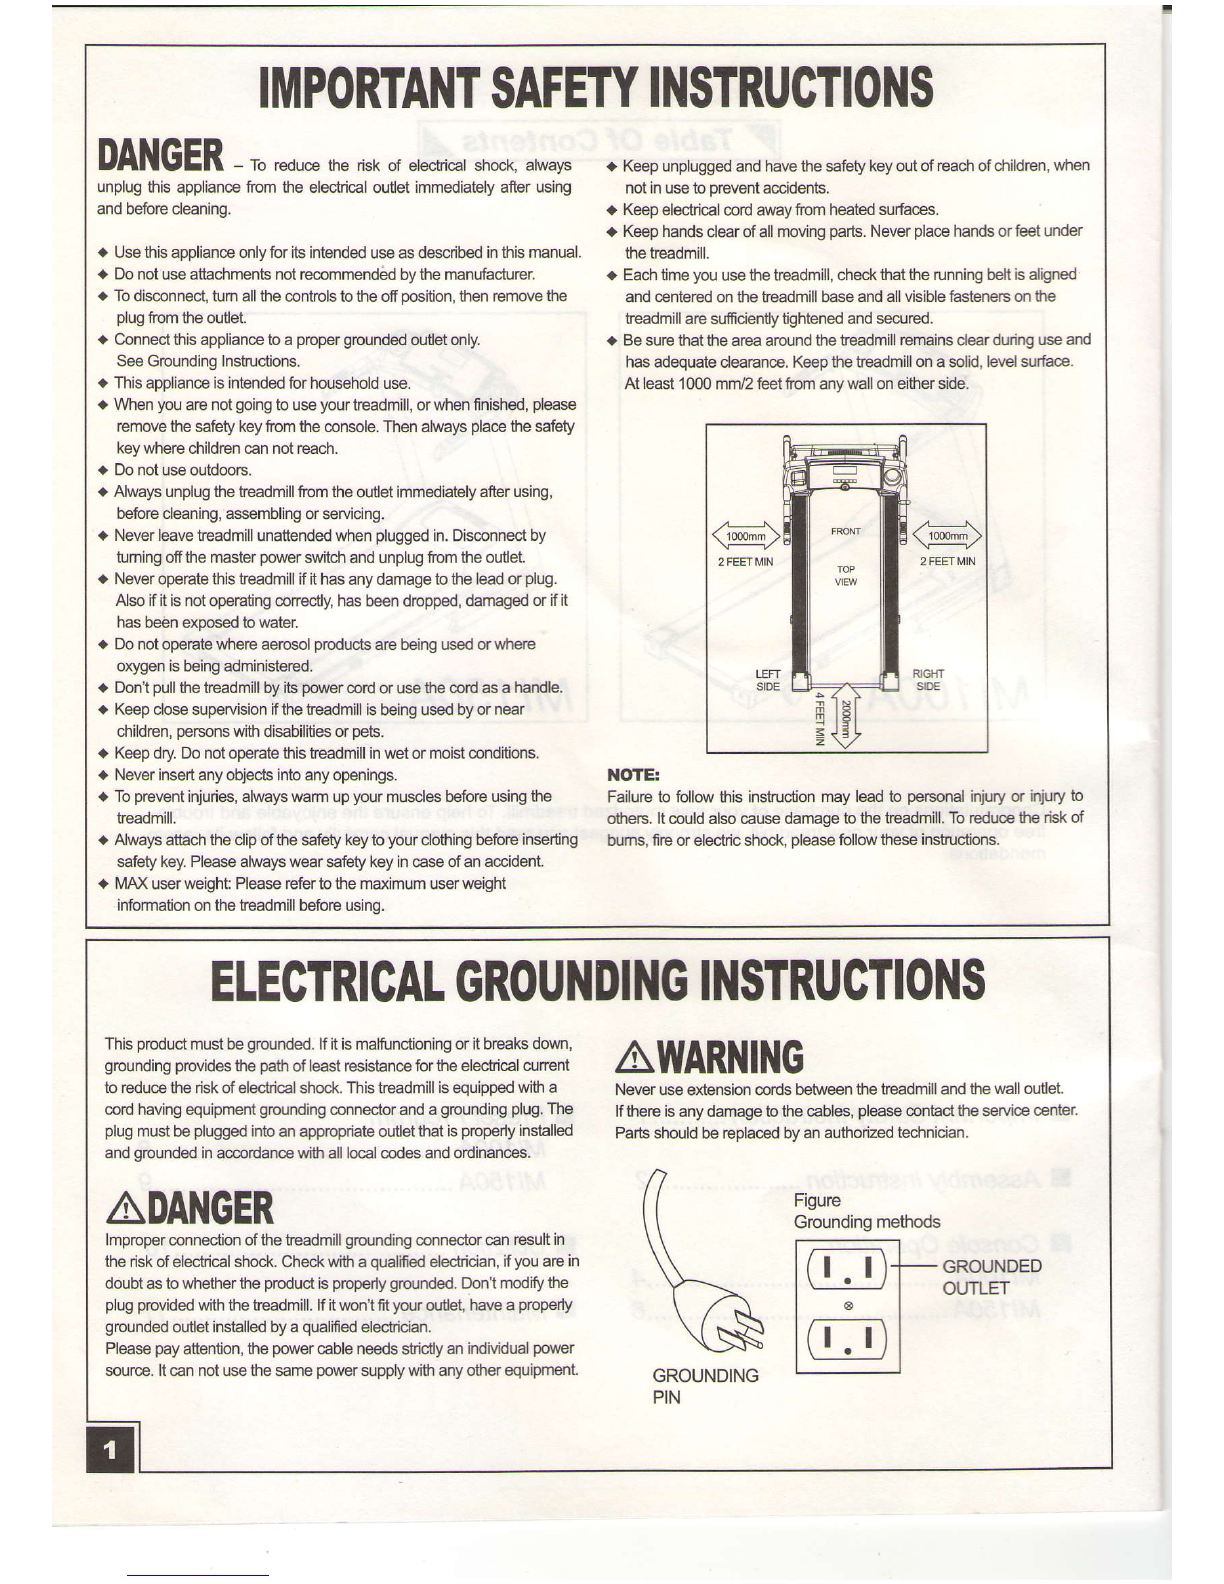
a Besurethattheareaaroundthetreadmill
remains
deardudng
useand
hasadequatedearance.Keepthetreadmill
onasolid,
le\relsurhce.
AtleastI000mn/2 feetfiomanywalloneitherside.
NOTEr
Failureto followthisinsfudion mayleadb personal
injuryor injury
b
others.ltcouldalsocausedamage
tolhefeadmill.Toreducehe rbk ol
bums,fireorelectricshock.
please
follov',/theseinstrudbns.
ELECTRIGAL
GROUNDING
INSTRUGTIONS
JI:IHJTJI1.T:HilT":I
il*#:J}X":
trS"Jffi
A,
WARI{
IN
G
torcducetheriskofelecticalshock.Thisteadmillisequipped
wift a Neveruseexbnsioncotds
bet\,\,eenthefeadmilland
thewalloutlet.
cordhavingequipment
gounding
conneciorandagrounding
plug.
The fthere isanydamagetothecables,
please
contadtheservice
center
plug
mustbeplugged
intoanappropriateoudetthatisproperly
installed Partsshouldbereplacedbyanautprizedtecinician.
and
grounded
inaccordancewilhalllocalcodesandordinances.
ADANGER Figure
Grounding
methods
lmproperconneclionofthefeadmillgrounding
connectorcanresultin
theriskofelecticalshock.Checkwih aqualified
electician,ifyouarein
doubtastowhetherlheproduct
isproperlygrcunded.
Don'tmodiry
the
plugprovided
wih theteadmill.lfitwontfityour
outlethaveaFopedy
grounded
oufetinstalledbyaqualifed
elecfician.
Please
pay
attention,
thepower
cableneeds
stric{y
anindMdual
power
source.ltcannot
use
thesame
power
supply
wih anyotherequipment.
(Y-=.
vs
GROUNDING
PIN
GROUNDED
OUTLET
@
o
@

I[/l: rll
1.
?
4.
7.
8.
Frarne
Support
@ -left
Suppoil
post
-right
Consde
CorndeGhandlebarset
LockirEla|obturfoHing
SaUyl(ey
PCBcablemildh
Handoulsecablebr€r
rcB cable
upper
l-land
pisecable
upper
rcB cablemkidle
rcB cablelower
10.
11.
12.
1a
7 Hardware
Screws already in place on the treadmill:
Screws in the plastic bag: Tools:
Ms(1Pcs) lM6(1PCS)
@\ lo\
AWARI{ING
Afrerunpackingthefitnessequipment,examineitcarefully
forpossibie
damage.
lftl6rs isanydamage
orth€r€aremissing
parb,please
contad
lrour
retaileroranauhorizedrepairfacilityforassistan@.
1.
Since
your
tr€admillisaheavy
piec6
of€quipment,w€recommend
th€afier
taking
ofihe topportion
oflhebox;
lou slitft€ mm€rsofth€
lowercartcnandfolddownthesides.Thiswilleliminab
theneedtopick
upthet€admilloverfnesidesofh€ box.
2.Priortc sbrtinghe assembly
process
takeallhe parts
outofhe box,
romoveallplastic
bags,andthenlayhem outonhe ffoor
tobecome
familiarwih thecomponents.Makesurethat
youremov€allparbpackagod
undern€athfle b€admill.Youmayneedb slighuy
pick
uphe
backofthetreadmilltogetbatter
access
b theparbonlh6bottom.
Youwillnotcethathe t€adm liscomplgtsly
assambledexceptforhe
handlebarsandhe displaywindov.
(See
FlG.1
ofnelt page
)
Parts
M8',7ot(4PCS)
@@
M8-701(4PCS)
@€
M8',701(4PCS)
@€

l'/l: UT
\,
1.
Carefully
lift
(as
shown
above)the
frame
(1)
from
therear.
Removehandlebars
(5)
firstthen
removethe
styrofoam
from
underneath.
2.Lower
the
frame
carefully.
3.Remove
4 screws
(A)
fromtheleft
andright
ofthebase
frame.
4.Raisetheleft
andright
supportbars
(2
&3)to
theupright
Dosition.
5.Refitthescrews
(A)
but
donottighten
yet.
1.Fitthecomplete
handlebars
(5)
ontothe
supportbars
(2
&3).
ConnectthePCB
middlecables
(12)
together,
connect
PCB
cableslower
(13)
and
place
cablesintothetube.
2.Securethehandlebar
settothe
supportbarswiththe
screws
(C)x 4 as shownabove.
3.Tightenthe screws
(A)ofthe baseframe.
4. Removethescrews
(B)fromthe backof the console.
5.ConnectPCB
cablemiddle
(8)
andPCBcable
upper
(10).
6.Connecthand
pulse
cablelower
(9)
andhand
pulse
cable
upper
(1
1).
7. Fitconsoleto console
bracketandtightenthescrews
(B).

oll OI: ifl UI
Button descri
START/STOP
:
ftis will
'START'
heteadmillandhis
will
"STOP'
heteadmill.
Thereisalsoan
Emergency
"STOP'suit*r
he(SAFETYKEY).
SPEED
up,\:
Thiswillselect
prwram
andlevelinsetting
modebebrcstarting.
Thiswillincrease
thespeedinincremenbof0.'lkrdh
or0.1mph.
SPEED.lownv :
'Tlis
willselec{
program
and
levelinsettingmodebefore
sbrting.
Thiswilldeqease
hespeedinincremenbof0.1
knvhor0.1
mph.
MODE:
Thiswillaccept
program
andlevelselec{ions.
ThiswillswitdrdisplayLAPorPULSEondata
window
during
your
exercise.
Dbplry :Theconsole
'rs
One
(1)
laqeLCD
wih
FVe
(5)
separatewindo6fordata.
Ha:
Time
:08:BB
Dishnce:88BE
Cal:8888
Lap/Pulse:8BB
Speed:8S.8
E E',E'E' t tu?lfl?|l?{
M
rFnrFlrPl
,Ft FtltFtl
,,rr!!!lll!!!!!t,,,,,,,,llllllllu,,,,
,,ll,,ll,,ll,,ll,,,,,,rr
.ll tt: rll
I
Introduction :
To
startbeadmill,
first
ensure
power
cordisplugged
in,he power
swildl
is
tumed
totre"ON"poGition
andhenstandonhe side-rails
(not
he
running
deck)
Then
attadlhe "safety
Key''to
your
clothing
andhento
theconsole-
The.treadmill
has
one
(1)
manual
and
five
(S)pres€tprograms
(p1
- p5).
Eadr
preset
program
has
hree(3)
differentlevels
fortre usertdciroosd
fiom.While
running
inthe
preset
programs,
thetreadmill
automatically
changes
the
speed.
However
you
canstillchange
thespeed
manuallyat
anytime
you
desire.
Ouick Start :
When
themain
po/ver
switchisinthe
"ON"
position
andhe 'safety
Key'isinserted
intrhe console,
Utemonitof
windov
wi displaya
flashing"0:00'
Press
the
"START'
buttontobegin
inthe,,Manual
Mode;.
Plogram Operation I
After
you
have
tumed
onfte power,
inseded
"safety
Key'he monitorwill
display
O:00
onallhe separab
LCDwindo^/s.
1.selecl
Programs:
Press" ^ "or
"\r "ano/vsto
do6sefom tre progranis
Ft - ps.rhenpred he floDi brtd'.
2.Sethe level:
Press" /\ "or"v "arTows
tochoosefrom
treworlioutlevel
you
desire.
'Ttreir
press
t're
ffiD€" b(,to".
3.Setlime:Choose
how
long
you
want
toworkgutfor
by
pregsingle
' ^ ' or
"w "anonr.
Ai prograns
*ff O"Auft
Om nirty1SO1
minutes
ifno
adjustrnent
ismade.
Oncecompleted,
press
the
.START'
button
trcbegin
),our,r;fi;n
The Pause Function :
Y€u,c€J]
qgse your
beadmill
atanytime
during
your
workout
by
pressing
tle ISTOF'
hrtm once.
Toresurne
your
vrorkoutjustpress
the"START'
button.
The Reset Func{ion :
.Y:*?ll"-T_t v:!t Ygrkout
program
andthe
timebyholding
he 1STOF
tuton fcrabv seconds
untitt]e program
window
disptays
u:w .Repeat
lheabove
steps
b reset
your
desired
program,
level
andwort(ojt
tjme.
NOTE:
1.When
he Amer€€& W:59
or0o:o0,
osettes
ofbeqpswi/,
sound,aN hsltlr fve (5)
s*ot45 aN th91r
themffir witt stop.
2.whenthe"safeVKey"is pulled
outinarrysituafion
ttrcmotorwittstopinndiatilyaro ur""focr a ral b lhemanual
seftings.
3.fhe.ghPhica
of ttE wotl|(c/ut
rr{,fitesarcpinfudonArccorcote.Eadtov€'att
wwr@ut
tinewillbe JPf,menw into
En (10)
s@tions.
Segm€,nt
lime=ov*all workout
lime
/ 10,
e.g.
:Itovenll wwt@utrime
issd atEn (10)
mi rtes,
the@chs€{/m€'ntwitt
b one
(1)ninutefE|ch.

.ll ft: ifl .J l.
Button descri,
START/ STOP
:
thiswill
'START'
he beadmill
and
hiswill
'STOp'
tretreadmill.
There
is
alsoanEmergency
"STOP"
s$/ttdr
fie (SAFETY
KEn.
SPEED
up l:
This
willselec{
program
andlevel
in
setting
rnode
beforestarting.
This
will
in$ease
he speed
inincremenb-of
0_1km/h
or0.1moi.
SPEED
dqvn rr :
ltriswill
selec{
program
and
level
in
settingmode
before
sbrling.
This
will
decrease
the
speed
ininqemerG
of0.1
km/hor
0.1m;h.
INGLI Eup ,\ !
This
will
seled
program
and
level
insetting
mode
beiore
starting.
This
will
insease
he elevation
in
incremenb
ofone
(1).
INCLI Edoyynv:
This
wllselecl
prqramandlevel
in
seting
mode
befotestrarting.
This
will
desease
he elevaton
in
incremenb
ofone
(1
).
MODE:
This
will
accept
program
and
level
selections.
This
willswitdt
display
LAPorPULSE
on
datawindoiv
during
your
exercise.
7o
Dlsplay
:The
consoleis
One
(1)
large
LCD
witrFive
(5)
separate
windor/s
fordata.
Data !
IIME:
BB:dU
Distance
:988,8
Cal
:EBBB
Lap/Pulse:888
Speed
:8S.B
Indine
:Be
.."llll."
!!!!!!!!
!t!!!!!!!
ltItl
l!!!!!!!l!!!!!!!!!!
E EIGTEU t^ll, ?l ?t ?| ta ?l
ats'rf,-EtrE
2.
BrG.
sldh i€hgdlo e pe tr@
r, nr* r6€t u€aE
sro6, aE.rub
4 bE rrE udr€ aEi6, q6ftd
.. ns sEt b b6gh wtqn

.ll .I: UI
Intloduc-tion :
Tostartteadmill,firstensure
power
cordisplugged
in,he power
s,vitdr
is
tumedto
he "ON"
position
andthen
stand
onthesiderails
(not
he
runningdeck)Thenatbchhe 'Safety
Key''to
your
dothingandhenb
theconsole.
Thefeadmillhasone
(1
)manualandfve (5)presetprograms(P1
- P5).
Each
presetprogram
hashree(3)
difierentlevelsforhe userb dDose
fom.\Mile runninginthe
presetprogErns,
tle feadmillautomatically
changeshe speedorindine.l-louever
)oucans1i[dEnge
tle speedor
indine
manuallyatanylime
ycu
desie.
Quic{<
Start :
\Menhemain
po,ver
switchisinthe
"ON"
position
and
he'Safety
Key'isinsertedinto$econsole,
the
monitorwindorvwilldisplay
flashing
"0:00"
.Press
he'START'bufrontobegininthe
"ManualMode".
Prcgram
Opelation:
Afrer
you
havetumed
on
hepower,
inserted
'Safety
Ke/hemonitorwilldisplay0:00onalltheseparateLCDwindo/s
P1
-P2=
speed
programs.P3-P4
=
indine
programs.P5=
HRC
program.
Selec.tSpeedor Inclinepogram (Pl - P4):
1.
Select
Prwram:
Press
' /\ "or'v "anows
tcdoosefrom
heprwrams
P1
- P5.Then
press
he'Mo[)Fbuton.
2.SetLevel:Press
' .r\"or
"v ' arowstodrooseheworkoutlevel
you
desire.Then
pre6s
the
'ilODF hren.
3.
Set
Tlme:
Choosehofflong
you
wanttoworkoutby
pressing
' ,\ "of
"v "anows.
All
prograrns
willd€frultb hify (30)
minut€s
ifm
adjustrnenbaremade.Once
complete,
press
tte"START'
button
tcbegin
heworkout.
SelectHRC
program
:
1.Selec{
prwram:
P€ss
Speed
' ,\"or"v "
arows
tochoose
program
untilP5
bsho{nmf'edi$ay.
Then
press
he
"MODE'
butbn.
2.Selec{Age:PressSpeed
",t "or
"v "arowstoenter
theusersage.
Tlrcn
press
the
XIODEbufron.
3.SetTargetHeartRate:Press
Speed
' ,\ "
or
'\t ' ano\
rs
icsethetargetl-ban
Rab.
Tl|en
press
he"MODE
button.
Afterawarm-up
period,
the
program
wjllautomaticallyadjusttrespeedb mahbinthehrgetHeartRate
(Range
60
- 180bpm).
4.SetTargetMax.
Speed:PressSpeed
" ,r. "or
"v 'aro^6 b sett reh|gE{
[raxspeed.
Thespeedwillnotinqeaseor'erthemax.
speedevenhough
pulse
hasnot
eached
he targetHeartRate
yel
5.Enter
program
tirne:Press
Speed" ,\ "or
"v "anor/stiJenbrtf|e
ptogram
lvorkouttime.Then
press
he'START'
butbn.
ThePauseFunc{lon:
You
can
pause
your
teadmillatanylimeduring
your.wofkout
by
pressing
he"ISTOP"
butbnonce.
Toresurne
)our
workout
just
press
tre"START'
button.
TheResetFunction
:
You
canre€et
your
workout
program
and
thetimebyholdinghe'STOF
butonfor
afewsecondsuntil
heprogram
windorrdisphys
'0:00'.
Repeatheabove
step6tcreset
your
desired
program,
leveland
workout
time.
NOTE
1.Whfithetlmet€€lds99;590/00.'00,oseriesofbeepswitlsoud,a''dlaslforfrve(5)s€6,ondsandthq,tl?€noffw,sbp.
2,
Whanthe'SafdyKey"
E ptl/€d
wt inatrysitualion
themow wiIs@ immdiaw andffies]rsfe|lrisrese{b It7€mamnl
sellings.
3.megraphics
d Utewoe.rtD'ofi/€sarca''nlbdonlhe
wrsole.Eachov*a vto'l{p/.rt(newivb sc{/nwtffi lnfute't
(10)
secabrs,Segnentfi?re
=
ovffiI wo*outtime/ 10.
eg.:lf otffill wod(p/ut
lineissetatt$ (10)
minuf'€s,the@ch
segmentwi
!€on€(1)minutb€€,ch.
I

km/h Speed program
P1 P2 P3 P4 P5
L1 L2 L3 L1 L2 L3 L1 L2 L3 L1 L2 L3 L1 L2 L3
11.52.5 3.5 123 1 23234 1 23
22346 7 8 3 4 523434. 5
32.5 3.5 4.5 1234566 7 8 4 56
43456 7 85676 7 856 7
53.5 4.5 5.5 123678 4 5667I
o3456 7 I567 4 56 6 78
72.5 3.5 4.5 123 4 5634556 7
82.5 3.5 4.5 6 7 8 3 4 53 4 556 7
91.52.5 3.5 12334512323 4
10 1.52.53.5 123 1 23123234
Each
program
is
dMdedinto
ten
(1
0)
segmenbandhas
hree
(3)
ditrerentlevels.
The
pre6et
workouttime
ishirty
(30)
minutes.
,urruillllflilflrrrInIIn,
llll,,,
lll.,,1111,,,,,,,
P=
,,nlill,u,
\'/
-nlnlll
llllllflffiru,,,,,,,
-uililililillnm--
MPH Speed program
I
,-illilfl||||tllilil',,,,,,0
P1 P2 P3 P4 P5
L1 L2 L3 L1 L2 L3 L1 L2 L3 L1 L2 L3 L1 L2 L3
10.9 1.5 2.1 0.6 1.21.80.61.21.81.21.82.4 0.6 1.21.8
21.21.82.4 3.7 4.34.9 1.82.4 3.0 1.2 1.82.4 1.82.43.0
31.52.1 2.7 0.6 1.21.82.5 3.1 3.7 3.7 4.3 4.9 2.53.13.7
41.82.4 3.0 3.7 4.3 4.9 3.13.7 4.3 3.7 4.3 4.9 3.1 3.74.3
52.12.7 3.30.6 1.21.83.7 4.3 7.9 2.5 3.13.7 3.74.34.9
61.82.4 3.0 3.7 4.3 4.9 3.1 3.7 4.3 2.5 3.1 3.7 3.7 4.3 4.9
71.52.1 2.7 0.6 1.21.82.53.1 3.71.8 2.4 3.0 3.1 3.74.3
81.52.1 2.73.74.3 4.9 1.82.4 3.0 1.8 2.4 3.0 3.13.7 4.3
I0.9 1.52.1 0.6 1.21.81.82.4 3.0 0.6 1.21.81.21.82.4
10 0.9 1.5 2.1 0.6 1.21.80.6 1.21.80.6 1.21.81.21.82.4
>=FE=E'
>=FeeD
>=FEEE)
>=FEEE'

P1 P2 P3 P4
L1 L2 L3 L{ L2 L3 L1 L2 L3 L1 L2 L3
11.52.5 3.5 123 1 23 1 23
223467 8 3 4 5 1 23.
32.5 3.54.5 123 4 5 6 6 7 8
4 3 4 5 6 7 8 5 67678
53.5 4.5 5.5 123 6 7 I 5 6 7
63 4 56 7 I5675 6 7
72.5 3.5 4.5 123 4 5 6 3 4 5
82.5 3.54.5 67 I 3 4 5 3 4 5
I1.52.5 3.5 123 3 4 5 1 23
101.52.5 3.5 123 1 23 1 23
rrlllllllll
llllrrlllr,,, llll,llll,llll,,,
,,llll,u,
,,illilllllllllllllllllrurrl, ,,,lllllillmffi*,,',,,,,,,
Each
prwram
isdMdedinto
ten
(10)segmenb
andhas
three
(3)
differentlevels.The
preset
workouttimeis
trirty
(30)
minutes.
km/h $peed program Incline
program
MPH Speedprogram lnclineprogram
:J
it I.ql ifll11
rIrrtII-l\ratJlY;
P=,
P1 P2 P3 P4
L1 L2 L3 L1 L2 L3 L1 L2 L3 L1 L2 L3
10.9 1.52.10.6 1.21.8 123 1 23
21.21.82.4 3.7 4.3 4.9 345123
31.52.1 2.7 0.6 1.21.8 4 5 6 6 7 8
41.82.4 3.0 3.7 4.34.9 5676 7 I
52.12.7 3.3 0.6 1.21.8 678 5 6 7
61.82.4 3.0 3.7 4.34.9 56 7 5 6 7
71.52.1 2.7 0.6 1.21.8 4 5 6 3 45
81.52.1 2.7 3.7 4.3 4.9 345345
I0.9 1.52.10.6 1.21.8 3 4 5 1 23
10 0.9 1.52.1 0.6 1.21.8 123 1 23
,,,,1111,,,,
,,,,fl|

1rIt.rI
Read
thefullowingcarefully
bebreusing
yow
treadmill
a Alwaysstretch
your
muscles
beforecommencing
lheexercise a Thisteadmillisequipped
wih asafetykey
-Atr\,ays
cliphe
program.
Warmupslolvlybywalkingataslowspeed.
lnqease cod attached
tolhesafety
keytoapart
ofyour
clohingsohe
workoutintensity
gradually
until
youreach
your
desired
workout safetykey
wjllproperly
dehchfromthemmputer
@nsole,
pace.
Decrease
workoutintensity
gradually
b aneasywalk. therefore
stoppingthetreadmill.
Allow
your
heart
rate
todecreaseb anormalsitralion. a Wearrunningorwalkingshoeswih hightractionsoles.
To
avoid
a When
starlingthetreadmill,alwaysstandwih boh feetonthe injuryandunnecessarywearonyour
feadmill,besure
your
step
ontheside
rails. shoesarefreeofanydebrissuchasgravel
orsmall
rocks.
a Vvhen
finishing,allowhe runningbelttodowdownandcome
to
acompletestopbeforesteppingoff.
a Wearmmfortablenonrestic'tiveclothingwhenusingthe
treadmill.Neverwearanyhingloose,
sudl asbaggysweat A,WARI{ING
pants,
necklaces,loosesocksorjewelryNeverdrapetowelson lfyou
feeldizy, nausea,chest
pain
orotrerabnormalsymptoms,
oraroundthetreadmillduring
use.
. Alwaysusethehandrailwhen
steppingonorofihe headmill
andwhenchangingincline
orspeed.
6TOP immediately.
Consultaphysician
beforecontinuinguse.
Befure
completinganexercise Attheendofweryexercisesession
session
always alYuays
1.
Allov/timeb dowyourpace,
cooldown,rcduce
)/our
hear
rate '1.
Remove
thesafetykeyfromtheconsole.
toa normallevelbeforecompleting
your
workout. 2.usethemasterDo,verswit$ totJmlheteadmillofi.
Themasbr
2.Graspthehandlebars
and
press
thespeed"v "buton.Slo\r/ pou/er
switchislocatedontile right+andsideofhe ftame,
next
yourpace
toaneasywalk, tothe
electricalmrd.
3.Ensuretherunning
belthascometoacompletestopbefore 3.Always
position
andstoretheele(ficalcod whereitisdearof
exitingthetreadmill. allpahways.
4.Unplugtheelecticalcod forn t|e ot-l0etThisisespecially
imporbntifyouarenot
gorE touse
your
teadmillicr exbnded
time
period.
5.Wpe allfeadmillsurfaces
wilhadrydoh orbwd especially
AWARNING
Tum off and undug the treadmillbeforeproceeding
with any perspiration
onthehandlebars,conbol
panel,
runningbehorany
maintenance
orvisual
insoec{ions.Failureb doso mav€sult in otherfeadmillcomDonenb.
seriousinjury.
NOTE: Fallur€ to perbrm this requircd pedodic and
prcrentaffve maintenance can nold tbur warranty

\r/ I\1tt
TGeneral cleani I
nspelcli
ngfa
sten
ercan
dcables
1l
1.Before
proceeding,
ensure
thatlhetreadmill
power
isoffand
lhatitisunplugged
fiomtheelectical
ouflet.
2.Remove
dust,use
asmall
vacuum
nozle b carefullyvacuum
around
allvisual
componenb.
3.Toremove
film
ordirtuse
aslighty
damprag
withamild
cleaning
agent
only.
4.Be
carefulnot
toimmerse
anyfeadmillcomponentswith
any
liouids.
Check
thatallfasteners
areproperly
tightened
andallcables
are
securely
inplace.
Toavoid
damaging
fusteners
donotovertighlen.
Sbre )/our
feadmillina deanand
master
powerswitchis off and is
outet.
dry
environment.
Ensurethe
unplugged
fiom
he electrical
/CWning anA inspeding flierunning bdt
Tum
offthepower
andunplug
ftomtheelecirical
ouflet.Caretully
position
he lreadmill
onib side.Use
adamp
clolhtowipeoffthe
insideoftherunning
belt.
Caretullyrohtehe runningbeltbyhand
to clean
theenlireinside
surface.
Retumtreadm
l to ib upright
position.
lf running
beltedgeis hayed,$eck he running
belts
alignment.
lf seamsare splitting,
call your retaileror nearest
authorized
service
center.
Moving
1l
Thetreadmill
hasbeen
designedandequippedwithwheelsfor
easy
mobility.
Bebremoving,
ensurethe
masier
power
switchisin
the"OFF posilion
and
he power
cordisunplugged.
Liftthebase
fi'ame
of thetreadmill
and then rollhe treadmill
to thedesired
position.
Aligningthe
runningbelt / Running
Ht lubriation
Ensure
therunningbeltiscentered
onyour
treadmill
atalltimes.
Running
style
anda nonlevel
surfuce
aretwoinstances
thatrnay
cause
t|e befi
todffi off
center.
Minoradjustrnenb
tothe
twobolts
athe rear
ofthetreadmill
a|enecessary
whenthebelthasdrifred
of center
1.Press
"SIARr tobegin
runningbelt,
thenincrease
the
tseadmills
speed
to5knvh
(3mph).
2.Stand
athe rear
ofthe
lreadmill
b detormine
whichdireciion
the
beltisdriftng.
3.lfthebeftdrifrstohe left,
tumthetefr
adjustrnent
boltwitht6
wrench
a l/4
ofatum
dockwise.
(Flc.
C)
4.lfthebeltdrifrstotheright,
tumtherightadjustnent
boftwith
*6
lvrench
a1/4
ofatumdod$,ise.(Flc. D)
5.Observetfre
hacking
ofthebeltforabout
30seconds.Repeat
previous
stepsifneeded.
When
youfeeltf|e rrise dtp nn*ng beftb bJder,please
use
thesilicon
spray
m thenrmirE bdt [ 'Feasyandquick.
BeiDre
proce€ding,
eftsuref€ EHdmill poi€r is of and unplugged.
Loosen
therunningbdtandthenspraythe
silicononfle innerside
ofhe runnirE
bdt Please
seeillustration.
A,frerspraying,
please
align
therunnirpbelt
andadjusthe running
belttension.

\r/ t\\'711I
7 roui 'unfolding1l
A,WARNING #J:tffiilt;,
r'"ase
putthe
incrinevaruetozero
(0)
rever.
Release
to unfold:
o
1.Pulloutthe
knobforlocking. 1 loldtrefrafng 1.Lower
theftamewithhand
support.
2.Pullout
knobforreleasino.
7 Horizontaladjustment /l
To
stabilizethetreadmillonfte foor,youcanadjustthetwoscrewslocated
underthefront
ofthebase
frame.
1.Lnthemachineononesideandhentum
thescrewunderthefont
ofthebaseframe.
2.Tumthesqewsclockwisetomakeitscrewup.
3.Tumthescrewcounterdodevisetomakeitscrewdown.
7 Troubteshootingwith error codes
Theeleclronicsarecontinuously
runningselfchecks.lfitfindsaninegularity,theconsole
willdisplayan"Eno|,'
codeandstopthe
normal
operatjonofthetreadmillforsafety
pumoses.
PLEASE
REMOVE
THE
SAFETY
KEYANDTURNOFFTHE
POWER
SWTCH,
TTIEN
TURNTHE
POWER
SV\IITCHBACKONTOSEE
IFTHE
ERROR
CODEHASCLEARED
IFTHEREIS
STILLANERROR
CODEPLEASECONTACTYOUR
AFTER-SERVICECENTER
Foldup:
1.
Raisetheframe.
Error
Code Trouble shooting
Er1 Speedsensor
enor:
'1
.Please
deck ifthere
isanythingstuckinside.
2.Please
deck ifhe speedsensorislooseordefedive.
3.Please
contad
your
afier-seMcecenter.
Er2 Motor
connection
enor:
1.Please
deck cableconnediontomotorarenotlooseordamaoed.
2.Pleasecontaci
your
after-seMcecenter
Er3 PCB
panel
controlboard
andMCBmotorcontrolboardconneclion
eror:
'1.
Please
checkall
cablesmnnededtohe mnsolePCBandmotor
contollerMCB
are
not
looseordamaqed.
2.Please
mntact
your
after-seMce
center.
Er4 Conlroller
protection
enor:
Please
contac't
vourafrer-seMcecenter.
Er5 Motor
protection
enor:
Please
contacl
Vour
after-service
center
E16 Motor
controller
(MCB)proteciion
error
:
Please
mntad
vourafier-servicecenter
Er7 Incline
enor
(only
Ml150):
Please
mntac{
your
after-seMcecenter
Er8
HRC
program
enor(only
M1150):
'1.
Pleasemake
surethathe hands
are
placed
on
thehand
pulsegrips
orhedtestsbapiswom.
(Chest
strapisan
optionalfunc{ion.)
2.Please
deck if
thewiringofthehand
pulses
arcnotlooseor
damaged.
3.Please
contact
vourafter-servi@@nter
This manual suits for next models
1
Table of contents
Other LA Fitness Treadmill manuals
Popular Treadmill manuals by other brands

ICON Health & Fitness
ICON Health & Fitness NETL27718.1 user manual

Bremshey Sport
Bremshey Sport PATH owner's manual

NordicTrack
NordicTrack C2300 NTL12905.5 user manual

Impulse
Impulse PT300 owner's manual

Bodyworx
Bodyworx Colorado 300 owner's manual

NordicTrack
NordicTrack Reflex 4500 Pro Treadmill user manual