LA Fitness MX800 User manual

ilfionilil
IRIII]il
I11
illfilll|fll
MX8serles

Table
Of
Contents
^l
Congratulations
on the purchaseof yournew
motortzed
treadmill.
To
helpensure
the
enjoyabte
andtrouble-free
operation
of
your
new
treadmill,
we
strongly
suggest
you
readthts
manual
carefully
and
follow
itsrecommendations.
I Impoftant
Safe\'
Instntction
....
..
........I I
I
I
| , ssembh
Irclruction
...... ..........2
MX800 ,a'/'
MX85A
J COI{SOLE
OPERATIOII .,..,,..,.4
20a6t11(MXB-3)

IMPORTANT
SAFETY
IN$TRUCTIONS
l|Rll0tf,-to ,uor..
the
risk
oreiectrtc
shock
Always
unplug
thrs
appliance
fromtne
eiectrical
outiet
lmrneolately
after
using
and
befor
cleantng.
I Use
this
applince
oniy
for
itsintended
ues
as
described
inthis
manuai
Do
notuse
attachment
nct
reccmmendeC
nythe
manufacture
a Todisconnect,
turnallcontrois
tothe
off
posttiorr.tnan
remove
plLlg
fromoutlet.
l Connect
this
appliance
to
properly
grcLindecl
ouilet
oniv
See
Grounding
Insiructtons
a The
appi'ance
s
,ntendeJ
for
househo
c.ise
t When
you
are
not
going
touse
your
treadnrili
,or
when
finishtng
pieaseremove
thesafety
keyfrom
theconsole
then
always
position
thesafety
kev
where
thechtldren
can
ncttake
a Do
not
use
outdoors.
a Always
unplug
thetreadmrll
from
the
electrical
outlet
immediately
after
usrng
3ng
pgfsrs
cleanrng.
assembling
or
serv:crTg
t Never
leave
the
treadmill
unattended
when
piuggecin
Disconnect
by
turnrng
off
the
master
power
switch
and
unpiugglng
form
outiei
<)
Never
operaie
thistreadmill
ifit hasa damaged
cord
or
plug
i3
noi
wor"king
prcperi,v,if
iihasbeen
droppecl
o'
cainaged
or
tf
t
nas
been
exPosed
to
water.
I Dc
not
operate
whereaercsoi
productsare
being
used
orwhere
oxygen
is
being
aCministered
a Don't
pull
the
treadmili
by
its
power
corc
cf
r.rse
ir]e
cord
as
a
handle'
I Keep
close
supervision
ifthrs
treadmili
isused
0y.
or
nearchtldren
persons
r,viih
disabilities
or pets
I Keep
drv
Do
notoperate
ihrs
treadmtll
in
wei
cr
Tnolst
c0ndltlons.
<)
Never
Inserl
a'l\
obl€cl
nloant
openin;
a Before
using
the
treadmili,
aiways
warm
up
vo'.-rr
muscles
to
prevent
ihe
exercise
tn1ury.
t Please
unplug
lhe
electical
cord
fronr
theelectrical
outlet,
and
aiways
prevent
the
children
fromCanger
because
of
careless
touching
tKeep
eiectrrc
cord
away
from
heatedsurfaces
tKeep
nandsclear
ofail
rnoving
parts.
Never
place
lrands
or-
feetunder
the
treadmiil
tBefore
each
use,check
thai
therunning
belt
isaligned
anc
centered
on
the
treaomiii
bed
andal1
visible
fasteners
onthe
treadmrli
are
sufficiently
tlghtened
and
secure
aKeep
tne
treaomlli
ona
solid,
levesudace
withstdes
at
easl
t\,vo
feet
fromany
walls.Be
sure
the
areaaround
the
treadmtll
remains
ciear
during
useand
has;
adequate
clearance
NOTE:
Failure
tc
foilorr.r
these
instructions
maylead
lo
personal
rn1u11
and
cause
Cantage
to
thetreadmill
Toreduce
the
riskof
Durns
frre.electric
snock.
please
keep
the
foliowing
lnrfilnd
n f -
ELECTRICAL
GROUNDING
INSTRUCTIOilS
This
product
must
be
groundeclf
|i
shculC
r.r:aiiuncilon
ci llreak
dcivn'
grcunding
providesapath
of
leasi
i-esists'-.le
foi'eiectriccurferl
io
reduce
the
riskof
electrtcshock.
Thrs
treacmjrr
is
eQ;lppec
trritn
a
;ord
having
equipment
groundingconnectoi
ano
a
gfcuncrng
r uS
The
plug
must
oe
plLrggeciintoanappropriate
oi-ltlet
lhal
: ''-ic'\ ' s:l e'
and
groundei
inaccorcjance
rvlth
ali
ioca
coades
an'jordirla;'-'-''
ADanget
mproper
connecticn
of thetreacmili
groundtng
conneclor
can
result
in
the
riskof
electric
shock
Check
wiiha
qualifred
electrician,
if
you
are
indoubt
as
to
whether
the
productis
propefly
grounded
Don
tmodily
the
plugprcvrCed
withthe
treadmill
lf
it
won
t
ftt
your
outlet,
have
a
properiy
grounded
outlet
installed
by
a
qualified
electrictan
P]Spa\'attentiOnthepowercabieneedlndtvicuapOwerSourOeStr]Ctly'
can
rot 0e
usage
mutuai
power
suppi"v
t'rrthanoiher
equlpn'rent'
ALilarning
Nevei'
,lse
extension
cords
between
the
treadmtll
airC
wail
cr.riiei
Figure
Grounding
metnods
l{3
.
i+-
i-l
L,..'-.--.----"-
lll
I
ir
l\ | ,l
l
GROUNDED
OUTLET
GROUNDING
PIN

Sin." your
treadmill
isa
heavy
piece
of
equipment.
we
recommend
thatafter
taking
off
thetop
portion
of
the
box
you
slit
the
corners
of
the
lowercarton
and
fold
down
the
sides
Thrs
will
eliminate
the
need
for
you
t0
pick
up
the
treadmili
over
thesides
of
ihebox.
Prior
to
starting
theassembly
processtake
all
ofthe
partsout
of
the
box.
remove
all
plastic
bags
and
laythem
out
on
the
floor
to
become
familrar
with
the
conrpoents
Make
sure
thai
vou
remove
all
parts
packaged
underneath
tne
readmill
you
may
need
toslightly
ptcK
up
the
back
ofthe
treadmlll
to
get
better
access
tothe
parts
onthe
bottom
you
will
notice
that
the
treadmill
iscompleteiy
assembied
except
for
the
handlebars
and
thedisplay
window'
Parts
$ Frame
@nase
frame
L$)Supporthandle-Left
r@'
Support
handle-R.ight
$. Handtebar-Left
$ Handtebar-Right
rJ Consr:le
bracket
,!'; Handle
rail
ig, Console
@ Rack-Left
'O Rack-Right
1] Base
framecover-Left
13Base
frame
cover-Left
14Base
frame
cover-Left
.'$ease
frame
cover-Right
td aase
frame
cover-Right
,@
eas"frame
cover-Right
Hardwsre
' tool
Screws
Already
in Place
onthe Treadmill
M1
0-75L{2
PCS
)
SCREWS g.
#8.s/8"L{4PCS)
M1o.10t(2PCS)
<-\
ev
nylon
nut.
Nl8(1
2PCS)
@
washer
M8"15L{6PCS)
SUKtrVVb20
M4-'10L(14PC
S
)
-xt.
f : \'
a_/
SCREWS
Tool !\.
,4,
€"
T
Handle
Wrench i$. Wrench-6mm

Step Handlebars assemblY
FIG-1 FIG-3
Attach
and
lighten
screw
anc
washer2''.2? ''t
rightllen
nanClebars
Aitacn
]efir-ac<'1
Ccn
ieft
handlebar
arciiEnle'
r"ltn
screws
2.3.
ReCea:
:ie San-e
;r r
gl^t
S.dB
fO: ;-'. . .-
assembly
1r,
i'lx
1 Flatthe
shipping
box
and
take
out
packrng
nraterial,
styrofoam,
parts
screlv
bag
a7d
T1n1"'
elc ft''rm
box
(FlG
1r
2 Removescrewsiwashers
_]
t=]g !Q.zz traffbaseframeandscrewsiwashers
'21
'22 frorrRrgr'L'Lefthandle-lariFlG2)
3 Uprightthecompletedsupporthandlesandhandlebars.Plssetuphandlebar@@withsupponinghandleOOo1-
attached
-4,, 22 screw
and
washer
and
frx
it
(FlG
3)
4 Attach
and
trghten
screw 18 and
nut 1Q,on
leftsupport
handle.
Attachand
tighten
screw !c :ndwasher
22 on
rght
support
handle.
Repeat
the
same
on
right
side
iFlG
4)
5.
Attach
base
frame
covers
-!3'and
.14to
match
cover
llon lBft
base
frame
and
then
tighten
withscrews
23 24'
(FlG
4)
6 Repeat
the
same
on
rightside
for
base
frame
covers
15'16-ll- (FlG
5t
Warning:
1.Becareful
toavoid
machine
tiltargetting
hurt'
2.Do not
have the
wire harness(inside
of handlebars)
get
pinched'
Step 2: Racks assembly
-{. '
--,
%. k-nfl I
4r'}
"o?,
Step 3: ComPete assemblY
1
1 Attacn
nandle
raiion
lranCiei)?t
3':x:'er trgflten
wltn
screwsiwashes
-21 22.
:F
C;t
2.
Adlust
consoie
bracxet
I ai-;:
-l-i;r€ :c
aproper
positionand
then
trgnien
lie 'l l:s :i sc'errs
2P-22
underneath
of
handiecar
lFlG
I

Incline
up:
This
wili
select
program/levelin
setting
mode
before
stailtng
This
will
increase
the
elevation
in
'1
tncrement.
lncline
down:
This
willselect
programllevelrnsetting
mode
before
starting
This
will
decrease
theelevation
in1increment
SPEED
up:
This
will
select
program/levelinsetting
mode
before
starting
This
will
increase
the
speed
in0
1km/h
or0
.1
mph
SPEED
down:
This
will
select
programllevelinsettrng
modebefore
starlng.
This
willdecrease
the
speed
in0
'1
kmihor
0.'1
mph
ENTER:
Thrs
willset-up
eacn
program.
lntoevery
slep
START/STOP:
This
wiilstarl
the
treadmill
and
this
will
stop
the
treadmill
There
willalso
bean
emergency
stop
switch
(Safety
Key)
MODE:
This
will
accept
programs,
eve
seiect
on
And
thls
wrl
switch
orsplay
data
ondata
wtndov'
c;''nE
€xerctse -------:-
__--_-
Buttons and Windows
Quick
keys
for
sPeed
/incline:
Quick
keys
for
incline:
46,8,14 ...'
Quick
keys
for
speed:
4,6,8
10(km/hr)
,/
l'.1'
/,
/"/
,r,t
-__-iirb,:
lf the
lightunder
each
button
isflashing,it means
fo
use
that
button
for
next
sefup
process.
There
are
1
LCD
window
and
3LED
windows'
1)WlN0(lncline)
window:
shows
ievelof
incline
2)WlN1:shows
Time,
Distance,
Calories,
Pulse,
Lap,Scan
3)WlN2(Speed)
window:
shows
sPeed
Handtebar
toggle
forincline
andspeed
adiustment
1.
Left:
for
tnclineadjustment.
Increase
ordecrease
by
1
every
tirne
2.
Right:
for
speeo
aojustment
Increase
or
decrease
by
01
km/hr
every
time,
\.
\.:,
- \).,
1r ' \\
uL
liiil' , ',
t 'u-:
I
..\.
rlll
T--t TnF
-:= =-_-=_-_==-==--
/". w' . i-
znELznE -E-1EA- -;Arc TD e*T MDDE
,ore--25q,
q,.\5O

/ euttonsandrylnge\
re
lncline
up:
This
willselect
programllevel
in
setting
ntode
befcre
starting
Thrs
wrll
increase
theelevation
tn
'1
tncrement.
lncline
down:
This
willselect
program/leveltn
setting
mode
before
starttng
This
willdecrease
theelevation
in1increment
SPEED
up:
Thiswill
select
programllevelin
setting
modebefore
starting
This
will
increase
thespeed
in0.1
kmih
or0.1
mph
SPEED
down:
This
willselect
program/levei
insetting
rnodebefore
sta(ing
This
willdecrease
the
speed
tn01km/hor
0
1mph
ENTER:
This
willset-up
each
programintoevery
step
START/STOP:
Thrs
willstart
the
treadmill
and
this
wiiistop
tne
treadmill,
There
willalso
bean
ernergency
stop
switch
(Safety
Key)
MODE:
This
willaccept
programs/levelselection
Andthis
willswitch
display
dataon
data
window
during
exercise
Quick
keys
for
speed
/incline:
Quick
keys
forincline,
46B
10
Quick
keys
forspeed:4
6.8.10(kmihr)
lt,,l
lfthe
light
under
each
button
isflashing,
itmeans
fo
use
that
button
for
nextsetup
process.
There
are
4LED
windows
and
12Alpha
numeric
display.
Handtebar
toggle
forincline
andspeed
adiustment
1.Left:
for
inclineadjustment.
lncreaseordecrease
by
1every
ttme
2.
Right:
forspeed
adlustment.
Increase
ordecrease
by
C
1rm/h'
e'iery
t
me.
.: DT=TMEE TFLEPIES PULEE
a

,f,.,ir. rilili
* ,rlii!, .,itiiii",,i,,i,f.
,riliih,,.
,', . .--
,rruilir,
.rlliii,, .rllllr, i,,
!"r .,1 *
. rnELZ-€ _,* ^ .--== -Ea-E. - --e j-<f
a{9:'-::1a
Button
function:
Button Function
POWERON/OFF Pressto
power
on
or
power
off
TVdisplay
1.Presstoselect
TV/Video/MP3
Function.
TV-AV-MP3
2.Hold
for
3-4
seconds:
enter
into
"MENU"
tosetup
screen.
CH+
cH, 1.
InTVmode:
Press
toselect
channel.
2.
InMENU
mode:
Press
to
select
ttemto
setup
VOL+
VOL
-1.ln
TV/Vedio/MP3
mode:
Presstoadiust
volume.
2,
inMENU
mode:
Ifggs
to
adjust
the
valu
MENU
Mode:Allowrng
usertoadjust
the
valueofBrightness,
Conirast,Color
andTint
1Hold
"MODE"
for3-4seconds
rnto
"MENU"model.
Using
button
CH+and
CH-
to
select
the
ltenr
you
llke
to
setup
2.Usrng
outton
VOL+andVOL-toadl.rst
valueofeacn
rtemasbelow,
Description
BRIGHTNESS AdiustBRIGHTNESS.
0
- 63
CONTRAST IAdiustCONTRAST.
0- 63
COLOR Adjust
COLOR0- 63_
TINT AdjustTlNT
0-63
MuteON/OFF
TVSYSTEM Select
TV
system.
NTSC-M
' NTSC-J
' PAL-BG
' PAL-DK
' PAL-AI
'
SECAM-BG
. SECAM-DK
' SECAM-L
according
to
Tuner.
AUTOSCAN ON/OFF
RESET Return
toDEFAULT
value
QUIT Press
VOL+or
VOL-toexit
MENU
mode

console
of3LED
&
lLCD
is
with
1Manual
function,
12
preset
programs,1HRC
prograrn'
Body
Mass
and
2
usersetting
programs.
Console
of
4LED&
12characterAlphanumenc
LED
is
with
1Manual
function,
'12
preset
programs,
1
H.R.C
program.
MonualFuncnon
^a
MXB0O:
1 Attachsafety
keyand
press
"MODE"
into
selecting
programmode.
2.Using
speed
arrow
buttons
to
choose
"Manual"function,
then
press
"ENTER'
3.
Time
window
isflashing.
Using
speed
or
incline
arrow
buttons
to
inpuiworkout
time
(10-99
Mrn
)
4 Press
"START".
MX850:
1 Attach
safety
key
anC,
l2Alpha
bunrericdisplay
shows
"WeicomeTo
Strength
Master"
2 press
"Mode"
intc
Mannual
aditing
mode.
l2Alpha
numeric
dlsplay
shows'SETTIME'
3 Using
speed
orincline
arrow
buttons
to
input
workout
tir-r-re
i'1C-99
lvlin
)Press
"ENTER'
4.Press
"START"
Ve PresetProgrffinil
P1-P5:Automatically
change
thespeed
ofthe
treadmill
throughout
theworKout'
P6-l0lAutomatically
change
the
level
ofincline
forthe
treadmill
belt.
p11:5kmdtstanceprogram,Automaticallychangethelevelof
inclineforthetreadmrll
beit
Theusersetstne
speed
toa
desrred
leveland
the
programmodifies
the
incline.
The
user
can
overrrde
the
incline
forany
segment
within
theworkout
but
at
theend
of
each
workout
segment
the
progranrwiiioverrlde
any
adlustments
madeto
the
incline,
p12:
10km
drstance
program.
Automatically
change
the
leveiof
incline
for
the
treadmiil
Dert
Tneuser
sets
the
speed
toa
desired
leveland
the
programnrodifies
the
incline
The
user
canc','eri-rde
the
incline
fo
rany
segment
within
theworkout
but
atthe
end
of
each
workout
segment
the
progran
r;iil
override
any
adlustnrents
maoeto
the
rncltne
'1
Attach
safety
keyano
press
"MODE"
into
seiecting
program
mode
2.
Usrng
speed
arrow
buttons
to
choose
oesired
preset
program
"Pl-P12' Then
press
'EN-lER
LCD
window
shows
speed
(P1-P5)orincline
(P6-P12)
3 Using
incline
arrow
buttons
to
choose
desired
level
(L'1-13)
Then
press
"ENTER'
4 Using
speec
or
incline
arrow
buttons
to
input
workout
tinre
(10-99
Min
)
This
program
automatically
modifies
the
speed
and
inclineto
maintain
a
preset
target
heart
rate.
Thii
target
is
established
in
thesetup
process.
Thechart
on
this
owners
manuai
should
be
used
todetermine
the
appropriate
target
heart
rate.
To
set
up
the
target
heai"t
rate
program'
you
will
need
toenter
the
workout
time,
ige,
yorrtarget
heart
rate
and
max
0esired
speed.
1.Attach
safety
keyand
press
'N'1ODE"
intoseleciing
program
mode
2.Usrng
speed
arrow
Duttons
to
choose'HRC',program.
Then
press
"ENTER'
3 Using
speed
or
inclinearrow
buttons
to
input
your
age
(13-80)
Then
press
'ENTER
4 Using
speed
or
incllne
arrow
buttons
to
input
yourtarget
neart
rate
(60-180)
Tlren
pr-ess
ENTER
5.
Using
speed
arrow
buttons
toinput
max,
desired
speed
(3-20)Then
press
"ENTER'
6 Using
speed
or
incline
arrow
buttons
to
input
Max,
desired
incline
(5-15)
Then
press
'Ei''ITER'
7.Using
speed
or
inclinearrow
buttons
to
input
workout
time
(1
0-99
Min
) Then
press
'
START
'
Tsrqet
Hesrt Rste em ^/

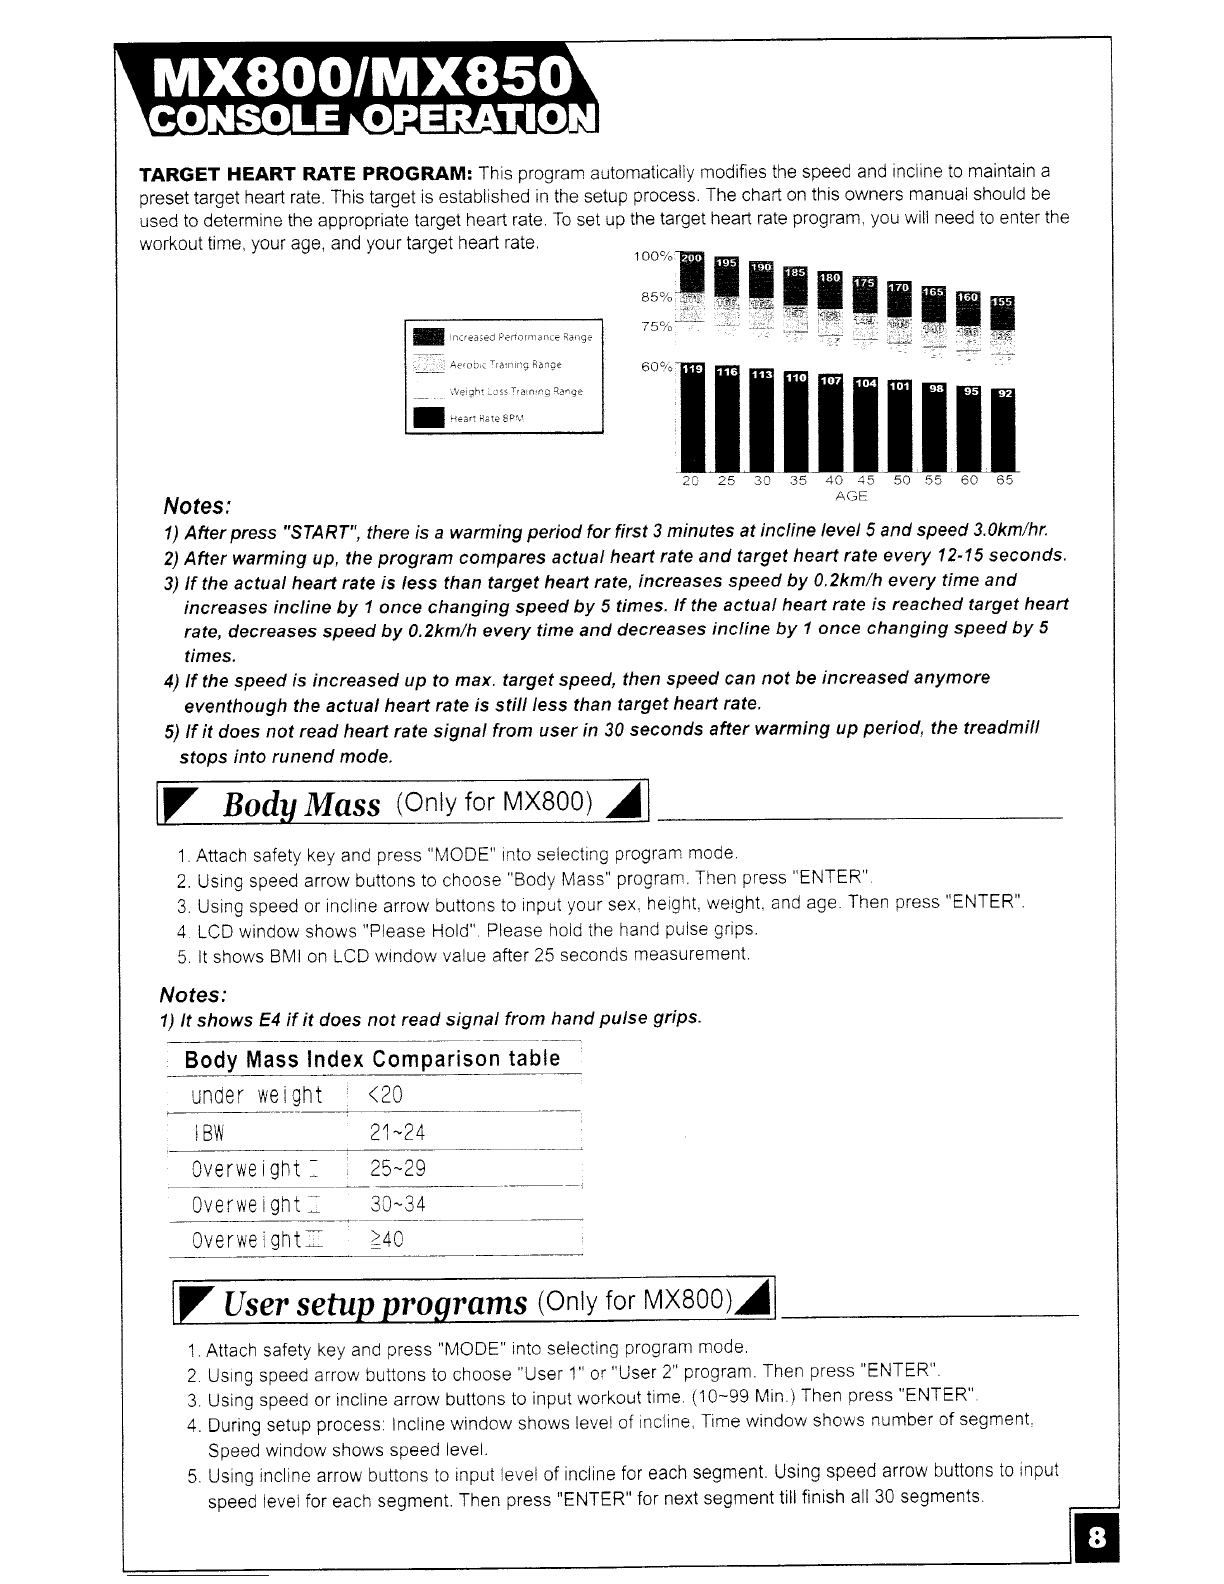
TARGET HEART RATE PROGRAM:
This
program
automatically
modifies
thespeedand
inclinetomaintain
a
preset
target
heartrate.Thistarget
isestablished
inthesetup
process.
The
chart
on
thisowners
manualshouldbe
used
todetermine
theappropriatetarget
hearlrate.
To
set
up
the
targetheartrate
program,
you
willneed
to
enterthe
workout
time
your
age,and
your
target
heart
rate,
I nar"ur"ati'ertorn]anceBange
-Aerco
i ra,nrlqhan E
i!e ql'':..\ss
i'alnr.g qa.ge
I n"uuru,uBru,
Nofes; 2A 25 30 35 40 45 50 55 60 65
AGE
1) Afterpress"SIARf", thereis a warmingperiod for first 3minutesat incline level 5and speed
3.1km/hr.
2) Afterwarmingup, the
program compares
actualheartrateand target
heartrate every 12-15seconds.
3)tt the
actual heartratels less than targetheartrate,lncreasesspeedby 0.2km/heverytimeand
lncreases
incline
by 1oncechanging
speed
by Stimes.lfthe
actualheart
rate
is reached
target
heart
rate,
decreasesspeedby 0.2km/heverytimeanddecreases
incline by 1once changing speedby 5
tlmes.
4)tf the
speedis increasedupto max.targetspeed,
thenspeedcan
notbe increasedanymore
eventhough
theactualheartratels sti//less thantarget
heartrate'
5)tf it doesnof read heartratesignalfrom userin 3Aseconds
afterwarmingup period, the treadmill
sfops
inforunendmode.
BoduMcss(Cnly
forMX80a)
I
1 Attachsafety
keyand
press
l'4ODE'
tntoselecting
program
rnode
2.Using
speed
arrowbuttons
tochoose
"Body
Mass"
program.
Then
press
'ENTER"
3.Usrng
speedorrnclinearrow
buttons
to
input
your
sex,
height,
werght,and
age.
Then
press
"ENTER".
4 LCD
windowshows
"Please
Hold"
Please
hoidthe
hand
pulsegrips.
5 Itshows
BMIonLCDwindow
value
after25
seconds
measurement
Nofes;
1)
It shows
E4if it doesnot read signal
fromhand pulse
grips.
Body
MassIndex
Comparison
table
under
wei
gnt <20
21-24
0verwe
i
ght
-25-29
0verwe
i
ght'' 30-34
0verwe
i
ght
,>40
Llser
se ro roms (Only
for
MXB00)
1 Attach
safety
keyand
press
"MODE"
intoselecting
programmode
2 Using
speed
arrowbuttons
tochoose
'User
1
"or
"User2"
program.
Then
press
'ENTER
'
3.Usingspeedorinclinearrowbuttonstoinputworkouttime
(10-99Min)Thenpress"ENTER"
4.During
setup
process:
Incline
windowshows
ler,,el
of
incline,
Time
window
shows
number
ofsegment
Speed
windowshows
speed
level.
5.Using
inclinearrow
buttonsto
input
levelof
incline
for
each
segment.
Using
speedarrow
buttonsto
tnpul
speed
levelforeach
segment.
Then
press"ENTER"for
nextsegment
till
finish
all30segments.
IBlV

Under
preset
programs.
the
whiie
inset
programmode.oreset
workout
time
is30
minutes.
You
canadjust
theworkout
tlme
Speed
Program
MX8()(,
-{'l 12{407Uq{n
tv 1a
tl 12,t?AI
t+ ,tt ,IA1718192021LI t5 .A
1+ ta 2eul 8q30
P1
.tVfl
,1 222 3 13.4 4433322233 3 4 J l 33J213J L
tEVEt
3 3 344A565443334 1 5(4aIJ31t1
4415556665554445 5 5606 5 c5I45cA4
8 6 66I4422a
L
P2
,EViL
12a
L23?44 4 l556D6775B
EVEt
IJ4 4 5cc60617B8 8 9I77,: 55
i5 J
,EVEL
4qn55566678B8IIvJ010 8B800J
P3
LiYEi
I22 2 144 6 66 I 8a77066555.l 14?3L2L
.tYti
23?3553777 I 9 9 IBB17 7 ?66c544J31
,1 446E 6 B881010 10 IIIBB81i1066 c 5.5
44j1
.EYEi
133366671I18BE 8 116663I3a
.!VEi
22 2 244477788 8 E9IgIB8a3c4422
.IVEI
33?3555BBBII?9101C '1C10 IIa:qI5J33
P5
EVit
1117 I 7222I I II22229 I c
IvH
22228AB2,t
L10 10 tc 10 3 1.1 i0 1n L8781
22
FVF
3333 I II2211 t1 11 11I4n1,::: ci qt
1_) )
P6
.EVEi
I2 2 3? ? AJ332/. LJ3Jlt
.+ I2J1LI
.EVEI
2333II+55)11IJ33!+ +.t )5I314?J
44455560665) 4 4t0
5 5 56065J:1
4D544
71EBb04 4 2I2
o
-EYf
I222 3 I_1 l14)"5 60
rEVt
233 3 41A55)0601ac6I I 9tf, 533
tE\E
3+4,1 555606788RI9g1C10 10 8r: c06.i J
PE
!ti:i
12III;1606IBt1c003+J3L22
F\]F
t3335c7II0088B771
I!6655
r
1i4 3J1
11 4 40 6 6BBB1010 10 I II3BB7770;( 54A4
P9
ttvt Il331660'l 1BEII177J?1
IncIne tEVi
22224447 1 7 I8BBI9I I B8B01,4t 22L
FYF 3 3 3555B8EII I 9i0 10 10 10 9 I c9
tt v lw ?3
P1t
tEvE
1172Iiv 9vJL2L2I00clr
t!vr
2
LiYT 2228E82)1l1 lir3 3 3 10 8I8I2L
333III22l1t 1t 14l4 44i1 1l ll v I IJ
trvrl
1
ttvfl
2
2221140bic
Ji83l7 c6hI +r+ IitJLI
3 3 3 ll7\7 7Ilq ln
l; 770^hitl 5l4 IJ
.it:l 44 I 01o Bis Ir 10 ic v8ie1i" .l
r lt
i1okm
.EVll
1
:.-
ttYrl
2
LTYIi
3
!
3?
3?
3:+!
+
j3
f.i iclJ
l-
1.1 1
-t:1
1
i3
-il ig
t-;
i.l
n
+i!
:l
L
l--
lJ
4 1 4 5q5 6 cl-
c5cti1
vtv (;
leJu I
SpeedProgram:rr*tt||lturrrtttl||tttrrttn,nd|iu[lWhhi,,,,rrri|lil||llttrrru*,,,,ul||lfl|h,'
*T'i*^ ^*i:i-- P3 P4 P5


Under
preset
programs.
the
preset
workout
timeis30
minutes.You
can
adjusttheworkout
time
while
in
set
program
mode
PG P7 PB P9 PlO P11
(5km)
P12(10km)
SpeedProgram:rr*tt|||tttrrrtttl|httrritrr,,ifii||||il|[i,,,,,||||||ll|||l|||||ll,
TFT.LCD
TV
$effril1 12,i A7Rq10 11
Speed
lncline
r
!CYCL
1a
Lo
z_ 3A3I343a
Za
J2
TEVEL
2J3A
-5+345A
a3A3
1.EVEL
3A
-Aqq46A A 5A
c1
IFVF
1.) 457 7 B6A2
rEl!t
13456788 I Y75J
ttvtL
1A5 6 7 xqv10 10 86,4
P3
IEVEt
ILA68 8 776 5 4J,)
LEV:t
2J57IY8{i0 5A
T
rEVtr.
?A6'10 10 I 9 Bj7 65A
t
rEliEL
I13o7 7 8 8 77 6?1
22478o9aaA
L"a
Bt
tEv!t
35UI I 10 10 3B
II 3
P5
i-EVil
1172I I 2)99271
| !f1
ztI)10 10 J310 8I
1C ,
!!l!L
1921'l 1'1 .4 /1 11 92
11 3
P6
IVEL
1a
La
L3A
-Ja343
23 a
tEVri.
23A5A
-JA5.4
3
A3
t:VEL
1445 6 5 A
a5 6 5 5
4A
P7
t!vit
1o
ZA
-q67 7 8 8 4
62
t!VEL
23A5t.) 7 I 8 Yq
7
I3
:!VEt
IA
a567U9 I 10 6B
10 A
-
PE
rEVEt
1o
LAo8 I 7 7 63
4
5o
,EVEL 3679Y87A
5
63
I.EVEL
1A610 10 9Y b 56
7A
P_q
iuti
113o7 7 8 I 7 3
67 1
tEVEL
2zA788II6A
81
L
t!'/IL
13 B5 I 9 10 I
10 5
EI3
P1l
tEVEi
I172vI2 2 I72
q
i!viL
228)10 10 3321C10 8,
TEVEI
33v)11 11 A A 11 2
i1 I3
pi1
{5km)
TEVIL
1a
L,4 b) B B 7 7 6A
-
q3 2
, FVII
t3579 9 B875
6/1 3
i[VIL
146x10 10 II 8 6 A
+5
atl
i10kni
tEvEr.
'I a
L3A
a?3a
Lu
L34
3oai
vLl
LEVit
23/54A
-3?/l 5
A+J
3A
-5 6 55A A 5565a

sead
carefully
the
followins
before
using
yout
treadmill
I Al*ays
stretch
vour
rnuscles
before
exercise
piograrn
Warnt
upslowly
cywaiking
at
aslowspeedlncrease
workout
tntensity
graduaily
until
you
reach
your
destred
workcut
pace.
graduailv
toan
easywalk,
allowing
ycur
heartrate
todecrease
tonormal
situation.
I lVnen
starlthe
treadnrrlL.
atways
standwith
bolhfeer
onthe
step-on
siderails
I Wnenflnisi"lng.
aliow
therunnrng
belt
tosiowand
conre
t0a
completestop
before
steppingcff
I tttear
comfortable
nonrestrictive
ciotningwhen
usrng
the
treadmrll.
Never
wear
anytningioose
such
as
Saggvsweat
pants
neck
es,
loose
socksor
te,velrv
Never
craDe
towels
onoi'around
lhetreadmil
a,Jrlng
USC.
Ajlow
trmeto
slow
yourpace.
cooldown,r"educing
Vour
heaft
rate
toanormallevel
before
completing
your
workout
I GraspthenanCiebars
anC
press
the
Sr_O\\Speec
buttonStow
Vour
pace
tc
aneasywalk
Ensurether!nnrnE
oethas
ccme
toaccn-plete
sioi)
before
exitrngthetread,.niii
Attlarning
Turn
offandunplug
thei;'eadmtlr
oefore
proceectng
wjii-t
an,v
marntenance
orvls.ral
ins0eci
ons.Failure
to
doso
rnav
resull
InsenousInJury.
NoteFaiiure
to
perform
'lhe
requtred
periodrc
and
preventative
rna{ntenance
canvord
your
warrantv
Belorc
comnleling
an
exercisc [t thc
end
ofcuely
exclcise
sessi0n
always sGssion
always
lf vou
feei
dizzy,nausea.
cnest
plr
arcihei
aDnorrnal
svmporrs
slopinrmediateiy
Consirta
physrcian
befcre
continuing
use
Remcve
tle Salety
Keyfromthe
.:onrputer
cof
soe
Usetheirrasler
po\ve,-switch
tol,;rf ihe
lreadrnit
oif
The
raslef pc,,r.ier
sv;rtcis icater,{
ai :he
itahi s0e
ji
i:an-rt
lexl laineeiec'ir
cataijfo
A:,.,
ays
!,.sri
!l :ira sioreiire
t e{tii-rcil
i.oi[]rf
ne
il S
o,ear
ii-crn
a !ainlval/s.
!np ugiirc
ereCil0aiccr'circm
tiie
eiecirica:o,l el -ir,s
r-s
especra,lyrmpcrtantrf
vo,*
ar;not
ic I,Ei- ,:i rour'
ireadmiii
fof
exienoec
per
oos
rr'Jrpe
a Ilreadnti
i s;rfa,--es!!iir it :f ./
it..,1r
-:r ;; ,.,
a
especrai
! pelsijriailol'cr'i-a
idiL:tleLa-:
_._: - .,i c
runnlng
belt
orotherireaCml
,
aomDcnerLis
t
a
AiwaVs
usethehanirail
r,vhen
stepping
or orcfftfre
treadrniil
ancwhen
cnanging
incline
or
speeC.
Thrstreadnnrl
is
equippedwith
asafetvkev
-
Alwavs
clrp
tfre
cordattachedto
thesafet'i
key
to
a part
of
your
clothrng
scinesafetyke.v
,,vtl1
properiy
detachfrom
the
conrpriier
conscle.tfiereiore
stopDrng
the
treadm
ll.
f/earrunning
orwalking
shoes
wtthnlgh-
ti.act
on
soies
Tc
avoidin1ury
anCunnecessar\
,rreer
crr .vour
treadmill.
ile
SUre
Vcur
ShOeS
are
free
oi
anv
deDnS
Sr-tCh
aS
grave
ancsmairocKs
t
AllJarnin$

GeneralCleqnin Insbectins
Fastaners
andCable
/Cteari,rganrlinspectirrg
the
runningbelt
Before
oroceeding
ensurethatthe
treadmill
power
isoffan0
that
rs
unrl.rgged
'roci
159
glgglrrca
outct
To
removedust,useasmall
vacuum
nozzle-tocarefuily
vacuumaroundall
vrsible
components.
To
removefilmordirtuseaslightly
damp
ragwitha
mtid
cleaning
agentsprayedontothe
ragonly.
Becareful
notto
rmmerse
anytreadmill
component
withany
lrqul0s.
Turn
oftthe
power
anounpiug
fromelectrical
outlet.
Careful
y
position
the
treadmill
on
rtsside.Use
a damp
clctn
towipe
off
the
insrdeofthe
runningbeltOarefuily
rotate
therunnlng
belt
byhand
tccieanthe
entire
insicjefaceRetrrrntreaCmill
lo
its
uprrght
positicn.
lf runningbeltedges
are
frayedcheck
the
runnin
g
beltalignment
f seams
arespiltling.
call
yoilt'
retarler
or
nearestauthorized
servlce
cenler
/au the
Runnins
BeIt
Ensure
the
runningbelt
is
centered
on
your
treadnrlil
atall
trmes.
Running
styleand
a
non-levelsudace
are
twc
instances
tnat
may
cause
ihebelttodrrft
off
centei'
Nltnoi'adlustments
tothe
two
bolts
at
the
rear
0{
thetreaCmiir
are
necessai'1'when
the
nelt
hasdi-rfted
offcenter
i Press
START
tobegir:
rr:nnlng
beli
ihen
ncrease
tne
treadmillis
speed
to
5
Km'hr
r3
ltl'hrr
2 Stand
at
the
rear
ol
th€
trea'lrrirr
tcaelermine
whicn
direction
tne
beitisdrifting
3 lf
the
belt
drifts
tothe
left,turn
ihe
iefi
aclusiment
Dolt
with
wrench
#6
one-quaner
ofaturn
crockiv
se
iSeeFIGCI
lfthe
belt
drifts
tothe
right,turn
the
rightaClustment
bolt
with
wrench
# 6
one-quarter
ofa
turn
clockwlse
(See
FIG
D)
Observe
thetracking
of
thebelt
forabout30
seconds
Repeat
step
3,
,1
and
5as
needed
.
'- -^-^ 2f
o rrnnorlr. -.hro-a! i-ic a,
ur uLn U
rdt drL d>rutrE,
s o.c I' upcl
-^h ^- ^.^ ,. ^r^^p Tn evnrrl .-lan:.tr..;;:q:orp-<
udu trJ dltr )cuJ q.y I y'loru. rv oturu vo. oy' J o 1.c
d^ nnl n\/ar linhlan
Storage
Store
your
treadmill
inacleananddryenvrronment
Ensure
the
master
power
switch
is ofi
and rs unpugged
fromthe
eiectncalor,tlel
/ Morirtg
Thetreadmill
has!ee'r
designedandequlpped
wlthwheeis
for
easy
nrobrlif,,
Before
ir:v rt'j.elstr-'the
master
power
switch
is in {he"OFF"
tlrsiiion
ari ti€ !.rwer
corc sunplugged
fromtheer€L:lr-j;a
iuijel 'ri ire 3ase
frarneci iie treadrn
li
and:nen
fci lhe lreaomii
ic ine destreC
pcsll;or
/Rrnrring B
ett
Lubric
stion
When
you
feelthe
noise
ofrunning
belt
islouder'
please
use
silicone
fluid
spray
on
running
belt.
ltis
easy
and
quick.Before
proceeding,
ensure
the
treadmill
power
isoffand
unplugged.
Fold
upthe
treadmill
toupright
position'
Loosen
the
runnlng
belt
and
then
spray
silicone
on
the
inner
side
of
running
belt
from
both
sides.
Ensure
spray
entire
runningbelt.
Please
see
illustration.
Afterspraying.
please
align
the
running
beltand
adjust
the
running
belt
tension.
I
I
't/ ))
.,/ ..'
//// .: ,' .-/
,:/ 'l ::=.
'z$ u
z,
al
IIG C---l

F
oldingl
unfolding(
S
o. DropFunction)
Fold
up
After
Inewc1'Kcdt
sesston.
voucan
foiithetreadmtil
totneLrprignt
positron
Lif;up
the
rear
end
of
the
treadmrll
untrltheupperfolding
tube
and
iower
fo
drnc
tubearenot
rn
icncertjciiosiliJrt
!pperlubeanc'cwer
lLtbe
afenct
rn
coir0enlrc
posrtior
ic' safefy
iocK
Release
Yoir
caarelease
lhe:re:cr-.i
,jrcl
tne
uprrght
posiiior
Pusn,
kick
tne
jcck
tubeafd
owertng
iieadmr
l
ihen
lnetreadm
I !^,,i1
Crop
aij:cniatcarl!
ryil1Ouf
haid SuppOrl
:.-:" .Jila' :-:a a"il.., ir:t f.ai.: -!!9a
ilrale afi [!\'ef i.Ue. aa.:]e_:'
H
orizont
al
Adi
ustrnent
To
fit mqchine on floor stoble,
you con
odlust
lhe 2 screwslocoted under ihe
froni of bosefrqme
l.Lift
the mochine
on one side
ond then
turn the screw
under the front of bose
fronre.
2.fvrn the screwclockwiseto moke the
screwup.
3.Turnlhe screw
counterciockwiseto
rnokethe screwdown
Trouble
llp
oowr,r
f1}_
tr
6^..-;,1; -..nttn ar.\,. ,.r.j1S
a je, .ar'"
normai
cperaiionfor
safety
ErrorCode Description F
1 Speec
Er'-
Error
Code MODEL Trouble
shooting
E1r [,1X800
N,lX850
\A,h^^rr . i,-^ ^,^A ..-^
i',,s, L rou,opro/qu,o, uveS3l€i,.
i.e,
erCl'rsen
iacarniO|esianlfeadfriil.
iiE'1
SstrlShOWI'r-ii'crSi-laJ
piease
cneckthe
fotlowlng
i. Please
check ait
caole
conneci,or-s /ieiiconiecled.
2 The lreadmill dtd nol .'no're
after press ng "Siart" an0 snow E 1 , piease theck rfthere s ar_.
i,a.1
sr, -'
3. The ireadmiii i-unfoi"few seccnds after pressing "Start" but stops p ease check !f
ihe set'scr
(near flywhee of front roilei-t
s ioose oI defecttVe
I Dease crect i\'te- , 'rLlc: LC
rlcto' .:l'P
:oS€
u ' ,l
5. Please aontact stcres for service if E
l can noi [reso]ve.j
E4: lvlXB00 UnderBcdylvlass
progr-am
hearilate
si-rol
ieadc!ilriita:rrrlrni.rcus6sec
l.Please
resel
orfernovesafetJ'
kev
Tlren
rui-r
bcd,i
rnass
1r3s'213s3ir
E6\E7I N4X800
lv1X850
rrvner
E6'E7 iS
dispiaVeC remcve safetr
(e\ aira
r.sed i deai.ilo restai'i
ireadm
I f F6rE;,s si snowf cl-l
CrspiayDease cneck Ine ioriowrn!
of aalt
ior serviae
'I l.eset rrrclinevaiue
il r
When tire
pos
tronci rnci:le
iS
,owef
than mtdd;e
]eve press ' Mode'ard rnclrrLe
up Suttons HoiC
both
DUiionsan,Jtne inclife wiil ce ralsed. Release lhe lwr buttons lrliihe rncrne posrtro|: s up lo nl0oie revel
i2) lrihen rhe pos tton of rnciine
is n qher than rridire e!'e . 0i-ess
" [lode" and ]ncl
ne "cown' tJuttons Holi both
bllttons and the inciinewiii De reduceo Reieas€ ine lt'ro butlcns tilithe nc:rne
pos t ofr rs
dov,'n
tc n'rdiie eve
PleaSe
tnr ,i
fOr"
ier^,
llmgs '_./O,"r
aair aorlqel the nc ne r]]avg 3iease ,:r:Jlia.ri
slores iot ser|ce
Cnce lhe icrrf e i.rcs
t ar, : Ji n.rccie e.,e' ;,
earsg
i!,in lI pcvrel airt' fe-stan !,ease see f E6 E7 goes awa:i
li not siease aort3ci sillae-c
tor serv ce
2 P ease checK ii :eit !rnile irclir'le
cabre-sare lveilcoi.tftcteaiio i\lCB
3 iiihe aDove
steps
can nol |eset
:rctine please
coniaci
storestar se1/r-e
This manual suits for next models
1
Table of contents
Other LA Fitness Treadmill manuals