La Marzocco Major V User manual

La Marzocco USA | 1553 NW Ballard Way — Seattle, WA 98107
Quick Start Guide
Mazzer
Major V, Robur S & Kony S Electronic
Note: This guide is a supplement to the full Major V, Robur S and Kony S instruction manual and the
electronic interface guide, not a replacement. Reference the instruction manual for warnings, important
safety information and more detailed instructions on using your grinder.
Grinder Overview
Note: hoppers designed for the Major, Robur or
Kony are not compatible with the Major V, Robur
S or Kony S. The tongue is not long enough to
activate the hopper safety switch.
Installation
1. Remove grinder, hopper and accessories from box.
2. Ensure grinder is on a stable surface and install
hopper onto grinder. Ensure the tongue of the
hopper slides into the slot to activate the safety
microswitch. Tighten the hopper fixing pin to the
grinder body.
Note: the grinder will not work without the
hopper in place.
3. Screw the disk stopping pin into the disk
stopping nut through a hole in the adjustment
disk. Screw adjustment disk handle into
adjustment disk.
HOPPER COVER
COFFEE GRINDING ADJUSTMENT DISK
LOCKING SLIDE
PUSH BUTTON PANEL
FUNNEL
FILTER HOLDER FORK
SERIAL NUMBER LABEL
HOPPER (coffee bean container)
HOPPER
HOPPER FIXING PIN
OPEN
HOPPER
TONGUE
MICROSWITCH

La Marzocco USA | 1553 NW Ballard Way — Seattle, WA 98107
4. If desired, install drip tray by sliding under front
of grinder until it pops into place.
5. Adjust the fork assembly to properly fit your
portafilter. (View Video Tutorial)
a. Place your portafilter into the forks by
positioning the portafilter at a slight
incline until the portafilter touches the
stop/activation pin then straighten the
portafilter out.
b. Adjust the side tongues of the fork assembly
until the portafilter is level with the ground.
6. Plug in grinder to acceptable grounded wall outlet
7. Turn the grinder on by moving the power switch
from O to I. The grinder will light up.
8. Press the manual grind button, , and confirm
the grinder motor turns on.
9. Add coffee to the hopper ensuring the hopper
gate is pulled to the open position allowing coffee
to flow into the grinder.
10. With the portafilter on the forks, press and hold
the manual grind button, , until coffee exits
the chute.
a. Coffee should fall into the center of the
portafilter basket. If it does not, or you
had other adjustment issues, reference
full instructional manual for additional
adjustment options.
Adjusting the Grind
1. Loosen the disk stopping pin.
2. Begin grinding coffee.
a. When changing the grind, ensure the grinder
is running while moving the adjustment
disk. This prevents jamming the burrs.
3. Rotate adjustment disk either couterclockwise, to
fine the grind, or clockwise, to coarsen the grind.
a. In some cases it may be necessary to
completely remove the disk stopping pin to
adjust the grind either coarser or finer. This
is due to the disk stopping nut halting the
travel of the adjustment disk. If this is the
case, do the following.
i. Loosen and remove disk stopping pin.
ii. Adjust grind as needed.
iii. Realign the disk stopping nut with
TONGUE
ACTIVATION PIN OR STOP PIN
LEFT SIDE TONGUE
SIDE SET SCREW
TONGUE
DISK STOPPING PIN
COFFEE GRINDING ADJUSTMENT DISK
DISK STOPPING NUT
ADJUSTMENT DISK NOTCH
ADJUSTMENT INDEX

La Marzocco USA | 1553 NW Ballard Way — Seattle, WA 98107
an adjustment disk hole for the disk
stopping pin.
iv. Install and tighten the disk stopping
pin.
4. Stop grinding
5. Tighten the disk stopping pin.
a. Purge at least two doses of coffee after
making an adjustment before pulling an
espresso shot. This ensures the espresso
being brewed is using the new grind setting.
Ring Zeroing
Your Major V, Robur S, and/or Kony S comes with an
adjustable numbered ring on the adjustment disk.
This numbered ring may be used to indicate where the
burrs touch, or for an initial grind adjustment setting.
From the factory the numbered ring is set such that
0 (zero) corresponds to the burrs touching. To change
the adjustment of the numbered ring, do the following:
1. Turn off grinder using main power switch.
2. Close hopper gate and remove hopper.
3. Loosen and remove disk stopping pin.
4. Loosen, but do not remove, the two Phillips head
ring setscrews using a Phillips screwdriver.
5. Rotate the numbered rind to the desired position
and tighten ring setscrews.
6. Reassemble in reverse order.
Electronic Grinder Interface
Display Overview
Changing the Operating Mode (Major V, Kony S only)
There is an activation pin switch on the body of
the grinder that may be used to activate grinding.
To change the operating mode from Keyboard, the
default, to Portafilter, and vice versa, press the menu
button, , then press the activation pin switch.
The display will show the new operating mode and,
after a few moments, return to the standby screen. In
Portafilter mode the user will select the dose on the
keypad first. To grind, press the portafilter into the
activation pin switch. The dose does not need to be
selected after each activation. The selected dose will
remain until the user changes it.
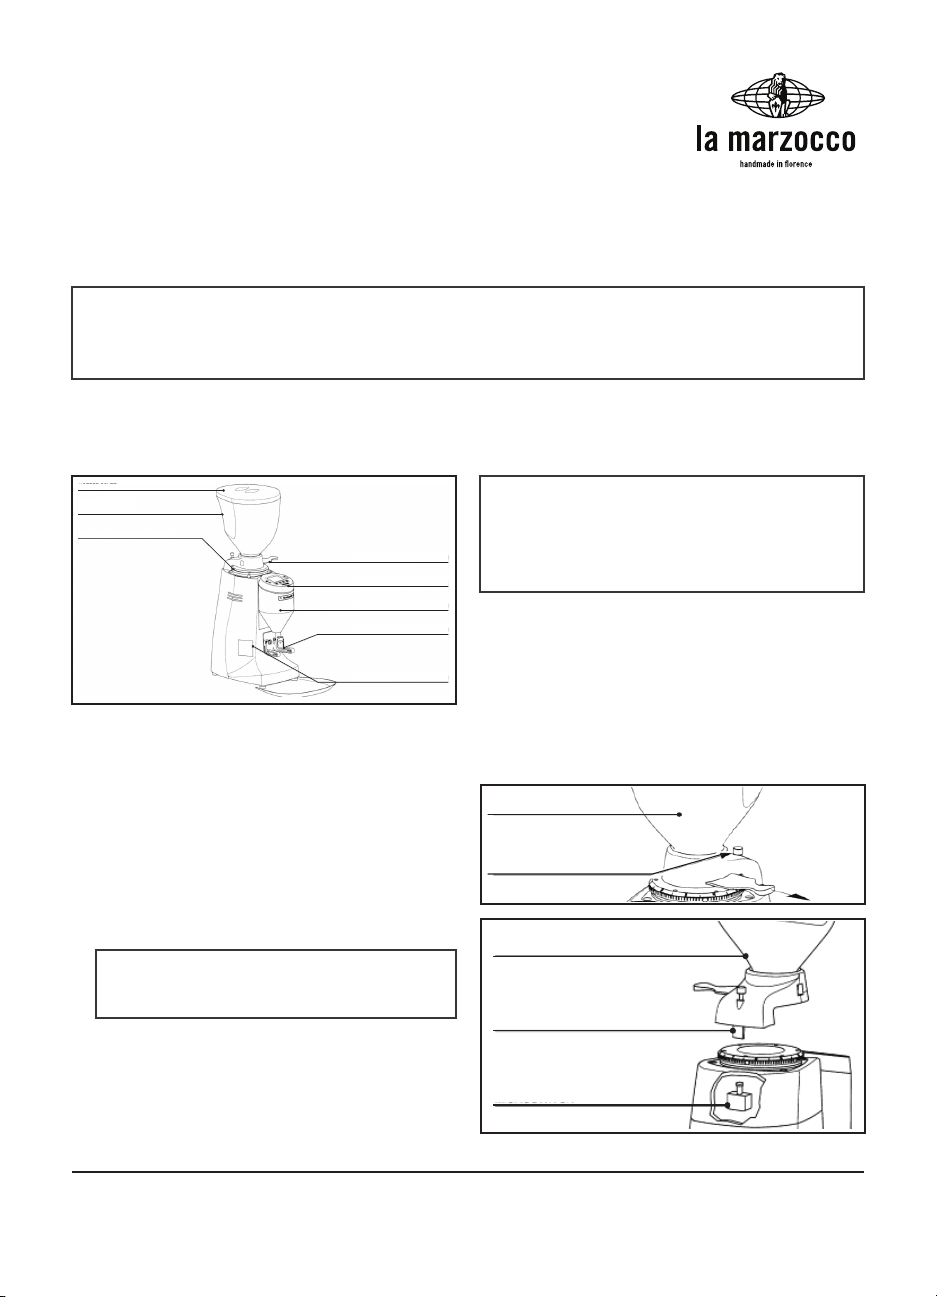
NUMBERED RING
RING SET SCREW
DISPLAY
MENU/SELECTION BUTTON
CANCEL BUTTON
PUSH BUTTON FOR MANUAL GRINDING
DOSE BUTTONS (1, 2, 3)
NAVIGATION BUTTONS
DATE AND TIME
ALERTS
INCREMENTAL COUNTER
DECREMENTAL COUNTER
PRESET TIMES FOR DOSES 1, 2, 3
MANUAL BUTTON STATE ICON (ON/OFF)
DISPLAY IN STANDBY

La Marzocco USA | 1553 NW Ballard Way — Seattle, WA 98107
Adjusting the Dose Time
1. Press and hold the
menu button, .
2. Press the dose button
you would like to
change the time of.
Either,
1
,
2
or
3
.
Then release both buttons. The display will
change to showing the symbol of the dose you
are changing and the time the dose is currently
set to.
3. Adjust the dose time using the navigation
buttons. to increase the dose time and to
decrease the dose time.
4. Press and release the menu button, , to save
the dose time and exit the menu.
Grind Flow Control Wires
Your Major V, Robur S, and/or Kony S allows different
wire inserts to be used in the outlet insert to control
the flow of grounds out of the grinder. The Hybrid grind
flow control (GFC) wire, installed by default, is the
best choice in almost all cases. If excessive clumping
is occurring, you may want to try the Anti-Clumping
GFC wire, Anti-Dust GFC wire and instructions on how
to install them are found in a small plastic box that
came with your grinder. The Kony S and Robur S use
the same GFC wires. (View Video Tutorial on Changing
Kony S/Robur S GFC Wire) The Major V uses different
GFC wires. (View Video Tutorial on Changing Major V
GFC Wire).
Cleaning the Grind Chamber
Note: you are able to clean the inside of your Major V, Robur S, and/or Kony S grind chamber without
disrupting your grind adjustment setting.
Tools Needed
• 5 mm Allen key, to remove ring support screws
• Dry nylon bristled brush, to clean burrs
• Clean, dry, lint-free soft cloth, to wipe surfaces
clean on ring support and grinder body
• Shop vacuum, to remove coffee from grind chamber
• Platic spudger (optional), to remove screw caps
1 Dose time
RING SUPPORT ASSEMBLY
ROUND OUTLET INSERT
COFFEE OUTLET GUARD
OUTLET INSERT
RING SUPPORT ASSEMBLY
OUTLET INSERT LOCK PIN
SQUARE OUTLET INSERT
COFFEE OUTLET GUARD
OUTLET INSERT

La Marzocco USA | 1553 NW Ballard Way — Seattle, WA 98107
1. Turn off and unplug the grinder.
2. Close hopper gate and remove hopper. Scoop as
many whole beans out of the grinder inlet and
place them in hopper.
3. Remove the four screw caps using your fingernail
or a spudger.
4. Remove the four screws using a 5 mm Allen key.
5. Lift up on the ring support assembly and remove
it from the grinder.
6. Rotate push button display outward so you can
view the inside of the funnel.
7. Remove the coffee ourlet guard by removing the
two Phillips crews using a Phillips screwdriver.
Then lift the coffee outlet guard out of the funnel.
8. Remove outlet insert.
Note: when completing this step, be careful
not to damage the grind control wire inside the
outlet insert.
a. Square Outlet Insert (Robur S and Kony S):
push outlet insert toward burrs and pull
up on outlet insert lock pin. Remove outlet
insert by pulling it into the funnel and
removing it from the grinder.
b. Round Outlet Insert (Major V): push
outlet insert toward burrs and rotate
counterclockwise a few degrees. Pull outlet
insert into funnel and remove from grinder.
9. Vacuum out grind chamber, funnel and chute.
10. Using the brush, brush off the burrs to remove
any built-up coffee grounds.
11. If needed, use vacuum to remove any coffee
grounds that have been knocked loose.
12. Wipe all mating surfaces clean using a soft cloth.
If the mating surfaces are not free of coffee
grinds and/or other debris, you will have difficulty
reassembling your grinder and may possibly
damage components.
13. Reassemble in reverse order.
This manual suits for next models
2
Table of contents
Other La Marzocco Coffee Grinder manuals

La Marzocco
La Marzocco La Marzocco User manual

La Marzocco
La Marzocco vulcano User manual

La Marzocco
La Marzocco Swift User manual

La Marzocco
La Marzocco Swift Mini User manual

La Marzocco
La Marzocco vulcano User manual

La Marzocco
La Marzocco GB/5 Instruction sheet

La Marzocco
La Marzocco SWIFT EPSB User manual

La Marzocco
La Marzocco Linea Instruction sheet

La Marzocco
La Marzocco Mazzer Major V User manual

La Marzocco
La Marzocco K-6 User manual